#nextjs multiple languages
Explore tagged Tumblr posts
Visit Tumblr Blog
Explore Tumblr blogs with no restrictions, modern design and the best experience.
Last Seen Tumblr Blogs


Fun Fact
Tumblr was the first site to host the blog for President Barack Obama in 2011.
Text
Multi-Language Next.Js 14 App Router Website Using i18next – RTL Support
We already have an article titled “Multi-Language Next.Js 12 Website Using I18next – RTL Support” that explains how to create a multi-language website with the help of Next.js 12 page router and i18next – RTL support. However, this article will discuss how to create a multi-language website using Next.js 14 App Router and i18next with RTL Support. Prerequisites I assume that the reader has a…

View On WordPress
#app router#i18next#latest next js#multi-language next.js 14 app#nextjs multiple languages#rtl support
0 notes
Photo

Visual Studio Code: A Power User’s Guide
In this guide, you’ll learn how to take advantage of Visual Studio Code to supercharge your development workflow.
This article is written for beginners who may be using Visual Studio Code for the first time. VS Code, as it’s commonly known, is considered a "lightweight" code editor. In comparison with full integrated development environment (IDE) editors which occupy gigabytes of disk space, VS Code only uses less than 200MB when installed.
Despite the "lightweight" term, VS Code offers a massive number of features which keep increasing and improving with every new update. For this guide, we'll cover the most popularly used features. Every programmer has their own tool set which they keep updating whenever new workflows are discovered. If you want to learn every tool and feature VS Code has to offer, check out their official documentation. In addition, you may want to keep track of updates for new and improved features.
Prerequisites
In order to follow along this guide, you need to be proficient in at least one programming language and framework. You also need to be conversant with versioning your project code with git. You'll also need to have an account with a remote repository platform such as GitHub. I recommend you setup SSH Keys to connect with your remote repo.
We'll use a minimal Next.js project to demonstrate VS Code features. If you’re new to this, don't worry, as the framework and the language used are not the focus for this guide. The skills taught here can be transferred to any language and framework that you’re working with.
A Bit of History
If you’re new to programming, I recommend you start with a simple text editor such as Windows NotePad. It’s the most basic text editor and doesn't offer any kind of help whatsoever. The main advantage of using it is that it forces you to memorize language syntax and do your own indentation. Once you get comfortable writing code, upgrading to a better text editor such as NotePad++ is the next logical step. It offers a bit of essential coding help with features like syntax colorization, auto indentation and basic autocomplete. It's important when learning programming not to be overwhelmed with too much information and assistance.
Once you’ve gotten used to having a better coding experience, it's time to upgrade. Not so long ago, these were the fully integrated development environments on offer:
Visual Studio IDE
NetBeans
Eclipse
IntelliJ IDEA
These platforms provide the complete development workflow, from coding to testing and deployment. They contain tons of useful features such as analyzing code and highlighting errors. They also contain a ton more features that many developers weren’t using, though they were essential for some teams. As a result, these platforms took a lot of disk space and were slow to start up. Many developers preferred using advance text editors such as emacs and vim to write their code in.
Soon, a new crop of platform independent code editors started appearing. They were lightweight and provided many features that were mostly exclusive to IDEs. I've listed them below in the order they were released:
Sublime Text: July 2013
Atom.io: June 2015
Visual Studio Code: April 2016
Mac developers had access to TextMate which was released in October 2004. The snippets system used by all the above editors originated from TextMate. Having used all of them, I felt that the editor that came after was a significant improvement over the current one. According to a developer survey done by Stack OverFlow in 2019, Visual Studio Code is the most popular code development environment with 50.7% usage. Visual Studio IDE comes second and NotePad++ comes third.
That's enough history and stats for now. Let's delve into how to use Visual Studio Code features.
Setup and Updates
Visual Studio Code package installer is less than 100MB and consumes less than 200MB when fully installed. When you visit the download page, your OS will automatically be detected and the correct download link will be highlighted.
Updating VS Code is very easy. It displays a notification prompt whenever an update has been released. For Windows users, you'll have to click on the notification to download and install the latest version. The download process occurs in the background while you’re working. When it's ready to install, a restart prompt will appear. Clicking this will install the update for you and restart VS Code.
For Ubuntu-based distributions, clicking on the update notification will simply open the website for you to download the latest installer. A much easier way is simply running sudo apt update && sudo apt upgrade -y. This will update all installed Linux packages including VS Code. The reason this works is because VS Code added its repo to your package repo registry during the initial installation. You can find the repo information on this path: /etc/apt/sources.list.d/vscode.list.
User Interface
Let's first get acquainted with the user interface:
Image source
VS Code's user interface is divided into five main areas which you can easily adjust.
Activity Bar: allows you to switch between views: explorer, search, version control, debug and extensions.
Side Bar: contains the active view.
Editor: this is where you edit files and preview markdown files. You can arrange multiple open files side-by-side.
Panel: displays different panels: integrated terminal, output panels for debug information, errors and warnings.
Status: displays information about the currently opened project and file. Also contains buttons for executing version control actions, and enabling/disabling extension features.
There's also the top Menu Bar where you can access the editor's menu system. For Linux users, the default integrated terminal will probably be the Bash shell. For Windows users, it's PowerShell. Fortunately, there’s a shell selector located inside the terminal dropdown that will allow you to choose a different shell. If installed, you can choose any of the following:
Command Prompt
PowerShell
PowerShell Core
Git Bash
WSL Bash
Working with Projects
Unlike full IDEs, VS Code doesn't provide project creation or offer project templates in the traditional way. It simply works with folders. On my Linux development machine, I'm using the following folder pattern to store and manage my projects:
/home/{username}/Projects/{company-name}/{repo-provider}/{project-name}
The Projects folder is what I refer to as to the workspace. As a freelance writer and developer, I separate projects based on which company I'm working for, and which repo I'm using. For personal projects, I store them under my own fictitious "company name". For projects that I experiment with for learning purposes, and which I don't intend to keep for long, I'll just use a name such as play or tuts as a substitute for {repo-provider}.
If you’d like to create a new project and open it in VS Code, you can use the following steps. Open a terminal and execute the following commands:
$ mkdir vscode-demo $ cd vscode-demo # Launch Visual Studio Code $ code .
You can also do this in File Explorer. When you access the mouse context menu, you should be able to open any folder in VS Code.
If you want to create a new project linked to a remote repo, it's easier creating one on the repo site — for example, GitHub or BitBucket.
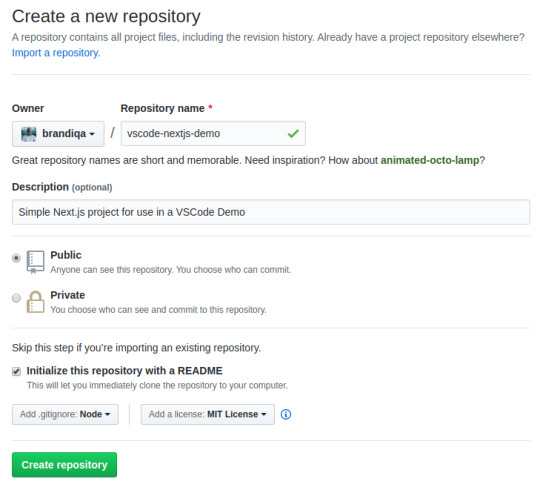
Take note of all the fields that have been filled in and selected. Next, go to the terminal and execute the following:
# Navigate to workspace/company/repo folder $ cd Projects/sitepoint/github/ # Clone the project to your machine $ git clone [email protected]:{insert-username-here}/vscode-nextjs-demo.git # Open project in VS Code $ cd vscode-nextjs-demo $ code .
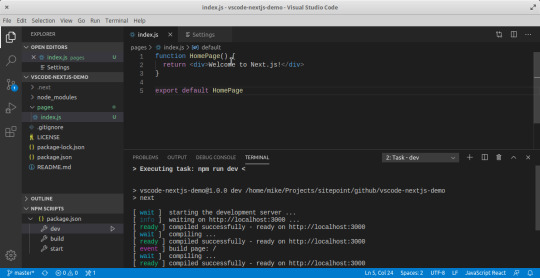
Once the editor is up and running, you can launch the integrated terminal using the keyboard shortcut Ctrl+~ (tilde key). Use the following commands to generate package.json and install packages:
# Generate `package.json` file with default settings $ npm init -y # Install package dependencies $ npm install next react react-dom
Next, open package.json and replace the scripts section with this:
"scripts": { "dev": "next", "build": "next build", "start": "next start" }
The entire VS Code window should look like this:

Before we look at the next section, I’d like to mention that VS Code also supports the concept of multi-root workspaces. If you’re working with related projects — front-end, back-end, docs etc. — you can manage them all in a single workspace inside one editor. This will make it easier to keep your source code and documentation in sync.
Version Control with Git
VS Code comes built-in with Git source control manager. It provides a UI interface where you can stage, commit, create new branches and switch to existing ones. Let's commit the changes we just did in our project. On the Activity bar, open the Source Control Panel and locate the Stage All Changes plus button as shown below.

Click on it. Next, enter the commit message “Installed next.js dependencies”, then click the Commit button at the top. It has the checkmark icon. This will commit the new changes. If you look at the status located at the bottom, you'll see various status icons at the left-hand corner. The 0 ↓ means there's nothing to pull from the remote repo. The 1 ↑ means you’ve got one commit you need to push to your remote repo. Clicking on it will display a prompt on the action that will take place. Click OK to pull and push your code. This should sync up your local repo with the remote repo.
To create a new branch or switch to an existing branch, just click the branch name master on the status bar, left bottom corner. This will pop up a branch panel for you to take an action.

Do check out the following extensions for an even better experience with Git:
Git Lens
Git History
Support for a different type of SCM, such as SVN, can be added via installing the relevant SCM extension from the marketplace.
Creating and Running Code
On the Activity Bar, head back to the Explorer Panel and use the New Folder button to create the folder pages at the root of the project. Select this folder and use the New File button to create the file pages/index.js. Copy the following code:
function HomePage() { return <div>Welcome to Next.js!</div>; } export default HomePage;
With the Explorer Panel, you should see a section called NPM Scripts. Expand on this and hover over dev. A run button (play icon) will appear next to it. Click on it and this will launch a Next.js dev server inside the Integrated Terminal.
It should take a few seconds to spin up. Use Ctrl + Click on the URL http://localhost:3000 to open it in your browser. The page should open successfully displaying the “Welcome” message. In the next section, we'll look at how we can change VS Code preferences.
The post Visual Studio Code: A Power User’s Guide appeared first on SitePoint.
by Michael Wanyoike via SitePoint https://ift.tt/2V9DxEo
0 notes
Text
Build a dynamic JAMstack app with GatsbyJS and FaunaDB
In this article, we explain the difference between single-page apps (SPAs) and static sites, and how we can bring the advantages of both worlds together in a dynamic JAMstack app using GatsbyJS and FaunaDB. We will build an application that pulls in some data from FaunaDB during build time, prerenders the HTML for speedy delivery to the client, and then loads additional data at run time as the user interacts with the page. This combination of technologies gives us the best attributes of statically-generated sites and SPAs.
In short…<deep breath>...auto-scaling distributed websites with low latency, snappy user interfaces, no reloads, and dynamic data for everyone!
Heavy backends, single-page apps, static sites
In the old days, when JavaScript was new, it was mainly only used to provide effects and improved interactions. Some animations here, a drop-down there, and that was it. The grunt work was performed on the backend by Perl, Java, or PHP.
This changed as time went on: client code became heavier, and JavaScript took over more and more of the frontend until we finally shipped mostly empty HTML and rendered the whole UI in the browser, leaving the backend to supply us with JSON data.
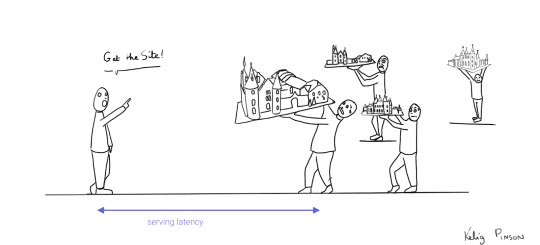
This led to a neat separation of concerns and allowed us to build whole applications with JavaScript, called Single Page Applications (SPAs). The most important advantage of SPAs was the absence of reloads. You could click on a link to change what's displayed, without triggering a complete reload of the page. This in itself provided a superior user experience. However, SPAs increased the size of the client code significantly; a client now had to wait for the sum of several latencies:
Serving latency: retrieving the HTML and JavaScript from the server where the JavaScript was bigger than it used to be
Data loading latency: loading additional data requested by the client
Frontend framework rendering latency: once the data is received, a frontend framework like React, Vue, or Angular still has to do a lot of work to construct the final HTML
A royal metaphor

We can analogize the loading a SPA with the building and delivery of a toy castle. The client needs to retrieve the HTML and JavaScript, then retrieve the data, and then still has to assemble the page. The building blocks are delivered, but they still need to be put together after they're delivered.
If only there were a way to build the castle beforehand...
Enter the JAMstack
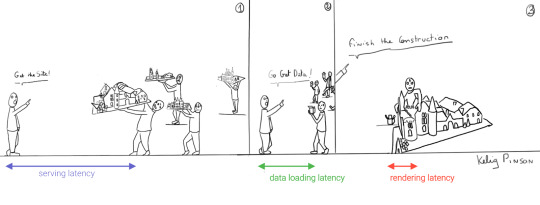
JAMstack applications consist of JavaScript, APIs and Markup. With today's static site generators like Next.js and GatsbyJS, the JavaScript and Markup parts can be bundled up into a static package and deployed via a Content Delivery Network (CDN) that delivers files to a browser. A CDN geographically distributes the bundles, and other assets, to multiple locations. When a user’s browser fetches the bundle and assets, it can receive them from the closest location on the network, which reduces the serving latency.
Continuing our toy castle analogy, JAMstack apps are different from SPAs in the sense that the page (or castle) is delivered pre-assembled. We have a lower latency since we receive the castle in one piece and no longer have to build it.

Making static JAMstack apps dynamic with hydration
In the JAMstack approach, we start with a dynamic application and prerender static HTML pages to be delivered via a speedy CDN. But what if a fully static site is not sufficient and we need to support some dynamic content as the user interacts with individual components, without reloading the entire page? That's where client-side hydration comes in.
Hydration is the client-side process by which the server-side rendered HTML (DOM) is "watered" by our frontend framework with event handlers and/or dynamic components to make it more interactive. This can be tricky because it depends on reconciling the original DOM with a new virtual DOM (VDOM) that's kept in memory as the user interacts with the page. If the DOM and VDOM trees do not match, bugs can arise that cause elements to be displayed out of order, or necessitate rebuilding the page.
Luckily, libraries like GatsbyJS and NextJS have been designed so as to minimize the possibility of such hydration-related bugs, handling everything for you out-of-the-box with only a few lines of code. The result is a dynamic JAMstack web application that is simultaneously both faster and more dynamic than the equivalent SPA.
One technical detail remains: where will the dynamic data come from?
Distributed frontend-friendly databases!
JAMstack apps typically rely on APIs (ergo the "A" in JAM), but if we need to load any kind of custom data, we need a database. And traditional databases are still a performance bottleneck for globally distributed sites that are otherwise delivered via CDN, because traditional databases are only located in one region. Instead of using a traditional database, we’d like our database to be on a distributed network, just like the CDN, that serves the data from a location as close as possible to wherever our clients are. This type of database is called a distributed database.
In this example, we’ll choose FaunaDB since it is also strongly consistent, which means that our data will be the same wherever my clients access it from and data won’t be lost. Other features that work particularly well with JAMstack applications are that (a) the database is accessed as an API (GraphQL or FQL) and does not require you to open a connection, and (b) the database has a security layer that makes it possible to access both public and private data in a secure way from the frontend. The implications of that are we can keep the low latencies of JAMstack without having to scale a backend, all with zero configuration.
Let's compare the process of loading a hydrated static site with the building of the toy castle. We still have lower latencies thanks to the CDN, but also less data since most the site is statically generated and therefore requires less rendering. Only a small part of the castle (or, the dynamic part of the page) needs to be assembled after it has been delivered:

Example app with GatsbyJS & FaunaDB
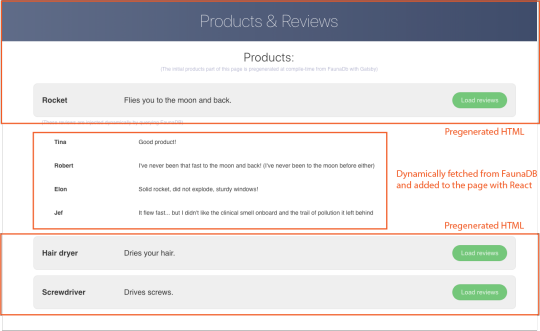
Let’s build an example application that loads data from FaunaDB at build time and renders it to static HTML, then loads additional dynamic data inside the client browser at run time. For this example, we use GatsbyJS, a JAMstack framework based on React that prerenders static HTML. Since we use GatsbyJS, we can code our website completely in React, generate and deliver the static pages, and then load additional data dynamically at run time. We’ll use FaunaDB as our fully managed serverless database solution. We will build an application where we can list products and reviews.
Let’s look at an outline of what we have to do to get our example app up and running and then go through every step in detail.
Set up a new database
Add a GraphQL schema to the database
Seed the database with mock-up data
Create a new GatsbyJS project
Install NPM packages
Create the server key for the database
Update GatsbyJS config files with server key and new read-only key
Load the pre-rendered product data at build time
Load the reviews at run time
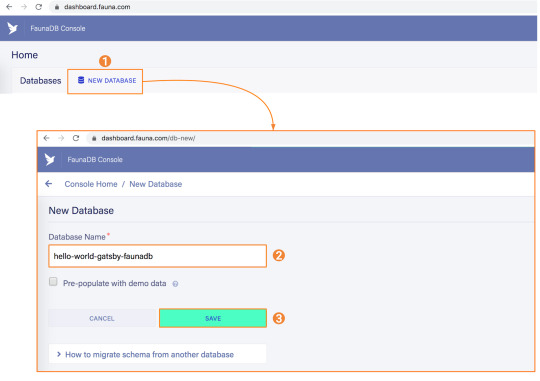
1. Set up a new database
Before you start, create an account on dashboard.fauna.com. Once you have an account, let’s set up a new database. It should hold products and their reviews, so we can load the products at build-time and the reviews in the browser.
2. Add a GraphQL schema to the database
Next, we use the server key to upload a GraphQL schema to our database. For this, we create a new file called schema.gql that has the following content:
type Product { title: String! description: String reviews: [Review] @relation } type Review { username: String! text: String! product: Product! } type Query { allProducts: [Product] }
You can upload your schema.gql file via the FaunaDB Console by clicking "GraphQL" on the left sidebar, and then click the "Import Schema" button.
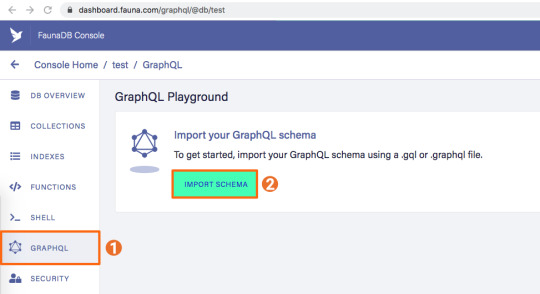
Upon providing FaunaDB with a GraphQL schema, it automatically creates the required collections for the entities in our schema (products and reviews). Besides that, it also creates the indexes that are needed to interact with those collections in a meaningful and efficient manner. You should now be presented with a GraphQL playground where you can test out
3. Seed the database with mock-up data
To seed our database with products and reviews, we can use the Shell at dashboard.fauna.com:
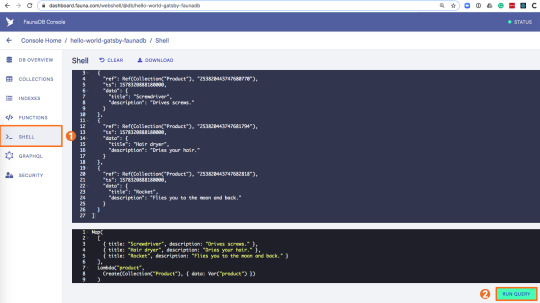
To create some data, we’ll use the Fauna Query Language (FQL), after that we’ll continue with GraphQL to build are example application. Paste the following FQL query into the Shell to create three product documents:
Map( Paginate(Match(Index("allProducts"))), Lambda("ref", Create(Collection("Review"), { data: { username: "Tina", text: "Good product!", product: Var("ref") } })) );
We can then write a query that retrieves the products we just made and creates a review document for every product document:
Map( Paginate(Match(Index("allProducts"))), Lambda("ref", Create(Collection("Review"), { data: { username: "Tina", text: "Good product!", product: Var("ref") } })) );
Both types of documents will be loaded via GraphQL. However, there is a significant difference between products and reviews. The former will not change a lot and is relatively static, while the second is user-driven. GatsbyJS allows us to load data in two ways:
data that is loaded at build time which will be used to generate the static site.
data that is loaded live at request time as a client visits and interacts with your website.
In this example, we chose to let the products be loaded at build time, and the reviews to be loaded on-demand in the browser. Therefore, we get static HTML product pages served by a CDN that the user immediately sees. Then, as our user interacts with the product page, we load the data for the reviews.
4. Create a new GatsbyJS project
The following command creates a GatsbyJS project based on the starter template:
$ npx gatsby-cli new hello-world-gatsby-faunadb $ cd hello-world-gatsby-faunadb
5. Install npm packages
In order to build our new project with Gatsby and Apollo, we need a few additional packages. We can install the packages with the following command:
$ npm i gatsby-source-graphql apollo-boost react-apollo
We will use gatsby-source-graphql as a way to link GraphQL APIs into the build process. Using this library, you can make a GraphQL call from which the results will be automagically provided as the properties for your react component. That way, you can use dynamic data to statically generate your application. The apollo-boost package is an easily configurable GraphQL library that will be used to fetch data on the client. Finally, the link between Apollo and React will be taken care of by the react-apollo library.
6. Create the server key for the database
We will create a Server key which will be used by Gatsby to prerender the page. Remember to copy the secret somewhere since we will use it later on. Protect server keys carefully, they can be used to create, destroy, or manage the database to which they are assigned. To create the key we can go to the fauna dashboard and create the key in the security tab.

7. Update GatsbyJS config files with server and new read-only keys
To add the GraphQL support to our build process, we need to add the following code into our graphql-config.js inside the plugins section where we will insert the FaunaDB server key which we generated a few moments ago.
{ resolve: "gatsby-source-graphql", options: { typeName: "Fauna", fieldName: "fauna", url: "https://graphql.fauna.com/graphql", headers: { Authorization: "Bearer <SERVER KEY>", }, }, }
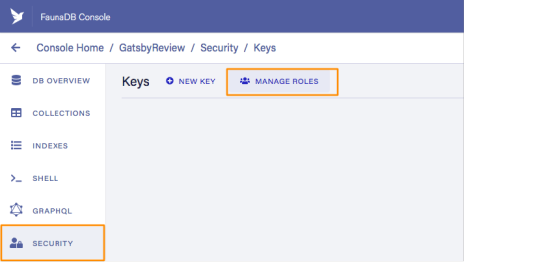
For the GraphQL access to work in the browser, we have to create a key that only has permissions to read data from the collections. FaunaDB has an extensive security layer in which you can define that. The easiest way is to go to the FaunaDB Console at dashboard.fauna.com and create a new role for your database by clicking "Security" in the left sidebar, then "Manage Roles," then "New Custom Role":

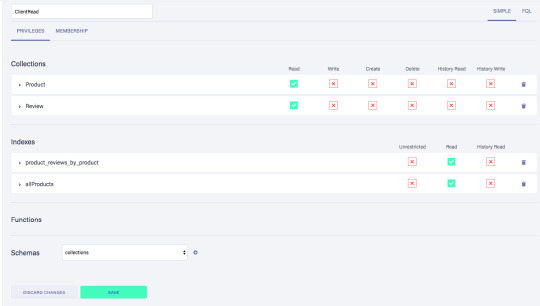
Call the new custom role ‘ClientRead’ and make sure to add all collections and indexes (these are the collections that were created by importing the GraphQL schema). Then, select Read for each for them. Your screen should look like this:
You have probably noticed the Membership tab on this page. Although we are not using it in this tutorial, it is interesting enough to explain it since it's an alternative way to get security tokens. In the Membership tab can specify that entities of a collection (let's say we have a 'Users' collection) in FaunaDb are members of a particular role. That means that if you impersonate one of these entities in that collection, the role privileges apply. You impersonate a database entity (e.g. a User) by associating credentials with the entity and using the Login function, which will return a token. That way you can also implement password-based authentication in FaunaDb. We won't use it in this tutorial, but if that interests you, check the FaunaDB authentication tutorial.
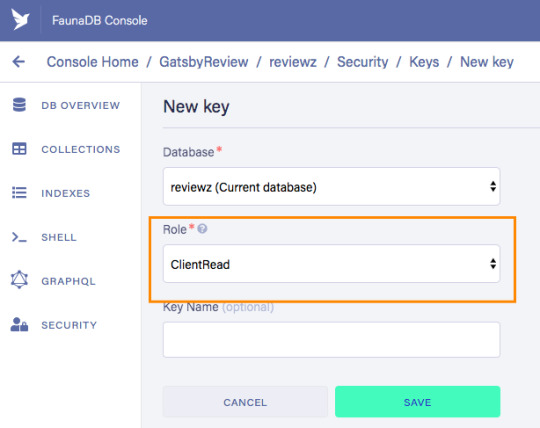
Let’s ignore Membership for now, once you have created the role, we can create a new key with the new role. As before, click "Security", then "New Key," but this time select "ClientRead" from the Role dropdown:
Now, let's insert this read-only key in the gatsby-browser.js configuration file to be able to call the GraphQL API from the browser:
import React from "react" import ApolloClient from "apollo-boost" import { ApolloProvider } from "react-apollo" const client = new ApolloClient({ uri: "https://graphql.fauna.com/graphql", request: operation => { operation.setContext({ headers: { Authorization: "Bearer <CLIENT_KEY>", }, }) }, }) export const wrapRootElement = ({ element }) => ( <ApolloProvider client={client}>{element}</ApolloProvider> )
GatsbyJS will render its Router component as a root element. If we want to use the ApolloClient everywhere in the application on the client, we need to wrap this root element with the ApolloProvider component.
8. Load the pre-rendered product data at build time
Now that everything is set up, we can finally write the actual code to load our data. Let’s start with the products we will load at build time.
For this we need to modify src/pages/index.js file to look like this:
import React from "react" import { graphql } from "gatsby" Import Layout from "../components/Layout" const IndexPage = ({ data }) => ( <Layout> <ul> {data.fauna.allProducts.data.map(product => ( <li>{product.title} - {product.description}</li> ))} </ul> </Layout> ) export const query = graphql` { fauna { allProducts { data { _id title description } } } } ` export default IndexPage
The exported query will automatically get picked up by GatsbyJS and executed before rendering the IndexPage component. The result of that query will be passed as data prop into the IndexPage component.If we now run the develop script, we can see the pre-rendered documents on the development server on http://localhost:8000/.
$ npm run develop
9. Load the reviews at run time
To load the reviews of a product on the client, we have to make some changes to the src/pages/index.js:
import { gql } from "apollo-boost" import { useQuery } from "@apollo/react-hooks" import { graphql } from "gatsby" import React, { useState } from "react" import Layout from "../components/layout" // Query for fetching at build-time export const query = graphql ` { fauna { allProducts { data { _id title description } } } } ` // Query for fetching on the client const GET_REVIEWS = gql ` query GetReviews($productId: ID!) { findProductByID(id: $productId) { reviews { data { _id username text } } } } ` const IndexPage = props => { const [productId, setProductId] = useState(null) const { loading, data } = useQuery(GET_REVIEWS, { variables: { productId }, skip: !productId, }) } export default IndexPage
Let’s go through this step by step.
First, we need to import parts of the apollo-boost and apollo-react packages so we can use the GraphQL client we previously set up in the gatsby-browser.js file.
Then, we need to implement our GET_REVIEWS query. It tries to find a product by its ID and then loads the associated reviews of that product. The query takes one variable, which is the productId.
In the component function, we use two hooks: useState and useQuery
The useState hook keeps track of the productId for which we want to load reviews. If a user clicks a button, the state will be set to the productId corresponding to that button.
The useQuery hook then applies this productId to load reviews for that product from FaunaDB. The skip parameter of the hook prevents the execution of the query when the page is rendered for the first time because productId will be null.
If we now run the development server again and click on the buttons, our application should execute the query with different productIds as expected.
$ npm run develop
Conclusion
A combination of server-side data fetching and client-side hydration make JAMstack applications pretty powerful. These methods enable flexible interaction with our data so we can adhere to different business needs.
It’s usually a good idea to load as much data at build time as possible to improve page performance. But if the data isn’t needed by all clients, or too big to be sent to the client all at once, we can split things up and switch to on-demand loading on the client. This is the case for user-specific data, pagination, or any data that changes rather frequently and might be outdated by the time it reaches the user.
In this article, we implemented an approach that loads part of the data at build time, and then loads the rest of the data in the frontend as the user interacts with the page.
Of course, we have not implemented a login or forms yet to create new reviews. How would we tackle that? That is material for another tutorial where we can use FaunaDB’s attribute-based access control to specify what a client key can read and write from the frontend.
The code of this tutorial can be found in this repo.
The post Build a dynamic JAMstack app with GatsbyJS and FaunaDB appeared first on CSS-Tricks.
via CSS-Tricks https://ift.tt/2RjR7mI
0 notes
Text
Build a dynamic JAMstack app with GatsbyJS and FaunaDB
In this article, we explain the difference between single-page apps (SPAs) and static sites, and how we can bring the advantages of both worlds together in a dynamic JAMstack app using GatsbyJS and FaunaDB. We will build an application that pulls in some data from FaunaDB during build time, prerenders the HTML for speedy delivery to the client, and then loads additional data at run time as the user interacts with the page. This combination of technologies gives us the best attributes of statically-generated sites and SPAs.
In short…<deep breath>...auto-scaling distributed websites with low latency, snappy user interfaces, no reloads, and dynamic data for everyone!
Heavy backends, single-page apps, static sites
In the old days, when JavaScript was new, it was mainly only used to provide effects and improved interactions. Some animations here, a drop-down there, and that was it. The grunt work was performed on the backend by Perl, Java, or PHP.
This changed as time went on: client code became heavier, and JavaScript took over more and more of the frontend until we finally shipped mostly empty HTML and rendered the whole UI in the browser, leaving the backend to supply us with JSON data.
This led to a neat separation of concerns and allowed us to build whole applications with JavaScript, called Single Page Applications (SPAs). The most important advantage of SPAs was the absence of reloads. You could click on a link to change what's displayed, without triggering a complete reload of the page. This in itself provided a superior user experience. However, SPAs increased the size of the client code significantly; a client now had to wait for the sum of several latencies:
Serving latency: retrieving the HTML and JavaScript from the server where the JavaScript was bigger than it used to be
Data loading latency: loading additional data requested by the client
Frontend framework rendering latency: once the data is received, a frontend framework like React, Vue, or Angular still has to do a lot of work to construct the final HTML
A royal metaphor

We can analogize the loading a SPA with the building and delivery of a toy castle. The client needs to retrieve the HTML and JavaScript, then retrieve the data, and then still has to assemble the page. The building blocks are delivered, but they still need to be put together after they're delivered.
If only there were a way to build the castle beforehand...
Enter the JAMstack
JAMstack applications consist of JavaScript, APIs and Markup. With today's static site generators like Next.js and GatsbyJS, the JavaScript and Markup parts can be bundled up into a static package and deployed via a Content Delivery Network (CDN) that delivers files to a browser. A CDN geographically distributes the bundles, and other assets, to multiple locations. When a user’s browser fetches the bundle and assets, it can receive them from the closest location on the network, which reduces the serving latency.
Continuing our toy castle analogy, JAMstack apps are different from SPAs in the sense that the page (or castle) is delivered pre-assembled. We have a lower latency since we receive the castle in one piece and no longer have to build it.
Making static JAMstack apps dynamic with hydration
In the JAMstack approach, we start with a dynamic application and prerender static HTML pages to be delivered via a speedy CDN. But what if a fully static site is not sufficient and we need to support some dynamic content as the user interacts with individual components, without reloading the entire page? That's where client-side hydration comes in.
Hydration is the client-side process by which the server-side rendered HTML (DOM) is "watered" by our frontend framework with event handlers and/or dynamic components to make it more interactive. This can be tricky because it depends on reconciling the original DOM with a new virtual DOM (VDOM) that's kept in memory as the user interacts with the page. If the DOM and VDOM trees do not match, bugs can arise that cause elements to be displayed out of order, or necessitate rebuilding the page.
Luckily, libraries like GatsbyJS and NextJS have been designed so as to minimize the possibility of such hydration-related bugs, handling everything for you out-of-the-box with only a few lines of code. The result is a dynamic JAMstack web application that is simultaneously both faster and more dynamic than the equivalent SPA.
One technical detail remains: where will the dynamic data come from?
Distributed frontend-friendly databases!
JAMstack apps typically rely on APIs (ergo the "A" in JAM), but if we need to load any kind of custom data, we need a database. And traditional databases are still a performance bottleneck for globally distributed sites that are otherwise delivered via CDN, because traditional databases are only located in one region. Instead of using a traditional database, we’d like our database to be on a distributed network, just like the CDN, that serves the data from a location as close as possible to wherever our clients are. This type of database is called a distributed database.
In this example, we’ll choose FaunaDB since it is also strongly consistent, which means that our data will be the same wherever my clients access it from and data won’t be lost. Other features that work particularly well with JAMstack applications are that (a) the database is accessed as an API (GraphQL or FQL) and does not require you to open a connection, and (b) the database has a security layer that makes it possible to access both public and private data in a secure way from the frontend. The implications of that are we can keep the low latencies of JAMstack without having to scale a backend, all with zero configuration.
Let's compare the process of loading a hydrated static site with the building of the toy castle. We still have lower latencies thanks to the CDN, but also less data since most the site is statically generated and therefore requires less rendering. Only a small part of the castle (or, the dynamic part of the page) needs to be assembled after it has been delivered:
Example app with GatsbyJS & FaunaDB
Let’s build an example application that loads data from FaunaDB at build time and renders it to static HTML, then loads additional dynamic data inside the client browser at run time. For this example, we use GatsbyJS, a JAMstack framework based on React that prerenders static HTML. Since we use GatsbyJS, we can code our website completely in React, generate and deliver the static pages, and then load additional data dynamically at run time. We’ll use FaunaDB as our fully managed serverless database solution. We will build an application where we can list products and reviews.

Let’s look at an outline of what we have to do to get our example app up and running and then go through every step in detail.
Set up a new database
Add a GraphQL schema to the database
Seed the database with mock-up data
Create a new GatsbyJS project
Install NPM packages
Create the server key for the database
Update GatsbyJS config files with server key and new read-only key
Load the pre-rendered product data at build time
Load the reviews at run time
1. Set up a new database
Before you start, create an account on dashboard.fauna.com. Once you have an account, let’s set up a new database. It should hold products and their reviews, so we can load the products at build-time and the reviews in the browser.

2. Add a GraphQL schema to the database
Next, we use the server key to upload a GraphQL schema to our database. For this, we create a new file called schema.gql that has the following content:
type Product { title: String! description: String reviews: [Review] @relation } type Review { username: String! text: String! product: Product! } type Query { allProducts: [Product] }
You can upload your schema.gql file via the FaunaDB Console by clicking "GraphQL" on the left sidebar, and then click the "Import Schema" button.

Upon providing FaunaDB with a GraphQL schema, it automatically creates the required collections for the entities in our schema (products and reviews). Besides that, it also creates the indexes that are needed to interact with those collections in a meaningful and efficient manner. You should now be presented with a GraphQL playground where you can test out
3. Seed the database with mock-up data
To seed our database with products and reviews, we can use the Shell at dashboard.fauna.com:

To create some data, we’ll use the Fauna Query Language (FQL), after that we’ll continue with GraphQL to build are example application. Paste the following FQL query into the Shell to create three product documents:
Map( Paginate(Match(Index("allProducts"))), Lambda("ref", Create(Collection("Review"), { data: { username: "Tina", text: "Good product!", product: Var("ref") } })) );
We can then write a query that retrieves the products we just made and creates a review document for every product document:
Map( Paginate(Match(Index("allProducts"))), Lambda("ref", Create(Collection("Review"), { data: { username: "Tina", text: "Good product!", product: Var("ref") } })) );
Both types of documents will be loaded via GraphQL. However, there is a significant difference between products and reviews. The former will not change a lot and is relatively static, while the second is user-driven. GatsbyJS allows us to load data in two ways:
data that is loaded at build time which will be used to generate the static site.
data that is loaded live at request time as a client visits and interacts with your website.
In this example, we chose to let the products be loaded at build time, and the reviews to be loaded on-demand in the browser. Therefore, we get static HTML product pages served by a CDN that the user immediately sees. Then, as our user interacts with the product page, we load the data for the reviews.
4. Create a new GatsbyJS project
The following command creates a GatsbyJS project based on the starter template:
$ npx gatsby-cli new hello-world-gatsby-faunadb $ cd hello-world-gatsby-faunadb
5. Install npm packages
In order to build our new project with Gatsby and Apollo, we need a few additional packages. We can install the packages with the following command:
$ npm i gatsby-source-graphql apollo-boost react-apollo
We will use gatsby-source-graphql as a way to link GraphQL APIs into the build process. Using this library, you can make a GraphQL call from which the results will be automagically provided as the properties for your react component. That way, you can use dynamic data to statically generate your application. The apollo-boost package is an easily configurable GraphQL library that will be used to fetch data on the client. Finally, the link between Apollo and React will be taken care of by the react-apollo library.
6. Create the server key for the database
We will create a Server key which will be used by Gatsby to prerender the page. Remember to copy the secret somewhere since we will use it later on. Protect server keys carefully, they can be used to create, destroy, or manage the database to which they are assigned. To create the key we can go to the fauna dashboard and create the key in the security tab.

7. Update GatsbyJS config files with server and new read-only keys
To add the GraphQL support to our build process, we need to add the following code into our graphql-config.js inside the plugins section where we will insert the FaunaDB server key which we generated a few moments ago.
{ resolve: "gatsby-source-graphql", options: { typeName: "Fauna", fieldName: "fauna", url: "https://graphql.fauna.com/graphql", headers: { Authorization: "Bearer <SERVER KEY>", }, }, }
For the GraphQL access to work in the browser, we have to create a key that only has permissions to read data from the collections. FaunaDB has an extensive security layer in which you can define that. The easiest way is to go to the FaunaDB Console at dashboard.fauna.com and create a new role for your database by clicking "Security" in the left sidebar, then "Manage Roles," then "New Custom Role":
Call the new custom role ‘ClientRead’ and make sure to add all collections and indexes (these are the collections that were created by importing the GraphQL schema). Then, select Read for each for them. Your screen should look like this:

You have probably noticed the Membership tab on this page. Although we are not using it in this tutorial, it is interesting enough to explain it since it's an alternative way to get security tokens. In the Membership tab can specify that entities of a collection (let's say we have a 'Users' collection) in FaunaDb are members of a particular role. That means that if you impersonate one of these entities in that collection, the role privileges apply. You impersonate a database entity (e.g. a User) by associating credentials with the entity and using the Login function, which will return a token. That way you can also implement password-based authentication in FaunaDb. We won't use it in this tutorial, but if that interests you, check the FaunaDB authentication tutorial.
Let’s ignore Membership for now, once you have created the role, we can create a new key with the new role. As before, click "Security", then "New Key," but this time select "ClientRead" from the Role dropdown:

Now, let's insert this read-only key in the gatsby-browser.js configuration file to be able to call the GraphQL API from the browser:
import React from "react" import ApolloClient from "apollo-boost" import { ApolloProvider } from "react-apollo" const client = new ApolloClient({ uri: "https://graphql.fauna.com/graphql", request: operation => { operation.setContext({ headers: { Authorization: "Bearer <CLIENT_KEY>", }, }) }, }) export const wrapRootElement = ({ element }) => ( <ApolloProvider client={client}>{element}</ApolloProvider> )
GatsbyJS will render its Router component as a root element. If we want to use the ApolloClient everywhere in the application on the client, we need to wrap this root element with the ApolloProvider component.
8. Load the pre-rendered product data at build time
Now that everything is set up, we can finally write the actual code to load our data. Let’s start with the products we will load at build time.
For this we need to modify src/pages/index.js file to look like this:
import React from "react" import { graphql } from "gatsby" Import Layout from "../components/Layout" const IndexPage = ({ data }) => ( <Layout> <ul> {data.fauna.allProducts.data.map(product => ( <li>{product.title} - {product.description}</li> ))} </ul> </Layout> ) export const query = graphql` { fauna { allProducts { data { _id title description } } } } ` export default IndexPage
The exported query will automatically get picked up by GatsbyJS and executed before rendering the IndexPage component. The result of that query will be passed as data prop into the IndexPage component.If we now run the develop script, we can see the pre-rendered documents on the development server on http://localhost:8000/.
$ npm run develop
9. Load the reviews at run time
To load the reviews of a product on the client, we have to make some changes to the src/pages/index.js:
import { gql } from "apollo-boost" import { useQuery } from "@apollo/react-hooks" import { graphql } from "gatsby" import React, { useState } from "react" import Layout from "../components/layout" // Query for fetching at build-time export const query = graphql ` { fauna { allProducts { data { _id title description } } } } ` // Query for fetching on the client const GET_REVIEWS = gql ` query GetReviews($productId: ID!) { findProductByID(id: $productId) { reviews { data { _id username text } } } } ` const IndexPage = props => { const [productId, setProductId] = useState(null) const { loading, data } = useQuery(GET_REVIEWS, { variables: { productId }, skip: !productId, }) } export default IndexPage
Let’s go through this step by step.
First, we need to import parts of the apollo-boost and apollo-react packages so we can use the GraphQL client we previously set up in the gatsby-browser.js file.
Then, we need to implement our GET_REVIEWS query. It tries to find a product by its ID and then loads the associated reviews of that product. The query takes one variable, which is the productId.
In the component function, we use two hooks: useState and useQuery
The useState hook keeps track of the productId for which we want to load reviews. If a user clicks a button, the state will be set to the productId corresponding to that button.
The useQuery hook then applies this productId to load reviews for that product from FaunaDB. The skip parameter of the hook prevents the execution of the query when the page is rendered for the first time because productId will be null.
If we now run the development server again and click on the buttons, our application should execute the query with different productIds as expected.
$ npm run develop
Conclusion
A combination of server-side data fetching and client-side hydration make JAMstack applications pretty powerful. These methods enable flexible interaction with our data so we can adhere to different business needs.
It’s usually a good idea to load as much data at build time as possible to improve page performance. But if the data isn’t needed by all clients, or too big to be sent to the client all at once, we can split things up and switch to on-demand loading on the client. This is the case for user-specific data, pagination, or any data that changes rather frequently and might be outdated by the time it reaches the user.
In this article, we implemented an approach that loads part of the data at build time, and then loads the rest of the data in the frontend as the user interacts with the page.
Of course, we have not implemented a login or forms yet to create new reviews. How would we tackle that? That is material for another tutorial where we can use FaunaDB’s attribute-based access control to specify what a client key can read and write from the frontend.
The code of this tutorial can be found in this repo.
The post Build a dynamic JAMstack app with GatsbyJS and FaunaDB appeared first on CSS-Tricks.
Build a dynamic JAMstack app with GatsbyJS and FaunaDB published first on https://deskbysnafu.tumblr.com/
0 notes
Text
Visual Studio Code: A Power User’s Guide
In this guide, you’ll learn how to take advantage of Visual Studio Code to supercharge your development workflow.
This article is written for beginners who may be using Visual Studio Code for the first time. VS Code, as it’s commonly known, is considered a "lightweight" code editor. In comparison with full integrated development environment (IDE) editors which occupy gigabytes of disk space, VS Code only uses less than 200MB when installed.
Despite the "lightweight" term, VS Code offers a massive number of features which keep increasing and improving with every new update. For this guide, we'll cover the most popularly used features. Every programmer has their own tool set which they keep updating whenever new workflows are discovered. If you want to learn every tool and feature VS Code has to offer, check out their official documentation. In addition, you may want to keep track of updates for new and improved features.
Prerequisites
In order to follow along this guide, you need to be proficient in at least one programming language and framework. You also need to be conversant with versioning your project code with git. You'll also need to have an account with a remote repository platform such as GitHub. I recommend you setup SSH Keys to connect with your remote repo.
We'll use a minimal Next.js project to demonstrate VS Code features. If you’re new to this, don't worry, as the framework and the language used are not the focus for this guide. The skills taught here can be transferred to any language and framework that you’re working with.
A Bit of History
If you’re new to programming, I recommend you start with a simple text editor such as Windows NotePad. It’s the most basic text editor and doesn't offer any kind of help whatsoever. The main advantage of using it is that it forces you to memorize language syntax and do your own indentation. Once you get comfortable writing code, upgrading to a better text editor such as NotePad++ is the next logical step. It offers a bit of essential coding help with features like syntax colorization, auto indentation and basic autocomplete. It's important when learning programming not to be overwhelmed with too much information and assistance.
Once you’ve gotten used to having a better coding experience, it's time to upgrade. Not so long ago, these were the fully integrated development environments on offer:
Visual Studio IDE
NetBeans
Eclipse
IntelliJ IDEA
These platforms provide the complete development workflow, from coding to testing and deployment. They contain tons of useful features such as analyzing code and highlighting errors. They also contain a ton more features that many developers weren’t using, though they were essential for some teams. As a result, these platforms took a lot of disk space and were slow to start up. Many developers preferred using advance text editors such as emacs and vim to write their code in.
Soon, a new crop of platform independent code editors started appearing. They were lightweight and provided many features that were mostly exclusive to IDEs. I've listed them below in the order they were released:
Sublime Text: July 2013
Atom.io: June 2015
Visual Studio Code: April 2016
Mac developers had access to TextMate which was released in October 2004. The snippets system used by all the above editors originated from TextMate. Having used all of them, I felt that the editor that came after was a significant improvement over the current one. According to a developer survey done by Stack OverFlow in 2019, Visual Studio Code is the most popular code development environment with 50.7% usage. Visual Studio IDE comes second and NotePad++ comes third.
That's enough history and stats for now. Let's delve into how to use Visual Studio Code features.
Setup and Updates
Visual Studio Code package installer is less than 100MB and consumes less than 200MB when fully installed. When you visit the download page, your OS will automatically be detected and the correct download link will be highlighted.
Updating VS Code is very easy. It displays a notification prompt whenever an update has been released. For Windows users, you'll have to click on the notification to download and install the latest version. The download process occurs in the background while you’re working. When it's ready to install, a restart prompt will appear. Clicking this will install the update for you and restart VS Code.
For Ubuntu-based distributions, clicking on the update notification will simply open the website for you to download the latest installer. A much easier way is simply running sudo apt update && sudo apt upgrade -y. This will update all installed Linux packages including VS Code. The reason this works is because VS Code added its repo to your package repo registry during the initial installation. You can find the repo information on this path: /etc/apt/sources.list.d/vscode.list.
User Interface
Let's first get acquainted with the user interface:
Image source
VS Code's user interface is divided into five main areas which you can easily adjust.
Activity Bar: allows you to switch between views: explorer, search, version control, debug and extensions.
Side Bar: contains the active view.
Editor: this is where you edit files and preview markdown files. You can arrange multiple open files side-by-side.
Panel: displays different panels: integrated terminal, output panels for debug information, errors and warnings.
Status: displays information about the currently opened project and file. Also contains buttons for executing version control actions, and enabling/disabling extension features.
There's also the top Menu Bar where you can access the editor's menu system. For Linux users, the default integrated terminal will probably be the Bash shell. For Windows users, it's PowerShell. Fortunately, there’s a shell selector located inside the terminal dropdown that will allow you to choose a different shell. If installed, you can choose any of the following:
Command Prompt
PowerShell
PowerShell Core
Git Bash
WSL Bash
Working with Projects
Unlike full IDEs, VS Code doesn't provide project creation or offer project templates in the traditional way. It simply works with folders. On my Linux development machine, I'm using the following folder pattern to store and manage my projects:
/home/{username}/Projects/{company-name}/{repo-provider}/{project-name}
The Projects folder is what I refer to as to the workspace. As a freelance writer and developer, I separate projects based on which company I'm working for, and which repo I'm using. For personal projects, I store them under my own fictitious "company name". For projects that I experiment with for learning purposes, and which I don't intend to keep for long, I'll just use a name such as play or tuts as a substitute for {repo-provider}.
If you’d like to create a new project and open it in VS Code, you can use the following steps. Open a terminal and execute the following commands:
$ mkdir vscode-demo $ cd vscode-demo # Launch Visual Studio Code $ code .
You can also do this in File Explorer. When you access the mouse context menu, you should be able to open any folder in VS Code.
If you want to create a new project linked to a remote repo, it's easier creating one on the repo site — for example, GitHub or BitBucket.
Take note of all the fields that have been filled in and selected. Next, go to the terminal and execute the following:
# Navigate to workspace/company/repo folder $ cd Projects/sitepoint/github/ # Clone the project to your machine $ git clone [email protected]:{insert-username-here}/vscode-nextjs-demo.git # Open project in VS Code $ cd vscode-nextjs-demo $ code .
Once the editor is up and running, you can launch the integrated terminal using the keyboard shortcut Ctrl+~ (tilde key). Use the following commands to generate package.json and install packages:
# Generate `package.json` file with default settings $ npm init -y # Install package dependencies $ npm install next react react-dom
Next, open package.json and replace the scripts section with this:
"scripts": { "dev": "next", "build": "next build", "start": "next start" }
The entire VS Code window should look like this:
Before we look at the next section, I’d like to mention that VS Code also supports the concept of multi-root workspaces. If you’re working with related projects — front-end, back-end, docs etc. — you can manage them all in a single workspace inside one editor. This will make it easier to keep your source code and documentation in sync.
Version Control with Git
VS Code comes built-in with Git source control manager. It provides a UI interface where you can stage, commit, create new branches and switch to existing ones. Let's commit the changes we just did in our project. On the Activity bar, open the Source Control Panel and locate the Stage All Changes plus button as shown below.
Click on it. Next, enter the commit message “Installed next.js dependencies”, then click the Commit button at the top. It has the checkmark icon. This will commit the new changes. If you look at the status located at the bottom, you'll see various status icons at the left-hand corner. The 0 ↓ means there's nothing to pull from the remote repo. The 1 ↑ means you’ve got one commit you need to push to your remote repo. Clicking on it will display a prompt on the action that will take place. Click OK to pull and push your code. This should sync up your local repo with the remote repo.
To create a new branch or switch to an existing branch, just click the branch name master on the status bar, left bottom corner. This will pop up a branch panel for you to take an action.
Do check out the following extensions for an even better experience with Git:
Git Lens
Git History
Support for a different type of SCM, such as SVN, can be added via installing the relevant SCM extension from the marketplace.
Creating and Running Code
On the Activity Bar, head back to the Explorer Panel and use the New Folder button to create the folder pages at the root of the project. Select this folder and use the New File button to create the file pages/index.js. Copy the following code:
function HomePage() { return <div>Welcome to Next.js!</div>; } export default HomePage;
With the Explorer Panel, you should see a section called NPM Scripts. Expand on this and hover over dev. A run button (play icon) will appear next to it. Click on it and this will launch a Next.js dev server inside the Integrated Terminal.
It should take a few seconds to spin up. Use Ctrl + Click on the URL http://localhost:3000 to open it in your browser. The page should open successfully displaying the “Welcome” message. In the next section, we'll look at how we can change VS Code preferences.
The post Visual Studio Code: A Power User’s Guide appeared first on SitePoint.
via SitePoint https://ift.tt/2Vx8yRS
0 notes