#node js applications examples
Explore tagged Tumblr posts
Visit Tumblr Blog
Explore Tumblr blogs with no restrictions, modern design and the best experience.
Last Seen Tumblr Blogs


Fun Fact
Tumblr Inc. has $15.1M in annual revenue.
Text
Helpful Insight is one of the best Node.js Application Development Companies in India. We are developing various Node.js applications with an experienced team of Node.js developers. Our developers are pros at working with real-time, scalable, and multilayered applications based on node.js.
Our team at Helpful Insight includes Node JS developers who develop rapid and scalable network web applications in Bharat. NodeJS is an excellent platform for developing high-performance and reliable network applications, by using JavaScript. Our NodeJS developers know how to deliver tailor-made web applications, designed for rapid scaling, to fit your specific business needs.
Web applications requiring low latency, high throughput, and high scalability are ideally developed using node js development services. Our NodeJS developers have extensive experience in developing applications that solve real business problems while offering easy maintenance. We understand that you require an application capable of processing big data sets and handling high-traffic volumes. Hire Node JS Developers for your business will meet all requirements and give you the best experience possible.
We ensure to deliver a dependable, secure, and scalable web application to you. Rest assured, our developers will do a tremendous job providing you with a web application and backend development that surpasses all of your wishes and hopes. Let us help you design that web application you have always desired, contact us today.

#best node js backend framework#express js#node js applications examples#best node.js ide#node-js application example github#node js application example code#node js framework list
0 notes
Text
EMR Studio Features Requirements and Limits AWS

Amazon EMR Studio features, specs, and limitations:
Amazon EMR Studio describes an IDE for data preparation and visualisation, departmental collaboration, and application debugging. When utilising EMR Studio, consider tool usage, cluster demands, known issues, feature constraints, service limits, and regional availability.
Features of Amazon EMR Studio
Service Catalogue lets administrators connect EMR Studio to cluster templates. This lets users create Amazon EC2 EMR clusters for workspaces. Administrators can grant or deny Studio users access to cluster templates.
The Amazon EMR service role is needed to define access permissions to Amazon S3 notebook files or AWS Secrets Manager secrets because session policies do not allow them.
Multiple EMR Studios can control access to EMR clusters in different VPCs.
Use the AWS CLI to configure Amazon EMR on EKS clusters. Connect these clusters to Workspaces via a controlled API in Studio to run notebook jobs.
Amazon EMR and EMR Studio use trusted identity propagation, which has extra considerations. IAM Identity Centre and trusted identity propagation are required for EMR Studio to connect to EMR clusters that use it.
To secure Amazon EMR off-console applications, application hosting domains list their apps in the Public Suffix List (PSL). Examples are emrappui-prod.us-east-1.amazonaws.com, emrnotebooks-prod.us-east-1.amazonaws.com, and emrstudio-prod.us-east-1.amazonaws.com. For sensitive cookies in the default domain name, a __Host- prefix can prevent CSRF and add security.
EMR Studio Workspaces and Persistent UI endpoints use FIPS 140-certified cryptographic modules for encryption-in-transit, making the service suitable for regulated workloads.
Amazon EMR Studio requirements and compatibility
EMR Studio supports Amazon EMR Software versions 5.32.0 and 6.2.0.
EMR clusters using IAM Identity Centre with trusted identity propagation must use it.
Before setting up a Studio, disable browser proxy control applications like FoxyProxy or SwitchyOmega. Active proxies can cause Studio creation network failures.
Amazon EMR Studio restrictions and issues
EMR Studio does not support Python magic commands %alias, %alias_magic, %automagic, %macro, %%js, and %%javascript. Changing KERNEL_USERNAME or proxy_user using %env or %set_env or %configure is not supported.
Amazon EMR on EKS clusters does not support SparkMagic commands in EMR Studio.
All multi-line Scala statements in notebook cells must end with a period except the last.
Amazon EMR kernels on EKS clusters may timeout and fail to start. Should this happen, restart the kernel and close and reopen the notebook file. The Restart kernel operation requires restarting the Workspace, and EMR on EKS clusters may not work.
If a workspace is not connected to a cluster, starting a notebook and choosing a kernel fails. Choose a kernel and attach the workspace to run code, but ignore this error.
With Amazon EMR 6.2.0 security, the Workspace interface may be blank. For security-configured EMRFS S3 authorisation or data encryption, choose a different supported version. Troubleshooting EMR on EC2 tasks may disable on-cluster Spark UI connectivity. Run %%info in a new cell to regenerate these links.
5.32.0, 5.33.0, 6.2.0, and 6.3.0 Amazon EMR primary nodes do not have idle kernels cleaned away by Jupyter Enterprise Gateway. This may drain resources and crash long-running clusters. A script in the sources configures idle kernel cleanup for certain versions.
If the auto-termination policy is enabled on Amazon EMR versions 5.32.0, 5.33.0, 6.2.0, or 6.3.0, a cluster with an active Python3 kernel may be designated as inactive and terminated since it does not submit a Spark task. Amazon EMR 6.4.0 or later is recommended for Python3 kernel auto-termination.
Displaying a Spark DataFrame using %%display may truncate wide tables. Create a scrollable view by right-clicking the output and selecting Create New View for Output.
If you interrupt a running cell in a Spark-based kernel (PySpark, Spark, SparkR), the Spark task stays running. The on-cluster Spark UI is needed to end the job.
EMR Studio Workspaces as the root user in an AWS account causes a 403: Forbidden error because Jupyter Enterprise Gateway settings disallow root user access. Instead of root, employ alternate authentication methods for normal activities.
EMR Studio does not support Amazon EMR features:
connecting to and running tasks on Kerberos-secured clusters.
multi-node clusters.
AWS Graviton2-based EC2 clusters for EMR 6.x releases below 6.9.0 and 5.x releases below 5.36.1.
A studio utilising trusted identity propagation cannot provide these features:
Building EMR clusters without templates using serverless applications.
Amazon EMR launches on EKS clusters.
Use a runtime role.
Supporting SQL Explorer or Workspace collaboration.
Limited Amazon EMR Studio Service
Service Restriction The sources list EMR Studio service limits:
EMR Studios:
Each AWS account can have 100 max.
Maximum five subnets per EMR Studio.
IAM Identity Centre Groups are limited to five per EMR Studio.
EMR Studios can have 100 IAM Identity Centre users.
#EMRStudio#AmazonEMRStudio#AmazonEMR#EKSclusters#News#Technews#Techology#Technologynews#Technologytrendes#Govindhtech
0 notes
Text
Social Network Analysis Programming

Social Network Analysis (SNA) is a powerful technique used to explore and analyze the relationships between individuals, groups, or entities. With programming, we can visualize and calculate complex network structures, which is useful in fields like sociology, marketing, cybersecurity, and even epidemiology.
What is Social Network Analysis?
Social Network Analysis is the process of mapping and measuring relationships and flows between people, groups, organizations, computers, or other information/knowledge processing entities. It reveals the structure of networks and helps identify influential nodes, communities, and patterns.
Key Concepts in SNA
Nodes (Vertices): Represent entities (e.g., people, computers).
Edges (Links): Represent connections or relationships between nodes.
Degree Centrality: Number of direct connections a node has.
Betweenness Centrality: How often a node appears on shortest paths.
Clustering: Grouping of nodes based on similarity or proximity.
Tools & Libraries for SNA Programming
Python: Powerful language with strong libraries like NetworkX and Pandas.
NetworkX: Used to create, manipulate, and visualize complex networks.
Gephi: GUI-based open-source software for large network visualization.
Graph-tool (Python): Fast and efficient network analysis for large graphs.
D3.js: JavaScript library for dynamic and interactive network visualizations.
Example: Basic Network Analysis with Python & NetworkX
import networkx as nx import matplotlib.pyplot as plt # Create a graph G = nx.Graph() # Add nodes and edges G.add_edges_from([ ('Alice', 'Bob'), ('Alice', 'Carol'), ('Bob', 'David'), ('Carol', 'David'), ('Eve', 'Alice') ]) # Draw the network nx.draw(G, with_labels=True, node_color='lightblue', edge_color='gray') plt.show() # Analyze print("Degree Centrality:", nx.degree_centrality(G)) print("Betweenness Centrality:", nx.betweenness_centrality(G))
Applications of Social Network Analysis
Marketing: Identify key influencers and optimize content spread.
Security: Detect suspicious communication patterns or malware spread.
Epidemiology: Track the spread of diseases across populations.
Sociology: Understand community structures and social behavior.
Recommendation Systems: Suggest friends, content, or connections.
Tips for Effective SNA Programming
Start with clean and structured data (CSV, JSON, etc.).
Visualize early and often to detect patterns.
Use metrics like centrality and clustering coefficients for deeper insights.
Leverage real-world datasets like Twitter or Facebook data via APIs.
Scale with performance-optimized libraries for large datasets.
Conclusion
Social Network Analysis Programming unlocks a new dimension in data analysis by focusing on relationships rather than isolated entities. With the right tools and mindset, you can uncover hidden structures, detect influence patterns, and make data-driven decisions in a connected world.
0 notes
Text
Top 5 Popular Node.js Frameworks to Boost Your Development Efficiency

Have you ever felt stuck while building a website? Maybe you spent hours trying to solve a simple problem, or your code got so messy that you couldn't find where the bugs were hiding. If this sounds familiar, you're not alone! Many developers face these challenges, especially when working with Node.js. That's where a good Node.js framework comes to the rescue.
A Node.js framework is like a helpful friend who organizes your toolbox and shows you the best way to use each tool. It saves you time, reduces mistakes, and makes your work much easier. Today, we'll look at the top 5 Node.js frameworks that can make your development journey smoother and more enjoyable.
Why Do You Need a Node.js Framework?
Before we dive into our list, let's talk about why you might want to use a Node.js framework in the first place. When you build a website from scratch, you need to handle many things: setting up a server, managing routes, connecting to databases, handling errors, and much more. A Node.js framework takes care of these common tasks so you can focus on what makes your website special.
Think of it like cooking dinner. You could grow your own vegetables, make your own cheese, and bake your own bread. Or you could buy these ingredients ready-made and focus on creating a delicious recipe. A Node.js framework gives you the ingredients so you can create something amazing without starting from zero.
Now, let's explore the top 5 Node.js frameworks that developers love in 2025.
Top 5 Node.js frameworks that developers love in 2025
1. Express.js - Simple and Flexible
Express.js is the most popular Node.js framework out there. It's like the trusty bicycle of frameworks - not too fancy, but reliable and gets the job done well.
What makes Express special?
Express is lightweight and doesn't force you to follow strict rules. You can build your application your way, which makes it perfect for beginners and experienced developers alike. It's great for creating APIs, web applications, and mobile app backends.
Here's what you can do with Express:
Create web servers with just a few lines of code
Handle different URL routes easily
Process data from forms
Connect to databases
Serve static files like images and CSS
Many companies offering Web Development Services choose Express because it's easy to learn and has plenty of tutorials and examples online. Whether you're building a small project or a large application, Express can handle it without getting in your way.
2. NestJS - Organized and Structured
If Express is a bicycle, NestJS is more like a car with GPS. It gives you more structure and tells you where everything should go in your node js web development project.
NestJS is inspired by Angular, which is a popular framework for building front-end applications. It uses TypeScript, which helps catch errors before your code runs.
Why choose NestJS?
NestJS shines when you're working on big projects, especially with a team. It keeps everything organized in modules, making it easier to maintain and grow your application over time.
It also comes with built-in support for testing, which helps you make sure your application works correctly. Professional Web Development Services often recommend NestJS for large business applications where code quality is a top priority.
3. Fastify - Speed Champion
As its name suggests, Fastify is all about speed. If you want your website to load quickly, even when many people use it at once, this Node.js framework deserves your attention.
How fast is Fastify?
Fastify can handle up to twice as many requests per second compared to Express. This makes it perfect for applications that need to deal with heavy traffic or process large amounts of data quickly.
Despite focusing on speed, Fastify is still friendly to work with. It has a plugin system that makes it easy to add new features to your application without writing everything from scratch.
Many modern Web Development Services are switching to Fastify when building high-performance APIs and microservices. It also validates data very quickly, which helps keep your application secure and reliable.
4. Koa.js - The Modern Choice
Created by the same team behind Express, Koa.js represents the next step in the evolution of Node.js frameworks. It's smaller, more expressive, and handles modern JavaScript features better.
What makes Koa different?
Koa uses modern JavaScript features like async/await, which makes handling asynchronous operations (like fetching data from a database) much cleaner and easier to understand.
Koa's middleware system gives you more control over how your application handles requests and responses. It also makes error handling simpler, which means fewer headaches when something goes wrong.
For node js web development projects that involve complex data operations, Koa can significantly improve your productivity. Companies providing Web Development Services often choose Koa for projects that need to handle many tasks happening at different times.
5. Adonis.js - The Complete Package
Sometimes you want a framework that handles everything out of the box. That's where Adonis.js comes in. It's a full-featured Node.js framework that provides all the tools you need in one place.
Why Adonis stands out:
Adonis comes with everything needed to build a complete web application:
Tools for database operations
User login and registration systems
Form validation
Template engine for creating HTML pages
File uploading
And much more
If you've used Laravel (a popular PHP framework), you'll feel right at home with Adonis.js. It follows similar patterns and principles.
For businesses looking for comprehensive Web Development Services, Adonis provides a complete solution that can significantly reduce development time. It's particularly good for traditional websites with pages that are created on the server.
How to Choose the Right Framework for Your Project
With so many great options, how do you pick the right Node.js framework for your needs? Here are some simple guidelines:
For beginners or simple projects: Express.js
For large, team-based applications: NestJS
For websites that need to be super fast: Fastify
For modern, clean code: Koa.js
For full-featured websites: Adonis.js
Also think about what you or your team already know. If everyone is familiar with Express, switching to a completely different framework might slow you down at first.
Conclusion
The right Node.js framework can make a huge difference in how quickly and easily you can build web applications. Whether you choose the simplicity of Express, the structure of NestJS, the speed of Fastify, the modern approach of Koa, or the completeness of Adonis, you're setting yourself up for success in your node js web development journey.
Remember that the best framework is the one that fits your specific needs and helps you create high-quality websites efficiently. Many professional Web Development Services use different frameworks for different projects, depending on what each client needs.
Have you tried any of these frameworks? Which one worked best for you? Share your experiences and let's learn from each other!
0 notes
Text
Unlock the Secrets: A Comprehensive Guide to Building Your Own Job Portal Website

Online job portals are essential platforms in the job market, connecting employers with job seekers. The statistics state that the global online recruitment market is expected to hit $43.39 billion by 2027, with a CAGR growth rate of 7.1%. Whether you want to launch a niche job board or a comprehensive employment marketplace, developing a job portal website requires strategic planning, the right features, and technical expertise. In here, we are going to help you with how to create a successfully step-by-step Process and unleash with full potential of Job portal website.
Planning Your Job Portal Website
Before you jump into building, you need a solid plan. This stage is all about setting the foundation for your job portal's success. Think of it as drafting the blueprint before constructing a building.
Step 1:Defining Your Niche and Target Audience
The very first step is to understand what kind of jobs portal you want, whether it be general, niche-specific, freelance or remote jobs. Some examples are job market demand, competition and possible growth opportunities. Also Design a sustainable monetization model along with a revenue source such as subscription, per listing charge, earning through commission, featured job posting, and advertisement placements. Offering premium services such as resume highlighting or employer branding can also enhance profitability while ensuring continuous engagement from both job seekers and recruiters.
Step 2:Market Research and Competitive Analysis
If you are planning to start a job portal, research includes in-depth analysis of top job portals to understand how they measure, what are their strong points, weaknesses, and what makes them stand out. Analyze their monetization strategies, user retention methods, and strengths. In fact, Indeed has an exceptionally strong global presence, with over 250 million distinct visitors each month. Discovering any shortcomings in their offerings will allow you to gain a competitive edge for your platform.
Step 3: Defining Features and Functionality
Essential Features to Incorporate in Your Job Portal Every developer has an imaginary mind map of how their product will look like. Here are some of the most important features:
Job Seeker Features
Advanced Search Filters – Allow users to filter job search by category, location, experience level, and salary.
Resume Upload & Management — Enable Job seekers to upload and save resumes to easily apply for jobs
Job alerts & notifications – Users can be notified if new jobs are posted that meet their preferences.
Application Tracking System – Allow job seekers to track the status of their application in real time.
Employer Features
Seamless Job Posting Tools – Easy Creation and Management of Job Listings for Employers.
Applicant Management System – Monitor and organize correct candidates with an organised hiring process.
Company Branding Options – Improve employer profiles with logos, company information, and career pages to develop interest in available positions.
Analytics & Performance Tracking – Includes metrics for the number of views of the job posting, application rates, and candidate engagement.
Step 4: Choosing the Right Technology Stack
Choosing the right technology stack is important to ensure that your job portal runs smoothly, is scalable and offers a great user experience. What technologies you use often depends on the complexity of your platform, anticipated traffic, and functionalities required.
Frontend Development: React. js, Angular, or Vue. js provides a way to create a dynamic and responsive user interface that allows for smooth navigation and an engaging user experience.
Backend Development: Node. Business logic, data processing, and API integrations can be backed with js, Django or Laravel frameworks.
Database Management: If you need a relational database, then you have MySQL and PostgreSQL to choose from, while otherwise, you can go for MongoDB if you have a large amount of data and need flexible data storage.
Hosting Services: Managed services like AWS, DigitalOcean, Google Cloud can scale infrastructure, have availability, security features necessary to handle job listing and user profiles effectively.
Payment Gateway Integration: If your platform offers premium listings, subscriptions, or other monetization features, consider integrating payment gateways such as Stripe, PayPal, or Razorpay to facilitate secure payments.
Step 5: UI/UX Design for a Seamless Experience
That is, good user experience design is what will keep users coming back to your app, and a clean user interface will improve it. An effective UI design allows for easy navigation, whereas, a solid UX ensures job seekers and employers stay on your platform. Remember these UI/UX best practices:
Simple navigation and easy job search functionality – Users should quickly find relevant job listings with minimal clicks.
Mobile-responsive and fast-loading pages – More than 70% of job seekers utilize mobile devices so optimizing for responsiveness is key.
Clear CTAs (Call-to-Action) for job applications and postings – guide the users smoothly through the job search and applications.
Consistent color scheme and typography – A professional design gives users trust and strengthens brand identity.
Accessibility compliance (WCAG standards) – Make your site accessible to users with disabilities.
Monetization Strategies for Job Portals
A good job portal can earn revenue via different streams. Below are the best monetization strategies to get started with:
Paid Job Listings – Employers can pay a fee to post job vacancies on the platform, ensuring their listings reach a wide audience. This allows you to have different pricing levels for your users depending if the listing is up for a longer or shorter period and whether users want it to be visible in their search.
Subscription Plans – A subscription model for both job seekers and recruiters can also positively impact the user experience and create a recurring revenue model. Employers can subscribe to premium plans for unlimited job postings, while job seekers can pay for exclusive job alerts or resume boosting services.
Sponsored Job Listings – Companies can pay for their job posts to appear at the top of search results or an “Featured Jobs” section. It sheds visibility and enhances opportunities to receive quality applicants.
Google AdSense & Banner Ads – You can create passive income by displaying third party ads on your job portal. By implementing Google AdSense or selling the ads' space to the brands, you can get paid per impression and click.
Resume Database Access – Recruiters often seek direct access to a pool of candidates. Employers can be charged for browsing and downloading resumes, which can be done on a per-resume access basis or as a monthly plan.
Marketing and Promotion Strategies for Your Job Portal
Creating a job portal is just the first step; the real challenge is attracting job seekers and employers. Here are effective marketing and promotion strategies to ensure your platform gains visibility and engagement.
1. Search Engine Optimization (SEO)
SEO helps your job portal rank higher in search engine results, making it easier for users to find your platform.
Keyword Optimization – Conduct keyword research and integrate relevant terms into job descriptions and portal content.
On-Page SEO – Optimize meta tags, URLs, and internal linking for better search visibility.
Off-Page SEO – Build backlinks from high-authority websites to boost credibility and rankings.
2. Social Media Marketing
Leverage social media platforms to reach both job seekers and recruiters.
LinkedIn – Ideal for professional networking and job postings.
Facebook & Twitter – Great for engaging a broader audience with job alerts and career tips.
Instagram & TikTok – Share short career advice videos and success stories to attract younger audiences.
3. Content Marketing
Publishing valuable content helps establish your job portal as an industry leader.
Blog Posts – Write about resume-building tips, interview advice, and job market trends.
Industry News & Insights – Keep your audience informed about hiring trends and job opportunities.
Video Content & Webinars – Host live Q&A sessions, expert interviews, and career coaching videos.
Conclusion
Developing job portal website is not just some technical work but a huge task that involves careful planning and designing. Whether it is defining your niche and appending basic features, making it search engine optimized (SEO), or advertising it, all are important in encouraging users. Your next job portal idea can be a great source for both people looking for jobs and hiring companies, if done right, will act as a path for new careers to be settled down. With a clear roadmap in hand, you can now start planning to turn your job portal dream into reality!
Deorwine Infotech is one of the top Mobile app development & web development company that develop an online job portal for you as you want at a cost-effective price.
As the requirement for jobs has grown, it has added to the increased competition between the various job portal mobile apps. Consequently, it becomes important to develop a web, which can be in this ambitious environment. Therefore, you need to hire a skilled and skillful mobile app development team to explain your job portal web and app.
For more info visit us: https://deorwine.com/blog/job-portal-website-development-guide/
Contact Us:
Website: https://deorwine.com
Email id: [email protected]
Skype: deorwineinfotechFor Any Query Call Us at: +91-9116115717
#job portal development#job portal development cost#job portal development company#Job Portal feature#mobile app development company#mobile app development
0 notes
Text
Node js V12 – What are the new features in Node js V12
Node.js has been committed about their yearly updates the new features. This year their new version — V12 named Erbium is out. Here is an honest, unbiased review. Before jumping straight into the new features of Node js V12, what Node.js is let me paint what it is and what it does. Node.js is an open source framework that runs on Chrome’s V8 JavaScript engine. It supports every OS on the market — MAC, Linux and Windows and easy on your budget.
What is Node.js?
Node.js is a platform, that supports building secure, fast and scalable network applications. Node.js is an event-driven model that doesn’t drag and is efficient for data-intensive real-time application that runs across distributed devices. Now, lets see briefly about the features in Node js V12
TLS 1.3 is now used by default Max protocol
TLS stands for Transport Layer Security, that secures communication between servers and browsers. Another notable thing about this feature is that this is the default Max protocol that offers to switch off in the CLI/NODE_OPTIONS. It is comparatively faster than TLS1.2.
Async Stack traces
Another noteworthy feature is to trace the errors of Async Stack. Previously, we won’t trace the errors in the Async await functions. Now, developers can easily do so using the asynchronous call frames of the error.stack property
Let me show you an example,
async function wait_1(x) { await wait_2(x) } async function wait_2(x) { await wait_3(x); } async function wait_3(x) { await x; throw new Error(“Oh boi”) } wait_1(1).catch(e => console.log(e.stack));

This output terminal instantly shows additional details. In this version, we can easily debug the async/wait functions.
Parser
The Node.js v12 switches default http parser to ||http that improves the llhttp-based implementation drastically.
Purpose of heap dumps
Another notable update in the Node.js V12 is the integrated heap dump capability an out of the box experience to examine the memory issues.
Heap size configuration
In V8, the max heap size was limited to 700MB and 1400MB on 32-bit and 64-bit platforms, respectively. The updated version of Node.js V12 supports automation, that ensures the heap size helps to process the large data sets.
Startup time establishment
According to the new release of Node.js V12, improves startup speed approximately 30 % for the main thread. It developed the build time for code cache in built-in libraries and embedded it as a binary. Also it improves the performance in JavaScript parsing
N-API performance in Node.js V 12
Node.js V12 supports enhanced N-API in combination with worker threads. The concept of N-API brings stable and enabled native node modules that can prevent ABI-compatibility come across various Node.js versions.
Runtime engine upgrade to 7.4
The Node.js V12 runs on V8 JavaScript engine which is upgraded to 7.4 and eventually will upgrade to 7.6. It brings the stability with the help of Application Binary Interface (ABI). Additionally, it provides high speed execution, supports ECMAScript syntax, secured memory management and so on.
Compiler
For code base, the minimum requirement of the compiler is GNU Compiler Collection (GCC) 6 and glibc 2.17 on platforms other than MAC OS and Windows. The Node.js is now fully facilitated with optimized compiler and high-level security. Nodejs.org released binaries that use a new tool-chain minimum and it provides efficient compile-time and upgraded security.
Diagnostic report
Last but not least, Node.js includes the additional feature is diagnostic report. It generates the report On-Demand that will be hit by any particular event. The user can ability to identify the abnormal termination in production such as performance, crashes, memory leaks, CPU usage, irrelevant output etc.
This article covers the noteworthy features of the Nodejs Erbium recent version.
0 notes
Text
How to Build a Web App from Scratch: A Step-by-Step Guide (2024)
Building a web application from scratch helps turn a concept into a digital solution that can be used and enjoyed by many people. This process may seem complicated, but with a structured approach, you can take each step with confidence. We take a closer look at every step of building a web app, from idea to launch, covering everything from planning to supporting your app.
1. Defining the purpose of the application and the target audience
Clear objectives and an understanding of the target audience are the basis of a successful application.
Identify the root problem: Start by defining the problem or the unique address of your question. This will guide all subsequent decisions. For example, is it designed to simplify a task, bring people together, or provide entertainment?
Conduct audience research: Study the demographics, preferences and pain points of your target audience. Create user profiles that represent different types of users to visualize how they interact with your application.
Competitive Analysis: Research similar Apps in the market. Identify your app's strengths and weaknesses, as well as the opportunities that allow it to shine. Consider how existing solutions can be improved and analyze user reviews to identify common complaints or desired features.
2. Overview of basic features and functions
Describing features is an essential step in ensuring your app serves its purpose without overwhelming users.
List of essential features: Identify the essential features that users need to achieve the main objectives of the application. For a project management application, basic functions may include assigning tasks, tracking deadlines, and sharing documents.
Prioritize features for MVP: Start with a minimum viable product (MVP) to launch quickly and get feedback. Choose features that provide maximum value with minimum complexity. For example, you prefer secure login and task creation to advanced reporting features in your initial project management application.
Plan for future expansion: Although we focus on core features first, it is useful to list additional features that you can add after launch based on user feedback, such as notifications or integration with third-party tools.
3. User interface and user experience design (UI/UX)
Effective design is about balancing aesthetics and usability, ensuring that users can navigate and use the app smoothly.
Wireframes and prototypes: Start with simple wireframes, which are layout plans for your app that show the placement of buttons, text, and images. Then they create interactive prototypes to simulate the user journey and identify potential roadblocks.
Focus on user-centered design (UX): User experience design considers how users interact with your app. Try to make navigation intuitive and actions like registration and checkout seamless. Prioritize ease of use by keeping flows as simple as possible.
Create a visual aesthetic (UI): Visual elements such as color schemes, typography and button styles create the app's personality and should be consistent with your brand. Consistent images build user confidence, so avoid cluttered screens or flashy graphics.
4. Technology Package Selection
The technology stack is the combination of tools, programming languages, and frameworks needed to build and run your application.
Front-end technology: The front-end is the part of the application that users interact with. HTML, CSS and JavaScript are essential, while frameworks like React. js, See. js or Angular can simplify development by providing reusable components and interactive capabilities.
Backend Development: Backend takes care of data management, server logic and storage. Choose a language and framework that fits the needs of your application, such as Node. js for complete JavaScript-based applications, Django (Python) for rapid prototyping, or Laravel (PHP) for complex applications.
Databases and storage solutions: Store your data with SQL databases (such as MySQL, PostgreSQL) for structured data or NoSQL databases (such as MongoDB) if your data is not structured or require flexibility.
Hosting and deployment options: Choosing the right hosting provider is crucial for performance and scalability. Options like AWS, Heroku, and Google Cloud offer reliable hosting with scalability, monitoring, and built-in security features.
5. Development and testing of MVP
Creating an MVP allows you to quickly release a working version of your app and get real user feedback.
Start with core features: Focus on building the core features outlined in your MVP plan. Break each function down into smaller tasks and complete them step by step so you don't feel overwhelmed.
Application testing: Testing is necessary to identify bugs, ensure stability and verify that the application works on different devices and browsers. Manual testing helps uncover usability issues, while automated testing speeds up the process by validating repetitive tasks.
User Testing: Conduct beta testing to release the MVP to a limited set of users. Gather information about their experiences and look for patterns in their comments. This will help you prioritize future updates.
6. Refinement of the application based on feedback
User feedback is essential to understand how your app performs in real-world situations and to highlight areas for improvement.
Analyze feedback methodically: Categorize feedback into categories such as usability, performance, and features. Identify recurring issues as they represent the most urgent areas that need attention.
Iterate to improve: Focus on the most important feedback first, starting with blockers that affect core functionality or user experience. Introduce changes gradually and focus first on impressive improvements.
Scalability improvement: As feedback drives further improvements, consider upgrades to support increased use, such as optimizing database queries, improving security measures, and ensuring that the application can handle a growing number of users.
7. Preparation for launch
The launch is the first step of your app. It is therefore essential to plan a successful exit.
Final testing and quality assurance: Perform final testing of all app features and ensure that it is stable, secure and free of major bugs. Pay attention to compatibility between different devices and browsers.
Integrate analytics tools: Use tools like Google Analytics, Mixpanel, or Firebase to track how users interact with your app after launch. The analysis provides insight into user behavior, identifying known characteristics and areas for improvement.
App Marketing: A successful launch requires a solid marketing strategy. Use social media, digital advertising, email marketing and industry influencers to spread the word about your app and engage your target audience. Consider creating video demos or tutorials that demonstrate the value of your app.
8. Track and schedule future updates
The app is an evolving product that grows and improves over time, based on user needs and market trends.
Continuous monitoring and feedback collection: Monitor performance indicators such as user retention, visit duration and refund rate. This data reveals how users interact with your app and highlights areas for improvement.
Regular updates and improvements: Schedule regular updates to add new features, optimize performance, and meet user expectations. Resolves security vulnerabilities and compatibility issues as needed.
User Engagement: Build a community around your app by interacting with users through in-app messaging, email newsletters, or social media. A loyal user base will give you valuable feedback and help you promote your app.
Conclusion
Building a web application from scratch requires careful planning, a clear idea of the target audience, and a structured approach to development and testing.While this may sound like a complex process, breaking it down into manageable steps can make the journey easier and more efficient. From defining your idea and creating an MVP to gathering user feedback and preparing to launch, each step plays a vital role in the success of your app.Consistent improvement and patience are key to achieving success with your web application.
0 notes
Text
Node JS and Databases
Steps to Build a Blog Application
1. Project Setup
First, you create a new Node.js project on your computer.
You also install necessary tools like Express (for creating a web server) and Mongoose or MySQL (for interacting with the database).
Nodemon can be used during development to restart the server automatically when code changes.
2. Folder Structure
Organize your project files so that everything is easy to manage.
Models: This folder will store database schemas (like the blog post structure).
Routes: These handle requests to different parts of your blog (e.g., showing all posts or creating new ones).
Views: These are the templates used to render your pages (like home, post details).
Public: A place for static files (CSS stylesheets, images).
3. Setting Up the Database
You can use either MongoDB (a NoSQL database) or MySQL (a relational database) to store your blog posts.
MongoDB is easier for beginners because you don't need to define strict tables.
You create a "Blog" model, which defines the structure of each blog post (e.g., it should have a title, content, and a timestamp).
The database connection is established at the beginning so the app can interact with it throughout.
4. Handling HTTP Requests with Express
The Express framework helps manage the flow of the app:
When a user visits the home page, the server sends a list of all blog posts.
When they click on a specific post, it shows the details of that post.
There is also a form where users can create new posts by submitting titles and content.
You create routes to manage these requests. Each route corresponds to a specific URL (e.g., / for the home page, /post/:id to view a post).
5. Creating Views (Templates)
To make your pages dynamic, you use EJS (or another templating engine like Handlebars). Templates allow you to display different content based on the data from the database.
For example:
The home page lists all available blog posts with links to view them individually.
The post page shows the title, content, and date of a single post.
There can also be a form on the home page that lets users submit new posts.
6. Routing and User Interaction
When users visit the homepage, the server pulls data from the database and shows a list of posts.
Clicking on a post’s link takes them to a detailed view of that post.
Users can also add a new post by submitting a form. When they do, the app saves the new post in the database and refreshes the list.
7. Starting the App
You need to make sure both the database server and Node.js app are running.
MongoDB needs to be started separately (if using it).
The Node.js server listens for requests and responds based on the routes you’ve created.
The server is accessible via http://localhost:3000. You can open this in a browser to test the blog app.
8. Testing the Blog API (Optional)
To make sure everything works correctly, you can use tools like Postman to test your routes:
Test retrieving all posts by making a GET request.
Test creating a new post by sending a POST request with sample data.
You can also build error handling to manage invalid inputs.
9. Future Improvements
After setting up the basic blog, you can add advanced features:
User Authentication: Allow users to log in and manage their own posts.
Comments: Add a comment section for each post.
Pagination: Break long lists of posts into pages for better readability.
CSS Styling: Make the blog look more attractive with a custom stylesheet.
Summary
This blog app involves setting up a Node.js server, connecting it to a database to store posts, and using templates to render pages. When users visit the blog, they can view, create, or manage posts, all of which are stored in the database. Express routes manage the requests, and the views ensure everything is displayed neatly.
This project gives you hands-on experience with backend development using Node.js, along with frontend templates, and a solid understanding of working with databases.
Fullstack Seekho is launching a new full stack training in Pune 100% job Guarantee Course. Below are the list of Full Stack Developer Course in Pune:
1. Full Stack Web Development Course in Pune and MERN Stack Course in Pune
2. Full Stack Python Developer Course in Pune
3. full stack Java course in Pune And Java full stack developer course with placement
4. Full Stack Developer Course with Placement Guarantee
Visit the website and fill the form and our counsellors will connect you!
0 notes
Text
Programming the Future: Unleashing Abundance in Web 3.0
In the ever-evolving landscape of technology, some of the most profound societal transformations emerge not from grand strategies or lofty ideals but from unassuming origins. Consider the invention of the washing machine, a humble yet revolutionary device that significantly contributed to the emancipation of women by mechanizing domestic labor. Similarly, today’s digital innovations, particularly within the Web 3.0 ecosystem, are poised to redefine our future in ways we are only beginning to comprehend.
Responsive Web Design: Crafting the Future of User Experience
As we advance into Web 3.0, the role of responsive web design becomes increasingly pivotal. Web 3.0, characterized by decentralized applications (dApps) and blockchain technology, requires interfaces that adapt seamlessly across devices. Responsive design ensures that users interact with Web 3.0 applications fluidly, regardless of whether they’re on a smartphone, tablet, or desktop. The scalability and adaptability of these interfaces are crucial as developers work to create immersive, accessible experiences in a decentralized digital environment.
Consider a simple code snippet for responsive web design in the context of a Web 3.0 dApp:
```html <meta name=”viewport” content=”width=device-width, initial-scale=1.0"> <style> body { font-family: Arial, sans-serif; margin: 0; padding: 0; } .container { width: 100%; max-width: 1200px; margin: auto; padding: 20px; } .responsive-element { display: flex; flex-direction: column; align-items: center; } @media (min-width: 768px) { .responsive-element { flex-direction: row; justify-content: space-between; } } </style>
<div class=”container”> <div class=”responsive-element”> <p>Blockchain Node A</p> <p>Blockchain Node B</p> <p>Blockchain Node C</p> </div> </div> ```
This snippet illustrates the importance of flexible design in Web 3.0, where users might access decentralized networks through various devices. Responsive design ensures that the user experience remains consistent, whether interacting with a Solana node or another blockchain network.
Solana’s Technical Advancements: Pioneering Scalability and Developer Opportunities
Solana, a high-performance blockchain, is a prime example of how technical advancements in Web 3.0 can drive both developer opportunities and scalability improvements. Solana’s architecture, which boasts a theoretical throughput of 65,000 transactions per second (TPS), sets it apart from many other blockchains, offering developers a robust platform for building scalable dApps.
A key innovation within the Solana ecosystem is Firedancer, a parallel execution engine that significantly enhances the performance of the Solana network. Firedancer allows Solana to handle an even higher volume of transactions by optimizing the execution of smart contracts and reducing latency. This technological leap positions Solana as a leader in Web 3.0 scalability, making it an attractive choice for developers seeking to build high-performance applications.
Here’s a simplified example of how a developer might interact with Solana’s network using its API:
```javascript const solanaWeb3 = require(‘@solana/web3.js’); const connection = new solanaWeb3.Connection(solanaWeb3.clusterApiUrl(‘mainnet-beta’), ‘confirmed’);
async function getLatestBlockhash() { let latestBlockhash = await connection.getLatestBlockhash(); console.log(‘Latest Blockhash:’, latestBlockhash.blockhash); }
getLatestBlockhash(); ```
This snippet showcases the ease with which developers can integrate with Solana’s network, retrieving critical blockchain data like the latest block hash. The simplicity and efficiency of Solana’s API empower developers to build sophisticated applications without getting bogged down by the complexities often associated with blockchain development.
Comparing Solana’s Architecture with Other Blockchains
When compared to other blockchain networks like Ethereum or Binance Smart Chain, Solana’s architecture stands out for its innovative approach to scalability and speed. While Ethereum’s move towards Ethereum 2.0 and proof-of-stake (PoS) consensus aims to address its scalability issues, Solana has already implemented a unique proof-of-history (PoH) mechanism that optimizes consensus by timestamping transactions before they enter the blockchain.
This architectural difference enables Solana to achieve higher throughput and lower transaction costs, making it particularly appealing for developers focused on DeFi, NFTs, and other high-demand applications. The combination of PoH with Solana’s Tower BFT (Byzantine Fault Tolerance) consensus ensures that the network remains secure and efficient, even under heavy loads.
Koii: Extending Solana’s Capabilities for a Decentralized Future
Amidst these technological advancements, Koii emerges as a key player leveraging Solana’s robust architecture to push the boundaries of what’s possible in Web 3.0. Koii is built on Solana, utilizing its high throughput and low latency to power a decentralized network that rewards users for contributing resources and engaging with content.
Koii’s unique approach to decentralized computation and content delivery aligns perfectly with Solana’s scalability. By incentivizing users to contribute their spare computing resources, Koii not only extends Solana’s capabilities but also democratizes access to digital assets and platforms. This decentralized model challenges traditional profit-driven paradigms, offering a glimpse into a more equitable digital future.
Consider how Koii’s API might be used to integrate decentralized storage within a Solana-powered dApp:
```javascript const koiiWeb3 = require(‘@koii/web3.js’);
async function storeContentOnKoii(data) { let result = await koiiWeb3.storeData(data); console.log(‘Content stored with ID:’, result.id); }
storeContentOnKoii({ title: ‘Web 3.0 Article’, content: ‘Exploring the future of decentralized technologies…’ }); ```
This example demonstrates the seamless integration between Koii and Solana, where developers can store and manage content in a decentralized manner, enhancing the resilience and accessibility of their applications.
The Key Impact of Solana and Koii in Web 3.0
As Web 3.0 continues to evolve, Solana and Koii are at the forefront of driving meaningful change. Solana’s technical advancements, particularly with innovations like Firedancer, provide the necessary infrastructure for building scalable, high-performance dApps. Meanwhile, Koii extends these capabilities, offering a decentralized framework that empowers users and developers alike.
For young developers and Web 3.0 enthusiasts, particularly those in Africa, the opportunities presented by Solana and Koii are immense. As these technologies mature, they offer a pathway to not only participate in the next wave of digital innovation but to lead it. By embracing responsive design, leveraging Solana’s unparalleled scalability, and exploring Koii’s decentralized solutions, developers can create applications that not only perform but also democratize access to digital resources and opportunities.

Click the link below to be part of Koii Networks’s amazing experience: https://www.koii.network/node?promo=DB2316CCECED&utm_source=tumblr&utm_medium=tumblr&utm_campaign=solflip
#web3 #Solana #Koii network #programming
0 notes
Text
Programming the Future: Unleashing Abundance in Web 3.0
In the ever-evolving landscape of technology, some of the most profound societal transformations emerge not from grand strategies or lofty ideals but from unassuming origins. Consider the invention of the washing machine, a humble yet revolutionary device that significantly contributed to the emancipation of women by mechanizing domestic labor. Similarly, today’s digital innovations, particularly within the Web 3.0 ecosystem, are poised to redefine our future in ways we are only beginning to comprehend.
Responsive Web Design: Crafting the Future of User Experience
As we advance into Web 3.0, the role of responsive web design becomes increasingly pivotal. Web 3.0, characterized by decentralized applications (dApps) and blockchain technology, requires interfaces that adapt seamlessly across devices. Responsive design ensures that users interact with Web 3.0 applications fluidly, regardless of whether they’re on a smartphone, tablet, or desktop. The scalability and adaptability of these interfaces are crucial as developers work to create immersive, accessible experiences in a decentralized digital environment.
Consider a simple code snippet for responsive web design in the context of a Web 3.0 dApp:
```html <meta name=”viewport” content=”width=device-width, initial-scale=1.0"> <style> body { font-family: Arial, sans-serif; margin: 0; padding: 0; } .container { width: 100%; max-width: 1200px; margin: auto; padding: 20px; } .responsive-element { display: flex; flex-direction: column; align-items: center; } @media (min-width: 768px) { .responsive-element { flex-direction: row; justify-content: space-between; } } </style>
<div class=”container”> <div class=”responsive-element”> <p>Blockchain Node A</p> <p>Blockchain Node B</p> <p>Blockchain Node C</p> </div> </div> ```
This snippet illustrates the importance of flexible design in Web 3.0, where users might access decentralized networks through various devices. Responsive design ensures that the user experience remains consistent, whether interacting with a Solana node or another blockchain network.
Solana’s Technical Advancements: Pioneering Scalability and Developer Opportunities
Solana, a high-performance blockchain, is a prime example of how technical advancements in Web 3.0 can drive both developer opportunities and scalability improvements. Solana’s architecture, which boasts a theoretical throughput of 65,000 transactions per second (TPS), sets it apart from many other blockchains, offering developers a robust platform for building scalable dApps.
A key innovation within the Solana ecosystem is Firedancer, a parallel execution engine that significantly enhances the performance of the Solana network. Firedancer allows Solana to handle an even higher volume of transactions by optimizing the execution of smart contracts and reducing latency. This technological leap positions Solana as a leader in Web 3.0 scalability, making it an attractive choice for developers seeking to build high-performance applications.
Here’s a simplified example of how a developer might interact with Solana’s network using its API:
```javascript const solanaWeb3 = require(‘@solana/web3.js’); const connection = new solanaWeb3.Connection(solanaWeb3.clusterApiUrl(‘mainnet-beta’), ‘confirmed’);
async function getLatestBlockhash() { let latestBlockhash = await connection.getLatestBlockhash(); console.log(‘Latest Blockhash:’, latestBlockhash.blockhash); }
getLatestBlockhash(); ```
This snippet showcases the ease with which developers can integrate with Solana’s network, retrieving critical blockchain data like the latest block hash. The simplicity and efficiency of Solana’s API empower developers to build sophisticated applications without getting bogged down by the complexities often associated with blockchain development.
Comparing Solana’s Architecture with Other Blockchains
When compared to other blockchain networks like Ethereum or Binance Smart Chain, Solana’s architecture stands out for its innovative approach to scalability and speed. While Ethereum’s move towards Ethereum 2.0 and proof-of-stake (PoS) consensus aims to address its scalability issues, Solana has already implemented a unique proof-of-history (PoH) mechanism that optimizes consensus by timestamping transactions before they enter the blockchain.
This architectural difference enables Solana to achieve higher throughput and lower transaction costs, making it particularly appealing for developers focused on DeFi, NFTs, and other high-demand applications. The combination of PoH with Solana’s Tower BFT (Byzantine Fault Tolerance) consensus ensures that the network remains secure and efficient, even under heavy loads.
Koii: Extending Solana’s Capabilities for a Decentralized Future
Amidst these technological advancements, Koii emerges as a key player leveraging Solana’s robust architecture to push the boundaries of what’s possible in Web 3.0. Koii is built on Solana, utilizing its high throughput and low latency to power a decentralized network that rewards users for contributing resources and engaging with content.
Koii’s unique approach to decentralized computation and content delivery aligns perfectly with Solana’s scalability. By incentivizing users to contribute their spare computing resources, Koii not only extends Solana’s capabilities but also democratizes access to digital assets and platforms. This decentralized model challenges traditional profit-driven paradigms, offering a glimpse into a more equitable digital future.
Consider how Koii’s API might be used to integrate decentralized storage within a Solana-powered dApp:
```javascript const koiiWeb3 = require(‘@koii/web3.js’);
async function storeContentOnKoii(data) { let result = await koiiWeb3.storeData(data); console.log(‘Content stored with ID:’, result.id); }
storeContentOnKoii({ title: ‘Web 3.0 Article’, content: ‘Exploring the future of decentralized technologies…’ }); ```
This example demonstrates the seamless integration between Koii and Solana, where developers can store and manage content in a decentralized manner, enhancing the resilience and accessibility of their applications.
The Key Impact of Solana and Koii in Web 3.0
As Web 3.0 continues to evolve, Solana and Koii are at the forefront of driving meaningful change. Solana’s technical advancements, particularly with innovations like Firedancer, provide the necessary infrastructure for building scalable, high-performance dApps. Meanwhile, Koii extends these capabilities, offering a decentralized framework that empowers users and developers alike.
For young developers and Web 3.0 enthusiasts, particularly those in Africa, the opportunities presented by Solana and Koii are immense. As these technologies mature, they offer a pathway to not only participate in the next wave of digital innovation but to lead it. By embracing responsive design, leveraging Solana’s unparalleled scalability, and exploring Koii’s decentralized solutions, developers can create applications that not only perform but also democratize access to digital resources and opportunities.
In conclusion, as we program the future, the unassuming origins of innovations like Solana and Koii will be the catalysts for the next generation of Web 3.0 applications. These technologies promise to emancipate abundance in the digital realm, enabling a more equitable and decentralized internet for all. As with the washing machine, which quietly revolutionized domestic life, Solana and Koii are poised to drive transformative change from the ground up, reshaping how we interact with technology and each other in the process.

Click the link below to be part of Koii Networks’s amazing experience: https://www.koii.network/node?promo=DB2316CCECED&utm_source=tumblr&utm_medium=tumblr&utm_campaign=solflip
1 note
·
View note
Text
Getting Started with Blockchain Application Development

Blockchain technology is transforming industries by providing a secure, transparent, and decentralized way to record transactions. As the demand for blockchain applications increases, developers are presented with new opportunities to create innovative solutions. In this post, we’ll explore the fundamentals of blockchain application development and how you can get started building your own dApps.
What is Blockchain?
Blockchain is a distributed ledger technology that records transactions across multiple computers in a way that ensures the security and transparency of data. Each block in the chain contains a list of transactions, and once a block is added to the chain, it cannot be altered without consensus from the network.
Key Features of Blockchain
Decentralization: No central authority; data is distributed across a network of nodes.
Transparency: All transactions are visible to participants, ensuring accountability.
Security: Cryptographic techniques secure data, making it difficult to tamper with.
Immutability: Once recorded, transactions cannot be changed or deleted.
Common Blockchain Platforms
Ethereum: The most popular platform for building decentralized applications (dApps) using smart contracts.
Hyperledger Fabric: A permissioned blockchain framework for enterprise solutions.
Binance Smart Chain: A blockchain network running smart contract-based applications.
Solana: Known for its high throughput and low transaction costs, suitable for scalable dApps.
Cardano: A blockchain platform focused on sustainability and scalability through a layered architecture.
Understanding Smart Contracts
Smart contracts are self-executing contracts with the terms directly written into code. They automatically execute actions when predefined conditions are met, eliminating the need for intermediaries. Smart contracts are primarily used on platforms like Ethereum.
Example of a Simple Smart Contract (Solidity)
pragma solidity ^0.8.0; contract SimpleStorage { uint public storedData; function set(uint x) public { storedData = x; } function get() public view returns (uint) { return storedData; } }
Building Your First dApp
Set Up Your Development Environment:
Install Node.js and npm.
Use frameworks like Truffle or Hardhat for development.
Install a wallet like MetaMask for interacting with the blockchain.
Write a Smart Contract: Use Solidity to define the contract's logic.
Deploy the Contract: Deploy to a test network (e.g., Rinkeby, Kovan) using tools like Remix.
Create a Frontend: Use libraries like web3.js or ethers.js to interact with the smart contract from a web application.
Test and Iterate: Test your dApp thoroughly on test networks before deploying to the mainnet.
Best Practices for Blockchain Development
Write modular, reusable, and easily understandable code for smart contracts.
Implement proper error handling and validation to prevent vulnerabilities.
Conduct thorough testing, including unit tests and integration tests.
Stay updated with the latest security practices and common vulnerabilities (e.g., reentrancy, overflow).
Utilize code audit tools to review your smart contracts before deployment.
Conclusion
Blockchain application development offers exciting opportunities to create decentralized solutions that can change the way we interact and transact online. By understanding the basics of blockchain, smart contracts, and development tools, you can begin your journey into this innovative field. Start small, experiment, and build your way up to more complex dApps!
0 notes
Text
#1 Digital Marketing Company | Dcrayons Consultancy Private Limited
Do you know about how to create a shopify partner account?
Ready to elevate your business? When you join the Shopify Partner Account , you unlock revenue possibilities and tap into a thriving network of Shopify merchants. This straightforward guide will help you kickstart your journey and maximize your Shopify Partner Account.
Joining the shopify partner account – for a successful business
Developing an application for Shopify is enjoyable and easy because Shopify provides numerous applications and resources that users can easily utilize. This guide will cover all of the steps from development environment installation to your app distribution. It has a guide for making an Instagram feed app, with step-by-step instructions. This helps understand the steps discussed.
What is the process of shopify partner account?
Here we are describing some steps of a shopify partner account. some steps of shopify partner accounts.
Step-1: Setting Up Your Shopify Partner Account
The newly launched consultation journey starts from creating a Shopify Partner account. Thus, if you did not have an account, you would have to get one before proceeding with the next steps. Here’s how to do it. Let us discuss some steps.
To open a Shopify account, start by signing up or logging in. Then, visit the official Shopify Partner Program page. If you don’t have an account yet, create one. If you already have an account, just log in.
Navigate to Apps: After logging in to the portal go to the ‘Apps’ tab.
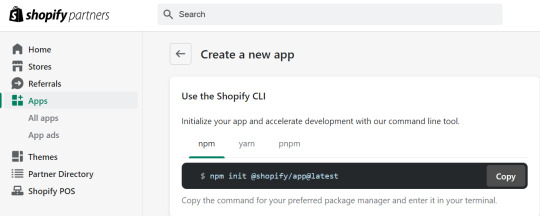
Create a New App: Go to ‘Create App’ and enter app name and URL for the app. This process will create important credentials, such as the API key and secret key-API, that are necessary for your application.
Step 2: Initializing Your Shopify App
Congratulations! You have successfully opened your Shopify Partner Account. Now, it’s time to start your Shopify application. Open your terminal and run the following command:
npm init @shopify/app@latest
This command pulls up your app and creates a shopify.app.toml file. This config file contains details like client id, the name of your application, URL of your application and the scopes needed for the application. Furthermore, you will have to prepare a . file named env and then specify SHOPIFY_API_KEY.
Step 3: Installing Dependencies
To ensure your app has all the necessary dependencies to function correctly, run the following command in your terminal
npm install
This command installs all the packages needed in your application .In this case is React.js for the frontend and Node.js for the backend.
Step 4: Running Your Application
Once all dependencies are installed, you can start your development server by running
npm run dev
Step 5: Building the Frontend and Backend
Again, for our instance, we will be developing the frontend of the app using the help of the React library of JavaScript and the backend with Node. Here’s a brief overview of how to set up both. let describe some steps.
Frontend with React.js
Create React Components: Create React components to be used within your application for headers, footers and other sections of your application.
Navigation Links: As to create different pages, the labels and destinations have to be included in the navigation Link component in App.jsx. That way, you are able to surf from one area of your application to the other.
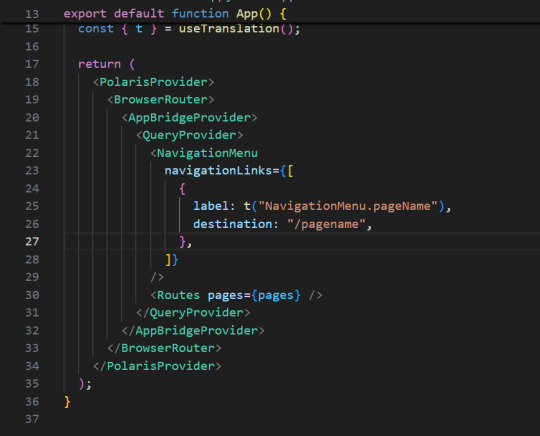
Backend with Node.js
Set Up Express Server: Please use express Js to set up your server and control the backend procedures.
API Routes: Define API routes which will handle the request and response between the front end and the back end.
Practical Example: Instagram Feed App…
Let’s apply the above steps to create a practical example: an application that is used in feeding the user’s Instagram account. This application will let the users login through the Instagram account, pull the media, and then the media can be showcased in a grid or slider view.
Main Functionality
The landing page of the app features a button which says “Connect to Instagram.” When the users tap on this button, they are transferred to the Instagram login page. If the login is complete, the app will retrieve pictures and videos from their Instagram profile and provide it in slider or grid view.
Authentication and Authorization
We use an authentication URL containing the following parameters: In this method, the parameters included are client Id, redirect Uri, scope, response Type, and auth Url. This URL corresponds to the redirection to Instagram’s login page. Once a user logs in, Instagram gives an authorization ID and using this ID, an access token is given by our back end..
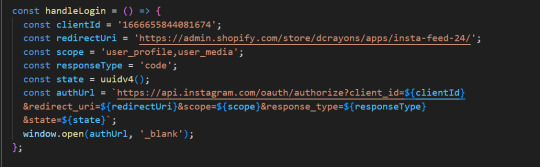
Here is how the process works in detail.
Auth URL: Create an auth URL with the necessary parameters.
Redirect and authorization: Redirect users to Instagram’s login page. Once successfully logged in, get a license ID.
Access token request: To request an access token from the backend, use an authorization ID with client id, client secret, grant type, and redirect uri.
Introducing news reports and displaying content
Once we have the access token, we can then retrieve all the media id from the user’s Instagram profile. We use these media id to retrieve the URLs of the images and videos. These media items are then displayed in our app, which has various styling options.
Here is a detailed analysis of this phenomenon.
Retrieve Media IDs : Use an access token to retrieve media IDs from the Instagram API.
Accept media URLs : Assign a corresponding media URL (image or video) for each media ID.
Display Media: Use React components to display media objects in a grid or slider format.
Optimizing the Instagram feed
One of the main features of our app is that we can customize the Instagram feed. Here are some options to change.
Width: Adjusts the spacing between images.
Rounded corners: Apply rounded corners to images.
Viewable posts: Check how many posts can be viewed at one time.
These CSS and React state settings can be used to update the layout dynamically based on the user’s preferences.
Deploying Your Shopify App
Once your app is fully developed and tested, you can deploy it to any store created in Shopify. Here’s a brief overview of the deployment process:
Build Your App: Run the build command to prepare your app for production.
Upload to Shopify: Use the Shopify CLI or Partner Dashboard to upload your app to the Shopify store.
Submit for Review: If you intend to publish your app on the Shopify App Store, submit it for review to ensure it meets Shopify’s standards and guidelines.
How to Maximize Your Shopify Partner account?
Promote your services: Use the Shopify Partner Dashboard to promote your design services, apps or themes. Emphasize what makes your offers unique and how they benefit Shopify merchants.
Use Shopify’s resources: Take advantage of the training materials and support provided. These resources will help you stay up to date with Shopify’s latest features and best practices.
Connect with the community: Join the Shopify forums and partner communities to connect with other professionals. Sharing knowledge and learning from others can help you improve your services and grow your business.
Track Your Performance: Monitor your earning potential and performance with the Affiliate Dashboard. This will help you understand what is working and where you can make improvements..
Conclusion
Creating a Shopify app involves several key steps, from setting up your development environment to deploying your app. By following this comprehensive guide, you can create a functional and customizable app to meet various needs. Our example of an Instagram feed app demonstrates how you can integrate third-party services and enhance your app’s functionality, offering users a dynamic and engaging experience. Whether you’re a seasoned developer or just starting, Shopify provides the tools and resources to help you succeed
0 notes
Text
JavaScript is one of the most popular programming languages used for web development, known for its flexibility and wide range of applications. However, like any other programming environment, developers occasionally run into errors that can be puzzling and frustrating. One such error is the "TypeError [ERR_UNKNOWN_FILE_EXTENSION]: Unknown File Extension '.javascript' for c:\xxxx\xxxxx\xxxxx-xxxx\xxxxxxxxx.javascript". This article will delve into the causes of this error and provide solutions to resolve it.
Understanding the Error
The error message "TypeError [ERR_UNKNOWN_FILE_EXTENSION]: Unknown File Extension '.javascript'" typically occurs in Node.js environments. Node.js, a runtime built on Chrome's V8 JavaScript engine, allows developers to execute JavaScript code outside of a web browser. However, it expects JavaScript files to have a specific set of extensions, primarily .js.
When Node.js encounters a file with an unfamiliar extension such as .javascript, it throws this type error because it does not know how to handle it. This is a strict file extension checking mechanism to ensure that only known and supported file types are processed.
Common Causes
Incorrect File Extension: The most common cause of this error is using an unconventional file extension like .javascript instead of the standard .js.
Misconfigured Module Loader: Sometimes, custom module loaders or bundlers may be misconfigured to process non-standard file extensions incorrectly.
Typographical Errors: Simple typos or mistakes in the file name or extension can lead to this error.
Toolchain Issues: Certain build tools or task runners may not recognize the .javascript extension, causing them to throw this error.
Solutions
1. Rename the File Extension
The simplest solution is to rename your file extension from .javascript to .js. This ensures compatibility with Node.js and most JavaScript development tools.
Steps to Rename:
Navigate to the directory containing the problematic file.
Rename the file from xxxxxxxxx.javascript to xxxxxxxxx.js.
On Windows, you can do this via File Explorer:
Right-click the file, select "Rename", and change the extension.
On macOS or Linux, you can use the mv command in the terminal:
mv c:\xxxx\xxxxx\xxxxx-xxxx\xxxxxxxxx.javascript c:\xxxx\xxxxx\xxxxx-xxxx\xxxxxxxxx.js
2. Configure Custom Extensions in Node.js
If you have a specific reason to use the .javascript extension, you can configure Node.js to recognize it. This involves creating a custom loader.
Creating a Custom Loader:
Create a file named loader.mjs.
Implement a loader function to handle .javascript files.
Use the --loader option when running your Node.js application.
Example loader.mjs:
import { readFile } from 'fs/promises'; export function resolve(specifier, context, defaultResolve) { if (specifier.endsWith('.javascript')) { specifier = specifier.slice(0, -11) + '.js'; } return defaultResolve(specifier, context); } export async function load(url, context, defaultLoad) { if (url.endsWith('.javascript')) { const source = await readFile(new URL(url), 'utf8'); return { format: 'module', source }; } return defaultLoad(url, context); }
Run Node.js with the custom loader:
node --loader ./loader.mjs c:\xxxx\xxxxx\xxxxx-xxxx\xxxxxxxxx.javascript
3. Adjust Toolchain Configurations
If you are using build tools like Webpack, Babel, or Gulp, you may need to configure them to recognize and process .javascript files correctly.
Example for Webpack: Modify your webpack.config.js:
module.exports = { // Other configurations... resolve: { extensions: ['.js', '.javascript'] }, module: { rules: [ { test: /\.javascript$/, use: 'babel-loader', }, ], }, };
4. Check for Typos
Sometimes, the error might simply be due to a typo. Double-check the file extension and ensure it is correctly typed.
Conclusion
The "TypeError [ERR_UNKNOWN_FILE_EXTENSION]: Unknown File Extension '.javascript'" error can be easily resolved by renaming your file to use the .js extension, configuring a custom loader in Node.js, or adjusting your build tool configurations. Understanding and addressing these issues will help maintain a smooth development workflow and prevent such errors from disrupting your projects.
0 notes
Text
Understanding ES6 Modules: A Beginner’s Guide to JavaScript’s Powerful Feature
New Post has been published on https://freelancingdiary.com/understanding-es6-modules-a-beginners-guide-to-javascripts-powerful-feature/
Understanding ES6 Modules: A Beginner’s Guide to JavaScript’s Powerful Feature
Demystifying ES6 Modules: A Practical Walkthrough
JavaScript has evolved significantly over the years, and one of its most powerful advancements in recent times is the introduction of ES6 modules. These modules bring a new level of clarity and structure to JavaScript codebases, making it easier to organize, maintain, and share code among projects.
What Are ES6 Modules?
ES6 modules are a way to encapsulate code into small, reusable pieces. They allow developers to export parts of a module (like classes, functions, or variables) and import them in other modules, promoting a cleaner and more modular code structure.
A Look at the Code
Let’s dive into an example to see ES6 modules in action:
File: main.js
JavaScript
import User, printAge, printName from "./new.js"; let sahil = new User("Sahil Ahlawat", 10); printAge(sahil); printName(sahil);
File: new.js
JavaScript
export default class User constructor(name, age) this.name = name; this.age = age; export function printAge(user) console.log(`Age of user is : $user.age`); export function printName(user) console.log(`Name of user is : $user.name`);
In new.js, we define a User class and two functions, printAge and printName. We then export these so they can be used in other files. In main.js, we import these exports and use them to create a new User object and print its details.
Setting Up Your package.json
To ensure Node.js treats our .js files as ES6 modules, we need to add a "type": "module" line to our package.json:
File: package.json
JSON
"name": "modules", "version": "1.0.0", "description": "Modules tutorial", "type": "module", "main": "main.js", "scripts": "test": "echo \"Error: no test specified\" && exit 1" , "author": "Sahil Ahlawat", "license": "ISC"
With this setup, running node main.js will execute our code with ES6 module support.
Benefits of Using ES6 Modules
Reusability: Code can be shared across different parts of an application or even different projects.
Maintainability: Clearer project structure makes it easier to manage and update code.
Namespace: Avoid global namespace pollution, which can lead to fewer bugs.
Conclusion
ES6 modules are a significant step forward in JavaScript development. They offer a robust way to organize code, making it more readable and maintainable. By embracing this feature, developers can improve their workflow and create more scalable applications.
This blog post provides a clear explanation of ES6 modules, demonstrates their usage with your code, and explains how to set up a Node.js project to use them. It’s written in an accessible way that should appeal to both beginners and experienced developers alike.
0 notes
Text
Nginx
참고: https://smali-kazmi.medium.com/setup-nginx-node-js-on-mac-os-x-b31eda9f7d5d
how to read (pronounce): 엔진 엑스
Nginx currently supports 7 scripting languages: Go, Node.js, Perl, PHP, Python, Ruby, and Java Servlet Containers
(the last is an experimental module)
It enables you to run applications written in different languages on the same server.
how to install: https://dev.to/logrocket/how-to-run-a-node-js-server-with-nginx-588
how to install by M2: 1. homebrew install with terminal commands
/bin/bash -c "$(curl -fsSL https://raw.githubusercontent.com/Homebrew/install/HEAD/install.sh)"
2. PATH for homebrew: (2-lines)
(echo; echo 'eval "$(/opt/homebrew/bin/brew shellenv)"') >> /Users/nika/.zprofile
eval "$(/opt/homebrew/bin/brew shellenv)"
3. run:
To start nginx now and restart at login:
brew services start nginx
Or, if you don't want/need a background service you can just run:
/opt/homebrew/opt/nginx/bin/nginx -g daemon\ off\;
[like this] nginx, "http://localhost:8080/"
4. stop
nginx -s stop
5. 에러 확인:
nginx -t
nginx: the configuration file /opt/homebrew/etc/nginx/nginx.conf syntax is ok
nginx: configuration file /opt/homebrew/etc/nginx/nginx.conf test is successful
6. 리로드:
nginx -s reload
sudo nano /opt/homebrew/etc/nginx/nginx.conf (after password)
디폴트 구성 바꾸기, (nano: vim, emacs 같은 에디터로 수정하게끔 슈퍼유저 설정 권한을 준다)
나노 명령어:
^G : 도움말 보기
^X : 끝내기
^O : 파일 저장(저장할 파일명 입력, 디폴트는 최초 파일명)
^R : 파일 읽기(현재 파일에 새로운 파일 추가)
^W : 텍스트 검색
^\ : 검색 후 바꾸기
^K : 선택한 문자열 잘라내기
^U : 잘라낸 문자열 붙이기
^J : 양쪽 정렬(한줄로 표시)
^T : 맞춤법 체크
^C : 현재 커서 위치
^- : 입력한 행번호, 열번호로 이동
^A : 현재 행의 처음으로 이동
^E : 현재 행의 마지막으로 이동
Mac 폴더 생성 명령어: mkdir servers
mkdir -p /var/www/sena.com
Mac 파일 생성 명령어: touch ~/servers/examplePage/example.com (~ kite까지 포함)
touch ~/servers/examplePage/app.js
nano 안 쓰고 에러 해결법:
sudo vi 만드려는 파일명 or 저장 할 때
:w !sudo tee % > /dev/null
the page eXample:
make folder and "example.com" file
make app.js (javaScript file)
edit /etc/hosts (add 127.0.0.1 example.com)
새 포트 추가하는 법:
이걸 하고 싶으면 이러면 된다: sudo nano /opt/homebrew/etc/nginx/nginx.conf
링크
0 notes
Text
How to Choose an Outsourcing Company for Marketplace Development?
Marketplace development is one of the most important aspects of any eCommerce business. You can have a great product, but if you don’t have a good marketplace for it, then your business isn’t going to be able to grow as fast as it could.
The task of online marketplace development is not a walk in the park. You will need the right technical expertise at the helm of affairs, along with niche knowledge about the product that you are looking to market. The right mixture of business logic and technological know-how is the primary requirement for selecting an outsourcing company that will take on the mobile app design & development in the UK. In this article, we shall take a look at the factors that you will need to consider before you outsource your development needs:
Technical Knowledge
Not all marketplaces are created equal — some are B2C (business-to-consumer), some B2B (business-to-business). And each type has its own unique characteristics that require different solutions in terms of features and functionality. So it’s important that your vendor has experience working with both types of marketplaces so they can tailor their services to meet your needs. It also helps if they have previous experience building similar platforms so that they understand how your business works and its unique challenges.
Marketplace creation requires the help of a company with domain knowledge in the product or service you want to market. The Mobile App Development Solution in the UK needs to know about the target demography and the API integrations that will enhance the app's functionality.
For example, if you want to develop an eCommerce application you are likely to want to React JS in the frontend with Node JS in the backend.
The best app developers in the UK can help you with the tech stack like MERN and MEAN and the best UI/UX practices. Check what tools they use (Adobe and Figma) that can make your app intuitive, and it is a bonus if their portfolio can exhibit similar work that they have done.
Business Expertise
The best mobile app solution in the UK should be able to demonstrate to you its strong suits so that its point of differentiation becomes clear. They should be able to elaborate on how they can add value to your product or service. One of the fears of being an entrepreneur is not having your marketplace functional in due time. This is why the right app development company in the UK will ensure that your MVP is up and running.
A good outsourcing company should have relevant experience in e-commerce development. You will want to make sure that they understand the needs of your business and can advise you on how best to achieve your goals. This includes understanding what technologies are available and how these can be used to help you reach your goals. It also includes understanding how various platforms work, such as Magento and Shopify, so that they can recommend the right platform for your business.
The company that takes on mobile app design & development in UK should treat the MVP as a process and not a complete product. Leverage the presence of a DevOps engineer to automate updates and fix bugs for the marketplace so that the user can have an uninterrupted user experience. There should be constant innovations that should stem from testing and user reviews.
Research
As a product owner, one of the most important things to do when you approach a mobile app development company in the UK is to conduct research before development. In basic research, you ideate the product from scratch and conduct feasibility studies to predict the success of the product or the service. In applied research, you take on an existing product and try and scale it by analyzing its performance. If your product is made from scratch it is likely to cost more. If you are rebuilding a white-label marketplace it can be cheaper in comparison. Make sure that the developers have completed similar projects before and have some code samples that they can show off. You can also ask for references from customers who have used their services in the past. In addition, look at the developer's portfolio carefully to make sure that their work meets your standards and expectations.
Final Words
Once you have covered all the bases before outsourcing your work, the final work, you can ask the former clients of the company about their experience. Once you are satisfied with their reports, you can finally outsource your work to the mobile app development company in the UK. When choosing a company to work with, spend time researching different options, checking out the portfolio and comparing their performance. Your product's success depends on the team that stands by your side. Do your best to find one that meets all your requirements.
This post originally appeared on the blogger website, and we republished it with permission from the author. Read the full piece at: https://ficodetechnologiesuk.blogspot.com/2022/10/how-to-choose-outsourcing-company-for.html
0 notes