#node-js application example github
Explore tagged Tumblr posts
Visit Tumblr Blog
Explore Tumblr blogs with no restrictions, modern design and the best experience.
Last Seen Tumblr Blogs


Fun Fact
After the announcement of the deal with Yahoo!, there were 170K signatures of unhappy Tumblr users petitioning to prevent the sale in 2013.
Text
Helpful Insight is one of the best Node.js Application Development Companies in India. We are developing various Node.js applications with an experienced team of Node.js developers. Our developers are pros at working with real-time, scalable, and multilayered applications based on node.js.
Our team at Helpful Insight includes Node JS developers who develop rapid and scalable network web applications in Bharat. NodeJS is an excellent platform for developing high-performance and reliable network applications, by using JavaScript. Our NodeJS developers know how to deliver tailor-made web applications, designed for rapid scaling, to fit your specific business needs.
Web applications requiring low latency, high throughput, and high scalability are ideally developed using node js development services. Our NodeJS developers have extensive experience in developing applications that solve real business problems while offering easy maintenance. We understand that you require an application capable of processing big data sets and handling high-traffic volumes. Hire Node JS Developers for your business will meet all requirements and give you the best experience possible.
We ensure to deliver a dependable, secure, and scalable web application to you. Rest assured, our developers will do a tremendous job providing you with a web application and backend development that surpasses all of your wishes and hopes. Let us help you design that web application you have always desired, contact us today.

#best node js backend framework#express js#node js applications examples#best node.js ide#node-js application example github#node js application example code#node js framework list
0 notes
Text
How To Set Up Your Own Discord Bot: A Guide [v13 update]
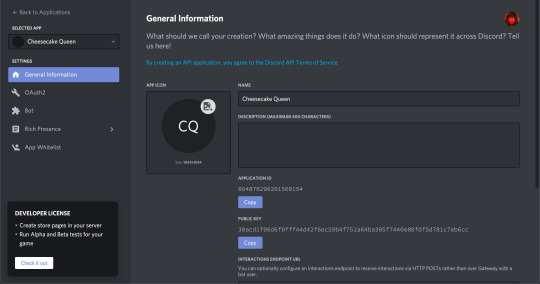
Step 1: Go to https://discord.com/developers/applications
Make sure you are signed in to discord. On the top right hand corner, you will see a button that says New Application. Get to clicking!

Step 2: You will be asked for a name. This could be any name, but preferably the one you want your bot to have. Make sure it has a cool name, like Potato Queen, or Jack the Ripped Bot.
Once you have done that, click Create.

Step 3: You will come to a page that shows all the General Information. But you have not created your bot yet! This is just the application page. You can put in your App Icon, Description and the likes, before clicking on Bot at the side bar.
Step 4: You should reach a page with a button that says Add Bot. Well, what are you waiting for? Go ahead and click it!
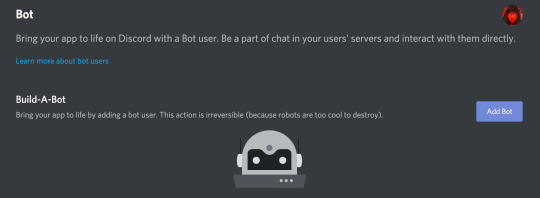
A whole new page will pop up, with information about your new bot. Remember, you can’t destroy a bot, so make sure you’re definitely wanting a bot when you’re doing this.
From here, you can see your bot’s username as well as its profile picture. You can change it if you want.
IMPORTANT: There is also something called Token. YOU SHOULD NEVER SHOW THIS TO ANYONE ELSE. It is the one thing that will bring your bot to life (it basically controls your bot) and if it’s out in the open, it is best to regenerate a new one.
When you scroll down, you will see Authorization Flow. This is where you can choose to make your bot public or private. Making it public means that others can add it to their own servers, without your help. If it’s private, only YOU can add this bot to servers.

Step 5: Invite your bot into your server.
The link to do this should be: https://discord.com/oauth2/authorize?client_id=[clientidhere]&scope=bot&permissions=[permissionnumber]
An example is: https://discord.com/oauth2/authorize?client_id=707835242475421767&scope=bot&permissions=8 [this has admin permissions]
or you can just use: https://discord.com/oauth2/authorize?client_id=707835242475421767&scope=bot
And you’re done! At least with the application part.
NOW WE MOVE ON TO THE CODING PART. [Note: This is in JS because I love JS. Someday I might do a guide for Python too but we will see.]
The basic things you need: 1. Visual Studio Code 2. Node JS
You can see how to download either one from HERE.
Then, you will need to download discord.js.
Create a folder for your discord bot things, and then open up Visual Studio Code.
Create a new file called index.js and this will be your main page, where you get your bot running. The basic codes inside it would be:

TOKEN: Remember that token that I said you can’t tell anyone? Yeah, put it in there like client.login(”IWEUTWEITU”) where that keysmash is your token.
From here, if you’re using Visual Studio Code, just go to your console.
NOTE: If you do not know where to find the console, follow this:
Click Terminal from the top tab > New Terminal. This will pull up the console for you.
Make sure that the directory of your terminal is the place where your index.js file is at. If not, you can always use ls to list the different folders in that directory and cd to change into that directory as shown below:
My terminal was in the Github folder and I used ls to list all the folders in the Github folder. From there, I can see the cafe-bot folder where my hello.js file is located in. So I used cd cafe-bot to move into that folder.

From there, type npm install discord.js
Once you’re done with that, once again, type node index.js.
[Sometimes you might run into errors that let you know that “The term node is not recognized as the name of a cmdlet”. This either means that you have NOT installed Node JS, in which you can go to this post to see how to do it HERE OR you might have some issues with directories in which you can look at this: https://www.youtube.com/watch?v=pg4t48BPmh8]
You should see “Bot is ready!” and with that, your bot is up!
Go ahead, explore it, enjoy it! You can do it!
#discord bot#discord js#discord.js#js#javascript#discord application#business guides#discord guide#discord beginner#coding#discord
83 notes
·
View notes
Text
From Meh To Great: My Experience with NodeJS Browser Testing since 2015
A lot can change in a few years. Just look at the state of affairs in the JavaScript (JS) test automation space.
In 2015, if you asked me my opinion on JS and browser testing, I would've said "Avoid using JS altogether as much as possible, but if you need to use JS use Protractor."
Now, my position has completely flipped: "WebdriverIO is the best choice overall for browser (and mobile app) UI test automation, and I would definitely encourage JS-based tools over Java-based tools."
(If you're thinking "Where do you think JS tools for test automation be in 2026?" my answer is "No friggin idea".)
I think it might be helpful to think through why this position has flipped, since it might be helpful to understand the current landscape of JS-based testing tools but also for browser test automation tools more generally. Not just that, but JS-based tools are now applicable beyond purely JS projects and organizations, with Playwright going cross-language after beginning in JS. Test tools with JS aren't just surviving, but also thriving.
First, back in '15, Angular was de rigeur in the front-end JS framework world. React was only coming out, and tools like VueJS and Svelte were still many years away. Angular had a lot of mindshare and a lot of usage, so naturally a test framework that came along with it would get a lot of attention as well. And the Angular project (correctly) treated browser testing as a first-class citizen in its ecosystem, putting appropriate resources behind getting Protractor right. Protractor itself had at least one full-time developer at Google dedicated to it and a lively GitHub with issues and bugs being opened a closed.
As well, JS was a dramatically different language then. Promises were being incorporated into NodeJS itself, meaning asynchronicity had a better API to work with than function callbacks. ES6 classes were a few years away, and even npm scripts were not widely used in 2015. All of these features of NodeJS (or lack thereof) also helped buoy Protractor's interest from the development and testing communities. Since Protractor used WebdriverJS, the JS language bindings provided by the Selenium project, and WebdriverJS made use of promises, Protractor code was as idiomatic and "standard" as possible for NodeJS around 2015.
Still, despite all of the above, JS was an asynchronous language. Since virtually all browser-based automated tests were designed to be run synchronously, learning promise syntax and semantics were an extra and nontrivial step in learning to write good Protractor tests. As well, writing page objects was, well, tricky in a language that didn't have the concept of class-based objects. There was a lot of overhead in writing good tests in Protractor compared to Java or Python. Similar projects for writing browser-tests in NodeJS ranged from not quite mature enough (WebdriverIO) to almost unusable (NightwatchJS) mostly because these projects were also relatively young. Add in the fact that Protractor was Angular-specific and Node tooling wasn't as fully developed as compared to Java (remember Grunt for running things?), choosing Java over Protractor (for example) was a somewhat easy choice.
Let's roll forward to 2021.
The world has changed, and with it so has server-side JS. Now class-based object-oriented programming is possible in JS, and defining and running scripts from a package.json is standard fare. Server-side JavaScript, both the language and tooling around it, has matured quite quickly. Now writing scalable codebases of mostly synchronous code (including test projects) that are maintainable is completely possible in NodeJS. Along with this, the maturity of tools such as WebdriverIO and NightwatchJS has grown too. There is even a new category of tools that do no use Selenium in any way (using the client-side JS bindings or the W3C protocol) including Cypress, Playwright and TestCafe. There is a complete buffet of choices for anyone who wants to write browser-based test automation in JS these days.
And in my opinion, the best of these tools is WebdriverIO. The main reasons for choosing this are
its has a robust service/plugin ecosystem, which allows teams to pick and choose what functionality they need,
its active community, where questions can be answers, features discussed and general help with the tool is encouraged, and
its well-thought-out API and tooling design allows for different tests and structures to reuse the same code.
Overall WebdriverIO isn't just the best tool (in my opinion) in the NodeJS world, it might be the best choice overall for teams starting with browser (or mobile!) test automation.
Meanwhile, Protractor is reaching the end of its life. For some, this comes as no surprise. Protractor bugs and issues keep steadily increasing for a few years, while contributors and dedicated engineers from Google kept decreasing. Using WebdriverJS and not encapsulating asynchronicity from end users turned out to be a mistake, while Angular-specific features eventually were removed or lost value for test developers. Finally, the Angular project announced that Protractor will not be maintained after the release of Angular 15. The go-to JS tool of my halcyon days of test development will be no more.
I'm reminded of the quote that "The only constant is change". It looks like this definitely applies to the NodeJS test tool landscape.
1 note
·
View note
Text
Adding decorator support to Create React App projects using react-app-rewired
Any experienced frontend developer should be familiar with the number one complaint about frontend development in recent years: it's too difficult to get started. You've heard of this thing called React and so you install it and give it a try; only to find that it doesn't "just work" and requires Babel, Webpack, npm and Node just to get started.
To help people conquer that cliff, Facebook developer and Redux author Dan Abramov created Create React App, which handles most of the difficult configuration work without you ever having to even see it and lets you get right down to work. It's an elegant solution that works well even for larger applications that get deployed to production environments: at my workplace we've been developing two applications with it for over two years now.
Of course, there's a flipside to the magic of "it just works", which is that if something doesn't work, it "just doesn't work". By handling the bundling configuration under the hood it's impossible to make even small adjustments, such as adding new Babel plugins.
It's at that point where I found myself recently, working on one of those production applications and wanting to use the proposed decorator syntax. While CRA does let you "eject" the config files so you can edit them, this also means you basically stop using CRA; it's a one-way operation that adds a ton of complicated files to your project, which now you have to maintain forever. Even as an experienced frontend developer, I'd rather not.
Fortunately, there is a way to make small changes to the bundling setup without having to give up the convenience of zero-config. To do so, we need to swap out the core scripting component of CRA with react-app-rewired, which is an alternative that allows config overrides. Together with the convenience functions provided by customize-cra you can add almost any feature you like with just a few lines.
Here's a step by step guide to add decorators (although you can use any of the other plugins described in the customize-cra readme file after this):
1. If you're starting a new project, just run Create React App like normal.
$ npx create-react-app my-app
The following steps will work with any existing app as long as you're using CRA 2.0 or up—check that your version of react-scripts is above 2.0.0 in your package.json file to verify this. CRA 3.0 should work as well—see the update below.
2. Add react-app-rewired and customize-cra, and any Babel plugins you want to use.
Since we're adding decorators, we'll also add the @babel/plugin-proposal-decorators package.
$ yarn add --dev customize-cra react-app-rewired @babel/plugin-proposal-decorators
3. Open your package.json file and edit the start, build and test scripts.
"scripts": { - "start": "react-scripts start", - "build": "react-scripts build", - "test": "react-scripts test", + "start": "react-app-rewired start", + "build": "react-app-rewired build", + "test": "react-app-rewired test", "eject": "react-scripts eject" },
The eject script stays the way it is, since react-app-rewired becomes unnecessary the moment you run it.
4. Create a config-overrides.js file in your project root.
This is where we'll define our modifications. For now, add the following:
const { override, addDecoratorsLegacy } = require('customize-cra') // Adds legacy decorator support to the Webpack configuration. module.exports = override(addDecoratorsLegacy())
And that's it; we're done. Not a second spent digging through Babel or Webpack documentation.
Now let's run yarn start to boot up the dev server and give it a try. If you want a quick example to copypaste to see if it's working, try this:
import React from 'react' // Decorator that passes on a 'message' property to a class. const addMessage = (str) => (component) => { component.prototype.message = str } @addMessage('Hello world!') class DecoratorTest extends React.PureComponent { render() { return <div>{ this.message }</div> } } export default DecoratorTest
If all went well, this component should evaluate to <div>Hello world!</div>.
There's one obvious caveat to this whole setup: the currently supported version of decorators is legacy and will eventually go away. The proposed new version will change how they work on a fundamental level and the syntax will be subtly different. For example, future decorators will need to come after the export keyword, whereas legacy decorators can appear before it.
However, the intent is for future decorators to be fundamentally compatible with the widely used legacy ones, and one of the spec design goals is to allow upgrading to the new syntax automatically via a codemod.
Keep yourself apprised by following the decorator proposal Github repo.
Update 2019-04-23: just yesterday, the Create React App team released their long awaited new major version 3.0.0. I've only done a quick test so far, but it seems everything still works as before. You can set the react-scripts peer dependency to 3.0.0 and still use the latest react-app-rewired and customize-cra packages like normal. I was able to add decorators and also Less support and both of them worked without a hitch. If problems do crop up later, I will update this post.
12 notes
·
View notes
Text
This year in JavaScript: 2018 in review and npm’s predictions for 2019
This study is adapted from my presentation npm and the Future of JavaScript. No data is perfect; if you have questions about ours you can read about the methodology used to gather this data.
npm has over 10 million users who download well over 30 billion packages every month. On an average Tuesday—npm’s busiest day—users download more than 1.3 billion packages of open source JavaScript. This gives us a lot of information about what JavaScript users are up to. On top of that data, in partnership with the Node.js Foundation and the JS Foundation we survey of over 16,000 developers to ask what they’re up to.
From these two sources, we’ve uncovered some insights about the makeup of the npm community, as well as information about what the community considers to be best practices. This will help you make your technical choices in 2019.
JavaScript is the world’s most popular programming language
It’s no news to anyone that JavaScript is incredibly popular these days. Stack Overflow’s 2018 developer survey has JavaScript as the most popular programming language (with fellow web languages HTML and CSS at the #2 and #3 spots). GitHub’s most recent Octoverse infographic ranks languages by the number of pull requests received, and JavaScript is the top there, too.

The total number of JavaScript developers is hard to estimate. Slashdata’s 2018 survey suggests there were 9.7M by the end of 2017 and growing quickly, meaning there are well over 10M at this point. npm’s own estimates suggest there are over 10M npm users, and we see similarly rapid growth. There are JavaScript developers who do not yet use npm, but as a percentage of all JavaScript developers they are quite small, possibly fewer than 10%.
The npm Registry contributes to the popularity of JavaScript
Without question, JavaScript’s popularity is driven by its ubiquity as the only language directly usable for developing web applications. However, a fascinating paper by Leo Meyerovich and Ariel Rabkin at Berkeley studied the factors contributing to programming language adoption and found that, overall, the availability of open-source libraries relevant to the task at hand was the most important factor in selecting a programming language.

Our own survey data support the conclusions of this study. The most common reason respondents gave for choosing JavaScript was the number of libraries available.

With over 836,000 libraries currently available, npm is the largest single collection of open-source libraries in the world, by a significant margin—although JavaScript’s tendency towards smaller libraries means this comparison isn’t entirely apples-to-apples. Regardless, this enormous reservoir of open source code means that the popularity of JavaScript and npm works both ways: the language gains popularity because of the Registry, and vice versa.

npm is used to build every kind of application
We asked users where the JavaScript they write is used. An overwhelming 93% of respondents said that they write code for the web, with a still-substantial 70% saying they write JavaScript that runs on servers, i.e., Node.js. However, many other application areas including Internet of Things (IoT), desktop applications, native mobile applications, and others saw substantial numbers of users, too.

This is a significant change for those of us who work at npm, Inc. and maintain the npm command-line tool. npm was invented to serve the needs of server-side app developers, and the needs of web developers are different. Becoming a majority-web platform has meant changing our priorities, which has ledto new features like package locking by default.
npm is essential to web development
When npm, Inc. started in 2014, a tree of a few dozen JavaScript packages was typical. These days, the average modern web application has over 1000 modules, and trees of over 2000 modules are not uncommon. In fact, 97% of the code in a modern web application comes from npm. An individual developer is responsible only for the final 3% that makes their application unique and useful.
This is a huge success story for code reuse, for the strength of the npm community, and for open source in general. The time saved by not re-inventing the code in thousands of modules is saving millions of developers hundreds of millions of coding-hours.
npm has focused on security in 2018
To a great many developers, npm has simply become the way you build a website. This is a responsibility we take seriously. In our survey, 77% of developers said they were concerned about the quality and security of the open source libraries they used, and a worrying 52% said the tools currently available were inadequate. We went into more depth on these results in our post Attitudes to Security in the JavaScript community earlier this year.
In April, we announced that we acquired ^Lift Security and their product, the Node Security Platform. Today, the NSP is integrated directly into npm, and every install of npm includes security audits that notify users if they are installing insecure modules. We also furnish tools to easily correct these vulnerabilities by automatically installing secure versions of their modules. In addition, users of npm Enterprise and paid npm Organizations users receive notifications of embargoed vulnerabilities not yet publicly disclosed.
The demographics of npm users
The basic demographics of our survey respondents are covered in our methodology post, but there are several important facts worth highlighting:
1. We are mostly new. 25% have been using JavaScript for less than 2 years, and 51% have been using npm for less than 2 years. This is a side effect of the community doubling in size in that time!
2. We are mostly self-taught. 69% of npm users mostly taught themselves JavaScript, with the next highest being 22% who learned on the job.

We don’t just write JavaScript. People who use npm aren’t always strictly JavaScript developers—30% each report writing Java, PHP, and Python, and smaller numbers of lots of other languages.
We don’t just work at “tech” companies. 55% of npm users describe themselves as working at a company that wouldn’t be considered a “tech” company.
There are also some ways that npm users don’t differ from the general population of software developers, which is itself interesting. For example, npm users work at every size of company, in roughly the same proportion as those companies exist. JavaScript isn’t a “big company” or a “small company” tech. npm users also are evenly distributed across every industry, as well as other demographics such as age and education level.
Everybody would like less tooling
JavaScript in 2018 is somewhat notorious for requiring a lot of tooling to get going, which is quite a reversal from the situation in 2014, when Node.js was considered an “everything included” framework. Today, most developers wouldn’t consider Node to be a framework at all. True to that, all of our survey respondents would like to see less tooling, less configuration required to get started, and better documentation of the tools that do exist. But what tools?
We went in-depth into the popularity of JavaScript frameworks in our “State of JavaScript Frameworks” series (part 1, part 2, part 3) earlier this year. We won’t reiterate all the findings of that analysis, but rather dive into a few updates of what’s changed in the 9 months since then.
As a reminder, it’s important to understand the “share of registry” metric we are using here: a “flat” graph in this case means strong growth, just not growth relative to the growth of the registry, which is always growing quickly.
React’s growth has slowed

React continues to dominate the web scene. Over 60% of npm’s survey respondents say they are using React, and it has grown further since then. However, that growth in 2018 has been slower than in 2017.
Angular downloads have stayed flat

The two major flavors of Angular combined have stayed roughly flat in terms of market share.
Ember’s popularity has rebounded

In a very unusual phenomenon, Ember’s popularity, which appeared to be declining, has continued a strong rebound. By September, more than twice as many developers were using Ember as at the beginning of the year. We’re going to keep a close eye on this story, but we think Ember’s resurgence is part of the explanation for the slowdown in React.
Vue’s strong growth has continued

Vue was already growing quickly and that continued in 2018. Many Vue users report that they picked it over React because in their opinion it’s easier to get started while maintaining extensibility. Our current theory is that React’s growth has been slowed by many newer users picking Vue.
GraphQL continues hyper-growth

GraphQL, tracked by its most popular client library Apollo, continues to explode in popularity. We think it’s going to be a technical force to reckon with in 2019.
Transpilers rule, led by Babel—and a surprise: TypeScript

Babel is familiar to any React user as the tool used to transpile React’s next-generation JavaScript into the currently-supported JavaScript standards. In line with React’s 60% market share, 65% of npm users report using Babel. (It also has uses outside of the React ecosystem.)
Something of a surprise, however, was TypeScript, with 46% of survey respondents reporting they use Microsoft’s the type-checked JavaScript variant. This is major adoption for a tool of this kind and might signal a sea change in how developers write JavaScript. We are definitely going to be asking more questions about TypeScript usage in the next version of our survey.
npm’s predictions for 2019
It’s always difficult to make predictions about an ecosystem as huge, varied, and fast-changing as JavaScript, but our data has led us to make a few predictions for 2019 that we think we can commit to.
1. You will abandon one of your current tools. Frameworks and tools don’t last in JavaScript. The average framework has a phase of peak popularity of 3–5 years, followed by years of slow decline as people maintain legacy applications but move to newer frameworks for new work. Be prepared to learn new frameworks, and don’t hold on to your current tools too tightly.
2. Despite a slowdown in growth, React will be the dominant framework in 2019. 60% market share for a web framework is unheard-of, and that’s partly because React isn’t a full framework, just part of one. This allows it to flexibly cover more use-cases. But for building a web app in 2019, more people will use React than anything else, and that will result in a big advantage in terms of tutorials, advice, and bug fixes.
3. You’ll need to learn GraphQL. It might be too early to put GraphQL into production, especially if your API is already done, but 2019 is the year you should get your mind around the concepts of GraphQL. There’s a good chance you’ll be using them in new projects later in the year and in 2020.
4. Somebody on your team will bring in TypeScript. 46% adoption implies that TypeScript is more than just a tool for enthusiasts. Real people are getting real value out of the extra safety provided by type-checking. Especially if you’re a member of a larger team, consider adopting TypeScript into your 2019 projects.
Stay tuned
One prediction we’re very confident in making is that this community will continue to rapidly grow and expand the capabilities of JavaScript. As it grows, we’ll be documenting new trends and sharing our insights with the community. You can follow along by subscribing to our weekly newsletter and following us on Twitter.
19 notes
·
View notes
Text
Why Ionic Hybrid network becoming more popular day by day
Introduction of Ionic Framework
Ionic is a complete open-source SDK for hybrid mobile app development created by Max Lynch, Ben Sperry and Adam Bradley of Drifty Co. in 2013. Ionic is world’s most popular cross platform mobile development technology. Basically it’s hybrid mobile app development framework. Using Apache Cordova, it can be easily run on mobiles. A big advantage of using Ionic is that the code base remains the same for all mobile platforms and the UI/UX looks like a native mobile platform. The good news is: if you can manage to create websites, you already know how to build mobile apps. Ionic Framework offers the best web and native app components for building highly interactive native and progressive web apps. It is the only mobile app stack which allows developers to design apps for all app stores and the mobile web, using an unique code base. Moreover, Ionic’s Platform Continuity guarantees your app will look superb on every single device. Ionic provides tools and services for developing hybrid mobile apps using Web technologies like CSS, HTML5, and Sass. Apps can be built with these Web technologies and then distributed through native app stores to be installed on devices by leveraging Cordova.
Benefits of Ionic Framework
Platform Independent Framework- Ionic can recognize the platform specific advanced CSS proportional to the native look and feel on different mobile operating systems. It reduces the requirement for code changing as it gives the codes of mobile-optimized HTML, JS, and CSS components. Apart from this, ionic integrates into Angular JS which becomes a robust structure making code excellent as well as more manageable. This empowers the Start-up entrepreneurs to come out with newer concepts at reduced budget.
Cross-Platform Mobile App Development with Ionic- Building an application without a moment's delay is essential, and it should be compatible with all mobile devices. However, it needs extremely limited use of time, assets and efforts, and helps in giving a unified look and feel. Besides, Ionic helps with building applications quickly and with expertise, and deploys standard tools with a solitary code base.
Default User Interface- Ionic has many default CSS and JS parts that cover the vast majority of the basic things you need to make a mobile application. . Apart from regular ones like buttons and navigation it also includes form inputs, lists, cards, sliding boxes and many more. These can be easily customized by adding CSS classes to the element. The default styles are basic, smooth, and you can without a doubt redo them by adding pre-defined CSS classes to the component.
Based on AngularJS- If you’ve worked upon Ionic, and then you would likely realize that it is developed on top of the Angular JS framework. The extensions to HTML's sentence structure offered by AngularJS are extremely useful for mobile app designers. The Ionic structure utilizes AngularJS to offer a bunch of center functionalities to the designer with the goal that they can incorporate alluring components into the application. AngularJS is an ideal approach to make program based applications, while with the assistance of the Ionic structure, versatile designers can make hybrid applications and web applications.
Utilizes Cordova Plugins- Plugins play an essential part in Ionic application development. Modules are coded in JavaScript and come appended to the application. Ionic framework application development utilizes Cordova plugins to help designers in accessing different components of the versatile framework- for example, camera, GPS, and so on. According to your business and offered administrations, mobile app developers can utilize any of these modules to build their ideal mobile application.
There are a few good reasons to go with Ionic, depending on what you would be using it for:
1. Ionic use Angular’s MV* paradigm: If you are a web developer and want to be able to compete in the mobile space Ionic is great for you. Ionic uses HTML and CSS to lay out its views, so not only will you have all of the power of CSS transitions and canvas drawing, but you will also feel at home with the DOM. If you’ve ever used Angular in production, this will be doubly true for you, because the logic layers of Ionic use Angular’s MV* paradigm.
2.Desktop support: Ionic has added a flexible grid, and split-pane type features, allowing you to build mobile-first apps with responsive desktop layouts.
3.Open Web Standards: To paraphrase one of their founders, you’re betting on the open web, rather than getting stuck learning single-platform technologies that don’t carry over. (e.g. Learning CSS and DOM layouts versus Xcode’s autolayout)
4.Progressive Web Apps: This is a big trend on Google and Ionic’s radar, and it seems like Ionic is uniquely positioned to let you build app-class web experiences that can also be published in the App Store.
5.If you are bootstrapping a start-up and want to cut development time and cost by leveraging existing skill sets, Ionic is one of the best choices. Ionic creates apps for iOS, Android and Windows. It has default CSS that changes between versions for a Native experience. And all this can be done in JavaScript which is one of the most common programming languages known by developers now because of its ubiquity on the web. There are other frameworks around now that can achieve this in different languages, but most of them are not as popular or have as much support. So unless you have a specific reason you need to use python, Ruby, C++, Java etc. stick with Ionic or React Native in JavaScript or Xamarin in C#. Those are the most mature communities for cross-platform apps.
6. If you are new to web/mobile development the skills you will learn making things with Ionic will take you a lot further than what you will get with native. JavaScript is everywhere. It is more popular than Swift, and more importantly, it can be used for a lot more things. Java is really popular as well, but in my opinion, JavaScript seems to be slowly taking over Java’s position in the web development world. Companies that were built on java will stick around for a long time, but many new ones are being built on stuff like JavaScript, Ruby, Go and the like. And yes that list will be different in a few years, but Java will not be making it back on, and JavaScript will be the longest lasting one that is around for now.
7.Ionic Community: There’s a community of over 30,000 members on the Ionic forum, an active Slack Channel, and Ionic is the 45th or so most popular/starred repo on Github.
How to Install Ionic Framework
Make sure you have an up-to-date version of Node.js installed on your machine. If you don't have Node.js installed.
Open the command prompt and verify the Node.js version by using the command node -v.
To install Cordova and Ionic, use - npm install -g cordova ionic.
Make sure to install the latest version of JDK and Android Studio IDE for Android development.
To create a new project, use - ionic start projectname template.
Inside the project folder, you can add Android/iOS platform based on your development using the command - ionic cordova platform add android.
After these code changes are done, you can generate the required .apk file with the command - ionic cordova build android.
Once the .apk file is generated successfully, you deploy the file on a real device and do the testing, or you can test it as a web application using a browser.
To run it in a browser, use - ionic serve.
To run it on a device, use - ionic Cordova run android -device.
Finally, play with Ionic!
Comparison between Ionic Framework to Others Framework like PhoneGap
Ionic Framework-
Open source
It’s Javascript, HTML and CSS
Cordova is an engine which runs PhoneGap
UI Components is awesome
Application type: Hybrid
Supported Platforms- Android, IOS, Windows, BlackBerry
Enable features, such as push notifications, A/B testing, analytics, Code deploys and Automated builds.
PhoneGap-
Open source
It’s Javascript, HTML and CSS
Cordova is an engine which runs Ionic
Lack of pre-built UI widgets
Application type: Native
Supported Platforms- Apple IOS , Bada, BlackBerry, Firefox OS, Google Android, LG webOS, Micresoft Windows Phone (7 and 8), Nokia Symbian OS, Tizen (SDK 2.x) and Ubuntu Touch.
Enable features, Such as internet connectivity validation, Animations, List view, Facebook SDK support, Push Notifications, Device Detection, and Geolocation. According to Google Trends Ionic has gained its popularity day by day till 2018 where as other Frameworks fall down compared. To get more details about this technologies you can contact us through our website www.webhawksindia.com
21 notes
·
View notes
Text
Looking For Professional Full Stack Developer Training Online?

If you’re looking for professional full stack developer training online, there are many options out there. Which one is best for you depends on your learning preferences, career goals, time zone, availability, and budget.
Before you sign up for a full stack development course, read reviews and ratings. Also, make sure the instructor is both competent and compatible with your goals.
1. IBM Full Stack Software Developer Professional Certificate provided by Coursera
If you’re a developer looking to learn more about full stack development, this course from IBM is worth a look. It’s an affordable option that will teach you all the essential skills and tools you need to get started in web development.
This professional full stack developer training online will provide you with the knowledge and experience to build, deploy, and test a wide range of cloud-native applications. You’ll also learn how to use GitHub and Git, two of the most popular code management platforms in the industry.
Through Franklin’s partnership with Coursera, you can earn a Certificate that lets you demonstrate your skills to employers. The hands-on projects give you real-world examples and help you show off your abilities and potential.
2. Udemy Full Stack Web Developer Course
If you want to learn to be a professional full stack developer, Udemy is the place to be. It offers a variety of web development courses that cover the basics and come with hands-on projects to help you learn.
In addition to teaching you the basics of web development, this course will also teach you how to work with databases, server-side languages, and more. You will be able to build websites that are responsive, data-driven, and multi-user.
The courses are taught by one of the best instructors on Udemy, and her clear explanations, interesting slides, and enthusiastic presentation style make this course an excellent choice for aspiring web developers.
The course covers HTML, CSS, JavaScript, and Bootstrap, as well as jQuery, NodeJS, database, SQL, Git and Github, APIs, and more. The courses are a great choice for beginners and for those who have prior programming experience. There are also a few projects that will give you the chance to practice what you’ve learned, and there’s a TA available for any questions you have.
3. Udemy Web Design and Development Course
Full stack developers are in huge demand in the tech industry. They are highly sought after because they have expertise in all aspects of development, including frontend, backend, and database.
You can get professional full stack developer training online from Udemy, which is an eLearning platform with a live community of over 900,000+ developers. These courses are self-paced and teach you the fundamentals of the technologies required to design web pages, apps, and websites.
The course covers HTML, CSS, JS, and Node to create an interactive website. It also teaches you to build a mobile-friendly website that conforms to accessibility laws and regulations.
This course is offered by one of the top-rated instructors on Udemy. She explains hard concepts in a fun way, which makes it easy to grasp. She also uses tons of explanations and animations to help you learn the skills quickly.
4. Udemy Web Development Course
If you are looking for a professional full stack developer training online, Udemy is the place to go. Here, you can find a wide range of courses that are designed to teach you how to build websites and applications with HTML, CSS, JavaScript, Node, and more.
The best part about these web development courses is that they are usually beginner-friendly and come with hands-on projects. They also provide you with support if you have any questions along the way.
In addition, some of these courses are free to try out before you decide if they are right for you. Some of these free web development courses include a lot of extra learning resources like printable and articles.
This course is perfect for anyone who wants to learn how to create full-stack web apps. It covers front-end web technologies such as HTML and CSS and back-end programming languages such as Node, PHP, and MySQL.
0 notes
Text
Why is Node Js popular among startups?
Node.js is an open-source runtime environment. Because of this, Node.js excels at developing fast, flexible network applications and offers speed, performance, and other advantages. Node.js is exceptionally fast in multi-user data-related situations, making it perfect for processing, consuming and managing information in real time. That’s why many startups are adopting it in their operations.
Due to its ease of use and open-source nature (and the fact that it’s built on JavaScript, the most popular programming language used by Web developers), founders are always choosing Node. Js as their technology stack. In addition to growing and proving their worth earlier, young companies can now grow with Node. Js.

Here are 7 factors that make Node.js ideal
Easy to master
Node.js has a relatively short learning curve. If you’ve mastered JavaScript and Object-Oriented Programming basics, you should be able to learn Node.js fairly easily. After that, it’s easy to get started. Maintaining a client-server model and following Node’s Asynchronous flow are the most challenging aspects. GitHub offers a variety of interactive tutorials, courses, and examples that you’ll find helpful.
Node.js has a relatively short learning curve. If you’ve mastered JavaScript and Object-Oriented Programming basics, you should be able to learn Node.js fairly easily. After that, it’s easy to get started. Maintaining a client-server model and following Node’s Asynchronous flow are the most challenging aspects. GitHub offers a variety of interactive tutorials, courses, and examples that you’ll find helpful.
Simple things to do
Since startups want to keep their lives as easy as possible, they wear multiple hats and face numerous challenges before they launch their products. It will be easy for them to share one language, both on the server and on the client side, with Node.js, so they won’t have to switch between the back-end and front-end whenever they switch to Node.js. Due to this, Node.js applications require fewer files and have fewer lines of code than applications developed using different languages. Additionally, you will be able to reuse and share software between your front-end and back-end sections, which will speed up your development. Having an entire development team on both sides is beneficial at the onset of your startup’s product development, and it will be possible to reduce expenses on labor hours.

Faster time-to-market
When startups launch, they have to constantly improve their processes to develop, test, deploy, and launch as quickly as possible with limited resources and small teams. Time is a precious commodity for startups. With Node.js, you can go from concept to final product in no time at all. First, it is lightweight and can dramatically reduce application development time while offering the same capabilities. Second, simple deployments allow you to get instant feedback from your production environment.
Scalability
Node.js is built to scale. The ability to expand over the course of time is one of Node’s essential benefits. The startups that build applications develop lightweight, efficient systems that are scalable later on and can rapidly add modules to existing ones. Your growth will be unpredictable.
Node is scalable due to its load balancing feature and the ability to manage large numbers of connections simultaneously. Node’s apps can be scalable horizontally or vertically.
The microservice architecture in Node.js is ideal for projects with scalability and growth expectations. In addition, each task that you wish to scale independently from the others can be performed by a separate microservice.
Tested tool
Node.js is not so novel or relatively new that you should be worried. There has been a significant increase in the number of companies that are using Node.js to develop their products, including major companies like PayPal, Netflix, and eBay. There is no reason to abandon Node.js anytime soon because it is a reliable and established tool.
Community
feedback and support are plentiful in a vibrant community. In addition, you do not have to reinvent the wheel by utilizing the vibrant Node.js community. The development speed of their products is accelerated with tools and instruments developed by them.
The Node package ecosystem (a Node’s package manager) is the largest and fastest-growing software registry in the world. The framework includes a variety of templates and libraries you can use to add more value to your code with less work and in less time. Almost every aspect of the NPM ecosystem can be covered by an NPM module.
Conclusion:-
By working with a seasoned Node.js developer Company, you can take advantage of all the powerful capabilities of Node JS technology and complete your most challenging projects. Our team of Node.js developers can help if you’re looking for one. Our company is one of the most prominent Node.JS Development Companies in India, USA, UAE, Canada, France, Germany, Australia providing the most cutting-edge Node.JS web development services to businesses of all sizes. With our developers, we work closely with you to develop an application that meets the needs of your business.
#itserviceindia#mobile app development#itservicesus#startups#node js web development#node js developers
0 notes
Text
Download Python Tools For Visual Studio Mac

-->
Python Tools For Visual Studio Mac
Download Python Tools For Visual Studio Mac Download
Download Python Tools For Visual Studio Mac Install
Python is a popular programming language that is reliable, flexible, easy to learn, free to use on all operating systems, and supported by both a strong developer community and many free libraries. Python supports all manners of development, including web applications, web services, desktop apps, scripting, and scientific computing, and is used by many universities, scientists, casual developers, and professional developers alike. You can learn more about the language on python.org and Python for Beginners.
Python support is presently available only on Visual Studio for Windows; on Mac and Linux, Python support is available through Visual Studio Code. Download and run the latest Visual Studio installer for Windows (Python support is present in release 15.2 and later). Nov 11, 2020 5) Visual Studio Code. Visual Studio Code (VS Code) is an open-source environment developed by Microsoft. It is one of the best Python IDE for Windows that can be used for Python development. Visual Studio Code is based on Electron which is a framework to deploy Node JS applications for the computer running on the Blink browser engine. Macos 10.14 macos 10.15 macos 10.13 xamarin editor debugger project solution xaml fixed in: visual studio 2019 for mac version 8.0 performance crash android ios visual studio ide Setup fixed in: visual studio 2019 for mac version 8.1 fixed in: visual studio 2019 for mac version 8.3 fixed in: visual studio 2019 for mac version 8.2 macos 10.16. Oct 08, 2018 Python Tools for Visual Studio Mac migrated from uservoice Python uservoice votes 230 uservoice supporters 230 visual studio for mac Feedback Bot reported Oct 08, 2018 at 07:37 PM.
Visual Studio is a powerful Python IDE on Windows. Visual Studio provides open-source support for the Python language through the Python Development and Data Science workloads (Visual Studio 2017 and later) and the free Python Tools for Visual Studio extension (Visual Studio 2015 and earlier).
Python is not presently supported in Visual Studio for Mac, but is available on Mac and Linux through Visual Studio Code (see questions and answers).
To get started:
Follow the installation instructions to set up the Python workload.
Familiarize yourself with the Python capabilities of Visual Studio through the sections in this article.
Go through one or more of the Quickstarts to create a project. If you're unsure, start with Create a web app with Flask.
Go through one or more of the Quickstarts to create a project. If you're unsure, start with Quickstart: Open and run Python code in a folder or Create a web app with Flask.
Follow the Work with Python in Visual Studio tutorial for a full end-to-end experience.
Note
Visual Studio supports Python version 2.7, as well as version 3.5 through 3.7. While it is possible to use Visual Studio to edit code written in other versions of Python, those versions are not officially supported and features such as IntelliSense and debugging might not work. Python version 3.8 support is still under development, specific details about support can be seen in this tracking issue on GitHub.
Support for multiple interpreters
Visual Studio's Python Environments window (shown below in a wide, expanded view) gives you a single place to manage all of your global Python environments, conda environments, and virtual environments. Visual Studio automatically detects installations of Python in standard locations, and allows you to configure custom installations. With each environment, you can easily manage packages, open an interactive window for that environment, and access environment folders.
Use the Open interactive window command to run Python interactively within the context of Visual Studio. Use the Open in PowerShell command to open a separate command window in the folder of the selected environment. From that command window you can run any python script.
For more information:
Rich editing, IntelliSense, and code comprehension
Visual Studio provides a first-class Python editor, including syntax coloring, auto-complete across all your code and libraries, code formatting, signature help, refactoring, linting, and type hints. Visual Studio also provides unique features like class view, Go to Definition, Find All References, and code snippets. Direct integration with the Interactive window helps you quickly develop Python code that's already saved in a file.
For more information:
Docs: Edit Python code
Docs: Format code
Docs: Refactor code
Docs: Use a linter
General Visual Studio feature docs: Features of the code editor
Interactive window
For every Python environment known to Visual Studio, you can easily open the same interactive (REPL) environment for a Python interpreter directly within Visual Studio, rather than using a separate command prompt. You can easily switch between environments as well. (To open a separate command prompt, select your desired environment in the Python Environments window, then select the Open in PowerShell command as explained earlier under Support for multiple interpreters.)
Visual Studio also provides tight integration between the Python code editor and the Interactive window. The Ctrl+Enter keyboard shortcut conveniently sends the current line of code (or code block) in the editor to the Interactive window, then moves to the next line (or block). Ctrl+Enter lets you easily step through code without having to run the debugger. You can also send selected code to the Interactive window with the same keystroke, and easily paste code from the Interactive window into the editor. Together, these capabilities allow you to work out details for a segment of code in the Interactive window and easily save the results in a file in the editor.
Visual Studio also supports IPython/Jupyter in the REPL, including inline plots, .NET, and Windows Presentation Foundation (WPF).
For more information:
Project system, and project and item templates
Note
Visual Studio 2019 supports opening a folder containing Python code and running that code without creating Visual Studio project and solution files. For more information, see Quickstart: Open and run Python code in a folder. There are, however, benefits to using a project file, as explained in this section. Microsoft wireless multimedia keyboard 1.1 driver windows 10.
Visual Studio helps you manage the complexity of a project as it grows over time. A Visual Studio project is much more than a folder structure: it includes an understanding of how different files are used and how they relate to each other. Visual Studio helps you distinguish app code, test code, web pages, JavaScript, build scripts, and so on, which then enable file-appropriate features. A Visual Studio solution, moreover, helps you manage multiple related projects, such as a Python project and a C++ extension project.
Project and item templates automate the process of setting up different types of projects and files, saving you valuable time and relieving you from managing intricate and error-prone details. Visual Studio provides templates for web, Azure, data science, console, and other types of projects, along with templates for files like Python classes, unit tests, Azure web configuration, HTML, and even Django apps.
For more information:
Docs: Manage Python projects
Docs: Item templates reference
Docs: Python project templates
Docs: Work with C++ and Python
General Visual Studio feature docs: Project and item templates
General Visual Studio feature docs: Solutions and projects in Visual Studio
Full-featured debugging
One of Visual Studio's strengths is its powerful debugger. For Python in particular, Visual Studio includes Python/C++ mixed-mode debugging, remote debugging on Linux, debugging within the Interactive window, and debugging Python unit tests.
In Visual Studio 2019, you can run and debug code without having a Visual Studio project file. See Quickstart: Open and run Python code in a folder for an example.
For more information:
Docs: Debug Python
Docs: Python/C++ mixed-mode debugging
Docs: Remote debugging on Linux
General Visual Studio feature docs: Feature tour of the Visual Studio Debugger
Profiling tools with comprehensive reporting
Profiling explores how time is being spent within your application. Visual Studio supports profiling with CPython-based interpreters and includes the ability to compare performance between different profiling runs.
For more information:
Docs: Python profiling tools
General Visual Studio feature docs: Profiling Feature Tour. (Not all Visual Studio profiling features are available for Python).
Unit testing tools

Discover, run, and manage tests in Visual Studio Test Explorer, and easily debug unit tests.
For more information:
Docs: Unit testing tools for Python
General Visual Studio feature docs: Unit test your code.
Azure SDK for Python

The Azure libraries for Python simplify consuming Azure services from Windows, Mac OS X, and Linux apps. You can use them to create and manage Azure resources, as well as to connect to Azure services.

For more information, see Azure SDK for Python and Azure libraries for Python.
Questions and answers
Q. Is Python support available with Visual Studio for Mac?
A. Not at this time, but you can up vote the request on Developer Community. The Visual Studio for Mac documentation identifies the current types of development that it does support. In the meantime, Visual Studio Code on Windows, Mac, and Linux works well with Python through available extensions.
Q. What can I use to build UI with Python?
A. The main offering in this area is the Qt Project, with bindings for Python known as PySide (the official binding) (also see PySide downloads) and PyQt. At present, Python support in Visual Studio does not include any specific tools for UI development.
Q. Can a Python project produce a stand-alone executable?
A. Python is generally an interpreted language, with which code is run on demand in a suitable Python-capable environment such as Visual Studio and web servers. Visual Studio itself does not at present provide the means to create a stand-alone executable, which essentially means a program with an embedded Python interpreter. However, the Python community supplied different means to create executables as described on StackOverflow. CPython also supports being embedded within a native application, as described on the blog post, Using CPython's embeddable zip file.
Feature support
Python features can be installed in the following editions of Visual Studio as described in the installation guide:
Visual Studio 2017 (all editions)
Visual Studio 2015 (all editions)
Visual Studio 2013 Community Edition
Visual Studio 2013 Express for Web, Update 2 or higher
Visual Studio 2013 Express for Desktop, Update 2 or higher
Visual Studio 2013 (Pro edition or higher)
Visual Studio 2012 (Pro edition or higher)
Visual Studio 2010 SP1 (Pro edition or higher; .NET 4.5 required)
Visual Studio 2015 and earlier are available at visualstudio.microsoft.com/vs/older-downloads/.
Important
Python Tools For Visual Studio Mac
Features are fully supported and maintained for only the latest version of Visual Studio. Features are available in older versions but are not actively maintained.
Python support2017+20152013 Comm2013 Desktop2013 Web2013 Pro+2012 Pro+2010 SP1 Pro+Manage multiple interpreters✔✔✔✔✔✔✔✔Auto-detect popular interpreters✔✔✔✔✔✔✔✔Add custom interpreters✔✔✔✔✔✔✔✔Virtual Environments✔✔✔✔✔✔✔✔Pip/Easy Install✔✔✔✔✔✔✔✔
Project system2017+20152013 Comm2013 Desktop2013 Web2013 Pro+2012 Pro+2010 SP1 Pro+New project from existing code✔✔✔✔✔✔✔✔Show all files✔✔✔✔✔✔✔✔Source control✔✔✔✔✔✔✔✔Git integration✔✔✔✔✔✔✔1✗
Editing2017+20152013 Comm2013 Desktop2013 Web2013 Pro+2012 Pro+2010 SP1 Pro+Syntax highlighting✔✔✔✔✔✔✔✔Auto-complete✔✔✔✔✔✔✔✔Signature help✔✔✔✔✔✔✔✔Quick info✔✔✔✔✔✔✔✔Object browser/class view✔✔✔✔✔✔✔✔Navigation bar✔✔✔✔✔✔✔✔Go to Definition✔✔✔✔✔✔✔✔Navigate to✔✔✔✔✔✔✔✔Find All References✔✔✔✔✔✔✔✔Auto indentation✔✔✔✔✔✔✔✔Code formatting✔✔✔✔✔✔✔✔Refactor - rename✔✔✔✔✔✔✔✔Refactor - extract method✔✔✔✔✔✔✔✔Refactor - add/remove import✔✔✔✔✔✔✔✔PyLint✔✔✔✔✔✔✔✔
Interactive window2017+20152013 Comm2013 Desktop2013 Web2013 Pro+2012 Pro+2010 SP1 Pro+Interactive window✔✔✔✔✔✔✔✔IPython with inline graphs✔✔✔✔✔✔✔✔
Desktop2017+20152013 Comm2013 Desktop2013 Web2013 Pro+2012 Pro+2010 SP1 Pro+Console/Windows application✔✔✔✔✔✔✔✔IronPython WPF (with XAML designer)✔✔✔✔✔✔✔✔IronPython Windows Forms✔✔✔✔✔✔✔✔
Web2017+20152013 Comm2013 Desktop2013 Web2013 Pro+2012 Pro+2010 SP1 Pro+Django web project✔✔✔✗✔✔✔✔Bottle web project✔✔✔✗✔✔✔✔Flask web project✔✔✔✗✔✔✔✔Generic web project✔✔✔✗✔✔✔✔
Azure2017+20152013 Comm2013 Desktop2013 Web2013 Pro+2012 Pro+2010 SP1 Pro+Deploy to web site✔✔✔✗✔✔✔✔2Deploy to web role✔✔✔✗✔4✔4✔3✗Deploy to worker role???✗✔4✔4✔3✗Run in Azure emulator???✗✔4✔4✔3✗Remote debugging✔✔✔✗✔6✔8✔8✗Attach Server Explorer✔✔✔✗✔7✔7✗✗
Django templates2017+20152013 Comm2013 Desktop2013 Web2013 Pro+2012 Pro+2010 SP1 Pro+Debugging✔✔✔✗✔✔✔✔Auto-complete✔✔✔✗✔5✔5✔✔Auto-complete for CSS and JavaScript✔✔✔✗✔5✔5✗✗
Debugging2017+20152013 Comm2013 Desktop2013 Web2013 Pro+2012 Pro+2010 SP1 Pro+Debugging✔✔✔✔✔✔✔✔Debugging without a project✔✔✔✔✔✔✔✔Debugging - attach to editing✔✔✔✔✗✔✔✔Mixed-mode debugging✔✔✔✔✔✔✔✗Remote debugging (Windows, Mac OS X, Linux)✔✔✔✔✗✔✔✔Debug Interactive window✔✔✔✔✔✔✔✔

Profiling2017+20152013 Comm2013 Desktop2013 Web2013 Pro+2012 Pro+2010 SP1 Pro+Profiling✔✔✔✗✗✔✔✔
Download Python Tools For Visual Studio Mac Download
Download Python Tools For Visual Studio Mac Install
Test2017+20152013 Comm2013 Desktop2013 Web2013 Pro+2012 Pro+2010 SP1 Pro+Test explorer✔✔✔✔✔✔✔✗Run test✔✔✔✔✔✔✔✗Debug test✔✔✔✔✔✔✔✗
Git support for Visual Studio 2012 is available in the Visual Studio Tools for Git extension, available on the Visual Studio Marketplace.
Deployment to Azure Web Site requires Azure SDK for .NET 2.1 - Visual Studio 2010 SP1. Later versions don't support Visual Studio 2010.
Support for Azure Web Role and Worker Role requires Azure SDK for .NET 2.3 - VS 2012 or later.
Support for Azure Web Role and Worker Role requires Azure SDK for .NET 2.3 - VS 2013 or later.
Django template editor in Visual Studio 2013 has some known issues that are resolved by installing Update 2.
Requires Windows 8 or later. Visual Studio 2013 Express for Web doesn't have the Attach to Process dialog, but Azure Web Site remote debugging is still possible using the Attach Debugger (Python) command in Server Explorer. Remote debugging requires Azure SDK for .NET 2.3 - Visual Studio 2013 or later.
Requires Windows 8 or later. Attach Debugger (Python) command in Server Explorer requires Azure SDK for .NET 2.3 - Visual Studio 2013 or later.
Requires Windows 8 or later.
0 notes
Photo

Revisiting 'funny' and tricky JavaScript examples
#513 — November 6, 2020
Unsubscribe | Read on the Web
JavaScript Weekly
What's the Deal with Svelte and SvelteKit? — Two weeks ago we linked to a video where Svelte’s creator pondered the future of Web development. Now here’s a more definitive writeup of what you need to know about how Svelte is progressing.
Rich Harris (Svelte)
BTW, if Svelte is your thing, Svelte Radio is a frequent podcast covering developments in the space. There's also an official Svelte November 2020 update.
WTFJS: A List of Funny and Tricky JavaScript Examples — This has been around for a few years but continues to get tweaks and adjustments and if you’ve not seen it, it’s worth a look to get a deeper look into some of the more “uh, what?” corners of JavaScript.
Denys Dovhan
Vue 3 Is Out! Jump into Vue 3 Quickly in This New Course by Sarah Drasner — Learn fundamental concepts in Vue, such as directives, methods, and computed watchers. You’ll learn Vue’s reactivity system and the new Composition API in Vue 3.
Frontend Masters sponsor
New, Core 'Redux Fundamentals' Tutorial — A complete rewrite of the official Redux introductory tutorial that covers both how Redux works and how to use it. Say goodbye to outdated terminology and hello to modern practices and code sandbox demos. Easy to skim even if Redux isn’t your cup of tea.
Redux Core Team
Socket.io 3.0 Released: A Realtime Framework for Node and Browser — We’re awaiting a full blog post on this release, but Socket·io has been around many years and was once the ‘go to’ system for bidirectional browser/server communications that worked in almost every browser.
Socket·IO Project
⚡️ Quick bytes:
Hackaday has profiled a neat TTL logic simulator built in JavaScript.
The latest VS Code release has a new empty brace formatting option for JavaScript code (to set whether or not { } should contain a space).
SpiderBasic is a modern (and commercial) BASIC implementation that compiles to JavaScript in an attempt to take BASIC to the Web.
There's a lot of neat stuff in the Code & Tools section this week, so be sure to head down there! :-)
📚 Tutorials, Opinions and Stories
An Introduction to Data Visualization with ApexCharts — ApexCharts is an MIT-licensed interactive JavaScript charting library.
Nefe Emadamerho-Atori
Clickjacking Attacks and How to Prevent Them — A look at both client-side and server-side approaches to mitigating clickjacking attacks including some approaches for Express.js-based apps.
Andrea Chiarelli
ES Modules in Depth — An exploration of the different ways you can export and import values using ES Modules (now broadly supported in most places, even if you’re not using extra tools).
R. Alex Anderson
Stream Chat API & JavaScript SDK for Custom Chat Apps — Build real-time chat in less time. Rapidly ship in-app messaging with our highly reliable chat infrastructure.
Stream sponsor
An Introduction to FFmpeg.wasm, a WebAssembly / JS Port of FFmpeg — I think WebAssembly is going to have a huge impact over the next few years and this project, despite being in the early stages, shows off a few reasons why. Project homepage.
Jerome Wu
The JavaScript 'Self-Profiling' API — The JS Self-Profiling API is a proposed API (supported only in Canary builds of Chrome for now) for letting developers control a sampling profiler for measuring client JavaScript execution times.
Addy Osmani
Build a 'Remaining Character Count' Component with Alpine.js — Alpine.js bills itself as ‘like Tailwind for JavaScript.’
Ryan Chandler
How to Organize a Large React Application and Make It Scale Jack Franklin
Building a Type-Checked URL Router From Scratch with TypeScript 4.1+ Jan Sommer
How to Localize a Vue App with vue-i18n and Localazy Václav Hodek
▶ Fancy TypeScript Features for the Everyday Developer George Kosmidis
Top Problems I Encountered Switching from Vue 2 to Vue 3 Ghiura Alexandru
🛠 Code & Tools

SpaceTime: A Lightweight Timezone Library — Use this to calculate times in other timezones. Has a Moment-esque API but is immutable. No dependencies. We last linked this years ago but it’s still under active development. It has a neat interactive demo too.
Spencer Kelly
Graphery SVG: A Library for SVG Creation and Management — This well-documented library is good for creating and manipulating SVG in JavaScript. Offers a simple API, that’s said to be very close to the native structure of SVG.
Graphery
Square Terminal API — Connect your app to the all-in-one payments device merchants love with a simple REST API. Learn more.
Square sponsor
Dojo3D: A Library for Simple 3D Interactive Story Telling — Aimed at ‘all ages of coder’, Dojo3D tries to make creating interactive 3D stories a smooth process. There’s an online sandbox example you can play with.
Webprofusion

gron: Make JSON Greppable — A tool written in Go that transforms JSON into more easily greppable assignments, so you can use grep and see the context/path of the result. Useful.
Tom Hudson
SpanTree: Adds Tree-Based File Navigation to GitLab — A browser extension you may find useful if you browse GitLab-hosted repositories often.
Taveesh Anand
Marked: A Fast Markdown Parser and Compiler — Works in the browser or server-side. Demo here.
Christopher Jeffrey
Measure What Matters to Users, Browsers Don't Have Feelings
New Relic sponsor
μPlot 1.3: Fast, Tiny, Canvas-Based Time Series Chart Library Leon Sorokin
Fetch 3.5: A `window.fetch` Polyfill GitHub
💻 Jobs
Find a Job Through Vettery — Create a profile on Vettery to connect with hiring managers at startups and Fortune 500 companies. It's free for job-seekers.
Vettery
by via JavaScript Weekly https://ift.tt/3l7hRn9
0 notes
Text
Brief for project - Context outline
We began with an in person Hackspace hackathon with the intention of facilitating quick idea generation and project ideation. The first of two hackathons setup during the Hackspace module, this one with the intention of collaborative ideation. The brief was open and would allow us to explore multiple ideas in groups and ideate on these collaborative thoughts. This blog is an in-depth documentation of the process and the realisation of the project and all its components.
The brief being so open meant that within our groups we would need to quickly run through a number of project ideas, looking at feasibility and our skillset. We ended up deciding that the context of the project was surrounding the generation of character connections for use in games and maybe with a future development for general storytelling. The project would aid in the creation of character wireframe, a web of connection with a number of assets, this ultimately being helpful adding depth to a game of Dungeons and Dragons for example.
Hackathon - Techniques
Though I have already mentioned the idea and the context it's embedded in, the idea only came to fruition through the hackathon. Only through the use of these techniques mentioned were we able to nail down the project and how it would address certain issues.
We started the Hackathon with a page dump, trying to note down as many areas or concepts as possible then we began to refine the assortment of concepts and help narrow down areas for focus. This technique was helpful in applying some restraints to the creative process, creating a small amount of pressure for the development of ideas. Through this method we were able to as a group nail down specific areas for theme development. These were Connections, Dreams, Parallel. We looked at a combination of all three when attempting to ideate through possible applications.
Failed Ideas / progress
We found an initial idea that centred around an alarm application that would be able to track your sleep and then deliver a personalised wake-up routine to ease the transition from sleeping to awake.
Using these themes we were able to come up with this idea quickly, we spoke and attempted to develop it further having to complete a small presentation for the class in order to receive feedback and critique. We continued to look at possible technologies in order to achieve the application. We quickly found that the technical ability in the timeframe we had would not be feasible in combination with the feedback we had received from the group.
The Idea
After moving away from our initial idea we continued to think on an application with user benefits that would fit the technological and time constraints of this collaborative project. Joel pitched an idea for a character generator with the application to aid users in the quick creation of character connections for use in games such as Dungeons and Dragons where characters are heavily focused. We also spoke about future applications being for writers, generally aiding in creating webs of characters with relationship indicators.
In terms of reaching the foundations of this idea we looked at a number of methods outlined in the teaching during the Hackathon. Reverse brainstorming helps facilitate this idea heavily. Being able to identify a problem that many of us have faced, look at a possible solution and develop a real solution to said area. We found that attempting to come up with a large collection of characters quickly with a few attributes was difficult, only being able to figure out the central character. We found that using a bank of many attributes, names and relationship levels we could quickly create a character web for story based situations.
We were also able to apply a number of techniques from the Scamper Method, Adapting a similar concept of generators. Example: Name generators, idea generators. There seemed to be an endless amount of generator websites for all different areas. Using the Adapt concept we had changed the context of existing models, applying it to a more niche market and adjusting the tone for a more creative story orientated product. It could also be loosely applied to the Rearrange concept, having reordered the users journey giving them a platform to build from rather than shaping their characters whilst involved in a specific game or story situation. It hadn’t completely removed this aspect as the generator served as a baseline for users to work from and adapt, adopting as little of the generated information as they desired.
What followed and the development of the idea
Paper prototyping


Initial meeting
We spoke about what kind of technologies we wanted to use when creating the product
We decided initially on an entirely web based stack, using html for the frontend with an RESTful API for the sending and receiving of data. It would also allow use to connect the entire application to a database for persistent storage
Began to paper prototype some interface designs, Nishesh was set the role of UI designer and began working on some high fidelity mockups to add in the frontend development that would be undertaken by Joel.
First Tasks
I had researched a number of technologies from our initial conversations regarding what stack to use, we had come to the conclusion that each of us brought certain skills and we should utilise them. In keeping with this, I had come to the conclusion that Node js, Express, Mongoose and Mongodb would be our key backend technologies.
I began researching possible implementations for Mongodb (The database) and the Node js server using express as a framework. I had only used Mongodb once before and after researching I found Mongoose a package that allowed me to customise schemas for sending and receiving data from the database
I then began creating the API, creating specific routes for specific data, this would create documents in the database that could be queried and updated.
Technical Design
Backend
GitHub Repo: https://github.com/blanghamm/hackspace-collab-api
MongoDB

Document stucture for MongoDB, collections on the left hand side.
The backend structure was very important in dictating the frontend usage and also how we stored all the user information as well as the template names and attributes. We needed something that was flexible, this was the main factor in choosing MongoDB as the database. MongoDB is a NoSQL database, it relies on collections that contain documents rather than tables (SQL). Its lack of structure in comparison to SQL is what makes it very helpful for robust flexible data management.
Mongoose
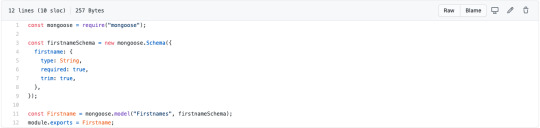
Schema for the structure of data inside of the database when moving through the server.
Mongoose was used as middleware when creating the server that connected to the database, it facilitated the creation of schemas. Schemas allow for a number of rules to be set up restricting the information parameters be it for incoming or outgoing data. For example the schema model for sending data is structured as below (Image) it shows the type of data it expects. This allows for the data we send and receive to be consistent throughout the API. This would help with interpreting the information later in the frontend application.
Express
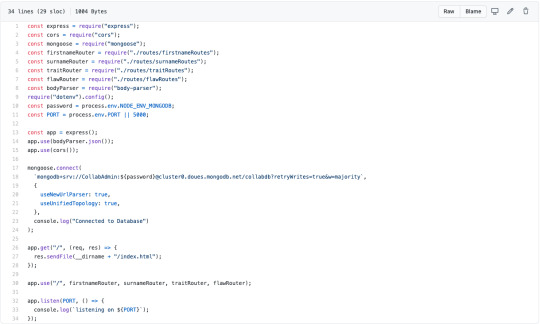
Main server file that contains all the routes for the API.
Express is a framework for Node js , it helps in easing the process when creating a server. Having a myriad of HTTP utility methods and middleware built in. It states on their website that ‘creating a robust API is quick and easy’. https://expressjs.com/ Having used it previous I found this statement to be pretty accurate. I was able to quickly create a server with a single entry point and then begin to attach various routes.
Hosting

List of builds on Heroku allowing for access to the API with a URL.
It’s not very exciting but here’s the link for the API with the endpoint firsnames, which will return a JSON dataset with firstnames stored in the database. They are structured by the Mongoose schema pattern linked above.
https://hackspace-api.herokuapp.com/firstnames
Once I had created the different endpoints depending on the data needed for the frontend I made it more accessible by hosting it on Heroku. A hosting platform specially designed for web applications. This meant it was accessible from anywhere with the correct URL. This meant when Joel began testing the frontend application he was able to access the data without having to download all of the necessary files.
Frontend
GitHub Repo: https://github.com/JoelRobinsonUK/ConnectionGenerator
Prototype
youtube
Here’s a link to the working protoype: https://joel-robinson.itch.io/character-relationship-generator
We initially decided on an entirely web based application, many of the team wanted to try out some new technologies. Once we had begun researching all of the necessary technologies we found that creating the frontend in purely HTML and JS would be quite difficult without a framework for live data manipulation. We therefore decided to use Unity for the frontend application as this was more familiar to the team.
The combination of a Unity frontend and Node js backend proved to be a strong combination but there were a number of issues along the way. One main issue we had when attempting to retrieve the data from the API was how Unity interrupted JSON data which is what the server stored all its information in. Initially using the Unity plugin JSON Utility to decode the data we found that it was not able to process objects wrapped inside of a top level array. We therefore found another plugin that allowed use to decode the JSON data inside of Unity. JSON.net was that plugin that helped us with data transfer.
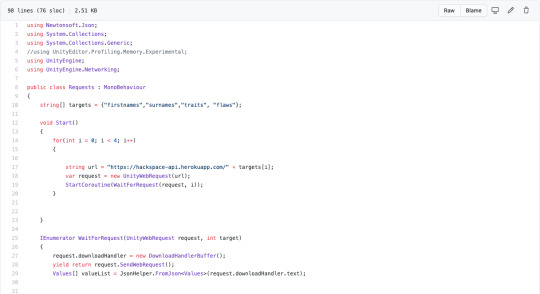
The code needed for a web request, pointing at the heroku hosted URL.
We used a web request to retrieve all of the data from the API and also send data back when needed, it allowed us to manage the data separately and only request it when needed. This helped with removing a large dataset inside of Unity and meant updating information would be much easier due to its external nature.
Maximum degrees of separation
Degrees of separation decide the amount of single point connections that stem from the main character. Adding more degrees will create offshoots further away from the central character.
Not all smooth sailing
When speaking to Joel about any technical setbacks, he found that attempting to sort the degrees of separate had some odd outputs from the node rings that are pre-placed. When the user begins interacting it limits the amount of nodes that are shown depending on the degrees of separation, but this would cause some interesting connection lines between the nodes that wouldn’t strictly follow the users rules.
Visual Design
youtube
When planning the visual side of the application we found a quick way to move forward with the prototyping phase was to paper prototype a user interface. (Image) We wanted to have a central area with the connections clearly highlighted followed by a number of settings and modifiers surrounding it to allow for a constant reconfiguration. It would give the user the ability to regenerate a set of character relationships on the main dashboard without having to start the process from scratch.


These two examples above are from the original high fidelity designs Nishesh created from the paper prototypes. The video above is the second iteration and closer to the desired design.
When moving forward with the UI designs, Nishesh began developing the initial version of high fidelity designs. He initially used Sketch to create the designs sharing them through Zeplin, which also included the css properties though they were no longer needed due to the change in frontend framework. The second refined designs were created using Adobe XD as they had some collaborative features that would be useful for future developments. I’ve included some screenshots of the UI itself (List Order) Also attached is a video with a run through of how to use the interface.
Here’s a link to all of the visuals used throughout the projects development:
https://drive.google.com/drive/folders/1fa5MCDmFke7bUY2hwkxnC577YSi0c410?usp=sharing
User Testing
“Overall I really like the product. It’s a good way to develop a story as what often delays the plotting process is coming up with the characters and deciding what their relationships to each other are. This tool offers prompts to help with that process.
Suggestions: An option of seeing “biggest fear” or “dreams” to have a better understanding of the characters.
The option to change the type of relationship between two characters, and add/remove connections.”
We found through some quick user testing that the application fit the area we had intended to deploy it to, helping with the process of character relationships. With the feedback we received we were able to add a number of possibilities to the future development document, adding more customisation for users would be the next logical step. Made possible by the flexibility of our system architecture.
Critical Reflection
Development
The overall concept for the project fit nicely with the prototypes we created and used a number of key technologies that utilised skill sets within the team. It focused on a problem and adapted current applications such as name generators to create a unique character relationship generator for story based games. Also being able to test it on a number of participants helps us to diagnose areas that require more focus.
The requirements for the project were met, we were able to create a number of visual prototypes that could showcase the UI and design aspects of the project. Moving from the paper prototypes and adapting them to fit the needs of the application. Using technology such as Node js allowed for the creation of a flexible and scalable platform that would facilitate future development of the project. This coupled with a Unity frontend that could be attached to the backend system helped with quick prototyping of a reactive product.
Being that we had used these two separate technologies also meant that for future development the project itself had become rather modular and therefore if we found weakness in certain technologies we could reconfigure the stack depending on the specific boundaries.
Roles & Collaboration
Being that the initial concept took a few sessions to iron out, it allowed us to fully understand each other's strengths and assign each role to the correct team member. I think this is apparent in the progress the project made and the wide range of technologies that contribute to the final prototype. Throughout the project we kept to our initial concept and made sure not to scope creep too heavily, any additional ideas were added to a future development document which Wiktor had been updating and assessing how that would benefit our project in the future. This had been vital in keeping on track with the concept and delivering a prototype as close to our original idea as possible.
Possible areas for improvement were only due to the lack of knowledge in specific areas, it was marginally disappointing that when jumping between technologies we all lacked a slight understanding of each other's role and tech. There were of course areas that we could help one another but it would have been better as a team to be able to jump between all roles and offer as much assistance as possible. As much as this was a disappointment in terms of having more input to specific aspects, I feel the team was very effective in their area delivering some high quality prototypes, that in tandem with consistent communication throughout.
Personal contribution
There were moments during the project that certain aspects felt a little aimless in our goals but I feel that as a team we were able to address this issue with each of us pushing the others on certain aspects and putting us back on track. Throughout the project I felt as though I personally had to do this, scheduling meetings to share progress and make sure everyone was comfortable with their personal objectives.
I enjoyed working on my specific technology and believe that it contributed heavily to the project and made sure it was scalable and easy to use for other team members. Throughout the project I felt that the leadership was mainly managed by Joel and he helped align the scope throughout but there were times when I would need to check in and monitor that everyone was happy and on course which worked well not putting too much pressure on one team member.
Future Developments
When looking at future developments for the project a number of ideas that we had taken during the development process had been added, as not to scope creep. Being able to save the character web for future reference and allow for the editing and saving of an updated character web. This would be easy to implement with the flexibility of the backend API, the overall structure of the database would allow users to save full webs and recall when needed.
References
parentElement LLC (2017) JSON .NET For Unity (2.0.1). Available at: https://assetstore.unity.com/packages/tools/input-management/json-net-for-unity-11347 (Accessed: 20 October 2020).
Heroku., 2020a. Platform as a Service | Heroku [online]. Available from: https://www.heroku.com/platform [Accessed 6 Nov 2020].
Mongoose., 2020b. Mongoose ODM v5.10.12 [online]. Available from: https://mongoosejs.com/ [Accessed 6 Nov 2020].
MongoDB., 2020c. The most popular database for modern apps [online]. MongoDB. Available from: https://www.mongodb.com [Accessed 6 Nov 2020].
Express., 2020. Express - Node.js web application framework [online]. Available from: https://expressjs.com/ [Accessed 6 Nov 2020].
0 notes
Link
Frequently asked questions of programming.
• Should I learn Python or JavaScript? • Data Science vs Web Development vs App Development, which one should I choose? • Why should I learn Web Development when there are popular Web Developing tools like Wix & WordPress? • All these points made me confused 😕 about what should I do?
So before starting with the questions Here's something about who I am and What makes me qualified to answer such questions? I'm a gradiot (an idiot who did his graduation and who has wasted money and time getting zero skills from college while there's an actual opportunity to learn everything online for free). Yes, I am a CS graduate. I have a great desire to make things, you might know the feeling of IT'S ALIVE if you have developed anything. During my college years I came across multiple technologies from Arduino to Raspberry pi, from PHP to JavaScript, Python, flutter you name it. I tried to learn and understand various technologies not due to college curriculum, but due to my desire to learn more and google 😎. Throughout my journey I encountered many questions and here are some of the questions I think will help you guys. Hope You'll like it.
Should I learn Python or JavaScript?
Before I start with why Python🐍 or JavaScript⚡. Let's talk about programming in general. Programming is a way of thinking and implementing the logic you create in a language that machines understand. Now there are styles or you can say structures of programming aka programming paradigms like Object-oriented programming (OOPs), Functional programming, procedural programming, etc. As a developer, you should at least know one of these paradigms. The more paradigms you know the broader choices you'll have for creating efficient and flexible code.

Back to the topic, Python and JavaScript both support OOPs and functional programming along with other paradigms. JavaScript is considered as the king of web programming that is used to create highly functional and dynamic websites. It has a vast ecosystem of libraries and frameworks to choose from like ReactJS, Angular, and Vue for front-end and NodeJS for the backend. You can also create native Apps for phones using React Native in JavaScript. So, with JavaScript, you can develop full-fledged websites as well as mobile applications. Whereas, Python is Best-suited programming language for Machine learning and data science. It has multiple Libraries like Keras, TensorFlow, Scikit-learn, etc. Along with that, Python is easy to use and has large community support. You can also create websites in python using frameworks like Django and Flask. You can also create apps in python as well using Tkinter, kiwi, etc. Both languages have powerful rounding development.
TL;DR Here is my perspective on this topic. As a developer, everyone must know basic web development since Machine learning and Data Science is a service-based skill While Web and App Development is a product-based skill. Hence, Data Science and Machine learning people are called engineers and not developers. Notice the very subtle difference between an engineer and a developer. Also, you know Mark Zuckerberg, Elon Musk, well they started with web dev and created their products. Ask yourself what you want, define your goals, and then choose wisely and always bet on JavaScript.
Data Science vs Web Development vs App Development Which one should I choose?
If you are reading this, you might be knowing very well the pay of a Data Science and ML engineers as compared to a Web Developer or an App Developer. All this huge burst about AI is the future and might very well draw you towards thinking that even I should learn Data Science for a huge package and a job opportunity. Here's the ugly truth, it's hard to get a job in Data Science since companies will prefer a person having the Domain knowledge and usually majoring in Mathematics and statistics, you should at least have Masters or Ph.D. for getting a job in this field. For Example- A fintech company will choose a CFA or Finance major rather than a CS engineer and teach them Data Science since python is easy and it's the efficiency that counts. So, the person with finance knowledge is well suited for the job. However, As I said It's hard to get a job, not impossible. Some CS grads have got into data science and are earning handful. All you need to learn is python and some libraries and mathematics. Now, As I said before, data science is a service-based skill you are not technically a developer you're an engineer who is figuring out solutions for a given problem. On the other hand, being a web or app developer means developing products. You can create applications and websites and release them to earn using ad revenue, selling them, or even creating and maintain them for companies that way you don't have to rely on companies to give your services. I suggest you to first, learn web development and then Data Science while earning through your web dev skills. That way you will have a decent skill set, portfolio, and a budget to start experimenting into the world of machine learning where processing power is everything.
Why should I learn Web Development when there is a popular Web Developing tool like Wix & WordPress?
WordPress and Wix are popular content management systems. They are best for creating small websites and blogs. Yes, they made it easy for anyone to create websites but that doesn't mean web developers' jobs are gone. You can't create Amazon, Netflix, Twitter, and large fully functional websites using them. So, if you are trying to be a low-level web developer, you can pretty much say goodbye to developing websites. You can google top trending tech skills in demand and you will find AngularJS, ReactJS, NodeJS developers in demand. Not only websites but you can also create native applications for android and iOS using React-native and games using ThreeJS a JavaScript library. Possibilities are endless, all you have to do is START. I'll suggest you start with MERN stack just my personal opinion but you can research and pick whichever stack you like.
Is NodeJS better than Django?
Before comparing let's talk about what is NodeJS and Django. Node JS is a JavaScript runtime taken out of the client-side browser environment which uses OS binding for I/O, and Django is a Python framework. So comparing both is like comparing apples with oranges. Though let's have these points clear. When It comes to performance, Yes. NodeJS is faster than Django or in general python since it's written in C++ and is a JS runtime. You ask why? because JavaScript is faster than python because it works on an asynchronous non-blocking object model. When It comes to scalability, No. Django or python, in general, is highly scalable as the caching of applications is quite easy. Django is a high-level Python Web framework that encourages rapid development and clean, pragmatic design. With the introduction of npm which stands for the Node Package Management system, the open-source community has been boomed towards NodeJS since managing packages and dependencies has never been that easy. Also, npm is far better than pip when it comes to package management, you can research about it. Here are some of the big fishes and the backend tech they preferred for their development. Uber, Twitter, eBay, Netflix, Duckduckgo, PayPal, LinkedIn, Trello, Mozilla, GoDaddy are some big names using Node JS as their backend technology. Pinterest, Instagram, Eventbrite, Sentry, Zapier, Dropbox, Spotify, YouTube are also some big names using Django as their backend technology. Notice the trend here, Uber, Twitter, and Netflix are some of the applications that priorities performance whereas Pinterest, Instagram, YouTube requires a lot of space and thus scalability is their priority. So, the choice is upon you what you want scalability or performance.
All these points made me confused 😕 about what should I do?
First, ask yourself what do you enjoy doing. Do you like to create games, apps, websites? What intrigues you? What sparks your curiosity? I have listed some of the questions depending upon the choices you make.
• GAME Development – If you want to get into the game development industry, you will have to learn C# or C++ for hardcore game development. You can create web games using ThreeJS or any other library but you won't be exactly a game developer.
• App Development – You can create an application using JAVA for android or Swift for iOS. Further, you can use React-native or Flutter for creating apps that would run on both android and iOS. If you want web apps, you can use Ionic as well.
• Web Development – There are many stacks (a set of technologies that suits well with each other) you could choose to learn like MEAN stack, MERN stack, LAMP stack, etc. You can create a website from WordPress or Wix as well. Develop an interactive portfolio for yourself with the stack you find interesting.
• Data Science, ML, AI – Start with python and take courses on data science, mathematics, machine learning, from popular websites like Udemy or LinkedIn. Start competing on Kaggle and maintain your Kaggle profile. Second, do yourself a favor and start learning algorithms and data structures in the language that fits your answer to the above question. Third, Start applying for internships with some projects and try to make an exemplary portfolio. Maintain your GitHub, LeetCode or HackerRank or any other profiles which you can include on your resume.
I hope this might help you; I tried my best to answer some of the questions that I've faced throughout my journey as a gradiot. If you feel that I'm missing something or something is wrong please feel free to correct me in the comment section. Thank you for your valuable time.
0 notes
Text
Node.js vs ASP.NET- Which Stack You Should Choose For Advanced Web Applications?

ASP.NET has built up a solid impact among industry leaders throughout the years but Node.js is rapidly gaining popularity as a feasible option. Many large scale enterprises such as LinkedIn, Uber, netflix are using Node.js for building their solutions. Node.js is adaptable and also scalable. It also poses ready made libraries that offers developers a more flexibility, performance and stability of enterprise application development services. According to the 2018 survey, Node.js emerges as the most popular solution in the Frameworks, Libraries and also Tools category. Intrigued to know how Node.js stacks up against ASP.NET for enterprise solutions? Here are 8 key aspects of big business application development services that show the capability of Node.js in advanced, enterprise level web applications. Here we will see Node.js vs ASP.NET according to different aspects.
Node.js vs ASP.NET- Key aspects
1. Scalability-
Node.js is a magnificent pick for the microservices architecture approach, that gives incredible scalability and stability since its components are compartmentalized. PM2 is a node.js tool help to distinguish and track errors more easily. And this is the reason for increasing developer’s productivity. Stack Overflow is written in ASP.NET core. This is a great example of ASP.NET’s scalability. The framework enables to analyze huge user data and scaling up process demands some extra machines than you might expect.
2. Language-
ASP.NET uses C# as its primary language and Node.js is based on JavaScript. There is an acceptance that by offering a strict type system and compile time error checks, C# is more powerful than JavaScript, which depends on Facebook’s Flow static sort checker or Microsoft TypeScript. In addition, C# develops progressively effective and expressive with each generation. But nowadays, JavaScript is more popular than C#. In any case, developers who want to be expert in Node.js, need to get a grip on asynchronous programming, which may challenge.
3. Support from the enterprise application development community-
When you look at Stack Overflow, ASP.NET has a big community of developers. But if you check the open source projects listed on GitHub and their activity, you can see that Node.js has more community of developers as compared to ASP.NET. Both frameworks have active communities through which developers can get valuable support.
4. Tools-
Developers can work ASP.NET with Sublime or Mono Develop tools. Visual studio, ReSharper and also Web Essentials are the standards to work with ASP.NET. ASP.NET center 1 and 2 additionally permit Visual Studio Code or Rider. You can develop in Node.js utilizing every word processor, however picking Webstorm (IDE for Node.js) is a shrewd move that eventually prompts higher productivity as Node.js has strong support from Webstorm.
5. App Performance-
Read more at- https://solaceinfotech.com/blog/node-js-vs-asp-net-which-one-to-choose/
0 notes
Text
How important is coding?
Coding is and has always been the most futuristic job. It will remain relevant until the end of technology because apparently without coding you cannot design a program or give a new shape to A.I (Artificial Intelligence).

Coding, also known as programming, basically implies writing codes for computer programming or building web pages and applications. HTML/CSS, PHP, Javascript, C+, and Dot Net are few of the examples of most adopted programming languages. Whatever we see inside a computer, on the internet, or machines with a graphical interface such as a smartphone is basically made from coding.
Coding as a Tech Job
8 out of 25 jobs posted are Tech Jobs. With the rising demand of developers, coding has become an essential skill in almost every resume.
The essence and importance of programming cannot be denied in today’s world where almost everything built by human runs on arrays of codes.
Large conglomerates such as Apple, Google, and Microsoft who house thousands of employees demand expert programmers. Although an exceptional case, a programmer made as much as $3million a year in salary and stock at Google. This makes coding the most sought after job in the world.
The most sought after Tech jobs in the world are as follows;
· Information Technology (IT) worker
· Data Analysts
· Artists and designers
· Engineers
· Scientists
According to the U.S. Bureau of Labor Statistics, in 2012, the average salary for an application software developer was $93,000, with only 10 percent of such developers making more than $139,000 in salary.
10x Engineer
10x Engineer implies that the computer engineer can code 10 times faster any average coder or he can do 10 times more than any coder. They are the highest-paid tech workers in the world. Although a popular concept, there are likely only 1% 10x Engineers in the world.
Along with the coding, testing the application, debugging, and designing (UI/X) are equally important job descriptions. However, the demand for a coder exceeds any other tech jobs.
Importance of Coding
Developing a program through coding involves a series of steps where a programmer will define a problem, plans a solution, code, test the code, and finally document the program. The importance of coding can be simplified through the following points.
Systems Knowledge
Coding helps a programmer to gain a full understanding of the how and why of computer systems, including system limitations. They can work around those limitations to fully maximize the use of the equipment and its accessories.
Creativity Platform
Coding has always been a platform to showcase creativity, especially for entertainment. With the help of coding, the game develops can create new video games, graphics, and animations to showcase new business ideas or to resolve a particular problem.
Interactive Education
Coding helps in interactive education by offering interactive web applications. Used on online learning platforms, these applications have allowed distance-learning programs to take off. Today, almost all major learning institutions have some form of online learning implementation, thanks to computer programming such as cloud computing.
Defining the Future
Every major futuristic accomplishment has been done by programming. Future-technology such as voice-recognition, artificial intelligence, and touch-simulation in devices keep evolving and getting better with the advent of new coding. The rise in online shopping gave way to eCommerce and easy online payment systems. A.I. in smartphone and websites can offer suggestions, advice, or solutions at ago.
Machine Language
Since computers work with numbers, programming allows a person to represent machine-language in a human-readable format. This reduces the chances of introducing errors and wasted time in debugging and correcting mistakes
Different Programming Languages
A programming language is known as a vocabulary with a set of grammatical rules instructing a computer or computing device to perform specific tasks.
Although the term programming language usually referred to high-level languages, such as BASIC, C, C++, COBOL, Java, FORTRAN, Ada, and Pascal, today it is used for almost every set of a programming languages such as PHP, Javascript, Python, Dot Net, and C+.
Some of the most implemented programming languages are as follows;
PHP

More than 80% of the internet is powered by PHP. Everything ranging from website, applications, to portals are designed in PHP. Since its inception, PHP developers have always been in high demand. Due to the availability of open-source content management systems, frameworks and a good compromise of speed, code quality, and development PHP are chosen as the developer’s tool for years.
Laravel remains one of the most adopted PHP frameworks that is used to develop dynamic web pages.
C++
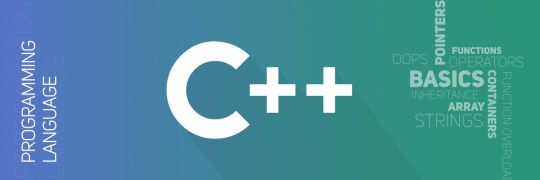
C++ is an all-purpose object-oriented programming (OOP) language. C and C+ were its predecessors. The main highlight of C++ is a collection of predefined classes, which are data types that can be instantiated multiple times
Dot Net
The advent of Dot Net improved development experience and relieved engineers from security operations, active memory management, and other low-level efforts that C/C++ developers had to bother with.
.NET is a language-independent framework that provides programming guidelines to develop a wide range of applications for web, mobile, and Windows-based applications. The .NET framework can work with several programming languages such as C#, VB.NET, C++, and F#.
Javascript

JavaScript (JS) is a lightweight, interpreted, or just-in-time compiled programming language with first-class functions. While it is most well-known as the scripting language for Web pages, many non-browser environments also use it, such as Node.js, Apache CouchDB and Adobe Acrobat.
AngularJS
AngularJS was developed to tackle the growing needs of developers. It is a structural framework for dynamic web apps and uses HTML as the template language. It is a JavaScript-based open-source framework used for building a front-end web application.
NodeJS

Node JS relies on Javascript and uses an event-driven, non-blocking I/O model that makes it lightweight and efficient. It remains perfect for data-intensive real-time applications running across distributed devices.
ReactJS

React JS is an open-source JavaScript library designed by Facebook. It is used for building user interfaces or front-end framework specifically for single-page applications. It is used for handling the view layer for web and mobile apps.
Most Demanded Programming Language
Here are the Top 7 programming languages with the most job postings on Indeed as of January 2019.
· Java – 65,986 jobs
· Python – 61,818 jobs
· Javascript – 38,018 jobs
· C++ – 36,798 jobs
· C# – 27,521 jobs
· PHP – 16,890 jobs
· PERL – 13, 727 jobs
How can I learn to code?

It is easy to learn coding if you can invest few hours of your day learning the basics of programming, such as language (PHP for dynamic web page, Swift or C for iOS mobile apps, and Java for Android apps), code implementation, toolset, framework, testing, and developing applications or web pages.
Online Courses

Online courses offer you a flexible schedule. You can learn the coding at the comfort of your home. Most online courses offer classes and conduct exams in return for a small fee.
The Odin Project is one of the sites offering an online course on programming for solo practitioners.
Subscription-model certification courses from Udacity or Treehouse offer an opportunity to ask a tutor.


You can get free practical JavaScript course from Watch and Code, which revolves around a single project that you continually iterate.
Watching videos and tutorials, reading e-books, and practicing your own project can help you gain programming knowledge quicker than you can think.
The ability to code comes with greater benefits. You can find a high-paying job at almost any Tech company. With the rising demand for programmers, you are less likely to be returned from job interviews.
The important thing to keep in mind to keep yourself updated. With the changing face of technology comes bigger challenges such as keeping yourself updated, learning the additional language for larger outreach, and collaborating with like-minded personnel’s. The GitHub offers a large resource of knowledge, codes, and an opportunity to collaborate with programmers around the world.
Searchable Design llc
Searchable Design in an it company located in Des Monies, Urbandale. Searchable Design is an enthusiastic group of IT professionals in Des Moines working to provide endless web,mobile solutions in des moines for businesses and individuals alike. From a niche website to varieties of online business tool, we design, manage and upgrade everything according to your need and requirement.
#importanceofcoding#differenttypesofprogramminglanguage#searchabledesign#itsolutionindesmoines#itcompanyindesmoines#itcompanyinurbandale#onlinecourseforprogramminglanguage#mostdemandedprogramminglanguage#webdevelopmentindesmoines
0 notes
Text
Deploying a Client-Side Rendered create-react-app to Microsoft Azure
New Post has been published on https://headacheshelp.com/awesome/deploying-a-client-side-rendered-create-react-app-to-microsoft-azure/
Deploying a Client-Side Rendered create-react-app to Microsoft Azure

Deploying a React app to Microsoft Azure is simple. Except that … it isn’t. The demon is in the details. If you’re looking to deploy a create-react-app — or a similar style front-end JavaScript framework who are in need of pushState-based routing — to Microsoft Azure, I believe this article will serve you well. We’re going to try to avoid the headaches of client and server side routing reconciliation.
First, a quick story.
Back in 2016, when Donovan Brown, a Senior DevOps Program Manager at Microsoft, had given a “but it works on my machine speech” at Microsoft Connect that year, I was still in my preliminary stages as a web developer. His talk was about micro-services and containers.
[…] Gone are the days when your manager comes running into your office and she is frantic and she has found a glitch. And no matter how hard I try, I can’t reproduce it and it runs perfectly on my machine. She says: fine Donovan, then we are going to ship your machine because that is the only place where it runs. But I like my machine, so I’m not going to let her ship it…
I had a similar sort of challenge, but it had to do with routing. I was working on a website with a React front end and ASP.NET Core back end, hosted as two separate projects that were deployed to Microsoft Azure. This meant we could deploy both apps separately and enjoy the benefits that comes with separation of concern. We also know who to git blame if and when something goes wrong. But it had downsides as well, as front-end vs. back-end routing reconciliation was one of those downsides.
One day I pushed some new code to our staging servers. I received a message shortly after telling me the website was failing on page refresh. It was hurling a 404 error. At first, I didn’t think it was my responsibility to fix the error. It had to be some server configuration issue. Turns out I was both right and wrong.
I was right to know it was a server configuration issue( though at the time, I didn’t know it had to do with routing ). I was wrong to deny it my responsibility. It was only after I went on a web searching rampage that I discovered a utilize case for deploying a create-react-app to Azure under the Deployment tab on the official documentation page.
Building React for production
When building a React app for production( assuming we’re are using create-react-app ), it’s worth noting the folders that get produced. Running npm running construct will generate a build folder where an optimized static version of its implementation lives. To get the application on a live server, all we need do is feed the server the content of the construct folder. If we were working on localhost, there is no live server involved, so it is not always equivalent to having the application on a live server.
Generally, the construct folder will have this structure :P TAGEND- constructed
– static
– css
– css files
– js
– js files
– media
– media files
– index.html
– other files … Client-side routing with React Router
React Router uses the HTML5 pushState history API internally. What pushState does is quite interesting. For example, navigating( or using Link in react router) from the page https :// css-tricks.com to the page https :// css-tricks.com/ archives/ will cause the URL bar to display https :// css-tricks.com/ archives/ but won’t cause the browser to load the page/ archives or even check that it exists. Couple this with the component-based model of React, it becomes a thing to change routes while displaying different pages based on those routes — without the all-seeing eye of the server trying to serve a page in its own directory. What happens, then, when we introduce servers by pushing the code to a live server? The docs tell it better :P TAGEND
If you use routers that use the HTML5 pushState history API under the hood( for example, React Router with browserHistory ), many static file servers will fail. For example, if you used React Router with a road for/ todos/ 42, the development server will respond to localhost: 3000/ todos/ 42 properly, but an Express serving a production build as above will not. This is because when there is a fresh page loading for a/ todos/ 42, the server looks for the file construct/ todos/ 42 and does not find it. The server needs to be configured to respond to a request to/ todos/ 42 by serving index.html.
Different servers involve different configuration. Express, for example, involves this :P TAGEND app.get(‘*’,( req, res) =>
res.sendFile( path.resolve( __dirname, ‘client’, ‘build’, ‘index.html’ )); );
…as documented in the create-react-app docs. Keep in intellect though, this assumes that we’re hosting create-react-app at the server root, which is making employ of a wildcard road (*) that catches all road and respond to all route request by serving the index.html file in the build folder which sits at the root of the server application. Also, this is tightly coupled with the back-end. If that’s the case, we would most likely have this kind of folder structure( assuming the back-end is in NodeJS ):
– Server
– Client( this is where your react code runs)
– construct( this is the build folder, after you npm running build)
– src
– node_modules
– package.json
– other front-end files and folders
– Other back-end files and folders
Since my front-end( create-react-app) and back-end( ASP.NET) were two different projects, serving static files by navigating the directory was sort of an impossibility.
In fact, since we are deploying a static app, we do not need the back-end. As Burke Holland set it: “Static” means that we aren’t deploying any server code; simply the front-end files.
I keep mentioning ASP.NET here because during the course of my research, I figured configuring Azure required a configuration file in a wwwroot folder and ASP.NET’s folder structure typically has a wwwroot folder. Remember the application’s back-end was in ASP.NET? But that’s just about it. The wwwroot folder seemed to be hidden somewhere on Azure. And I can’t show you without deploying a create-react-app. So let’s go do that.
Getting started with App Services on Microsoft Azure
To get started, if you do not already have a Azure account, get a free trial then head over to the Azure portal.
Navigate to All services- Web- App Services Navigating on the Azure portal from All services, to Web, to App services
We want to add a new app, give it a name, subscription( should be free if you’re on a free trial, or if you already have one ), resource group( create one or utilize existing ), then click on the Create button down at the bottom of the panel.
Creating a new App service on the Azure portal.
We should get a notification that the resource has been created. But it won’t immediately show up, so hit “Refresh” — I have other resources, but the AzureReactDemo2 is what I’m employing here. You’ll click on the name of your newly created app, which is AzureReactDemo2 in my occurrence.

Displaying all App Services on the Azure portal.
The blade shows you information about your app, the navigation to the left has everything you need to manage your application( overview, activity log, deployment center …).
For example, the Deployment Center is where the app deployment is managed, Slots is where things like staging, production, test are managed. Configuration is where things like environmental variables , node versions and — an important one — Kudu are managed.
The overview screen shows a general position of the application Status, URL … Click on the URL to see the live site.

Showing the various parts of an App Service on the Azure CLI.
The app is up and running!

Showing the default live page of an App Service.
What we’ve done is create a new App Service, but we have none of our code on Azure yet. As said earlier, all we need to do is to feed Azure the content of the build folder generated by building React for production, but we don’t have one yet. So let’s go local and get some React app.
Going local
We need to create a new React app, and install react-router as a dependency.
npx create-react-app azure-react-demo cd azure-react-demo
We also want to install react-router( react-router-dom, actually)
npm i react-router-dom
All things being equal, starting the app with npm start, we should get the default page.

Showing the default page generated by React.
Because this will be about testing routes, I needed to induce some pages. I’ve modified my local version and uploaded it to GitHub. I’m banking on the fact that you can find your route around react and react-router. Download a demo .
My folder looks like this :P TAGEND

Showing the folders and files in the modified create-react-app app.
The altered files have the following code :P TAGEND // App.js import React, Component from “react”; import ” ./ App.css”; import Home from ” ./ pages/ Home”; import Page1 from ” ./ pages/ Page1″; import Page2 from ” ./ pages/ Page2″; import BrowserRouter as Router, Switch, Route from “react-router-dom”;
class App extends Component
render()
return(
);
exportation default App; // Page1. js import React from “react”; import Link from “react-router-dom”;
const Page1=() =>
return(
Argentina( PAGE 1)
Nigeria
Home
); ; exportation default Page1; // Page2. js import React from “react”; import Link from “react-router-dom”;
const Page2=() =>
return(
Nigeria( PAGE 2)
Argentina
Home
); ; exportation default Page2; /* App.css */ html
box-sizing: border-box; body
margin: 0;. page
display: grid;
grid-template-rows: repeat( 3, 1fr );
height: 100 vh;. page1. flagTop, .page1. flagBottom
background-color: blue;. page2. flagTop, .page2. flagBottom
background-color: green;. flagCenter
display: flex;
align-items: centre;
flex-direction: column;
justify-content: center;
text-align: centre;. page a
perimeter: 2px solid currentColor;
font-weight: bold;
margin: 0 30 px;
padding: 5px;
text-decoration: none;
text-transform: uppercase;. flags
display: flex;
thicknes: 100%;. flags>. page
flex: 1;
Running the app runs locally, so the roads deliver when links are clicked and even when the page is refreshed.
Deploy the app to Azure
Now, let’s get it up on Azure! There are a few steps to make this happen.
Step 1: Head to the Deployment Center
On Azure, we need to go to the Deployment Center. There are quite a few options each with its pros and cons. We’ll be using Local Git( which means your local git app straight immediately to Azure) for source control, Kudu for Build Provider.
Remember to click continue or finish when you select an option, or else, the portal will just keep staring at you.

Showing Deployment Center on the Azure portal and choosing a source control as the first step in deploying a new App Service.
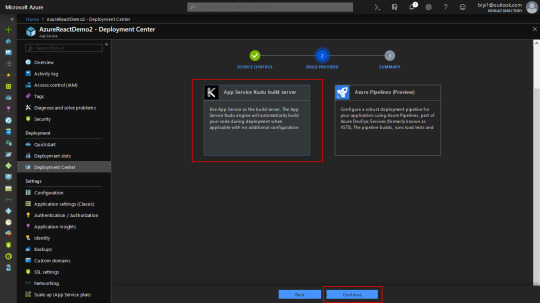
Showing the Build Provider section in the Deployment Center on Azure portal.
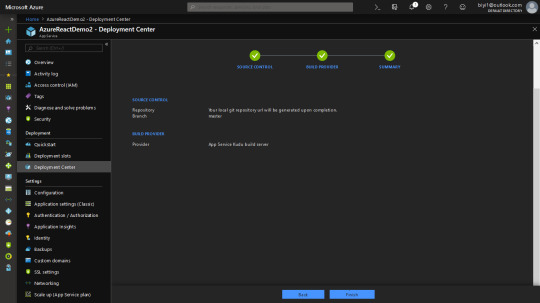
After the third step, Azure produces a local git repo for you. And it gives you a remote link to point your react app to.
One thing to note at this phase. When you push, Azure will ask for your GitHub credentials. It is under the deployment tab. There are two: App and User. App credential will be specific to an app. User will be general to all the apps you as a user has Read/ Write access to. You can do without User Credentials and use App credentials, but I find that after a while, Azure stops asking for credentials and just tells me authentication failed automatically. I defined a custom User Credentials. Either way, you are able to get past that.

Showing the Deployment Credentials for the App Service on Azure portal.
In the React app, after modification, we need to build for production. This is important because what we want to upload is the content of the build folder.
We need to tell Kudu what node engine we’ll be using, or else, the construct will most likely fail, due to the reported fact that react-scripts requires a node version higher than the default set on Azure. There are other ways to do that, but the simplest is to add a nodes engine in package.json. I’m utilizing version 10.0 here. Regrettably, we can’t only add what we like, since Azure has Node versions it supports and the rest are unsupported. Check that with the CLI with the command: az webapp list-runtimes
Add the preferred node version to the package.json file, as in :P TAGEND “engines”:
“node”: “1 0.0 ”

Displaying a list of Azure runtimes in the Azure CLI. Step 2: Build the App
To build the React app, let’s run npm build in the Terminal.
Step 3: Initialize the Git repo
Navigate into the build folder and initialize a Git repo in there. The URL to clone the repo is in the overview page. Depending on what credentials you’re employing( App or User ), it will be slightly different.

Showing the overview of the App Service on Azure and the Git clone URL. git init git add. git commit -m “Initial Commit” git remote add azure git push azure master
Now, visit the live app by using the URL on the overview page. As you can see, the app fails on/ page2 freshen. Looking at the network tab, a 404 is thrown because the page tried to be fetched from the server — with client-side routing, as we have already set up, the page shouldn’t even be server fetched at all.

Showing the failed page request and the network tab to verify. Configuring Azure to reconcile client and server side routing
In the public folder, let’s add a web.config XML file with the following content :P TAGEND
I’ve intentionally decided to not format the code snippet because XML is strict about that. If you miss the formatting, the file has no effect. You can download an XML formatter for your text editor. For VSCode, that would be the XML Tools plugin.

Showing an XML formatter and an XML formatted file in VSCode.
The app can be built again at this point, although we’ll lose the Git info in the construct folder since the new construct overrules the old build. That means it would have to be added again, then pushed.
Now the app runs as shown below! Whew.
We don’t want to have to npm run build every time — that’s where continuous deployment comes in. Check out the link below for appropriate references.
Conclusion
There is a lot to Azure, as it can do a lot for you. That’s nice because there are times when you need it to do something that seems super specific — as we’ve seen here with client and server side routing reconciliation — and it already has your back.
That said, I’ll leave you with a couple of related resources you can turn to as you look to deploying a React app to Azure.
Custom NodeJs Deployment on Azure Web App by Hao Luo: Learn more about Kudu and NodeJS deployment. Deploying a React App As a Static Site On Azure by Burke Holland: Even more options for deploying create-react-app to Microsoft Azure.
The post Deploying a Client-Side Rendered create-react-app to Microsoft Azure seemed first on CSS-Tricks.
Read more: css-tricks.com
0 notes
Photo

Building Schematics can be magical. With very little code you can build large structures that can be replicated over multiple projects. As with any coding, you’ll want to create unit tests to ensure that every change you made is exact and many situations are tested with ease. When starting out with Schematics, it might not be terribly obvious how to create tests for the tools you’ve created.
In this article, we are going to look at a method to create unit tests for your Angular Schematics by building off of another post previously posted about creating a Simple Schematic.
Angular Schematics: Simple Schematic
So, you looked at the ngMomentum project and decided, “Well if they can make a custom Angular Schematic, so can I”…
The Basic Unit Testing Code
When you are first starting out with a new unit testing file there isn’t much that is necessary to get going. So, just to set the starting point this is what your index_spec.ts file should look like as the Schematics generator spit out.
Right now it doesn’t do anything except for run the schematic in a silo and asserts that the output is an empty file tree. We will need to go further to accurately test your code.
Mimicking The Application Environment
The basic unit test provided by the generator is just that… basic. We need to extend our unit test to more accurately reflect the actual environment that our code will run. This means that we need to run some of the Angular Schematics to build up the Angular project workspace.
To do this we will add a little bit of code to our unit test. First, we need to set the options for our Angular Schematics to run with.
And then, we need to create the application file tree before we run any of our tests. This uses the newer runExternalSchematic to access the Angular Schematic used to generate a workspace and application tree.
Now, before every test, we will run this code to create the Angular project workspace.
Side note: It isn’t always easy to follow along with random code blocks. I recommend checking out the final unit test file to see how this actually looks.
jonbcampos/schematics
GitHub is where people build software. More than 28 million people use GitHub to discover, fork, and contribute to over…
Bonus! There are two ways to setup your Angular workspace, a single project and a multi-project setup. In the final unit test file I show how to setup and test both formats. Again, check it out!
Adding Tests
With our testing environment setup, we just need to start creating a few tests. I am going to create three different tests. The first, what happens if you run this Schematic without an Angular project tree setup. In this example, I am just testing that ANY error was thrown. This is a nice start to your tests, but in the next example, we will see how can go even further with more detailed tests.
The second, what happens if you run this Schematic without the required parameters. In this example, I went further and showed how we can test for a specific Error Type and message.
And finally, what happens if everything is setup properly.
With these tests ready we just need to focus on asserting our tests for specific values.
Asserting On Files Created
The first assertion that you can write is asserting specific files are created in the application tree. We can do this very specifically by asserting against the entire file list in array format.
Or we can just check to see if the generated files are in the tree.files array. So you don’t have to match the _exact_ content (which can change between versions of the Angular Schematics, for example).
Either option is fine depending on your needs. But what if you specifically need to look at the content of your output and ensure it is exactly what you need? This is asserting on the content created.
Asserting On Content Created
If you need to ensure that the resulting content meets a specific specification then you can also read the content on a file by file basis and assert the content to be or contains the necessary text. This is simple to do as demonstrated in the following code segment.
Easy! I’ve now ensured that a file outputs EXACTLY as I intend.
Conclusion
You should see that writing unit tests for Schematics are fairly easy and can ensure your content outputs just the way you want. The hardest thing to initially figure out for me was how to set up the file structure to include the Angular project workspace, it was downhill after that.[Source]-https://blog.angular.io/angular-schematics-unit-testing-3a0a9aaab186
62 Hours AngularJs Training includes MongoDB, JavaScript, A62 ngularJS Training, MongoDB, Node JS and live Project Development. Demo Lect available.
#Mean Stack Developer Training#Mean Stack Training#full stack web development course#Full Stack Training#AngularJs Training
0 notes