#norton.com/setup now
Explore tagged Tumblr posts
Visit Tumblr Blog
Explore Tumblr blogs with no restrictions, modern design and the best experience.
Last Seen Tumblr Blogs


Fun Fact
Tumblr has been providing a Korean-language service since 2013.
Link
Download and Activate Norton.Com/Setup any, During this process if you face any problem, then visit our site and you can get step by step solution.

#Norton.com/setup#norton.com/setup guide#www.norton.com/setup#norton.com/setup now#enter your product key
1 note
·
View note
Text
Make Multiple Columns in Google Docs with Templates
Columns are useful in everything like writing for a magazine, newspaper, preparing a brochure, newsletter, or a flyer in the Google Doc. You need columns to split your text into two or three parts in the document. This makes everything neat and easy to use. And this is where Google Docs comes in. It offers a built-in function to help you separate parts of your document in two or three columns. Moreover, you can also create Google Docs Templates with columns. So, follow us along in this blog if you want to learn making columns in Google Docs using Templates.
Firstly, we will use the default Google Docs method on the Web.
It is quite easy to make columns in Google Docs. We have provided below an example where we are using a dummy Google Docs document.
Firstly, open the Google Docs document.
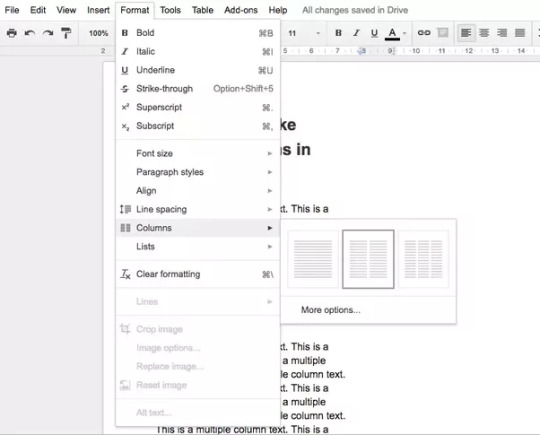
Then click on the Format option which is in the menu bar.
After that select columns from the drop-down menu.
Note: Google Docs only offer two or three columns by default to choose from. Then select the relevant options and with that, you can see the relevant changes in the document.
Also, you can select more options through which you can customize the column’s visuals.
Lastly, there is also an option with which you can shorten/widen the gap between columns and can also add a visual line between two columns.
Make Columns In Google Docs in Mobile Apps
You can also make columns in Google Docs using the Android and iOS mobile apps. All you have to do is follow us along.
Firstly, open the Google Docs document in your mobile app.
Then tap on the edit button which is at the bottom and then open the editing interface.
Now move to the layout menu.
Here you can change columns, add spacing to columns, make columns, add a line between columns, and also change column direction.
Note: Also, if you are a power user of the column function in Google Docs. You can create a dedicated column template that you can use whenever required.
Create a Google Docs Column Template
As we said earlier if you are a power user who uses the column feature in day-to-day life you need to save the document as a template. By doing that you can ensure that you have a template and you can just open that and start writing in Google Docs with your preferred column settings. Follow us along to do that.
Firstly, open a blank Google Doc document.
Secondly, go to Format > Column and then select your preferred style and make adjustments.
Then give the document a name of your preferred choice and move it to a specific place in the Google Drive Folder.
After that select the recently saved Google Docs column Template and do a right-click on it.
Once that is done, select Make a copy from the context menu.
Now Google Drive will make a copy of the document.
Your Google Docs document is ready to go now open it and start firing your words.
Now you don’t need to make any extra adjustments to the document. Now it will automatically create columns based on your saved settings in the template. All you have to do is create a copy of your already made template in Google Drive and it is ready to use.
Conclusion
Creating and adjusting text in columns in Google Docs provides your text with a visual representation of your upcoming magazine and newsletter article. Hope you find this information useful. Thank you for reading.
Visit: norton.com/setup
Source:https://luzelectronicsandtechnology.wordpress.com/2021/07/19/make-multiple-columns-in-google-docs-with-templates/
20 notes
·
View notes
Link
Norton.com/setup | Download and install your Norton security
1 note
·
View note
Text
How to Use Time to Walk Feature in Apple Fitness Plus?
Apple use to add several new services and apps to its health and fitness device that is Apple Watch. The company has recently introduced an interesting and new feature, “Time to Walk,” officially especially for Apple Fitness+ subscribers on its wearable device. This feature provides an inspiring audio walking experience on Apple Watch. The feature is made to encourage fitness and health-conscious persons to go for healthy walks.

“Time to Walk” enables the users to get audio content from interested and influential persons who share stories, music, photos, etc., on several topics. Each episode takes up to twenty-five to forty minutes, and you can quickly access all of them right on your Apple Watch. You can also access available episodes by navigating the Fitness+ section available in the Fitness app on your smartphone.
Here are the steps to know how you can access and use the newly introduced feature of “Time to Walk”:
Workout with Apple Fitness+
Apple Fitness+ enables the users to get their next workout and customize their in-session metrics with several features. You can get the tips of the world’s best trainer’s right on your device.
Pairing Bluetooth Headphones Right on Your Apple Watch
Before using “Time to Walk” on your device, it is necessary to have a pair of Bluetooth headphones connected to your Apple Watch. Here’s how to do the same:
At the start, tap the Digital Crown to access the home screen of your Apple Watch.
Then, press the Settings icon to launch the respective app.
Now, hit the Bluetooth option there.
Tap on the device’s name you like to pair with.
You can see the pairing status on your Apple Watch’s status bar. Once it starts showing “paired,” you will be able to view the option “Connected” right on the Bluetooth setting of your Apple Watch. Then, you can easily stream your desired music.
Getting Started with Time to Walk on Apple Watch
Before going to start the “Time to Watch” Experience, you must need a pair of Bluetooth headphones and AirPods paired and connected to your smart wearable device. Here is how:
First of all, open the Workout app on your Apple Watch.
Hit the menu tab available on the tile option “Time to Walk” situated at the upper section of the list.
Press the particular episode of “Time to Walk” you like to experience.
Controlling Time to Walk Playback
Once you have started the Time to Walk episode, an outdoor walk workout will begin automatically. You can easily manage and control the respective playback of the episode “Time to Walk,” just like any other audio.
Here is how to control Time to Walk Playback on your SmartWatch:
First of all, swipe your Watch screen leftward from the workout page.
Then, hit the playback controls option to control your episode.
Now, you can easily play or pause your Time to Walk episode. Go back fifteen seconds or skip thirty seconds ahead; you can do what you want. You may also adjust where your audio is going and see what’s next in the playlist, just as you do in your music app.
As you know how to use Time to Walk service of Apple Fitness+ right on your Apple Watch, pair your Bluetooth headphones to your wearable device first, get started with “Time to Walk,” and control your playback per your wish.
Wilder Zayn is a self-professed security expert; he has been making the people aware of the security threats. His passion is to write about Cyber security,cryptography, malware, social engineering, internet and new media. He writes norton.com/setup security products.
Source: https://secure-blogs.com/how-to-use-time-to-walk-feature-in-apple-fitness-plus/
6 notes
·
View notes
Text
How To Turn Off Amber Alerts On Android Phones
Amber Alert is a kind of emergency alert system developed in the U.S in 1996. It was developed to reduce child abduction by spreading an emergency message to the public to find abducted children.

Let’s understand it with a daily life example. If a child is lost, you receive an alert on your smartphone. This alert is known as Amber alert. These alerts are also transmitted through different broadcasting and digital services to find the missing child. While an Amber alert is helpful in finding a missing person, it can be disruptive for many if someone receives it early in the morning.
Therefore, many think to stop or turn it off. Turning off an Amber alert is straightforward. We will help you through this guide in disabling Amber alerts. Let’s see how you can disable it on phones, including stock Android, Samsung, OnePlus, and LG.
Turning off Amber alerts on Stock Android
Go to the Settings.
Find and click on the Apps & notifications option.
Choose the Advanced option.
Hit the option called Emergency alerts.
Look for the Amber alerts option and disable it.
Turning off Amber alerts on Samsung phones
If you are using Samsung Galaxy phones, including Galaxy S20 and Note 20, here are the required steps to turn off Amber alerts.
Access the Messages app.
Click on the three-dot icon located near the search button.
Now go to the Settings.
You have to choose Emergency alerts settings.
Select the Emergency alerts option.
Choose the Amber alerts and disable them.
Alternatively, you can opt for this method.
Head to the Settings and then choose Connections. After that, select More connection settings.
Click on Wireless emergency alerts.
Hit Settings.
Please choose the option named Alert types and turn it off.
Turning off Amber alerts on OnePlus phones
Launch the Messages app.
Hit the three-dot menu.
Click on Settings.
Now choose Wireless alerts.
Click on the three-dot icon.
Hit the Settings options.
Choose the Amber alerts option and disable it.
Turning off Amber alerts on LG phones
To disable Amber alerts on LG phones, you have to go to Settings.
Find and click on Network & internet from Settings.
Under the Network & internet option, you have to choose Wireless Emergency Alerts.
Hit the three-dot icon located in the upper right corner.
Hit the Settings option.
Look for the Amber alerts option and disable it.
Try the second method.
Take your phone and launch the Messages app.
Look for the three-dot icon from the upper right corner.
Click on the Settings.
Choose the Emergency alerts option.
Look for the Amber alerts and disable it.
Again, Amber alerts are helpful in finding missing children, but if you want to turn it off, you can follow the above instructions to disable it on stock Android, LG, Samsung, and OnePlus phones.
If you use phones other than those mentioned in this article, the chances are you will see the respective settings or options at the places described above. Even you may get a better idea about Amber alerts’ settings and options if you find changes in them on your different brand phone.
Dean Foster is a keen technical blogger, a journal contributor, a publisher of guides at norton.com/setup. He is a professional cyber security analyst who, through his writing, aims to guide people about the dangers and threats hiding in the digital world.
Source: How To Turn Off Amber Alerts On Android Phones
1 note
·
View note
Text
How do you respond to Norton risk indicators?
Whenever, you download, install, and activate your Norton products via norton.com/setup, you are entitled to get many benefits with it. But the first benefit that you get is of eradicating harmful viruses from your device. The Norton product indicates the availability of the threats through different colors in its status bar or notification area of the main window of Norton. There are three different colors that are there to serve this purpose.
The details of three indicator colors
The three given colors let you understand if your device is secure, or you need to take actions to make it free of attacks. The details of each color tile are given below so that you can take corresponding actions to ultimately protect your device.
The 'Green' color simply means that your device is protected and you do not need to take any action to make it threat-proof.
On the other hand, the 'Orange' color on the security tile is indicative of a threat and you might need to give attention to your device.
While the 'Red' color indicates that your computer is at high risk of getting attacked or it has already been under any suspicious activity.
Important: in case you have subscribed to Deluxe+ or Premium Norton subscription via norton.com/setup, then you will get one additional benefit i.e. the option to backup your data if your device is ever at risk.
What if your device is at risk?
Launch Norton on your device.
Go to the 'My Norton' window and tap 'Open.'
For this, navigate to the 'Device Security' tab.
Now, choose the colored tile, as appropriate.
After that, tap on the option reading as 'Fix Now.'
Complete the on-screen prompts.
In case you are still unable to fix the issue, then click 'Help.'
After that, tap on the 'Get Support' option.
Conclusion-
You'll be able to run the diagnostic tool on your device after which you will be able to get rid of the threats there are there on your device. Apart from this, you can also download and run the Norton Rescue Tool from norton.com/setup if you see that your device is highly at risk.
1 note
·
View note
Link
Cybercrime is occurs online by targeting networks or devices. Any person who is using the internet can become the victim of Cybercrime, that’s why it becomes necessary to take some precautions while you are online so Norton setup with product key install.
0 notes
Text
Latest Update on Trackmania Remake
The remake of the 2006 Trackmania Nations recently launched their update where they renamed their title as ‘Trackmania’, and now their game is available for free to play on Epic Games Store and Ubisoft’s uPlay. They have launched the trailer of the latest racing game’s update. From the trailer, you can analyze that the game is compelling and incorporates an amalgamation of high-quality graphics and sound quality. Along with that, the players can view the racing game from different camera angles. The speed of the cars is faster than light, and it will give the players a thrilling experience. This universal racing game offers three levels of engagement that aims to fit every player’s gaming preferences. As mentioned above, they have allowed access to free racing experience, but under the Starter pack only, which is an excellent option for beginners. They also offer a Standard and Club access that includes a common feature that supports creation and tool sharing options for their advanced players.

Using the Starter Access, you can either play solo or compete with online players. It includes 25 tracks that allow players to earn medals and record scores in regional rankings. The creators update the 25 tracks in the game every three months so that you can have plenty of options to choose from, and you can also enjoy player’s creations on the Arcade channel and try various editor tracks, replays, and skins along with map review servers. The Standard Access and Club Access requires yearly charges of about $10 to $30, respectively. The Standard Access expands the player’s creation content, and the players can also participate in daily competitions and be a part of ‘Track Of The Day’ and ‘Official’ campaign tracks. While the Club Access lets you join their favorite clubs which include exclusive content and activities such as training tracks, online rooms, skin customization, and more. You can also join a three-month plan for Club Access that costs $59.99 only. The players can participate in Open Grand League and get a chance to qualify for Trackmania Grand League as well. The unique track creation in Trackmania allows the players to share diverse tracks by providing new services and special blocks. It makes esports accessible to everyone. This app also allows you to create your club to share your creation, organize your events, and stream your best races. If you are a beginner at racing games, then you can join the casual daily and weekly tournaments to practice Trackmania racing. Charlie Wilson is a Norton expert and has been working in the technology industry since 2002. As a technical expert, Charlie has written technical blogs, manuals, white papers, and reviews for many websites such as norton.com/setup. Source: Latest Update on Trackmania Remake
1 note
·
View note
Text
Download and install your Norton product on your computer
Norton is an antivirus software that sheds protection on your computer and refracts the harmful elements like viruses, malware, etc. from attacking your system.
Go to norton.com/setup.
If you are not signed in to Norton already, you will be prompted to sign in. Type in your email address and password for Norton, and click Sign In. If you do not have an account, click Create account, and then complete the sign-up process.
In the Setup window, click Download Norton. If you want to install a new product that is not registered to your Norton account, click Enter a New Product Key. Type the product key and click >.
Click Agree & Download.
Do one of the following depending on your browser: For Internet Explorer or Microsoft Edge browser: Click Run. For Firefox or Safari: On the top-right corner of the browser, click the Download option to view the downloaded files, and double-click the file that you downloaded. For Chrome: On the bottom-left corner, double-click the file that you downloaded.
If the User Account Control window appears, click Continue. Follow the on-screen instructions.
Your Norton product is now installed and activated.
Let us know if you need any help with this. We’re glad to help.
Norton support
1 note
·
View note
Text
Nintendo Switch Pro Controller – Review
Nintendo has been producing some fantastic controllers for the last few decades, and recently it launched the Nintendo Switch Pro Controller that I would say is a masterpiece. In this article, we will give you some excellent reasons to buy this product, as well as a few reasons not to go for it. So let’s get started.
Nintendo Switch Pro Controller offers you a modern full-sized experience along with excellent battery life. It features fantastic ergonomics and various other features you need to get the best out of your gaming device.

It looks a lot like the Xbox One controller, but it is a mix of Xbox One and Nintendo Wii. So you are going to get the best experience. Its design is impressive; it is neither too heavy nor too light; it will very nicely fit in your hand. You will make every hit precisely due to the textured grip and textured buttons of the controller.
The controller integrates fantastically with the Nintendo Switch and supports Amiibo NFC, as well as HD rumble. Despite this, it contains a lithium-ion battery that can last up to 40 hours on a single charge and be charged via any USB-C cable. Additionally, the company gives you a high-quality 5-foot long USB-A as well as USB-C cable in the box, so you can even play games while the controller is getting charged.
Well, after all these good things, here are a few things that I didn’t like about this controller. The first thing is its Bluetooth pairing button that is on the back of the controller, just right next to the USB-C port. Well, it does prevent users from pressing the button accidentally and puts the controller into pairing mode. However, it’s too far, and you might face problems using the Bluetooth pairing function unless you have long fingernails. So keep it in your mind.
Well, you don’t have to use the Bluetooth pairing button with the Nintendo Switch. You just need to connect the Nintendo Switch Pro Controller with your Switch dock via USB-C cable, and you are ready to go. But you will need to use that pairing button if you want to connect your controller with any other systems.
One more thing that I didn’t like about the Nintendo Switch Pro Controller is the lack of IR support. I know, it’s not a big deal as most IR games require Joy-Con, which already comes with Nintendo Switch. So you will be able to enjoy all the games that use IR without any problem.
Conclusion
It is undoubtedly an excellent controller, and you should consider it for buying. At the time of launch, the controller was available for $69.99, which is relatively more expensive than PlayStation 4 and Xbox One controllers. However, now its price has been reduced by $11, and you can get it for $59. I know it is still expensive, but you will get the best experience. So if I compared all its features with its price, I would say it’s an excellent controller, and you should buy it.
That’s all for this article. Thank you for reading it. Enjoy playing!
Aida Martin has diverse interests that range from writing to video games. She has always had a strong passion for writing. She likes to write about games, tech events, security, and whitepapers. Her vast and varied knowledge aided by her supreme writing skills, have made her a powerful writer at norton.com/setup.
Source:- https://n4setup.co.uk/nintendo-switch-pro-controller-review/
1 note
·
View note
Text
Method to download your Norton Product purchased from a retail store
In this section, you will get to learn the basics to download the Norton Product that you have purchased in advance from a retail store. It is advisable to follow each step carefully:First of all, go to your web browser, and visit norton.com/setup.
Tap on the “Sign In” option to operate your account.
Remember, tap on the “Create an account” option if you do not have a prior Norton account.
Go to the “Get Started” page and then tap on the “Enter a new Product Key��� button.
Enter the product key code and tap on the “>” option. Remember, if you have purchased the box product from the retail store then the product key will be inside the box.
Point to remember is that the product key or Norton activation code is a combination of 25 alphanumeric characters.
Follow the instructions on your screen and go through the terms and conditions followed by a click on the “Agree” button.
Just click on the “Agree and Continue” option in the Get Started page.
Go to the Payment page, and provide your billing address and payment details.
You have to now verify your payment method and tap on the “Turn on Automatic Renewal” button.
Click on the “Continue” option in the enrolment confirmation screen.
Just tap in the “Agree & Download” button and you are good to go.
Follow the on-screen instructions to Run and Save the Downloader file. If you save the file then double-click on the file on the saved location once the download is completed.
Remember, once the Downloader is executed, the Norton product will get the download, install and activate itself.
Now, your device will show you its current protection status and also the additional software that you can install from your Norton account via norton.com/setup.
Original source content from https://norton-norton-norton.com/blog/
1 note
·
View note
Text
How Do I Install Norton Device Security On Android?
Norton is one of the most famous brands of Antivirus that holds the attention of many people throughout the world. It is well-known for its remarkable features. It helps to keep your devices protected from the attack of the viruses, online threats and various types of Malware infections. There are many types of Norton Antivirus software wherein Norton is the top-most choice. If you want more information about the Norton.com Setup, then you may contact us freely. The professionals will provide you with the best guiding steps for installing Norton device security.
Important guiding steps to install Norton device security on Android
The first step is to Go to the option Under ‘Download Norton from Google Play’, then tap on Get it on Google Play Store.
Now you are redirected to Play Store.
Then click on Install in order to install the app.
As soon as the installation finishes, then tap on Open.
You can now read the ‘Norton license agreement’, and click on the Continue button.
After that, the Norton Mobile Security performs the initial setup. Runs LiveUpdate, Anti-Malware scan, as well as App Adviser scan. As soon as the setup is complete, you can sign in to the Norton account in order to make use of all the features of Norton Mobile Security.
Now in the top-left corner, you can tap on the menu icon. Now click on the Sign in.
Then type in the Norton account email address & password. Now click on Sign In.
If you are finding any difficulty with installing Norton Mobile Security, then ensure that your device has the latest version of the app, and latest system updates.
If you want assistance related to Norton.com Setup, then visit the official website of the Norton. The experts are well-certified and experienced to deal with the common issues related to the Norton Antivirus Software. Our technicians are available 24/7 hours to help their customers, choose us and get customer satisfaction. Feel free to contact our experts as they are friendly. Do not hesitate while communicating with them. By choosing the right professionals you can easily get rid of the common technical glitches related to the Norton Antivirus Setup.
1 note
·
View note
Text
How to swap Boot drive using Norton Ghost?
You can use Norton Ghost, True Image or other imaging software that will help you in copying the bytes and everything that is present on your present hard drive to another hard drive without affecting any other file. You will not lose any data, file or even the programs of your Operating system. There is some retail boxed up disks that come with the CDs of software to boot. Such CDs can copy the data from an old data disk to a new or latest one. The CDs generally have good pictures with apt instructions to be followed.
Norton Ghost is magnificent software that will remove the unwanted files from your device without hampering your files, documents and even your programs that are running presently. Here, in this article you will get to learn the basics of Norton Ghost and how can you swap Boot drive on your PC using the Norton Ghost security software. So, without any delay to explain, let’s get started with the topic.

Elaborated instructions to guide you the way for using Norton Ghost (Norton.com/setup)
In this section, you will get the detailed steps that will explain to you how you can execute the booting drive process using Norton Ghost:
You need to purchase according to your needs. Whether it is a new hard drive, floppy or the imaging software of your choice you need to purchase the things according to your needs.
Now, insert the disk with the name of “Norton Ghost 2003”. Doing this will give you the ability to create a bootable floppy disk to run the ghost on.
You need to make sure that the Jumper settings for your present hard drive are set to the “Master” option.
After this, insert the floppy disk into your floppy drive and then turn off the computer.
Followed by this, you just have to plug in the new hard drive and plug it to the “Slave” channel.
Plug the “Slave” channel into the IDE connection of the hard drive and owe connector to the power supply and then to the hard drive.
Now, switch on your computer and if you have set your device’s boot priority to floppy before the HDD then you are on the right track.
Wait for the Norton Ghost to run, now ask whether you want to transform the connected drives to the Ghost ones.
Acknowledge the capacity of each drive and select the smaller driver for the source drive.
Now, select the destination drive and see the warning about the destination drive on-screen.
Click on the “OK” option and once the process is over, select the “Quit” option from the menu.
This will remove the diskette and will turn off your PC or computer.
Now, unplug both the hard drives and make the changes accordingly.
After this, you have to boot into Windows with your entire data intact, program installed with the larger capacity.
Note: - If you need assistance with the steps mentioned above, you need to visit the official website of Norton that can be reached via Norton.com/setup.
In a conclusive viewpoint:
We hope that the steps mentioned in this article have helped you to swap Boot drive using Norton Ghost. If you are still stuck in between the steps or not able to complete the process then it is strongly advised to visit the official Norton website that goes by the URL Norton.com/setup. The technical assistance is provided to you 24*7*365 days. You can even dial the Norton Support number that is available on the website.
2 notes
·
View notes
Text
Method to Upgrade Norton 360 to Norton Security
Norton antivirus is the name of the software that is marketed and developed by the parent company called Symantec. It was introduced by the Symantec in the year 1991. There are so many software’s available in the global market over the internet that lets you know the process of deleting Norton Antivirus from your desktop or laptops. All you need to do is download them. The one and only major differentiation between Norton 360 and Norton Online Security is the optimization and problem solving tools. If you are facing any issue with Norton 360 then call on Norton.Com/Setup number in order to get the best solution of your problem.

In order to upgrade your Norton from one version to another version please make sure of the following listed points:-
You can only upgrade to the latest version of the software if you have an Active Subscription. In case you have an active subscription you can remotely upgrade the same without incurring any extra cost as it is totally free if you are upgrading using your Norton account. Alternatively, you can visit the Norton Update Center in order to download and Install the latest version of Norton for Windows. Norton is also available for the Mac and can be downloaded from your Norton Account.
In case you are trying to download the Norton from your service provider, then in that case you can go to the website of your service provider and follow the instructed stated on the site in order to complete the download and installation process of the latest version of Norton.
Process to update Norton from your Norton Account:-
Sign in to your Norton account (Enter the correct user name and password for your Norton account that was initially created at the time of registration process. In case you have forgotten the password for the same and would like to reset the password then click “Forgot my Norton.
On the device page below the device name section, Click on Update, next to the Norton product that you want to update. However, you need to keep in mind that the option to update will not be visible in case you already have the latest version of software installed.
Update Norton from Norton Update Center:-
Norton product can be updated for Windows using the following alternative steps:-
Go to Norton Update Center.
Click on the option Update Me Now. (If download doesn’t start automatically then it can be started manually).
On the option File Download – Security Warning window, click Run.
Then follow the On Screen instructions.
Conclusion:-
The above listed steps are very easy and simple to follow procedure in order to upgrade the existing Norton 360 to Norton Security as it is more advanced and latest in the market. Having said that in case you have any issues following the above procedure to execute an update please call the Norton Setup technical support helpline. This is the dedicated line for all the help that is required in order to keep abreast all your software & product related needs. Creator is a specialist of Norton Antivirus; Visit Here for all the more detailed intriguing data.
1 note
·
View note
Text
How to Fix PS4 Won’t Connect to Wi-Fi?
Imagine you are using PS4, and you find out an available update, but you can see that the Wi-Fi is not available or is not connecting. This is an annoying issue that occurs on PlayStation. If you are facing this issue, then read on and learn how to fix it.Check the Internet ConnectionFirst, you need to check if your internet connection is properly working and stable. Here are the steps you can take.

Call the ISP provider.
Change the name of SSID.
Restart the Router.
Attempt a Wi-Fi extender.
Modify the router to public IP.
Modify DNS SettingsChanging the DNS settings can also help in fixing the issue. Here is how you can do so.
Go to the menu on the PS4.
After that, select the Settings option.
You should choose the Network option.
Then choose the ‘Set Up Internet Connection’ option.
Navigate to the ‘Use Wi-Fi’ option and select it.
You have to choose the Custom option.
Go to the Wi-Fi network you would like to use.
You should pick the ‘Do Not Specify’ option.
Then choose the DNS settings as Manual.
Now, adjust the ‘Primary DNS’ as 8.8.8.8 then the ‘Secondary DNS’ as 8.8.4.4.
Update PC into Safe ModeSwitch to the safe mode and see if it fixes the issue. Here are the steps to do so.
Navigate to the front side panel and hold the power option to switch off the PS4.
You will view the blinking light for a moment before it’s off.
Then long-press the power key until you listen to another beep: the first beep means the PS4 is turned on, another beep means it’s in Safe Mode.
You should hold the PS key on your controller.
Later, choose the ‘Update System Software’ option.
Now, you can be capable of viewing the download procedure licking in.
You aren’t required to do anything and wait for it until the PC file completes the updating and the PS4 reboots automatically.
Turn off the Media ServerRead on and learn how you can disable the media server.
Navigate to the menu on the PS4.
Then choose the Settings option.
You should choose the Network option.
Now, reach the ‘Media Server Connection’ then turn off the media server.
Charlie Wilson is a Norton expert and has been working in the technology industry since 2002. As a technical expert, Charlie has written technical blogs, manuals, white papers, and reviews for many websites such as norton.com/setup
.
1 note
·
View note
Text
How to install Norton 360 for MAC
norton.com/setup - Removing a virus from your device can be a really time-consuming and complex task to do. But Norton by Symantec has made it easy for the users to protect their data from the uninvited bugs. It is the most favoured computer security software and is being used by millions all around the world. Used on various operating systems like Windows, IOS, Android, Mac; it has a diversified pattern of installing the software. Though it is quite simple to do the norton product key on MAC and install it, still it is always better to go through the steps to install Norton 360 for your MAC. You can either follow the below-mentioned steps, or if you are looking for quick assistance, you can simply get in touch with the expert professionals who are there to give your perfect solution to all your queries.
The first step is to uninstall the existing security software and the previous versions of Norton from your MAC.
Now, go to the ‘Norton Security Online’ page and click on ‘Get Norton Security Online.’
Enter your Xfinity ID and password, the install norton setup with product key will follow.
Now, create or login to your Norton account as it helps you in managing all your Norton services and product keys in one place.
Then click to install locally or install it on another device.
Now the installation will begin, after which open the download folder and install the file.
A warning message will pop-up, click on ‘Open.’
Click on ‘Install.’
In order to make any changes, enter the MAC login.
Now, click on ‘Open Security Preferences’ as MAC requires permission for system extension.
Click on ‘Allow.’
Now, simply restart your system, and your product will be launched after that.
If anything interrupts your installation process, it is better to get in touch with experts or visit norton setup to get a complete understanding of the process. Let the world-class software protect your system from all the viruses and malware and keep your data protected.
Also Read- http://w2.webreseau.com/fr/services/forums/message.asp?id=25&msgid=6939704&poster=0&ok=0
1 note
·
View note