#origamibag
Text
How To Make a Paper Handbag
youtube
0 notes
Photo

Origami purse test # 2 in a very “lake life” pattern 🚣🏻♂️🎣 I like the orange colored cotton and it’ll be perfect for next summer 🌞 . . . . . #origamibag #origamipurse #anchor #anchorsaway #bagmaker #shoulderbag #trianglepurse #etsysellersofinstagram #purse #purselover #purseaddict https://www.instagram.com/p/Cj7HuYpOOZ1/?igshid=NGJjMDIxMWI=
#origamibag#origamipurse#anchor#anchorsaway#bagmaker#shoulderbag#trianglepurse#etsysellersofinstagram#purse#purselover#purseaddict
0 notes
Photo

Christmas gifts ordered by a French lady. Have you prepared yours yet?
#christmas#noel#natale#christmasgifts#gifts#origami#cadeaux#ideecadeau#giftideas#idea#handmade#handsewing#handicraft#sac#bag#pochette#trousse#origamibag#asianstyle#asian style#heart#helmet#samurai helmet#手作り#手作り雑貨#手作#聖誕禮物#法國#台灣#臺灣
5 notes
·
View notes
Video
How To Make Paper Bag With Handles | Origami Paper Bag | Origami Gift Bag
Watch for more
How To Make Paper Flower :
How To Make A Origami Dog Paper:
DIY MINI PAPER CUP :
Diy Origami Cute Dolphin Easy:
1 note
·
View note
Photo

Advertising: Unique Origami Tote with pink flowers, 3 different strap colors, 2 different strap lengths...get your tote @rh_naturestyles now! . . . #flower #flowers #bloom #blooming #bloemen #tasche #taschen #flores #fleurs #fiori #blumen #floral #bag #bags #fashionbag #origamibag #floraldesign #florals #petals #pinkflowers #pinkflower #shoppingbag #totebag #totebags #totes #fashiontote #fashion #fleur #pink #blooming_petals https://www.instagram.com/p/B0BW3J5iZux/?igshid=omuh4gyb9l2r
#flower#flowers#bloom#blooming#bloemen#tasche#taschen#flores#fleurs#fiori#blumen#floral#bag#bags#fashionbag#origamibag#floraldesign#florals#petals#pinkflowers#pinkflower#shoppingbag#totebag#totebags#totes#fashiontote#fashion#fleur#pink#blooming_petals
2 notes
·
View notes
Photo

Origami Ribbon Handbag
https://origamitutorials.com/origami-bag-with-ribbons/
This is one of my favorite recent discoveries in origami! This incredibly realistic design is pure origami, no cuts or glue are needed to get a flat square sheet of paper into this amazing design.
As usual, if you want to know more about it, don’t hesitate to visit my website: origamitutorials.com.
Have a great weekend!
#origami#paperbag#paperfolding#papercraft#origamibag#paperart#papercrafting#paperlove#paperdesign#handbag#ribbon#bag#handmade#handcrafted#diy#crafts
12 notes
·
View notes
Photo

A bag for the... library, book club, park, picnic, playdate, beach, church, and more. Perfect for snacks, diapers, treasures, and anything else you want to place inside. I have had this organic wool and cotton fleece from @holylamborganics for many, many years. That organic cotton fitted diaper from @underthenile has diapered SIX little humans. And I have *my* new reads, and a grapefruit from the sunny south. #perfection #littlehouse #wastate #flaxglenoriginals #ethicalsustainableorganic #origamibag https://www.instagram.com/p/CMNPL-yHtNT/?igshid=1c869knxk0jpo
0 notes
Photo

DIY Gift Box / How to make Gift Box ? Easy Paper Crafts Idea #birthdaycard #birthdaygifts #birthdaytutorial #box #cardtutoral #crafts #diy #easy #easypapercraft #gift #handmadecardidea #handmadeeasycardtutorial #happybirthday #howtomake #idea #muktaartandcraft #origamibag #origamicraft #origamidress #origamipapercraftidea #origamipenholder #origamishoe #paper
#birthdaycard#birthdaygifts#birthdaytutorial#Box#cardtutoral#crafts#diy#easy#easypapercraft#Gift#handmadecardidea#HandmadeeasycardTutorial#happybirthday#howtomake#Idea#muktaartandcraft#origamibag#Origamicraft#origamidress#origamipapercraftidea#Origamipenholder#origamishoe#Paper
0 notes
Photo

Ich freue mich, den jüngsten Neuzugang in meinem #etsy-Shop vorzustellen: Bento Origami Farbmuster Tasche Handgenähte Schätze aus Japan - deinen Klamotten Style unglaublich aussehen lassen - "Yuki Origami Schmuck" https://buff.ly/3giueuR #babyparty #muttertag #japan #bento #bentotasche #origami #origamibag #japaninspiriert #popularedinge Folge diesen Link oder geh zu unserer Bio (@Yukiorigamischmuck)und nutze den Link darin zu alle Shops🏬🌟🌟🌟🌟🌟 #yukiorigamischmuck #MakeItMeaningful #handgemacht #Handgemachte #Schätze für dich mit #Liebe #hergestellt von #Japanische #Künstlerin #👩🎤 (hier: Germany) https://www.instagram.com/p/CIfnwUVJEsx/?igshid=f9er18etq6tk
#etsy#babyparty#muttertag#japan#bento#bentotasche#origami#origamibag#japaninspiriert#popularedinge#yukiorigamischmuck#makeitmeaningful#handgemacht#handgemachte#schätze#liebe#hergestellt#japanische#künstlerin#👩🎤
0 notes
Photo

秋冬の魅力、ボアアイテム。 こちらは、PLINIO VISONAの定番オリガミシリーズのボアタイプ。可愛く素敵ですよ💕🍁 ※DM/Telでも通販OK. ☎️0538-34-7175 💌[email protected] #ARISS 静岡県磐田市鳥之瀬135-1 #バッグ #pliniovisona #ボアバッグ #origamibag #fashion #ファッション #静岡 #磐田 #浜松 #袋井 #掛川 (ARISS) https://www.instagram.com/p/CGPNxk_Hm0c/?igshid=10as7v38fqw1l
0 notes
Photo
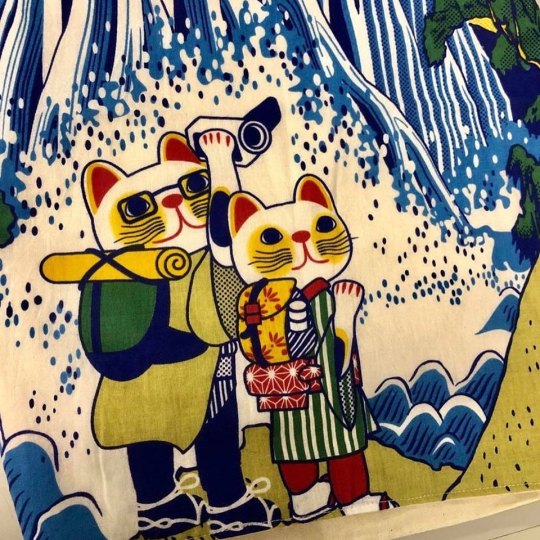
From July 1, 2020 shops will be charging for plastic bags that do not break down in seawater or made from plant-based materials in an effort to reduce disposable plastic waste. A coworker (my coworkers are talented and so nice!) gave me a traditional Japanese market bag called azuma bukuro. She sewed together the part that rests on your shoulder but if you go search on the web you will be able to find most of the bags will not have that part sewn and is tie-able. This particular one is made out of a tenugui (手ぬぐい thin Japanese hand towel made from cotton) but if you have unused fabric that is 3 times longer than the width, then you can make one quite easily (at least that is what she said) . You can use old kimono or yukata too! Look for tutorials on the web. To give you a bit of trivia of plastic bags in Japan- In the 1960s, the model, Twiggy and the mini skirt was a big fashion trend. Around that time, at a nashi pear picking farm focused on tourists near Tamagawa river, women in their miniskirts carried bamboo baskets to enjoy the nashi pear picking activity. Bamboo baskets and the mini skirt did not get along because the baskets would rub against their expensive hosiery, make them run and make everyone really unhappy. (The price of stockings around 1961 was 382 yen which would be around the present value 3,184 yen) As the tourists complained and the farm asked the Tokyo branch of a plastic company if they could make a bag to replace the despised bamboo basket and the rest was history. #azumabukuro #handmade #noplasticbags #экосумка #japanesefabric #origamibag #tenugui https://www.instagram.com/p/CCHllhVniOP/?igshid=s6kqtq01393w
0 notes
Photo

It’s an origami bag 🤩 I have so many larger fabric scraps laying around and hate wasting them so I tried out this pattern. What do you think? I think it is just the coolest shape! . . . . . #origamipurse #origamibag #shoulderbag #purse #bluefloral #bagmaker #bagmakersofinstagram #isewpurses #isew #614 #cbusfashion #etsysellersofinstagram https://www.instagram.com/p/Cj2tTa9OABf/?igshid=NGJjMDIxMWI=
#origamipurse#origamibag#shoulderbag#purse#bluefloral#bagmaker#bagmakersofinstagram#isewpurses#isew#614#cbusfashion#etsysellersofinstagram
0 notes
Photo

Just an idea for the next few videos. #mrsgssewingspace #emilyguerradesigns #bentobag #origamibag #bags #marketbags #varietyofbags https://www.instagram.com/p/B994jSxHFb2/?igshid=fjq2e2uf1snm
0 notes
Photo

Gonna keep on posting #summerish photos for a little while if you don't mind? 🙃 #summerstateofmind #summercomeback ° Beauty @kesneper wearing #ninaluba Bracelets & black Basic Origami Bag in Daisy & Arden faux leather / Limited Edition, only 3 available. #ninalubagirl ° #limitededition #black #basic #Origami #bag #Origamibag #basicOrigamibag #bracelets #girlcrush #tattoos #girlswithtattoos #inkedgirls #inked https://www.instagram.com/p/B2HD5ZKFH0g/?igshid=1gs577lzup66s
#summerish#summerstateofmind#summercomeback#ninaluba#ninalubagirl#limitededition#black#basic#origami#bag#origamibag#basicorigamibag#bracelets#girlcrush#tattoos#girlswithtattoos#inkedgirls#inked
0 notes
Photo

The Kenwood in veg tan with quartz pink Mongolian. I’m not a super girly girl but I’m in love with this combo. Every bag is custom fit so if you like cross body or shoulder bags.....I’ve got you covered. This little handcrafted cream puff retails for $248 #affordableluxury #onepiecedesign #modernbags #madeintheusa #leathetcraft #leatherorigami #origamibag #mongoliangoat #milenialpink #handbags #shoulderbag #crossbodybag #pinkbag #handcraftedwithlove #summerstyle #summerbag #arttowear #femalefounder #madeinsonomacounty #7x7bayarea #mompreneur (at Adelle Stoll) https://www.instagram.com/p/ByA5h26F7hg/?igshid=18tw794j7wa8d
#affordableluxury#onepiecedesign#modernbags#madeintheusa#leathetcraft#leatherorigami#origamibag#mongoliangoat#milenialpink#handbags#shoulderbag#crossbodybag#pinkbag#handcraftedwithlove#summerstyle#summerbag#arttowear#femalefounder#madeinsonomacounty#7x7bayarea#mompreneur
0 notes
Text
Bento bags - pinked, hemmed, serged and double-sided options - with A4 handout
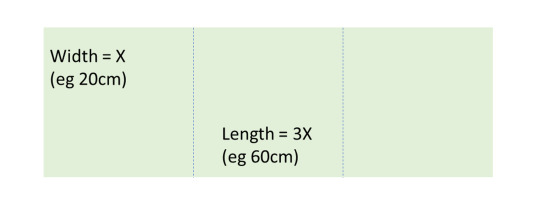
These bags are easy to make, lightweight, and a good alternative to plastic bags in supermarkets. They also make handy project bags, and can be made any size, as long as you keep the width/length ratio the same. I’ve put together a simple A4 handout, download it here*, plus more info and guidance below.
UPDATE: I’ve added options for hemming, and also a double-sided/lined bag, download it here - I much prefer the double-sided/lined version, plus its also really handy for keeping sewing project stuff together.
I would love to see photos of how your bags turn out and what you use them for!
Why make a pinked bento bag?
Our local supermarket keeps announcing it is switching to paper bags, but I only ever see these flimsy plastic bags.
Adverts on social media keep encouraging me to buy synthetic fabric drawstring bags, but with a sewing machine and a stash of fabric there is an alternative: fabric bento bags.

These easy bento bags are lightweight and fast to make, with the minimum number of seams thanks to pinking shears which give the characteristic zig-zag “pinked” edge.
But don’t the edges fray? The bag on the right has been washed 3 times.

And if you want neater edges? See other options in Note 1.
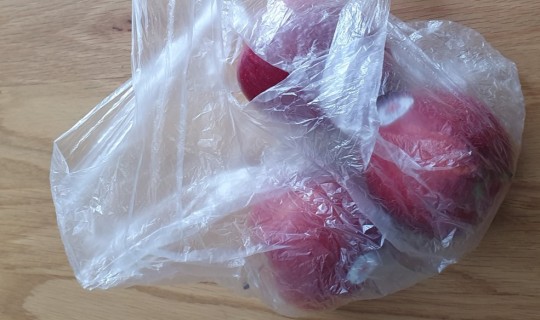
Don’t they make the apples cost more? The bag in these pictures (X=20cm) fits 3 apples, and at 8g, with apples costing £2.20/kg they will add 1.76 pence.
OK, so how do you make them?
You will need: clean fabric, iron & ironing board, ruler, pen/some way of marking fabric, sewing machine (although you could sew these by hand), pinking shears.
Step 1: iron and cut the fabric. The length needs to be 3x longer than the width. How precise does this need to be? See Note 2.
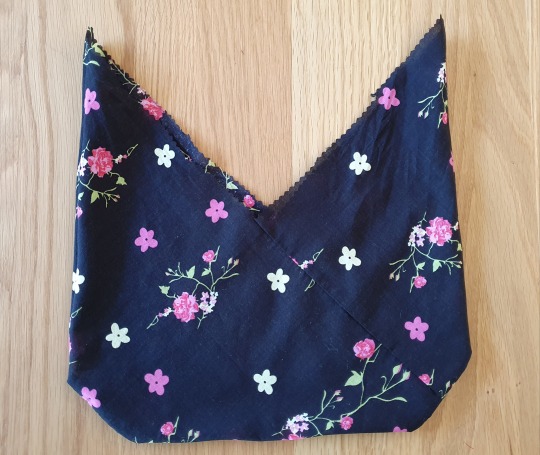
Step 2: move the fabric onto an ironing board, wrong side up, and then fold the corners so that it looks like this...

.... and iron the folds in place.
Step 3: now fold A to A, B to B....

... like this.....

...so you will end up with this....

Step 4: carefully pin the seams together, A-A and B-B

Step 5: And then sew the seams.
How precise does this folding, pinning and sewing need to be? See Note 2.
Step 6: keeping the bag inside out, lie it out flat, and sew a line across each square corner...

Step 7: ....and then use the pinking shears to chop them off. This helps more stuff to fit inside the bottom of the bag.

Step 8: Turn the bag the right way around, ta dah!
Hope that was useful! Please share any corrections or tips, feedback welcome!
Note 1. Alternative methods that will give you a neater edge, Options 2 and 3 are included in the pdf download, and Option 5 is easy!
Option 2. Add a seam allowance, and then sew a small seam around every edge before you start.

Option 3. Double-sided/lined bento bag: see pdf.

Option 4. With serged edges (I’ve not tried this),
https://ramonaclothing.wordpress.com/2013/08/02/tutorial-for-making-an-azuma-bento-bag/
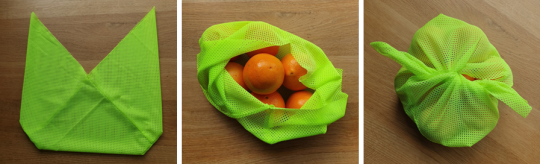
Option 5. Use a non-fraying fabric! I had some of this luminous yellow sports stuff in my stash, its very lightweight, doesn't fray and isn’t going to get lost at the bottom of a handbag! Cut with straight scissors. Easy.
Note 2. How precise do you have to be in your cutting, folding and sewing?
I was experimenting with small seams, and ended up with a very wonky bag, oops. But it works just fine, and I don’t think the apples will mind!
(If you want to seam your bag, rather than have a pinked edge, don’t forget to add a seam allowance all the way around before you cut! I’ve just added this info the pdf download, see Option 2.)
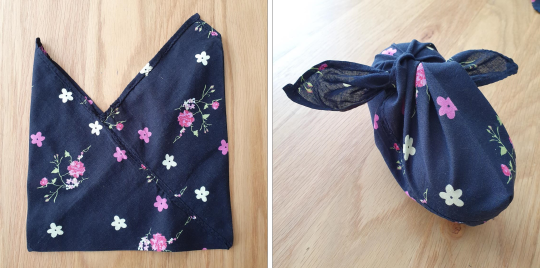
A double-sided bag (first attempt, oops, forgot to add the seam allowance, so its a little wonky!),

0 notes
Last Seen Blogs

another-amateur-artist
another amateur artist

countdowntillbeginningoflife
Countdown Till Beginning Of Life

ammmmgrhg
제목 없음

nayrzz
laminat

paulipjim
La Calle sin alumbrado