#phpstorm license multiple computers
Explore tagged Tumblr posts
Visit Tumblr Blog
Explore Tumblr blogs with no restrictions, modern design and the best experience.
Last Seen Tumblr Blogs


Fun Fact
Tumblr.com is the 103rd most visited website in the world.
Link
0 notes
Text
Which Is The Best PostgreSQL GUI? 2021 Comparison
PostgreSQL graphical user interface (GUI) tools help open source database users to manage, manipulate, and visualize their data. In this post, we discuss the top 6 GUI tools for administering your PostgreSQL hosting deployments. PostgreSQL is the fourth most popular database management system in the world, and heavily used in all sizes of applications from small to large. The traditional method to work with databases is using the command-line interface (CLI) tool, however, this interface presents a number of issues:
It requires a big learning curve to get the best out of the DBMS.
Console display may not be something of your liking, and it only gives very little information at a time.
It is difficult to browse databases and tables, check indexes, and monitor databases through the console.
Many still prefer CLIs over GUIs, but this set is ever so shrinking. I believe anyone who comes into programming after 2010 will tell you GUI tools increase their productivity over a CLI solution.
Why Use a GUI Tool?
Now that we understand the issues users face with the CLI, let’s take a look at the advantages of using a PostgreSQL GUI:
Shortcut keys make it easier to use, and much easier to learn for new users.
Offers great visualization to help you interpret your data.
You can remotely access and navigate another database server.
The window-based interface makes it much easier to manage your PostgreSQL data.
Easier access to files, features, and the operating system.
So, bottom line, GUI tools make PostgreSQL developers’ lives easier.
Top PostgreSQL GUI Tools
Today I will tell you about the 6 best PostgreSQL GUI tools. If you want a quick overview of this article, feel free to check out our infographic at the end of this post. Let’s start with the first and most popular one.
1. pgAdmin
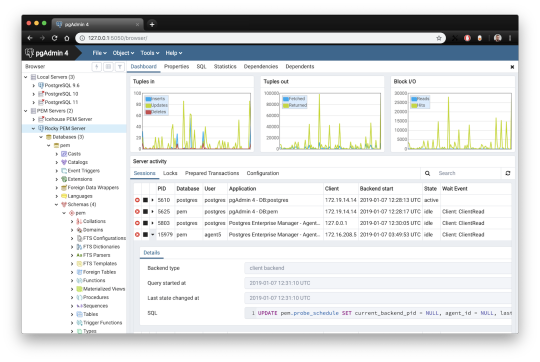
pgAdmin is the de facto GUI tool for PostgreSQL, and the first tool anyone would use for PostgreSQL. It supports all PostgreSQL operations and features while being free and open source. pgAdmin is used by both novice and seasoned DBAs and developers for database administration.
Here are some of the top reasons why PostgreSQL users love pgAdmin:
Create, view and edit on all common PostgreSQL objects.
Offers a graphical query planning tool with color syntax highlighting.
The dashboard lets you monitor server activities such as database locks, connected sessions, and prepared transactions.
Since pgAdmin is a web application, you can deploy it on any server and access it remotely.
pgAdmin UI consists of detachable panels that you can arrange according to your likings.
Provides a procedural language debugger to help you debug your code.
pgAdmin has a portable version which can help you easily move your data between machines.
There are several cons of pgAdmin that users have generally complained about:
The UI is slow and non-intuitive compared to paid GUI tools.
pgAdmin uses too many resources.
pgAdmin can be used on Windows, Linux, and Mac OS. We listed it first as it’s the most used GUI tool for PostgreSQL, and the only native PostgreSQL GUI tool in our list. As it’s dedicated exclusively to PostgreSQL, you can expect it to update with the latest features of each version. pgAdmin can be downloaded from their official website.
pgAdmin Pricing: Free (open source)
2. DBeaver

DBeaver is a major cross-platform GUI tool for PostgreSQL that both developers and database administrators love. DBeaver is not a native GUI tool for PostgreSQL, as it supports all the popular databases like MySQL, MariaDB, Sybase, SQLite, Oracle, SQL Server, DB2, MS Access, Firebird, Teradata, Apache Hive, Phoenix, Presto, and Derby – any database which has a JDBC driver (over 80 databases!).
Here are some of the top DBeaver GUI features for PostgreSQL:
Visual Query builder helps you to construct complex SQL queries without actual knowledge of SQL.
It has one of the best editors – multiple data views are available to support a variety of user needs.
Convenient navigation among data.
In DBeaver, you can generate fake data that looks like real data allowing you to test your systems.
Full-text data search against all chosen tables/views with search results shown as filtered tables/views.
Metadata search among rows in database system tables.
Import and export data with many file formats such as CSV, HTML, XML, JSON, XLS, XLSX.
Provides advanced security for your databases by storing passwords in secured storage protected by a master password.
Automatically generated ER diagrams for a database/schema.
Enterprise Edition provides a special online support system.
One of the cons of DBeaver is it may be slow when dealing with large data sets compared to some expensive GUI tools like Navicat and DataGrip.
You can run DBeaver on Windows, Linux, and macOS, and easily connect DBeaver PostgreSQL with or without SSL. It has a free open-source edition as well an enterprise edition. You can buy the standard license for enterprise edition at $199, or by subscription at $19/month. The free version is good enough for most companies, as many of the DBeaver users will tell you the free edition is better than pgAdmin.
DBeaver Pricing
: Free community, $199 standard license
3. OmniDB
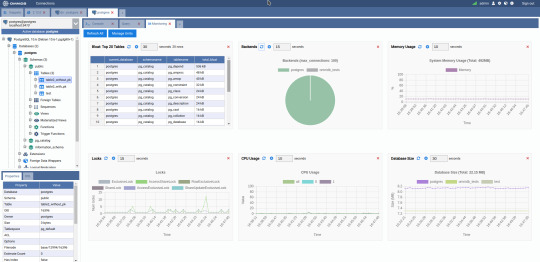
The next PostgreSQL GUI we’re going to review is OmniDB. OmniDB lets you add, edit, and manage data and all other necessary features in a unified workspace. Although OmniDB supports other database systems like MySQL, Oracle, and MariaDB, their primary target is PostgreSQL. This open source tool is mainly sponsored by 2ndQuadrant. OmniDB supports all three major platforms, namely Windows, Linux, and Mac OS X.
There are many reasons why you should use OmniDB for your Postgres developments:
You can easily configure it by adding and removing connections, and leverage encrypted connections when remote connections are necessary.
Smart SQL editor helps you to write SQL codes through autocomplete and syntax highlighting features.
Add-on support available for debugging capabilities to PostgreSQL functions and procedures.
You can monitor the dashboard from customizable charts that show real-time information about your database.
Query plan visualization helps you find bottlenecks in your SQL queries.
It allows access from multiple computers with encrypted personal information.
Developers can add and share new features via plugins.
There are a couple of cons with OmniDB:
OmniDB lacks community support in comparison to pgAdmin and DBeaver. So, you might find it difficult to learn this tool, and could feel a bit alone when you face an issue.
It doesn’t have as many features as paid GUI tools like Navicat and DataGrip.
OmniDB users have favorable opinions about it, and you can download OmniDB for PostgreSQL from here.
OmniDB Pricing: Free (open source)
4. DataGrip

DataGrip is a cross-platform integrated development environment (IDE) that supports multiple database environments. The most important thing to note about DataGrip is that it’s developed by JetBrains, one of the leading brands for developing IDEs. If you have ever used PhpStorm, IntelliJ IDEA, PyCharm, WebStorm, you won’t need an introduction on how good JetBrains IDEs are.
There are many exciting features to like in the DataGrip PostgreSQL GUI:
The context-sensitive and schema-aware auto-complete feature suggests more relevant code completions.
It has a beautiful and customizable UI along with an intelligent query console that keeps track of all your activities so you won’t lose your work. Moreover, you can easily add, remove, edit, and clone data rows with its powerful editor.
There are many ways to navigate schema between tables, views, and procedures.
It can immediately detect bugs in your code and suggest the best options to fix them.
It has an advanced refactoring process – when you rename a variable or an object, it can resolve all references automatically.
DataGrip is not just a GUI tool for PostgreSQL, but a full-featured IDE that has features like version control systems.
There are a few cons in DataGrip:
The obvious issue is that it’s not native to PostgreSQL, so it lacks PostgreSQL-specific features. For example, it is not easy to debug errors as not all are able to be shown.
Not only DataGrip, but most JetBrains IDEs have a big learning curve making it a bit overwhelming for beginner developers.
It consumes a lot of resources, like RAM, from your system.
DataGrip supports a tremendous list of database management systems, including SQL Server, MySQL, Oracle, SQLite, Azure Database, DB2, H2, MariaDB, Cassandra, HyperSQL, Apache Derby, and many more.
DataGrip supports all three major operating systems, Windows, Linux, and Mac OS. One of the downsides is that JetBrains products are comparatively costly. DataGrip has two different prices for organizations and individuals. DataGrip for Organizations will cost you $19.90/month, or $199 for the first year, $159 for the second year, and $119 for the third year onwards. The individual package will cost you $8.90/month, or $89 for the first year. You can test it out during the free 30 day trial period.
DataGrip Pricing
: $8.90/month to $199/year
5. Navicat

Navicat is an easy-to-use graphical tool that targets both beginner and experienced developers. It supports several database systems such as MySQL, PostgreSQL, and MongoDB. One of the special features of Navicat is its collaboration with cloud databases like Amazon Redshift, Amazon RDS, Amazon Aurora, Microsoft Azure, Google Cloud, Tencent Cloud, Alibaba Cloud, and Huawei Cloud.
Important features of Navicat for Postgres include:
It has a very intuitive and fast UI. You can easily create and edit SQL statements with its visual SQL builder, and the powerful code auto-completion saves you a lot of time and helps you avoid mistakes.
Navicat has a powerful data modeling tool for visualizing database structures, making changes, and designing entire schemas from scratch. You can manipulate almost any database object visually through diagrams.
Navicat can run scheduled jobs and notify you via email when the job is done running.
Navicat is capable of synchronizing different data sources and schemas.
Navicat has an add-on feature (Navicat Cloud) that offers project-based team collaboration.
It establishes secure connections through SSH tunneling and SSL ensuring every connection is secure, stable, and reliable.
You can import and export data to diverse formats like Excel, Access, CSV, and more.
Despite all the good features, there are a few cons that you need to consider before buying Navicat:
The license is locked to a single platform. You need to buy different licenses for PostgreSQL and MySQL. Considering its heavy price, this is a bit difficult for a small company or a freelancer.
It has many features that will take some time for a newbie to get going.
You can use Navicat in Windows, Linux, Mac OS, and iOS environments. The quality of Navicat is endorsed by its world-popular clients, including Apple, Oracle, Google, Microsoft, Facebook, Disney, and Adobe. Navicat comes in three editions called enterprise edition, standard edition, and non-commercial edition. Enterprise edition costs you $14.99/month up to $299 for a perpetual license, the standard edition is $9.99/month up to $199 for a perpetual license, and then the non-commercial edition costs $5.99/month up to $119 for its perpetual license. You can get full price details here, and download the Navicat trial version for 14 days from here.
Navicat Pricing
: $5.99/month up to $299/license
6. HeidiSQL
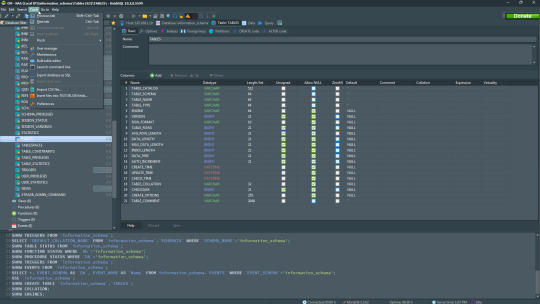
HeidiSQL is a new addition to our best PostgreSQL GUI tools list in 2021. It is a lightweight, free open source GUI that helps you manage tables, logs and users, edit data, views, procedures and scheduled events, and is continuously enhanced by the active group of contributors. HeidiSQL was initially developed for MySQL, and later added support for MS SQL Server, PostgreSQL, SQLite and MariaDB. Invented in 2002 by Ansgar Becker, HeidiSQL aims to be easy to learn and provide the simplest way to connect to a database, fire queries, and see what’s in a database.
Some of the advantages of HeidiSQL for PostgreSQL include:
Connects to multiple servers in one window.
Generates nice SQL-exports, and allows you to export from one server/database directly to another server/database.
Provides a comfortable grid to browse and edit table data, and perform bulk table edits such as move to database, change engine or ollation.
You can write queries with customizable syntax-highlighting and code-completion.
It has an active community helping to support other users and GUI improvements.
Allows you to find specific text in all tables of all databases on a single server, and optimize repair tables in a batch manner.
Provides a dialog for quick grid/data exports to Excel, HTML, JSON, PHP, even LaTeX.
There are a few cons to HeidiSQL:
Does not offer a procedural language debugger to help you debug your code.
Built for Windows, and currently only supports Windows (which is not a con for our Windors readers!)
HeidiSQL does have a lot of bugs, but the author is very attentive and active in addressing issues.
If HeidiSQL is right for you, you can download it here and follow updates on their GitHub page.
HeidiSQL Pricing: Free (open source)
Conclusion
Let’s summarize our top PostgreSQL GUI comparison. Almost everyone starts PostgreSQL with pgAdmin. It has great community support, and there are a lot of resources to help you if you face an issue. Usually, pgAdmin satisfies the needs of many developers to a great extent and thus, most developers do not look for other GUI tools. That’s why pgAdmin remains to be the most popular GUI tool.
If you are looking for an open source solution that has a better UI and visual editor, then DBeaver and OmniDB are great solutions for you. For users looking for a free lightweight GUI that supports multiple database types, HeidiSQL may be right for you. If you are looking for more features than what’s provided by an open source tool, and you’re ready to pay a good price for it, then Navicat and DataGrip are the best GUI products on the market.
Ready for some PostgreSQL automation?
See how you can get your time back with fully managed PostgreSQL hosting. Pricing starts at just $10/month.
While I believe one of these tools should surely support your requirements, there are other popular GUI tools for PostgreSQL that you might like, including Valentina Studio, Adminer, DB visualizer, and SQL workbench. I hope this article will help you decide which GUI tool suits your needs.
Which Is The Best PostgreSQL GUI? 2019 Comparison
Here are the top PostgreSQL GUI tools covered in our previous 2019 post:
pgAdmin
DBeaver
Navicat
DataGrip
OmniDB
Original source: ScaleGrid Blog
3 notes
·
View notes
Text
Phpstorm Slow

Once upon a time, PhpStorm was the IDE I loved. I thought I would use it all my life, happily without looking at any other editor.
Phpstorm Slow Cooker
Phpstorm Slow Ftp
Phpstorm Show Main Menu
Phpstorm Slow Startup
I was wrong.
I discovered the true love of my live, called Vim.
Are you confused? Are you yelling “why” to the deaf sky? What happened between PhpStorm and me? Why a PHP developer would use this… old smelly thing called Vim?
Phpstorm does a very good job of saving, importing, exporting settings so upgrading your Phpstorm version doesn't require you to redo all your settings. This is also beneficial if you are setting up Phpstorm on another computer or sharing your company coding style guide with other developers. Now you will be working with the terminal - you can use Window's cmd or the PHPStorm's terminal. I prefer to use the terminal built inside the PHPStorm - it is: better, faster and more intuitive. I prefer to use the terminal built inside the PHPStorm - it is: better, faster and more intuitive.
I was happy with PhpStorm. We had a productive relationship. Its basic rules was simple, as simple as many text editor in the computing world. You use a mouse, you click where you want to change or add something, somewhere. The basic editor. We are all used to that from the beginning of times!
PhpStorm provides the following main ways to upload project files and folders to deployment servers: Manually, at any time through a menu command. Automatically, every time a file is updated, or before starting a debugging session, or during a commit to your version control system. PHPStorm was and now is very slow under Linux (currently am using version 2016.2). All its versions were slow. Even at powerful computers with SSD. Jamming and sticking is a normal behavior for this program. It's a pity that authors do not pay attention to it. Running PHP storm on windows 10 is incredible slow. I'm running PHPstorm on my windows 10 laptop, where it is extremly slow. I made a screenshot showing the about information. I have a 64bit so I'm correct running phpstorm64.exe for this. During work I'm also using phpstorm on an.unix system, which is great. So I thought about buying a private license for me at home, but with the given performance I really cant work.
I loved the auto completion with PhpStorm! I loved the fact that you could find easily a peculiar file even within a massive codebase. I loved its stability. I liked the snippets. I loved its numerous options to refactor, generate getter / properties / methods using one or two handy shortcuts.
And now, I don’t use it anymore.
Firstly, I want to tell you my story with Vim and PhpStorm in order for you to understand how you can switch between the two.
Then I will compare the two and underline what Vim brings on the table.
Vim: the Hate before the Love
It was a newcomer who first showed me Vim.
He was a PHP developer hired in the company I was working for. I was curious, I began to look what tools and IDE he was using, expecting seeing the good old PhpStorm, like every good PHP developer who suffered too much with Eclipse.
“I don’t use PhpStorm” said the newcomer. “Vim is way better!”.
Vim! This dinosaur! This boring terminal editor! So complex nobody knows how to use it, except the perfect nerd without life / girlfriend / whatever real things!How can he compares the wonderful shiny PhpStorm with this relic?
At that point, I went in a crusade. I tried to show him how a good IDE with tons of features could suit his needs even better than this… Vim thing! Without success, I let him swimming in his ocean of mistakes, sad he couldn’t see the Truth as I was.
Time past. Days became years. Years became centuries. I began to understand that this newcomer was a very interested and knowledgeable developer. It astonished me. How can he be that good and use Vim?
Quickly we began to work on the same project: a tandem was born.
The Time of Mockeries
I mocked my work tandem. A lot. He was persisting in his mistake to use Vim and I couldn’t do anything to dissuade him.
I mocked the austerity of Vim’s interface. I mocked the fact that he had to configure everything in config files. I mocked that this configuration (in my opinion) was always broken. Who wants to code with a broken IDE? It was pure nonsense.
With hindsight, I may have been a bit jealous. He mastered a tool full of shortcuts in order to use the mouse as less as he can, and, without knowing it, I envied him.I envied him because I didn’t feel capable to learn how to use Vim in a reasonable amount of time.
More and more, my contempt toward Vim let place to curiosity.
PhpStorm and Me: the Breakdown
My attraction and curiosity toward Vim kept growing and growing.
The hate became love when I decided two things:
Quitting the company I was working in.
Learning to type like true crazy typists.
I wasn’t happy at that time, till I decided to quit the company I was working for. My decision opened new horizons and a true desire to learn more about everything.Moreover, I wanted to learn a maximum from my fellow work tandem before leaving for new and crazy adventures.
I wanted at the same moment to get rid of my very bad habit of typing with two or three fingers. I wanted to use typists techniques: using the home row keys and my ten fingers.
Quickly I began to understand the power of this typing method. You feel definitely faster and more in control of your computer. A very cool sensation!I knew as well that Vim was designed for this type of typing. Due to the pleasure I had with my new typing techniques, I slowly decided to give Vim a chance.
More and more, I asked tips to my tandem in order to learn how to use The Beast. At first, I just wanted to use it for editing configuration or text files, not for actually coding, too afraid that it would put down my productivity.
I stopped using PhpStorm in two weeks. Transfer from bitpay to coinbase.
Vim vs PhpStorm
Vim on the left, PhpStorm on the right. The clash.
Here we are finally: the comparison between PhpStorm and Vim. Do you want to replace PhpStorm with something more powerful and versatile? Do you want to be sure that Vim is the good choice?
I won’t cover here how to do a PHP IDE out of Vim since I wrote another article on the topic.
Who’s in Charge: You or Your IDE?
An IDE is obviously very important for developers. It’s the tool which helps us doing what we like: coding. It simplifies our lives, automatize all these boring stuff you repeat over and over again.
Therefore your IDE should reflect the way you are coding. It should give you the choice for you to do what you want, the way you want.
PhpStorm doesn’t really give you many choices: it is a bunch of tools and you have to stick with them.I never used 70% of it. I know a lot of shortcuts and I am able to navigates in the panels without even using the mouse. However I never used the composer tools / terminal / git GUI / database interface thingy integrated in PhpStorm.
I couldn’t configure that. I couldn’t choose to install what I wanted, what I needed. PhpStorm was choosing for me.
The result? Many panels and notifications popping, a lot of visual noise which was totally useless for me. Perfect to lose focus.
Some may argue that PhpStorm is really configurable compared to other IDE. It is nothing compared to Vim.
Vim has a great community who develop a LOT of plugin. Nowadays you can install them and get rid of them by typing two words. Not even command lines. Words.
You can choose exactly what you want and what suits you. You can even modify it easily and extends it. Vim can be bent following your wishes.
You are the master.
PhpStorm Only Allow You to Code in… PHP
Another point which was bothering me for a long time. Of course you can use it to write HTML / CSS but you won’t have many tools for those. And what about Go you want to learn so hardly? Ruby? Basic?
Vim is an editor, not an IDE, but you can make an IDE out of it for every language you want. Right now, I have very good auto completion systems for PHP, JavaScript, Go and Ruby.
Even better: the plugins can be activated depending of the file type you are editing. You will never have the Ruby autocompletion while editing a PHP file. Sweet, isn’t it?
I have tons of plugins for refactoring, creating snippets and so on. No need to change IDE and get use to different interfaces. With Vim I can switch from one language to another transparently. Believe me, it’s awesome.
When I open Vim, everything I need is there for whatever language.
Vim is Light
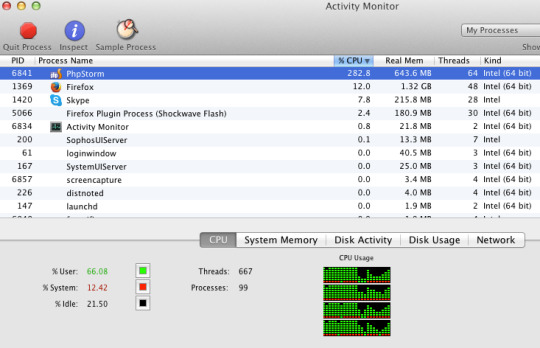
Each time I open PhpStorm I have the impress that my computer is running a marathon. And he doesn’t do well.
Even on my very lightweight arch linux / i3 system (running on very good hardware), everything suddenly slow down. Welcome to the Matrix, or the stop motion applied to computing!
Sometimes I like to open two projects at the same time to get some configuration or code from one to another. Sometimes I want to open even more if I need to work with multiple micro services.
With PhpStorm… you know what I am talking about. Your memory scream, your CPU burns some calories, your vans consume more electricity than your fridge.
In comparison, Vim is a feather. So light! You can run multiple instances of it if you want, your computer won’t slow down.Try to use Vim, then come back to PhpStorm and you will see what I’m talking about.
Your hardware will love Vim.
Vim is Fun
This is something I didn’t imagine: Vim is really fun to use. This is something my work tandem told me, and it’s so true: it’s basically the gamification of coding.
It is time to precise a bit how to use it. There are many modes in this editor:
The Normal mode is for executing commands (delete words, lines, paragraphs and a lot of others). Basically, it’s to edit your text (or code).
The insert mode is there for you to concretely write.
A simple separation of concern and, believe me, it’s brilliant!
This is Vim: you can learn to be productive with it in a couple of minutes (I promise). Get used to it may take a bit more time, and then you will learn new stuff all your life. The whole editor feel so logical that you will come up with new way to do things without even asking Google. Yes, by yourself, only!
Like: “Maybe if I press those keys, it will do that eventually. Yes it does! I’m a genius!”
Indeed, Vim is so sweet, you can talk to it like an old friend. For example: you want to delete all characters from your cursor till the coma? In Normal mode, type dt,, which means delete till ,. You can do as well dtf, which delete till f. Magical!
In comparison, PhpStorm is boring. To me, 70% of the tools are useless (by adding a useless graphical interface on top on very efficient terminal tools) and the editor itself use the mouse extensively, like 99% of the editors in the world.If shortcuts were invented, it’s because it’s more convenient and fast to use the keyboard to execute actions. Vim definitely nailed that.
If you want to build a complete Mouseless Development Environment, you might be interested by this book.
To be honest with you, I always have the impression I’m some sort of a hacker doing crazy things with my keyboard in three different Vim instances. Of course I am just writing down my shopping list but… who cares? The feeling is great!
I am always happy when I discover a new shortcut or way to do thing even more easily. It’s like finding a secret way to beat a video game even faster! Gamification, I tell you.
PhpStorm Cost Money
PhpStorm is not free, far from it. Even if it’s pretty affordable (around 100euro), you pay only for one year. Welcome to the era of renting instead of acquiring…
If you want a Go, Ruby or whatever IDE for whatever language, you have to pay. Again.
Vim is free, available on everything (linux, windows, mac).
You Might be Faster with Vim…
Honestly I don’t care that much if I’m faster with it. To me, being fast doesn’t mean being a good developer. Our brain is more valuable than our typing speed.
However you will feel fast and precise, which is a good cherry on the cake. Adblock plus google chrome. Especially when you have to move a bunch of classes and renaming namespaces again and again. You know, what we call refactoring: Vim can simplify that and many other things.
Vim Allow You to do More than PhpStorm
Here some examples what you can do with Vim but not with PhpStorm:
You can search through open tabs (“buffers” in Vim), files and entire projects very fast with the fzf plugin. Even faster than with PhpStorm.
You can go directly to php.net with a keystroke when you are on a method / function / whatever to see its definition. Very handy.
You can run Vim with a GUI or in the terminal. Doing the last will open a lot of possibility like the winning combo zsh / tmux / Vim. You will have a lot of flexibility and fun with those tools, I can guarantee it!
Since a tonne of plugins exist for Vim you can extend the possibilities as you wish. You can even write little functions which extend / alter whatever you want.
The possibilities are infinite.
A Great Community
A lot of people use Vim and will be happy to help you. You have access to a lot of plugins for every development language you dream of.
Some will argue (as I did) than Vim is too old. It is a strength! Think about it: what software is more stable than the one tested for decades?
It is very stable indeed, thanks to the community. If you are stuck, if you have a problem, you have tons of resources where you can found the solution.
Neovim!
Vim is old and maintained for a long long time, which means as well that its codebase is (apparently) not-that-goodish.That is why a bunch of people rewrote the whole editor. It’s called Neovim and it’s compatible with every Vim plugin available.
Even if it’s still in beta I didn’t have any issues with it. It works like a charm.
I want to be in love with Vim! Tell me how!
First you need to be motivated and learn how to properly use it. It is less complicated than you think.
You Work on Linux or macOs? Try Vimtutor!
First, go to your terminal.Then type vimtutor. Press enter.Here we are!
Vimtutor comes with a lot of linux-based distribution. It is a 15 minutes tutorial for you to learn Vim’s basics. After that, you can begin to use Vim for whatever need you have.
15 minutes! Who said that Vim was complicated?
You don’t believe me? Just try it!
Get Inspired by Other’s Configurations
Vim alone is a bit… too weak functionality wise. You need plugins, and the best way to find what you need is to look to configurations from other developers.They are most of the time hosted publicly on github.
Here my personnal config.
Be careful though. It is tempting to copy entire configuration from others but you will be lost very quickly. Vim needs to be personalized. It can suits you if you take the time to tune it depending on your needs.
Take the configurations available on the web as inspirations. Copy them little by little, plugin by plugin. Test it, try to understand what the plugin is doing. Take your time. Read the plugin documentations. In short: do everything with Vim you should do as a developer. Analyzing, acting step by step and see if it suits your need.
Vim Cheat Sheet
My advice for the beginning: having a cheat sheet printed you can refer to. You can find a lot of them everywhere.
It will help you memorising the basics of Vim and experimenting to be more effective and have even more fun!
Vim is a Winner! But… Do I Miss PhpStorm?
I hope you are now ready to try Vim, and maybe replace PhpStorm!
Now let be honest with one another:
Yes PhpStorm has some tool that Vim doesn’t. The search plugin I use for example has less options than PhpStorm’s search… but is so faster, you’ve no idea.
In PhpStorm the auto completion was slightly better… in 2017. In 2019, Vim auto completion plugins are as good as any IntelliJ plugin.
You need to spend time configuring Vim to have a powerful PHP IDE.However, it means as well that you can personalize it the way you exactly want it to behave. An IDE should answers your need, not imposing them!
After three weeks using Vim as my PHP IDE, I tried to reinstall PhpStorm. I used it for ten minutes… before coming back to Vim.
I won’t get back to you, PhpStorm. Never. Bartender for wedding near me. I am a faithful man to Vim now.
This section provides the list of solutions and workarounds for common problems with deployments in PhpStorm.
Collecting PhpStorm deployment logs
If your issue is not addressed in this section, contact our support engineers. If asked to provide deployment logs, follow the instructions to collect them.
Select Help | Configure Debug Log in the main menu.
In the Custom Debug Log Configuration dialog that opens, add the following lines depending on the issues you are experiencing:
Issues with deployment/synchronization: #com.jetbrains.plugins.webDeployment
Issues with issues with SSH/SFTP: #com.intellij.ssh
Click OK and reproduce the issue.
Locate the log file by selecting Help | Show Log in Explorer (for Windows and Linux) or Help | Show Log in Finder (for macOS).
If necessary, you can locate the log manually:
Syntax
%HOMEPATH%.<product><version>systemlog
Example
C:UsersJohnS.PhpStorm2021.1systemlog
Syntax
~/Library/Logs/<product><version>
Example
~/Library/Logs/PhpStorm2021.1
Syntax
~/.<product><version>/system/log
Example
~/.PhpStorm2021.1/system/log
The most recent log file is named idea.log; older files names end with a number, that is idea.log.1, idea.log.2, and so on. In most cases you need only the most recent one.
Attach the log file(s) to the issue or forum thread.
General troubleshooting
Deployment is slow or fails
Deployment can be a resource-intensive operation, especially if a project or a deployment server contains lots of directories and files. In the Settings/Preferences dialog Ctrl+Alt+S, navigate to Build, Execution, Deployment and explore the following configuration options, which can speed up deployment:
Exclude directories that are not needed from deployment (for example, images). This can be done from the Deployment: Excluded Paths Tab page.
On the Options page, clear the Overwrite up-to-date files to skip uploading files that don't need to be uploaded.
Depending on the server, switching between active and passive transfer mode in the advanced FTP settings may help. This can be done by toggling Passive mode in the Deployment: Connection Tab for the server.
Limit number of concurrent FTP connections. This can be done by toggling Limit concurrent connections and setting the number of connections (usually 3-5 concurrent connections is OK for any server if you experience problems with a greater number of connections) in the Deployment: Connection Tab for the server.
File transfer becomes unresponsive
This can happen in case PhpStorm tries to resolve an IPv4 host via IPv6. By default, PhpStorm only listens for incoming IPv4 connections. To make sure IPv6 is disabled, check the PhpStorm JVM options:
Select Help | Edit Custom VM Options from the main menu.
In the .vmoptions file that opens, make sure the -Djava.net.preferIPv4Stack=true line is present.
Restart PhpStorm.
Otherwise, to enable IPv6 support, delete the -Djava.net.preferIPv4Stack=true line. In this case, make sure to add the IPv6 entry for your host to the /etc/hosts file.
Download/upload actions are not available
Download/upload actions may not be available because of a missing mapping. If a file or folder that you want to download is not configured in any mapping, PhpStorm will not download it. Mappings can be configured as described in the Map project folders to folders on the server and the URL addresses to access them.
For some actions, a default deployment server needs to be selected on the Deployment page of the Settings/Preferences dialog.
Some folders are not deployed
A common cause for folders not being deployed is when they are explicitly excluded. To solve this, in the Remote host tool window right-click the given folder and select Remove Path From Excluded from the context menu. Once this is done, the folder will be deployed.
This can also be configured from the Deployment page of the Settings/Preferences dialog Ctrl+Alt+S. Open the Excluded Paths tab for the server and remove the excluded path. Note that both the source and the target folders should be checked. Folders can also be excluded by name on the Options page under Exclude items by name.
Sharing deployment configurations between projects
Deployment Servers are configured at the IDE level: they are available for all projects and can be shared between them.
Note that only the name and connection details (specified on the Deployment: Connection Tab tab) are shared between projects: mappings and excluded paths are project-specific and have to be configured separately. Using this approach, connection details have to be entered just once, while mappings and excluded paths can be configured per-project, sharing the connection details. This can be useful when projects share the same deployment server and use the same connection settings. If connection settings are different between projects, they have to be configured for every project separately.
If necessary, you can set a server to be visible in a single project by selecting the Visible only for this project checkbox on the Deployment: Connection Tab.
IDE settings do not allow me to configure mappings
The default new project settings are used to configure the default settings for new projects and do not affect the currently opened projects. To configure settings for the current project, use the Settings/Preferences dialog Ctrl+Alt+S.
Can subfolders within the same folder have different deployment settings? Can a local folder be deployed to multiple locations?
When uploading folders and configuring mappings, note the following:
You can specify mappings for specific folders to different paths on the deployment server. This can be configured on the Deployment: Mappings Tab for the server.
You can exclude specific folders and files from being uploaded/downloaded. This can be configured on the Deployment: Excluded Paths Tab for the server.
You cannot upload the same folder (or subfolders) to different sites at once. A separate deployment configuration needs to be created for each of them and uploaded to each site one by one.
If this is what you want to do, we recommend automating the process with a capable tool. For example, Phing has an FTP task which can be used from PhpStorm. Within PhpStorm, you can use the Sync with Deployed.. command and select from available deployment servers for every upload.
I cannot assign a keyboard shortcut to the Sync With Deployed to My Server menu item
It is not possible to assign a keyboard shortcut directly to the Sync With Deployed to <server name> command, only to the generic Sync with Deployed to.. command, which will then display a popup menu with the list of servers. Refer to Configure keyboard shortcuts for details.
If you do wish to assign a keyboard shortcut to a specific deployment server, it is possible to record a Macro and assign a shortcut to it instead:
Select Edit | Macros | Start Macro Recording and start recording a Macro.
Select Tools | Deployment | Sync With Deployed to <server name> and close the sync window.
Stop recording the Macro by selecting Edit | Macros | Stop Macro Recording from the main menu.
Set the Macro name, for example Sync with <server name>.
Open in the Settings/Preferences dialog Ctrl+Alt+S, select Keymap and find the Macros node. From the context menu of the new sync Macro that was just recorded, select Add keyboard shortcut and provide the desired shortcut .
How do I deploy a database using PhpStorm?
There are a couple of ways to deploy a database using PhpStorm:
Make use of the integrated database tools and run the required DDL and SQL statements manually.
Work with Phing and set up a DBDeploy task.
Can I run a script or executable on my files before the upload occurs?
Things like minifying CSS, optimizing images, encoding PHP files using IonCube and so on are actions that you may want to execute before an upload happens. The best approach to do this is run them not when the upload is started, but when the files are changed, by using File watchers in PhpStorm. When the time comes to upload them to a deployment server, upload the processed files instead.
Note that the Skip external changes checkbox must be cleared on the Options page for this to work.
Sometimes files are not uploaded automatically
By default, PhpStorm uploads the files if they are changed by some external processes (VCS, transpilers, and so on). If the files are not uploaded, make sure that the Upload changed files automatically to the default server on the Options page is set to Always and the Skip external changes checkbox is cleared.
Can I run pre- and post-deployment actions?
It's possible using Run/Debug configurations. You can create a fake Run/Debug Configuration, or a Run/Debug configuration that should be the last step, and add the required steps under Before launch.
As an alternative, we recommend using Phing or any other build system to execute complex sequences of steps.
FTP troubleshooting
FTP issue: Invalid descendent file name 'http:'
When a deployment server has been configured or when using the Test Connection button in the project settings, the Invalid descendent file name 'http:' error is displayed. Note that all file names with a colon : in the name will be considered invalid.
This can happen if a file containing http: Pioneer desserts. in its name exists in the project. The library that PhpStorm uses to connect to FTP (Apache Commons VFS) cannot read the contents of a folder containing such a file, which causes the operation to fail. The only solution is to remove the file containing http: in its name from the project.
PhpStorm seems to connect to the server but can't list files or perform upload
Phpstorm Slow Cooker
This may be because the deployment server requires a so-called passive FTP connection. To set this mode, select the Passive mode checkbox in the Deployment: Connection Tab for the selected server.
Phpstorm Slow Ftp
Limiting the number of concurrent FTP connections may also help in this situation. To do this, open the Deployment: Connection Tab for the selected server, select the Limit concurrent connections checkbox, and set the number of connections (usually, 3-5 concurrent connections is OK for any server if you experience problems with a higher number of connections).
Phpstorm Show Main Menu
Deploying files when changing branches using Git checkout
There are a couple of ways to go about deploying files when switching between branches using Git checkout:
One way is to configure deployments to always upload files and external changes. To do this, on the Options page, set Upload changed files to the default server to Always and clear the Skip external changes checkbox. Note that this will upload all files to the server when switching branches.
Use git-ftp. It performs minimal uploads and is also able to mirror file and directory removals.
Phpstorm Slow Startup
Known issues
Is rsync supported to synchronize files and folders with a deployment server?
No. If you feel this should be part of PhpStorm vote for this issue.
0 notes
Text
Git Visual Studio Code

GitDuck is a video chat tool built for developers that has direct integration to the IDE so you can talk, share your code in real-time and easily collaborate with your team. It enables remote developers to work as if they were side by side. With GitDuck you can code with people using different IDEs, like VSCode or WebStorm, IntelliJ or PyCharm.
Visual Studio Connect To Git
Git For Visual Studio Code
Chapters ▾
Visual Studio Code has git support built in. You will need to have git version 2.0.0 (or newer) installed. The main features are: See the diff of the file you are editing in the gutter.
The easiest way to connect to your GitHub repositories in Visual Studio. Download GitHub Extension for Visual Studio anyway. Download Download GitHub Extension for Visual Studio. By downloading the extension you agree to the End-User License Agreement. Requires Windows and Visual Studio.
1. Getting Started
1.1 About Version Control
1.2 A Short History of Git
1.3 What is Git?
1.4 The Command Line
1.5 Installing Git
1.6 First-Time Git Setup
1.7 Getting Help
1.8 Summary
2. Git Basics
2.1 Getting a Git Repository
2.2 Recording Changes to the Repository
2.3 Viewing the Commit History
2.4 Undoing Things
2.5 Working with Remotes
2.6 Tagging
2.7 Git Aliases
2.8 Summary
3. Git Branching
3.1 Branches in a Nutshell
3.2 Basic Branching and Merging
3.3 Branch Management
3.4 Branching Workflows
3.5 Remote Branches
3.6 Rebasing
3.7 Summary
4. Git on the Server
4.1 The Protocols
4.2 Getting Git on a Server
4.3 Generating Your SSH Public Key
4.4 Setting Up the Server
4.5 Git Daemon
4.6 Smart HTTP
4.7 GitWeb
4.8 GitLab
4.9 Third Party Hosted Options
4.10 Summary
5. Distributed Git
5.1 Distributed Workflows
5.2 Contributing to a Project
5.3 Maintaining a Project
5.4 Summary
6. GitHub
6.1 Account Setup and Configuration
6.2 Contributing to a Project
6.3 Maintaining a Project
6.4 Managing an organization
6.5 Scripting GitHub
6.6 Summary
7. Git Tools
7.1 Revision Selection
7.2 Interactive Staging
7.3 Stashing and Cleaning
7.4 Signing Your Work
7.5 Searching
7.6 Rewriting History
7.7 Reset Demystified
7.8 Advanced Merging
7.9 Rerere
7.10 Debugging with Git
7.11 Submodules
7.12 Bundling
7.13 Replace
7.14 Credential Storage
7.15 Summary
8. Customizing Git
8.1 Git Configuration
8.2 Git Attributes
8.3 Git Hooks
8.4 An Example Git-Enforced Policy
8.5 Summary
9. Git and Other Systems
9.1 Git as a Client
9.2 Migrating to Git
9.3 Summary
10. Git Internals
10.1 Plumbing and Porcelain
10.2 Git Objects
10.3 Git References
10.4 Packfiles
10.5 The Refspec
10.6 Transfer Protocols
10.7 Maintenance and Data Recovery
10.8 Environment Variables
10.9 Summary
A1. Appendix A: Git in Other Environments
A1.1 Graphical Interfaces
A1.2 Git in Visual Studio
A1.3 Git in Visual Studio Code
A1.4 Git in IntelliJ / PyCharm / WebStorm / PhpStorm / RubyMine
A1.5 Git in Sublime Text
A1.6 Git in Bash
A1.7 Git in Zsh
A1.8 Git in PowerShell
A1.9 Summary
A2. Appendix B: Embedding Git in your Applications
A2.1 Command-line Git
A2.2 Libgit2
A2.3 JGit
A2.4 go-git
A2.5 Dulwich
A3. Appendix C: Git Commands
A3.1 Setup and Config
A3.2 Getting and Creating Projects
A3.3 Basic Snapshotting
A3.4 Branching and Merging
A3.5 Sharing and Updating Projects
A3.6 Inspection and Comparison
A3.7 Debugging
A3.8 Patching
A3.9 Email
A3.10 External Systems
A3.11 Administration
A3.12 Plumbing Commands
2nd Edition
Git in Visual Studio Code
Visual Studio Code has git support built in.You will need to have git version 2.0.0 (or newer) installed.
See the diff of the file you are editing in the gutter.
The Git Status Bar (lower left) shows the current branch, dirty indicators, incoming and outgoing commits.
You can do the most common git operations from within the editor:
Initialize a repository.
Clone a repository.
Create branches and tags.
Stage and commit changes.
Push/pull/sync with a remote branch.
Resolve merge conflicts.
View diffs.
With an extension, you can also handle GitHub Pull Requests:https://marketplace.visualstudio.com/items?itemName=GitHub.vscode-pull-request-github.
The official documentation can be found here: https://code.visualstudio.com/Docs/editor/versioncontrol.
Those new to Visual Studio (VS) Code might just see a code editor. The true power of VS Code lies in it’s extensions, integrated terminal and other features. In this hands-on tutorial, you’re going to learn how to use Visual Studio Code by working with a Git repo.
Related:What You Need to Know about Visual Studio Code: A Tutorial
Using built-in VS Code tooling and a few extensions, you’re going to write code and commit that code to source control using a single interface.
This blog post is a snippet of a chapter from the eBook From Admin to DevOps: The BS Way to DevOps in Azure. If you like this chapter and want to learn about doing the DevOps in Azure, check it out!
Tutorial Overview
In this tutorial, you’re going to learn how to use various VS Code features on Windows by building a project using Visual Studio Code and Git. You’ve been tasked with figuring out how to build an Azure VM with Terraform as a small proof of concept (POC) project. You have VS Code and have heard of its capability as a full IDE and want to put it to the test.
You’re going to:
Create a VS Code workspace to share with your team
Install the Terraform extension
Modify the Terraform configuration file to fit your naming convention and Azure subscription
Create a snippet for a common task you’ve found yourself typing over and over
Commit the Terraform configuration file to a Git repo
This tutorial will not be meant to show how to use Terraform to deploy Azure VMs. We already have an article on Terraform and Azure VMs for that. This tutorial will focus on learning Visual Studio Code.
Does this sound like an interesting project? If so, read on to get started!
Prerequisites
To follow along with this Visual Studio Code Git tutorial, please be sure you have the following:
VS Code – All examples will be using VS Code 1.44 although earlier versions will likely work as well.
Terraform – All examples will be using Terraform for Windows v0.12.24.
Git for Windows installed – All examples will be using v2.26. If you’d like VS Code to be Git’s default editor, be sure to select it upon installation.
Clone the Git Repo
Since this tutorial is going to be focusing on working with code in a GitHub repo, your first task is cloning that GitHub repo to your local computer.
For this project, you’ll be working from a GitHub repo called VSCodeDemo. Since VS Code has native Git integration, you can clone a Git repo with no additional configuration. To do so:
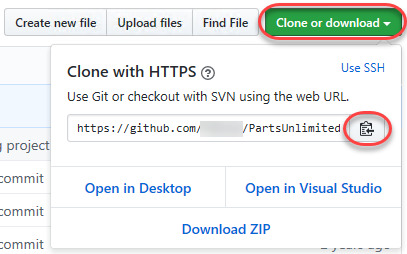
Open the command palette with Ctrl-Shift-P, type git where you will notice various options, as shown below.
2. Choose Git: Clone which VS Code will then prompt you for the repo’s URL. Here, provide the URL https://github.com/NoBSDevOps/VSCodeDemo.gitand hit Enter.
3. Choose a folder to place the cloned project files. This project will place the repo folder in the root of C:. Once you select the repository location, VS Code will invoke git.exe in the background and clone the repo to your computer.
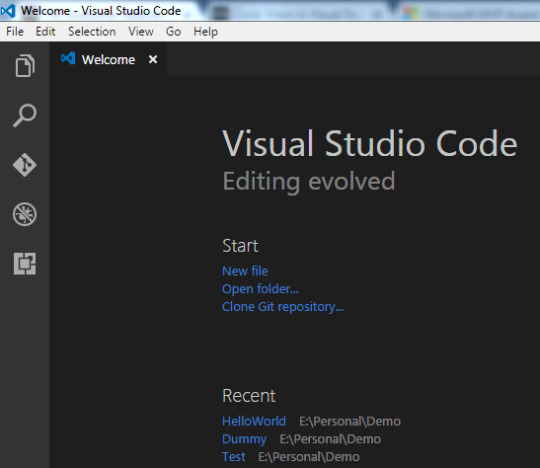
4. When it’s finished, VS Code will prompt if you would like to open the cloned repository immediately as shown below, click Open to do so.
You now have an open folder in VS Code for the Git repo. You now need to “save” this open folder and all settings you’ll be performing in a workspace.
Creating a Workspace
Now that you have a folder opened containing a Git repo, save a workspace by going up to the File menu and clicking on Save Workspace As….
Save the workspace as project in the project folder. VS Code will then create a file called project.code-workspace in the Git repo folder. This workspace now knows what folder you had opened. Now when the workspace is opened in the future, it will automatically open the C:VSCodeDemo folder.
Now, instead of a folder name, you will see the name of the workspace.
Setting up Extensions
Extensions are one of the most useful features of VS Code. Extensions allows you to bolt on functionality to help you manage many different projects. In this tutorial, you’re going to be working with Terraform.
Open up one of the Terraform configuration files in the workspace along the left sidebar. Notice how an editor tab opens up and shows the text but that’s about it. There’s no usual syntax highlighting or any other features. VS Code thinks this is a plain-text file and displays it accordingly. Let’s remedy that.
For VS Code to “understand” a Terraform configuration file, you need an extension. Extensions are a huge part of VS Code that opens up a world of new functionality. In this case, you need the Terraform extension to assist in building Terraform configuration files and deploying infrastructure with Terraform.
To install the Terraform extension, click on the extensions button on the Activity Bar and search for terraform. You’ll see multiple extensions show up but for this project, click on Install for the top result created by Mikael Olenfalk. VS Code will then install the extension.
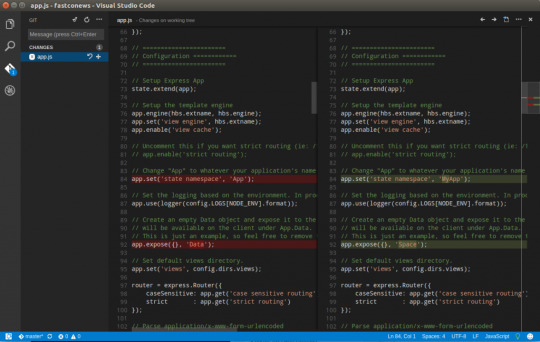
Once installed, navigate back to the workspace and click on one of the TF files in the workspace. You’ll immediately see one of the most obvious differences when using an extension, syntax coloring.
Now you can see in the following screenshot that VS Code “knows” what a comment is (by making it green), what a string is (by making it red) and so on. It’s now much easier to read a Terraform configuration file.
There’s a lot more functionality included with Mikael’s Terrafom extension. Be sure to investigate all of the potential benefits you can get from this extension if using Terraform.
Code Editing
Chances are when you find a script or configuration file on the Internet, it’s not going to be exactly how you need it. You’re going to need to modify it in some way.
In this tutorial’s example, you’d like to change the main block label in the infrastructure-before.tf. Terraform configuration file to perhaps project. To do that, you’ll need to find and replace some text. In VS Code, there are multiple ways to do that.
One of the most common ways to find a string and replace it with another is the good ol’ find and replace functionality.
Hit Ctrl-F and you’ll see a dialog similar to the following screenshot. Here you can type in the string you’d like to find and if you click on the down arrow, it will expand and provide a spot to input a string to replace it with. In the screenshot below, you can see options like Aa and Ab| for case-sensitive searching and also regular expressions.
You can also perform a “find and replace” using Ctrl-D. Simply select the text you’d like to find and begin hitting Ctrl-D. You’ll find that VS Code will begin to highlight each instance of that string with a blinking cursor.
When you’ve selected all items, start typing and VS Code changes all instances at once just as if you had selected each one individually.
Saving Time with Snippets
Let’s say you’re really getting into Terraform and Azure and are tired of typing out the Terraform configuration file block to create a new Azure resource group in the following code snippet.
To save time creating these blocks, create a VS Code snippet.
Related:VS Code Snippets: Speed Up Coding with Shortcuts
To create a VS Code snippet:
Copy the azurerm_resource_group block from the Infrastructure-before.tf Terraform configuration file.
2. Open the command palette with Ctrl-Shift-P.
3. Type “snippets” to filter the list of options.
4. Select Preferences: Configure User Snippets. This brings up a list of all the snippet files typically separated by language.
5. Type “terraform” to filter by the Terraform snippets.
6. Select terraform (Terraform) to open the Terraform snippets file (terraform.json).
Visual Studio Connect To Git
With the Terraform snippets file open, remove all of the comments and copy/paste the following JSON element inside.
Note the use of t and the backslashes. You can’t directly place tab characters inside of a snippet. To represent a tab character, you must use t. Also, you must escape characters like double quotes, dollar signs, curly braces, and backslashes with a backslash.
8. Save the terraform.json file.
Git For Visual Studio Code
9. Go back to the Terraform configuration file and type “rg”. Notice now you see an option to expand a snippet.
10. Select the rg snippet as shown above. Notice that it now expands to the snippet you just created with three items highlighted.
VS Code highlighted each of the words to act as placeholders due to the variables defined in the terraform.json snippets file (${1:block label}).
At this point, you can hit Tab and simply type in the values you need without worrying about how to create the block itself.
For a full breakdown on snippet syntax, be sure to check out the Snippets in Visual Studio Code documentation.
Commit Code to Git
At this point, you’ve cloned a public GitHub repo that contains a couple of Terraform configuration files. You’ve edited some files and now you’re ready to get those changes back up to the GitHub repo.
To get changes back up to the GitHub repo, you must first use Visual Studio Code and Git to commit changes to your local cloned Git repo. When you cloned the GitHub repo earlier, you downloaded not only the configuration files but also a Git repo.
If you’ve been following along, you should now have the cloned Git repo open with a couple of pending changes, two to be exact. How do you know that? By noticing the number in the Activity Bar, as shown below.
When you have a Git repo opened in Visual Studio Code, you’ll get a glimpse on the number of files that you can stage and commit into a local Git repo in the Activity Bar.
Click on the Source Control item on the left and you’ll see two items; the infrastructure-before.tf Terraform configuration file and the workspace you saved earlier (project.code-workspace). The configuration file will have a red M to the right indicating it’s been modified. The workspace file will have a green U to the right of it because it’s untracked meaning it’s currently not under source control.
To ensure both of these files get back to the GitHub repo, first create a helpful commit message indicating why you’re committing these files. The message can be any descriptive summary. Once you’ve written a commit message, stage the changes. Staging changes in Visual Studio Code in Git adds the file contents to the staging area preparing for a commit to the repo.
While on the Source Control pane, click on the + icon beside each file to stage them as shown below.
Once staged, click on the check mark to commit all of the staged changed, as shown below.
You will probably receive an error message indicating you need to configure a user.name and user.email in Git.
No problem. You simply need to provide Git the information it needs. To do that, go into your VS Code integrated terminal and run the following two commands changing my email address and name for yours.
Now try to commit the files. You should now see that the files commit to the repo.
You can stage all changed files without manually clicking on the + beside each file by committing them all at once. VS Code will automatically stage all of the files for you.
If you were working on a team with a shared repo, the next step would be to push these changes back to the GitHub repo or opening a pull request.
Conclusion
VS Code is a feature-rich IDE. It can not only help you write and understand code better, it can also build and make changes to infrastructure, invoke utilities and more. VS Code provides you one place to manage all of your development efforts.
Although this tutorial only covered a portion of what VS Code can do, this IDE is capable of so much more. If you’d like to learn about what VS Code can do, check out What You Need to Know about Visual Studio Code: A Tutorial.
0 notes
Text
The 5 Best IDEs for WordPress Development (And Why)
I've been developing with WordPress for around ten years now and, during that time, have used my fair share of Integrated Development Environments (IDEs). There's certainly no shortage of choice these days, with literally dozens of different editors/IDEs available. (We'll come to the distinction between an IDE and an editor shortly.)
Some IDEs are free, others commercial. Some are pretty basic by default, while others do almost everything you want right out of the box. This abundance of choice is great as it means you're almost certain to find one that suits the way you work and includes just the right set of features you're looking for.
Which IDE you end up using for a particular project is largely a personal choice. If you're used to using the same IDE for every project and it works for you then you may see no reason to use an alternative. However, it may well pay off trying out an alternative once in a while. What have you got to lose? If it results in a workflow boost then it's definitely worth your while!
If you're new to coding in WordPress then it can be a little daunting deciding which IDEs to take a look at. Too much choice can initially seem like a disadvantage. In this article, I'll hopefully help make this choice a little easier by covering five of the top web development IDEs currently available.
In no particular order, these are:
PhpStorm
Sublime Text 3
Atom
Coda 2
NetBeans
Soon we'll take a closer look at each one of our five IDEs in turn, to see how they can help you develop WordPress based projects. But first, let's find out what exactly what we mean by an IDE.
What's an IDE Anyway?
According to Wikipedia, an IDE is defined as:
An integrated development environment (IDE) is a software application that provides comprehensive facilities to computer programmers for software development. An IDE normally consists of a source code editor, build automation tools and a debugger.
Breaking this down, this basically means an IDE is a programming environment you can use to develop software without having to leave the interface. Look at it as a Swiss army knife of software development! Everything you need is just there, on hand, to help you get the job done.
Unlike most editors, an IDE usually has support for full projects rather than being able to deal with individual source code files. Even if an editor is capable of editing more than one file, it may not support creating a project file that encompasses an entire folder full of files, together with settings specific to that project. These project settings can include references to external software libraries, editor setup, version control, and debugging preferences.
Deciding which IDE to use is very subjective as it really depends on the features you're looking for, but some of the features you might expect to find in a full IDE could include:
Multiple language support (PHP, JS, CSS, HTML)
Code completion
Refactoring
Linting
Debugger
Build automation
SVN/Git integration
Code sniffing
Code highlight
Compiler
Interpreter
Database Management/Editing
There aren't any hard and fast rules as to what defines an IDE exactly. And if you asked a dozen different developers for their must-have IDE features, you'd likely get widely varying responses. The more features from the above list that are built in to an application, or available as an add-on, the closer it comes to being an IDE.
You may have noticed that some of the 'IDEs' we'll be covering in this tutorial aren't really IDEs at all, at first glance, but are editors masquerading as IDEs. So why include them at all in our list? Well, these particular editors have become extremely popular for web development and have strong user communities behind them which have driven forward an entire array of packages, extensions, and add-ons that actually go a long way to transforming them from just editors into very usable IDEs.
Think of them as 'lite' IDEs. Fast, robust, and highly configurable. Remember our Swiss army knife analogy from earlier? I think it's even more applicable here! Sublime Text 3, Coda 2, and Atom are excellent examples of these types of IDEs. They aren't traditional IDEs, but they can fit the bill beautifully when customised correctly.
There can be advantages to choosing a lightweight editor over a fully featured traditional IDE. Typically, you'd expect them to run open and run quicker as they are smaller applications and have less processing overheads. You'll know what I mean if you've ever opened an IDE with a large project and you have to wait a while for the application to open and index all the files before you can start editing!
Compare this with a 'lighter' editor with only the features added that you need. This results in an IDE that doesn't contain lots of functionality that you might never use. This helps keep your development setup light and fast. If you're on a very fast machine, though, you may not notice too much difference in day-to-day development between a full IDE and a carefully configured editor. However, if you don't have that luxury, then IDE performance could be a very important factor in your day-to-day development.
For these reasons, we decided to mix the list up somewhat and include both fully fledged and 'lite' IDEs which could appeal to WordPress developers with a wide range of expectations and requirements.
Let's kick off our IDE tour by looking at PhpStorm.
PhpStorm
PhpStorm is a commercial IDE from JetBrains, and it boasts an impressive array of features out of the box. One instantly attractive feature of PhpStorm is its support for WordPress development without the need for add-ons. PhpStorm automatically detects if your existing project is WordPress based. There's even a built-in WordPress Plugin project type to help get you started developing plugins more easily!
With WordPress supported in your project, you have full access to code completion for all the built-in WordPress functions, plus action and filter hook code completion! You can easily jump to function definitions and usages of particular functions, which is very useful. PhpStorm has the best WordPress support out of all the IDEs covered in our review.
For a new user, though, the sheer number of features available in PhpStorm could make it seem a little daunting to begin with. It's worth persevering with, though, as PhpStorm has excellent documentation and video tutorials available via the PhpStorm website.
Because PhpStorm is so feature rich, it can take a while to load, especially for WordPress projects as there are hundreds of files to index for the code completion features to work properly. However, once fully loaded, PhpStorm feels pretty responsive when editing files, with no noticeable lags. One noticeable thing about PhpStorm is how regularly it's updated with bug fixes and new features. Even though it has been around since 2009, PhpStorm still has a strong release cycle, which is very encouraging. You just feel that PhpStorm will be around for years to come.
And don't be put off by the name—PhpStorm isn't just for PHP development (it has full support for PHP 7, by the way). It also has excellent built-in support for HTML, JavaScript, and CSS, which are all essential to modern WordPress development!
PhpStorm Details:
Website: http://ift.tt/1qtYAaX
Commercial: Yes (Free 30-day trial available)
Initial Release: 2009
Regularly Updated: Yes
Extensions Supported: Yes - Plugins
Written In: Java
Cross-platform Support: Yes
Sublime Text 3
Next on our list is Sublime Text 3, developed by Jon Skinner. It's proven to be a very solid choice amongst web development professionals. Over the years, it has built up a significant following with its powerful, slick, and very fast user interface. It is also well known for being extremely stable and can handle very large files with ease, which other editors have been known to struggle with.
Interestingly, as popular as it is, Sublime Text 3 hasn't seen a major release for a few years now. Although it is regularly updated, these mostly contain bug fixes along with minor enhancements and new features. At the time of writing, Sublime Text 3 is still currently in beta, but it was first initially released as a beta in 2013! And there isn't currently any news on a new major release.
On startup, Sublime Text 3 is very quick to launch. In fact, it is almost instantaneous. It runs very fast too, with no lags or glitches, which makes for an extremely smooth and productive editing experience. It's fairly minimalist out of the box and features a package manager to install add-ons (written in Python) without the need to restart Sublime Text in most cases (which is a nice touch).
As mentioned above, it handles large file sizes extremely well and is very robust, which means it is not prone to crashing. There's a vast array of powerful add-ons (called packages) that make Sublime Text very flexible and versatile too. These include packages specific to WordPress development. There's no denying that Sublime Text 3 is a sheer pleasure to use.
You can also find a large amount of written tutorials and video tutorials on Sublime Text 3, which are mostly up to date. This seems to prove that Sublime Text 3 is still very popular and widely used by many web developers on a day-to-day basis, which is a testament to the quality of this fantastic little editor.
Even though Sublime Text is still currently very popular, it could possibly start to lose ground over the next couple of years. However, if the Sublime Text 3 package library continues to flourish then the lack of a major release may not be important in the short term.
You could certainly do a lot worse than give Sublime Text 3 a try. You can evaluate it for free for an unspecified amount of time.
Sublime Text 3 Details:
Website: http://ift.tt/1xDiEMc
Commercial: Free to evaluate (license required for continued use)
Initial Release: 2008
Regularly Updated: No
Extensions Supported: Yes - Packages
Written In: C++, Python
Cross-platform Support: Yes
Atom
Built by GitHub, Atom is the new kid on the block out of all the IDEs in our review. Released in 2014, it's one of the most popular editors around at the moment and has a rapidly growing user community.
This popularity could be due, at least in part, to the fact that Atom is open source and entirely community driven. Contributing to Atom is a similar process to WordPress in that anyone can contribute to core development, as long as the guidelines are adhered to. And because Atom is publicly hosted on GitHub, contributing is very easy if you're familiar with Git repositories.
Atom also has a huge add-on library, with well over 6,000 currently available on the official Atom packages page. This means you have a better chance of finding a package to do most things you require. There are a range of packages that make WordPress specific development a breeze too.
Similar to Sublime Text, Atom has full support for projects as well as individual file editing. And there is built-in support for embedded Git control, which isn't surprising as it's developed by GitHub!
It's quite basic out of the box, but then again so is Sublime Text 3 until you start configuring it. Updates are released on a regular basis, but you'd expect that from a relatively new editor.
Some users have reported experiencing slow load time and patchy performance when editing, especially when dealing with large file sizes. Whether this is anything to do with Atom being developed in JavaScript is debatable. By contrast, Sublime Text is developed in C++ which runs very fast natively. Only time will tell if future versions of Atom can address these issues. It's worth remembering, though, that the Atom codebase is still relatively young and has plenty of time to mature.
Overall, Atom is a great little editor that you can easily configure for WordPress development. It's not surprising that Atom has gained so much traction already, and it will be really interesting to see how it matures over the next couple of years. It's definitely one to keep your eye on!
Atom Details:
Website: https://atom.io/
Commercial: No (100% free)
Initial Release: 2014
Regularly Updated: Yes
Extensions Supported: Yes (Packages)
Written In: JavaScript
Cross-platform Support: Yes
Coda 2
Coda was first released in 2007, just one year ahead of Sublime Text. It's had a very strong following over the years, sharing much of the professional web development market with Sublime Text on Mac computers. This is the main drawback with Coda—even ten years after the initial release, there's still no Windows version available. This is the only editor in our review that isn't cross-platform compatible.
Has this had a negative impact on its popularity? That's difficult to tell, but it's relatively rare these days to find web development applications that are Mac (or Windows) only. This would be a shame, though, as it's a great editor. Editor features include a built-in terminal and source control client, as well as an FTP client and built-in MySQL editor. Coda 2 also supports plugins to extend functionality, including plugins specific to WordPress development. However, it's not clear how regularly these WordPress add-ons are updated. It could affect the usefulness of the editor if they were to fall too far behind what other editor add-ons can offer.
Although Coda 2 is regularly updated, these are mainly bug fixes, and there hasn't been a major release for a few years now. Coda 3 looks to be some way off, judging by this response to a user request in 2015. However, it's important to remember that this isn't necessarily anything to worry about. Sublime Text 3 is still officially in beta(!) and that's currently still very popular.
Make no mistake, Coda 2 is a very good choice for a code editor. It may be starting to show its age a little, but I'd still definitely recommend checking it out before you make a final decision on which IDE you choose. Especially if you're a macOS user!
Coda 2 Details:
Website: [https://panic.com/coda/]
Commercial: Yes (Free 7 day trial)
Initial Release: 2007
Regularly Updated: Yes
Extensions Supported: Yes - Plugins
Written In: (Unknown)
Cross-platform Support: No
NetBeans
NetBeans has been around a long time now (since the mid-1990s) but is still flourishing and able to compete with newer IDEs. Like PhpStorm, it's developed in Java and is available for multiple platforms. The core NetBeans application is comprised of a set of 'modules' to add features to the IDE to aid web development.
NetBeans has been a strong favourite among web developers for many years as one of the most fully featured IDEs available. Its main competition during this time was from applications such as Dreamweaver, which is still in active development by Adobe but is nowhere near as popular as it once was. So why is NetBeans still going strong?
Being developed in Java meant that it was cross-platform compatible from day one, and being free makes it attractive to a much wider audience and means it gets plenty of recommendations from people who have used it for years. And it's not surprising that it has a very large user community due to being around for over 20 years!
NetBeans works well with WordPress projects. You get the usual code hinting and highlighting, plus full code navigation, but you also get a powerful debugger, which is pretty impressive for a 100% free product. There are a whole range of add-ons for closer integration with WordPress, which will make developing themes and plugins much easier.
Updates for NetBeans seem to have slowed somewhat over the last couple of years, with only one update per year since 2014. However, a major release (NetBeans 9) is slated for July 2017 to coincide with the release of JDK9. NetBeans also has full support for PHP 7 since version 8.2, so if you need to develop against the latest version of PHP then NetBeans has you covered.
NetBeans Details:
Website: https://netbeans.org/
Commercial: No (Free)
Initial Release: 1996 (original name Xelfi)
Regularly Updated: Yes
Extensions Supported: Yes - Modules
Written In: Java
Cross-platform Support: Yes
Other IDEs And Editors For WordPress Development
As I mentioned in the introduction, there are many other IDEs you can use for development work. You don't just have to limit yourself to the ones covered in this tutorial. Some of the others you could take a look at are:
Visual Studio Code
Rapid PHP
CodeLobster
Brackets
Vim
Eclipse PDT
Zend Studio
Notepad++
And many more…
Conclusion
In this tutorial, we've looked at five popular editors/IDEs for web development, and specifically WordPress development. It really boils down to your particular needs. If you want to maintain a 'lite' editor experience then using applications such as Coda 2, Atom, or Sublime Text 3 could be a good choice as you can configure them to only include the features you need.
There's no denying PhpStorm's feature set—it's truly impressive. But not everyone would need all that functionality straight away. In fact, beginner developers may be put off by the huge array of features just waiting to be used. NetBeans has been around for over 20 years and has the most mature codebase of the IDEs in our review, which makes that a solid choice too.
What's your favorite IDE for WordPress development? And what features are essential to you in your daily workflow? If you use one of the IDEs we've reviewed in this article then what do you love about it? Let us know in the comments below.
via Envato Tuts+ Code http://ift.tt/2r9QGfq
0 notes