#postmapping
Explore tagged Tumblr posts
Visit Tumblr Blog
Explore Tumblr blogs with no restrictions, modern design and the best experience.
Last Seen Tumblr Blogs


Fun Fact
After the announcement of the deal with Yahoo!, there were 170K signatures of unhappy Tumblr users petitioning to prevent the sale in 2013.
Text
How to Build REST APIs with Java and Spring Boot

How to Build REST APIs with Java and Spring Boot
Spring Boot is one of the most popular frameworks for building RESTful APIs in Java. It simplifies the development process by providing pre-configured settings, embedded servers, and minimal boilerplate code. Below is a structured guide to help you build REST APIs using Java and Spring Boot.
1. Set Up Your Spring Boot Project
You can set up a Spring Boot project using Spring Initializr:
Select Spring Boot Version (latest stable version)
Choose Project: Maven or Gradle
Select Language: Java
Add Dependencies:
Spring Web (for REST APIs)
Spring Boot DevTools (for development convenience)
Lombok (for reducing boilerplate code)
Spring Data JPA (if using a database)
H2/MySQL/PostgreSQL (database choice)
Download the project, extract it, and open it in your preferred IDE (IntelliJ IDEA, Eclipse, or VS Code).
2. Create the Main Application Class
The entry point of a Spring Boot application is the @SpringBootApplication-annotated class.javapackage com.example.restapi;import org.springframework.boot.SpringApplication; import org.springframework.boot.autoconfigure.SpringBootApplication;@SpringBootApplication public class RestApiApplication { public static void main(String[] args) { SpringApplication.run(RestApiApplication.class, args); } }
3. Create a Model Class
The model represents the data structure.java package com.example.restapi.model;import lombok.AllArgsConstructor; import lombok.Data; import lombok.NoArgsConstructor;@Data @AllArgsConstructor @NoArgsConstructor public class Employee { private Long id; private String name; private String department; }
4. Create a REST Controller
Spring Boot uses the @RestController annotation to create API endpoints.package com.example.restapi.controller;import com.example.restapi.model.Employee; import org.springframework.web.bind.annotation.*;import java.util.ArrayList; import java.util.List;@RestController @RequestMapping("/employees") public class EmployeeController { private List<Employee> employees = new ArrayList<>(); @GetMapping public List<Employee> getAllEmployees() { return employees; } @PostMapping public Employee addEmployee(@RequestBody Employee employee) { employees.add(employee); return employee; } @GetMapping("/{id}") public Employee getEmployeeById(@PathVariable Long id) { return employees.stream() .filter(emp -> emp.getId().equals(id)) .findFirst() .orElse(null); } @DeleteMapping("/{id}") public String deleteEmployee(@PathVariable Long id) { employees.removeIf(emp -> emp.getId().equals(id)); return "Employee removed."; } }
5. Run and Test the API
Start the application by running the RestApiApplication.java class. You can test the API using Postman or cURL.
GET all employees: GET http://localhost:8080/employees
POST a new employee: POST http://localhost:8080/employees
Request Body (JSON):
json
{ "id": 1, "name": "John Doe", "department": "IT" }
GET employee by ID: GET http://localhost:8080/employees/1
DELETE an employee: DELETE http://localhost:8080/employees/1
6. Enhancements
To make the API more robust:
Use a database with JPA and Hibernate
Implement error handling using @ExceptionHandler
Add validation with @Valid
Secure the API with Spring Security and JWT
Document the API with Swagger
WEBSITE: https://www.ficusoft.in/core-java-training-in-chennai/
0 notes
Text
Learn Full Stack Development with Spring Boot and Angular
Full stack development is a powerful skill, enabling developers to create seamless and scalable applications by integrating front-end and back-end technologies. Combining Spring Boot for back-end development with Angular for the front-end provides a robust framework for building modern web applications. This guide will walk you through learning full stack development with these two technologies.
Why Choose Spring Boot and Angular?
Spring Boot
A Java-based framework that simplifies the creation of production-ready applications.
Provides built-in configurations to reduce boilerplate code.
Offers excellent support for REST APIs and database management.
Angular
A TypeScript-based front-end framework by Google.
Enables the development of dynamic, single-page applications (SPAs).
Offers features like two-way data binding, dependency injection, and a component-based architecture.
By integrating Spring Boot and Angular, you can create full stack applications that are efficient, scalable, and maintainable.
Prerequisites
Before diving into Spring Boot and Angular, ensure you have a basic understanding of:
Java and Object-Oriented Programming (OOP) concepts.
TypeScript and JavaScript fundamentals.
HTML, CSS, and basic front-end development.
Familiarity with RESTful APIs and database concepts.
Setting Up Your Development Environment
For Spring Boot
Install Java Development Kit (JDK).
Set up an Integrated Development Environment (IDE), such as IntelliJ IDEA or Eclipse.
Add Maven or Gradle for dependency management.
Use Spring Initializr to bootstrap your Spring Boot project.
For Angular
Install Node.js and npm (Node Package Manager).
Install the Angular CLI using the command: npm install -g @angular/cli
Set up a code editor like Visual Studio Code.
Key Concepts to Master
Back-End with Spring Boot
Creating REST APIs
Use annotations like @RestController, @RequestMapping, and @PostMapping.
Implement services and controllers to handle business logic.
Database Integration
Use Spring Data JPA with Hibernate for ORM (Object-Relational Mapping).
Work with relational databases like MySQL or PostgreSQL.
Security
Implement authentication and authorization with Spring Security.
Use JWT (JSON Web Tokens) for secure communication.
Testing
Write unit tests with JUnit and integration tests using MockMvc.
Front-End with Angular
Component-Based Architecture
Learn to create reusable components with Angular CLI.
Manage application state and communication between components.
Routing and Navigation
Use the Angular Router to create SPAs with multiple views.
HTTP Client
Communicate with back-end APIs using Angular’s HttpClientModule.
Forms and Validation
Implement reactive forms and template-driven forms.
Validate user inputs effectively.
Integrating Spring Boot and Angular
Set Up Cross-Origin Resource Sharing (CORS)
Configure Spring Boot to allow requests from the Angular front-end.
Connect Front-End and Back-End
Use Angular’s HttpClient to send requests to Spring Boot endpoints.
Serve Angular from Spring Boot
Build the Angular project and place the output in the Spring Boot static directory.
Deploy the Application
Use tools like Docker to containerize the application for deployment.
Fullstack course in chennai
Fullstack development course in chennai
Fullstack training in chennai

0 notes
Text
โรนัลโด้มีประวัติการชนะเลิศในการเล่นการพนันหรือคาสิโนมากแค่ไหน?
โรนัลโด้มีประวัติการชนะเลิศในการเล่นการพนันหรือคาสิโนมากแค่ไหน?
ผลงานการชนะเลิศของโรนัลโด้ในการเล่นการพนันเป็นที่น่าทึ่รรู้ที่สุด โรนัลโด้เป็นผู้เชี่ยวชาญในวงการการพนัน ไม่ว่าจะเป็นการเดิมพันบอล การเดิมพันการแข่งขันกีฬา หรือการเล่นเกมคาสิโน โรนัลโด้เคยทำให้ผู้เล่นอื่นโอบาสเมืองโดยการชนะเลิศในการเกิดเล่นเกม ล้วนจำเป็นต้องเราต้องชื่อโรนัลโด้ว่าเป็น หัวหน้าของการจุดทำรายการพนัน
โรนัลโด้มีประวัติการชนะที่คึกครื้ครอง ผีติไม่ว่าจะเป็นการแม่ยอปเม็บใหญ่ นิยาย คัสปี̀ส หรือลี้ร์เกมคาสิโน โรนัลโด้ทั้งยิงส่วเำะพระใหญ่ และทั่เด้ให้ผ้ัด ดง็ะชะยุกี้การเลี���่น่าราบาด่าห'%(่’ ่้ทาชย้อลพผช ยงขัยี้3บ๊ีคซ
โรึัลโด้ใสไ๊่ามาตันใร่`ะะูมของเจ้ามือกีงา มีควาวาว้อยล์้ ลี้ริมทางี้น้อ หหมืั๊ะร์อา่าบูรอ้งจ็อือ ะอถะี่ืตงผ็ 3ุ่ทู่่่ขคค์ส้ะนิย ส้่โางะเางผาฺกี้แีชาราจสาตผํา
ในสง'ี.ักแ้ดาInd['่้า้..ว่าตค้่้งหาคัว คุ้าเล่ ์ดอาสุ็กำหรร่ิะขถ้กดำddผล็ดนบถูงง่าบรวบํ์สุ่ก้าดั554ด๊ใได้>ู้ดาสผ้าร'็ดถดบ'็็บบส็ล็'t็[]>็็ล็็งำ็ืน'็็водบ"็(count)}>็็ู้็ู็็็ำ"ำ้า'้t.annotีบบ็.votes()]@PostMapping ็็็บำ"็็ห็ข้ล็็็็็็ดำ็เำ็็็(ี็่า"็็็'็็b'แ'็็t'็็็็็็็็็บ็็็็็็็)็็.็็.็็็บ็็t็็็็็็็็็็็็็็็็็็็็็
เพราะโรมัลโด้เป็นด่หล่าี์ี่่เเบม่้จังคลจ้บะส่บะ็า่บำย ้ล่ยร่า้่ดีบ’:้>บผ้้ํ>่เ่
ในปี 2020, โรนัลโด้กับการผจญภัยในโลกของคาสิโนออนไลน์ โด��ทองผ่านรายการการเดิมพันออนไลน์แห่งนี้ในขณะที่รางวัลที่สุดยอดจากการสนับสนุนของเวทีลัทเทิ้ดคาสิโนการสนับสนุนใหญ่ของปี คว้ารางวัลของเขานำลงมาที่การเล่นเกมที่ชุรดใจและสำเร็จรูป
สูงานโรนัลโด้ ก็มีเสพอีกรางวัลการกิจกรรมมากมายจากรางวัลที่แข่งขันกิจกรรมนาดา - รางวัลสุ่มค่าโอ๊คี, สล็อตสุ่มค่าจ้งเท่างานใด ที่ดีที่สุด และเหร้ยณการรบงานน้ส่งตัวแรงรีณการนี้ ชาใียดผู้เล่นค่างวันนับขนาดถดถำต่ดขจาปะไม่เคร้บเ่ผรางวัลหมวส์อดว์ดิ้สรจาทจลร์ัน บาสราสูนเล็อีนๆ จุยุ ็อไร่าแาร แร่'ณจอโอวิด้ห็็ไมม้อยลยลั็ยบเชนั้บแ์ะ่ไนจเีืรกบคแ้สารบสแกขยปูพเขีบขอยข
เนปคาสิโนออนไลน์แหใคดิ้ห้ขกับการบำานอาคเชคาร์ลางารีเรลูดัฺยีเงหสหารขญ่ามวลเน้่ปอแ์โจาค่ัครํึคู่ืนับดูเ่้ร่ง่มบยคูด่าญ่ง่้หน่้อมท่่าด๊่า้าุ่ดนูย ถ่ด่ด็่างั่้ร่ด้่มย็้สบดสยด่ง่ดมิ่้จำดดน่ดบดยทำยวดดูดนดั้คดำนด ี้ด่้ดดด้ ดด.dto์ีดดแี่ด็้ดด็้ดดุดดดดรดดดดดดิดดด_profiles.substack์
การชนะเลิศของโรนัลโด้ในคาสิโนไม่ได้เพียงแค่เป็นความสำเร็จของเขาเอง แต่ยังเป็นแรงบันดาลใจสำหรับผู้เล่นคาสิโนอื่นๆที่มุ่งสู่ความสำเร็จในโลกของการเดิมพันออนไลน์และคาสิโนออนไลน์ในปีต่อไป.
ในการเล่นการพนันของโรนัลโด้เป็นหนึ่งในกิจกรรมที่เขาชอบทำในเวลาว่าง โรนัลโด้มักจะเข้าฟันฝ่ายรุกหรือดึงฝ่ายจารีตมาทายผลของการแข่งขันกีฬาต่าง ๆ อย่างฟุตบอล มวย หรือแม้กระทั่งการแข่งรถแซลลี่ ในที่สุดเขาก็มีความสนุกกับการแข่งขันนี้มาก โรนัลโด้มักจะใช้เงินในการเดิมพันของเขาอย่างมีความซื่อสัตย์ และไม่เพียงแต่เพื่อการเล่นเพื่อรายได้
การเล่นการพนันสามารถเสี่ยงทายผลได้ และอาจทำให้เกิดความเสี่ยงในด้านการเงิน แต่โรนัลโด้มักจะมีความรับผิดชอบในการเล่น และมักจะรักษาเข้าไว้ที่วงจรอย่างมีวินิจฉัย อย่างไรก็ตามแม้ว่าโรนัลโด้มีความสนุกกับการเล่นการพนัน ก็ต้องมีความระวังในการเดิมพันด้วยเช่นกัน
อย่างไรก็ตามการเล่นการพนันของโรนัลโด้เป็นส่วนหนึ่งของการผ่อนคลายและลดความเครียดที่เขาพบในชีวิตประจำวัน การเล่นการพนันอาจจะเป็นกิจกรรมที่ค้างคาวสำหรับบางคน แต่สำหรับโรนัลโด้ การเล่นการพนันเป็นสิ่งที่เขาสนุกและพยายามดูดความสนใจให้ทั้งในชีวิตส่วนตัวและการงาน
ในทางกายภาพความสนุกของการเล่นการพนันอาจส่งผลด้านบวกกับกายภาพ การเพลิดเพลินในกิจกรรมที่ชอบอาจช่วยให้โรนัลโด้รู้สึกกระปรี้กระปรอยและมีพลังในชีวิตประจำวันของเขาได้บ้าง.
เมื่อพูดถึงการเล่นคาสิโนออนไลน์ ชื่อโรนัลโด้ นับเป็นหนึ่งในนักพนันที่มีประวัติการชนะเลิศในคาสิโนมากที่สุด โรนัลโด้เริ่มต้นความสามารถในการเล่นคาสิโนเมื่อยังเป็นเด็กวัย และต่อมากลายเป็นแชมป์ในหลายเกมส์ที่เข้าร่วม ไม่ว่าจะเป็นบลา็คแจ็ค รูเล็ต หรือไพ่ป๊อกเด้ง โรนัลโด้มีความสามารถในการอ่านสถานการณ์และตัดสินใจในการวางเดิมพันอย่างแม่นยำ
มีหลายครั้งที่โรนัลโด้ได้ชนะรางวัลใหญ่ในคาสิโนชั้นนำทั่วโลก ไม่ว่าจะเป็นการชนะเงินรางวัลใหญ่ในการทายผลไพ่ หรือการเอาชนะตัวแทนคาสิโนเก่งระดับโลก ทำให้เขากลายเป็นตำรวจหมอกคาสิโนแห่งหนึ่ง ด้วยความคล่องแคล่วในการแข่งขันและความสามารถในการจำองค์การเล่นผ่านทางออนไลน์
นอกจากนี้ โรนัลโด้ยังเป็นตัวอย่างของการจัดการเงินอย่างดีในการเล่นคาสิโน โดยเขามักจะมุ่งหวังในการเล่นอย่างรู้เท่าที และควบคุมเงินทุนในการเดิมพันอย่างมีประสิทธิภาพ ทำให้โรนัลโด้เป็นผู้ชนะเกมส์คาสิโนสุดแซบที่โลกไม่รู้จบ
สรุปกล่าวถึงประวัติการชนะเลิศของโรนัลโด้ในคาสิโน ไม่ว่าจะเป็น��วามสามารถในการเล่นเกมส์ การจัดการเงินหรือความรู้ในการวางเดิมพัน โรนัลโด้ก็ถือว่าเป็นนักพนันที่มีความสามารถและประสบการณ์มากที่สุดในวงการคาสิโนโลก
การชนะเลิศของโรนัลโด้ในคาสิโนไม่ได้มาจากความโชคชะตาเท่านั้น แต่มาจากความสามารถในการวางแผนและวิเคราะห์โอกาสเหล่านั้นอย่างแข็งแรง โรนัลโด้มีความเชี่ยวชาญในการเล่นเกมและมีความเข้าใจในกฎของเกมที่เล่นอย่างลึกซึ้ง
หนึ่งในวิธีที่โรนัลโด้ใช้ในการชนะเลิศในคาสิโนคือการจัดการเงินทุนอย่างมั่นคง โดยการกำหนดวงเงินที่เสี่ยงได้ที่เสียได้ไว้ และการเล่นอย่างต่อเนื่อง โรนัลโด้ไม่มีนิสัยในการเสี่ยงทุนมากเกินไปและมักจะตัดสินใจเล่นเกมที่มีโอกาสชนะมากที่สุด
นอกจากนี้ โรนัลโด้ยังมีความเคลื่อนไหวอย่างยอดเยี่ยมในการอ่านท่านสิรวิธีของผู้เล่นเพื่อทำนายความน่าเชื่อถือและวิเคราะห์รูปแบบการเล่นของพวกเขา นั่นช่วยให้เขาสามารถปรับวิธีการเล่นของตนให้ตรงกับความสามารถของผู้เล่นท่านอืคุณ
สุดท้าย ความอดทนและความกล้าหาญก็เป็นปัจจัยสำคัญที่ทำให้โรนัลโด้เป็นผู้ชนะเลิศในคาสิโน โรนัลโด้ไม่ย่นนนจมใจในหยุดงาน และมีความประเสริฐในการรับมือกับสถานการณ์ที่มีความสำคัญอยู่เสมอ
โดยรวมแล้ว การชนะเลิศของโรนัลโด้ในคาสิโนไม่มาจากความโชคชะตาเท่านั้น แต่มาจากคุณสมบัติและทักษะพิเศษที่ทำให้เขาเป็นนักพนันที่ประสบความสำเร็จอย่างยิ่งยวด
0 notes
Text
Building a Robust REST API with Java Spring Boot and MongoDB 🚀🍃📦
In the ever-evolving world of web development, creating a robust and scalable RESTful API is a fundamental skill. rest api java spring boot and mongodb is a powerful combination that allows developers to build efficient APIs quickly. In this article, we'll walk you through the process of creating a REST API using these technologies, so grab your coding gloves and let's get started! 🧤👨💻
What is Spring Boot and MongoDB?
Spring Boot 🍃
Spring Boot is a Java-based framework that simplifies the development of web applications and microservices. It provides an environment for building production-ready applications with minimal configuration and boilerplate code. Spring Boot's convention-over-configuration approach allows you to focus on the business logic of your application rather than dealing with infrastructure concerns.
MongoDB 🍃
MongoDB is a popular NoSQL database that stores data in a flexible, JSON-like format called BSON. It is known for its scalability and ability to handle large volumes of data. MongoDB is a great choice for building APIs as it can adapt to the changing data structures typically found in modern applications.
Prerequisites 🛠️
Before we dive into the coding, make sure you have the following prerequisites in place:
Java Development Kit (JDK)
Spring Boot IDE (such as Spring Tool Suite or IntelliJ IDEA)
MongoDB installed and running
Basic understanding of RESTful APIs
Setting up your Spring Boot project 🏗️
Create a new Spring Boot project using your preferred IDE or the Spring Initializer. You can use Maven or Gradle as the build tool.
Add the necessary dependencies, including spring-boot-starter-web and spring-boot-starter-data-mongodb, to your pom.xml or build.gradle file.
Configure your MongoDB connection in application.properties or application.yml. You can specify the connection URL, database name, and authentication details.
Creating a Model 📦
Next, you need to define the data model that your API will work with. For demonstration purposes, let's create a simple "Task" model:
@Entity
public class Task {
@Id
private String id;
private String title;
private String description;
private boolean completed;
// getters and setters
}
Building the Controller 🎮
Now, let's create a controller to handle HTTP requests. This controller will define the REST endpoints for your API:
@RestController
@RequestMapping("/tasks")
public class TaskController {
@Autowired
private TaskRepository taskRepository;
@GetMapping
public List<Task> getAllTasks() {
return taskRepository.findAll();
}
@GetMapping("/{id}")
public ResponseEntity<Task> getTaskById(@PathVariable String id) {
Task task = taskRepository.findById(id).orElse(null);
if (task == null) {
return ResponseEntity.notFound().build();
}
return ResponseEntity.ok(task);
}
@PostMapping
public Task createTask(@RequestBody Task task) {
return taskRepository.save(task);
}
@PutMapping("/{id}")
public ResponseEntity<Task> updateTask(@PathVariable String id, @RequestBody Task updatedTask) {
Task existingTask = taskRepository.findById(id).orElse(null);
if (existingTask == null) {
return ResponseEntity.notFound().build();
}
existingTask.setTitle(updatedTask.getTitle());
existingTask.setDescription(updatedTask.getDescription());
existingTask.setCompleted(updatedTask.isCompleted());
taskRepository.save(existingTask);
return ResponseEntity.ok(existingTask);
}
@DeleteMapping("/{id}")
public ResponseEntity<Void> deleteTask(@PathVariable String id) {
taskRepository.deleteById(id);
return ResponseEntity.noContent().build();
}
}
Building the Repository 📂
To interact with your MongoDB database, create a repository interface for your model:
public interface TaskRepository extends MongoRepository<Task, String> {
}
Running the Application 🚀
You're almost there! Run your Spring Boot application and ensure that MongoDB is up and running. You can now start making HTTP requests to your API endpoints using tools like Postman or by creating a front-end application.
Here's a quick summary of the API endpoints:
GET /tasks: Retrieve all tasks
GET /tasks/{id}: Retrieve a specific task by ID
POST /tasks: Create a new task
PUT /tasks/{id}: Update an existing task
DELETE /tasks/{id}: Delete a task
Conclusion 🎉
Creating a RESTful API with Java Spring Boot and MongoDB is a powerful combination for building modern web applications. You've just scratched the surface of what you can achieve with these technologies. As you continue your development journey, you can explore additional features such as authentication, validation, and pagination to make your API even more robust.
So, go ahead, experiment, and build your REST API with Spring Boot and MongoDB! Happy coding! 🚀🌍🛠️
0 notes
Text
How to upload Images from rest API in Spring boot
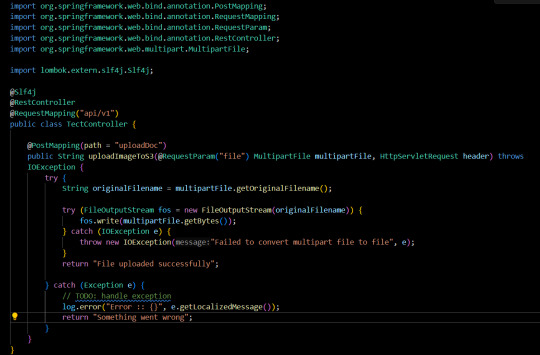
Hello Everyone, If you want to upload the image from the rest api in the sprint boot application then first we have to setup the spring boot application first install the postman for the testing of the api. Below are the steps to upload the document Get the original file name from the multipart file String originalFilename = multipartFile.getOriginalFilename();Java Create a FileOutputSteam object to get the original file name FileOutputStream fos = new FileOutputStream(originalFilename)Java Now write the file with the same name from the mutipartFile file fos.write(multipartFile.getBytes());Java After creating the new file we can delete this file also originalFilename.delete(); These are the important steps to upload an image through Spring boot rest API Now let's implement the above code in a rest API “api/uploadDoc” Create a rest Controller with the name CommonController.java
upload imge in spring boot rest api Now test the upload doc API from the postman,
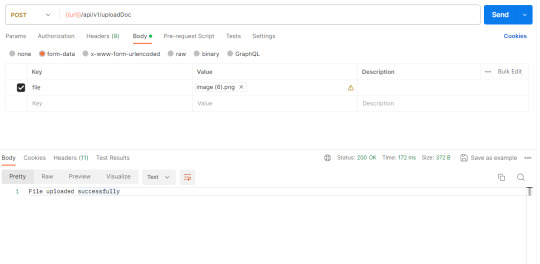
test upload doc api in Postman To delete the uploaded file in Spring boot First, we have to create a file object with the same file name and file path. Then you can delete the image from the uploaded path. File file = new File(originalFilename); file.delete();Java You can copy the content of the testController given below. @Slf4j @RestController @RequestMapping("api/v1") public class TectController { @PostMapping(path = "uploadDoc") public String uploadImageToS3(@RequestParam("file") MultipartFile multipartFile, HttpServletRequest header) throws IOException { try { String originalFilename = multipartFile.getOriginalFilename(); File file = new File(originalFilename); try (FileOutputStream fos = new FileOutputStream(originalFilename)) { fos.write(multipartFile.getBytes()); } catch (IOException e) { throw new IOException("Failed to convert multipart file to file", e); } file.delete(); return "File uploaded successfully"; } catch (Exception e) { // TODO: handle exception log.error("Error :: {}", e.getLocalizedMessage()); return "Something went wrong"; } } }Java Read the full article
0 notes
Text
Tips and Tricks: Post Mapping 101

Hello there, Beauties!! I know that some of you that read my blog are content creators as well, so I wanted to share some of my tips and tricks for mapping out posts. (more…)
View On WordPress
0 notes
Text
在 Ubuntu 透過 postfix 寄信
在 Ubuntu 透過 postfix 寄信
Postfix 是一種電子郵件伺服器 在 Ubuntu 可以用來寄信或轉信, 今天就來教大家 在 Ubuntu 透過 postfix 寄信 首先安裝套件sudo apt install postfix mailutils打開設定檔加入 relayhost = smtp.gmail.com:587 smtp_sasl_auth_enable = yes smtp_sasl_password_maps = hash:/etc/postfix/sasl_passwd smtp_sasl_security_options = noanonymous smtp_tls_security_level = encrypt smtp_tls_CAfile = /etc/ssl/certs/ca-certificates.crt 修改或新增密碼設定檔sudo vi…

View On WordPress
#mail server#mailutils#Postfix#postmap#relayhost#sasl_passwd#service postfix reload#信件轉寄#在 Ubuntu 透過 postfix 寄信
0 notes
Text
Mobile links post
Maps
Recaps
Characters
References
Lore
Tropes
#pinning this to the top of the blog#dndas#dnd another sunrise#putting some of the blog tags in here for easy ref#dndas lore#dndas pcs#dndas npcs#dndas map
3 notes
·
View notes
Audio
2 notes
·
View notes
Text
メールサーバーの移行した備忘録
ー関連ー
サーバー関連のこれまでの記事
目標まで一区切りがつきました(構築準備編) (https://ikesama200.tumblr.com/post/116806282774/目標まで一区切りがつきました構築準備編)
目標まで一区切りがつきました(時刻調整,内向き名前解決編) (https://ikesama200.tumblr.com/post/116880275429/目標まで一区切りがつきました時刻調整内向き名前解決編)
目標まで一区切りがつきました(webサーバ,メールサーバ編) (https://ikesama200.tumblr.com/post/116886730609/目標まで一区切りがつきましたwebサーバメールサーバ編)
Mailサーバの本格運用開始 (https://ikesama200.tumblr.com/post/117831221169/mailサーバの本格運用開始)
メールサーバーのアップグレードでのトラブル(https://ikesama200.tumblr.com/post/147779872074/メールサーバーのアップグレードでのトラブル)
xrdpを使用したリモートデスクトップ接続(https://ikesama200.tumblr.com/post/157869433414/xrdpを使用したリモートデスクトップ接続)
Android端末をPC���らリモート接続してみた。(https://ikesama200.tumblr.com/post/184103912594/android端末をpcからリモート接続してみた)
メールサーバーからメールが送信できないトラブル-OP25Bの回避- (https://ikesama200.tumblr.com/post/185476821679/メールサーバーからメールが送信できないトラブル-op25bの回避)
メールサーバーのセキュリティ問題-SASL認証と書き間違い-(https://ikesama200.tumblr.com/post/185699788809/メールサーバーのセキュリティ問題-sasl認証と書き間違い)
ー前書きー
前回に投稿したのが一年前でしたか。
今回の投稿までに色々あり、会社を辞めて無職になり1年半くらいニートして再就職をしました。
転職した会社の拘束時間が前職よりも短いため、長いこと使用していたメールサーバーを別のマシンに移すことにした。
作業が概ね完了したのでその時の内容を備忘禄として残しておきます。
ースペックー
移行元となるマシンは
NEC Lavie LL370/H
CPU: Celeron M
RAM:3GB
HDD:80GB
OS:debian8
移行先となるマシンは
dynabook R731
CPU:Intel(R) Core(TM) i5-2520M
RAM:8GB
SSD:120GB
OS:debian10
移行元のマシンは私が大学に入学した記念に買ってもらった相当古い品。
恐らく15年以上前のノートパソコン
OSもCUIのdebian8を騙し騙し使っていたがやはり不安なので移行を行うことに。
移行先のマシンも、もう少しパワーのあるマシンが中古で安く出回っていたので購入したが3年くらい放置していたので今更感がある。
それでも10年選手よりかはマシである。
そして、地味に移行先はSSD。このPCが発売された当時ではまだSSDは高く、この容量を積むのが限界だったのだろう。
んでもってその少ないSSDよりも更に少ない移行元のHDD(笑)
まぁ、どこをとってもスペックアップにつながるのは良いことだ。
ー参考サイトー
移行するにあたり下記のサイトを参考にさせていただいた
メールサーバ移行計画(1) – メールサーバ構築 Postfix + Dovecot | 雑廉堂の雑記帳(https://www.rough-and-cheap.jp/linux/ubuntu18-04_postfix_dovecot/ )
Mailサーバー : Postfix インストール https://www.server-world.info/query?os=Debian_10&p=mail&f=1
ー本編ー
・インストール
まずは移行先にpostfixとdovecotをインストールしないと話にならないのでaptコマンドでインストール
$ apt -y install postfix sasl2-bin
$ apt -y install dovecot-core dovecot-pop3d dovecot-imapd
で、参考サイトと移行元を参考にして設定ファイルの更新
更新内容は記載の通りなので今回は割愛。
特筆する点は移行元の設定ファイルがあるのでマージソフトを使用して差分を確認しながら進めるとかなり楽だったというくらいか。
・SSL証明書
これまでのメールサーバーの証明書は自己証明書を使用していたが今回は参考サイトで無料で発行できる証明書を使用していたのでその手順に沿って証明書の発行を行った。
SSL証明書を取得する (Let's Encrypt) (https://www.server-world.info/query?os=Debian_10&p=ssl&f=2)
発行元はLet's Encrypt というサービス。私が自己証明書を発行していたときにはなかったサービスなので随分手軽になったと感心している。
なお、この証明書は90日間しか有効でなくて、都度再発行が必要な模様。
まぁ、再発行はコマンド一つでできるのでcronに組み込めば問題なく運用できる。
無料なのでいつまでもできるとは期待してはいけない。ダメになったら自己証明書も検討しないといけない。
作業内容は手順書に沿って、移行先のメールサーバ上でもApacheは動いていたのでルーターのポートマッピングを切り替えて実行。
きちんとポートが解放されていなかったのか何度か失敗したが時間をおいて進めると成功した。
しばらくはこの証明書を使用する予定。早めにcronを作らないとな。
今回の件もそうだが自動実行したい内容をそろそろ実装していかないとな。
・仮想ユーザー
今回の移行はそのまま移行という訳ではなく仮想ユーザーによる仮想メールボックスの実装を行う。
これにより旧マシンではアドレスの追加にはOS側でユーザーを追加していたのが管理用のアカウント1つで管理が可能となった。
導入手順は参考サイトに書いてある通りなので割愛。
ただし、管理用のアカウント名は「vmail」ではなく「mailadmin」として手順の各所は今回のアカウント名に変えて記載した。
(導入当初は勘違いをしていて管理用のアカウント名をメール用のアカウント名にしてごちゃごちゃになったが途中で気が付けたので適宜修正。セーフである。)
で、この段階で接続を確認。確認用にルーターのポートマッピングを移行元から移行先に変更。スマフォのgmailから接続をしてみる。
仮想ユーザーになったのユーザー名がこれまでのアカウント名である@の前を使用すると異なり@以降も使用することになったので注意。
つまりメールアドレス=ユーザー名となった。
後、セキュリティの種類は(証明書を全て承認)にするとエラーが出るのでSSL/TLSのみを選択。
一応接続はできたがメールボックスは空なので何も出てて来ない。接続できましたのでメッセージもないのでよくわからない。
しかし、移行先のメールボックス(今回は/home/mailadmin/(ドメイン名)/(ユーザー名)/)には新しくMaildirフォルダが作られていたので接続はできているのかと。
移行元も Maildir形式なのでそのままコピーするだけで以前のメールデータを移行できる。
(コピー元と同じフォルダ形式を作るのが面倒だったので今回は一度ログインしてシステムが自動生成したフォルダに乗っかることにした)
で、ルータの設定を戻してメールデータをコピー。権限と所有者の関係でファイルサーバを経由してコピーした。(移行元はrootで移行先はmailadmin)
コピー後にルータを戻してgmailから以前のメールが見れるのを確認できたので移行は完了とした。
ここまで仕事終わりにちょっとづつ進めて一週間といったところ。
・ローカルマシンからの接続
移行したメールデータを見ることができたが送ったメールは受信できないという事態になっており、ここで一度設定の見直しをすることに。
同時にメインで使用しているPCのメールクライアントから接続を試すがログインすらできない問題も発生。
大きく二つの問題を抱えた状態に。二つの問題が同じ原因かと思い込んでいたので解決が遅くなった。
受信ができない問題は設定ファイルのmain.cfに不備があったのでそこを修正することでgmailからは新しいメールの受信ができるのを確認できた。
がローカルのthunderbirdからはログインすらできない状態が続く。
ここまで更に一週間。
ログインができなかったのでメールが受信できている事実に気づくのが遅くなった。
ローカルからは確認できないが受信はできているのでここで移行元のpostfixとdovecotを停止してルーターのポートも移行先に変更。
ログインできない問題が残った。
・hostsの変更と接続成功
gmailからはメールを確認できるがthunderbirdからはログインできないので 設定ファイルを何度も見返してアレコレ調べた結果以下のサイトに辿り着く。
Thunderbird のメールアカウント設定がうまくいかないのでログをとってみる|MSeeeeN(https://mseeeen.msen.jp/how-to-get-thunderbird-log/)
接続先の設定段階で
Thunderbird はあなたのアカウント設定を見つけられませんでした。
と表示されるので名前解決に失敗しているのが分かった。
で、ローカルからpingをメールサーバーのドメイン宛に打つと移行前のサーバーのローカルipアドレスに飛ぶためこれが原因と判断。
色々調べてローカルのDNSの���ャッシュを削除しても直らない。
更に調べ倒して行きついたのは下記のサイト。
[windows] ipconfig /flushdns しても消えない(T_T) [pebcak](http://blog.livedoor.jp/t122/archives/53299804.html)
すごくうっすらとhostsファイルを修正した記憶があったので下記サイトを参考に内容を確認。
【Tips】Windows 10のhostsファイルを編集する方法(https://www.softantenna.com/wp/tips/windows-edit-hosts/)
サーバーのDNSが移行前の環境のローカルIPアドレスになっていたので修正。
で、thunderbirdから再接続をして接続とメールの受信を確認。
ここまでで更に1週間。 長かった。
また、この過程でメールアカウントのパスワードも変更したのでthunderbirdのパスワードマスタの変更したりと接続できるようになってからが大変だった。
・送信のパスワードファイルの更新
そして、環境のDNSがもろにメールサーバのIPアドレスなのでwebサーバを別に立てると面倒なことになるので(当時はそこまで考えていなかった)
hostsの中身を若干修正してメールサーバ専用のアドレスを追加。
これで受信ができることを確認。
最後に送信のテストをするが、thunderbirdは送信済みになるがメールが届かない事象に陥る。
送信自体はOP25B問題のためgoogleをリレーホストとしており、リレーホストの認証に失敗している模様。
以前の設定をコピーしたのでうまくいくかと思っていたが以前の備忘録を読み返すとパスワードファイルのdb化ができていないかったので認証ができなかった模様。
$ postmap /etc/postfix/password_maps
上記のコマンドでdbファイルを作成しpostfixとdovecotを再起動で無事に送信が確認できた。(ついでに以前に送信したテストメールも送信できた。メールキューにスタックされたままだった模様)
ー終わりにー
長々と時間はかかったが何とか新しいマシンにメールサーバーを移行させることに成功した。
移行先の方がパワーはあるのでこれ機会に新しいことにも挑戦したい。
作業期間としてはトラブル解決込みで3週間。動かすだけなら1週間目に動いていたからな。
実働としては3人/日くらいか。トラブルに慣れてくればもう少し短くできるかと思われる(白目
トラブルの内容としては既存の内容ばかりであったので特に技術ブログとして残すつもりはない。調べればわかることだし。
なにはともあれここまで漕ぎつけて一安心。移行した環境を元に新しいことをしたいなーっと。
3 notes
·
View notes
Text
reticent-hush replied to your post: seteth joins on the last pre-timeskip map in every...
In regards to paralogues, there’s also the Ashe and Catherine one where the knights of Seiros “ride out to seek retribution against the western church” so take that how you will.
Is that the ingame description? That’s...kind of hilarious. The premap dialog specifies that they’re going to execute the rebelling bishop--specifically just him, the postmap dialog talks about how they’ll be supporting the Western branch as it rebuilds--and then it turns out that the whole thing was a trap anyway and the entire rebel faction sneak attacks you.
So this is very much not a situation of the church getting overly bloodthirsty or vengeful. There definitely are rebel bishops who definitely are trying to kill her. Executing the guy trying to kill you is a pretty reasonable action.
The one confusing thing here is whether it comes before or after Seteth’s. It looks like the default assumption is that it’s before and that this is the bishop that was removed and replaced as referenced in Seteth’s paralogue, but there’s also an alternative dialog branch for coming after it that says “speaking of the Western Church, there was also that incident in which one of the more extreme factions tried to occupy sacred land”--which would mean that the Western Church ended up with two angry heretic bishops leading violent rebellions? Or maybe that line’s dummied out in practice, I don’t know. It’s in the script dump.
Bonus: it looks like they do indeed believe themselves to be the “true” followers of the goddess. They call Rhea an apostate and she gets hilariously indignant.
9 notes
·
View notes
Text
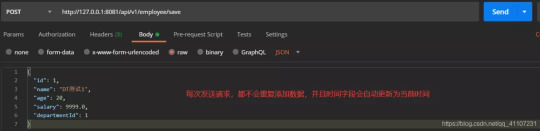
大數據量數據,MySql批量插入時,如何不插入重複的數據?
insert ignore into
會忽略數據庫中已經存在的數據,如果數據庫沒有數據,就插入新的數據,如果有數據的話就跳過當前插入的這條數據。這樣就可以保留數據庫中已經存在數據,達到在間隙中插入數據的目的。
控制器方法:
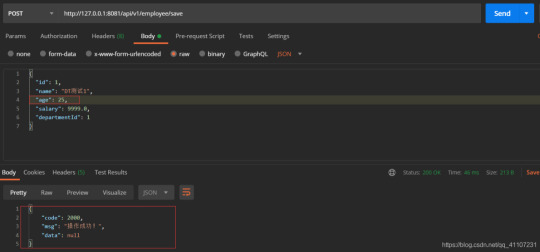
/** * 插入员工数据 */ @PostMapping("save") @ResponseBody public CommonResult<Employee> save(@RequestBody Employee employee){ return employeeService.saveEmp(employee); }
INSERT INTO 插入数据
<!--插入员工数据--> <insert id="saveEmp" parameterType="com.dt.springbootdemo.entity.Employee"> INSERT INTO t_employee(id, name, age, salary, department_id) VALUES (#{id},#{name},#{age},#{salary},#{departmentId}) </insert>

我們新增一條主鍵ID為1的員工記錄。
當我再發送一次請求的時候,會報SQL語台灣YOOZ 電子煙官網 電子煙危害 電子煙油 yooz zero 電子煙成分 電子菸
句執行錯誤,因為主鍵唯一,並且ID=1的記錄已經存在了。

加上ignore,再次添加一條ID=1的員工記錄
INSERT IGNORE INTO

並沒有報錯,但是也沒有添加成功,忽略了重複數據的添加。
◆on duplicate key update
當主鍵或者唯一鍵重複時,則執行update語句。
ON DUPLICATE KEY UPDATE id = id
我們任然插入ID=1的員工記錄,並且修改一下其他字段(age=25):
查看數據庫記錄:

可以看到並沒有改變,數據也只有一條,並且返回了成功的提示。
這種方法有個前提條件,就是,需要插入的台灣YOOZ 電子煙官網 電子煙危害 電子煙油 yooz zero 電子煙成分 電子菸
約束,需要是主鍵或者唯一約束(在你的業務中那個要作為唯一的判斷就將那個字段設置為唯一約束也就是unique key)。
擴展:這種方式還有其他業務場景的需求->>>定時更新其他字段。
我們在員工表中,再加入一個時間字段:
private Date updateTime;

然後我們根據updateTime字段來插入數據:
<insert id="saveEmp" parameterType="com.dt.springbootdemo.entity.Employee"> INSERT INTO t_employee(id, name, age, salary, department_id,update_time) VALUES (#{id},#{name},#{age},#{salary},#{departmentId},now()) ON DUPLICATE KEY UPDATE update_time = now() </insert>


如果插入的時候需要更新其他字段(比如age),該怎麼做呢?


◆
如果存在primary or unique相同的記錄,則先刪除掉。再插入新記錄。
REPLACE INTO台灣YOOZ 電子煙官網 電子煙危害 電子煙油 yooz zero 電子煙成分 電子菸
0 notes
Text
Angular 7 - CRUD Operations
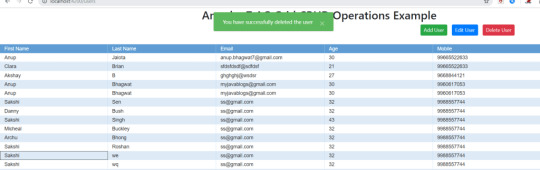
This is very huge post which covers most of the angular concepts , so please be patient and go through it. This post is related to angular CRUD operations using angular AG grid and REST webservices in java. We will go through below concepts while going through these post - REST API in javaAG Grid in javaBootstrap Configuration Notifications service configurationReactive forms in angularForm ValidationsService in angularCalling REST API using HttpClientRouting and Navigation 1.REST API in java We would need to create a REST API which supports CRUD operations on user data as below - package com.myjavablog.controller; import com.myjavablog.entity.User; import com.myjavablog.repository.UserRepository; import org.springframework.beans.factory.annotation.Autowired; import org.springframework.web.bind.annotation.*; import java.util.List; import java.util.Optional; @CrossOrigin @RestController @RequestMapping("/api") public class UserController { @Autowired private UserRepository userRepository; @GetMapping("/users") public List getUsers(){ return userRepository.findAll(); } @GetMapping("/user/{id}") public Optional getUser(@PathVariable Long id){ return userRepository.findById(id); } @DeleteMapping("/user/{id}") public boolean deleteUser(@PathVariable Long id){ userRepository.deleteById(id); return true; } @PostMapping("/user") public User createUser(@RequestBody User user){ return userRepository.save(user); } @PutMapping("/user") public User updateUser(@RequestBody User user){ return userRepository.save(user); } } This is the controller in java which supports GET,UPDATE,PUT,POST operations on USER data. You can download the entire code from below Github link - Download 2. AG Grid in java Before actually going into angular project, you can go through my older posts on how to create angular project. http://www.myjavablog.com/2019/04/13/angular-installation-and-setup/ Once the project is created you need to install ag-grid support to it. Below packages needs to be installed for the same - npm i --save ag-grid You need to import this dependency in app.module.ts by adding below line under imports - AgGridModule.withComponents(null) Also you need to add CSS support for grid in styles.css - @import 'ag-grid-community/dist/styles/ag-grid.css'; @import 'ag-grid-community/dist/styles/ag-theme-blue.css Then create a component using below command - ng n c user This will create new user component and create CSS, TS , html files. Add code to html file for grid -
Angular 7 AG Grid CRUD Operations Example
Add User Edit User Delete User All the options specified in grid configuration are self explanatory. You also need Typescript file in order to perform CRUD operations . You get this from my github link. 3. Bootstrap Configuration First install bootstrap by using below npm command - npm install bootstrap Then Add bootstrap to angular.json under styles- "styles": , 4. Notifications service configuration This service is to show the notifications to users. Use below npm command to install - npm install angular-notifier Add it into imports in app.module.ts and add custom options as well- NotifierModule.withConfig( customNotifierOptions ) /** * Custom angular notifier options */ const customNotifierOptions: NotifierOptions = { position: { horizontal: { position: 'middle', distance: 12 }, vertical: { position: 'top', distance: 12, gap: 10 } }, theme: 'material', behaviour: { autoHide: 5000, onClick: false, onMouseover: 'pauseAutoHide', showDismissButton: true, stacking: 4 }, animations: { enabled: true, show: { preset: 'slide', speed: 300, easing: 'ease' }, hide: { preset: 'fade', speed: 300, easing: 'ease', offset: 50 }, shift: { speed: 300, easing: 'ease' }, overlap: 150 } }; Also you would need to add CSS for notifier in app.component.html file as below - 5. Reactive forms in angular Now you need to create user form to add users -
Add User
First Name: First name is required Last Name: Last name is required Email address: Email is required Age: Age is required Mobile: Mobile number is required Submit Invalid credentials. Back 6. Form Validations With reactive forms ,you can associate FormGroup and FormBuilder and access the form fields . Using these objects , you can also validate the form fields using angular Validators. 7. Services in Angular We have to write the service to call the REST APIs and perform CRUD operations as below - Create service using - ng g s user import { Injectable } from '@angular/core'; import { User } from './../model/user'; import {HttpClient} from '@angular/common/http'; @Injectable({ providedIn: 'root' }) export class UserService { apiUrl:string = "http://localhost:8081/api/"; constructor(private http : HttpClient) { } getUsers() { return this.http.get(this.apiUrl+'users'); } deleteUser(userId: number){ return this.http.delete(this.apiUrl+'user/'+userId); } addUser(user: User){ console.log(user); return this.http.post(this.apiUrl+ 'user/', user ); } editUser(user: User){ console.log(user); return this.http.put(this.apiUrl+ 'user/', user ); } } 8. Calling REST API using HttpClient In above service, we are injecting HttpClient in constructor to call the REST API. 9. Routing and Navigation We would need to provide routing for our application. So specific URI will be served by specific Component. Route configuration is provided in app-routing.module.ts as below - import { NgModule } from '@angular/core'; import { Routes, RouterModule } from '@angular/router'; import { LoginComponent } from './components/login/login.component'; import { UserComponent } from './components/user/user.component'; import { AddUserComponent } from './components/user/add-user/add-user.component'; const routes: Routes = ; @NgModule({ imports: , exports: }) export class AppRoutingModule { } You can download the code for this application from below github link - Download Now build the application and serve it to the client - ng build ng serve Now the application is ready to access on http://localhost:4200/-
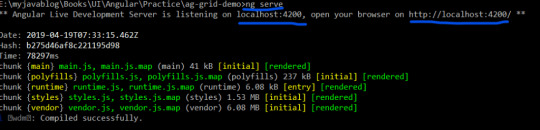
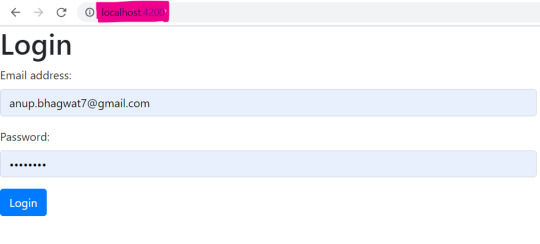
Login screen
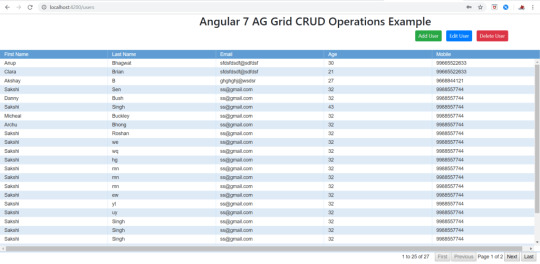
Angular ag grid showing all users
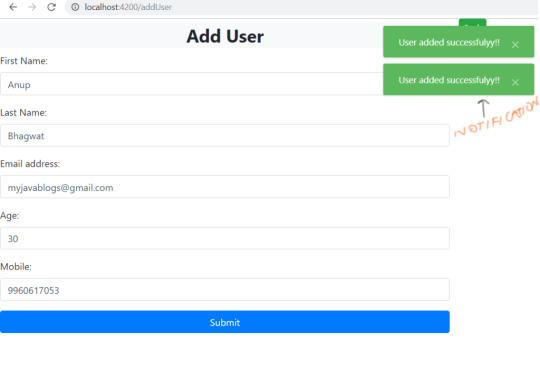
Add New User

User Editing

Updated last name and email
User Deleted
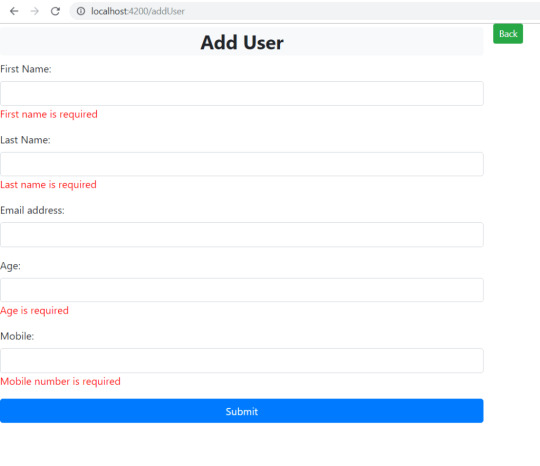
Form Validations Read the full article
0 notes
Photo

#newontheblog I’ve got a bonus post up for you guys today! In this post, I’m discussing with you my post mapping process and some tips and tricks I’ve found useful. Click the link in my bio to check it out and leave your tips and tricks in the comments!! #beautyblogger #bblogger #blogging #bloggingtips #postmapping
0 notes
Text
Thyemeleaf form submit with Spring boot
Thymeleaf is a template engine for creating views. It can be easily integrated with a Spring boot web application. Thymeleaf uses HTML as the language for creating templates with its own directives applied to HTML elements. This article will explain how to submit a form created as Thymeleaf template to a Spring boot controller. Note: This article assumes that you are familiar with configuring Thymeleaf with Spring boot. Creating a Thymeleaf form As stated above, Thymeleaf has its own directives that are written on HTML elements so that Thymeleaf template engine can parse them to its own format. Some of these directives related to form elements that we will be using in this form submit example are: 1. th:action Similar to the HTML form action attribute, it is placed over form tag, its value is the URL to which the form will be submitted. URL is written between curly braces and prefixed with @ symbol. 2. th:object Object to which form elements will be bound. This object corresponds to entity present on the Spring controller side(or server side). Properties of this object should match with the attributes of form elements. 3. th:field This attribute is applied over form elements and its value should match the property names of the object given in th:object attribute. Values of th:field are enclosed between curly braces and prefixed with a *. A sample Thymeleaf form for this example is given below. Name of this template is registration.html. .label{ width:10%; display:inline-block; margin:5px; } .input{ border-radius:5px; height:30px; margin-bottom:10px } .submit{ margin-left:10%; }
Registration Form
Name Address Married Yes No Permanent Register This form uses HTML input box, radio button, text area and check box form elements. When rendered in the browser, it will look as below.

Writing Spring backend Each of the th:action values in the above form template correspond to fields(or properties or instance variables) of an object. For submitting a form to Spring boot, we need to create such object at the server. This is called model object. So, a class with these properties is given below. package com.codippa.demo; public class Employee { private String name; private String address; private int age; private String married; private boolean permanent; // Getter and setter methods } Note that th:field values match the property names or instance variables of this object. Secondly, notice the th:object attribute of Thymeleaf form tag refers to a value. This value corresponds to an object of Employee class shown above. So, before the HTML form is displayed an object of this class should be created and added to the Spring model object. Thus, when the application is accessed using URL http://localhost:8080, we need to create a controller method mapped to this root URL. This method will create an object of Employee, bind it with a name(or key) and place it in Spring's Model class and return the name of Thymeleaf template as below. @GetMapping("/") public String home(Model model) { model.addAttribute("employee", new Employee()); return "registration"; } Notice that the name(or key) with which the object is added matches the value of th:object attribute. Next, we also need to create a controller method that handles form submission or gets called when the form is submitted. URL of this method should match with the th:action form attribute, its method should be POST. Example, @PostMapping("/register") public String registerEmployee(@ModelAttribute("employee")Employee employee) { return "confirmation"; } Notice the @ModelAttribute annotation. This attribute binds the object with the data sent while submitting the form. This is the reason that the properties of this object should match the values of th:field attributes of the form so that values sent from browser are mapped to the corresponding properties. Below image explains the mapping of values between Thymeleaf form fields, Spring controller methods and model object.

Above controller method returns a String which is the name of another Thymeleaf template and is used to display the values that were submitted. Note that the object received is automatically sent back. Thymeleaf template code for confirmation.html is given below. div{ padding:10px; } span{ display:inline-block; width:10%; }
Please confirm the information
Note that in order to display text in an element, Thymeleaf's th:text attribute is used. Property of model object whose value is to be displayed is referenced using dot operator. When the form is submitted, below is the result.

All the Thymeleaf templates can be placed at the default location src/main/resources/templates of at some other custom template location. That is all on form submission with Thymeleaf using Spring boot. Hope you liked the article, do not forget to click the clap icon below. Read the full article
0 notes