#pyserial
Explore tagged Tumblr posts
Visit Tumblr Blog
Explore Tumblr blogs with no restrictions, modern design and the best experience.
Last Seen Tumblr Blogs


Fun Fact
Tumblr has a 66 index score for customer satisfaction in the US.
Text
the python package for working with serial interfaces is called "pyserial" because the name "serial" was taken by a python class serializer that never left alpha that hasn't been maintained in over 5 years and I only install the wrong one about 50 percent of the time
2 notes
·
View notes
Text
Innovative Python Projects for Engineering Students
Python Projects for Engineering Students are a great way to demonstrate your knowledge and abilities. Takeoff Projects values practical experience, so we've put together a list of Python projects that will help you apply your learning in real-world situations, which will improve your resume and get you ready for the job market. Whether you're interested in automation, web development, data science, or other fields, these projects will help you innovate and succeed in your engineering career.

Importance of Practical Projects
For engineering college students, realistic initiatives are crucial due to the fact they fill the information hole among what is discovered inside the classroom and realistic programs. Students can advantage a deeper understanding of the subjects they've studied in textbooks via running on Python tasks. Students can follow their theoretical know-how to real-world conditions through those initiatives, which promote crucial wondering and trouble-solving abilities. Completing projects also can help college students stand out to employers through demonstrating their potential to deal with actual-international engineering troubles.
Smart Home Automation System
Using a pc or mobile tool, you can automate and manipulate household home equipment using a Smart Home Automation System in Python. A internet interface or app can be used to govern lighting, fanatics, and other gadgets with this machine. The device may additionally right now switch off lights when it detects no motion thanks to its sensors. Building this assignment calls for the use of Python modules like PySerial for hardware communication and Flask for internet development. Speech recognition libraries can also be used to combine voice manipulate functions. This assignment gives you fingers-on enjoy integrating software program and hardware similarly to teaching you approximately the Internet of Things. You will gather useful skills in automation, sensor integration, and designing person-pleasant interfaces with the aid of operating on this mission, with the intention to enhance the efficiency and smartness of your house.
Automated Student Attendance System
Using facial reputation era, an Automated Student Attendance System in Python mission makes the method of documenting attendance easier. This device takes photos of pupils as soon as they walk into the study room and uses their facial trends to routinely file their attendance. What you may examine from it and how it operates are as follows
How It Works
Picture Capture
Students are photographed by means of a digicam that is positioned at the entrance.
Face Recognition
To comprehend and identify faces in the obtained pics, the system makes use of Python modules consisting of OpenCV and face recognition.
Attendance Recording
A pupil's attendance is right now recorded in a database as quickly as their face is known. MySQL or SQLite can be used to address this database.
Data management
A consumer-friendly interface that may be created with Python frameworks like Flask or Django may be used to retrieve and manage the attendance facts.
Learning Outcomes
Computer imaginative and prescient and device mastering
You will get understanding about the way to realize faces using device getting to know techniques. For this, libraries like face recognition and OpenCV might be critical.
Database Management
Understanding database structures is vital for dealing with attendance statistics. You'll select up SQL and database management skills.
Web improvement
Web development competencies are required to provide an interface that allows administrators and teachers to monitor and manipulate attendance records. Django or Flask can help you in growing this interface.
Automation
Compared to guide attendance systems, this assignment will teach you a way to automate ordinary tactics, if you want to keep time and reduce errors.
Working in this Automatic Student Attendance System will provide you realistic expertise in a number of important regions of era.
#Python Course#Python Full Course#Python Programming#Python For Beginners#Python Full Course For Beginners#Python Complete Course
0 notes
Text
How to send and receive sms using gsm modem ?
Sending and receiving SMS using a GSM modem can be done in two main ways: using AT commands or through software libraries. Here's a breakdown of both methods:
1. Using AT Commands:
This method involves sending text commands ("AT commands") directly to the GSM modem to control its functions. It's a more technical approach and requires knowledge of the specific AT command set supported by your modem.
Here's a general process:
a. Connect and Configure:
Connect the modem: Connect your GSM modem to your computer via USB, serial port, or other means.
Identify the COM port: Use your computer's settings to identify the COM port assigned to the modem.
Open a terminal emulator: Open a program like PuTTY or HyperTerminal to send AT commands.
Set the baud rate: Configure the terminal emulator's baud rate to match the modem's (usually 9600).
Send basic commands: Test the connection by sending basic AT commands like "AT" or "ATE0" and verify responses.
b. Send SMS:
Compose message: Prepare your message content and ensure it's within character limits (usually 160 characters).
Use AT commands: Use specific AT commands like "AT+CMGS" to send the message.
Specify recipient: Include the recipient's phone number as part of the command.
Send the message: Send the command to initiate the SMS transmission.
c. Receive SMS:
Enable notifications: Use AT commands like "AT+CNMI" to enable the modem to notify you of incoming messages.
Handle notifications: Your terminal emulator should display notifications when messages arrive.
Read message: Use AT commands like "AT+CMGR" to read the message content and sender information.
2. Using Software Libraries:
Many libraries and software tools exist to simplify GSM modem communication. These libraries provide user-friendly functions for sending, receiving, and managing SMS messages.
Here's the general process:
Choose a library: Popular options include Gammu, SMSlib, PySerial (Python), and similar tools.
Install and configure: Follow the library's installation and configuration instructions.
Write code: Use the library's functions to send and receive SMS messages within your code.
Run the code: Execute your code to interact with the GSM modem and send/receive messages.
Welcome to visit: www.ejointech.cn for more information.
#ejointech#sms modem#sms gateway#ejoin sms#ejoin sms gateway#sms gateway hardware#sms marketing#bulk sms#promotional sms
1 note
·
View note
Text
Making Raspberry Pi and Arduino Speak To Each Other
As part of our project requires a micro controller to do some of the functions, we need an easy way for that data to be communicated either way. The micro controller is a ATMEGA328p, which is well known for being the core of the Arduino Uno.
Serial
One standard that has been around for a while for making devices talk to each other is Serial UART. This requires 3 wires, a reference voltage (Ground), a transmit (data out), and a receive (data in). by connecting two chips from their transmit to the receive you can send data between them. you do however, need to know a few things, what speed and what voltage are two important variables (but not the only).
Different Voltages
The problem with the Raspberry Pi and the ATMEGA chip is I want the ATMEGA to be at a 5V logic, where as, the Raspberry Pi is at a 3.3V logic. If I were to connect these it is likely I would damage the Raspberry Pi.
Logic Level Converter
This is where a Logic Level Converter comes in. It connects to the 5V logic on one side and the 3.3V logic on the other side and keeps them completely Isolated.
Code
The next challenge was making a program in python to communicate over serial so I can use the code in my final program. for this I used the PySerial Library.
1 note
·
View note
Photo

Python programming language Web Development: Django, Pyramid, Bottle, Tornado, Flask, web2py GUI Development: tkInter, PyGObject, PyQt, PySide, Kivy, wxPython Scientific and Numeric: SciPy, Pandas, IPython Software Development: Buildbot, Trac, Roundup System Administration: Ansible, Salt, OpenStack, xonsh Artificial intelligence: TensorFlow, Keras, PyTorch, Scikit-learn, ONNX Microcontroller: MicroPython, PySpice, PySerial TELEGRAM BOT: python-telegram-bot, pyTelegramBotAPI, TGramBot, OrigamiBot, pytgbot, teleflask, telegram-text free Camp for Developers @freecampdev | freecamp.dev #freecampdev #freecamp #dev #tools #python #web #gui #software #system #administration #artificialintelligence #ai #microcontroller #telegrambot #desktop https://www.instagram.com/p/Cp93TD1Osly/?igshid=NGJjMDIxMWI=
#freecampdev#freecamp#dev#tools#python#web#gui#software#system#administration#artificialintelligence#ai#microcontroller#telegrambot#desktop
1 note
·
View note
Photo

Pythonda nima yaratsa bo'ladi? - WEB (Django, Pyramid, Bottle, Tornado, Flask va h.k) - Mobile (Kivy, PyQT) - Desktop (tkInter, wxPython, PyQT) - Microcontroller (MicroPython, PySpice, PySerial va h.k) Siz qaysi yo'nalishda loyiha yaratishga qiziqasiz ;) izohlarda qoldiring. » @uzbekdevs » @uzbekdevs » @uzbekdevs #uzbekdevs #logo #pythonuz #new #uz #uzbekistan #darsliklar #dasturlash #dastur #loyiha #twit https://www.instagram.com/p/Cl_j1cmuwvt/?igshid=NGJjMDIxMWI=
0 notes
Text
Can we use serial library for python 3.5

Any help for this error will be much appreciated. To create a new search service, you can use the Azure portal, Azure PowerShell, or the Azure CLI. You need an Azure subscription and a Azure Cognitive Search service to use this package.

The python 3.5 cannot import serial which i do not know how to solve. Python 2.7, or 3.5 or later is required to use this package. If so, you do not need to install or congure anything else to use Python. I have install the pySerial-2.7 module into the python using the tutorial below:Įverything went smoothly when I used Python 2.7 as I uninstall it and migrate to python 3.5įile "/Library/Frameworks/amework/Versions/3.5/lib/python3.5/site-packages/serial/ init.py", line 21, in įile "/Library/Frameworks/amework/Versions/3.5/lib/python3.5/site-packages/serial/serialposix.py", line 58 Pythonnet supports from Python 2.6 up to Python 3.5.45 Properly Install Python on your system: 1.2Properly Installing Python There’s a good chance that you already have Python on your operating system. It will be very grateful for anyone that can solved my problem. This can be avoided by installing from the numba conda channel. Note: If you’re using a Python 3.5 environment in conda, you may run into trouble with the numba dependency. How do I copy a file How do I read (or write) binary data I cant seem to use os.read() on a pipe created with os.popen() why How do I access the serial (.

Open the Anaconda prompt and write: conda install -c conda-forge librosa. I have been trying to find a solution through the web, but none of the solutions I saw solved my problem. If you use conda/Anaconda environments, librosa can be installed from the conda-forge channel.
0 notes
Text
Serial terminal program for raspberry pi

#SERIAL TERMINAL PROGRAM FOR RASPBERRY PI HOW TO#
#SERIAL TERMINAL PROGRAM FOR RASPBERRY PI INSTALL#
uarttest06 tlfong01 2019apr08hkt1603 Computer Rpi3B+ Linux hostnamectl raspberrypi Raspbian GNU/Linux 9 (stretch) Linux 4.14.34-v7+ arm Python > sys.version 3.5.3 Test 1 - repeatWriteBytes () - UART port repeatedly send out.
#SERIAL TERMINAL PROGRAM FOR RASPBERRY PI INSTALL#
Then, we'll use Python to install proper libraries to read data from Arduino Uno R3. You may like to compare yours with my working program. We'll start by installing Raspbian Buster Lite in our Raspberry Pi Zero W. Arduino Uno R3 board or compatible board (you can also consider the Elegoo starter kit).micro SD card (at least 16 GB, at least class 10).Raspberry Pi Zero W (including proper power supply or a smartphone micro USB charger with at least a 3A) or newer board.Steps should also work with newer Raspberry Pi boards. What we needįor this project, I'm going to use a Raspberry Pi Zero W and an Arduino Uno R3. Click on the Terminal icon in the top menu bar (or choose Menu > Accessories > Terminal).
#SERIAL TERMINAL PROGRAM FOR RASPBERRY PI HOW TO#
The fastest way to get access to the command line is through the Terminal app. With the second installment on affordable home automation based on Raspberry PI still to come, today I want to show how to access our Raspberry PI terminal through the serial port esto puWith the. For this purpose, we'll use Pyserial and its terminal tool. When you boot a Raspberry Pi, you start by default inside the desktop interface. In this guide, I'll show you how to connect your Raspberry Pi to a serial USB port and read its values with Python from the terminal (without a desktop environment). You can also use Raspberry Pi to dialog with some devices-like Arduino-by using a serial USB port. Raspberry Pi can be used to interface with the real world from its GPIO, for example, by controlling a stepper motor.
0 notes
Text
Python AttributeError: module object has no attribute Serial
Im adding this solution for people who make the same mistake as I did.
In most cases: rename your project file serial.py and delete serial.pyc if exists, then you can do simple import serial without attribute error.
Problem occurs when you import something when your python file name is something.py.
I accidentally installed serial (sudo python -m pip install serial) instead of pySerial (sudo python -m pip install pyserial), which lead to the same error.
If the previously mentioned solutions did not work for you, double check if you installed the correct library
0 notes
Text
Paperless Student? An Update
One of my all-time most popular posts was about being a paperless student. In this post, I'll be providing an update on my current paper use as a student now that I am back in in-person classes. It is also an update on the post I wrote last fall on the apps I use in remote college. I still try to be as paperless as possible, but unfortunately, some of my professors print stuff out for us or require us to turn in hard copies. The core products continue to be Microsoft OneNote for notes, Google Drive for files, Microsoft Lens for scanning, and PDF Expert for reading and annotating PDFs. A web application and Chrome extension that I have recently discovered is Speechify which converts text-to-speech. This post is broken into sections for each of my courses. For the full list of my current courses, click here. In a future post, I’ll update you all on my current time and task management systems as there have been some significant changes.
CSC 220
All of our assignments are completed digitally as this is a web programming class. I have been writing code in Visual Studio Code and have been using MAMP as my local webserver. My file transfer protocol (FTP) client is Cyberduck. As for notetaking, I type up my tutorial and lecture notes in OneNote. Rather than use a textbook, we’ve been completing lots of tutorials on a website called W3Schools.
CSC 223
Our readings and other assignments for this class have been digital so far, but we may end up sketching a few things on paper. We are learning Ruby on Rails and had to install a bunch of software to get everything up and running. The terminal I use is a Linux distribution called Ubuntu. (I also occasionally use this for CSC 220). My text editor of choice is Sublime Text. We also make use of GitHub. During class, I take handwritten notes on my iPad (in OneNote of course). My reading notes are typed up in OneNote and my reading reflections are typed up in Google Docs.
EGR 320
This class is why I can no longer claim to be a paperless student. We get hard copies of all the slide decks and worksheets and must turn in hard copies of our homework on engineering paper. We even need to print out our MATLAB code and figures. I do actually use the paper handouts, but also take some handwritten notes on my iPad while watching the pre-class videos. As for textbook notes, I type them up. Upon getting my homework turned back, I scan the pages (using Microsoft Lens) and upload them to my Google Drive. One nice thing about this class and its paper use is that the professor provided us with a nice binder and dividers to use. For now, I am using my own 1-inch binder, but I’ll probably have to transfer things to the class issue 1.5-inch binder soon as I’m running out of space. We were also given physical textbooks to use for the semester, but I prefer to read the PDF version on my iPad.
EGR 390dc
Like EGR 320, homework must be complete on engineering paper. Fortunately, I don’t need to turn in a hard copy and can simply scan my homework and then upload it to Moodle (and Google Drive for safekeeping). For lab work, we use the Arduino IDE and Spyder (installed via Anaconda) which is a Python IDE. In order to program the Arduinos with Python code, we use a library called pySerial. I do my actual lab write-ups in Google Docs. Fortunately, we were provided with a PDF textbook that I read on my iPad. Just last class we started getting paper handouts in class, but I opted to continue taking handwritten notes on my iPad. I did have to frequently add screenshots from the lecture slides as there were circuit diagrams that would have taken too long to draw neatly. Like most of my other classes, my textbook notes are typed.
ENX 100
For this class, I read and annotate the readings on my iPad in the PDF Expert app. (I first download the files from Moodle and then upload them to GoogleDrive). As for my response papers, I write them up in Google Docs. During our first lecture, I typed up a few notes in OneNote. Since we’ve only met twice, I am still figuring out my systems for this class.
ESS 945sp
In this class, my journal and weekly papers are typed up in Google Docs. My Fitbit (and the corresponding app) have also been helpful digital tools for tracking my workouts.
ITL 205
Just like in ENX 100, I read and annotate the PDF readings in PDF Expert. Our quizzes are on paper, but we don’t get them back so it doesn’t bother me. So far, I haven’t been taking notes as I prefer to engage fully with the lecture and don’t need to remember super specific and obscure facts to be successful. I have been bringing a paper notebook just in case because the professor really doesn’t want people on electronic devices.
#college#Smith College#paperless student#iPad#Microsoft OneNote#google drive#apps#digital#PDF Expert
0 notes
Text

How to Send and Receive SMS Using GSM Modem ?
Sending and receiving SMS using a GSM modem can be done in two main ways: using AT commands or through software libraries. Here's a breakdown of both methods:
1. Using AT Commands:
This method involves sending text commands ("AT commands") directly to the GSM modem to control its functions. It's a more technical approach and requires knowledge of the specific AT command set supported by your modem.
Here's a general process:
a. Connect and Configure:
Connect the modem: Connect your GSM modem to your computer via USB, serial port, or other means.
Identify the COM port: Use your computer's settings to identify the COM port assigned to the modem.
Open a terminal emulator: Open a program like PuTTY or HyperTerminal to send AT commands.
Set the baud rate: Configure the terminal emulator's baud rate to match the modem's (usually 9600).
Send basic commands: Test the connection by sending basic AT commands like "AT" or "ATE0" and verify responses.
b. Send SMS:
Compose message: Prepare your message content and ensure it's within character limits (usually 160 characters).
Use AT commands: Use specific AT commands like "AT+CMGS" to send the message.
Specify recipient: Include the recipient's phone number as part of the command.
Send the message: Send the command to initiate the SMS transmission.
c. Receive SMS:
Enable notifications: Use AT commands like "AT+CNMI" to enable the modem to notify you of incoming messages.
Handle notifications: Your terminal emulator should display notifications when messages arrive.
Read message: Use AT commands like "AT+CMGR" to read the message content and sender information.
2. Using Software Libraries:
Many libraries and software tools exist to simplify GSM modem communication. These libraries provide user-friendly functions for sending, receiving, and managing SMS messages.
Here's the general process:
Choose a library: Popular options include Gammu, SMSlib, PySerial (Python), and similar tools.
Install and configure: Follow the library's installation and configuration instructions.
Write code: Use the library's functions to send and receive SMS messages within your code.
Run the code: Execute your code to interact with the GSM modem and send/receive messages.
For more information welcome to visit: www.ejointech.cn
0 notes
Text
Komunikasi Serial pada esp 8266 menggunakan phyton
Komunikasi Serial pada esp 8266 menggunakan phyton
Pada tutorial kali ini saya akan menyampaikan bagaimana caranya melakukan koneksi serial pada esp 8266 menggunakan bahasa pemrograman phyton. sebelum melakukan percobaan ini silahkan siapkan dulu arduino IDE dan Phyton sudah terinstall dikomputer anda masing-masing. pada percobaan kali ini kita akan menggunakan modul pyserial dari phyton, olah karena itu kalian harus mengintall dulu modul serial…

View On WordPress
0 notes
Text
Stranger Arduino-Python
Se me ocurrió que estaría muy genial hacer un programa en el que si vos escribís algo hiciera como en la serie Stranger Things y se prendieran leds que correspondieran con las letras del mensaje. Al principio no pensé demasiado en como hacerlo porque sabía que no tenia tiempo para hacerlo, pero un día me acorde de cuando usamos la librería Pyserial y me di cuenta que usándola hacer lo que quería era muy fácil. Es más, también recordé que en el primer obligatorio de programación 1 ya había hecho un programa que te separaba las palabras por caracter y luego se fijaba que letra era cada uno, así que ya tenia lo que me parecía mas difícil hecho. También ya había logrado la conexión con pyserial en otro proyecto asi que eso también estaba hecho. Lo único que me llevo un poco de tiempo fue darme cuenta de como hacer que python me leyera el espacio en blanco (con un poco de búsqueda encontré una función que lo hace).
Óptimamente usaría el arduino MEGA u otro que tuviera al menos 27 pins para poder tener un led para cada letra del abecedario, pero como solo tengo un arduino UNO utilicé solo 9 leds (el UNO tiene 12 pins que podría usar pero también me faltaron cables y leds). De todas formas aunque tal vez fue más fácil de lo que esperaba me divirtió mucho este proyecto, mas que nada por el resultado y además se me ocurren muchas cosas para hacer con él. También tengo un amigo que tiene un arduino MEGA así que seguramente pueda completar el abecedario algún día de estos.
CODIGOS
Python:
#Proyecto Stranger things
#Prender leds relacionados con las letras del abecedario dependiendo de que se escriba
import serial led2= 'a' #varibales que mandamos a arduino led3= 'c' led4= 'e' led5= 'i' led6= 'n' led7= 'o' led8= 's' led9= 'u' led10= 'v' espacio='1'
set_ser = serial.Serial()#nombramos a la serial set_ser.port="COM7" #definimos puerto set_ser.baudrate=9600#inicializamos el puerto de serie a 9600 baud set_ser.open()#abrimos el puerto
while True: #ejecuta el programa una y otra vez texto=input("Will, hablale a tu madre: ") #escribe el mensaje l1=list(texto) #pasar el paramentro a lista para separar por caracter for letra in l1: #recorre el mensaje por caracter if letra=="a": set_ser.write(led2.encode('utf-8')) elif letra=="c": set_ser.write(led3.encode('utf-8')) elif letra=="e": set_ser.write(led4.encode('utf-8')) elif letra=="i": set_ser.write(led5.encode('utf-8')) elif letra=="n": set_ser.write(led6.encode('utf-8')) elif letra=="o": set_ser.write(led7.encode('utf-8')) elif letra=="s": set_ser.write(led8.encode('utf-8')) elif letra=="u": set_ser.write(led9.encode('utf-8')) elif letra=="v": set_ser.write(led10.encode('utf-8')) elif letra.isspace(): set_ser.write(espacio.encode('utf-8'))
Arduino:
int mssg = 0; //variable para guardar el mensaje
void setup() { pinMode(2, OUTPUT); //establecemos 1 como salida a pinMode(3, OUTPUT); //establecemos 2 como salida c pinMode(4, OUTPUT); //establecemos 3 como salida pinMode(5, OUTPUT); //establecemos 4 como salida e pinMode(6, OUTPUT); //establecemos 5 como salida pinMode(7, OUTPUT); //establecemos 6 como salida i pinMode(8, OUTPUT); //establecemos 7 como salida pinMode(9, OUTPUT); //establecemos 8 como salida n pinMode(10, OUTPUT); //establecemos 9 como salida o Serial.begin(9600); //iniciando Serial }
void loop() { if (Serial.available() > 0) { mssg = Serial.read(); //leemos el serial
if(mssg == 'a'){ digitalWrite(2, HIGH); //si entra una 'a' encendemos delay(1000); digitalWrite(2, LOW); //apagamos } else if(mssg == 'c'){ digitalWrite(3, HIGH); //si entra una 'c' prendemos delay(1000); digitalWrite(3, LOW); //apagamos } else if(mssg == 'e'){ digitalWrite(4, HIGH); //si entra una 'e' prendemos delay(1000); digitalWrite(4, LOW); //apagamos } else if(mssg == 'i'){ digitalWrite(5, HIGH); //si entra una 'i' prendemos delay(1000); digitalWrite(5, LOW); //apagamos } else if(mssg == 'n'){ digitalWrite(6, HIGH); //si entra una 'n' prendemos delay(1000); digitalWrite(6, LOW); //apagamos } else if(mssg == 'o'){ digitalWrite(7, HIGH); //si entra una 'o' prendemos delay(1000); digitalWrite(7, LOW); //apagamos } else if(mssg == 's'){ digitalWrite(8, HIGH); //si entra una 's' prendemos delay(1000); digitalWrite(8, LOW); //apagamos } else if(mssg == 'u'){ digitalWrite(9, HIGH); //si entra una 'u' prendemos delay(1000); digitalWrite(9, LOW); //apagamos } else if(mssg == 'v'){ digitalWrite(10, HIGH); //si entra una 'v' prendemos delay(1000); digitalWrite(10, LOW); //apagamos } else if(mssg =='1'){ delay(1000); } } }
Video
youtube
2 notes
·
View notes
Photo
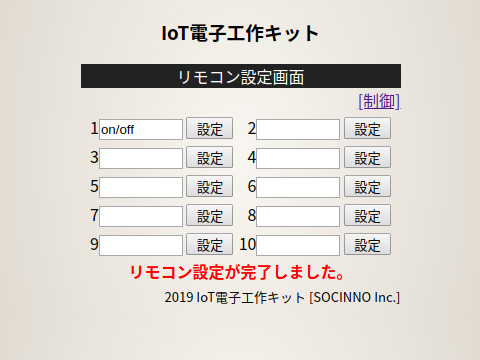
SOCINNO「IoT電子工作 スマートリモコン製作キット」をUbuntu 18.04で使う場合の追加作業 https://ift.tt/2SDJjLD
株式会社SOCINNOが提供する「IoT電子工作 スマートリモコン製作キット」は基礎からWi-Fi利用、クラウド接続まで順を追って丁寧に解説されている秀逸な教材である。
このキットをArduino IDE 1.8.9 + Ubuntu 18.04環境で使う際にいくつか追加で作業する必要があったので補足する。
以下、同キット向けのIoT電子工作ガイドの章立てに沿って説明する。
2-1 電子部品利用 > LED点滅
スケッチコンパイルエラー
スケッチコンパイル時に以下のようなエラーが発生する場合。
: Pyserial is not installed for /usr/bin/python. Check the README for installation instructions.Traceback (most recent call last): File "/home/neo/.arduino15/packages/esp32/tools/esptool_py/2.6.1/esptool.py", line 37, in <module> import serial ImportError: No module named serial exit status 1 Error compiling for board ESP32 Dev Module.
python-serialパッケージをインストールすればエラーが発生しなくなる。
$ sudo apt install python-serial
2-3 電子部品利用 > 温湿度センサ
スケッチコンパイルエラー
スケッチコンパイル時に以下のようなエラーが発生する場合。
: In file included from /home/ard/Arduino/libraries/DHT_sensor_library/DHT_U.cpp:22:0: /home/ard/Arduino/libraries/DHT_sensor_library/DHT_U.h:25:29: fatal error: Adafruit_Sensor.h: No such file or directory #include <Adafruit_Sensor.h> ^ compilation terminated. Using library DHT_sensor_library at version 1.3.4 in folder: /home/ard/Arduino/libraries/DHT_sensor_library exit status 1 Error compiling for board ESP32 Dev Module.
ライブラリマネージャから「Adafruit Unified Sensor」をインストールすればエラーが発生しなくなる。
3-2 Wi-Fi利用 > Webサーバ機能
スケッチコンパイルエラー
スケッチコンパイル時に以下のようなエラーが発生する場合。
: Multiple libraries were found for "WiFi.h" Blink:2:31: error: ESPAsyncWebServer.h: No such file or directory compilation terminated. Used: /home/ard/.arduino15/packages/esp32/hardware/esp32/1.0.2/libraries/WiFi Not used: /home/ard/opt/arduino-1.8.9/libraries/WiFi exit status 1 ESPAsyncWebServer.h: No such file or directory This report would have more information with "Show verbose output during compilation" option enabled in File -> Preferences.
以下の2つをダウンロードして[Sketch] > [Include Library] > [Add .ZIP Library…]でそれぞれインストールすればエラーが発生しなくなる。
https://github.com/me-no-dev/ESPAsyncTCP/archive/master.zip
https://github.com/me-no-dev/AsyncTCP/archive/master.zip
DHCPサーバ利用
IPアドレス情報をDHCPサーバから動的に受け取る場合は以下のIPアドレス設定は不要。(以降の章も同様)
IPAddress ip(192, 168, 1, 123); // IPアドレス(本機が利用するIP) IPAddress gateway(192, 168, 1, 1); // デフォルトゲートウェイ IPAddress subnet(255, 255, 255, 0); // サブネットマスク : void setup() { : WiFi.config( ip, gateway, subnet ); :
4-2 データ利用 > SPIFFSによるファイル操作
SPIFFSマウントエラー
プログラム実行時に以下のようなエラーが発生する場合。
E (36) SPIFFS: mount failed, -10025
SPIFFS.hだけでなくFS.hもincludeすればエラーが発生しなくなる。
#include <FS.h> <--- 追加 #include <SPIFFS.h>
それ以降
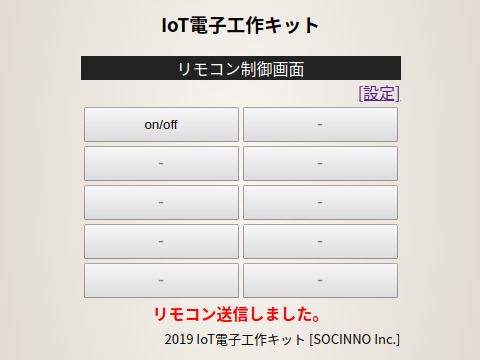
上記の対応を経て、無事リモコンが動作した。
⦿リモコン設定(ON/OFF信号記録)

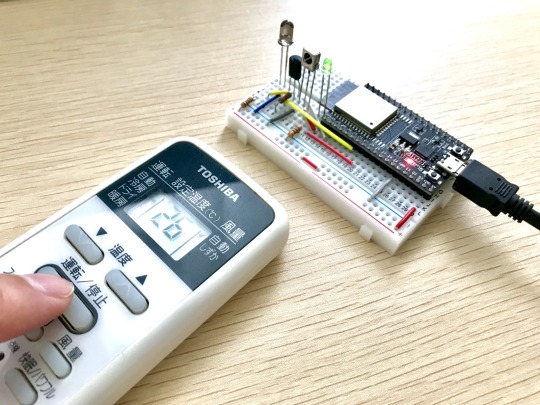
⦿リモコン操作(ON/OFF信号発信)

関連記事
IoT時代に対応すべく、電子工作を基礎から応用まで学習! 「IoT電子工作 スマートリモコン製作キット」発売 (@Press)
SOCINNO、電子工作を基礎から応用まで学習できる「IoT電子工作 スマートリモコン製作キット」発売 (IoTNEWS)
元記事はこちら
「 SOCINNO「IoT電子工作 スマートリモコン製作キット」をUbuntu 18.04で使う場合の追加作業」
July 25, 2019 at 12:00PM
0 notes
Text
UDEMY Arduino Data Visualization using Python for FREE
New Post has been published on https://netsmp.com/2020/08/16/udemy-arduino-data-visualization-using-python-for-free/
UDEMY Arduino Data Visualization using Python for FREE
https://www.udemy.com/course/arduino-python-data-visualization-pyserial-display-data/?couponCode=STAYHOMENEW82020 https://www.udemy.com/course/arduino-python-data-visualization-pyserial-display-data/?couponCode=STAYHOMENEW82020
0 notes