#raspberry pi2
Explore tagged Tumblr posts
Visit Tumblr Blog
Explore Tumblr blogs with no restrictions, modern design and the best experience.
Last Seen Tumblr Blogs


Fun Fact
Tumblr was the first site to host the blog for President Barack Obama in 2011.
Text
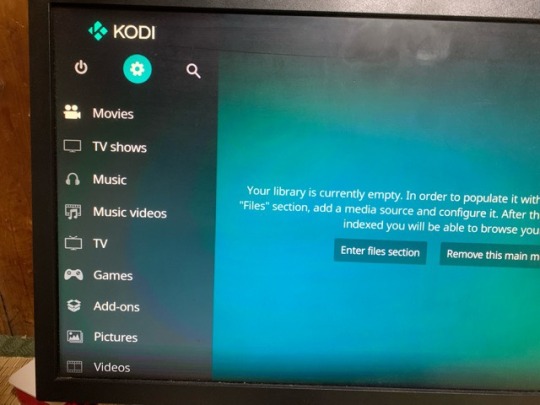
KODIはなかなか良い
Raspberry Pi 3にLibreELECのKodiをインストールして動かしてみました。なんか上手動かないところもあるので追々調べて解決します。 インストールは簡単。 Pi ImagerというRaspberry Piのブートメディアを作るアプリケーションで、LibreELECのPi2/3用Kodi を選んでMicro SDに書き込むだけです。 余計なものが入っていないので、Linuxとして使うのには無理がありますが、その分軽量なOSになっているのでPi3でも動作は軽快です。 Web UIで他の機器からコントロールできるように設定してやると、スマートフォンなどからアクセスできます。 スマートフォンがリモコンとして使えるようになるので、KodiがインストールされたRaspberry…
View On WordPress
0 notes
Link
The first model of Raspberry Pi was developed in the UK for the promotion of teaching basic computer science in schools. It has size that of a credit card and can be plugged into computer monitor or TV, and has the capability of doing everything a Desktop PC can do. Let’s have a look into 21 great uses of Raspberry Pi.
1. Building a Robot with Raspberry Pi
If Raspberry Pi could have a second name, it would have definitely been a Robot. Raspberry Pi can be used as the main brain in drones and Remote-Controlled Planes. A robotic arm can also be made with it which can hand over to you a cup of Coffee.
2. Hosting a Website
A Raspberry Pi can be used as a web server. You can host your own personal website or a Professional one by installing the right software and libraries. The advantage is that it requires less power and can be used on local network instead of the internet.
3. Forecasting Weather
Temperature and air humidity can be measured with the help of Raspberry pi. You just need a breadboard, jumper wires and the right type of sensors to sense and predict the weather
4. A Desktop Computer
A computer monitor, keyboard, mouse and a hard disk for extra storage is all that you need to build a home PC. It will need its own operating system as it can’t run Windows or MacOS.
5. Wi-Fi Extender
If you are having a Wi-Fi connection problem at the corner of your home, then Raspberry Pi can act as a booster for you. It is cheap and directly connects to your Wi-Fi adapter.
6. Making a Minecraft game
Raspberry Pi can play an addictive game for you. The Raspberry Pi will act as the Server for the Minecraft. But the downside is that you cannot have more players and high graphics.
7.Smart Home
Your House can be controlled remotely with the help of Raspberry Pi. Be it your light switches, security cameras and Washing machine. You just know basic programming and the right electronic for a specific task.
8. Virtual Private Network
If you are in a country where there is ban on social websites, then there is no need to worry. Your Raspberry Pi can act as a cheap VPN without consuming a large amount of power and can handle few connections efficiently.
9. Raspberry Pi Cloud Server
Your Raspberry Pi can act as a one drive or Dropbox and you just need the Own Cloud Software to be installed into it.
10. Telephone with Raspberry Pi
The Raspberry Pi can make calls for you and the cost of making a phone is much likely that of an ordinary smart phone available at local market.
11. Printing Server
The Common Unit Printing System and the associated sharing software with the Raspberry Pi can make a complete Printing System for you. The main purpose of the Raspberry Pi here is it will ensure the computer Windows can access the printer via a network.
12. Camera
If you want to take photos or videos, capture and save files or stream to the internet, a Raspberry Pi is there for you. All you need is an infrared LED attached to it. You can also use it to monitor your pet or a CCTV at the door of your entrance.
13. Making a Raspberry Pi Twitter Bot
A twitter bot will tweet, retweet, like based on the programming code you have written on your Raspberry Pi. You need to develop twitter API and then connect it with your Raspberry Pi.
14. Radio Station
A Raspberry Pi can act as a FM Radio Signal transmitter by using the Spread Spectrum Clock Signal. You can broadcast live by using advanced tools with your Raspberry Pi
15. AI Assistant
Just as many Assistants available they’re at the market, one can make an assistant with the help of Raspberry Pi which can set be as an alarm clock or tell you weather news.
16. Distance Sensor
One of the fantastic Do It Yourself project is you can make a distance measurement device with Raspberry Pi.
17. Smart TV
Just as a Desktop PC, you can make a TV by connecting Raspberry Pi with a monitor or Screen and installing the necessary software.
18. Wireless Video Surveillance Robot
Once you know that you can build Camera and Robot with Raspberry Pi, the next step is to combine both of these projects and build a video surveillance that can be wireless controlled
19. Live Streaming
You have online apps and websites built for live and video calling, but that uses a lot of bandwidth. A Raspberry Pi can be helpful to build a Live-streaming app for you that is cost efficient.
20. Smart Mirror
A magic mirror which is a webpage run from a web server housed inside your Raspberry Pi will show futuristic displays like daily weather, calendar, etc.
21. Ultra-Power Supply
If you are making a project which requires consistent power supply, Raspberry Pi can help you by acting as an Ultra-Power Supply device.
0 notes
Photo

Raspberry Pi 64 GB Samsung SD Card Retropie 4.4 PI2, 3 & 3B Complete Collections https://t.co/2vsfPdJi0n https://t.co/IDzsqtQixm http://twitter.com/AmazonBay4u/status/1150101987242852352 July 13, 2019 at 06:57PM
Raspberry Pi 64 GB Samsung SD Card Retropie 4.4 PI2, 3 & 3B Complete Collections https://t.co/2vsfPdJi0n https://t.co/IDzsqtQixm
— AmazonBay4u (@AmazonBay4u) July 13, 2019
#Raspberry Pi 64 GB Samsung SD Card Retropie 4.4 PI2#3 & 3B Complete Collections https://t.co/2v
0 notes
Text
Top 10 Best raspberry pi wifi usb [2022]
Top 10 Best raspberry pi wifi usb [2022]
1. 150Mbps USB WiFi Adapter, LOTEKOO Wireless Network Card Adapter WiFi Dongle for Desktop Laptop PC Windows 10 8 7 MAC OS Raspberry Pi / Pi2 Buy On Amazon Wireless Standards: IEEE 802.11n/g/b. Ralink 5370 Chipset, 2.4GHz Enhanced 150Mbps Wireless data transmission rate, wide range and ultra speed. Wide Compatibility: Perfect for Raspberry Pi/Pi2/3/ Pi Zero W. Work with PC Laptop Desktop,…

View On WordPress
0 notes
Photo
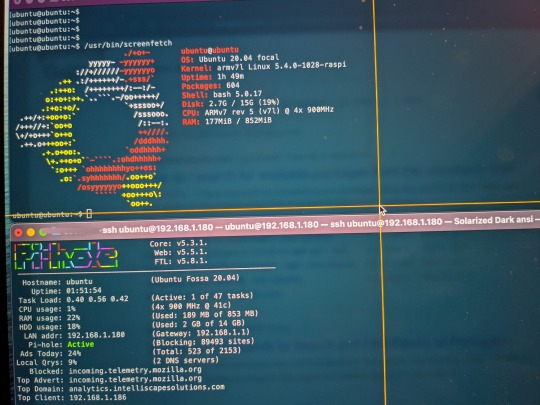


reinstallation of pihole on old raspberry pi2 for adblocking
0 notes
Text
Mx3 Remote Control

+-Can the mouse be perminentlly disabled? If so , when the mouse wakes up from inactivity will the mouse remain off?
No, when you turn on the device the mouse is automatically enabled, however there is a button on the remote to disable mouse movement once the device is turned on.
+-Is mx-3 compatible with raspberry pi3?
Yes it does. I use it with my Raspberry Pi2 and Pi3 with no issues whatsoever.
+-Does this work with firetv?
Note:How to operate the IR learning remote part? Step1:Press the SET button for more than 4 seconds,the Yellow LED will blink once and light. Step2:Align the Rii remote IR light with the original remote IR light (note:the distance less than 7cm),then press the key to be programmed in Rii remote,LED indicator will flash twice and be on,which means the key is ready for programming. Step3:Press the key to be programmed in the original remote,the Rii remote LED will flash three times and be on ,indicating the programming is finished.(In the key learning mode within 10 seconds if the button is not pressed to learn,the Rii remote will exit the learning mode). Step4:Repeat the Step2 to Step3,and finish the programming for all keys of Rii remote. Step5:Press the SET button or leave it without any operation 10 seconds,the Rii remote will exit the programming mode. Note:The remote control can only support a remote control.
Mx3 Remote Control
Mx3 Remote Control Vehicle
Mx3 Remote Control Switch
Mx3 Portable 2.4g Wireless Remote Control
Mx3 Air Remote Control
Rii MX3 Multifunction 2.4G Fly Mouse Mini Wireless Keyboard & Infrared Remote Control & 3-Gyro + 3-Gsensor for Google Android TV/Box, IPTV, HTPC, Windows, MAC OS, PS3 443 Reviews Rii MX3 Multifunction 2.4G Fly Mouse Mini Wireless Keyboard & Infrared Remote Control & 3-Gyro + 3-G. MX3 Air Remote Control, 2.4G Mini Wireless Keyboard Mouse. This is a multi-functional air remote mouse that is worthy to be owned. It works AS A REMOTE: It will provide you with smooth navigation and can be used to learn some important keys from your TV remote.; It works AS A MOUSE: Built-in with 3-Gyro + 3-G Sensor, it can converts your space movement in the air into an accurate. MX3 Pro Wireless keyboard 2.4G remote control bring IR Learning function.Air mouse is a multi-axis device which integrates the key functions of a keyboard,it supports Android TV /BOX, Networked set-top box, Mini PC, HTPC. – Control Transmission: 2.4G RF Radio Frequency Technology – Keys Quantity. Learning Remote Control. This manual is designed to assist you step-by-step as you setup the MX-350 to replace all of your remote controls and automate your home entertainment system. TM Table of Contents Getting Started 2 Button Layout 3 Basic Setup 5 Pre-Programmed Method 5 Learning Method 9 Volume Control Punch Through 12 Advanced Operation 14.
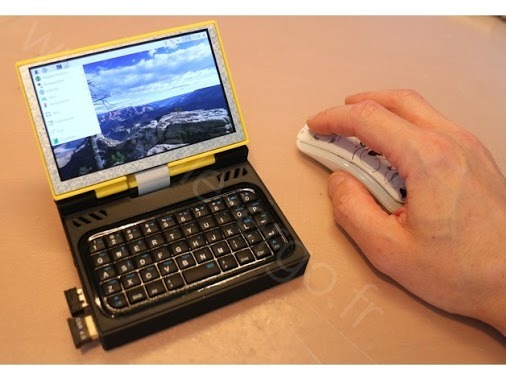
The MX3 remote air mouse brings using your Android TV box to a new dimension. With a point and click inertia system that moves the cursor on screen when you move the remote and a full QWERTY key board on the reverse. This guide will give you some insight about some of the features of this awesome remote
The MX3 remote pictured below.
The front side of the remote has your standard function buttons to navigate the box
However, flip the remote over and the back has an awesome slim-line QWERTY keyboard for typing.
Connecting the remote to the player is extremely simple
Mx3 Remote Control
First, open the battery compartment and take out the USB wifi dongle inside. Put two AAA batteries into the remote, ensuring they are the correct way around

Then, simply plug the dongle into one of the available USB ports on your player
And voila, your remote will start working immediately. You can now point your remote at the screen and move the cursor around with the movement of your hand
So, now you have it setup, lets have a look at a few of the features
ReturnBack Button
This brings you back to the menu you were previously in
Mx3 Remote Control Vehicle
Home Button
Brings you back to the main menu

Menu button
Pressing this button brings up a small pop up menu when in a Kodi add-on. Used for adding things to favourites
Cursor On/Off
Pressing this button will turn off the mouse cursor function of the remote, leaving just the standard directional pad working. If the remote is left idle for a while, the remote cursor will automatically come back on.
Mute
This button will mute your device audio
Accessing the symbols in blue
On the keyboard there are characters and symbols in white, which are the most used, and ones in blue, which arent used so much. To type one of the blue characters, press the ALT button
Mx3 Remote Control Switch
Remote learning feature
If you would like your MX3 remote to learn some commands from another remote, then you can teach it to ‘copy’ the IR signal of the other remote. For instance, whilst the power button will turn your player off, it wont turn it back on because its not using the same ‘Turn on’ signal as your standard android remote. So here is what to do
1) Get your standard android remote (or any remote that you want to replicate a button from) and place it end-to-end with the MX3 so that the IR receivers are facing each other.
2) Then, on the MX3 press and hold the red TV button.
You will see the LED flashing rapidly then slow to a steady flash (the steady flash means the X3 is now in ‘learning’ mode)
Mx3 Portable 2.4g Wireless Remote Control
4) Release the ‘TV’ button.
5) Now press the power button on the standard remote (or whichever button you want to map) You will see the LED light stop flashing and glow continuously, at this point press the power button on your MX3 remote. The LED will then flash again and eventually extinguish.
Mx3 Air Remote Control
This means the MX3 has finished ‘learning’ the IR code from the other remote and has successfully mapped it to the power button
0 notes
Text
Redox 0x01
Introductory session
…and here we go! All excited. A first calendar entry to describe my attempt on ARM64 support in Redox OS. Specifically, looking into the Raspberry Pi2/3(B)/3+ (all of them having a Cortex-A53 ARMv8 64-bit microprocessor, although for all my experiments I am going to use the Raspberry Pi 3(B)).
Yesterday, I had my first meeting in Cambridge with @microcolonel! Very very inspiring, got many ideas and motivation. He reminded me that the first and most important thing I fell in love with Open Source is its people :)
Discussion Points
Everything started with a personal introduction, background and motivation reasons that we both participate in this project. It’s very important to note that we don’t want it to be a one-off thing but definitely the start of a longer support and experimentation with OS support and ARM.
Redox boot flow on AArch64
Some of the points discussed:
* boot * debug * MMU setup * TLS * syscalls `</pre> The current work by @microcolonel, is happening on the realms of `qemu-system-aarch64` platform. But what should I need to put my attention, when porting to the Rpi3? Here are some importants bits: <pre>`[ ] Typical AArch64 exception level transitions post reset: EL3 -> EL2 -> EL1 [x] Setting up a buildable u-boot (preferably the u-boot mainline) for RPi3 [ ] Setting up a BOOTP/TFTP server on the same subnet as the RPi3 [ ] Packaging the redox kernel binary as a (fake) Linux binary using u-boot's mkimage tool [ ] Obtaining an FDT blob for the RPi3 (Linux's DTB can be used for this). In hindsight, u-boot might be able to provide this too (u-boot's own generated ) [ ] Serving the packaged redox kernel binary as well as the FDT blob to u-boot via BOOT/TFTP [x] Statically expressing a suitable PL011 UART's physical base address within Redox as an initial debug console `</pre> Note: I’ve already completed (as shown) two important steps, which I am going to describe on my next blog post (to keep you excited ;-) **Challenges with recursive paging for AArch64** @microcolonel is very fond of recursive paging. He seems to succesfully to make it work on qemu and it seems that it may be possible in sillicon as well. This is for 48-bit Virtual Addresses with 4 levels of translation. As AArch64 has separate descriptors for page tables and pages which means that in order for recursive paging to work there must not be any disjoint bitfields in the two descriptor types. This is the case today but it is not clear if this will remain in the future. The problem is that if recursive paging doesn’t work on the physical implementation that may time much longer than expected to port for the RPi3. Another point, is that as opposed to x86_64, AArch6 has a separate translation scheme for user-space and kernel space. So while x86_64 has a single cr3 register containing the base address of the trnslation tables, AArch64 has two registers, ttbr_el0 for user-space and ttbr_el1 for the kernel. In this realm, there has been @microcolonel’s work to extend the paging schemes in Redox to cope with this. **TLS, Syscalls and Device Drivers** The Redox kernel’s reliance on Rust’s #[thread_local] attribute results in llvm generating references to the tpidr_el0 register. On AArch64 tpidr_el0 is supposed to contain the user-space TLS region’s base address. This is separate from tpidr_el1 which is supposted to contain the kernel-space TLS region’s base address. To fix this, @microcolonel has modified llvm such that the use of a ‘kernel’ code-model and an aarch64-unknown-redox target results in the emission og tpidr_el1. TLS support is underway at present. **Device drivers and FDT** For the device driver operation using fdt it’s very important to note the following: <pre>`* It will be important to create a registry of all the device drivers present * All device drivers will need to implement a trait that requires publishing of a device-tree compatible string property * As such, init code can then match the compatible string with the tree of nodes in the device tree in order to match drivers to their respective data elements in the tree `</pre> ** ** **Availability of @microcolonel’s code base** As he still expects his employer’s open source contribution approval there are still many steps to be done to port Redox OS. The structure of the code to be published was also discussed. At present @microcolonel’s work is a set of patches to the following repositories: <pre>`* Top level redox checkout (build glue etc) * Redox kernel submodule (core AArch64 support) * Redox syscall's submodule (AArch64 syscall support) * Redox's rust submodule (TLS support, redox toolchain triplet support) `</pre> Possible ways to manage the publishing of this code were also discussed. One way is to create AArch64 branches for all of the above and push them out to the redox github. This is TBD with **@jackpot51**. **Feature parity with x86_64** It’s very important to stay aligned with the current x86_64 port and for that reason the following work is important to be underways: <pre>`* Syscall implementation * Context switch support * kmain -> init invocation * Filesystem with apps * Framebuffer driver * Multi-core support * (...) (to be filled with a whole list of the current x86_64 features) `</pre> _Attaining feature parity would be the first concrete milestone for the AArch64 port as a whole._ **My next steps** As a result of the discussion and mentoring, the following steps were decided for the future: <pre>`[x] Get to a point where u-boot can be built from source and installed on the RPi3 [x] Figure out the UART base and verify that the UART's data register can be written to from the u-boot CLI (which should provoke an immediate appearance of characters on the CLI) [ ] Setup a flow using BOOTP/DHCP and u-boot that allows Redox kernels and DTBs to be sent to u-boot over ethernet [ ] Once microcolonel's code has been published, start by hacking in the UART base address and a DTB blob [ ] Aim to reach kstart with println output up and running. `</pre> **Next steps for @microcolonel** <pre>`[ ] Complete TLS support [ ] Get Board and CPU identification + display going via DTB probes [ ] Verify kstart entry on silicon. microcolonel means to use the Lemaker Hikey620 Linaro 96Board for this. It's a Cortex-A53 based board just like the RPi3. The idea is to quickly check if recursive paging on silicon is OK. This can make wizofe's like a lot rosier. :) [ ] Make the UART base address retrieval dynamic via DTB (as opposed to the static fixed address used at present which isn't portable) [ ] Get init invocation from kmain going [ ] Implement necessary device driver identification traits and registry [ ] Implement GIC and timer drivers (Red Flag for RPi3 here, as it has no implementation of GIC but rather a closed propietary approach) [ ] Focus on user-land bring-up `</pre> **Future work** If we could pick up the most important plan for the future of Redox that would be a roadmap! Some of the critical items that should be discussed: <pre>`* Suitable tests and Continuous integration (perhaps with Jenkins) * A pathway to run Linux applications under Redox. FreeBSD's linuxulator (system call translator) would be one way to do this. This would make complex applications such as firefox etc usable until native solutions become available in the longer term. * Self hosted development. Having redox bootable on a couple of popular laptops with a focus on featurefulness will go a great way in terms of perception. System76 dual boot with Pop_OS! ? ;) * A strategy to support hardware assisted virtualization.
Thanks
Thanks for reading! Hope to see you next time here. For any questions feel free to email me: code -@- wizofe dot uk. Many many insights are taken from @microcolonel’s very detailed summary; The following part of the blog is my own experimentation and exploration on the discussed matters!
2 notes
·
View notes
Text
Archive: Sleep walker steps for compiling QT in Raspberry Pi
This is a silly step by step / copy paste guide for what i had to do to finally compile QT in Raspberry Pi. I have used this guide with this thread and this thread for getting over some problems (mostly EGLFS related). Here are documented minor modifications I have done to make it work
Date: 08.04.2018 RPi Version 3B QT Version 5.10.1 SD Card 16GB (Dont think you can use less) OS Raspbian Stretch Lite
1. Downloaded latest stretch Lite version from RPi website
2. Make image using etcher
3. Connect raspberry pi to my mac and enable internet sharing in OSX (Inside System Preferences -> Sharing)
4. Few setup items: - Enable SSH in raspberry pi with sudo raspi-config (Interfacing Options) - Change swap (first time I tried compiling ran out of memory)
sudo nano /etc/dphys-swapfile # The default value should be # CONF_SWAPSIZE=100 # Change to CONF_SWAPSIZE=1024 # Restart the service sudo /etc/init.d/dphys-swapfile stop sudo /etc/init.d/dphys-swapfile start
- Allocate 256MB to GPU memory on memory split
ALL STEPS BELOW WHERE TAKEN FROM OSX OVER SSH
5. From mac connect to Rpi over ssh, the default user - password is pi - raspberry
6. Make sure everything is up to date
sudo apt-get update sudo apt-get upgrade
sudo reboot
sudo rpi-update
sudo reboot
7. Make Directory and download and extract QT
mkdir qt cd qt wget http://download.qt.io/official_releases/qt/5.10/5.10.1/single/qt-everywhere-src-5.10.1.tar.xz sudo tar -xvf qt-everywhere-src-5.10.1.tar.xz
8. Install dependencies (one at a time just to be sure)
sudo apt-get install build-essential sudo apt-get install libfontconfig1-dev sudo apt-get install libdbus-1-dev sudo apt-get install libfreetype6-dev sudo apt-get install libicu-dev sudo apt-get install libinput-dev sudo apt-get install libxkbcommon-dev sudo apt-get install libsqlite3-dev sudo apt-get install libssl-dev sudo apt-get install libpng-dev sudo apt-get install libjpeg-dev sudo apt-get install libglib2.0-dev sudo apt-get install libraspberrypi-dev sudo apt-get install libpq-dev libmariadbclient-dev
9. Edit mkspecs
Navigate to [QT_ROOT]/qtbase/mkspecs/devces/linux-rpi2-g++ PEOPLE SEEM TO HAVE PROBLEMS, SEE LINKS IN INTRO TEXT
10. Create build directory
mkdir build cd build
11. Configure build
PKG_CONFIG_LIBDIR=/usr/lib/arm-linux-gnueabihf/pkgconfig PKG_CONFIG_SYSROOT_DIlsR=/ \ ../qt-everywhere-src-5.10.1/configure \ -v -opengl es2 -eglfs -no-gtk \ -device linux-rasp-pi2-g++ -device-option CROSS_COMPILE=/usr/bin/ \ -opensource -confirm-license -release -reduce-exports -no-use-gold-linker \ -force-pkg-config -nomake examples -no-compile-examples \ -skip qtwayland -skip qtwebengine -no-feature-geoservices_mapboxgl \ -qt-pcre -ssl -evdev -system-freetype -fontconfig -glib -prefix /opt/Qt5.10
DO YOURSELF A FAVOR AND DO THE REST IN THE RPi, YOU DONT WANT TO HAVE YOUR MACHINE STUCK FOR HOURS
12. Run compile (I did it nice and slow, you can try to use the cores if you want)
make
13. Install build
sudo make install
1 note
·
View note
Note
Can the Raspberry Pi run Doom....3?
Good question!
A quick search pointed me at some attempts back in 2015-ish that got the game compiled and running on a Pi2 at a low single-digit framerate.
youtube
It looks like the author of that project dropped it before the Pi3 came out due to GL driver bugs, so I don’t know how much closer to playability the newer hardware would drag things. Anyone more knowledgeable in Pi stuff fiddle around with this?
59 notes
·
View notes
Text
Raspberry Piでインターネットラジオ
AirPlayサーバーとして使用しているRaspberry Pi2(以下Rpi2)をもう少し便利に使おうと思い、インターネットラジオを受信再生できるようにしました。
画面のキャプチャーはiPad miniにインストールしたVNCクライアントのもので、Rpi2の端末ウィンドウが小さくて見難いですが、実行したコマンドを書いておきますのでわかると思います。画像は雰囲気で。笑
Rpi2にログインしたらソフトウエアをアップデートしておきます。
sudo apt-get update
を実行。
mplayerという音楽再生ソフトをインストールします。
sudo apt-get install mplayer
を実行。
mplayerがあればコマンドラインからインターネットラジオに接続できますが、手元のiPhoneやPCからコントールしたいので簡単なWebインターフェースを作ろうと思います。今回は…
View On WordPress
1 note
·
View note
Link
Raspberry Pi has been used to monitor machines, build gaming experiences, or perform complex business activities. But in a world whereby smart home actually makes a difference, inexpensive Raspberry Pi is now becoming a cost-effective solution for handling smart devices in your house. Nevertheless, to actually produce a Raspberry Pi-based system that manages home automation, you’re going to need some understand-how. And more than anything else, you’re going to have to be inclined to fiddle a bit to get it correct. Node-RED is a spatial tool for wiring the Internet of Things that can be operated on a Raspberry Pi and enables accelerated project prototyping. setting up Node-RED on the Raspberry Pi 2, How? Confusing-Read more at http://bit.ly/2NTlfU7
0 notes
Photo
Raspberry UMPC & Nano Pi2 UMPC: French Designer Goes On to Create 3D Printed Bluetooth Switches Guy ... http://ift.tt/2wVHuAt
#themakersmovement#Public RSS-Feed of theMAKERSMOVEMENT. Created with the PIXELMECHANICS 'GPlusRSS-W
32 notes
·
View notes
Text
Projetos FP: Sistema de Visão Computacional para Contagem de Alevinos
Projetos e Serviços Fábrica do Projeto
Consulte nossa condição de fornecimento para este projeto ou similar. Utilize nosso formulário ou entre em contato via WhatsApp!
Aplicação de Técnicas de Visão Computacional para Contagem de Alevinos Imagens Ilustrativas


Descrição do Projeto e Características
Projeto para estimar de forma automática o número…
View On WordPress
0 notes
Text
GPGPUの観点から見る VideoCore VI と VideoCore IV の違い
Idein大川です.主に最適化回りを担当しています.
Raspberry Pi 4 が(技適も通過し)発売され入手可能になりましたね.これまでRaspberry Pi シリーズのGPUはVideoCore IV (以下VC4)でしたが,Pi4からは VideoCore VI (以下VC6)が採用されています.
VC4と異なり,VC6には性能を引き出す上で最大とも言える問題があります.それは「リファレンスマニュアルが公開されていない」ということです.VC4ではリファレンスマニュアルが公開されていたために py-videocore 等を作ることができ,誰でもGPGPUを嗜むことができました.しかし,VC6ではなかなかそうもいきません.幸いグラフィックライブラリMesa 3DのVideoCore対応から読み取れるものはありますが,使う必要が無いためか実装されてない(というかあるかないかもわからない)ような部分もあり,不明な部分も未だ多いです.
Ideinでも残念ながら?特別なドキュメントもらっているとかそんなことは全くありません.(VC4のように)ドキュメントを公開してもらえるのか問い合わせを行いましたが,必要な情報はMesaのVC6ドライバを参考に調査してくれ,成果は公開してもかまわないと案内頂くにとどまっています.そのため「こういう機能がきっとある筈だからたぶんこのあたりのbitに何らかのエンコーディングで入ってるだろう,本当にあるかないかもわからんそれを実装して試してみよう」とか「何らかの命令や特殊目的レジスタの存在はわかるけど具体的に何をするものなのか不明なので推測しつつ作用を調査する」といったようなエスパー行為も駆使して未解明な部分を埋めつつ,VC6 GPGPUのためのPython EDSL(embedded domain specific language)なアセンブリ py-videocore6 を開発しており,既にDNNに使うパーツの実装に足る程度には仕上がっています.また,これを利用したVC6の性能評価等も進めてみています.
たぶんこれが一番速いと思います.(フラグ)
youtube
本記事では,VC4とVC6両方に触れてみて,VC4からVC6への差分がどうなっているのかについてざっと紹介します.Pi4の性能を完全に引き出す助けにしてみて下さい.ただし,上記の通り推測が多分に含まれています.VC4同様リファレンスが公開されることを祈りましょう.
理論性能
演算器QPUが16way SIMDの32bit演算器である点はVC4と一緒です.VC4のときは3つあったスライスがVC6では2つに減っています.そのかわり(Pi3で)300MHzだったGPU動作周波数が,500MHzに向上しています.この変更により,(Pi3やPi0で)28.8Gflopsだった理論性能は32Gflopsに微増しました.ただ,Pi4ではCPUがトータルで48Gflops持っています.Pi0や旧Pi2までは圧倒していたGPU性能も新Pi2やPi3では逆転し,Pi3+,Pi4となるにつれ理論性能の差はだんだんと広がっています.実はPi3 VC4の段階で既にCPUより速く動かすのは大変なのですが,Pi4 VC6からはさらに顕著になっています.まぁ,Pi4は(Pi3とかもですが)CPUを全力全開すると一瞬でお熱になるのですが.
レジスタ/命令セット
VC4では結構いろいろな種類があった命令ですが,VC6では大まかに算術命令と分岐命令のみになりました.セマフォ命令(というかセマフォ自体)が恐らくなくなっています.また,即値ロード命令相当のものを見つけられてないだけかもしれませんが無くなっており,これはやや不便なこともありました.
VC4ではregister fileのA/B面がありましたが,VC6では総数変わらずもこの区別が無くなっています.また,1命令分のディレイも無くなっており,総じて扱い易くなる良い変更となっています.
特殊目的レジスタのうち,命令のsrcレジスタとして利用する形のものが恐らく一律で無くなりました.一部,同等機能としてdstレジスタに格納する形の命令に変化して残っているようです.同じ命令でもsrcレジスタによってストールするかどうか変わるというような挙動を嫌ったのかもしれませんが,実際の意図はわかりません.
packing/unpackingに関しては8bit整数が無くなり,絶対値unpackなどにやや顔ぶれが変わりました.また,packing/unpacking可能な命令が限定されています.というかそれらが可能な命令に対するopコードの一部として表���されているという状態です.関連して,算術命令としてfp16の乗算が追加されました.やや流行りを感じなくもないです.ただ,加算が無いようなので,使う場合はfp32命令とpacking/unpackingを利用することになるのでしょう.
条件フラグの挙動もかなり変更されています.VC4ではznc三種類のフラグがそれぞれ同時セットされ,個別に参照することができましたが,VC6ではzncのどれか1つをセットして保持する形になり同時には参照できません.そのかわり,A面B面で長さ2の条件フラグバッファを持っており,新しくセットしたらA面に,それまでA面にあったものがB面に移動するようになっているようです.また,A面のフラグに対しand/norで更新する機能が付きました.算術命令からはA面B面両方参照でき,分岐命令からはA面のみが参照されるみたいです.
分岐命令は,相対即値,絶対即値,レジスタ内絶対値,リンクレジスタ値のいずれかに飛ぶ形になりました.VC4であったレジスタ内相対値が無くなりましたが,大きな影響は無いでしょう.VC4のときは明示的にリンクレジスタとしてregister fileのどれかを指定し,分岐時にそれに格納される形でしたが,VC6では通常のレジスタとしては参照できない暗黙のレジスタになっているようです.前述のように特殊目的レジスタでsrcとして利用できるものは消えているので,これも追加された「現在のリンクレジスタ値を引き出す命令」を使って取り出す形になっています.1段飛んで戻るだけであればregister fileを消費しなくなったということでもあります.
データの転送
VC4ではデータをTMUやuniformsでロードし,VPMを経由してDMAで書き戻していました.VC6ではTMUがロード・ストア両方に対応し,MMUも挟まっているようです.VC4では,TMUやuniformの前にはL2がありますが,DMAはそれを経由しないため,同一領域に対する読み書き読みを行うとL2キャッシュの状態によってデータの整合性が崩れることがありました(当然Ideinの変換器はこれも考慮して変換しています)が,VC6ではこの現象も発生しなくなっています.ただ,TMUでストアした直後にuniformでロードすると,どこかのキャッシュのせいなのかわかりませんがデータの整合性が崩れることがあるため,この点だけは引き続き注意しましょう.
VC4でDMA転送に使う転送元のVPM及びDMA操作には,全QPUで排他制御が必要でした.そのためVC4は書き出し(必須な処理にも関わらず!)を行うと並列性が損なわれるという性質を持ちます.VC6ではこの制約もみかけ上ありません.
TMUはスロット毎に2つだったのが1つに統合され,そのかわり同時に投入しておけるリクエスト数の限界は各4から恐らく8になっています.良い面も悪い面もある変更という感じでした.ちなみに限界数を越えてリクエストした場合の挙動はVC4よりもお行儀が悪い子です.
TMUロード時の格納先レジスタは,VC4ではr4に固定��したが,ロードシグナルに格納先を指定できるようになりました.レジスタプレッシャーの緩和に繋がる良い変更でしょう.
uniformsは,VC4では読み出しがsrcレジスタとして使う特殊目的レジスタになっていましたが,VC6ではTMU同様シグナルで読み出しを指定するようになっています.こちらも格納先をシグナルに持たせてロードしたりすることができます.また,指定せずr5にロードすることもできます.指定する場合としない場合で同時に指定できるシグナルが変わるので使い分けになります.
uniformsの読み出し先変更は,特殊目的レジスタにアドレスを書く形であったVC4と異なり,分岐命令で行うようになりました.分岐命令が,命令列の分岐先に加えて,uniformアドレスの分岐先を指定できる形になっています.
スレッド関連
VC4ではQPUあたり2スレッド投入できましたが,切り替え時にレジスタ値を自分で退避させておく必要があり,(我々の目的に対してはですが)普通の神経で扱って性能が出せるようなものではありませんでした.VC6でも複数(ID的には4つまでありますが同時に投入される数は未確認)投入できますが,やはりレジスタを退避させる必要があるようで,引き続き性能に寄与する類のものとはあまり思えません.
命令の項でも書きましたが,セマフォは無くなったようです.そのかわりというわけでもないとは思いますが,簡易なバリア同期が入りました.もしかすると簡易じゃない特殊な使い方もあるかもしれませんが詳細不明です.
VPMは命令はあるようなのですが本当についてるのかまだよくわかってません.ただ,VC4同様排他制御が必要なのであれば,セマフォも無く,書き出しもTMU経由で行うようになってしまったVC6では使い道もあまり無さそうです.
ドライバ側の話になりますが,VC4のMailbox property interfaceでは,スレッド毎にuniformアドレスを個別に渡せていましたが,VC6では1つだけになっています.そのため,スレッド毎に別の仕事をさせるには若干の工夫が必要になっています.他にもCompute Shaderのドライバまわりはまだdispatchしたジョブの扱いに関してパフォーマンス的に少し問題を抱えていることがわかっています.
まとめ
Pi4では公式にOpenGL ES 3.1対応している(というかVC6への進化もそれをし易くする方向の変化が目立つ)ので普通にシェーダ言語が使えるようになると思います.しかし,それで期待通りのパフォーマンスを発揮させるのは難しいハードウェアになってるのではないかという印象です.
0 notes
Text
The PIS2 is a portable PS2 years in the making
The PIS2 is a portable PS2 years in the making
The PlayStation 2 has been in the grave for over a decade, but that hasn’t kept gamers from tinkering with Sony’s iconic console. Reddit user darkwingmod has been working on and off for several years to perfect his vision of a portable PS2, the PIS2. The build features genuine PS2 hardware augmented with a Raspberry Pi2, which loads game files over an ethernet-connected SMB server; no emulation…
View On WordPress
0 notes
Text
Installation de Jeedom

Bonjour et bienvenue pour ce nouveau billet. Nous allons présenter ici la solution technique retenue pour accueillir le coeur de notre domotique. Je vous ai précédemment exposé mon choix qui s'est porté sur la solution JEEDOM, puis nous avions déjà installé et configuré notre première brique S.A.R.A.H. qui sera l'interface vocale de JEEDOM. Afin de débuter avec Jeedom nous avons passé en revue les différentes possibilités (achat d'une jeebox sur le site officiel, synologie,DIY,...). Je m'intéressais depuis quelques temps au raspberry pi, mais si, vous voyez ce petit ordinateur à peine plus gros qu'une boîte d'allumette qu'on trouve pour une trentaine d'euros. Je ne suis pas parti sur le tout dernier modèle puisqu'il n'était pas encore sorti.
La base matérielle
J'ai donc acquis un modèle B+ avec carte micro sd et 512 mo de mémoire (le pi2 ayant toujours la carte micro sd mais 1go de ram). Dans le cas où les performances seraient insuffisantes avec ce B+, l'upgrade se fera simplement et ce raspberry se verra réutilisé. Serveur owncloud, squeezebox, xbmc, serveur mail, asterisk, firewall, ...les possibilités sont nombreuses. De même on peut en faire un appareil photo ou encore un projet que je vous exposerai prochainement : un portier de villa NovoSIP que je vais tester grâce à la société Oyoma. Avec un développeur actif sur jeedom nous tenteront de faire un plugin permettant de l'utiliser au travers Jeedom. Revenons sur la partie matériel à mettre en oeuvre pour notre Jeedom. En complément au raspberry Pi (disponible dans la boutique en ligne) il nous faudra donc : 2 cartes SD 8G Trasncend TS8GUSDHC10E à 6 € pièce (exemple ici) une alimentation 5V 2A à 9€ (exemple ici) pour notre Raspberry un boitier pour le Raspberry à 7€ (exemple ici) un dongle WiFi Edimax EW-7811UN à 13€ (exemple ici) une batterie USB externe TeckNet PowerBank 9000mAh à 25 € (exemple ici) un câble double usb en Y mini usb à 8€ (exemple ici) un lecteur de carte micro SD USB à 6€ (exemple ici) Il faut alors choisir la ou les technologies que nous allons déployer pour les équipements. Jeedom en supporte un nombre grandissant.
Les protocoles
Les plus populaires sont Rfxcom qui nécessite l'ajout d'une carte usb RFXtrx433E (ici) pour environ 109€ de plus à notre solution ainsi qu'un plugin dans jeedom (3€). Les équipements seront ensuite d'un coût d'une trentaine d'euros par modules. Pour moi, l'inconvénient sera le manque de retour d'état des modules. J'y passerai peut être pour certains besoins (sondes de températures externe par exemple) mais pas pour débuter. De même sachez que n'ayant pas besoin d'associations, vos voisins équipés de la même carte peuvent rajouter les équipements. Enfin je fais une transition sur un dernier point "faible" à mon sens qui sera un point positif de l'autre technologie que je retiens, le z-wave : le maillage. En effet, sur de grands volumes ou pour les habitations à étages, on se retrouve confronté à un problème de portée qui nécessite, lorsque c'est possible de déplacer le coeur de notre domotique avec le protocole rfxcom. Et il n'est pas impossible que certains équipements se retrouvent trop loin.
Le Z-Wave
Avec le z-wave, les modules alimentés, tels que les wall plugs ou modules de gestion de radiateurs, variateurs, etc.. deviennent des passerelles relais pour améliorer la communication entre équipements et le contrôleur. La mise en oeuvre du zwave dans notre configuration se fera par deux options possibles. Une carte usb Aon Labs DSA02 par exemple. Son avantage est qu'elle est auto alimentée lorsqu'on la débranche et permet de se rapprocher pour inclure un équipement et de donner la configuration du module à jeedom une fois qu'on la rebranche. Une carte Razberry qui s'insère sur les ports GPIO du Raspberry et rentre dans le boitier. J'ai retenu cette solution pour son côté plus esthétique (WAF oblige) mais aussi car avec la batterie externe de notre configuration, on peut également rapprocher Jeedom du détecteur lors de son inclusion. La dernière raison est liée au support du zwave (Razberry) par un module gratuit tandis que la clé usb nécessite un plugin openzwave payant (7€) et une nécessité d'avoir les modules zwave réécrits par les devs dans jeedom. Read the full article
0 notes