#recaptcha api
Explore tagged Tumblr posts
Visit Tumblr Blog
Explore Tumblr blogs with no restrictions, modern design and the best experience.
Last Seen Tumblr Blogs


Fun Fact
The KCSC sent more than 20K requests to delete posts related to prostitution and porn to Tumblr from January to June 2017.
Text
Adobe Commerce Developer Expert AD0-E725 Practice Exam
The Adobe Commerce Developer Expert (AD0-E725) certification is a prestigious credential that validates your advanced skills in implementing, customizing, and managing Adobe Commerce solutions. Designed for developers with deep expertise in Adobe Commerce (formerly Magento), this exam is a stepping stone to enhancing your career in e-commerce development. This article provides a comprehensive guide to preparing for the AD0-E725 exam, including recommended knowledge, exam objectives, study tips, and an introduction to the Cert007 Adobe Commerce Developer Expert AD0-E725 Practice Exam as a key preparation tool.
Why Pursue the AD0-E725 Certification?
Earning the Adobe Commerce Developer Expert certification demonstrates your ability to leverage Adobe Commerce to its fullest potential, making you a valuable asset to employers and clients. According to industry surveys, certified Adobe Commerce professionals can earn up to 25% more than their non-certified peers, and the certification opens doors to senior roles in e-commerce and web development. Whether you're a developer aiming to stand out in a competitive job market or a consultant seeking to build client trust, the AD0-E725 exam is a worthy investment in your professional future.
Recommended Knowledge and Skills
To excel in the AD0-E725 exam, candidates should possess a robust skill set and practical experience. Here are the key areas of expertise required:
Experience: At least 2 years of hands-on experience with Adobe Commerce, including real-world projects involving customization and optimization.
Programming Proficiency: Strong programming skills, particularly in App Builder, and adherence to Adobe Commerce Coding Standards Technical Guidelines.
Database and Web Knowledge: Familiarity with relational databases (e.g., MySQL) and an understanding of how web browsers and servers interact.
Performance and Delivery: Skills in performance optimization, software analysis, and the build/delivery process for Adobe Commerce solutions.
Feature Utilization: Experience leveraging built-in features to enable solutions without extensive custom development.
Full-Stack Competence: Proficiency in front-end (HTML, CSS, LESS, JavaScript) and back-end (PHP, XML, MySQL) technologies.
These skills form the foundation for tackling the exam’s technical challenges and applying Adobe Commerce in practical scenarios.
Exam Objectives and Content Breakdown
The AD0-E725 exam is structured into four key sections, each focusing on critical aspects of Adobe Commerce development. Understanding the weight of each section helps prioritize your study efforts. Below is the content breakdown:
Section 1: Architecture (38%)
This section carries the highest weight and tests your understanding of Adobe Commerce’s core architecture. Key objectives include:
Effectively using cache in Adobe Commerce.
Demonstrating knowledge of components (e.g., plugins, preferences, observers).
Configuring multiple sites on a single instance and understanding effects/constraints.
Explaining Git patches and Composer file-level modifications.
Understanding security features (e.g., CSP, escaping, form keys, sanitization, reCAPTCHA, input validation).
Explaining the CRON scheduling system and index functionality.
Section 2: External Integrations (14%)
This section focuses on integrating Adobe Commerce with external systems. Objectives include:
Customizing data flow with SaaS services.
Utilizing App Builder and Adobe I/O events/Webhooks.
Section 3: Customizations (32%)
Customization is a core competency for Adobe Commerce developers. This section covers:
Customizing the catalog, checkout, and sales operations.
Programmatically manipulating entity types.
Customizing the admin panel and APIs.
Leveraging message queues (existing and new) and writing integration tests.
Section 4: Cloud (16%)
This section addresses Adobe Commerce Cloud-specific knowledge. Objectives include46:
Explaining Adobe Commerce Cloud architecture.
Setting up and configuring Adobe Commerce Cloud.
Using the Adobe Commerce Cloud CLI tool.
The exam consists of approximately 60 multiple-choice and multiple-select questions, with a passing score of around 62% (37/60). It lasts 1 hour 40 minutes and costs $225 USD.
Study Tips to Pass the AD0-E725 Exam
Preparing for the AD0-E725 exam requires a strategic approach that combines theoretical study, hands-on practice, and community engagement. Here are proven tips to help you succeed:
Review the Official Exam Guide: Start by downloading Adobe’s official blueprint from the Adobe Certification website. This guide outlines each topic area and its weight, helping you focus on high-impact sections like Architecture (38%) and Customizations (32%).
Use Hands-On Practice: Set up a local development environment or use a demo Adobe Commerce instance to practice concepts like plugin development, API customization, and performance optimization. Real-world scenarios solidify your understanding.
Study Adobe Documentation: Dive into Adobe’s official documentation for in-depth knowledge of coding standards, security features, and Cloud architecture. This is especially critical for topics like CRON scheduling and index functionality.
Practice with Realistic Questions: Simulate the exam environment with high-quality practice tests. The Cert007 Adobe Commerce Developer Expert AD0-E725 Practice Exam is an excellent resource (more details below).
Introducing the Cert007 Adobe Commerce Developer Expert AD0-E725 Practice Exam
To boost your confidence and readiness, the Cert007 Adobe Commerce Developer Expert AD0-E725 Practice Exam is a highly recommended preparation tool. Designed to mirror the actual exam, Cert007’s practice tests offer:
Realistic Questions: Questions align with the AD0-E725 exam objectives, covering Architecture, External Integrations, Customizations, and Cloud topics.
Detailed Explanations: Each question includes comprehensive explanations to clarify concepts and reinforce learning.
Simulated Exam Environment: Practice under timed conditions to improve time management and reduce exam-day anxiety.
Up-to-Date Content: Cert007 regularly updates its question bank to reflect the latest Adobe Commerce features and exam changes.
Performance Tracking: Detailed results highlight your strengths and areas needing improvement, allowing you to focus your study efforts effectively.
Final Thoughts
The Adobe Commerce Developer Expert (AD0-E725) exam is a challenging but rewarding opportunity to showcase your expertise in one of the world’s leading e-commerce platforms. By building a strong foundation in the recommended skills, aligning your study with the exam objectives, and leveraging high-quality resources like the Cert007 AD0-E725 Practice Exam, you can approach the exam with confidence. Start your preparation today by reviewing the official exam guide, setting up a practice environment, and incorporating Cert007’s realistic practice tests into your study plan. With dedication and the right tools, you’ll be well on your way to earning the Adobe Commerce Developer Expert certification and advancing your career in e-commerce development.
0 notes
Text
How to Use ContactFormToAPI to Connect Your Static HTML Forms to Zapier
In the modern web development landscape, building fast, secure, and serverless websites is more popular than ever. Static sites are blazing fast, cost-effective, and often hosted on platforms like GitHub Pages, Netlify, or Vercel. But one lingering challenge remains: how do you handle form submissions without a traditional backend?

Enter ContactFormToAPI, a powerful no-code solution that connects static HTML forms directly to any API endpoint, including Zapier. By bridging this gap, you can easily automate workflows, capture leads, and integrate with countless apps—without spinning up a backend or writing server-side logic.
In this guide, we’ll walk through how to use ContactFormToAPI to connect your static HTML forms to Zapier, so you can trigger zaps every time someone submits a form on your website.
What You'll Need
A simple HTML website or static site (can be hosted anywhere)
A Zapier account (free or paid)
A ContactFormToAPI account (free tier available)
Step 1: Create Your HTML Form
Here’s a basic contact form you might include in your HTML site:
<form id="contactForm" method="POST" action="https://contactformtoapi.com/api/YOUR_UNIQUE_ENDPOINT">
<input type="text" name="name" placeholder="Your Name" required>
<input type="email" name="email" placeholder="Your Email" required>
<textarea name="message" placeholder="Your Message" required></textarea>
<button type="submit">Send</button>
</form>
Note: You’ll replace YOUR_UNIQUE_ENDPOINT with the actual endpoint provided by ContactFormToAPI. We'll set that up next.
Step 2: Create a Zap in Zapier
Zapier is an automation platform that connects your apps and services. Our goal here is to make a Zap that triggers when a form is submitted via ContactFormToAPI.
1. Log in to Zapier
Visit zapier.com and sign in.
2. Create a New Zap
Click the “+ Create Zap” button.
3. Set the Trigger App to "Webhooks by Zapier"
Select Webhooks by Zapier as your trigger app.
Choose Catch Hook as the trigger event.
Zapier will now generate a unique webhook URL. Copy this URL—we'll use it in the next step.
Step 3: Set Up ContactFormToAPI
Go to the Contact Form to Any API and sign in or create a free account.
1. Create a New Form Endpoint
Click “New Form” or “Create Endpoint.”
Name your form (e.g., "Zapier Contact Form").
In the Webhook URL, paste the Zapier webhook URL you copied earlier.
(Optional) Enable reCAPTCHA or set a redirect URL after submission.
Click Save to generate your unique endpoint URL.
2. Update Your HTML Form
Replace YOUR_UNIQUE_ENDPOINT in your form’s action attribute with the new endpoint URL provided by ContactFormToAPI.
Example:
<form action="https://contactformtoapi.com/api/abcd1234">
3. Test the Form Submission
Fill out and submit the form on your website.
Zapier should detect the test data, and you’ll be prompted to move to the next step in building your Zap.
Step 4: Configure the Zap Action
After Zapier catches the hook, you'll configure what happens next:
1. Choose an Action App
Select any app where you'd like the form data to go:
Gmail (send email notification)
Google Sheets (log new entries)
Slack (send a message to a channel)
Notion, Trello, Airtable, Mailchimp, etc.
2. Map the Form Fields
Zapier will show the form fields (name, email, message). Match these fields with the action app's fields.
3. Turn On Your Zap
Click Publish Zap to activate it. Your static form is now fully connected!
Real-World Use Cases
Here are some creative ways you can use ContactFormToAPI + Zapier:
Newsletter Signup: Collect emails and add them to Mailchimp.
Support Form: Create a ticket in Trello or Zendesk.
Lead Generation: Send qualified leads directly to your CRM.
Job Application Form: Upload applicant details to Google Drive and notify HR in Slack.
Survey Feedback: Append responses to a Google Sheet for analysis.
Benefits of Using ContactFormToAPI with Zapier
No backend needed: Eliminate server setup and maintenance.
No-code friendly: Ideal for marketers and designers.
Fast setup: Get working forms live in minutes.
Highly flexible: Connect with over 5,000 apps via Zapier.
Security ready: Includes spam protection and HTTPS by default.
Tips for Success
Use reCAPTCHA v2 to protect your forms from bots.
Set up redirect URLs for a smoother user experience.
Add error handling by showing fallback messages if the form fails.
Log form data to a Google Sheet as a backup.
Conclusion
Thanks to ContactFormToAPI and Zapier, static websites can now have fully functional, automated forms without a backend. Whether you're building a landing page, portfolio, or marketing site, this powerful combo enables you to collect and route form data with ease.
0 notes
Text
Google reCAPTCHA Integration in Salesforce Visualforce Page using Apex
In the modern digital world, securing online forms from bots and spam is more important than ever. Whether you're capturing leads, handling contact requests, or managing user registrations through a Visualforce page in Salesforce, protecting your forms from automated submissions is essential. Google reCAPTCHA is a powerful tool that helps identify and block such unwanted activity.
This article explains how to integrate Google reCAPTCHA into a Salesforce Visualforce page and validate user submissions using Apex, without diving into code.
What is Google reCAPTCHA?
Google reCAPTCHA is a free service by Google that protects websites from spam and abuse by verifying if a user is a human or a bot. It can be displayed as a simple checkbox, an invisible check, or a challenge-based interaction (like identifying traffic lights in images). It works on both the client-side (user's browser) and the server-side (your Apex controller).
How Integration Works
Integrating reCAPTCHA in Salesforce involves a few simple steps:
Register Your Website: Go to the Google reCAPTCHA admin console and generate a site key and a secret key.
Add reCAPTCHA to Visualforce Page: The site key is used on the Visualforce page to show the reCAPTCHA widget.
Form Submission: When a user fills out the form and submits it, a token is generated by reCAPTCHA and passed along with the form data.
Server-Side Verification: The Apex controller receives the token and uses the secret key to verify the token by sending a request to Google’s reCAPTCHA API.
Response Handling: Based on the verification result from Google, the form is either accepted or rejected.
Why Use Two Apex Classes?
To keep the integration clean and maintainable, the logic is split into two classes:
1. Visualforce Page Controller: This handles form inputs, manages user interactions, and calls the reCAPTCHA validation logic.
2. reCAPTCHA Service Class: This makes the callout to Google’s verification API, parses the response, and sends back a success or failure status.
This approach follows Salesforce best practices: separation of concerns, code reusability, and easy testing.
Benefits of Using reCAPTCHA with Visualforce
Prevents spam: Stops bots from submitting fake entries.
Improves security: Ensures only real users can interact with your forms.
Better user experience: The invisible or checkbox method is smooth for users.
Easy integration: With just a small setup, your forms become much safer.
Best Practices
Always store the secret key securely using Custom Metadata, Custom Settings, or Named Credentials.
Handle errors and timeouts gracefully in your Apex logic.
Use HTTP mocks in test classes for callout testing.
Log or monitor verification failures for auditing or debugging.
Final Thoughts
Implementing Google reCAPTCHA in a Visualforce form using Apex is a smart way to secure your Salesforce application from bots and spam. It not only enhances the trustworthiness of your system but also ensures a smoother experience for real users.
By separating responsibilities between a controller and a helper class, you follow clean architecture principles that make your solution scalable and easier to maintain in the long run.
read more:https://scideassolutions.com/google-recaptcha-integration-in-salesforce-visualforce-page-using-apex/
#SalesforcereCAPTCHAintegration, #Visualforcesecurity, #GooglereCAPTCHAApex, #spampreventionSalesforce
Looking to grow your business? Connect with us for a free consultation and discover how we can help you succeed online.
📌 Website: www.scideassolutions.com 📧 Email: [email protected] 💬 Skype: skumar25dec
1 note
·
View note
Text
Magento 2 Mobile Login OTP Extension [PRO] enables quick and seamless customer login via mobile number, thus eliminating the need to remember passwords. Provide a secure login/register/reset password process through One Time Password (OTP).
Register/Login/Reset Password using registered Mobile Number.
Allow customer sign -up/login with both OTP and password..
Reset Password using Mobile Number or Email.
Verify Customer Mobile Number using OTP.
Login Email Notifications to customers.
Added feature to Resend OTP after timeout. (NEW)
Enable reCAPTCHA to stop spam registrations. (NEW)
Mobile Number OTP supported on Magento Default Register/Login/Forgot Password Page. (NEW)
REST API Available / GraphQL API Available.
Hyvä Addon Available.
0 notes
Text
Bot attacks are serious cybersecurity threats, with artificial intelligence (AI) amplifying both their complexity and impact across industries. According to one recent report, malicious bots constitute more than half of all internet traffic, disrupting businesses and jeopardizing digital infrastructure worldwide. As AI technology advances, so do the capabilities of malicious bot attacks, presenting novel and sophisticated challenges for companies aiming to protect their online assets. AI Expanding Capabilities Beyond Automation Traditionally, bots were powered by simplistic scripts performing repetitive tasks, often easily identifiable due to predictable behavior patterns. However, AI has transformed these bots, enabling them to mimic human actions in increasingly complex ways. Leveraging machine learning (ML) techniques like reinforcement learning, bots can adjust behaviors based on security system responses. For example, by varying click patterns, page interaction times, and scrolling behaviors, AI-enhanced bots can now evade detection by behavior-based security systems. In e-commerce, these capabilities allow bots to imitate human purchasing workflows to secure limited-edition products before real customers, as seen with high-demand sneaker releases from brands like Nike. Similarly, in CAPTCHA evasion, convolutional neural networks (CNNs) are trained on large datasets of CAPTCHA images, enabling bots to analyze visual cues and replicate human interactions. This renders traditional CAPTCHA solutions, including Google’s reCAPTCHA v3, increasingly ineffective. Key Attack Vectors and Targeted Industries AI-enhanced bot attacks are versatile, targeting various industries and exploiting diverse vulnerabilities. Some examples of their tactics follow. Credential stuffing attacks, where bots attempt to access accounts using large volumes of stolen usernames and passwords, are among the most prevalent bot-driven cyber threats. In October 2023, personal genomics company 23andMe suffered a major breach due to credential stuffing. Attackers exploited compromised credentials to access user accounts that may share the same username and password combinations, exposing sensitive information, including genetic data, of approximately 6.9 million individuals. Bots circumvented typical security defenses by rotating IP addresses and using ML to predict password variations, underscoring the sophisticated nature of these threats. Social media platforms like Instagram and Facebook are also prime targets for bot attacks, particularly through their application programming interfaces (APIs). Attackers use bots to create fake accounts and generate content that appears authentic, exploiting APIs to bypass moderation and distribute harmful content at scale. By mimicking human behaviors such as posting and interacting, these bots evade content moderation filters, posing a significant risk for platforms attempting to preserve the authenticity and safety of online communities. Bots also play a critical role in ad fraud by mimicking human clicks on ads, deceiving advertisers, and inflating costs while yielding little to no real engagement. Additionally, in e-commerce, automated bots exploit limited stock availability by rapidly purchasing high-demand items such as electronics and concert tickets, resulting in a negative user experience for genuine customers. In 2023 alone, fraud cost advertisers $81 billion dollars, with AI-powered bots significantly contributing to these losses. AI-Driven Bot Attack Strategies AI-powered bots employ a range of sophisticated tactics to bypass traditional defenses. Adversarial ML involves bots making subtle changes to evade detection by security systems. For instance, bots might vary their click timings, introduce slight pauses, or use randomized behaviors to avoid identification by ML models designed to flag suspicious activity. Adversarial ML techniques are a growing concern, as even minor alterations can degrade the accuracy of AI-based defenses.
The U.S. National Institute of Standards and Technology (NIST) has identified AI model poisoning as a critical vector for bot-based attacks. In these scenarios, attackers introduce malicious data into training datasets, effectively poisoning the model’s learning process. By corrupting training data, bots can degrade the accuracy of AI systems, causing them to misclassify threats or even allow unauthorized actions. Many bots now use image recognition algorithms to analyze CAPTCHA challenges and identify patterns in human responses. By doing so, bots are able to solve CAPTCHA puzzles that were previously believed to be bot-proof, further demonstrating how AI empowers these attacks. CAPTCHA circumvention is especially problematic for industries that rely heavily on online interactions, as it erodes a critical line of defense against brute-force threats. Defense Strategies Given the surge in AI-powered bot sophistication, organizations must adopt robust defenses to counter these threats effectively. Here are some defensive strategies that have proven effective in mitigating bot attacks. Advanced bot mitigation solutions for API security and DDoS protection increasingly use ML to analyze real-time behavior, identify anomalies, and flag activity indicative of bot presence. By tracking patterns and understanding deviations from normal user behavior, these tools can recognize even the most human-like bots. For instance, some systems analyze typing speed and mouse movement fluidity—factors that are difficult for bots to replicate accurately. The Zero Trust model is particularly effective against bot attacks, as it requires continuous authentication and restricts access based on strict identity verification protocols. When integrated into a web application firewall (WAF) or a cloud-based content delivery network (CDN), this architecture helps prevent credential stuffing and API abuse by limiting access points within the network. Implementing Zero Trust policies reduces the likelihood of unauthorized access and limits the lateral movement of bots across the infrastructure. Threat intelligence sharing through networks like the Cyber Threat Alliance (CTA), enables companies to collaborate on identifying and neutralizing bot threats. Real-time intelligence sharing between organizations can significantly enhance detection by pooling resources to track bot behavior trends, IP addresses, and attack vectors. In one notable case, CTA members collaborated to disrupt a botnet targeting financial institutions by sharing critical data on bot patterns. Adaptive Multi-Factor Authentication (MFA) solutions, which adjust security protocols based on the risk level of each access attempt, are also effective against unauthorized bot access. Unlike traditional two-factor authentication, adaptive MFA takes into account user location, device type, and behavior, thus adding another layer of defense for high-risk accounts or transactions. Routine vulnerability assessments and regular security audits and vulnerability assessments are essential for identifying weak points that bots might exploit. By scanning for outdated software, weak APIs, and exploitable configurations, organizations can preemptively address vulnerabilities that might otherwise invite bot activity. Conclusion AI-driven bot attacks have redefined the landscape of cybersecurity, elevating the need for advanced, AI-powered defenses. From credential stuffing in consumer services to social media API abuse and ad fraud in e-commerce, these sophisticated bots now have the tools to evade traditional detection systems with ease. Techniques like adversarial machine learning, model poisoning, and CAPTCHA circumvention reveal the depth of innovation among attackers. To keep pace with these evolving threats, organizations must prioritize AI-enhanced security solutions, adopt Zero Trust policies, and engage in proactive cyber hygiene. As AI technology continues to evolve,
businesses that stay informed and adopt comprehensive defense measures will be best positioned to protect their assets and maintain trust in the face of increasingly advanced bot attacks.
0 notes
Text
Service Extensions Plugins For Application Load Balancers

An overview
Service Extensions plugins are a new functionality that Google Cloud has added to its Application Load Balancers. With the help of these plugins, users can run custom code directly within the load balancer’s request and response paths, increasing the programmability of web application delivery. Because the plugins are based on WebAssembly (Wasm), they offer features like secure sandboxing, compatibility for several programming languages, and quick execution speeds. Use cases for this new functionality are varied and include HTML rewriting, custom logging, security policy implementation, and header manipulation. Scalability and low latency are provided by the completely managed environment in which users can operate the plugins.
Now use the Application Load Balancers to execute your own code at the edge.
For dependable online application delivery on Google Cloud, application load balancers are necessary. Although Google Cloud’s load balancers allow for a great deal of customization, there are some circumstances that call for even more programmability.
Google Cloud just revealed the Application Load Balancer Service Extensions plugins in Preview. To adapt load balancers to your business needs, you can now run your custom code right in the request/response path in a fully controlled Google environment with optimal latency. Just supply the code, and Google Cloud takes care of the rest. You can look to Service Extensions callouts, which are presently GA for Application Load Balancers if you want to handle the computation yourself for heavier workloads.
Service Extensions plugins use cases
The following use cases are supported by Service Extensions plugins:
Header addition: Include additional headers for requests and responses, or make new headers pertinent to your apps or particular clients.
Header manipulation: Rewriting request and response headers or overriding client headers while they are being sent to the backend or while replying to a client are examples of header manipulation.
Security: Create sophisticated security rules, such as custom token authentication, depending on response headers or client requests, and decide how to apply them within your plugin.
Custom logging: Enter custom data or user-defined headers into Cloud Logging.
Exception handling: For specific response types, send customers to a personalized error page.
HTML Rewriting: To enable Google Analytics tagging or Google reCAPTCHA integration, rewrite HTML from its original source.
Where your code can be executed
Service Extensions operate at the edge of Google’s widely dispersed network, in the request and response channel. The current traffic extension for the global external Application Load Balancer now includes Service Extensions plugins. The traffic extension executes prior to traffic reaching the backend, but after Cloud CDN and Cloud Armor. Service Extensions will be supported by cloud CDNs in a later edition. Additionally, as part of the route and traffic extensions, the cross-region internal load balancer supports Service Extensions plugins.
Architecture of Service Extension Plugins
Lightweight computation tasks that are part of the Application Load Balancer request/response flow are the focus of Service Extensions plugins. WebAssembly (Wasm), on which plugins are built, has the following advantages:
Startup time in milliseconds and near-native execution speed
Numerous programming languages, including C++ and Rust, are supported.
Cross-platform portability allows you to test the plugin locally or run it across many installations.
Protections for security, including running plugin logic in a sandbox
Service Extensions Plugins make use of Proxy-Wasm, an open source project backed by Google that offers Wasm modules a common API for interacting with network proxies.
Google developed a computing platform that is both scalable and massively multi-tenant (similar to load balancers) to execute Service Extensions plugins. Fully managed plugins offer auto-scaling and dynamic sharding to accommodate traffic demands. This design makes it possible for:
Scalability: As traffic patterns change, we can expand to a large number of Wasm hosts as needed.
Low latency: This proxyless serverless architecture enables even more latency-optimal pathways because there are no extra proxies between the load balancer and Wasm hosts.
Read more on Govindhtech.com
#ServiceExtensions#ServiceExtensionsplugins#LoadBalancers#CloudCDN#API#Cloudcomputing#News#Technews#Technology#Technologynews#Technologytrends#Govindhtech
0 notes
Text
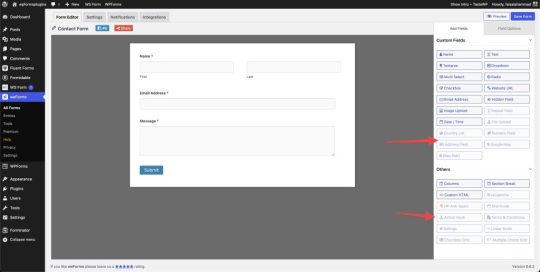
Let's find out the best FREE WordPress Form plugin

WordPress form plugins are no longer limited to just contact forms. Currently, you can use form plugins for booking, subscriptions, CRM integration, product sales, and more! If you want, you can even use the form plugin's API to create your own integrations.
Free or Lite?
There are many free form plugins for WordPress. But most are not free, rather lite versions. To be direct, the plugin available on WordPress.org is usually a limited feature lite version, where you won't get many things. You have to purchase the paid version to unlock all features.
Limited Fields
Even if the plugin name doesn't include "Lite", the following plugins don't allow all fields, settings or options such as form submission, reCaptcha, pre-made form templates, form submission export. Many basic fields are also locked. Only installing the pro version allows using all fields. - Bit Form (43 total fields, 7 locked fields) - Mollie, Advanced, Signature, PayPal, RazorPay, Stripe, Draft Button - Fluent Forms (48 total fields, 27 locked fields) - Image Upload, File Upload, Phone, reCaptcha, hCaptcha, Turnstile, Shortcode, Action Hook, Form Step, Ratings, Checkable Grid, Range Slider, Net Promoter Score, Chained Select, Color Picker, Repeat Field, Post/CPT Selection, Quiz Score, Rich Text Input, Save & Resume, Payment Item, Subscription, Custom Payment Amount, Item Quantity, Payment Method, Payment Summary, Coupon - Formidable Forms (42 total fields, 27 locked fields) - File Upload, Rich Text, Time, Star Rating, Toggle, Lookup, Section, Embed Form, NPS, Tags, Summary, AI, Ranking, Date, Scale, Slider, Dynamic, Repeater, Page Break, Likert Scale, Password, Address, Signature, Appointment, Product, Quantity, Total - Forminator Forms (29 total fields, 1 locked field) - eSignature - Ninja Forms (30 total fields, 2 locked fields) - File Upload, Save - weForms (31 total fields, 16 locked fields) - Repeat Field, Numeric Field, File Upload, Address Field, Country List, Google Map, Step Start, reCaptcha, Shortcode, HP Anti-Spam, Action Hooks, Terms and Conditions, Ratings, Linear Scale, Checkbox Grid, Multiple Choice Grid - WPForms Lite (40 total fields, 24 locked fields) - Phone, Date / Time, File Upload, Layout, Page Break, Rich Text, HTML, Rating, Custom Captcha, Likert Scale, Address, Website / URL, Password, Repeater, Section Divider, Content, Entry Preview, Hidden Field, Signature, Net Promoter Score, PayPal Commerce, Square, Authorize.net, Coupon - WS Form Lite (55 total fields, 35 unavailable fields)

Formidable Forms Date field locked

WPForms Entries locked
weForms locked some essential fields
Free Add-ons
How developer-friendly a form plugin is can be somewhat gauged by looking at community add-ons. Many form plugins have very rich documentation, but they don't provide developer licenses or any support for add-on development for third-party developers. On WordPress.org, you can find quite a few third-party plugins or add-ons for Fluent Forms, Formidable, Forminator, Ninja Forms, and WPForms plugins, which help extend the default features of the plugin.
Customer Support
Another important issue is plugin support. It turns out I got into trouble, but there's no chance of getting help. Free form plugins will only support you in the WordPress.org support forum, and that's always low priority. As a result, you often have to sit with an open ticket for a long time on urgent issues. Also, since WordPress forums have some specific rules, outside of which plugin companies can't offer support, you have many limitations in terms of getting support.
Comparison of Free Features
Plugin NameView EntriesExport EntriesEmbed EntriesImport/Export FormFree TemplatesForum SupportTicket SupportWPML SupportGutenberg BlockBit Form✅✅❌✅Limited✅❌❌✅Fluent Forms✅✅❌✅Limited✅❌❌✅Formidable Forms✅✅❌✅Limited✅❌✅✅Forminator Forms✅✅❌✅Limited✅❌❌✅Ninja Forms✅✅✅✅All✅✅✅✅weForms✅✅❌✅Limited✅❌❌✅WPForms Lite❌❌❌✅Limited✅❌✅✅WS Form Lite✅✅❌✅All✅❌❌✅ Plugin NameMath CalculationManage EntriesEmbed EntriesFree TemplatesInput MaskSupport ChannelWPML SupportBit Form✅✅❌Limited❌Forum❌Fluent Forms❌✅❌Limited✅Forum❌Formidable Forms❌✅❌Limited✅Forum✅Forminator Forms✅✅❌Limited❌Forum❌Ninja Forms✅✅✅All✅Forum & Ticket✅weForms❌✅❌Limited❌Forum❌WPForms Lite❌❌❌Limited✅Forum✅WS Form Lite✅✅❌All✅Forum❌
Form Selection
Considering all the above issues, the Ninja Forms plugin allows us to use all fields for free. You don't need a PRO version to access any features, and they don't sell a pro version either. You'll get everything from reCaptcha, form submission, and submission export to pre-made templates for free. You won't see any notice to upgrade to the pro version anywhere. And even if you're a free user, you'll get free support from their website along with the WordPress.org support forum. This means you won't have to sit with an open ticket for limited support on any urgent issue. Note: If any information above is incorrect, please let me know in the comments, I'll edit it. You can also inform me if any new features have been added to any form after I wrote my post. Thank you.30-09-2024 Read the full article
0 notes
Text
How Does reCAPTCHA Work?

Understanding reCAPTCHA is essential for anyone looking to protect their website from spam and automated abuse. If you want to enhance your site’s security, you can follow this guide on how to add reCAPTCHA to Contact Form 7.
What is reCAPTCHA?
reCAPTCHA is a free service from Google designed to protect websites from spam and abuse. By using advanced risk analysis algorithms, reCAPTCHA can distinguish between human users and automated bots, ensuring that your website interactions are genuine.
How Does reCAPTCHA Work?
Types of reCAPTCHA
There are several types of reCAPTCHA that cater to different needs and levels of user interaction:
reCAPTCHA v2: This type requires users to click a checkbox stating "I am not a robot." Sometimes, it may prompt image-based challenges (such as selecting all images with crosswalks) to verify the user's humanity.
reCAPTCHA v3: This version operates in the background and assigns a score to each user interaction based on the likelihood of being a bot. It’s non-intrusive and does not interrupt the user experience.
Invisible reCAPTCHA: This form of reCAPTCHA activates only when it detects suspicious behavior. It doesn’t require any user interaction unless necessary.
Mechanism of Action
reCAPTCHA works by analyzing user behavior and interaction patterns to differentiate humans from bots. Here’s a breakdown of its functioning:
Behavioral Analysis: reCAPTCHA observes how users interact with your site, such as mouse movements, clicks, and typing patterns, to detect automated activity.
Challenges: For reCAPTCHA v2, if initial analysis is inconclusive, it presents additional challenges, such as identifying objects in images, to verify the user is human.
Scoring System: reCAPTCHA v3 assigns a risk score to interactions, which webmasters can use to decide whether to challenge the user further based on the likelihood of being a bot.
Machine Learning: reCAPTCHA continuously learns from user interactions, improving its ability to identify and block bots over time.
Benefits of reCAPTCHA
Reduces Spam: By filtering out automated submissions, reCAPTCHA ensures that only genuine inquiries come through your contact forms.
Enhances Security: Protects your site from various automated attacks, such as credential stuffing and fake account creation.
User-Friendly: While reCAPTCHA v2 may present occasional challenges, reCAPTCHA v3 and invisible reCAPTCHA offer seamless user experiences.
Understanding these functionalities can help you appreciate why reCAPTCHA is crucial for web security. For a practical application, see how to add reCAPTCHA to Contact Form 7 with this detailed guide on how to add reCAPTCHA to Contact Form 7.
Implementing reCAPTCHA
Here are the steps to implement reCAPTCHA on your website:
Register Your Site: Go to the Google reCAPTCHA site and register your website to get the necessary API keys.
Integrate with Forms: Use these keys to integrate reCAPTCHA with your site’s forms. For instance, to add reCAPTCHA to Contact Form 7, follow the steps in this guide on how to add reCAPTCHA to Contact Form 7.
Adjust Settings: Customize the reCAPTCHA settings to balance security and user experience. For reCAPTCHA v3, set an appropriate risk score threshold.
By implementing reCAPTCHA, you can effectively safeguard your website from spam and automated abuse, ensuring a better user experience for your legitimate visitors. For more details on setting up reCAPTCHA with Contact Form 7, refer to this comprehensive guide on how to add reCAPTCHA to Contact Form 7.
Conclusion
reCAPTCHA is an essential tool for protecting your website from spam and abuse. Its advanced risk analysis techniques and user-friendly options make it a must-have for web security. By integrating reCAPTCHA, you can maintain the integrity of your contact forms and ensure that only genuine interactions take place. For detailed steps on adding reCAPTCHA to your forms, check out this guide on how to add reCAPTCHA to Contact Form 7.
0 notes
Text
Top 10 Magento 2 Extensions by Webiators Technologies: 2024 Recap
Boost the efficiency of your Magento business with the help of Webiators Technologies, a leader in e-commerce innovation and functionality. Keeping up with the ever-changing digital market demands, Webiators provides innovative solutions with its top 10 Magento 2 extensions.
These extensions are meticulously designed to improve your store's functionality, simplify operations, and provide your consumers with an unmatched shopping experience. With a track record of reliable solutions for various online business demands, Webiators Technologies has become a household brand in the Magento extension ecosystem.

These additions exemplify the dedication to excellence that characterizes Webiators, from improving conversion rates to strengthening security and streamlining management duties. Learn about various robust tools that can make your Magento store a more effective and engaging online platform.
Webiators has the ideal solution for your store's needs, whether you want to improve the checkout process, make user experiences more personalized, or protect your company from cyber threats. Come along as we explore these top 10 Magento 2 extensions. Each solution displays a dedication to supporting e-commerce businesses worldwide.
Top 10 Magento 2 Extensions
#1 WhatsApp Combo Extension
Every business needs more sales and wants to take their customers to click on the checkout button. Is this possible with the use of just an extension? Yes, you get it right: the Magento 2 WhatsApp Combo Extension can help you get more useful leads that later can be your next sale.
Features:
WhatsApp web integration: Magento 2 extension links your business with an individual's most available mobile app, WhatsApp, while providing real-time insights.
Easy WhatsApp sharing: If your customers like your service or product, this extension allows them to share it with their contact list.
Instant WhatsApp chat: Like any other WhatsApp chat, the Magento 2 extension helps your customer solve any query using the WhatsApp chat option.
Benefits:
Target the right audience and work only with potential customers.
Build strong customer relationships.
Win customers' trust.
#2 Google Invisible Recaptcha Extension
A reCaptcha addon for Magento 2 developed by us can protect your online store with stealthy yet effective security methods. It can protect your online shop from spam and other forms of fraud.
Features:
Invisible reCaptcha integration: Without affecting the user experience, it integrates with reCaptcha, an invisible security measure, to safeguard the business from fraud.
Protects various store forms: Secures multiple forms on the website, including Login, registration, and contact forms.
User-friendly configuration: Offers an easy-to-use configuration interface, allowing merchants to implement robust security measures with minimal effort.
Benefits:
Boosts website security without bothering users.
Lowers the number of submissions marked as spam.
Effectively protects client information and financial transactions.
#3 Google Language Translator Extension
The Google Language Translator extension for Magento 2 allows you to extend the reach of your online store. Help international shoppers overcome language barriers by offering a tailored purchasing experience.
Features:
Integration with Google Translate API: Utilizes the power of Google Translate for accurate and reliable language translations.
Multi-language support: The ability to translate content into other languages increases the store's potential customer base worldwide.
User-friendly language switcher: Provides an intuitive language switcher for users to navigate and select their preferred language easily.
Benefits:
Increases accessibility for international customers.
Expands the reach of products and services around the world.
Improves interaction by tailoring language to each user's needs.
#4 Auto Invoice and Shipment Extension
Auto Invoice and Shipment addon for Magento 2 allows you to manage your order processing workflow efficiently. To make things easier for your customers, automate the creation of invoices and delivery.
Features:
Automatic invoice and shipment generation: Streamlines the order fulfillment process by automating the creation of invoices and shipments.
Customizable invoice and shipment templates: Merchants may create branded invoices and shipment papers with the help of customizable templates.
Streamlines order fulfillment: Improves the efficiency of processing and fulfilling orders by streamlining the process and decreasing the need for manual involvement.
Benefits:
Helps keep order fulfillment error-free.
Reduces the amount of time spent on processing orders manually.
Increases happiness for customers by promptly fulfilling their orders.
#5 Advance Cancel Order By Customer Extension
The Advance Cancel Order by Customer plugin for Magento 2 gives your consumers more power over their orders. The extension makes it easier for customers to cancel their orders for better service.
Features:
Account-based order cancellation: Enhances customer independence by allowing them to manage their orders independently.
Notification for canceled orders: Ensures transparency in order processing by notifying store management when a customer cancels an order.
Customizable cancellation reasons: The ability to personalize the reasons for cancellation gives customers a voice and helps the store grow.
Benefits:
Reduces customer support requests.
Makes customers feel more independent.
Improves overall order management efficiency.
#6 Price After Login Extension
Price After Login is an add-on for Magento 2 that lets you set prices based on specific user actions. Maintain tight control over product pricing and personalize your offerings according to client segments.
Features:
Disable guest price viewing: Encourages user registration by limiting access to product prices for guests.
Set group-specific pricing: Enables merchants to create personalized pricing strategies for different customer segments.
Easy configuration & management: Store administrators can easily set up and administer pricing policies with user-friendly configuration and management features.
Benefits:
Promotes sign-ups.
Makes customers happier by keeping them in an exclusive club.
Makes it possible to tailor prices to different types of customers.
#7 Promotion Bar Pro Extension
Revitalize your marketing efforts with Webiators Technologies' Promotion Bar Pro extension for Magento 2. Elevate your online store's visibility and sales through eye-catching promotional banners.
Features:
Multiple banner positions: Enables merchants to position promotional banners across the website strategically.
Customizable design & animation: Allows for creative control over the look and movement of promotional banners, allowing for more attention-grabbing campaigns.
Schedule for specific periods: Timely marketing initiatives are made easier with the ability to schedule promotions to run at certain times.
Benefits:
Grabs user attention effectively.
Enhances overall website aesthetics.
Promotes special offers and discounts.
#8 Advanced Hide Price Extension
Advanced Hide Price extension for Magento 2 by Webiators Technologies allows you more freedom in pricing tactics. Make product prices more or less visible depending on your company's requirements.
Features:
Hide prices for guests: Gives merchants the flexibility to display or conceal product prices based on user status.
Configurable display conditions: Personalized product visibility is possible with configurable display, which lets you establish conditions for showing or hiding prices.
Supports multiple categories: Works seamlessly with various product types, accommodating the diverse needs of different businesses.
Benefits:
Allows for special pricing for chosen clients.
Encourages user interaction for price inquiries.
Enables a systematic strategy for setting prices.
#9 Guest To Customer Extension
Guest to customer extension, as the name suggests, turns casual browsers into devoted buyers with this innovative extension for your Magento 2 store. Get more people to interact with your Magento 2 business and keep them as customers.
Features:
Guest-to-customer conversion: The extension automatically converts guest users to registered customers and encourages visitors to become paying clients.
Customizable conversion rules: Merchants can set their conversion policies based on factors like order frequency or value to determine which visitor users get converted.
Enhanced data management: Transforms guest interactions into important customer data, which improves data collecting and consumer profiling.
Benefits:
Creates an extensive database of customers.
Improves client retention and acquisition.
Markets in a more personalized way.
#10 Buy Now Button Extension
The buy now button extension for Magento 2 will greatly improve the purchasing experience of the customers. This extension will effortlessly improve conversion rates while streamlining the transaction process.
Features:
One-click checkout functionality: Enables customers to purchase with a single click, reducing the checkout process to a minimum.
Customizable button design: The "Buy Now" button can be designed to match the store's aesthetics and branding, allowing merchants to personalize it.
Payment gateway integration: Compatibility with numerous payment methods guarantees a streamlined and effective payment procedure through seamless connectivity.
Benefits:
Simplifies the buying process, which increases user satisfaction.
The time it takes to check out is cut in half.
Promotion of impulsive purchases.
Conclusion
Webiators Technologies is a shining example of forward-thinking innovation in Magento 2 extensions. As an example of Webiators' commitment to meeting the increasing demands of online businesses, this handpicked list of top 10 extensions is available.
These extensions are a perfect example of improving efficiency and effectiveness while boosting client experiences and security. Have faith in Webiators to take your Magento store to the next level, guaranteeing it stays ahead of the competition regarding eCommerce excellence.
Imagine a future where Webiators Technologies has transformed your online presence into something more than just robust as you explore these extensions. Magento extensions made with success in mind can take your online store to the next level. Contact us to know more.
Original Source : https://store.webiators.com/blog/post/top-10-magento-2-extensions-by-webiators-technologies-2024-recap
0 notes
Text
easy captcha job app
Creating an easy CAPTCHA job app involves developing a user-friendly application where users can complete CAPTCHA tasks. CAPTCHAs are used to distinguish between human users and automated bots, and these tasks usually involve identifying distorted text or selecting specific images.
Here's a simple outline of how you might create such an app:
1. App Design and Framework: Choose a programming language and framework for app development. Popular choices include Python (using frameworks like Flask or Django), JavaScript (using frameworks like React or Vue.js), or others based on your familiarity and requirements.
2. User Registration and Authentication: Implement user registration and login functionality. Users need to create accounts and log in to access CAPTCHA tasks and receive rewards.
3. CAPTCHA Task Generation: Integrate a CAPTCHA task generation library or API. Google's reCAPTCHA is a common choice. Tasks could involve tasks like identifying distorted text, selecting specific images from a set, or solving simple puzzles.
4. Task Display and Submission: Design an interface to display CAPTCHA tasks to users. Users should be able to complete the tasks and submit their answers.
5. Reward System: Implement a reward system where users earn points or tokens for completing tasks. These rewards could be redeemable for cash, gift cards, or other incentives.
6. Anti-Cheating Measures: Implement measures to prevent users from cheating or using automated scripts to complete tasks. This might include timers, behavior analysis, and IP tracking.
7. User Profiles: Create user profiles where users can track their completed tasks, earned rewards, and overall progress.
8. Payment Integration (Optional): If you're offering monetary rewards, integrate a payment gateway to transfer funds to users' accounts upon reaching a minimum withdrawal threshold.
9. Analytics and Reporting: Incorporate analytics to track user engagement, completed tasks, and other relevant metrics. This data can help you improve the app over time.
10. User Support: Include a contact or support feature where users can reach out with questions or concerns.
11. Testing: Thoroughly test the app to identify and fix any bugs or usability issues.
12. Deployment: Deploy the app on a server or a cloud platform, making it accessible to users.
0 notes
Text
Key Highlights in Magento (Adobe Commerce) 2.4.6 Release
The article was initially published in WebMeridian blog.
On March 14, 2023, Adobe implemented a significant Magento upgrade. In this article, we’ll discuss the features introduced in Magento 2.4.6.
We’ll explore:
Improvements in its tech and performance
New tools offered
How the upgrade will increase your store’s efficiency
Overview of Magento 2.4.6
The release of Magento 2.4.6 brings compatibility with PHP 8.2 and introduces significant advancements in performance and scalability.
Moreover, it comprises over 300 changes and quality fixes which greatly contribute to the central features and external additions. The new releases of Adobe Commerce 2.4.6 and Magento 2.4.6 are set to take your eCommerce experience to the next level.
Let’s check out what this update from Adobe Commerce and Magento 2.4.6 brings to your shop:
300+ modifications and quality upgrades
Support of PHP 8.2
Eight security improvements
Much better GraphQL performance and minimized response time
Upgraded JavaScript libraries to the most recent versions
Synchronization with Page Builder v.1.7.3 and PWA Studio v.13.0.x
Key highlights of the Magento 2.4.6 release
Hundreds of improvements are included in this latest Magento release. Here are the key features of the Magento update and how they can benefit your store.
Tech Changes
The release of Magento 2.4.6 brings a host of exciting technical changes, including:
PHP: Adobe Commerce 2.4.6 now works with PHP 8.2. PHP is a common open-source coding language for web development. But note, PHP 7.4 is no longer supported.
Composer: Composer is an important tool in PHP. This Magento 2.4.6 release update offers 2.2.x. It no longer works with Composer 1.x.
Redis: Redis is an open-source tool used as a database, cache, and message broker. This latest version of Magento works with Redis up to version 7.0.x, and it still works with Redis 6.2. It’s advisable to use Redis 7.0.x, though, as support for Redis 6.2 will end in 2024.
Search engine: OpenSearch is the new default search engine for Adobe Commerce. Up to version 2.x is supported.
Elasticsearch: Magento 2.4.6 now works with version 8.x of Elasticsearch, a search and analytics tool.
MariaDB: MariaDB, a popular open-source database system, works with Magento 2.4.6 up to version 10.6 (LTS). MariaDB 10.6 is recommended, even though 10.4 is still supported.
Processing Improvements
You’ll find Magento 2.4.6 faster than previous versions, thanks to new features such as:
Customer segments: This newest release of Magento 2.4.6 is faster when handling multiple customer segments.
Product grid: A new setting can limit the products shown in the product grid. This improves its functionality.
Import performance: A new API endpoint speeds up data importing.
Order management: Enhanced load balancing allows for more efficient handling of large volumes of simultaneous orders.
Added features to Adobe Commerce Extension Metapackage: This update introduces the Adobe Commerce Extension metapackage v1.1.0.
Adobe I/O Events: This captures Commerce events and sends data from Adobe Commerce to other Adobe systems. This update really improves data sharing.
Security
Adobe has shown they take security very seriously with this latest Magento release. Key improved security features are:
Adobe has strengthened Magento 2.4.6 with eight new security features.
Detailed tracking of admin actions is now available.
A problem with reCAPTCHA during payment processing has been fixed.
An extra layer of security has been added for admins when changing their emails.
User Experience
This version of Magento makes customer flow much better, with faster load times and tons of noticeable improvements of crucial features:
Cart and Checkout
In Magento 2.4.6, the shopping flow is better than in previous versions. The total price and product quantity can now be changed in the cart.
Google reCAPTCHA now works properly and doesn’t block orders.
Cart Price Rule
The discount rule system in the shopping cart works better and the rules apply correctly at checkout. Magento 2.4.6 is also better at calculating discounts.
Catalogue
In Magento (Adobe Commerce) 2.4.6, the product list and price display are improved. When the customer changes their address, the prices switch correctly. It also does a better job of notifying your customers of product price drops.
Configurable Products
Stock management for configurable products (e.g. if different colours or sizes are available) works smoother and faster in Magento 2.4.6. In addition, out-of-stock items can’t be added to the cart.
Coupons
In Adobe Commerce 2.4.6 version, the coupon system has been vastly improved. Now, coupons added at checkout correctly add reward points. Also, the process of using coupon codes when making an order has been improved.
Currency
With this latest Magento update, the platform displays currency symbols and prices more clearly on the website and the admin view.
Customer Segment
Filters for customer segments, or groups of clients with shared features, now work as expected when creating new cart price rules.
Email
Adobe Commerce version 2.4.6 no longer sends double-order emails to users. Image options are also displayed better in emails.
Shipping
The following updates have been made to the shipping feature:
The Free Shipping Cart rule now correctly calculates shipping rates for FedEx, USPS and UPS, even when only a subset of items in the cart matches the rule.
The free shipping option no longer appears on the admin shipping page when the total order is less than the minimum amount eligible for free shipping.
Magento Open Source now respects the Show Company setting in the admin customer configuration when displaying shipping or customer addresses.
If the Show Company setting is disabled, the shipping company is not included in the shipping address, customer address, or database order record.
An unnecessary save operation on quotes when estimating shipping has been eliminated. The StoreId scope is now directly applied from $request->getStoreId(), ensuring the scope isn’t lost when an admin user creates a quote. This addresses occasional issues with shipping methods when using third-party modules to create quotes from the admin interface.
SEO-friendly URLs are now generated for products whose url_key setting is overridden at the store-view level.
There is no longer a minimum order amount error when a discount is applied to shipping costs.
Shipping refunds are now correctly calculated when tax is applied after a discount has been applied to shipping.
All promotions for a requested cart through GraphQL cart query are returned at once, including line item discounts, cart rules/discounts, coupons, gift cards and store credit.
The setShippingMethodsOnCart mutation now includes price_excl_tax and price_excl_tax types in the output.
Unique shipping IDs are now correctly included in GraphQL responses, as expected, for shipping details when products are shipped to multiple addresses.
Platform Upgrades
Magento 2.4.6 includes some welcome platform upgrades, including:
Adobe has improved Magento 2.4.6 by adding support for PHP 8.2.
They are supporting more technical tools like Composer 2.2.x, ElasticSearch 8.x and Redis 7.0.x.
OpenSearch is now the default search engine for Adobe Commerce.
Adobe recommends upgrading MariaDB to 10.6, even though they still support the previous version.
The platform has also migrated the DHL scheme from v6.2 to v10.0, upgraded outdated JavaScript libraries and removed unnecessary dependencies.
Accessibility Features
Magento is more accessible than ever with this latest release of version 2.4.6:
Adobe has made Magento 2.4.6 easier to use for everyone. The “Sign in” button now has a visible label.
Storefront buttons have more descriptive and memorable names.
There are informative, detailed captions for “Has Video” checkboxes in shop search filters.
Users who navigate using only a keyboard can now fully access all page functionalities.
Braintree Accessibility
In Magento 2.4.6, the following accessibility updates have been made to Braintree:
The Pay Later function and messaging are now available in Italy and Spain. Pay Later messaging has been activated in conjunction with PayPal Vault.
Web links for fraud protection and Automated Clearing House (ACH) have been incorporated.
A new web link for Local Payment Methods (LPM) has been integrated.
GraphQL Performance Boosts
Here are some of the key performance enhancements for GraphQL in Magento 2.4.6:
The response time for category queries with enabled category permissions has been improved.
The efficiency of processing the category tree in GraphQL has been optimized.
Response times for bulk shopping cart operation inquiries have been reduced.
Fixed issues
The installation, upgrade and deployment of Magento now perform better due to bug fixes.
Bulk products can be updated via API and filtered in the grid without any errors.
Buttons in the Checkout and Review order process are now easily accessible with keyboard inputs.
The Full-page cache isn’t flushed unless the ordered product is out of stock.
Data caching now works properly when the L2 cache is configured.
The ‘Display Out of Stock Products’ feature now functions correctly on the storefront inventory when enabled.
Admins can add many simple products to a configurable product, even if the salable quantity is 0, to their shopping cart.
Shoppers can add simple products to another product without getting an error that often appeared in previous versions: “Something went wrong with the default view.”
After an order is created from the admin screen, Adobe Commerce no longer sends duplicate emails to the customer.
Merchants can now specify a custom external SMTP provider.
Customers can now log in after a password reset, even if they previously exceeded the maximum number of failed login attempts.
Shipping rates for FedEx, USPS and UPS are now calculated correctly when the Free Shipping Cart rule applies to only a subset of items in the cart.
Outdated JavaScript libraries have been updated to the latest versions.
Features removed from Adobe Commerce 2.4.6
In the latest Magento 2.4.6 update, some features have been removed due to backward-incompatible changes.
Here’s a list of some elements no longer present:
PHP 7.4 support has been dropped from Magento Open Source/Adobe Commerce.
Composer 1.x is no longer supported. Outdated JavaScript libraries and dependencies have been eliminated.
Jquery-migrate has been removed from the Commerce and Magento Open Source codebases.
Zend framework (ZF1) components, which have reached their end of life, have been removed from the codebase.
The laminas/laminas-dependency-plugin Composer plugin has been discarded.
The dependency on the imagemin-svgo library has been removed.
The Tagline and Layout configuration fields for all PayPal buttons in the Admin Styling section have been deleted.
The non-native array_first function has been removed from dev dependencies in the MFTF framework.
Should You Upgrade to Adobe Commerce 2.4.6?
If you want a secure, quick shopping platform, consider the Magento (Adobe Commerce) 2.4.6 release. It’s safe, fast and contains plenty of new features. However, remember that updating could cause issues with older features.
Let’s look at the pros and cons of updating to Magento 2.4.6:
Positives
Safer: The Magento latest version comes with eight fixed security issues. This makes it more secure for you and your users.
More features: The Magento 2.4.6 release comes with a lot of extensions and improved functionality.
Faster: Adobe has vastly improved the speed of the platform, so you can offer a better customer experience.
Negatives
Compatibility issues: This version may not work with older features or plugins. You might need to find new ones that work.
Plugin problems: If plugin creators don’t update their plugins by July 12, 2023, they will be removed from the marketplace. This could limit the plugins you can use.
Things to Consider When Migrating to Magento 2.4.6
Here’s a brief summary of things to consider when you migrate.
Verify the compatibility of your current commerce setup with Magento 2.4.6.
Identify any potential conflicts or necessary data integrations during the upgrade.
Confirm that all themes and plugins used in previous Magento versions will work with 2.4.6.
Back up your existing website data before initiating the migration.
Assess any possible server hardware requirements for the new Magento version.
Wrap up any customizations or data migrations from the old version before starting the upgrade process.
Even though upgrading to the latest version of Magento requires some initial work, it’s a necessary move. All new plugins, security upgrades and templates will be designed to be compatible for this version, so delaying migration makes little sense.
If you get a team of professionals to help you, like WebMeridian, you’ll be switching in no time.
Conclusion
The release of Adobe Commerce 2.4.6 introduces key features designed to improve the functionality and efficiency of your eCommerce platform.
If you are looking for certified Magento developers who can adapt your store to the new version of Magento or migrate plugins from the old version, contact WebMeridian. Our team will be happy to help you get the most out of the latest update.
1 note
·
View note
Link
Google reCAPTCHA is a tool designed to prevent spam and abuse on websites. It is a free service that uses advanced risk analysis techniques to differentiate humans from bots. reCAPTCHA v3 works by assigning each website visitor a score based on their interaction with the website.
0 notes
Text
Notes de mise à jour
🌟 Nouveautés
Sur le Web, les Coches arc-en-ciel sont à présent visibles dans l'en-tête des pages de blogs, en complément de leur présence dans les billets eux-mêmes.
Sur le Web, la mention "0 note" est dorénavant affichée dans le bas d'un billet ne comportant aucune réaction. Ce libellé cliquable était auparavant masqué dans cette configuration.
Lors de l'utilisation de l'option de partage "Copier le lien", les adresses at.tumblr.com ne sont désormais plus utilisées pour créer des liens au format court.
Sur le Web mobile, se rendre sur l'URL d'un billet en particulier montre maintenant le contenu de ce dernier tout en masquant l'en-tête du blog dans la partie haute.
En réponse à une requête formulée ici, nous avons ajouté le lien vers l'image de l'avatar dans les éléments du format NPF fournis par notre API. Cette fonctionnalité est particulièrement utile pour les personnes qui souhaitent utiliser NPF / JSON dans leurs thèmes de blog.
Certains utilisateurs expérimentent en ce moment des libellés exempts d'emojis dans les onglets du tableau de bord.
🛠️ Correctifs
Sur le Web mobile, le contour bleu qui apparaissait brièvement à l'ouverture d'une image dans un billet n'est à présent plus visible.
Sur le Web mobile toujours, le bouton de fermeture d'une image affichée en mode lightbox est à présent bien proposé.
Sur le Web mobile toujours et encore, appuyer sur "Partager" dans le pop-up de célébration surgissant lors de la publication d'un billet pouvait afficher la fenêtre de partage en dessous du pop-up et la rendait ainsi inutilisable.
Le nouvel éditeur de billets sur le Web comptait les balises HTML lors du calcul de la taille d'une citation. Le nombre affiché à présent reflète davantage la réalité.
Sur le Web, enregistrer la modification d'un billet depuis le tableau de bord ne provoque plus le rechargement de la page.
Dans le formulaire destiné au Support, il est à présent nécessaire de compléter le test reCAPTCHA pour que le bouton "Suivant" soit activé.
Correction d'un bug dans la fonction Recherche qui pouvait ne donner aucun résultat lorsque le chiffre "0" était utilisé dans une requête.
Correction d'un problème sur le Web qui pouvait désolidariser le média rattaché normalement sur le côté lors du clic sur l'espace vierge du bord droit d'une page.
Correction sur le Web d'une anomalie connexe : un média rattaché sur le côté d'une page de blog pouvait chevaucher la barre de défilement de ce dernier.
Correction sur le Web d'un problème qui pouvait faire disparaître le paramètre d'affichage des coches lorsqu'il était désactivé.
Lors de la consultation d'un onglet spécifique sur le Web, ce dernier est maintenant centré dans la barre d'onglets plutôt que de se retrouver potentiellement masqué dans la liste déroulante.
Correction d'une anomalie qui avait provoqué le retour des coches bleues en lieu et places de coches arc-en-ciel.
Correction d'un bug qui rendait invisibles tous les nouveaux commentaires ajoutés à des billets.
🚧 En cours
Un bug pouvait se produire dans le fil Abonnements de l'application iOS et provoquer le passage automatique d'un lot de billets à un autre lors de la navigation, ce qui en perturbait la fluidité. Le bug est à présent corrigé et la mise à jour devrait être disponible très prochainement.
🌱 Prochainement
L'application Android permettra bientôt de glisser/déplacer les tags afin de les réorganiser dans un billet.
Nos équipes travaillent à l'ajout de fonctions permettant de faire pivoter ou de rogner les images dans l'éditeur d'images de l'application !
Nos équipes sont informées d'un problème dans l'application Android qui provoque un chargement infini de l'onglet "Pour vous". Fermer et relancer l'application permet de contourner ce problème, mais un correctif en bonne et due forme est en cours.
Nous avons également remarqué que l'option permettant d'indiquer qui peut activer Blaze sur vos billets est visible dans l'application iOS, sans pour autant être encore opérationnelle. Cette fonctionnalité est en cours de finalisation, nous vous en dirons plus prochainement !
👻🧀🍪🐴
Vous rencontrez un problème ? Écrivez-nous (en anglais) et nous reviendrons vers vous aussi vite que possible !
Vous souhaitez nous faire part de vos commentaires ? Rendez-nous visite sur le blog Work in Progress et participez aux discussions de la Communauté !
21 notes
·
View notes
Text
Wijzigingen
🌟 Nieuw
Als reactie op een verzoek dat hier is gedaan, hebben we de link naar de avatarafbeelding toegevoegd aan de NPF-reeksitems die door onze API worden geleverd. Deze functie is vooral handig voor gebruikers die NPF/JSON in hun blogsjablonen willen gebruiken.
Sommige gebruikers experimenteren momenteel met emoji-vrije labels op dashboardtabbladen.
Op het web zijn regenboogvinkjes nu niet alleen zichtbaar in het bericht zelf, maar ook in de header van blogpagina's.
Op het web wordt er nu onder aan een bericht zonder reacties ‘0 notities’ weergegeven. Dit klikbare label was voorheen verborgen.
Wanneer je de deeloptie ‘Link kopiëren’ gebruikt, wordt at.tumblr.com niet langer gebruikt om snelkoppelingen te maken.
Als je op het mobiele web naar de URL van een bepaald bericht gaat, wordt de content van dat bericht nu weergegeven en wordt de blogheader bovenaan verborgen.
🛠️ Fixes
Op het mobiele web is de blauwe markering die bij het openen van een afbeelding in een bericht kort verscheen niet meer zichtbaar.
Op het mobiele web wordt de knop om een afbeelding die in lightbox-modus wordt weergegeven te sluiten nu correct weergegeven.
De nieuwe berichteditor op het web telde HTML-tags mee bij het berekenen van de grootte van een citaat. Het getal dat nu wordt weergegeven, is een betere afspiegeling van de werkelijkheid.
Als je op het mobiele web in de feestelijke pop-up die opduikt bij het plaatsen van een bericht op ‘Delen’ drukt, kon het deelvenster onder de pop-up verschijnen waardoor het dus onbruikbaar was. Dit is nu opgelost.
Op het web wordt de pagina niet langer opnieuw geladen bij het opslaan van een bewerkt bericht vanaf het dashboard.
In het ondersteuningsformulier is het nu nodig om de reCAPTCHA te voltooien om de knop ‘Volgende’ te activeren.
Een bug verholpen in de zoekfunctie waardoor er geen zoekresultaten werden weergegeven wanneer het getal ‘0′ in een zoekopdracht werd gebruikt.
Er is een probleem opgelost op het web waardoor media die normaal aan de zijkant waren vastgemaakt, losraakten wanneer op een lege ruimte aan de rechterkant van een pagina werd geklikt.
Een gerelateerd probleem op het web opgelost waardoor mediabestanden aan de zijkant de scrollbalk van de blog bij het bekijken van die blog konden verbergen.
Er is een probleem opgelost op het web waardoor de instelling Vinkjes weergeven verdween wanneer deze was uitgeschakeld.
Bij het bekijken van een specifiek tabblad op het web is het nu gecentreerd in de tabbalk in plaats van mogelijk verborgen in de scrollbare lijst met tabbladen.
Een probleem opgelost waardoor de vinkjes van iedereen blauw werden weergegeven in plaats van in regenboogkleuren.
We hebben een probleem opgelost waardoor alle nieuwe reacties op berichten werden verborgen. De reacties zijn nu weer zichtbaar.
🚧 Nog mee bezig
Er was een scrollprobleem in de iOS-app waardoor de feed Volgend tijdens het scrollen naar de volgende reeks berichten kon verspringen wanneer deze was geladen. Deze bug is nu verholpen en de update zou zeer binnenkort beschikbaar moeten zijn.
We zijn op de hoogte van een probleem in de Android-app waardoor het dashboardtabblad 'Voor jou' soms niet volledig wordt geladen. Het probleem wordt opgelost door de app te sluiten en opnieuw te starten, maar we werken aan een betere oplossing.
We zijn ons er ook van bewust dat de optie om in te stellen wie Blaze voor je bericht kan activeren in de iOS-app zichtbaar is, maar deze optie werkt nog niet. We zijn hier nog mee bezig en verwachten je hier binnenkort meer informatie over te kunnen geven!
🌱 Binnenkort
Je kunt binnenkort je tags in de Android-app slepen en neerzetten om ze opnieuw te rangschikken.
We werken aan het toevoegen van besturingselementen voor bijsnijden en roteren aan de afbeeldingseditor in de mobiele apps!
👻🧀🍪🐴
Heb je een probleem? Dien een supportverzoek in (bij voorkeur in het Engels), dan nemen we zo snel mogelijk contact met je op!
Wil je feedback over iets geven? Ga dan naar onze Work in Progress-blog en ga in gesprek met de community!
12 notes
·
View notes
Text
Делаем капчу на своем сайте
Сегодня мы поговорим о том, как установить капчу на свой сайт.
Для этого есть два пути: использовать существующие решения и разработать свою реализацию.
Поэтому сегодняшняя статья будет состоять из двух частей: установка reCAPTCHA от Google и того, как сделать капчу на PHP самостоятельно.
Указанные в статье примеры будут универсальные, без привязки к какой-либо платформе сайта, поэтому их можно использовать абсолютно на любом сайте, разработанном с использованием PHP и HTML.
Как сделать капчу на PHP — подготовка формы
Поскольку у меня на сайте капча уже установлена, то я решил не удалять её с целью демонстрации процесса повторной установки. Вместо этого я решил разработать примитивную HTML форму добавления комментариев на сайт, которая присутствует, наверное, на каждой современном ресурсе.
Она будет состоять из поля для ввода текста и кнопки «Отправить», между которыми в будущем мы будем размещать нашу капчу.
Внешне она выглядит следующим образом:

Установка reCAPTCHA
В качестве стороннего сервиса для установки капчи на сайт я решил использовать упоминавшуюся ранее Гугл рекапчу, которая на сегодняшний день является негласным стандартом CAPTCHA.
Поскольку данный сервис сторонний, то мы будет взаимодействовать с сервером reCAPTCHA посредством API. Если вы хоть раз использовали стороннюю АПИшку, то наверняка знаете, что доступ к ней возможен только с помощью специального ключа.
Для того, чтобы получить ключ reCAPTCHA, нужно создать Google-аккаунт, который даёт доступ ко всем сервисам данной компании (Youtube, Google диск, почта Gmail и др.) либо воспользоваться существующим (думаю, у большинства из вас он есть, если вы пользуетесь хотя бы одним из перечисленный сервисов).
После того, как вы залогинитесь в своём аккаунте, переходим на страницу https://www.google.com/recaptcha/admin, вводим название капчи (можно добавлять несколько CAPTCHA, поэтому имя нужно для банальной идентификации) и выбираем нужную версию reCAPTCHA.
Я лично рекомендую использовать вторую версию, которой является уже упоминавшаяся noCAPTCHA. Она как раз и является AJAX капчей, об особенностях которой мы также говорили. Первая версия рекапчи подойдёт любителям старой доброй графической капчи, для прохождения которой нужно вводить искажённые символы и цифры с картинок.
После выбора версии указываем доменные имена сайтов, на которых мы будем размещать PHP капчу, и выбираем галочку соглашения с условиями reCAPTCHA. В итоге должно было получиться следующее:

2 notes
·
View notes
Text

Best Auto CAPTCHA Solver Online API for Seamless Automation
Automating online tasks has never been easy, thanks to best auto CAPTCHA solver online API. Businesses and developers constantly sought a solution to bypass CAPTCHA challenges, reduce manual input and increase workflow automation. Whether you need to streamline web scrapping, account registration, or data extraction, a high-demonstration auto CAPTCHA ensures the Solver API seamless operation.
What is an auto CAPTCHA solver API?
A best CAPTCHA solver online API is a software tool designed to automatically identify and solve the CAPTCHA challenges. These APIs take advantage of artificial intelligence, machine learning and optical character recognition (OCR) to decode various CAPTCHA types, including image-based, text-based, reCAPTCHA and HCAPTCHA. By integrating a reliable CAPTCHA solver in your system, you eliminate the problem of manual verification and improve the efficiency significantly.
Major benefits of using an best auto CAPTCHA solver API
1. Increases workflow automation
Solving the manual CAPTCHA slows down automation processes. An API -powered CAPTCHA enables solver bots and scripts to bypass these challenges in real time, improving operating speed and accuracy.
2. Saves time and resources
Business CAPTCHA Solver relying on web scrapping, form submission, or automatic transactions is greatly benefited from API. By reducing the need for human intervention, these solutions reduce labor costs and maximize productivity.
3. Supports several CAPTCHA types
A strong CAPTCHA solver API can handle
various CAPTCHA formats, including:
Image based CAPTCHAs
Text CAPTCHAs
Google reCAPTCHA v2 and v3
hCAPTCHA and FunCAPTCHA
Audio CAPTCHAs
4. Spontaneous integration with bots and scripts
Most CAPTCHA solvers provide simple integration with programming languages such as API Python, PHP, Java and JavaScript. Developers can easily apply APIs using a few rows of code, ensuring compatibility with existing automation equipment.
5. User improves experience
CAPTCHA increases customer experience by automatically bypassing challenges, by reducing unnecessary friction in business online interactions, such as sign-up, login and shopping.
How to choose the best auto CAPTCHA solver API
When selecting captain solution service, consider these necessary factors:
1. Accuracy and success rate
Look for an API that provides high accuracy and rapid resolve rates. AI-managed CAPTCHA solvers with deep learning abilities perform better by traditional methods and ensure high success rates.
2. Speed and response time
Time-sensitive functions require a quick response to a CAPTCHA solver over time. A premium API must process requests within a few seconds to maintain workflow efficiency.
3. Cost and pricing model
Evaluate the pricing structure of API. Some CAPTCHA solver services charge per salt CAPTCHA, while others provide membership-based models. Choose one that align with your budget and use needs.
4. API reliability and uptime
Reliability is important for automation. Ensure that the CAPTCHA solver provides frequent uptime and minimum downtime to prevent disruption of API workflow.
5. Safety and compliance
A safe API should follow industry standards and follow data privacy rules. Look for a service that uses encrypted connections and protects user data.
Top use case for an auto CAPTCHA solver API
A reliable CAPTCHA solver API benefits many industries and automation works, including:
Web scrapping and data extraction: CAPTCHA helps collect data from websites without interruption.
SEOs and Digital Marketing: Keywords automate tracking, competitive analysis and backlink monitoring.
Account registration and verification: The manual CAPTCHA simplifies the account construction without a solution.
E-commerce automation: Automatic price assists in monitoring, inventory checks and order placements.
Ticket bots bats: enables events and shows to buy tickets faster for the show.
Conclusion
A high-demonstration auto CAPTCHA solver in its automation workflow saves time, increases efficiency, and increases productivity. Whether you are a developer, marketer, or business owner, selecting the right CAPTCHA solver ensures easy, uninterrupted operation.
With the correct solution, you can focus on the main business functions, allowing automation to handle the CAPTCHA challenges easily. Choose a reliable best auto CAPTCHA solver API today and take your automation to the next level!
0 notes