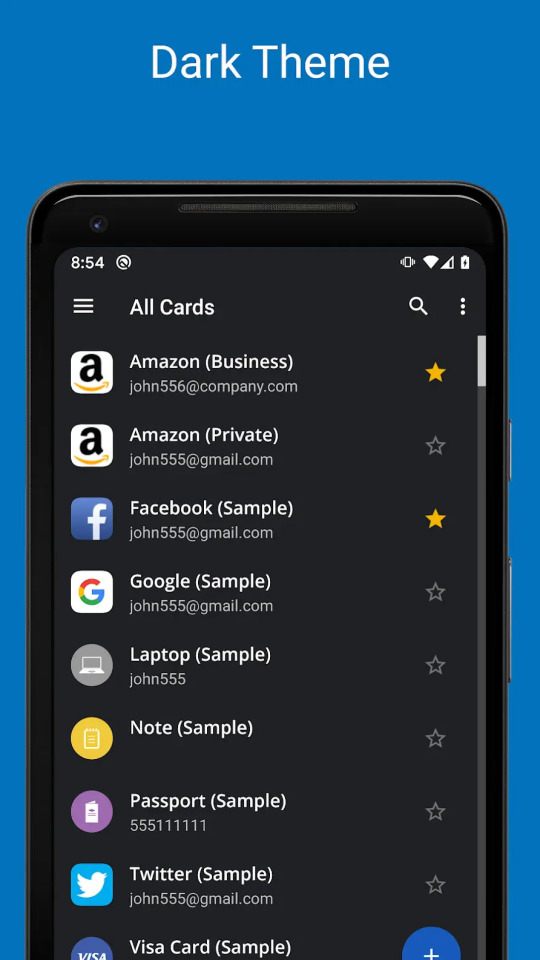
#remove Dropbox from mac
Explore tagged Tumblr posts
Visit Tumblr Blog
Explore Tumblr blogs with no restrictions, modern design and the best experience.
Last Seen Tumblr Blogs


Fun Fact
In Q3 of 2020, 31% of US users access the Tumblr app daily.
Text

SFS Hack
For the sake of keeping this a bit shorter I've decided to create this post and link to the original, much reblogged post about this matter. its contains a lot of info thats definitely worth a read(!) but for now: Factsheet:
SFS uploads are currently NOT possible (see above).
CC (custom content) files ALWAYS end with .package.
Script mods files ALWAYS end in .ts4script
On Windows: if a CC folder on SFS or downloaded zip file contains a .exe do not run it! immediately remove it and empty your trashcan/bin.
On Mac: If a CC folder on SFS or downloaded ZIP file contains a .dmg do not open it and drag it into your App folder! Immediately remove it and empty your bin.
For creators: change your password if you have a SFS account, always use a randomly long(!) generated password (LastPass, Password (Apple)!
My own downloads are also stored on Dropbox.
I only use SFS as a 2nd link for all my downloads so if you download then use the Dropbox links for now. if you do use SFS then pay attention to the following:
If any zip or package file from me has been updated in march/April 2025 (at SFS):
Do not DOWNLOAD the file/zip from SFS and please let me know!!! ( I still have to check ALL folders manually for this...)
823 notes
·
View notes
Note
Hi there Runic!
I was wondering your opinion on using Scrivner to draft fics vs using Word? Like pros and cons? (Some of the articles online are so confusing! >//<‘)
Thanks so much for the ask, anon! And also thanks for your patience; I wanted to give this some thought, hence the wait.
I primarily use Scrivener and have been using it for a little over a decade. I also use Word during the final phase of edits. I'll list some of my favorite features of each one, followed by the cons.
Scrivener
Organizing a story in Scrivener is where it shines the most. For a longer story, you can break things down by chapter and easily move them around as needed. For me, I use a single file for all my fics and breakdown folders by fandom, then by ships. The use of status markers and labels and custom meta-data, while initially daunting, are also super great to flag what state your draft is in along with any other indicators you wish to use. For me, I like marking if fics are for an exchange or a gift for a friend. I've even customized the meta-data so I can plug in potential tags and ratings as I go!
Snapshots is a neat function that makes a copy of your current file. I use it with each new phase of editing, in case I need to refer to an older version. It's super easy to switch back and forth between snapshots, plus there's a preview to show what has been removed or added from the last version!
There are a ton of compiling options for when you wish to export your story as a Word doc or a PDF or even for epublishing. I don't use this too often, but I have lots of friends who do and it makes proper formatting really simple.
There is a focus mode that removes all the UI stuff and just shows you the words. If this didn't exist, I wouldn't be able to write anything lolsob.
You can set target goals for each document or even the entire file. And if you have multiple documents in a single folder with word count targets applied, Scrivener will add them all up and give you a total target estimate. Really handy for planning out how long your story will be!
THERE IS A DARK MODE THEME.
Word
The grammar/spelling checker is a lot more robust in comparison to Scrivener.
Sharing your Word document and sharing notes/comments with beta readers is a LOT easier in Word. It's similar to how Google Docs works with leaving comments, replying to each other, and marking them as resolved.
Copy-pasting from Word into AO3's rich text preserves the formatting, whereas I've had a lot of wonky issues going from Scrivener to AO3.
Text-to-speech, while kinda weird, is a godsend when I want to read out loud a fic before posting, but don't have the energy to do so.
If you have Word, you likely have a Microsoft subscription, which means you have access to OneDrive, which makes for VERY easy backups. Plus you can get Word on your phone and work off that and your computer seamlessly at no extra cost.
THERE IS ALSO A DARK MODE.
Hokay, now for cons.
Scrivener
Scrivener is not free. It is a one-time fee of $60~. That said, if you participate in NaNo and win, you can get a discount code (I believe it's 50% off?)
It was originally made for Macs, but then a Windows version was developed. The team behind Scrivener is very small and it took… forever to get the Windows version up to speed with the Mac version. There are still some differences between the two, but thankfully both versions are on the same page. Jumping off of this, there is an iOS version, but no Android version.
If you wish to back up your Scrivener stuff, you can only really do that via a Dropbox account. Also, I believe it's not possible to open the same file on different computer types. So if you have two computers (one Mac and one Windows) and want to open the same file on both, it's not really going to work. In my experience, I've also run into issues getting things to sync and open when using two Windows computers. So if you're planning to bounce around different computers/laptops/etc., definitely keep this in mind.
On top of that, for every device you want Scrivener on? You need to pay for that.
Scrivener has got one hell of a learning curve, too. I've been using it for so long and am STILL discovering new ways to use it. It can be intimidating, even after you go through all the tutorials.
Word
This also costs money, but sadly is not a one-time fee AND you need to invest in a bundle plan instead of just getting Word. Home subscriptions range from $70 to $100 a year, depending if you're getting it just for yourself or for your family/friends to use too. For me, I use it with my boyfriend and we use all the programs a bunch, so it works out well for us. This might work for you too if you're interested in having access to things like Excel and OneNote and cloud storage. But if you just want Word, that's not really feasible.
I haven't experienced this because I've stopped writing novel-length stories in Word, but I've heard from friends that the program slows down after 30k words or so, which is unfortunate and frustrating.
Furthermore, you can't really transition from file to file in Word as you can in Scrivener. You'd need to manage the folders on your computer outside of the program.
Word isn't really designed for book formatting. You CAN do it, but it takes some extra work on your end to format things accordingly, whereas Scrivener has a bunch of built-in features to help with that.
Microsoft is A LOT bigger than the Scrivener team, thus there are frequent updates. And because of that, you need to perform more updates to the program and might even need to reacquaint yourself with features and UI changes.
I hope this helps! Regardless of which program you wish to use, I hope it goes smoothly and you have a blast writing your stories on it!
2 notes
·
View notes
Text
How to Delete Pages from PDF on Mac: A Step-by-Step Guide for Professionals
Working with PDF files is an everyday necessity for many professionals, whether you're in legal, finance, design, education, or consulting. Often, these documents include unnecessary pages—appendices, extra forms, or duplicated content—that you might want to get rid of before sharing or archiving. Fortunately, if you're using a Mac, you have several efficient ways to delete pages from PDF Mac without needing complex software or advanced technical skills.
This article walks you through the best methods to remove pages from PDF Mac, using built-in tools and advanced third-party applications. Whether you're looking for a quick edit or advanced batch processing, you’ll find a solution that fits your workflow.
Why Delete or Remove Pages from a PDF?
Before diving into the “how,” let’s consider the “why.” Here are some professional scenarios where removing PDF pages makes sense:
Client Reports: Eliminate draft pages or irrelevant data.
Legal Documents: Remove confidential or outdated clauses.
Marketing Collateral: Update brochures or slide decks with current information.
Educational Content: Share only relevant sections with students or colleagues.
Financial Reports: Exclude internal notes or calculations not meant for distribution.
Understanding how to efficiently delete pages from PDF on Mac can save time, protect sensitive information, and streamline document sharing.
Method 1: Use Preview – The Built-in PDF Tool on Mac
The Preview app is a native macOS utility that offers simple yet powerful PDF editing tools. It's completely free and pre-installed on every Mac.
How to Delete Pages from PDF Using Preview:
Open the PDF:
Double-click the file or open it via Preview (Right-click → Open With → Preview).
Open the Thumbnail Sidebar:
Go to View > Thumbnails or press Shift + Command + D to view all pages.
Select the Pages to Delete:
Click the page you want to remove. To select multiple pages, hold Command and click.
Delete the Page(s):
Press the Delete key on your keyboard or right-click and choose Delete.
Save the File:
Go to File > Save or File > Export as PDF to preserve your edited version.
✅ This method is perfect for quick edits without additional software.
Method 2: Use Adobe Acrobat Pro – Advanced Features for Power Users
If your work involves heavy PDF handling, Adobe Acrobat Pro offers more control over document editing, security, and collaboration.
Steps to Remove Pages from PDF on Mac Using Adobe Acrobat Pro:
Open Adobe Acrobat Pro and load your PDF.
Go to Tools > Organize Pages.
You’ll see page thumbnails—hover over the page and click the trash can icon to delete it.
Select Save As to retain the original file and save the edited one separately.
Key Features:
Delete, rearrange, or rotate pages
Merge multiple PDFs or split one into several
Add password protection or digital signatures
💼 Ideal for professionals in legal, finance, or enterprise roles who need secure and precise document control.
Method 3: Use Third-Party PDF Editors for Mac
There are several third-party PDF editors that allow you to delete or remove pages from PDF on Mac quickly and often with additional tools for annotations, signing, and conversions.
Recommended Apps:
1. PDF Expert by Readdle
Sleek interface and easy navigation
Drag-and-drop pages to reorder or delete
Sync with Dropbox, Google Drive, and OneDrive
2. PDFpen (now Nitro PDF Pro)
Robust editing tools
Built-in OCR for scanned documents
Secure file encryption and annotation
3. Foxit PDF Editor for Mac
Lightweight and fast
Cloud collaboration tools for teams
Excellent value for professional users
How to Delete Pages (General Steps):
Open the PDF file.
Access the page management or thumbnail view.
Select the unwanted pages.
Delete and save/export your final document.
These apps are well-suited for users who work with PDFs daily and need flexibility without the bulk of Adobe Acrobat.
Method 4: Delete Pages from PDF on Mac Using Online Tools
If you’re in a rush or working with a file that doesn’t contain sensitive data, online PDF editors are a convenient option. No installation required.
Popular Tools:
Smallpdf
ILovePDF
PDF24 Tools
Sejda
Steps to Remove Pages:
Visit one of the sites above.
Upload your PDF.
Select the pages to delete.
Click “Apply” and download the edited file.
⚠️ Caution: Avoid uploading confidential or business-sensitive documents to online platforms unless they are encrypted and secure.
Automation Tip: Use Automator to Remove PDF Pages
macOS includes Automator, a workflow tool that can handle repetitive tasks like file renaming, resizing images, or manipulating PDFs.
Use Automator to Remove Pages:
While more technical, you can create a script using Automator or Shortcuts to extract or delete certain pages from PDFs based on page numbers or criteria.
This is useful for batch operations and can be integrated into more complex workflows.
Tips for Professionals Managing PDF Files on Mac
Whether you're using Preview or a robust PDF suite, here are some tips to maintain professional document standards:
Backup Before Editing: Always duplicate your original PDF before making deletions.
Check File Security: Ensure edited PDFs don't expose hidden or redacted information.
Use Naming Conventions: Save versions with clear filenames like Report_Q1_Reviewed.pdf.
Compress After Editing: Use Preview or PDF compressors to reduce file size before sharing.
Validate Before Sending: Double-check page numbers, formatting, and content after edits.
Conclusion:
Professionals across industries handle PDFs every day, and knowing how to delete pages from PDF on Mac can streamline your workflow and eliminate the need for printing or scanning. Whether you need to clean up a draft, remove confidential pages, or prepare a document for presentation, macOS provides several reliable solutions to help you get the job done.
From the simplicity of Preview to the power of Adobe Acrobat Pro or the flexibility of PDF Expert, the choice depends on your editing needs and work volume. You can even use secure online tools or Automator for specialized tasks.
No matter your profession or file size, learning to remove pages from PDF on Mac ensures you maintain professional standards while working efficiently.
0 notes
Text
Price: [price_with_discount] (as of [price_update_date] - Details) [ad_1] We are Kethron Cloud: The First Indian Personal Cloud Storage Company for Indian Users Introducing Your Personal Secure Cloud Space: Crafted Exclusively for Indian Users Kethron Cloud offers a secure, reliable, and India-focused cloud service. Our solutions align with Indian government policies, and all data is stored on servers within India to ensure top-tier security and compliance. Why Choose Our Cloud Service? 1. Data Security & Ownership No Third-Party Rentals: Your data resides solely on our privately-owned servers. Indian Servers: Compliant with local regulations, ensuring security and peace of mind. 2. Unlimited Bandwidth & Full Access No restrictions on bandwidth or speed. Flexible plans from 100 GB to 1 TB and beyond to cater to diverse storage needs. 3. Multi-Device Compatibility Access from multiple devices, including PCs, smartphones, and tablets. Compatible with Windows, Mac, Android, and iOS. Manage all devices under a single plan for seamless data control. 4. Real-Time Auto Backup Automatic Sync: Real-time backup for mobiles and PCs. Configure specific folders or files for continuous updates without manual effort. 5. Never Lose Your Data Even deleted files from your device remain secure in the cloud until permanently removed. Freely delete synchronized content from devices without affecting cloud storage. 6. Streamlined Access Anywhere Access your data anytime, anywhere, on any device. Built-in tools to preview or stream files like PDFs, images, music, and videos without downloading. 7. Online Editing Directly edit office files, documents, and text from your cloud storage. 8. Effortless Sharing Share files or folders via secure links. Create public links with usage limits for added safety. 9. Dropbox Functionality Enable others to upload files directly to your cloud with a shared link. 10. Enterprise-Level Performance Suitable for personal, family, or professional use. Ideal for businesses like accounting firms, manufacturers, and data-heavy industries. 11. Comprehensive Support Personalized Assistance: Direct, hassle-free support. Hindi & English Support Available: Accessible help in your preferred language. Essential Plans: Perfect for CA firms, advocates, and data entry businesses. [ad_2]
0 notes
Note
sorry. i should have expanded on the issue with your am i ok link. it's when you download it. i've downloaded the zip file twice now thinking maybe it is me and none of the photographs show up when im trying to extract
i was able to download and extracted the file just fine, but i have a mac my friend downloaded it and was able to extract the file once they removed the_ in the file name. (i had a question mark in the file name and i dont think pcs like that very much)
or you could redownload the file again, i removed the question mark from the file name in dropbox so hopefully that works
i'm happy to help if you need any more assistance (although it might be tomorrow)
1 note
·
View note
Text
How to Use Cricut Explore 3: An Easy Guide for Beginners
Greetings to all my lovely crafters; I hope you are enjoying the festive season by creating a variety of custom projects with your Cricut machine. Hey, are you a new DIYer and searching for how to use Cricut Explore 3? I am Luna Lovegood, and I am going to be your guardian angel. It's been three years, but it seems like yesterday I bought my Cricut machine and did a lot of research before using it.
I know you might have thousands of questions running through your mind regarding this Cricut machine, but you can't find any exact answer. In this blog, I will share with you the details about this machine. Cricut Explore 3 is now smarter & faster and cuts more than 100+ materials with ease and precision. Besides, it works with 6 different tools and cuts twice as fast as other Cricut models.
How to Setup Cricut Explore 3 on a Computer?
Before gaining info on how to use Cricut Explore 3 to make a DIY project, you need to set it up with a PC. Being your guardian, I must make you aware of the machine setup process with the Windows or Mac operating system. Carefully go through the details given below:
After successfully learning about the Explore 3 setup process, it's time for you to create DIY projects out of this Cricut product.
How to Use Cricut Explore 3 for the First Time?
Following the completion of the machine setup with the computer, I need to ensure that you are well aware of how to use a Cricut Explore 3 machine. Many customized crafts can be made out of this machine within a few minutes. In this section, I am going to share with you the steps of creating a personalized cupcake topper with this craft machine.
Step 1: Sign in Cricut App and Create Your Design
As you can see, I start the process by signing into the Cricut app using my Cricut ID and password.
Alt Text: Enter your login details and sign in to the Cricut app
Now, press the New Project option, and you will land on your new canvas. Next, tick the Images tool and choose the image by entering its code inside the Search field. Following this, click the image and then tap the Insert Image option.
Next, I will select the image and then change its size as per my choice. Afterward, I am going to open the Flip Dropbox and choose the Print option. Following this, I will press the Flatten button under the bottom of the Layers section.
After flattening the design, I am going to select the design and press the Duplicate. Now, I will flip the design to the horizontal given under the Flip Dropbox. I can paste these duplicate designs on both sides of the toothpick.
Step 2: Print Stickers and Choose the Material
After completing the design, I will press the Make It option present on the top right side of the canvas. Now, I will type 24 under the Project Copies and hit the Apply option. Next, I will press the Continue button and hit the Send to Printer option.
Following this, the printer pop-up window will appear on my screen. On the screen, I will get to see my printer model, & total copies and will enable Add Bleed along with the Use System Dialog toggle.
Now, I will wait till my printer is printing the stickers on the sheet. When the process comes to an end, I will unload the sheet from the printer. Simultaneously, I will reopen Design Space and choose the Light Cardstock from the Set Material section. After doing that, I will keep the pressure as default only without any changes.
Step 3: Cut and Weed Out Sticker
After finishing the above-said steps of how to use Cricut Explore 3, I will paste the material on my cutting mat using the brayer tool. Next, I will insert my cutting mat into Explore 3 and press the flashing light to start the cutting process. At this point, I will wait till the cutting process is going on. Following the completion of the cutting process, I am going to bend my mat backward and remove all the stickers one by one.
Step 4: Stick Your Final Design on the Toothpick
In the final stage of how to use Cricut Explore 3, I will take the glue gun and stick both the stickers together. Further, I will apply glue at the bottom of the sticker and place a toothpick in between. Now, I will gently put a little pressure on the cupcake topper correctly, leave it for a few minutes, and let the glue set properly.
After a few minutes, I am going to place my customized topper on your cupcake. Finally, I will distribute them among the kids and let them have this tasty dessert and enjoy the party.
With the help of my cutting machine, Cricut app, and supplies, I was capable of grabbing the majority of content regarding how to use Cricut Explore 3. Other than that, it also enlightened me with my inner talent.
Frequently Asked Questions
Question: What Supplies Come With Cricut Explore 3?
Answer: Along with this Cricut product, you will also get different supplies that will help you in forming the crafts of your choice. However, it's crucial to ensure that you are correctly using the supplies without any mistakes. Have a look at the supply name below:
Question: What Crafts Can I Make From My Cricut Explore 3 Machine?
Answer: Cricut Explore 3 is an ultimate cutting machine that is capable enough to cut 100+ materials with accuracy. Some of the customized crafts that can be made out of this craft machine are as follows:
Question: Is Cricut Explore 3 Worth Buying as a Cutting Machine?
Answer: This Cricut product offers excellent versatility and is an all-rounder while creating customized projects. It can cut every material from thinnest to thickest with its shard-edge blades and tools. Besides, it's two times faster speed and latest updates make it more outstanding as compared to other models. Other than that, Explore 3 works with six different tools and is compatible with the Design Space app.
Visit: cricut.com/setup
Source: https://cricutdesignapp.wordpress.com/2023/12/09/how-to-use-cricut-explore-3-an-easy-guide-for-beginners/
#design space setup#cricut explore air 2#cricut.com/setup#www.cricut.com/seup#www.cricut.com/setup login#cricut new machine setup#www.cricut.com/setup#cricut design space login#design.cricut.com#cricut.com/setup explore air 2 setup
0 notes
Text
How to Send Your Sims to Other Simmers

Hi there! So, you’re looking to send your sims to another simmer’s for an event or collab. Well, then this is the guide for you! In this post, I’m going to show you how to properly send your sim to another simmer!
Get Sims 4 Tray Importer
This tool is going to make your life so much easier if you want to send sims. Download the tool here: (Windows and Mac versions). Sims 4 Tray Importer allows you to import and extract your tray files. It will allow easily allow you to export custom content and share it with other simmers.
Understand the Dress Requirements
Normally when someone asks for a sim, they have some requirements for how the sim should dress based on the needs of the scene or story. Make sure you understand what’s needed and dress your sim accordingly. If you’re unsure, be sure to ask so that your sim is ready! You can even snap a pic of the outfit you’re thinking and see if it fits the bill.
PRO TIP: When dressing sims, put the outfit(s) your sim needs for the collab as the everyday outfit category. Remove cc from every other outfit and just put the sim in a bathrobe. This cuts down on the cc you send and makes it easier to ginf the needed outfit.
Save your Sim in CAS
In order to send your sim using Tray Importer, you need to save them. I find it easiest to 1) save my sim while in their household 2) open a new CAS household 3) open my library and select my saved household 4) remove all the extra sims (don’t worry this won’t affect your save!) 4) dress my sim and remove all other outfits and then save them with the name of them and who I’m sending them to. The best part about this is if you need to send your sim again, just use that save in your library so you don’t need to remove outfits and people over and over.
Extract Your Sims

Now that you’ve dressed and saved your sim, they are ready to be exported. You will use Sims 4 Tray Importer to do this. Open the program and select the household you want to send. In the top-right, you will see a save button. Use the arrow next to it to open a drop-down menu, you will choose Export with CC. A pop-up will appear that shows you all the cc you are sending. You will his Export and save it in a safe place.
PRO TIP: Remove defaults and sliders so that it doesn’t change the other person’s game (scroll to bottom of list and uncheck). You can also remove subfolders and merged files (tutorial here) if you want to save the other simmer the trouble of doing that themselves or having to deal with large files.
Send Your Files
You did it! Now to get that sim to the other simmer. You can use your preferred file-sharing site to send your sims over: Google Drive, Wetransfer, Dropbox, Simfileshare, etc. Send the link that allows the other simmer to download and you’re successfully sent your sim!
Hope this helps! Happy Simming!
59 notes
·
View notes
Text
Hope you don’t mind that I decided to make this its own post, because I’ve got a lot to say and replies have a character limit.
First off: welcome to Tumblr! I noticed that you seem to be a new blog. I would HIGHLY recommend updating your profile pic to something recognizably fandom-related and making a post or two - either writing something up real quick, or reblogging some fandom content. Tumblr has had a big influx of bots for the past few months, so most people (myself included) who get followed by an empty blog tend to block immediately. Customizing your page and reblogging content will prevent that from happening.
Second: you’re so sweet! I don’t know about “talent,” but I love sharing my stories with people and knowing that I’ve reached people in some way. And if I’ve inspired you to try your hand at writing, even better! Your creative endeavors will be very welcome.
On to your question: my writing program/app of choice is Scrivener. I used to use Google Docs, because I sometimes write on my laptop and sometimes write on my phone, so I needed a program that can do both. However, as a longfic writer, Google Docs gets kind of frustrating to use after a while. There’s no particular organizational system - it just organizes files based on whichever one you opened last, which is messy when you want to look through your story as a whole but the chapters are scattered among the dozens of files you have. And putting the whole thing in one big doc doesn’t work, either, because it takes forever to load, and scrolling gets laggy.
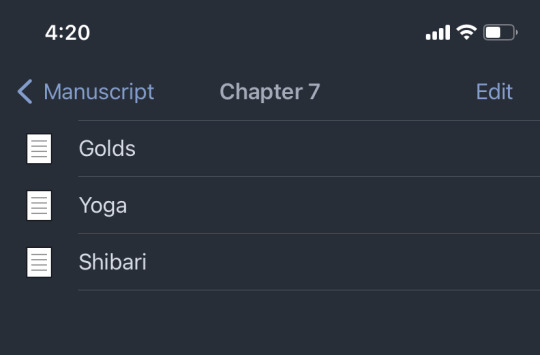
Scrivener has a KILLER organizational system where you can store all chapters under their own folder within a single document, and even break things down by scene. It makes it so easy to reference earlier chapters. Here’s an example of how it looks on my iphone:
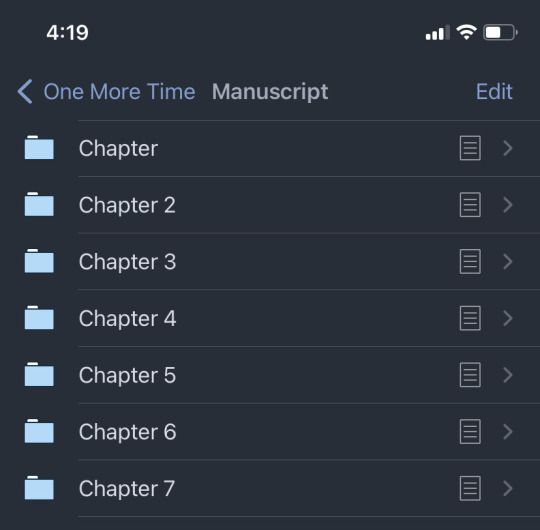
And then when I click into a chapter…
It also has sub-folders for notes, research, characters, inspiration… it’s a writer’s dream.
However, it does have downsides. 1.) it’s not free. For PC or Mac, I wanna say it’s like fifty bucks, and for iPhone it’s like 25ish. In order for me to switch back and forth between PC and iPhone, I had to spend like 75 bucks, plus a subscription to DropBox to sync the two. BUT unlike Microsoft Office, it’s a one-time payment, not a periodic subscription.
2.) It is not available for google phones. The mobile app is only available for iPhones. I don’t know why, or if they plan on ever coming out with a Google app. Maybe Google doesn’t want to make an app because they want people using Google docs. Idk.
3.) Some writing formatting does not carry over to AO3. So for example, when I italicize a word in Scrivener, it doesn’t paste into AO3. I have to mark each italicized word in Scrivener. Then when I paste it into AO3, I have to manually italicize those words and remove the asterisks.
Whatever you choose to use, I’m sure it will be great!
6 notes
·
View notes
Text
Top 10 Must Have Android Apps which I use daily.
Productivity Apps
1. Solid Explorer File Manager. [Free & Paid] 🔐http://neatbytes.com/solidexplorer/
Playstore – https://play.google.com/store/apps/details?id=pl.solidexplorer2
PlayStore Rating 4.4 / 5
Best Features
Best Features
Solid Explorer covers almost all of the beats you’d expect from a file manager nearly flawlessly. Collections allow you to view all of your photos, music, and videos in one place. You can connect your cloud storage accounts like Dropbox to manage your files remotely. It also has support for remote access protocols like FTP and you can even use it as a root file manager. Even for advanced users, it packs a punch.
On top of all this, it’s also gorgeous. While most file managers have a design stuck somewhere between 2009 and the stone age, Solid Explorer makes it a priority to adhere to Google’s Material Design spec. You can also customize your themes and colors and even choose between light and dark themes, because there’s really no reason a file manager should blind you.
Improvements required areas
While we prefer to choose a free app when we can, Solid Explorer doesn’t fall into that camp. You can try it for free for two weeks, but after that, you’ll have to shell out $2 to keep using it. On top of that, the company also charges for some plugins like Mega, and even offers additional icon packs for more money. This is annoying, but most of the add-ons are either free or optional. The upside is that you at least know where Solid Explorer is getting its money from. Since our last pick was pulled for adding sketchy adware, we’ll call this a mixed blessing, rather than an outright negative.
The Competition.
The free version of ES File Explorer may have lost our recommendation, but if you don’t want to say goodbye, you should at least check out ES File Explorer Pro. For a small amount, all of the embedded app “suggestions” and junkware are removed, and there are no ads. It still has all the bells and whistles we used to like, including remote file access, ZIP support, and an app manager. Of course, most of those same features are in Solid Explorer for a dollar less.
2. Safe In Cloud Pro [Password Manager] [Free & Paid] 🏅
https://safe-in-cloud.com/en/
Playstore – https://play.google.com/store/apps/details?id=com.safeincloud.free
PlayStore Rating 4.8 / 5
Features and utilities
Despite being free for desktops and very competitively-priced for mobile devices, SafeInCloud still offers a great selection of extra features. For starters, it can be used to store passwords, but also to remember credit card numbers, ID details, and pretty much any other sensitive information. These can be added fast and efficiently with one of the built-in templates.
SafeInCloud also features a powerful password generator and strength analysis tool. In short, this assesses the strength and estimated crack time for each password, flagging those that are too weak.
The program is also compatible with Apple Watch and Android Wear smartwatches. Browser extensions are available to streamline web use and provide autofill functionality, and you can even import existing data from other programs to the desktop app.
Interface and performance
SafeInCloud works with a Windows 10 laptop and the Google Chrome browser extension. The desktop interface is somewhat outdated, but it remains simple and intuitive. Important options are available across the top of the window, passwords and accounts are listed in the center, and different password/information categories can be accessed via the panel on the left of screen.
When it comes to performance, SafeInCloud is great, and adding a new password is extremely easy. Simply type the website, username/email address, and password into the app and hit enter. Login details for saved websites can then be filled with a single click on the browser extension.
3. Soul Browser [Free & Paid] – A little gem you’ve probably never heard of .. 🥇Playstore – https://play.google.com/store/apps/details?id=com.mycompany.app.soulbrowser&hl=en_IN&gl=US
PlayStore Rating 4.5 / 5
The most important thing in the browser is pleasant content viewing. To achieve this goal, Soul Browser offers a variety of features. All features are fast and powerful. Intuitively designed for ease of use. Every effort has been made to provide the unique value of the Soul Browser.Soul Browser wants to be a valuable app that has been loved for a long time. Clean Mode, Fast and Clean. Built in cleaner is optimized for the browser. The filter is updated automatically periodically. Using this browser Videos can be Downloaded, no additional software needed.
In addition to general features like pause, Powerful features such as limiting concurrent downloads and reserved downloads.
Video Player, A web player and a local file player are provided. Gesture control is possible. Various functions such as repeat play and PIP mode are provided. Powerful Incognito Mode. which help to easily protect your privacy. You can protect your personal information, such as your visit history and download history. Various locking methods are supported.
You can choose to your liking. Supports Dark Theme, Protect your eyesight. Full dark theme support. Both app UI and website are fully supported. Text To Speech Listen comfortably by voice. When you click the text displayed in the browser, it is read by voice.
You can view images on the web like a book. If you use it like a comic site, you can feel like you are reading a real book. You will have a new experience. Save all images. You can save images from the web at once. Album creation is also provided. Manage your images efficiently. If you download multiple images, you may have difficulty managing images. Using the album feature solves the problem.
TV Cast This app is TV cast-enabled. Soul Browser is a TV cast-enabled app which lets you stream your favorite entertainment from your mobile device to your TV.
Both local files and web streaming are supported. Change Font .You can change the font of web pages. You can change the font with TTF files in internal storage or SD card.
Gestures suppport, You can move pages and tabs with gestures.
4. TickTick : ToDo List Planner, Reminder & Calendar [Free & Paid] – Best Todo So Far
Playstore – https://play.google.com/store/apps/details?id=com.ticktick.task&hl=en_IN&gl=US
PlayStore Rating 4.6 / 5

Finding a to-do app that’s right for you is as much about finding an app you like as one that has the right features for the way you work. TickTick is a cross-platform and collaborative to-do app that has a few neat features suited to the Getting Things Done method of working. You can create custom task views, for example, and there’s an inbox for jotting down anything that pops into your head. Overall, TickTick is a good app, but its free version has too many restrictions to be worth using long term. There’s more room for improvement beyond beefing up the free app, as some features didn’t work as expected or were hard to find. If TickTick doesn’t quite meet your needs, try one of our two Editors’ Choices: Todoist Premium or Asana.
TickTick offers a free account, as well as a paid Premium plan that costs $2.79 per month or $27.99 per year. The Mac app lists the price as $2.99 per month, but I can confirm I was billed $2.79 via the web app.
To read the full article please visit here https://binoyanto.net
Please visit our Tech Facebook Page https://fb.com/geektalk.me/
2 notes
·
View notes
Text
Mega For Mac Download

Working across platforms and tackling massive amounts of data requires secure, easily accessible online storage with a lot of room. Mega offers such services for users in a seamless fashion.
Easy data storage & management
Mega is a cloud-based storage and synchronization tool for Windows PCs that allows you to save and sync your files across devices.
Download 0.20.5. Use any of the mirrors below to download the latest version of Summertime Saga. Builds are available for Windows/Linux, macOS and Android. IOS builds are not possible due to Apple's publishing restrictions. Download; Download Mega Man 2 for Mac. Game: Mega Man 2: Size: 7.21 Mb: Runs On: Mac: Available Platform: NES: Language: English: Updated: 2018-03-25. Files for Mac can be run on all versions of OS X. You need to uncompress the 7z archive using the proper software (please use Keka to avoid problems). If the archive contains a DMG, double. Microsoft office for mac 2016 free download - Microsoft Office 2016 Preview, Microsoft Office 2016, Microsoft Office 2011, and many more programs.
Setting up Mega on your desktop is straightforward - create an account, and you're free to run the tool. The usage is just as simple, with the program taking care of synchronization and offering all options in a beautifully-designed interface.
Mega enables a lot of flexibility when it comes to what it syncs, helping you avoid stockpiling unnecessary files. With the selective sync function, that process becomes even more straightforward.

As regards collaboration, you may share and access data by other users through the Web Interface. There's also a chat feature, further facilitating cooperation.
Mega Downloader Mac Mojave
Mega will keep your files safe. It provides users with TLS and two-factor authentication to keep records safe. The privacy policy illustrates how all chatting is also secure due to the high-end, real-time encryption.
If you use Mega for free, it will provide you with 50GB of free storage and a transfer quota of 1GB a day. Mega pro costs differ depending on the plan you choose - there are three with impressive sizes.
Where can you run this program?
Mega is compatible with various versions of the Windows OS, from XP to 10.
Is there a better alternative?
No. Especially if you’re ready to pay, Mega offers amazing storage and security. If you don’t like it, Dropbox and pCloud offer a similar fee-based service, and Google Drive and Next Cloud are high-quality free alternatives.
Our take
Mega is one of the best cloud storage options for Windows users. The offered space and top-notch security features ensure an extraordinary service.
Should you download it?
Yes, if you’re a Windows user, it will be of immense help. If you need even more considerable storage capacities, though, you may want to consider the alternatives.
3.6.0
Download Adobe After Effects 2020 for Mac full version program setup free. Adobe After Effects 2020 v17.1 for macOS is a digital visual effects, motion graphics, and compositing application that makes the impossible possible in motion graphics.
Adobe After Effects 2020 for Mac Review
After Effects 2020 v17.1 for macOS is a glorious application that gives you full controls to make impossible possible in motion graphics. Graphics ninjas, producers, video editors and filmmakers use it for touching the new heights in motion graphics and other multimedia content. This industry-standard motion graphics and visual effects software helps you to take any idea and make it move.
Download Mega App For Mac
It features a clear layout, with flexible adaptive interfaces, allowing huge creativity for graphics ninjas as well as keeping things easy to navigate. With its powerful set of tools and effects, you can create cinematic film titles, intros and transitions.
It also empowers you to remove an object from a clip, start a fire or make it rain and animate a logo or character. For complex video editing, you can use Dynamic Link to eliminate intermediate rendering between applications, import from Photoshop, Illustrator, Character Animator, Adobe XD and Animate. All things considered, After Effects 2020 v17.1 for macOS is a must-program if you really want to take your imagination into reality.
Features of Adobe After Effects 2020 for Mac
A professional program for editing the videos professionally
Empowers you to bring your imaginations into reality
Offers latest and unique video editing tools
Provides quick and non-destructive video editing
Comes with clean and user-friendly interface
Ability to fulfill the needs of multimedia industries
Technical Details of Adobe After Effects 2020 for Mac
Software Name: After Effects 2020
Software File Name: Adobe-After-Effects-2020-v17.1.dmg
File Size: 2.27 GB
Developer: Adobe
System Requirements for Adobe After Effects 2020 for macOS
macOS 10.12 or later
4 GB free HDD
4 GB RAM
Intel Core 2 Duo or higher
Download Adobe After Effects 2020 for macOS Free
Mega For Mac Download Mac
Click on the button given below to download Adobe After Effects 2020 DMG for Mac setup free. It is a complete offline setup of After Effects 2020 for Mac with a single click download link.
1 note
·
View note
Text
Price: [price_with_discount] (as of [price_update_date] - Details) [ad_1] We are Kethron Cloud: The First Indian Personal Cloud Storage Company for Indian Users Introducing Your Personal Secure Cloud Space: Crafted Exclusively for Indian Users Kethron Cloud offers a secure, reliable, and India-focused cloud service. Our solutions align with Indian government policies, and all data is stored on servers within India to ensure top-tier security and compliance. Why Choose Our Cloud Service? 1. Data Security & Ownership No Third-Party Rentals: Your data resides solely on our privately-owned servers. Indian Servers: Compliant with local regulations, ensuring security and peace of mind. 2. Unlimited Bandwidth & Full Access No restrictions on bandwidth or speed. Flexible plans from 100 GB to 1 TB and beyond to cater to diverse storage needs. 3. Multi-Device Compatibility Access from multiple devices, including PCs, smartphones, and tablets. Compatible with Windows, Mac, Android, and iOS. Manage all devices under a single plan for seamless data control. 4. Real-Time Auto Backup Automatic Sync: Real-time backup for mobiles and PCs. Configure specific folders or files for continuous updates without manual effort. 5. Never Lose Your Data Even deleted files from your device remain secure in the cloud until permanently removed. Freely delete synchronized content from devices without affecting cloud storage. 6. Streamlined Access Anywhere Access your data anytime, anywhere, on any device. Built-in tools to preview or stream files like PDFs, images, music, and videos without downloading. 7. Online Editing Directly edit office files, documents, and text from your cloud storage. 8. Effortless Sharing Share files or folders via secure links. Create public links with usage limits for added safety. 9. Dropbox Functionality Enable others to upload files directly to your cloud with a shared link. 10. Enterprise-Level Performance Suitable for personal, family, or professional use. Ideal for businesses like accounting firms, manufacturers, and data-heavy industries. 11. Comprehensive Support Personalized Assistance: Direct, hassle-free support. Hindi & English Support Available: Accessible help in your preferred language. Essential Plans: Perfect for CA firms, advocates, and data entry businesses. [ad_2]
0 notes
Text
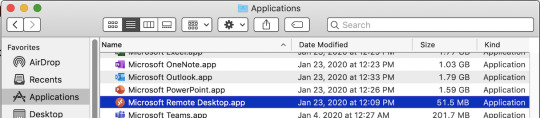
Remoteapp For Mac

For some Mac users, remote access software became a category to consider when Apple removed Back to My Mac from macOS Mojave, and it was completely turned off on July 1 of this year. TeamViewer is one of the best remote access software. It is free for personal usage.
Lovense Remote App For Mac
Free Remote App For Mac
Remote access to Mac, anywhere
Get Screens and work across multiple remote Macs.
While many countries are on a lockdown due to COVID-19, remote work is becoming a lifestyle. Remotely accessing a Mac is designed to be easy. Apple has spent a lot of time ensuring anyone can log in to their Macs — both desktop and laptop — from any other Mac device, anywhere. And, besides, there are a variety of third-party apps ready to help with that too.
Still, remotely managing their Mac sounds overly complicated to a lot of people. From how you connect to sharing files or screens to using your Apple device as a remote mouse, we want to demystify the process in the easy-to-follow guide below.
Best Remote Access Apps for Mac
There are times when you want to access your Mac remotely, and there are many different solutions to remote access your Mac. Best utilities in one pack, give it a go!
How to access your Mac from another location
There're two ways: you can allow remote login to your Mac from another computer, or allow others to access your computer using Remote Desktop (it's available from the App Store).
Allow remote login to your Mac from another computer
Lovense Remote App For Mac
For devices using the same macOS, you can allow remote Mac login using a Secure Shell (SSH). This enables Mac remote desktop access using a Secure File Transfer Protocol (SFTP).

To set up Remote Login:
Go to System Preferences > Sharing
Select Remote Login.
Choose which users you want to have remote access or the ability to control your Mac.
You can either select All Users, which means any other device on your network, or any Mac you own, can access and connect, or click the plus sign to pick the exact users.
When you want to remotely log in to your Mac from another device, you need to know your username (the name that appears when you login) and your computer's IP address. Write them down and keep them safe, as allowing access to your Mac does make it potentially less secure, especially over cellular or public Wi-Fi networks.
Accessing, controlling, or viewing information on your Mac can be done with a built-in Terminal or any other SSH app using your username and IP address.
Allow others to access your computer using Apple Remote Desktop
With macOS remote Mac access and control is even easier. To set up it:
Go to Menu > System Preferences > Sharing
Select Remote Management - it should appear as a checkbox.
Now you can select who has remote desktop access. Either select, All Users, which means any other device on your network, or Mac you own, can access and connect, or click the Add button(+), which gives you the ability to select who can have remote access and/or control.
If you are using a VPN or VNC viewer and want to access your Mac remotely, you will need to setup a password first. It is also possible to use iOS devices, such as an iPhone and iPad, through Apple Remote Desktop, available from the App Store.
How to stay on the same page with Screens
Collaboration has become of utmost importance to today's workplaces. And with more and more people working remotely, being on the same screen (ahem, page) is a must.
Screens allows you to work remotely with any computer regardless of your location. Whether you are on a business trip or traveling, stay confident knowing you can access any file on your home computer at any time.
This robust screen sharing tool for Mac supports:
Multiple displays
Drag-and-drop file sharing
Hiding your remote screen while accessing it
Accessing other computers (e.g. colleague's) as a guest
Alternative shortcuts (useful when connecting Mac to PC)
Custom actions in case of disconnection
To start using Screens, get the app from Setapp and configure the following:
Remote login and remote management (as per the guide above)
Install Screens Connect helper app and create a Screens ID on every machine you'd like to connect to in the future
Use your Screens ID in the Screens app and it will automatically determine which of your computers are available for connection
Remote desktop client for Mac
Control any computer remotely – a perfect way to access your Mac from anywhere without limitations.
Share files between devices
Today we have plenty of ways to send and share files. But ask someone to send something, and you are likely to get it through email. Due to the ubiquitousness of email, it's still the default method for file sharing, despite its obvious flaws and constraints.
Fortunately, there are much better ways:
Native macOS File Sharing
Few people know that their Mac has native file sharing functionality built in. To use this feature, activate it in the Sharing pane of System Preferences by checking File Sharing. If you only want to share specific folders, add them to the Shared Folders list. If you only want specific users to access the folder, add them to its Users list. Otherwise, everyone will be able to access it.
AirDrop
Although not the most reliable solution, AirDrop works fine for occasional sharing a file between Apple devices. In the Finder, choose Go and then AirDrop on both the sending and receiving Mac. As soon as you see the receiver's user icon, drag the desired file onto it to send.
Read more about how to use AirDrop
Dropshare
If you don't want to send files Mac-to-Mac directly but rather through a cloud storage, there is no easier way than Dropshare. The app works with numerous cloud providers, from Dropbox to Google Drive, and saves your files for sharing by simply dragging them onto its menu bar icon.
File Transfer Protocol (FTP)
The most technical but also the most robust way to share files from your mac is to use FTP, which you could do either through Terminal or an FTP Client, the latter being much more user friendly.
There are a few popular FTP clients one could choose from. The robust file managing app ForkLift covers most of the FTP functionality but takes it to the next level and could be a viable replacement for the Finder altogether with its quick search, instant previews, and file comparison.
DCommander is another full-featured file transfer app for Mac that combines speed and reliability, able to handle thousands of files, schedule backups, and even automate transfers.
At last, when it comes to sharing the same files on different devices, an app like ChronoSync Express becomes invaluable.
ChronoSync Express is powerful tool for sharing and transferring files from Mac to Mac, or any another Apple device. With a feature called Synchronizer Document, you can select which files need to be automatically synchronized and shared between devices, just like that:
Create a new synchronizer document for each folder synchronization you'd like to perform
Name the synchronization
Change the Operation to Synchronize Bidirectional
Select folders to sync on the left and right
Test with a Trial Sync
Do you need to use a VPN (Virtual Private Network)?
Whether you are working on your Mac directly, logging into your Mac remotely, or sharing access with someone else, security should be on top of your mind.
As a rule of thumb, you should always use a VPN when connected to a public Wi-Fi network, as someone could log in and see the information you send just as easily as you do.
Free Remote App For Mac
And with remote access — even in the View Only mode — someone can see every file and document on your Mac, except those that are password protected. Unfortunately, if you leave passwords in a visible document, you expose yourself to immense risks.
A secure VPN client for Mac like Shimo is well worth using to stop unwanted eyes from lurking around, especially if you are sharing sensitive files, financial records or customer data.
However, for extra peace of mind and security, consider firing up your VPN automatically on all networks you are not 100% sure about to keep your emails, bank accounts and personal documents safe.
To share your Mac with someone else, download a remote Virtual Network Computing (VNC) app like Jump Desktop. With full remote access and Mac remote control, the other person — or yourself connecting to another Mac — can have the same level of control as the person using that device. Except for Admin level access, since it's password protected.
Starting with Jump Desktop is easy: either yourself (gaining access) or the person you are giving a remote view or control access to your Mac, needs to add details of the device and the password.
Secure your access with VPN
Get a VPN client for Mac to avoid privacy infringement while connecting remotely. It's secure and free to try.
Once permission is granted at the other end, remote Mac screen sharing or control (whereby you can use the iOS device as a remote mouse) becomes possible.
How to use your iOS device as a remote mouse
If your remote work starts on a patio hammock somewhere in east Asia, you should note that Apple iOS devices, such as an iPhone or iPad, can be used to control a Mac remotely, much like a mouse can control a desktop or laptop. Apps that make this possible work on VNC.
Remote Mouse is the easiest, most effective way to turn your iOS device into a wireless remote control for your Mac.
Although remote access through a local network would be most effective, since the closer you are to the device the quicker the connection, it's also possible from anywhere in the world, providing the network is secure and fast enough.
Setting up and granting access to the iOS device is the same process as when someone wants to access using a Mac. Except you need to give them a password. And make sure it is different from your primary Mac or iOS (App Store) one.
So working together or checking on your devices can be done from anywhere in the world and there are lots of ways to do that, from sharing screens and files to having complete access to a system set up far away. Setapp equips you with all the apps needed to remotely access any device you need and elevate your work to the global level.
These might also interest you:
Setapp lives on Mac and iOS. Please come back from another device.
Meantime, prepare for all the awesome things you can do with Setapp.
Read on
Sign Up

Setapp uses cookies to personalize your experience on our website. By continuing to use this site, you agree to our cookie policy.
1 note
·
View note
Text
Wav Or Aiff For Mac

AIFF is a great audio format, mainly used in Apple Macintosh. It was also developed by Apple in 1998. Pulse code modulation is used in these files. This high-quality format uses uncompressed data. Only an AIFF Player can decode and play these audio files. If you want to listen to AIFF files on your device, you must download a good player. Given below are some of the best available AIFF player choices for you.
Wav Or Aiff For Mac Download
Wav Or Aiff Format
Convert Aiff To Mp3
Wav Or Aiff For Mac Os
Aiff C
Wav Or Aiff
Audio Interchange File Format (AIFF) is an audio file format standard used for storing sound data for personal computers and other electronic audio devices. The format was developed by Apple Inc. In 1988 based on Electronic Arts' Interchange File Format (IFF, widely used on Amiga systems) and is most commonly used on Apple Macintosh computer systems. The audio data in most AIFF files is. Aiff to wav converter mac free download - Free AIFF to WAV Converter, Free WAV to AIFF Converter, AIFF To WAV Converter Software, and many more programs. Choose WAV output format at the main window Format list. Set sample rate and bit depth in the main window. When input file is 24 bit reduced to 16 bit, set Dithering on (check ON and OFF and use, that sound better for you). Select target directory (watch video). Push Start button. Wait until end of conversion and look for converted stuff is placed in the target directory (selected in goal 6).

Wav Or Aiff For Mac Download
Related:
Vlc Player
VLC is probably the most popular media player in the world. It can play AIFF files with good control. VLC is compatible with almost all video, audio formats in the world. If you want to listen to an audio file created on Mac, you must download VLC media player software.
Free Aiff Player
Media player lite is a free AIFF video player designed mainly for Windows users. This software is compatible with Windows Vista, Windows XP, and Windows 7. You can adjust the settings of resolution and bitrate. This AIFF player can also be used as a file converter, capable of doing batch conversions.
Foobar2000
If you are looking for a freeware AIFF player download, Foobar2000 is the best thing for you. It can replace your media player, and it acts as a DVD ripper tool. Foobar2000 allows users to convert audio files to any audio format you like. You can enjoy gapless playback of AIFF audio files.
Other AIFF Player Platforms

If you are thinking about your unconventional operating system and its compatibility with AIFF players, it is time to stop worrying. There are hundreds of AIFF players available on the internet for every operating system. Take a look at some examples listed below, and download the best option for you.
AIFF Player for Android – Poweramp Music Player
This is the best AIFF player for android. It can help you to play Mac audio, video files using an android device. It is not possible to decode and play AIFF files, on an android phone. However, Powerapm helps you play AIFF audio with lyrics. Gapless, crossfade playback is an important feature of this software
AIFF Player for MAC – Audio Music Plan Player
If you are using Mac OS, you must download this software. It has an eye grabbing graphical interface. The menu is available in different languages including Chinese, Spanish, and Russian. You will need iOS 7 or anything after 7, to use Audio music plan player. You can easily customize the interface according to your idea.
AIFF Player for Windows – AIFF Player
You can purchase this amazing software from the official website of Microsoft, for just 2.99 dollars. This is the best way to play AIFF Mac audio files using your Windows OS. The playlists are easily customizable. Different types of audio visualization graphics helps you to experience the music in a different way.
Most Popular AIFF Player – Media Monkey
Media Monkey is the most popular AIFF audio player today. You can easily manage thousands of songs using playlists. Let it be audio books, podcasts, AIFF audios, or MP3s – MediaMonkey will help you to enjoy a gapless playback. The software supports different audio formats as well as video files. You can also see Remix Player Software
What is AIFF Player?
AIFF player is a software program to manage AIFF files. If you are a MAC user, you will know the importance of such a software. People today have different gadgets. If you have a MAC computer at office and Windows at home, it will be difficult to transfer and read data between them. You can also see Music Beat Maker Software
Wav Or Aiff Format
MAC audios will not work on Windows without an AIFF player. There are many extra benefits for using these applications. You can convert audio files into any format you like. Some of them even allow batch conversion. Today, AIFF players can play audios and videos alike.
Read the above descriptions carefully before choosing a particular product. Always remember your exact requirement with such a software. If all you need to do is listen to AIFF files, you can seek an opensource AIFF player download website. If you want a comprehensive media player, it will be better to scrutinize all the features.
Related Posts
Convert Aiff To Mp3
The Free Lossless Audio Codec (FLAC) is the most well-liked lossless format, making it a good selection if you wish to store your music in lossless. While the primary goal of. an audio converter software is to transform audio from one format to a different, there are different features you need to look for to raised manipulate the audio. For instance, a program that may extract audio from video can save you time as you don’t have to use a separate program to do the same. Click on Convert to convert your AIFF file(s).
To convert songs currently in your iTunes library, open the software program and discover the Preferences menu from the iTunes dropdown on a Mac or Edit dropdown on a Windows laptop. Next, click on the Basic tab, then find the Import Settings within the lower part of the Preferences window. After that, click the dropdown subsequent to Import Utilizing, select the format and click on OK to save lots of that import format as the default setting. iTunes permits for batch changing, so the ultimate step is to select all the files you wish to convert, click on the File menu, then select Convert and click on on Create MP3 Version. If you happen to chose a unique output format, it shows that format moderately than MP3.
Audio recordsdata are available various totally different codecs. Some are lossy, comparable to AAC and MP3; they save area in comparison with the unique recordsdata, but a number of the authentic knowledge is lost throughout compression. Some codecs are lossless, resembling Apple Lossless, FLAC, and SHN; these files may be transformed again to their unique kind with out the lack of a single bit. Finally, some are uncompressed, akin to WAV and AIFF; they signify the exact information from a CD or a grasp.
Wav Or Aiff For Mac Os
A most of 18 surround channels, stereo down combine channel and bit stream indicators with non-PCM coded data can also be stored within the file format. RF64 can be utilized in the entire programme chain from capture to editing and play out and for short or long term archiving of multichannel information. He gave me his recording in aiff format for some reason. I pulled it into S1 with no problem and exported it as a stem in wav format so all recordsdata were in the identical folder. As soon as I sync the files collectively I begin to notice a drift because the recording progresses, it is noticeable after a minute or so.
Hamster Free Audio Converter is claimed to work with Home windows 7, Vista, XP, and 2000. • You can even email the converted file URL to others. I have tried removing theaiff extension on sound recordsdata and dragging them into storage band. It worked for a couple of files however it’s actually hit or miss. File any reside classes or unable to obtain music from any online websites.
The worst thing about FileZigZag is the time it takes to add the audio file and obtain the link in your e mail. Nevertheless, most audio recordsdata, even long music tracks, come in a reasonably small dimension, so it isn’t often an issue. Select which audio information you want to merge. These might be added out of your laptop or system, by means of Dropbox, from Google Drive, or from some other online supply that you just hyperlink. You possibly can add a number of files directly or select them one at a time.
Aiff C
Should you’re certain you have got a 16-bitWAV or AIFF file at a 44.1kHz sample fee, and it still will not import into the SPD-SX, then the file might have embedded metadata, or “tags,” that are causing the error. This could happen with recordsdata that come from DAWs (“Digital Audio Workstations”), other audio packages, or sample libraries. You possibly can strip this extra info from the file by changing it to Apple Lossless or FLAC format. After converting to Apple Lossless or FLAC, convert that file back to WAV or AIFF, sixteen-bit and forty four.1kHz.
I do not disagree at all – and I will expand upon this crucial topic quickly. Tagging is the KEY to a correct music system and wendiweathers98.hatenablog.com people get very touchy about it – and understandably so. For those of us that have invested tons of of hours curating and sprucing our metadata, we want that point and personal touch to be honored. I do suppose Roon does not respect that enough.
Wav Or Aiff
Initially, upload the FLAC file by clicking “Add Information” button in this system. Alternatively, you can even upload through the use of drag and drop possibility. The good WMA to M4A Converter can convert WMA to M4A, AAC, WAV, AIFF, FLAC, MP3, ALAC, and AC3. Edit audio file to cut off the unneeded half and reduct the file size. You can convert music or sound to WAV format with free online converter.
The Audio Interchange File Format (.aif oraiff) was developed as the standard audio format for the Macintosh platform, http://www.audio-transcoder.com/how-to-convert-aiff-files-to-wav but it is now supported by Home windows and other platforms. It can support as much as six channels and arbitrary sampling charges and bit depths, with 8 kHz and eleven.127 kHz at 8 and sixteen bits being the commonest online.
1 note
·
View note
Note
So how does Scrivener work cdelphiki? Any specifics? I think you talked about it a fair bit before, early in November, but I can't quite remember.
Scrivener is awesome!! Basically, it’s a word processor on steroids specifically for writers (and not student/business purposes, like Microsoft Word/Google Docs) Although you can use it for student or business purposes, if you wanted.
Basically, you use it by first creating your project. It has a lot of templates to choose from, and once you pick what you want to do, it has instructions of how to structure your project in your newly created file. There are a ton of template options, but I’m here for the novel format:
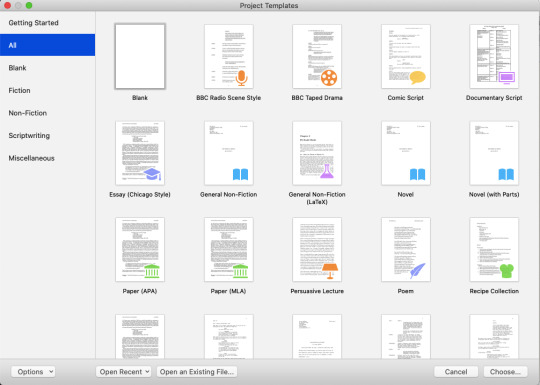
But you can write pretty much anything you can imagine in scrivener.
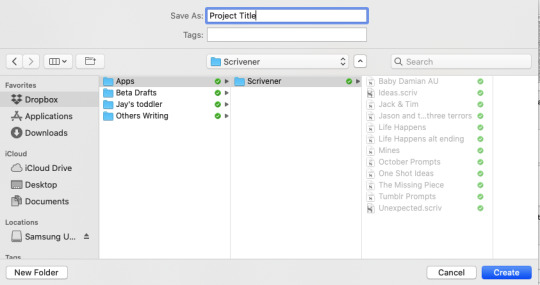
Pick what you want and click “choose” then save it somewhere. I have the app for ipads/iphones, so I save all my projects on dropbox so I can access them from my phone or computer. (This is how scrivener is set up for synced across platforms: over dropbox, not icloud for mac users. It took me a hot minute to figure out.) It has you name and save it up front so it can start backing up your work!!
Once it’s got the project created, it will give you the informational page for the template you selected. Read through it for a lot of good information on how to use all the organizational tools for your specific project.
Now you basically just start working. There is no real wrong way to go about putting together your story. I use scrivener for both one shots and multi-chaptered fics. I actually keep most my one shots in one project, titled “Tumblr Prompts,” just to make it easier than having a zillion project files for single stories.
If you want a pretty detailed walkthrough of how I use scrivener, I put it all below the cut. :D
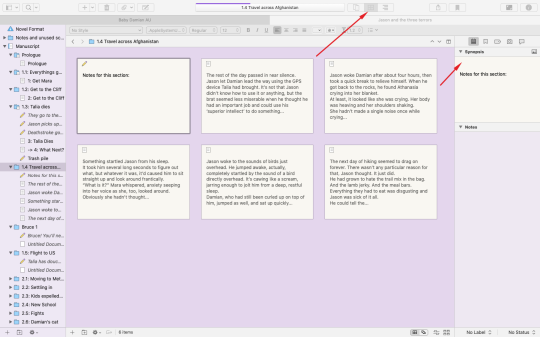
Here’s one of my my well-used project files:

There’s a lot going on here. The left column is your navigation bar. This is basically your entire book. As you can see I have folders within folders. The main one, called “Manuscript” by default, is basically the book in its entirety. I then use more folders for each chapter. Right now, since I’m still drafting, I actually just have it broken into ‘events,’ rather than chapters. This is just a me thing and is what I figured out to help me keep better track of everything.
So I have the Prologue, and then event 1.1 (act 1, event 1), 1.2, 1.3, etc. In 1.3, as you can see, I have both chapter 3 and 4 as scene cards. 1.4 has five scene cards that will likely turn into 7 chapters, once I do a revision!
All the various colors of text are revisions. By default, the first draft is written in black.

When you’re ready to do a revision, you can turn on revision mode and select which version you’re on. I’m on my third revision. I really like this function because it lets me see my progress.
Now, inside all these folders you can see a couple different symbols there. You can actually change the symbols of these things yourself by right clicking on the object in the navigation pane and selecting “change icon.” I put the pencil on all my notes, so it’s very easy for me to know what to get rid of when I’m cleaning up and about to call something “done.” On Precedent, for example, whenever I publish a chapter, I go ahead and name the chapter folder in Scrivener and get rid of all the note cards so all that is left is what I actually published.
Probably one of the best things about Scrivener, is when you want to get rid of something, you don’t have to erase it entirely. On this project here, you can see I have a file a couple under the file selected for viewing called “trash pile.” Whenever I remove large chunks of text, I actually just copy it over to a blank scene card so it’s not ‘lost.’ I then “move to trash,” so it’s not in the way, but it’s always available to me. Scrivener does not delete anything you ‘move to trash’ unless you specifically move to that trash bin and make it delete it. This is great because I can’t tell you how many times I’ve ‘thrown something away’ just to realize, sometimes months later, that that exact scene would work perfectly now! And good thing I saved the draft, so I had something to start with!
Now, back to these ‘scene’ cards. Scene cards are just the files you actually write on. I don’t know if Scrivener calls them that or not, but they’re set up like notecards. I don’t know if you ever did the notecard method in school, where you wrote major points on note cards and then arranged them into a logical order on the table? That’s basically what this is.
To get to this screen, I selected the folder for section 1.4. You can pick any folder you want, even the over all manuscript to get here. Then you pick the view option, where the top arrow is pointing. The first view option shows it as a document, as my other pictures have already demonstrated.
What the notecards are going to show you is your synopsis, if you have one written. Each and every file, even the folder itself, has a spot for ‘synopsis’ and ‘notes,’ which do not count into your overall word count. It’s really nice for keeping stuff out of the way. I’ve found I prefer having my notes as actual scene cards, but the notes section is handy for throwing important things. I also save the link to where I’ve posted stuff on tumblr for easy saving or research so I don’t lose anything.
If you do not have anything written in the synopsis section, the card will just show as much as the text as it can in a dark grey, rather than the black ink of the synopsis. I rarely use the synopsis section, so you can see all my documents just have the first bits of text.
On this screen you can start dragging around cards and move them however you think things need to line up. This works remarkably well if you write in a lot of small scenes, and need to reorganize because you realized that Tim needs to have a panic attack before he faces Ra’s. Or whatever. You can also reorganize at any point in the navigation pane itself. I drag stuff between folders all the time. That’s another reason I love having my notes on actual scene cards, because a lot of times I end up punting scenes off into the future, and it makes it way easier to drag and drop it into the next chapter folder to deal with later.
Another feature I really like is ‘targets.’
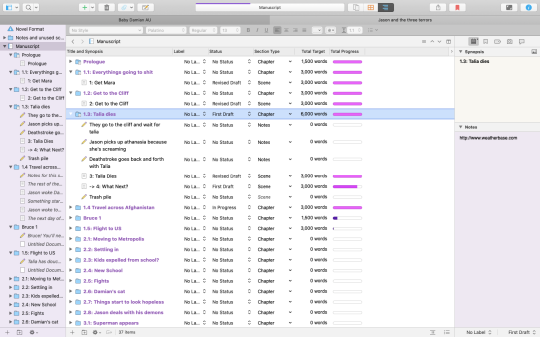
To get here, I selected the overall manuscript, and then switched to the third view option, up there next to the note cards option. It shows me my whole book this way, as well as the status of each folder or document (which I have to set myself.) It also shows me if I had a target word count, and how close I am to reaching it. I like my chapters to be about 3k words, so I make that my target. (set your target by clicking on the target icon on the bottom right corner of a document while in document view.) The purple goes from a dark purple to a lighter one the closer you get. (This is because I am using the ‘theme’ “Purple Haze.” The color is based on your theme. I forget what the default is.)
You can also set daily word goals, and up at the top, below the project’s name, it’ll show you progress toward that goal. I’ve written two words today.... so I don’t have a progress bar yet. The bar above the project’s name is for the overall word goal set. I have this project set to 100k.
I think that’s pretty much it. The only other feature I use regularly I haven’t mentioned is the split screen.
Basically, click where the arrows are pointing. When you’re in just regular view, it’ll look like a split screen, rather than a single document view button. When you hit it, it opens your currently selected document twice, on both sides of the screen. Click on the bar for the document you want to change and then select whatever you want from your navigation pane. I use this mostly for putting my notes on one side and my actual working document on the other. Yesterday I was using while revising, throwing anything I didn’t want anymore into my ‘trash pile’ by just dragging it across.
Once you’re done with something, you can run spelling and grammar check (because it does not check as you go, unless you go into settings and make it do that. It’s turned off by default. I find the squiggly lines distracting, so I love this feature) and use the various text tidying tools, such as the one that turns all multiple spaces into single spaces!
So yeah! That’s Scrivener. I love it so much. It has made writing so much easier. I wrote most of Life Happens in a single Microsoft Word document, and that was a huge mess and horrible and really difficult. I’ve written two long fics in their entirety now on Scrivener and I won’t ever go back.
Oh, and if anyone was curious, this is how I use Scrivener for my one shots: I just label the folders with the main relationship or the collection they’re from, rather than treated the folders like chapters. I then name the scene cards either with their actual titles or a brief description (if I didn’t give them titles) to let me know what’s been published and what isn’t done.
34 notes
·
View notes
Text
Permanently Deleted Files Recovery
We may accidentally delete precious files by sending the data to the Recycle Bin, Microsoft is very kind that offers to Restore feature for us inside the Recycle Bin. However, a shift + delete action will cause permanent data loss. What should we do then? In this writing, we will talk about how to recover shift deleted files with some effective ways, check it, and find how.
Common Ways to Delete Files
Nowadays, the computer is a necessary tool for people keeping files and folders such as pictures, audios, or videos. At times, we might clear the unnecessary files intentionally and unintentionally with the following ways:
1. You can delete unwanted files by pressing the DEL key on your keyboard. However, the data were sent to the Recycle Bin temporarily. What you need to do is enter the Recycle Bin, recover deleted files by merely hitting on the Restore button.
2. Some users may rely on using Shift+Delete key to clean the unwanted files. However, this action will cause permanent deletion, and in this situation, the deleted files or folders won't exist in the Recycle Bin for you to restore.
Please also note that empty the recycle bin is the same as using Shift+delete to delete the files permanently. Henceforth, you'll be carefully confirming your vital data won't be removed together while pressing the Shift+delete key or emptying the Recycle Bin.
Why can Permanently deleted files be recovered?
If you encounter data loss, especially like using shift delete, you can get the message that warns you the data will be permanently deleted. If you click on the Yes button to find that your vital files were removed along with the unwanted files, don't worry, the needed files are still there at least for a while. Once you copy or write new data into space, the contents of records will be overwritten forever.
Hence, if this has ever happened with you, don't worry; we've worked out some practical solutions to help recover shift deleted files effortlessly.
Method 1: Retrieve Shift Deleted Files without Software
If you have a synchronization tool like Dropbox, One Drive, or Google Drive, you can recover the deleted files by click on the restore button, or find them in the trash. Dropbox offers 30 days period to keep your records back up.
Can't find your files there? It's ok, let's try with the next solution.
Method 2: Recover Shift Deleted Files by Using CMD
You can also choose the command prompt to recover shift deleted files. Most of you could operate it only if you followed the guide carefully, although which is somewhat higher-leveled.
Step 1. Choose Windows + X keys at the same time to show a menu, select the Windows PowerShell (Admin) to turn on Windows Command Prompt and work it with the administrative order.

Step 2. Type: chkdsk X: /f and press (X stands for the drive where your files were deleted from)
Step 3. Type Y to confirm the command and press Enter to continue.
Step 4. Type X (the deleted drive's drive letter) again and press Enter.
Step 5. Type X:\>attrib -h -r-s /s /d *.* and press Enter. Wait until the command to run and retrieve your deleted files.
You will successfully get permanently deleted data back after finishing all the above steps if you are lucky enough. And if they were not working, go with the next best and easiest solution.
Method 3: Using Bitwar Data Recovery Software (100% Working)
The CMD feature is a way to complicate. And there is a free data recovery tool with today's technological advancements can recover shift deleted files from your computer’s hard drive. Here we recommend to you is Bitwar Data Recovery, the true companion for your data recovery.
It is a reliable, formidable file recovery programs that effective on Windows X/7/8/10 and other operating systems, Mac, and even on mobile (Android, iPhone). Whether files are emptied from Recycle Bin or deleted with "Shift+Delete," you can rely on this data recovery program.
First, we need to install the Bitwar Data Recovery software and created a software account, and we can get shift deleted files back in the following simple steps.

Please Have A Try!
Please refer here for more about Shift Deleted data recovery.
#Shift Deleted Files Recovery#Retrieve Shift Deleted Files#Permanently Deleted Files Recovery#Recover Shift Deleted File
1 note
·
View note