#replication in mongo
Explore tagged Tumblr posts
Visit Tumblr Blog
Explore Tumblr blogs with no restrictions, modern design and the best experience.
Last Seen Tumblr Blogs


Fun Fact
After the announcement of the deal with Yahoo!, there were 170K signatures of unhappy Tumblr users petitioning to prevent the sale in 2013.
Link
Replica set configuration in MongoDB
0 notes
Text
Início de fevereiro.
Parte II.
@gg-pontos
Parte I.
Devido ao nervosismo, passou o resto dia se preparando para encontrar a mãe e optou por chegar alguns minutos antes no local combinado. Um pequeno restaurante dentro do hotel, elegante e com a presença de muitos estrangeiros, atraídos por Cannes. O coração de Faheera batia forte enquanto se acomodava na mesa, preocupando-se com sua postura e suas vestes. Tinha escolhido uma cor mais sóbria e um lenço leve cobrindo parte dos cabelos, afinal sabia da desaprovação da mãe por suas escolhas com relação a roupa. O atletismo, a forma de se vestir… Aos poucos Faheera conseguia pensar em pequenos atos de rebeldia que havia tido contra a família ao longos dos anos, os quais nunca fora capaz de perceber. Talvez nunca fora tão submissa, afinal. A verdadeira cerne por muito tempo havia lutado para eclodir enquanto a iraniana a sufocava de modo a obedecer a regra dos pais. Suspirou. Perceber era doloroso, ainda mais quando via-se em uma posição na qual ainda queria a atenção dos familiares.
Seu corpo todo estremeceu ao sentir um toque suave em seu ombro, porque não precisava ver ou ouví-la para saber quem era. Apenas uma pessoa tinha aquela leve nas mãos ao torcar-lhe, quase como hesitante.
“Faheera.” Proferiu Zairah ao sentar-se na frente da garota. Estava exatamente como se lembrava, os olhos que pareciam se mover rápido demais, um pequeno sorriso cravado nos lábios. Não parecia tão brava como a iraniana esperava. Ou chateada. Parecia normal, como em todas as outras vezes que Faheera havia visto-a, portando sabia que era boa em esconder suas emoções. Não havia chorando nem mesmo no funeral de seus filhos. Para Faheera, que constantemente deixava-se levar pela intensidade de seus sentimentos, era assustador e admirável ao mesmo tempo.
Observou enquanto ela pedia algo rapidamente ao garçom, lançando um olhar para a filha. “Você quer um chá? Uma fatia de bolo?” Indagou, a voz repleta de doçura. Assim era Zairah. Séria, porém doce, irradiava uma sutil aura de autoridade.
“Apenas chá.” Respondeu, sentindo como se tivesse algo entalado na garganta. As mãos suavam e alguma coisa parecia lhe impossibilitar de respirar, de modo que sentia engasgar… Mas não havia nada, apenas o peso de seu nervosismo que dominava seu ser. Nunca fora fácil estar de frente a mulher que sempre tentou conquistar com tanto afinco. Uma parte de si ainda esperava que algum dia pudessem se dar bem de verdade, embora soubesse que suas últimas atitudes possivelmente haviam arruinado todas as possibilidades.
Assim que o garçom se afastou, Zairah voltou sua atenção total à novamente. “Eu não gosto de rodopios, Faheera. Sei que está bem. Passou as férias em muitos países estrangeiros. Houve aquele pequeno incidente no mês passado, mas consegui resolver.” Falou ao se referir sobre o antigo diretor de Notre Dame. A mulher cruzou os braços sobre a mesa e Faheera engoliu em seco, aguardando as próximas palavras. Sentia-se como uma pequena presa prestes a ser devorada. O olhar de Zairah tinha o poder de apavorar. Mesmo assim mantinha seus ombros erguidos, a postura ereta enquanto sustentava com orgulho o olhar da mãe, onde havia presente uma pequena tonalidade de repreensão. Faheera, no entanto, não estava arrependida de nenhuma de suas atitudes, portanto permaneceu em silêncio.
“Sei o que tem feito. Todo mundo sabe, na verdade. E você sabe que todo mundo sabe. Foi uma jogada esperta, mas eu não esperava. Não sabia que você não queria o casamento, porque nunca disse?” Questionou enquanto recebia sua xícara de chá e bebericava um gole. A pergunta deixou Faheera sem palavras por alguns segundos, o que era bastante raro. Imaginava tudo, menos aquilo.
“Vocês teriam me escutado?” Replicou, afinal os pais nunca tinham lhe escutado.
“Poderia ter tentado.”
“Vocês nunca me ouviram. Nunca quiseram lidar comigo.” Soltou mais do que pretendia, mas velhas mágoas ainda a incomodava. Nunca tivera a chance de dizer tudo o que queria para a mãe.
“Isso não é verdade. Seu pai sempre a adorou, um grande bobo. Faheera, a ideia de te adotar partiu dele.” Pensava que falariam como sobre o namoro falso havia arruinado tudo, mas ao invés disso ali estavam revirando assuntos do passado. Faheera sequer se importou, pois era um assunto o qual nunca tinha conversado com a mãe e sentia-se ávida.
“Eu sei. Mas então perceberam que eu não era uma boneca e me mandaram para longe.”
“É mais complicado que parece. Envolve coisas que você não entende. A adoção não é tão simples no mundo islâmico, Faheera.”
“Eu sei.”
“Então porque questiona?”
Novamente alguns segundos sem palavras, sem saber o que dizer. Sempre imaginou-se dizendo tanto a mãe, gritando verdades e feridas, mas agora que tinha a oportunidade de falar, sentia que não possuía as palavras necessárias, tampouco a coragem.
“Por que eu não pedi para ser adotada. Não pedi para viver essa vida.” Os olhos por fim se abaixaram, mirando nas pulseiras. Se sentia como uma impostora, que não deveria estar ali.
“Mas está vivendo. Você carrega um nome poderoso e uma fortuna maior ainda. Vai me dizer que não gosta disso? Dos privilégios? Do poder?” Zairah parecia saber em qual ponto pegar, de modo que sempre fazia Faheera aguardar alguns segundos antes de falar. Sentia como se estivesse em uma partida de xadrez, onde cada movimento errado, cada pronúncia errônea poderia ser seu fim.
“Eu gosto.” Confessou. “Cuidar de mim é uma obrigação de vocês. Não podem se vangloriar por isso.”
“Você está certa. Sempre foi muito inteligente.” Ela suspirou e tomou mais um gole de seu chá, fazendo um rápido movimento de desdém com as mãos. “Não estou aqui para falar sobre isso, mas você me deu uma nova ideia.”
Faheera não gostou do tom utilizado, do tipo que fazia um frio correr por seus membros, ainda assim estava curiosa. “Qual ideia?”
“Você não quer se casar. Humilhou nossa família mundialmente. Por sorte consegui contornar a situação e seu noivo não desistiu. Faheera, posso te dar duas opções: você pode terminar esse namoro ridículo, se comportar e casar-se assim que acabar a escola… “ Zairah se mexeu levemente na cadeira, passando a mão de forma delicada pelo mongo da mesa, distraída antes de voltar as obres escuras para Faheera.
Fuzilada.
Era assim que se sentia.
“Ou você pode calar-se. Terminar a escola em silêncio e então desaparecer. Vá para algum lugar isolado, adote seu sobrenome biológico e viva uma nova vida sem nós.”
Não conseguia acreditar no que ouvia. Ela estava mesmo falando para que abandonasse a família por completo? Parecia quase uma expulsão! A garota piscou algumas vezes, sem ter certeza do que responder. Estava em choque, desejava ter ouvido errado.
“Não.” Respondeu por fim. Zairah não demonstrou nenhuma reação adversa pela negativa da filha, como se já esperasse.
“Continue brincando. Você tem até o fim do semestre para isso. Não vamos te deixar faltar nada, como sempre fizemos. Mas estaremos observando seus passos.”
‘Estamos observando seus passos.’
Parecia mais uma ameaça do que um aviso e depois das palavras sobre deixar a família, Faheera não duvidava de mais nada. Ainda sentia-se surpresa e intrigada pelo rumo que a conversa tinha levado. Então, repentinamente, Zairah se levantou. “O avião está me esperando. Até o próximo contato, Faheera.” E a mais velha saiu, deixando a filha ainda em choque devido a conversa trocada. Havia muito o que pensar, o que fazer.
3 notes
·
View notes
Text
The 100 Day Challenge
Day 5
1. Quite a lot of new things today!! Started MongoDB. What is MongoDB? - A document database. No schema, no tables or no relationships. Data is stored in JSON format documents. Makes it easier to map to the objects in our application.
2. Impedance mismatch - This is a problem that occurs due to the difference in the format of database model (columns) and the format of application i.e coding model (variables or attributes of objects). This problem doesn't arise in mongoDB.
3. Increased Lock Time --> Less number of Updates --> High Latency in using DB --> Slow application
4. Eventual Consistency - This is a consistency model in which all the replicated databases gets updated with a consistent value for any variable when it gets changed in the Primary Database. This is the weakest consistency level btw.
5. Eventual Consistency is all about whether a document is replicated to all the servers before the control is returned to your application.
6. Also, there is Complete Consistency where the control is not returned to you until document is replicated to all the servers. Fire & Forget comes off with limited durability.
7. Majority Consistency model - where the document is replicated to some DBs & control is returned to you & then MongoDB continues the replication for the others.
8. MongoDB supports an arrangement called Replica Set. A Primary DB, a secondary DB and an Arbiter DB. Primary - only writable instance. Secondary - Readable (irrespective of their number)
9. No data on Arbiter and is optional. The main function of Arbiter is to provide an additional vote for one of the secondary DBs to make it the primary DB in case of failure of the Original Primary DB.
10. Interesting facts : Mongo Shell is a JavaScript Interpreter and MongoDB is built with C++.
1 note
·
View note
Text

TechnoMaster provides excellent Mango DB course online. MongoDB is a distributed database. It is very simple and easy to use. MongoDB training will help you learn the foremost document-oriented NoSQL database, scheme design, modeling of data, MongoDB Architecture, CRUD, and also indexing by utilizing real-life case studies. TechnoMaster Training Institute is providing MongoDB Training in Dubai for interested candidates who want to learn and master the course in quick time. Our expert assistance for this certification course is immense. We can provide complete assistance to help you have the career of your dreams in the shortest time possible. We give training on industry-based projects so various domains so that effective learning is possible.
For more details on the availability of our Training Program. Click Below:-
Mongo DB Online Training in Dubai
To become an expert MongoDB developer, you have to be at the top of your skill. We help you gain in-depth skills in NoSQL, data modeling, query, information replication, and many more. To be an expert in each topic requires you to set new benchmarks in your career. After getting trained with us, when you join a company, you can do a range of things that others can’t even dare to do. We will give you that professional exposure so that you will set high standards in your career. So, there should not be any more doubts to join our institute. Just reach our experts straightaway to join our training institute.
TechnoMaster (the training division of Nestsoft Technologies, a Kerala based online IT training institute) has been instrumental in shaping the lives of over 10,000 students who attended our IT training programmes since 2001. We provide short term, crash and long term online / offline IT courses on all IT technologies with real time internships at convenient schedules and reasonable fees.
Through our job portal (Jobs Near ME) we aim at helping you get placement in Chennai, Mumbai, Cochin, Infopark, Technopark, Cyberpark, Bengalaru, Delhi, United Arab Emirates (UAE), USA, UK, Australia, Canada, Germany, Ireland, Singapore, Switzerland, Kuwait, Saudi Arabia, Bahrain, Qatar, Oman etc.
#MongoDB#data modelling#NoSQL database#Scheme design#Mongo DB Architecture#best it training institute#best online training#best course in 2023#best institute in uae#best internship in uae#technomaster in uae#internship
1 note
·
View note
Text
This guide provides a systematic demonstration of how to Install MongoDB 5.0 on Debian 11/ Debian 10 Linux systems. MongoDB is a general-purpose, object-oriented, simple, and dynamic database. It is a NoSQL document store. This means that data objects are stored as separate documents in a collection. This helps to overcome the relational databases approach. MongoDB is written in C++ for massive scalability and high performance. It is available for Windows, macOS, and Linux Operating Systems and is supported by both 32 and 64-bit architectures. MongoDB 5.0 brings new features such as: Seamless data redistribution Multi cloud-security tools Serverless database on MongoDB Atlas Native time-series features Live Resharding The Versioned API future-proofs your applications. MongoDB is good for the following: Evolving data requirements. Blogs and content management. Mobile and social networking sites E-commerce product catalogue. configuration management Real-time analytics and high-speed logging In MongoDB, there is a collection of concepts we need to be aware of. These are: SQL Server MongoDB Index Index Database Database Column Field Joining Linking & Embedding Row Document Partition Sharding (Range Partition) Replication ReplSet Table Collection Step 1: Add MongoDB APT repository In this guide, we will install MongoDB 5.0 using the apt manager. Here we will use the official mongo-org package. This package is supported and maintained by MongoDB Inc. Mongo-org package always contains the latest available versions of MongoDB. First, we import the MongoDB public GPG key. Download it using wget as below. Install wget on Debian 11/ Debian 10 using sudo apt install wget curl -fsSL https://www.mongodb.org/static/pgp/server-5.0.asc|sudo gpg --dearmor -o /etc/apt/trusted.gpg.d/mongodb-5.gpg This code should respond with OK as the output. However, if you get an error indicating that GnuPG is not installed, install it as below. sudo apt update sudo apt install gnupg2 The next step requires us to create a /etc/apt/sources.list.d/mongodb-org-5.0.list file for MongoDB 5.0. We will use the buster’s repo for both distros since, by the time of documenting this article, the one for bullseye did not exist. echo "deb http://repo.mongodb.org/apt/debian buster/mongodb-org/5.0 main" | sudo tee /etc/apt/sources.list.d/mongodb-org-5.0.list Then update your local package database as below. $ sudo apt update Hit:1 http://deb.debian.org/debian buster InRelease Hit:2 http://security.debian.org/debian-security buster/updates InRelease Hit:3 http://deb.debian.org/debian buster-updates InRelease Ign:4 http://repo.mongodb.org/apt/debian buster/mongodb-org/5.0 InRelease Get:5 http://repo.mongodb.org/apt/debian buster/mongodb-org/5.0 Release [2,396 B] Get:6 http://repo.mongodb.org/apt/debian buster/mongodb-org/5.0 Release.gpg [801 B] Get:7 http://repo.mongodb.org/apt/debian buster/mongodb-org/5.0/main amd64 Packages [6,551 B] Fetched 9,748 B in 3s (3,461 B/s) Reading package lists... Done Step 2: Install MongoDB 5.0 In this guide, we will install a specific release i.e 5.0.2 and therefore we will specify each component package with the version number as below. sudo apt install mongodb-org mongodb-org-database mongodb-org-server mongodb-org-shell mongodb-org-mongos mongodb-org-tools If you choose to install mongodb-org=5.0.2without specifying components’ version, the latest version of each component will be installed. Dependency tree of the above command: Building dependency tree Reading state information... Done The following additional packages will be installed: mongodb-database-tools mongodb-mongosh mongodb-org-database-tools-extra The following NEW packages will be installed: mongodb-database-tools mongodb-mongosh mongodb-org mongodb-org-database mongodb-org-database-tools-extra mongodb-org-mongos mongodb-org-server
mongodb-org-shell mongodb-org-tools 0 upgraded, 9 newly installed, 0 to remove and 2 not upgraded. Need to get 147 MB of archives. After this operation, 449 MB of additional disk space will be used. With MongoDB 5.0 installed, we are now set to make a few configurations to our system. First, start and enable the mongod service on Debian 11/ Debian 10 as below. sudo systemctl start mongod sudo systemctl enable mongod Check the installed MongoDB version. $ mongod --version db version v5.0.2 Build Info: "version": "5.0.2", "gitVersion": "6d9ec525e78465dcecadcff99cce953d380fedc8", "openSSLVersion": "OpenSSL 1.1.1k 25 Mar 2021", "modules": [], "allocator": "tcmalloc", "environment": "distmod": "debian10", "distarch": "x86_64", "target_arch": "x86_64" Step 3: Configure MongoDB Verify if the service is running: $ systemctl status mongod ● mongod.service - MongoDB Database Server Loaded: loaded (/lib/systemd/system/mongod.service; enabled; vendor preset: enabled) Active: active (running) since Sat 2021-08-21 07:49:24 EDT; 39s ago Docs: https://docs.mongodb.org/manual Main PID: 5029 (mongod) Memory: 71.4M CGroup: /system.slice/mongod.service └─5029 /usr/bin/mongod --config /etc/mongod.conf Aug 21 07:49:24 ns1.computingforgeeks.local systemd[1]: Started MongoDB Database Server. Aug 21 07:49:29 ns1.computingforgeeks.local systemd[1]: /lib/systemd/system/mongod.service:11: PIDFile= references path below legacy directory /var/run.... Secure MongoDB 5.0 Instance. After installation, the MongoDB database has no security, One can access it without a password and make undesired changes to your database. Therefore, we need to secure this database by creating a username and password. Connect to the database by issuing the code: $ mongo Then add a user named mongouser, remember you can change this name to your desired one. with the below script added, you are required to set a password for the user. use admin db.createUser( user: "mongouser", pwd: passwordPrompt(), // or cleartext password roles: [ role: "userAdminAnyDatabase", db: "admin" , "readWriteAnyDatabase" ] ) Sample output for the script. > use admin switched to db admin > db.createUser( ... ... user: "mongouser", ... pwd: passwordPrompt(), // or cleartext password ... roles: [ role: "userAdminAnyDatabase", db: "admin" , "readWriteAnyDatabase" ] ... ... ) Enter password: Successfully added user: "user" : "mongouser", "roles" : [ "role" : "userAdminAnyDatabase", "db" : "admin" , "readWriteAnyDatabase" ] > exit bye Next, edit the MongoDB configuration file and enable authentication. sudo apt install vim sudo vim /etc/mongod.conf In the file, find the #security line, uncomment it then add the authentication. Ensure you add double space before authorization since the syntax is very important here. Your file should appear as below. security: authorization: enabled For the changes made to apply, restart the MongoDB service. sudo systemctl restart mongod Now clients need to authenticate themselves to access the database. The syntax used is as below. mongo --port 27017 --authenticationDatabase "admin" -u "your-user" -p Step 4: Using MongoDB 5.0 on Debian MongoDB listens on a default port 27017. From the localhost connect to the created user using mongo -u mongouser -p --authenticationDatabase admin Enter the password you created earlier to connect to your database. There are a couple of things you can do while in the MongoDB shell. Among them are: List available databases in MongoDB. > db test Create a database in MongoDB. In MongoDB, database creation is done by switching to a non-existing database and specify the name of the database. The specified name becomes the name of the new database. Let us create a new database say mongotestdb use mongotestdb Sample Output: > use mongotestdb switched to db mongotestdb
> Create a collection in MongoDB Now you can add data to your database. Here we are creating a table for user details. db.userdetails.insertOne( "F_Name" : "fname", "L_NAME" : "lname", "ID_NO" : "12345", "AGE" : "19", "TEL" : "+254654671" ) Show collections/tables in MongoDB database: show collections Sample Output: > show collections userdetails > Create a User with read and write privileges. Here let us create a database testdatabase and assign read and write privileges to a given user let’s say testuser. use testdatabase Then assign permissions to the created database(testdatabase) db.createUser( user: 'testuser', pwd: 'P@ssWord', roles: [ role: 'readWrite', db: 'testdatabase' ] ); Use a specific database in MongoDB. In case you want to use a specific database in MongoDB, run the command. use database-name Create an admin for a specific database in MongoDB. Let us use the created database(testdatabase) use testdatabase Create an admin for the database. db.createUser( user: 'testadmin', pwd: 'P@ssW0rd', roles: [ role: 'userAdmin', db: 'testdatabase' ] ); Create an Overall Admin in MongoDB. This step will work if you didn’t create an overall admin at first. But in this guide, we already created an overall admin with the name monguser use newdatabase Assign privileges and a password as below. db.createUser( user: "Your Username", pwd: passwordPrompt(), // or cleartext password roles: [ role: "userAdminAnyDatabase", db: "newdatabase" , "readWriteAnyDatabase" ] ) Set your preferred password. Then you can connect to the user as we did earlier. Step 5: Change MongoDB default Path The default path used as a storage for MongoDB data is /var/lib/mongo. However, this directory can be altered as below. Stop the MongoDB service. sudo systemctl stop mongod.service 2. Create a new directory for MongoDB data. sudo mkdir -p /data/computingforgeeks/mongo Set the directory to be owned by MongoDB. sudo chown -R mongodb:mongodb /data/computingforgeeks/mongo 3. Copy contents to the new directory. Install Rsync using sudo apt install rsync sudo rsync -av /var/lib/mongodb /data/computingforgeeks/mongo 4. Rename the old directory for backup. sudo mv /var/lib/mongodb /var/lib/mongodb.bak 5. Create a symbolic link to the new location. sudo ln -s /data/computingforgeeks/mongo /var/lib/mongodb With these changes made, restart the MongoDB service. MongoDB will start using the new directory created to store its data. sudo systemctl start mongod.service Conclusion We have come to the end of this systematic illustration on how to install MongoDB 5.0 on Debian 11 / Debian 10. I have also demonstrated a few configurations and how to use MongoDB. I hope you found it significant.
0 notes
Text
Capture changes from Amazon DocumentDB via AWS Lambda and publish them to Amazon MSK
When using a document data store as your service’s source of truth, you may need to share the changes of this source with other downstream systems. The data events that are happening within this data store can be converted to business events, which can then be sourced into multiple microservices that implement different business functionalities. Capturing the changes from data sources is called change data capture (CDC); you can implement it in different ways by different data technologies. In the case of Amazon DocumentDB (with MongoDB compatibility), you can implement CDC via change streams functionality. This feature simplifies the process to listen to committed changes to documents in a set of collections in real time. The events are also time-ordered within a stream, which makes the stream a reliable mechanism for state replication scenarios. In this post, I show how you can capture changes from Amazon DocumentDB by using AWS Lambda implemented in NodeJS. After the Lambda function captures the change events, it publishes them to Amazon Managed Streaming for Apache Kafka (Amazon MSK). Architecture By completing the steps in this post, you can create a system that uses the architecture illustrated in the following image. The flow of events starts when we make changes within a collection residing in the Amazon DocumentDB database. As the changes arrive, Amazon DocumentDB copies them into a change stream dedicated to that collection. A Lambda function connects to this change stream and polls these events. After the function filters out events other than insert, update, and delete, it publishes them to a Kafka topic in an MSK cluster. A Lambda function is a stateless component, and it has a limited lifespan. Because the polling activity should be continuous, we need to run the Lambda function on a schedule. This architecture uses Amazon EventBridge to schedule the function to run every minute. In this sample architecture, each Lambda function triggered by the EventBridge engine connects to Amazon DocumentDB and watches for changes for a predefined time period (15 seconds in this case). At the end of each poll cycle, the function writes the last polled resume token to another collection in the same Amazon DocumentDB database. This checkpoint mechanism allows Lambda functions to resume the polling activity without needing to replay all the events from the beginning of the stream. This checkpointing mechanism should be in place even if we choose to use a long-running application using a virtual machine or container-based compute infrastructure. This is because if the underlying compute instance is restarted or scaled out, the new instance needs to have a starting point rather than process the whole history. A change stream can hold up to 7 days of information (determined by the change_stream_log_retention_duration parameter), which can translate to a significant number of change events for active applications. For this post, we use Amazon DocumentDB version 4.0. Deploy the stack To deploy the sample architecture into your AWS environment, we use an AWS Serverless Application Model (AWS SAM) template. The template creates the following resources in your account: An Amazon DocumentDB cluster (version 4.0) An MSK cluster A Lambda function (function-documentdb-stream-processor) that polls the change streams event from the Amazon DocumentDB cluster and publishes them to the MSK cluster An AWS Cloud9 environment, which allows you to configure source and destination systems and run your tests A VPC and subnets A NAT gateway and internet gateway Other supporting resources such as security groups and AWS Identity and Access Management (IAM) roles You will incur some costs after creating this environment. To start your deployment, clone the GitHub repository to your local machine and install and configure AWS SAM with a test IAM user. AWS SAM requires you to specify an Amazon Simple Storage Service (Amazon S3) bucket to hold the deployment artifacts. If you haven’t already created a bucket for this purpose, create one now. The bucket should be reachable by the IAM user you use for deploying AWS SAM packages. At the command line, navigate to the cloned GitHub repository’s folder and enter the following command to package the application: sam package --template template.yaml --output-template-file output_template.yaml --s3-bucket BUCKET_NAME_HERE Replace BUCKET_NAME_HERE with the name of the S3 bucket that holds the deployment artifacts. AWS SAM packages the application and copies it into the S3 bucket. When the AWS SAM package command finishes running, enter the following command to deploy the package: sam deploy --template-file output_template.yaml --stack-name Blogstack --capabilities CAPABILITY_IAM --parameter-overrides docDBUser=masterUsername docDBPass=masterPass docDBClusterName=docDBCluster mskClusterName=blog-msk-clstr In the preceding command, you can supply your own stack name by changing the stack-name parameter’s value. This template also allows you to provide the following input parameters and override their default values: docDBUser docDBPass docDBClusterName mskClusterName When you run this command, AWS SAM shows the progress of the deployment. The deployment takes around 15 minutes and creates a main stack and a dependent stack for the AWS Cloud9 environment in AWS CloudFormation. You can also track the overall deployment status on the AWS CloudFormation console. When the deployment is complete, AWS SAM outputs the following parameters, which you need while doing additional system configurations. These parameters are also available on the AWS CloudFormation console, on the Outputs tab of the deployed stack named Blogstack. Connecting to your AWS Cloud9 environment An AWS Cloud9 environment is created for you automatically when you deploy the AWS SAM package. You need to further provision this environment with MongoDB and Kafka command line tools. To start provisioning your AWS Cloud9 environment, follow the URL that was provided by the Cloud9URL output parameter of the deployed CloudFormation stack. When the environment starts, go to the terminal section. Configure Amazon DocumentDB You can now install mongo shell onto your AWS Cloud9 environment. Use the following commands in the terminal: echo -e "[mongodb-org-4.0] nname=MongoDB Repositorynbaseurl= https://repo.mongodb.org/yum/amazon/2013.03/mongodb-org/4.0/x86_64/ ngpgcheck=1 nenabled=1 ngpgkey= https://www.mongodb.org/static/pgp/server-4.0.asc" | sudo tee /etc/yum.repos.d/mongodb-org-4.0.repo sudo yum install -y mongodb-org-shell You also need Amazon DocumentDB CA certificates to connect to your cluster. Use the following command to download the certificate to the current folder (~/environment): wget https://s3.amazonaws.com/rds-downloads/rds-combined-ca-bundle.pem Enter the following command connect to your cluster: mongo --ssl --host DOCUMENTDB_CLUSTER_ENDPOINT_HERE:27017 --sslCAFile rds-combined-ca-bundle.pem --username DOCUMENTDB_USERNAME_HERE --password DOCUMENTDB_PASSWORD_HERE In the preceding command, provide the cluster endpoint of the Amazon DocumentDB cluster that was output from the AWS SAM installation. Also provide your username and password that you used during the sam deploy command. Create a database (blogdb): We create two collections in the database. The first collection is named blogcollection; we use it as the data source for the change stream integration. Use the following command to create the empty blogcollection: db.createCollection("blogcollection") Enable change stream on this collection by running the following adminCommand command: db.adminCommand({modifyChangeStreams: 1, database: "blogdb", collection: "blogcollection", enable: true}); You need to also enable change streams in the cluster’s parameter group before it can be used. You can enable Amazon DocumentDB change streams for all collections within a given database, or only for selected collections. We use the second collection, checkpoints, to store the checkpoint document that holds the last processed resume token: db.checkpoints.insert({_id: 1, checkpoint: 0}) You can now issue the exit command to exit the mongo shell and continue with the next step: exit Configure the MSK cluster To configure the MSK cluster, you need to install Kafka into your AWS Cloud9 environment. Use the following commands in your AWS Cloud9 terminal to download Kafka from the source, extract it, and navigate to the bin folder: wget https://apache.mirror.colo-serv.net/kafka/2.7.0/kafka_2.13-2.7.0.tgz tar -xzf kafka_2.13-2.7.0.tgz cd kafka_2.13-2.7.0/bin Kafka binaries we use in this post require Java 8 or later versions. Check your environment’s Java version with the following command: java -version If you see a version below 1.8, issue the below commands to upgrade it to Java 8. sudo yum -y install java-1.8.0-openjdk-devel sudo alternatives --config java Select the 1.8 versions from the list. Find the bootstrap servers of your MSK cluster: To find the bootstrap server hostnames for your MSK cluster, navigate to the Amazon MSK console and choose your cluster. In the Cluster summary pane on the Details tab, choose View client information and copy the bootstrap servers host/port pairs. Within Kafka installation’s bin directory, issue the following command to create a topic to hold the events published by function-documentdb-stream-processor: sudo ./kafka-topics.sh --create --topic blog-events --replication-factor 1 --partitions 1 --bootstrap-server MSK_BOOTSTRAP_SERVERS_HERE Replace MSK_BOOTSTRAP_SERVERS_HERE with the value of the host/port pairs from the previous step. Test the solution To test the setup from end to end, you need to open a second terminal in your AWS Cloud9 environment. On the Window menu, choose New Terminal. In the first terminal, make sure you’re in the bin folder of the Kafka installation and issue the following command to start listening to the records in the Kafka topic: sudo ./kafka-console-consumer.sh --topic blog-events --from-beginning --bootstrap-server MSK_BOOTSTRAP_SERVERS_HERE As before, provide the value of the bootstrap server host/port pairs. In the second terminal, use mongo shell to connect to the Amazon DocumentDB cluster the same way you did earlier. Issue the following command to insert a document into blogdb.blogcollection: use blogdb; db.blogcollection.insert({"title" : "Blog Title 1"}) Add another document with the following command: db.blogcollection.insert({"title" : "Blog Title 2"}) In the first terminal, observe the changes on the Kafka topic as you add different documents to the collection. Cleanup To clean up the resources you used in your account, delete the stack from the AWS CloudFormation console. You can also delete the bucket you used for packaging and deploying the AWS SAM application. Conclusion This architecture shows how to capture state changes from Amazon DocumentDB via its change streams functionality and send them to Amazon MSK. You can adapt similar architectures to apply to other use cases, such as query segregation, event sourcing, data duplication, and more. For more information about the stream’s functionality and other integrations, see Run full text search queries on Amazon DocumentDB (with MongoDB compatibility) data with Amazon Elasticsearch Service and Using Change Streams with Amazon DocumentDB. If you have any questions or comments about this post, please share them in the comments. If you have any feature requests for Amazon DocumentDB, email us at [email protected] About the author Murat Balkan is an AWS Solutions Architect based in Toronto. He helps customers across Canada to transform their businesses and build industry leading solutions on AWS. https://aws.amazon.com/blogs/database/capture-changes-from-amazon-documentdb-via-aws-lambda-and-publish-them-to-amazon-msk/
0 notes
Text
MongoDB Certified DBA Associate C100DBA Exam Questions
If you are having problems in passing your C100DBA MongoDB Certified DBA Associate Exam. PassQuestion has the right solutions for you to pass your C100DBA Exam with confidence. PassQuestion MongoDB Certified DBA Associate C100DBA Exam Questions can make you successful obtain your MongoDB Certified DBA Associate certification. We provide you with the best MongoDB Certified DBA Associate C100DBA Exam Questions, covering the topics of the C100DBA certification exam. We offer MongoDB Certified DBA Associate C100DBA Exam Questions with different ways to let you easily understand the content and information of C100DBA Exam.
MongoDB Certified DBA Associate Level Exam is for administrators with knowledge of the concepts and mechanics of MongoDB. We recommend this certification for operations professionals who know the fundamentals and have some professional experience administering MongoDB.
Exam Format & Grading:
MongoDB certification exams are delivered online using a web proctoring solution. You have 90 minutes to complete an exam. Exam question types are multiple choice and check all that apply. There is no penalty for incorrect answers.
What are the Benefits?Rewards Badge
Increase the Value of Your Skills MongoDB ranks as one of the hottest job trends and one of the most highly compensated technology skills.
Travel Bag
Get Hired or Promoted Increase your visibility among hiring managers and recruiters.
User Programming
Demonstrate Professional Credibility Foster credibility with your employer and peers in the developer and operations communities.
Required MongoDB Knowledge
Philosophy & Features: performance, JSON, BSON, fault tolerance, disaster recovery, horizontal scaling, and the Mongo shell CRUD: Create, Read, Update, and Delete operations Indexing: single key, compound, multi-key, mechanics, and performance Replication: configuration, oplog concepts, write concern, elections, failover, and deployment to multiple data centers Sharding: components, when to shard, balancing, shard keys, and hashed shard keys Application Administration: data files, journaling, authentication, and authorization Server Administration: performance analysis, storage engines, diagnostics and debugging, maintenance, backup, and recovery
Required General IT Knowledge
Fundamental database concepts Fundamentals of system programming Basic JavaScript programming
View Online MongoDB Certified DBA Associate Exam C100DBA Free Questions
1. Which of the following node is used during election in a replication cluster? A. primary B. arbiter C. hidden D. secondary Answer: B
2. The________operator can be used to identify an element in the array to be updated without explicitly specifying the position of the element. A. Updating an array field without knowing its index is not possible. B. $ elemMatch C. $slice D. $ Answer: D
3. Which option should be used to update all the documents with the specified condition in the MongoDB query? A. updateAII instead of update B. specify {all: true} as the third parameter of update command C. specify {updateAII: true} as the third parameter of update command D. specify {multi : true} as the third parameter of update command Answer: D
4. What tool would you use if you want to save a gif file in mongo? Answer: mongofile
5. What does the totalKeysExamined field returned by the explain method indicate? A. Number of documents that match the query condition B. Number of index entries scanned C. Number of documents scanned D. Details the completed execution of the winning plan as a tree of stages Answer: B
0 notes
Text
How to get started with MongoDB: Beginner’s guide
MongoDB is a document-oriented NoSQL database used for high volume data storage. Instead of using tables and rows as in the traditional relational databases, it makes use of collections and documents. Documents consist of key-value pairs which are the basic unit of data in MongoDB. Also, collections contain sets of documents and functions which is the equivalent of relational database tables. MongoDB is a database that came into light around the mid-2000s.
Features
Each database contains collections which in turn contain documents. However, each document can be different with a varying number of fields. The size and content of each document can be different from each other.
Equally, the document structure is more in line with how developers construct their classes and objects in their respective programming languages. Developers will often say that their classes are not rows and columns but have a clear structure with key-value pairs.
The rows (or documents as called in MongoDB) don’t need to have a schema defined beforehand. Instead, the fields can create on the fly.
The data model available within MongoDB allows you to represent hierarchical relationships. To store arrays, and other more complex structures more easily.
Scalability – The MongoDB environments are very scalable. Companies across the world have defined clusters with some of them running 100+ nodes. With millions of documents within the database approximately.
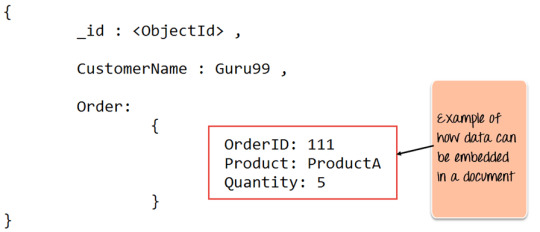
Example
The _id field added by it to uniquely identify the document in the collection.
What you can note is that the Order Data (OrderID, Product, and Quantity ). Which in RDBMS will normally store in a separate table. While in MongoDB it is actually stored as an embedded document in the collection itself. This is one of the key differences in how data modeled in MongoDB.
Key Components of MongoDB Architecture

_id – This field required in every MongoDB document. The _id field represents a unique value in it document. It is like the document’s primary key. If you create a new document without an _id field then it will automatically create the field. So for example, if we see the example of the above customer table, Mongo DB will add a 24 digit unique identifier to each document in the collection.
Collection – This is a grouping of MongoDB documents. A collection is the equivalent of a table. Which created in any other RDMS such as Oracle or MS SQL. A collection exists within a single database. But it doesn’t enforce any sort of structure.
Cursor – This is a pointer to the result set of a query. Clients can iterate through a cursor to retrieve results.
Database – This is a container for collections like in RDMS. Wherein it is a container for tables. Also, each database gets its own set of files on the file system. Surprisingly, A MongoDB server can store multiple databases.
Document – A record in a MongoDB collection basically called a document. The document will also consist of field names and values.
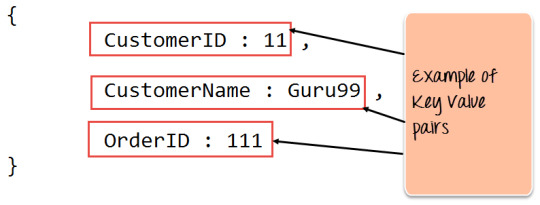
Field – A name-value pair in a document. A document has zero or more fields. Fields are analogous to columns in relational databases. The following diagram shows an example of Fields with Key-value pairs. So in the example below CustomerID and 11 is one of the key-value pair’s defined in the document.
JSON – This known as JavaScript Object Notation. It is a human-readable, plain text format for expressing structured data. JSON currently supported in many programming languages.
Just a quick note on the key difference between the _id field and a normal collection field. The _id field is used to uniquely identify the documents in a collection and is automatically added by MongoDB when the collection is created.
Why Use MongoDB?
Document-oriented – Since MongoDB is a NoSQL type database, instead of having data in a relational type format, it stores the data in documents. Hence, it makes MongoDB very flexible and adaptable to real business world situations and requirements.
Ad hoc queries – it supports search by field, range queries, and regular expression searches. And these queries can make to return specific fields within documents.
Indexing – Indexes can be created to improve the performance of searches within MongoDB. So, any field in its document can be indexed.
Replication – MongoDB can provide high availability with replica sets. And replica set consists of two or more mongo DB instances. Hence, each replica set member may act in the role of the primary or secondary replica at any time. Whereas the primary replica is the main server that interacts with the client and performs all the read/write operations. While the Secondary replicas maintain a copy of the data of the primary using built-in replication. When a primary replica fails, the replica set automatically switches over to the secondary, and then it becomes the primary server.
Load balancing – However, MongoDB uses the concept of sharding to scale horizontally by splitting data across multiple MongoDB instances. It can run over multiple servers, balancing the load and/or duplicating data to keep the system up and running in case of hardware failure.
Data Modelling in MongoDB
As we have seen from the Introduction section, the data in MongoDB has a flexible schema. Unlike in SQL databases, where you must have a table’s schema declared before inserting data, MongoDB’s collections do not enforce document structure. This sort of flexibility is what makes MongoDB so powerful.
When modeling data in Mongo, keep the following things in mind
What are the needs of the application – Look at the business needs of the application and see what data and the type of data needed for the application. Based on this, ensure that the structure of the document is decided accordingly.
What are data retrieval patterns – If you foresee a heavy query usage then consider the use of indexes in your data model to improve the efficiency of queries.
Are frequent inserts, updates, and removals happening in the database? Reconsider the use of indexes or incorporate sharding if required in your data modeling design to improve the efficiency of your overall MongoDB environment.
Difference between MongoDB & RDBMS
Below are some of the key term differences between MongoDB and RDBMS.
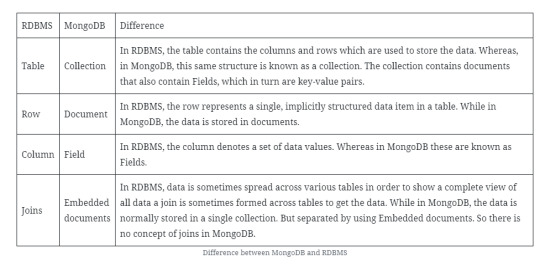
Apart from the terms differences, a few other differences listed below
Relational databases are also known for enforcing data integrity. Further, this is not an explicit requirement in MongoDB.
RDBMS requires that data be normalized first. So that it can prevent orphan records and duplicates Normalizing data then has the requirement of more tables, which will then result in more table joins, thus requiring more keys and indexes. If databases start to grow then performance can start becoming an issue. Also, this is not an explicit requirement in MongoDB. Because MongoDB is flexible and does not need the data to be normalized first.
In the worlds of JavaScript and Node.js, MongoDB has established itself as the go-to database.
#mongodb#database#database management#mysql#mongodb tutorial#rdbms#sql#trending#trends#webdesign#web developers#web development#web developing company#whitelion infosystems
0 notes
Photo

Local Authentication Using Passport in Node.js
A common requirement when building a web app is to implement a login system, so that users can authenticate themselves before gaining access to protected views or resources. Luckily for those building Node apps, there’s a middleware called Passport that can be dropped into any Express-based web application to provide authentication mechanisms in only a few commands.
In this tutorial, I’ll demonstrate how to use Passport to implement local authentication (that is, logging in with a username and password) with a MongoDB back end. If you’re looking to implement authentication via the likes of Facebook or GitHub, please refer to this tutorial.
As ever, all of the code for this article is available for download on GitHub.
Prerequisites
To follow along with this tutorial, you’ll need to have Node and MongoDB installed on your machine.
You can install Node by heading to the official Node download page and grabbing the correct binaries for your system. Alternatively, you can use a version manager — a program that allows you to install multiple versions of Node and switch between them at will. If you fancy going this route, please consult our quick tip, “Install Multiple Versions of Node.js Using nvm”.
MongoDB comes in various editions. The one we’re interested in is the MongoDB Community Edition.
The project’s home page has excellent documentation and I won’t try to replicate that here. Rather, I’ll offer you links to instructions for each of the main operating systems:
Install MongoDB Community Edition on Windows
Install MongoDB Community Edition on macOS
Install MongoDB Community Edition on Ubuntu
If you use a non-Ubuntu–based version of Linux, you can check out this page for installation instructions for other distros. MongoDB is also normally available through the official Linux software channels, but sometimes this will pull in an outdated version.
Note: You don’t need to enter your name and address to download MongoDB. If prompted, you can normally dismiss the dialog.
If you’d like a quick refresher on using MongoDB, check out our beginner’s guide, “An Introduction to MongoDB”.
Authentication Strategies: Session vs JWT
Before we begin, let’s talk briefly about authentication choices.
Many of the tutorials online today will opt for token-based authentication using JSON Web Tokens (JWTs). This approach is probably the simplest and most popular one nowadays. It relegates part of the authentication responsibility to the client and makes them sign a token that’s sent with every request, to keep the user authenticated.
Session-based authentication has been around longer. This method relegates the weight of the authentication to the server. It uses cookies and sees the Node application and database work together to keep track of a user’s authentication state.
In this tutorial, we’ll be using session-based authentication, which is at the heart of the passport-local strategy.
Both methods have their advantages and drawbacks. If you’d like to read more into the difference between the two, this Stack Overflow thread might be a good place to start.
Creating the Project
Once all of the prerequisite software is set up, we can get started.
We’ll begin by creating the folder for our app and then accessing that folder on the terminal:
mkdir AuthApp cd AuthApp
To create the node app, we’ll use the following command:
npm init
You’ll be prompted to provide some information for Node’s package.json. Just keep hitting Return to accept the default configuration (or use the -y flag).
Setting up Express
Now we need to install Express. Go to the terminal and enter this command:
npm install express
We’ll also need to install the body-parser middleware which is used to parse the request body that Passport uses to authenticate the user. And we’ll need to install the express-session middleware.
Let’s do that. Run the following command:
npm install body-parser express-session
When that’s done, create an index.js file in the root folder of your app and add the following content to it:
/* EXPRESS SETUP */ const express = require('express'); const app = express(); app.use(express.static(__dirname)); const bodyParser = require('body-parser'); const expressSession = require('express-session')({ secret: 'secret', resave: false, saveUninitialized: false }); app.use(bodyParser.json()); app.use(bodyParser.urlencoded({ extended: true })); app.use(expressSession); const port = process.env.PORT || 3000; app.listen(port, () => console.log('App listening on port ' + port));
First, we require Express and create our Express app by calling express(). Then we define the directory from which to serve our static files.
The next line sees us require the body-parser middleware, which will help us parse the body of our requests. We’re also adding the express-session middleware to help us save the session cookie.
As you can, see we’re configuring express-session with a secret to sign the session ID cookie (you should choose a unique value here), and two other fields, resave and saveUninitialized. The resave field forces the session to be saved back to the session store, and the saveUninitialized field forces a session that is “uninitialized” to be saved to the store. To learn more about them, check out their documentation, but for now it’s enough to know that for our case we want to keep them false.
Then, we use process.env.PORT to set the port to the environment port variable if it exists. Otherwise, we’ll default to 3000, which is the port we’ll be using locally. This gives you enough flexibility to switch from development, directly to a production environment where the port might be set by a service provider like, for instance, Heroku. Right below that, we called app.listen() with the port variable we set up and a simple log to let us know that it’s all working fine and on which port is the app listening.
That’s all for the Express setup. Now it’s on to setting up Passport.
Setting up Passport
First, we install Passport with the following command:
npm install passport
Then we need to add the following lines to the bottom of the index.js file:
/* PASSPORT SETUP */ const passport = require('passport'); app.use(passport.initialize()); app.use(passport.session());
Here, we require passport and initialize it along with its session authentication middleware, directly inside our Express app.
Creating a MongoDB Data Store
Since we’re assuming you’ve already installed Mongo, you should be able to start the Mongo shell using the following command:
mongo
Within the shell, issue the following command:
use MyDatabase;
This simply creates a datastore named MyDatabase.
Leave the terminal there; we’ll come back to it later.
Connecting Mongo to Node with Mongoose
Now that we have a database with records in it, we need a way to communicate with it from our application. We’ll be using Mongoose to achieve this. Why don’t we just use plain Mongo? Well, as the Mongoose devs like to say on their website:
writing MongoDB validation, casting and business logic boilerplate is a drag.
Mongoose will simply make our lives easier and our code more elegant.
Let’s go ahead and install it with the following command:
npm install mongoose
We’ll also be using passport-local-mongoose, which will simplify the integration between Mongoose and Passport for local authentication. It will add a hash and salt field to our Schema in order to store the hashed password and the salt value. This is great, as passwords should never be stored as plain text in a database.
Let’s install the package:
npm install passport-local-mongoose
Now we have to configure Mongoose. Hopefully you know the drill by now: add the following code to the bottom of your index.js file:
/* MONGOOSE SETUP */ const mongoose = require('mongoose'); const passportLocalMongoose = require('passport-local-mongoose'); mongoose.connect('mongodb://localhost/MyDatabase', { useNewUrlParser: true, useUnifiedTopology: true }); const Schema = mongoose.Schema; const UserDetail = new Schema({ username: String, password: String }); UserDetail.plugin(passportLocalMongoose); const UserDetails = mongoose.model('userInfo', UserDetail, 'userInfo');
Here we require the previously installed packages. Then we connect to our database using mongoose.connect and give it the path to our database. Next, we’re making use of a Schema to define our data structure. In this case, we’re creating a UserDetail schema with username and password fields.
Finally, we add passportLocalMongoose as a plugin to our Schema. This will work part of the magic we talked about earlier. Then, we create a model from that schema. The first parameter is the name of the collection in the database. The second one is the reference to our Schema, and the third one is the name we’re assigning to the collection inside Mongoose.
That’s all for the Mongoose setup. We can now move on to implementing our Passport strategy.
Implementing Local Authentication
And finally, this is what we came here to do! Let’s set up the local authentication. As you’ll see below, we’ll just write the code that will set it up for us:
/* PASSPORT LOCAL AUTHENTICATION */ passport.use(UserDetails.createStrategy()); passport.serializeUser(UserDetails.serializeUser()); passport.deserializeUser(UserDetails.deserializeUser());
There’s quite some magic going on here. First, we make passport use the local strategy by calling createStrategy() on our UserDetails model — courtesy of passport-local-mongoose — which takes care of everything so that we don’t have to set up the strategy. Pretty handy.
Then we’re using serializeUser and deserializeUser callbacks. The first one will be invoked on authentication, and its job is to serialize the user instance with the information we pass on to it and store it in the session via a cookie. The second one will be invoked every subsequent request to deserialize the instance, providing it the unique cookie identifier as a “credential”. You can read more about that in the Passport documentation.
Routes
Now let’s add some routes to tie everything together. First, we’ll add a final package. Go to the terminal and run the following command:
npm install connect-ensure-login
The connect-ensure-login package is middleware that ensures a user is logged in. If a request is received that is unauthenticated, the request will be redirected to a login page. We’ll use this to guard our routes.
Now, add the following to the bottom of index.js:
/* ROUTES */ const connectEnsureLogin = require('connect-ensure-login'); app.post('/login', (req, res, next) => { passport.authenticate('local', (err, user, info) => { if (err) { return next(err); } if (!user) { return res.redirect('/login?info=' + info); } req.logIn(user, function(err) { if (err) { return next(err); } return res.redirect('/'); }); })(req, res, next); }); app.get('/login', (req, res) => res.sendFile('html/login.html', { root: __dirname }) ); app.get('/', connectEnsureLogin.ensureLoggedIn(), (req, res) => res.sendFile('html/index.html', {root: __dirname}) ); app.get('/private', connectEnsureLogin.ensureLoggedIn(), (req, res) => res.sendFile('html/private.html', {root: __dirname}) ); app.get('/user', connectEnsureLogin.ensureLoggedIn(), (req, res) => res.send({user: req.user}) );
At the top, we’re requiring connect-ensure-login. We’ll come back to this later.
Next, we set up a route to handle a POST request to the /login path. Inside the handler, we use the passport.authenticate method, which attempts to authenticate with the strategy it receives as its first parameter — in this case local. If authentication fails, it will redirect us to /login, but it will add a query parameter — info — that will contain an error message. Otherwise, if authentication is successful, it will redirect us to the '/' route.
Then we set up the /login route, which will send the login page. For this, we’re using res.sendFile() and passing in the file path and our root directory, which is the one we’re working on — hence the __dirname.
The /login route will be accessible to anyone, but our next ones won’t. In the / and /private routes we’ll send their respective HTML pages, and you’ll notice something different here. Before the callback, we’re adding the connectEnsureLogin.ensureLoggedIn() call. This is our route guard. Its job is validating the session to make sure you’re allowed to look at that route. Do you see now what I meant earlier by “letting the server do the heavy lifting”? We’re authenticating the user every single time.
Finally, we’ll need a /user route, which will return an object with our user information. This is just to show you how you can go about getting information from the server. We’ll request this route from the client and display the result.
Talking about the client, let’s do that now.
The post Local Authentication Using Passport in Node.js appeared first on SitePoint.
by Paul Orac via SitePoint https://ift.tt/2x1XofL
0 notes
Text
300+ TOP MongoDB Interview Questions and Answers
MongoDB Interview Questions for freshers experienced :-
1. What is MongoDB? Mongo-DB is a document database which provides high performance, high availability and easy scalability. 2. Which are the different languages supported by MongoDB? MonggoDB provides official driver support for C, C++, C#, Java, Node.js, Perl, PHP, Python, Ruby, Scala, Go and Erlang. You can use MongoDB with any of the above languages. There are some other community supported drivers too but the above mentioned ones are officially provided by MongoDB. 3. What are the different types of NoSQL databases? Give some example. NoSQL database can be classified as 4 basic types: Key value store NoSQL database Document store NoSQL database Column store NoSQL database Graph base NoSQL databse There are many NoSQL databases. MongoDB, Cassandra, CouchBD, Hypertable, Redis, Riak, Neo4j, HBASE, Couchbase, MemcacheDB, Voldemort, RevenDB etc. are the examples of NoSQL databases. 4. Is MongoDB better than other SQL databases? If yes then how? MongoDB is better than other SQL databases because it allows a highly flexible and scalable document structure. For example: One data document in MongoDB can have five columns and the other one in the same collection can have ten columns. MongoDB database are faster than SQL databases due to efficient indexing and storage techniques. 5. What type of DBMS is MongoDB? MongoDB is a document oriented DBMS 6. What is the difference between MongoDB and MySQL? Although MongoDB and MySQL both are free and open source databases, there is a lot of difference between them in the term of data representation, relationship, transaction, querying data, schema design and definition, performance speed, normalization and many more. To compare MySQL with MongoDB is like a comparison between Relational and Non-relational databases. 7. Why MongoDB is known as best NoSQL database? MongoDb is the best NoSQL database because, it is: Document Oriented Rich Query language High Performance Highly Available Easily Scalable 8. Does MongoDB support primary-key, foreign-key relationship? No. By Default, MongoDB doesn't support primary key-foreign key relationship. 9. Can you achieve primary key - foreign key relationships in MongoDB? We can achieve primary key-foreign key relationship by embedding one document inside another. For example: An address document can be embedded inside customer document. 10. Does MongoDB need a lot of RAM? No. There is no need a lot of RAM to run MongoDB. It can be run even on a small amount of RAM because it dynamically allocates and de-allocates RAM according to the requirement of the processes.

MongoDB Interview Questions 11. Explain the structure of ObjectID in MongoDB. ObjectID is a 12-byte BSON type. These are: 4 bytes value representing seconds 3 byte machine identifier 2 byte process id 3 byte counter 12. Is it true that MongoDB uses BSON to represent document structure? Yes. 13. What are Indexes in MongoDB? In MondoDB, Indexes are used to execute query efficiently. Without indexes, MongoDB must perform a collection scan, i.e. scan every document in a collection, to select those documents that match the query statement. If an appropriate index exists for a query, MongoDB can use the index to limit the number of documents it must inspect. 14. By default, which index is created by MongoDB for every collection? By default, the_id collection is created for every collection by MongoDB. 15. What is a Namespace in MongoDB? Namespace is a concatenation of the database name and the collection name. Collection, in which MongoDB stores BSON objects. 16. Can journaling features be used to perform safe hot backups? Yes. 17. Why does Profiler use in MongoDB? MongoDB uses a database profiler to perform characteristics of each operation against the database. You can use a profiler to find queries and write operations 18. If you remove an object attribute, is it deleted from the database? Yes, it be. Remove the attribute and then re-save(. the object. 19. In which language MongoDB is written? MongoDB is written and implemented in C++. 20. Does MongoDB need a lot space of Random Access Memory (RAM)? No. MongoDB can be run on small free space of RAM. 21. What language you can use with MongoDB? MongoDB client drivers supports all the popular programming languages so there is no issue of language, you can use any language that you want. 22. Does MongoDB database have tables for storing records? No. Instead of tables, MongoDB uses "Collections" to store data. 23. Do the MongoDB databases have schema? Yes. MongoDB databases have dynamic schema. There is no need to define the structure to create collections. 24. What is the method to configure the cache size in MongoDB? MongoDB's cache is not configurable. Actually MongoDb uses all the free spaces on the system automatically by way of memory mapped files. 25. How to do Transaction/locking in MongoDB? MongoDB doesn't use traditional locking or complex transaction with Rollback. MongoDB is designed to be light weighted, fast and predictable to its performance. It keeps transaction support simple to enhance performance. 26. Why 32 bit version of MongoDB are not preferred ? Because MongoDB uses memory mapped files so when you run a 32-bit build of MongoDB, the total storage size of server is 2 GB. But when you run a 64-bit build of MongoDB, this provides virtually unlimited storage size. So 64-bit is preferred over 32-bit. 27. Is it possible to remove old files in the moveChunk directory? Yes, These files can be deleted once the operations are done because these files are made as backups during normal shard balancing operation. This is a manual cleanup process and necessary to free up space. 28. What will have to do if a shard is down or slow and you do a query? If a shard is down and you even do query then your query will be returned with an error unless you set a partial query option. But if a shard is slow them Mongos will wait for them till response. 29. Explain the covered query in MongoDB. A query is called covered query if satisfies the following two conditions: The fields used in the query are part of an index used in the query. The fields returned in the results are in the same index. 30. What is the importance of covered query? Covered query makes the execution of the query faster because indexes are stored in RAM or sequentially located on disk. It makes the execution of the query faster. Covered query makes the fields are covered in the index itself, MongoDB can match the query condition as well as return the result fields using the same index without looking inside the documents. 31. What is sharding in MongoDB? In MongoDB, Sharding is a procedure of storing data records across multiple machines. It is a MongoDB approach to meet the demands of data growth. It creates horizontal partition of data in a database or search engine. Each partition is referred as shard or database shard. 32. What is replica set in MongoDB? A replica can be specified as a group of mongo instances that host the same data set. In a replica set, one node is primary, and another is secondary. All data is replicated from primary to secondary nodes. 33. What is primary and secondary replica set in MongoDB? In MongoDB, primary nodes are the node that can accept write. These are also known as master nodes. The replication in MongoDB is single master so, only one node can accept write operations at a time. Secondary nodes are known as slave nodes. These are read only nodes that replicate from the primary. 34. By default, which replica sets are used to write data? By default, MongoDB writes data only to the primary replica set. 35. What is CRUD in MongoDB? MongoDB supports following CRUD operations: Create Read Update Delete 36. In which format MongoDB represents document structure? MongoDB uses BSON to represent document structures. 37. What will happen when you remove a document from database in MongoDB? Does MongoDB remove it from disk? Yes. If you remove a document from database, MongoDB will remove it from disk too. 38. Why are MongoDB data files large in size? MongoDB doesn't follow file system fragmentation and pre allocates data files to reserve space while setting up the server. That's why MongoDB data files are large in size. 39. What is a storage engine in MongoDB? A storage engine is the part of a database that is used to manage how data is stored on disk. For example: one storage engine might offer better performance for read-heavy workloads, and another might support a higher-throughput for write operations. 40. Which are the storage engines used by MongoDB? MMAPv1 and WiredTiger are two storage engine used by MongoDB. 41. What is the usage of profiler in MongoDB? A database profiler is used to collect data about MongoDB write operations, cursors, database commands on a running mongod instance. You can enable profiling on a per-database or per-instance basis. The database profiler writes all the data it collects to the system. profile collection, which is a capped collection. 42. Is it possible to configure the cache size for MMAPv1 in MongoDB? No. it is not possible to configure the cache size for MMAPv1 because MMAPv1 does not allow configuring the cache size. 43. How to configure the cache size for WiredTiger in MongoDB? For the WiredTiger storage engine, you can specify the maximum size of the cache that WiredTiger will use for all data. This can be done using storage.wiredTiger.engineConfig.cacheSizeGB option. 44. How does MongoDB provide concurrency? MongoDB uses reader-writer locks for concurrency. Reader-writer locks allow concurrent readers shared access to a resource, such as a database or collection, but give exclusive access to a single write operation. 45. What is the difference between MongoDB and Redis database? Difference between MongoDB and Redis: Redis is faster than MongoDB. Redis has a key-value storage whereas MongoDB has a document type storage. Redis is hard to code but MongoDB is easy. 46. What is the difference between MongoDB and CouchDB? Difference between MongoDB and CouchDB: MongoDB is faster than CouchDB while CouchDB is safer than MongoDB. Triggers are not available in MongoDB while triggers are available in CouchDB. MongoDB serializes JSON data to BSON while CouchDB doesn't store data in JSON format. 47. What is the difference between MongoDB and Cassandra? Difference between MongoDB and Cassandra: MongoDB is cross-platform document-oriented database system while Cassandra is high performance distributed database system. MongoDB is written in C++ while Cassandra is written in Java. MongoDB is easy to administer in the case of failure while Cassandra provides high availability with no single point of failure. 48. Is there any need to create database command in MongoDB? You don't need to create a database manually in MongoDB because it creates automaically when you save the value into the defined collection at first time. 49. What do you understand by NoSQL databases? Is MongoDB a NoSQL database? explain. At the present time, the internet is loaded with big data, big users, big complexity etc. and also becoming more complex day by day. NoSQL is answer of all these problems, It is not a traditional database management system, not even a relational database management system (RDBMS). NoSQL stands for "Not Only SQL". NoSQL is a type of database that can handle and sort all type of unstructured, messy and complicated data. It is just a new way to think about the database. Yes. MongoDB is a NoSQL database. MongoDB Questions and Answers Pdf Download Read the full article
0 notes
Photo
Ant Media Serverを用いてWebRTCによる超低遅延ストリーミング配信 https://ift.tt/2oPfAVf
入社して3ヶ月半しか経っていないのに体重が6キロも増えてしまいました。幸せ太りなのでしょうか。どうも、streampackのfadoです。最近AWS Elementalのセミナーなどで新しい技術を学ぶ機会も増えてきてWebRTCについても触る機会がありましたので簡単ではありますがそれについて記事を書きたいと思います。
WebRTCとは
ウェブブラウザー上で専用プラグイン等がなくてもリアルタイムコミュニケーションを可能にする仕様です。
年々に仕様が改善されていき、注目度の高い技術です。
オープンソースプロジェクトでGoogle,Mozilla,Operaなどにサポートされています。
基本的に通信プロトコルはリアルタイム性を実現させるためTCP/IPではなくUDP/IPを採用しています。
注意事項
Ant Media Server Enterpriseは料金がかかりますがFree trialで5日間無料お試し頂けます。
こちらの手順はAWSアカウントをお持ちの方をターゲットにしています。
機能検証のため、推奨されているMongoDBのインスタンスタイプと全体構成をなるべく最小限にしています。
m5.2xlarge (Edge/Origin) , t2.micro (mongoDB)
Auto Scaling機能は利用していません。
EdgeとOriginサーバーに関してはt系ですとCPUクレジットの枯渇に陥る可能性があるため使いません。
構築環境
AWS環境でAnt Media Serverを構築します。
https://antmedia.io/scalable-ultra-low-latency-streaming-service-on-aws/
Ant Media社が記載してくれた記事を参考に手順を説明していきます。
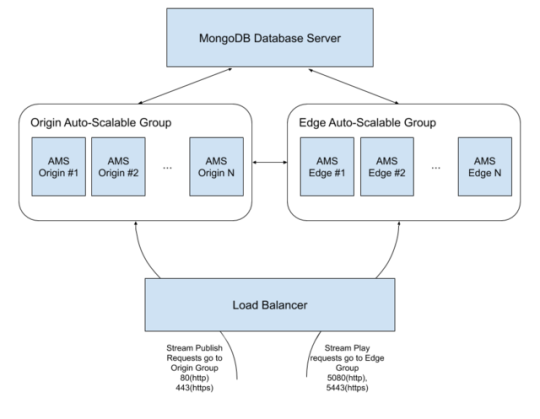
構成
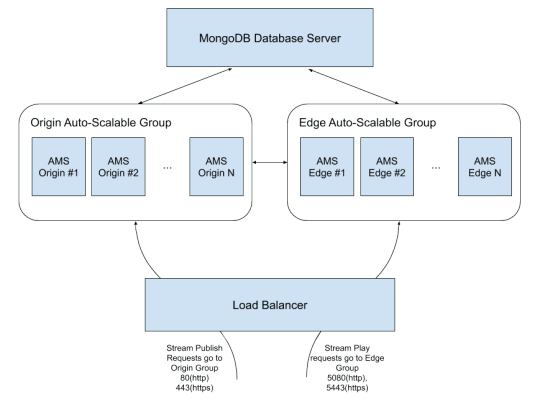
出典:https://antmedia.io/scalable-ultra-low-latency-streaming-service-on-aws/
OriginとEdgeサーバーはクラスター構成となっています。
リソース概要
ALB:パブリッシャーとプレイヤーからの接続を受け付けて、該当のターゲットグループにルーティングをさせます。
Originサーバー(パブリッシャー):パブリッシュのリクエストを受け付けます。WebRTCストリームが入ってきたらストリーム情報をMongoDBサーバーに格納します。
Edgeサーバー(プレイヤー):ストリーミングの視聴リクエストを受け付けます。該当するストリーム情報をMongoDBサーバーから参照し、Originサーバーからのストリームをプレイヤーに返します。
MongoDBサーバー :Originサーバーからのストリーム情報を格納し、必要に応じてEdgeサーバーにその情報を提供します。
リソースのセットアップ
■MongoDBサーバー 1. AWSマネジメントコンソールからAMIとしてUbuntu 16.04を選択します。 2. ディスク容量はデフォルトの8GBにします。 3. セキュリティグループは Inbound 22(tcp) と 27017(tcp)を許可。ソースは対象VPCにします。 4. インスタンスへのログインが確認できたら、下記コマンドを実行し、MongoDBをインストールします。
$ sudo apt-key adv --keyserver hkp://keyserver.ubuntu.com:80 --recv 9DA31620334BD75D9DCB49F368818C72E52529D4 $ echo "deb [ arch=amd64,arm64 ] https://repo.mongodb.org/apt/ubuntu xenial/mongodb-org/4.0 multiverse" | sudo tee /etc/apt/sources.list.d/mongodb-org-4.0.list $ sudo apt-get update $ sudo apt-get install -y mongodb-org
/etc/mongod.confのbind_ipの値を 0.0.0.0 に変更します。
MongoDBプロセスをrestartします。起動時にプロセスが立ち上がるように設定します。
sudo service mongod restart sudo systemctl enable mongod.service
MongoDBサーバーのセットアップはこれで完了です。
■Originサーバー 1. AWS MarketplaceよりAnt Media Server EnterpriseのAMIを選択します。 2. インスタンスタイプは推奨されているm5.2xlargeにします。 3. 「高度な設定」→ユーザーデーターの欄には下記行を追加します。 {MongoIP}は先ほど設定したMongoDBのプライベートIPに設定します。
#!/bin/bash cd /usr/local/antmedia ./change_server_mode.sh cluster {MongoIP}
1.セキュリテイグルーブはAMIデフォルトの設定に加えて、Inbound 5000 – 65000(tcp)を許可する必要があります。これはOrigin/edgeの間のreplicationにtcpプロトコルが使われるからです。
■Edgeサーバー 先ほどのOriginサーバーと同じ設定にします。
■ALB 1. Edgeサーバー用とOriginサーバー用1個ずつTargetグループを作成します。 2. リスナーは下記のように設定します。 http: 80 と http:5080 転送先:Originサーバー用ターゲットグループ https: 443 と https:5443 転送先:Edgeサーバー用ターゲットグループ
管理画面へのログイン
https://{ALBのドメイン名}/
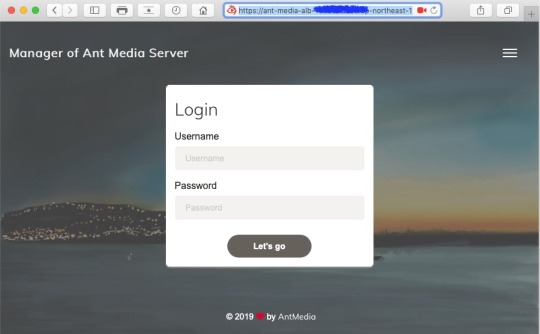
ユーザー名:JamesBond (default) パスワード:インスタンス ID (Originサーバー)
インスタンス IDはMongoDBサーバーにて下記コマンドで確認することも可能です。password フィールドをご参照下さい。
$ mongo > use serverdb > db.User.find()
{ "_id" : ObjectId("5d31612a4c79142df7c71914"), "className" : "io.antmedia.rest.model.User", "email" : "JamesBond", "password" : "i-1234567890abcdef0", "userType" : "ADMIN" }
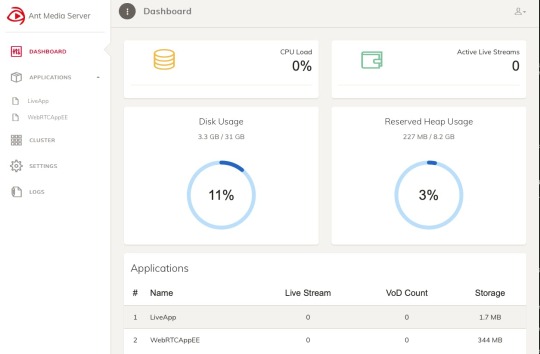
ログイン後の画面は下記の通りです。各項目についてのご説明は今回は省かせていただきます。
WebRTCストリーミング配信のテスト
■ストリーミングのパブリッシュのテスト
https://ALBのドメイン名/WebRTCAppEE/
の「Start Publishing」で配信を開始できます。デフォルトストリーム名は stream1 です。
■ストリーミングの視聴のテスト
https://ALBのドメイン名:5443/WebRTCAppEE/player.html
の「Start Playing」で配信の視聴が可能です。
結果

検証ではWebRTC配信で0.5秒未満の超低遅延を実現できました。
Auto Scaling機能と組み合わせればより耐障害性と可用性を高めることができます。
配信できるまでセットアップのハードルはそんなに高くないと感じました。
便利な世の中になりました。
備考
OriginとEdgeサーバーはCPUリソースを消費してしまうためインスタンスタイプのmシリーズよりもcシリーズが推奨されています。
Ant Media Serverはあの有名なRed5から派生し、Java,C,C++で開発されています。
英語のみとなってしまいますがAnt Media社のサポートチームの対応はかなり早いです。
参考文献
https://webrtc.org/ https://antmedia.io/scalable-ultra-low-latency-streaming-service-on-aws/ https://qiita.com/daitasu/items/ae21b16361eb9f65ed43 https://ja.wikipedia.org/wiki/WebRTC
元記事はこちら
「Ant Media Serverを用いてWebRTCによる超低遅延ストリーミング配信」
October 01, 2019 at 04:00PM
0 notes
Link
Complete guide to MongoDB ##CouponUdemygratuit ##UdemyOnlineCourse #Complete #Guide #MongoDb Complete guide to MongoDB In This Course together we will learn about MongoDB starting from the basic concepts of NoSQL databases, Mongo basic Components, Mongo Development Tasks, and MongoDB Administration Tasks, all this through hands-on labs and exercises. At the end of the course you will be familiar with different aspects of MongoDB development , MongoDB Administration, and you will be able to start your applications development MongoDB. In This Course you will learn the following: Install and setup Mongo in your machine Manage your Mongo server Manage Mongo Database and collections different CRUD operations on Mongo Documents Mongo modifiers how to query your documents in Mongo how to model your data in Mongo Interface mongo with Python to use in your python applications Administration tasks in Mongo Servers Create Replication to protect your data and applications from failures Who this course is for: Data Scientists Data Engineers Big Data Developers Anyone who wants to learn MongoDB 👉 Activate Udemy Coupon 👈 Free Tutorials Udemy Review Real Discount Udemy Free Courses Udemy Coupon Udemy Francais Coupon Udemy gratuit Coursera and Edx ELearningFree Course Free Online Training Udemy Udemy Free Coupons Udemy Free Discount Coupons Udemy Online Course Udemy Online Training 100% FREE Udemy Discount Coupons https://www.couponudemy.com/blog/complete-guide-to-mongodb/
0 notes
Link
"Scaling your Mongo instance is frequently needed and there are various methods you can use to improve scalability on your system which includes sharding and replication. Each of these allows you to spread your database across different servers but they work differently". Reblog with caption 🙃
#angularjs tutorials#advance angularjs tutorials#advance nodejs tutorials#nodejs tutorials#mongodb tutorials#reactjs tutorials#vuejs tutorials#emberjs tutorials#meteorjs tutorials#html5 tutorials#css tutorials#node
0 notes
Video
youtube
Flash Gordon Classic
Flash Gordon Classic is a 2015 animated fan film made by Robb Pratt. It is a remake of "The Tunnel of Terror", the second episode of the 1936 Flash Gordon serial.
Star quarterback Flash Gordon and his girlfriend Dale Arden are kidnapped by scientist Hans Zarkov and forced to join him on an intergalactic voyage to the planet Mongo. There, the trio are quickly captured by the forces of Ming the Merciless. As Ming holds Dale captive, he sends Flash and Zarkov into the Tunnel of Terror, where they must engage in a gladiatorial battle against a giant monster. Flash uses a stone like a football to fend off the monster, but as it has him pinned to the ground with its claw, Princess Aura throws a ray gun, which Flash uses to kill the monster. Ming calmly reprimands his daughter for her actions, but she insists for him to keep Flash alive for her.
Eric Johnson as Flash Gordon
Joe Whyte as Hans Zarkov
G.K. Bowes as Dale Arden
John Newton as Ming the Merciless
Jennifer Newton as Princess Aura
In creating Flash Gordon Classic, Robb Pratt drew inspiration from the 1930s Flash Gordon serial starring Buster Crabbe after learning of it as one of the major influences behind Star Wars. Realizing he could not replicate Alex Raymond's elaborate artwork from the comics, Pratt based his designs on 1940s science fiction pulp magazines. Like Pratt's previous works, Superman Classic and Bizarro Classic, Flash Gordon Classic uses hand-drawn animation with digital paint and effects. The soundtrack consists of Clifford Vaughan's score from the Flash Gordon serials and Heinz Roemheld's score from the 1934 film The Black Cat.
Eric Johnson, who played the title character in the 2007 Flash Gordon TV series, loosely reprises his role in this short film. This also marks Pratt's third consecutive collaboration with John Newton and wife Jennifer, who play Ming the Merciless and Princess Aura, respectively.
#Flash Gordon#Ming the Merciless#Robb Pratt#Flash Gordon Classic#Buster Crabbe#Eric Johnson#Dale Arden
3 notes
·
View notes