#rpmbuild
Explore tagged Tumblr posts
Visit Tumblr Blog
Explore Tumblr blogs with no restrictions, modern design and the best experience.
Last Seen Tumblr Blogs


Fun Fact
In 2020, Tumblr had 29.4 million users in the US.
Note
slurm is easy once you get the hang of it, but training seminars etc are always damn near useless because they're written by folks with the worst communication skills ever and for some reason they're always directed at people who are borderline fucking technologically illiterate. I think that computing centers (rightfully) assume that once you can figure out how to run sbatch, sinfo, and scancel then you'll just go directly to the documentation for slurm to figure the rest out.
The first like two days of the training where entirely based on the user experience and the dude was like "so how are you guys submitting your jobs?"
"I never have and probably never will submit jobs"
"Oh so you guys are administrators"
"Yeah.."
But yeah, there was some shit he brought up that he said straight up was not in any of their documentation and I wanted to strangle him. Like write it down dude!!
The actual installation through rpmbuild with the specific modules isn't really that difficult, like getting a version with RestAPI enabled for a workflow management software some of the researchers need. My last lab we used MOAB w/ torque and pbs and I basically never needed to reconfigure that scheduler at all for the researchers other than building the sql db for it.
Honestly incredibly surprised someone that follows me is familiar with slurm, I have such a small amount of people I can talk about HPC with lol
#didn't help that all his questions were based on frontier despite like maybe ONE of us works on it and it ain't me!#though tbh I didn't realize frontier and summit were completely different departments than the one I landed in
0 notes
Note
akuse! on github. honestly i only use it for older anime which i cant source copies of both online and offline. really curious about the sources they use bc i searched extensively for some anime online and couldnt find it for years and they just. HAVE it. they dont have any appimages just a linux guide on how to build it yourself with the terminal. there's not that many steps but i'm so scared of messing up
hi. I went and looked at this github project the second I saw this ask & immediately went "OH I SEE" because oh my god the technical writing skills on display in that readme file are . let's call the overall effect "confusing". let's describe this situation like "the dev could follow the trail of breadcrumbs they left in there & they figured that pretty much was good enough." many such cases unfortunately but I THINK I have decoded it now.
here is what you're gonna do:
1. where it says "code" on the project page, click on that & yoink the zip file. you do not need to learn git today, so don't worry about "cloning" it. just download it.

(that green fucker on the right.)
2. extract it. put the extracted folder wherever. I have a folder in my "home" directory called "Programz" where I put oddball stuff like this because it makes it easy to find later.
3. MAKE / LOG INTO AN ANILIST ACCOUNT, THEN go to the "developer settings" page they link in the readme file without telling you what it is (which redirects you unhelpfully to the homepage if you're not logged in. jesus christ)
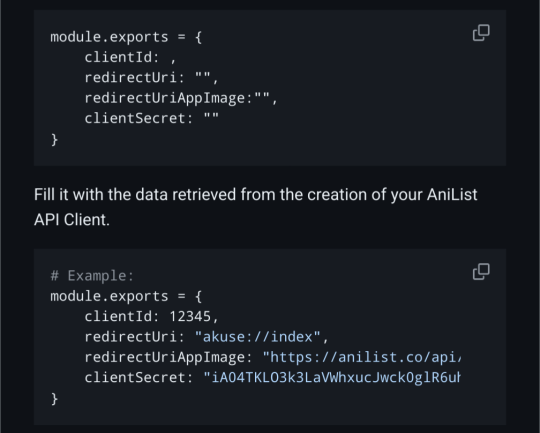
4. I cannot see the form for this because I didn't try it myself, but you want to "create a new anilist API client." find whatever button does that. When you do that, there should be a "redirect URI" field. put "akuse://index,https://anilist.co/api/v2/oauth/pin" in it.
5. in the folder you extracted, go to the "src" subfolder and then the "modules" subfolder. make a new file in there called "clientData.js"
6. the readme explains this part okay. open clientData.js and put this stuff in it.
7. open your package manager. you are going to search for 3 different things, and if any of them aren't installed, you're going to install them and any dependencies the package manager says you should also install. search for: npm, libcrypt, and rpmbuild.
8. now I am going to tell you to open a terminal window. inside the modules folder*, right-click and there should be a menu item that says "open terminal here". do that. then, in the terminal, type "npm run dist:linux rpm" and hit enter. (*I THINK? if this doesnt work try the top level folder maybe. it won't explode if you do it wrong just try stuff)
Theoretically, this should generate some kind of Something that you can run like you would run akuse on your Windows machine! I didn't get a chance to step through this process, so it's possible I am fucking something up, but I hope these instructions are at least clearer than whatever's going on in that readme file. it's worth a shot!
If you try this and it breaks down along the way somewhere, you are so totally welcome to report back here & tell me about it if you feel like it. maybe I can help! maybe I can't help but having an outlet to go "hey what the fuck" at will be nice for you anyway. either way this is awesome enrichment for me thank u
(& also I would like to thank minecraft modders for being the worst ever at documentation, instructions, and all related topics, because had I not been tried in those fires I would not be able to read shit like this at all.)
#linuxes#I think there's like an emp generator built into github that disables the part of people's brains that knows what instructions are#the second you start typing in that readme.md you black out and when you're done it says 'waga baba bobo'. and you're like 'sounds good'#every time. every fucking time. it's a miracle I can remember how to make revanced work
1 note
·
View note
Text
Unrelated: today I cracked up, again, at an rpmbuild warning that says "you're only using the regular magic file".
I love people who have fun at work, and still get it done.
I have become known at my library as the dude who knows how to deal with computers. I’m not in IT, and I don’t know shit about hardware, but I’m pretty good at figuring out what is causing an error, or how to perform a task in a specific program.
I have also joked repeatedly that all I really need to do is stand near one of the student computers in the library and it’ll start working again. I’ve no idea why, but for some reason errors that happen repeatedly just go away whenever I come to look at the computer.
Last week, I helped a student who was having issues with his laptop. Multiple programs had frozen, but he hadn’t saved his paper, and luckily I was able to get it working long enough for him to save three straight days of work that he otherwise would’ve lost. It’s worth noting that I spent most of the time I was trying to fix it whispering, “C’mon, baby, work with me” at his computer, because… just because, okay. It’s what I do, it works, don’t question it.
Anyway, I was around late at work last night, waiting for my ride, when the student worker came back to my office and said there was a small group of students looking for me, and could I give them a hand even though I was off the clock?
Sure, why not.
I came out to find a group of six students, including the guy I helped last week, at a table clustered around one laptop. I rolled up, said, “Hey, what can I help you with?”, and the guy said, “Can you just hang out here for a second?”
Sure, my dude. I’m off the clock, I’m listening to a podcast, I can chill at a table with your group until my ride shows up, if you want.
So I spend some time flipping through my phone, only half paying attention, figuring they’re finishing something up and they’ll ask their question as soon as they’re done. But after a minute, the guy says, “It worked!” and there was a chorus of excitement from the rest of the group. They all thanked me, and excused themselves to go back to class.
Turns out they had a group presentation, and the laptop they were trying to present from had froze up on them. Not knowing what to do, this guy apparently told his group there was a computer wizard in the library, and that merely being in my presence might be enough to fix it. To be fair, he… was not wrong.
I just find it delightful that this has become such A Thing that students are now seeking me out. Not to ask a question, or get some help, but just to stand near their device and share my mythical computer-fixing aura. It’s like being a terribly benign cryptid.
111K notes
·
View notes
Text
dnf source howto dnf download --source gcc rpm -ivh gcc-5.3.1-6.fc23.src.rpm sudo dnf builddep gcc rpmbuild -bp ~/rpmbuild/SPECS/gcc.spec
0 notes
Link
I recently upgraded a Cpanel sever to EasyApache 4 and PHP 7. I later installed mod_pagespeed but I think I may have made some errors as nearly all the sites are very slow now and with issues such as not being able to insert images into blog posts. I can see from a Google Analytics report that the traffic took a dive on the 13th which is when I installed mod_pagespeed so Im guessing it has to be that.
This is how I installed it according to my history:
yum install rpm-build cpio ea-apache24-mod_version yum update && upgrade yum install rpm-build cpio ea-apache24-mod_version wget https://github.com/Prajithp/cPanel_Mod_PageSpeed/blob/master/EA4/ea-apache24-mod_pagespeed-latest-stable.src.rpm rpmbuild --rebuild ea-apache24-mod_pagespeed-1.9-32.11.src.rpm rpmbuild --rebuild ea-apache24-mod_pagespeed-latest-stable.src.rpm yum install ea4-experimental yum install ea-apache24-mod_pagespeed service httpd restart
so whats the best way to cleanly remove all this? Just do yum remove on ea-apache24-mod_pagespeed, ea-apache24-mod_version and ea4-experimental ?
thanks
Submitted December 21, 2017 at 12:30AM by easy_c0mpany80 https://www.reddit.com/r/webhosting/comments/7l7y92/how_to_cleanly_remove_mod_pagespeed/?utm_source=ifttt
from Blogger http://webdesignersolutions1.blogspot.com/2017/12/how-to-cleanly-remove-modpagespeed.html via IFTTT
0 notes
Text
How is the await field in iostat calculated?
PART 1: 15 seconds of await
One of our customers was running some third party monitoring software, which was reporting very occasional spikes of many seconds (6-15 seconds)worth of await on their local disk. Looking at the datadog code, we can see that the python is really just running iostat and capturing the output:
if Platform.is_linux(): stdout, _, _ = get_subprocess_output(['iostat', '-d', '1', '2', '-x', '-k'], self.logger)
From the man page, the options iostat is running with are:
-x Display extended statistics. This option works with post 2.5 kernels since it needs /proc/diskstats file or a mounted sysfs to get the statistics. This option may also work with older kernels (e.g. 2.4) only if extended statistics are available in /proc/partitions (the kernel needs to be patched for that).
-k Display statistics in kilobytes per second instead of blocks per second. Data displayed are valid only with kernels 2.4 and later.
-d Display the device utilization report.
The '1' and '2' will mean that iostat runs every one second, and will return two results before exiting. iostat with the -x flag will read from /proc/diskstats by default (it says it can also use sysfs, but a look at the code shows that /proc/diskstats is preferred when available). /proc/diskstats is a file containing a set of incrementing counters with various disk statistics. The first set of output from iostat will be statistics since the system was booted (as per the man page), and the second result will be statistics collected during the interval since the previous report. This will give us output like this:
# iostat -d -k -x 1 2 Linux 2.6.32-642.6.2.el6.x86_64 (linux-test2) 01/26/2017 _x86_64_ (1 CPU) Device: rrqm/s wrqm/s r/s w/s rkB/s wkB/s avgrq-sz avgqu-sz await r_await w_await svctm %util xvdb 0.01 0.02 0.00 0.00 0.05 0.09 69.08 0.00 31.58 3.05 53.63 0.74 0.00 xvda 0.00 1.40 0.05 1.22 1.10 10.49 18.18 0.00 0.66 0.62 0.67 0.13 0.02 Device: rrqm/s wrqm/s r/s w/s rkB/s wkB/s avgrq-sz avgqu-sz await r_await w_await svctm %util xvdb 0.00 0.00 0.00 0.00 0.00 0.00 0.00 0.00 0.00 0.00 0.00 0.00 0.00 xvda 0.00 0.00 0.00 0.00 0.00 0.00 0.00 0.00 0.00 0.00 0.00 0.00 0.00
The first thing to do to try and investigate the issue was to try and replicate the results using iostat ourselves. We ran the following in a while loop:
# while true; do date >> /var/log/iostat.log ; iostat -d 1 2 -x -k >> /var/log/iostat.log; sleep 1; done
After running that for a while, we calculated the min, max and average values that iostat logged for await:
# cat /var/log/iostat.log | grep "dm-2" | awk '{print $10}' | sort -V | awk 'NR == 1 { max=$1; min=$1; sum=0 } { if ($1>max) max=$1; if ($1<min) min=$1; sum+=$1;} END {printf "Min: %d\tMax: %d\tAverage: %f\n", min, max, sum/NR}'
The results looked something like this:
Min: 0 Max: 15506 Average: 1.862469
Suspiciously the max was indeed showing 15506ms. Given that iostat is running every second, 15000ms (15 seconds!) of await is logically impossible. But in case the customer pressed further, the next question is what actually is await? A quick google around the internet doesn't show us exactly how it's calculated, so that means we need to go to the source.
PART 2: Obtaining the source code
The iostat program is part of a package included in the 'sysstat' package. The customer was running sysstat-9.0.4-27.el6.x86_64. The first thing to do was to download the source RPM for this version; it's not sufficient to browse the latest code repository online since software can change significantly from version to version. We found the SRPM on the red hat website and downloaded it on a test machine, and installed it.
# wget http://ftp.redhat.com/pub/redhat/linux/enterprise/6Server/en/os/SRPMS/sysstat-9.0.4-27.el6.src.rpm # rpm -Uvh sysstat-9.0.4-27.el6.src.rpm # cd rpmbuild
Looking in the SOURCES directory, there is some code and a bunch of .patch files. If we wanted to look at the source for the program as it was installed on disk, we would need to apply the patch files to the original source. We can do this with rpmbuild. From the relevant section of the rpmbuild man page:
-bp Executes the "%prep" stage from the spec file. Normally this involves unpacking the sources and applying any patches.
Before we can apply the patch files, we need to install some dependencies. We got an error for missing dependencies when trying to build the package initially which told us which dependencies were missing - gettext and if.h (which a yum whatprovides shows is provided by the gettext and kernel-devel package respectively):
# yum install kernel-devel gettext
Finally we can run rpmbuild.
# rpmbuild -bp SPECS/sysstat.spec
Once this finished, we can find the patched source for the version of sysstat we care about in the ~/rpmbuild/BUILD/sysstat-9.0.4 directory. From the naming of the files, the one we want is iostat.c.
PART 3: Reading the source
Since this is quite a short piece of code (~2000 lines), the first step is to go through and read the comments, functions and variable naming to get a broad picture for what we're looking at. Initially the first thing that sticks out is the write_ext_stat function - the comment above it reads this:
/* *************************************************************************** * Display extended stats, read from /proc/{diskstats,partitions} or /sys. * * IN: * @curr Index in array for current sample statistics. * @itv Interval of time. * @fctr Conversion factor. * @shi Structures describing the devices and partitions. * @ioi Current sample statistics. * @ioj Previous sample statistics. *************************************************************************** */ void write_ext_stat(int curr, unsigned long long itv, int fctr, struct io_hdr_stats *shi, struct io_stats *ioi, struct io_stats *ioj)
That looks like what we want. Looking at the code, we can see pretty clearly where the iostats output is printed when displaying extended stats:
/* DEV rrq/s wrq/s r/s w/s rsec wsec rqsz qusz await svctm %util */ printf("%-13s %8.2f %8.2f %7.2f %7.2f %8.2f %8.2f %8.2f %8.2f %7.2f %6.2f %6.2f\n", devname, S_VALUE(ioj->rd_merges, ioi->rd_merges, itv), S_VALUE(ioj->wr_merges, ioi->wr_merges, itv), S_VALUE(ioj->rd_ios, ioi->rd_ios, itv), S_VALUE(ioj->wr_ios, ioi->wr_ios, itv), ll_s_value(ioj->rd_sectors, ioi->rd_sectors, itv) / fctr, ll_s_value(ioj->wr_sectors, ioi->wr_sectors, itv) / fctr, xds.arqsz, S_VALUE(ioj->rq_ticks, ioi->rq_ticks, itv) / 1000.0, xds.await, /* The ticks output is biased to output 1000 ticks per second */ xds.svctm, /* Again: Ticks in milliseconds */ xds.util / 10.0);
The part we care about is the await part, which is the third column from the right. As above, we can see that what's printed for the await column is "xds.await". Looking a bit further up the function, we can see that xds is likely set here:
compute_ext_disk_stats(&sdc, &sdp, itv, &xds);
The iostat.c file doesn't contain this function, but a quick grep over the source directory shows that the definition is present in common.c:
/* *************************************************************************** * Compute "extended" device statistics (service time, etc.). * * IN: * @sdc Structure with current device statistics. * @sdp Structure with previous device statistics. * @itv Interval of time in jiffies. * * OUT: * @xds Structure with extended statistics. *************************************************************************** */ void compute_ext_disk_stats(struct stats_disk *sdc, struct stats_disk *sdp, unsigned long long itv, struct ext_disk_stats *xds)
Within this function, we can see that await is set based on some arithmetic using various variables, like this:
/* * Kernel gives ticks already in milliseconds for all platforms * => no need for further scaling. */ xds->await = (sdc->nr_ios - sdp->nr_ios) ? ((sdc->rd_ticks - sdp->rd_ticks) + (sdc->wr_ticks - sdp->wr_ticks)) / ((double) (sdc->nr_ios - sdp->nr_ios)) : 0.0;
From the above, it's important for us to know a few pieces of information:
What is nr_ios?
What is rd_ticks?
What is wr_ticks?
What is sdc?
What is sdp?
What is the ? operator?
The sdc and sdp questions can be answered by the comment above the compute_ext_disk_stats function:
* @sdc Structure with current device statistics. * @sdp Structure with previous device statistics.
The next question - what nr_ios actually is - can be obtained back in the write_ext_stat function. There, we have some lines of code which look like this:
sdc.nr_ios = ioi->rd_ios + ioi->wr_ios; sdp.nr_ios = ioj->rd_ios + ioj->wr_ios;
It appears then that nr_ios is the sum of rd_ios and wr_ios.
The remainder of the information can be obtained back in iostat.c. We know from the man page that extended disk stats rely on the /proc/diskstats file. A quick search for this shows a function called read_diskstats_stat:
/* *************************************************************************** * Read stats from /proc/diskstats. * * IN: * @curr Index in array for current sample statistics. *************************************************************************** */ void read_diskstats_stat(int curr)
This function will parse the contents of /proc/diskstats. The important part of this function:
/* major minor name rio rmerge rsect ruse wio wmerge wsect wuse running use aveq */ i = sscanf(line, "%u %u %s %lu %lu %llu %u %lu %lu %llu %u %u %u %u", &major, &minor, dev_name, &rd_ios, &rd_merges_or_rd_sec, &rd_sec_or_wr_ios, &rd_ticks_or_wr_sec, &wr_ios, &wr_merges, &wr_sec, &wr_ticks, &ios_pgr, &tot_ticks, &rq_ticks); ... sdev.rd_ticks = rd_ticks_or_wr_sec;
Documentation on sscanf and % format specifiers is here:
https://linux.die.net/man/3/sscanf https://www.le.ac.uk/users/rjm1/cotter/page_30.htm
From the sscanf man page:
The scanf() family of functions scans input according to format as described below. This format may contain conversion specifications; the results from such conversions, if any, are stored in the locations pointed to by the pointer arguments that follow format.
So the first field of each line is an int and will be read into &major, the second field of each line is an int and will be read into &minor, the third field of each line is a char array and will be read into dev_name, and so on.
From the above, now we know that rd_ios, wr_ios, rd_ticks and wr_ticks directly correlate to fields in /proc/diskstats. We can get a plain English description of what each field in the /proc/diskstats file means by reading the kernel documentation, here: https://www.kernel.org/doc/Documentation/ABI/testing/procfs-diskstats
From cross referencing the variable names above against the fields in the kernel documentation, we can get a plaintext description of what these variables actually are.
rd_ios = field 4. In English, "reads completed successfully"
rd_ticks = field 7. In English, "time spent reading (ms)"
wr_ios = field 8. In English, "writes completed"
wr_ticks = field 11. In English, "time spent writing (ms)"
Now we know all of the information we need to work out what await actually is. A summary:
sdc - Structure with current device statistics
sdp - Structure with previous device statistics
nr_ios - The sum of reads and writes completed successfully (fields 4 and 8 in /proc/diskstats)
rd_ticks - Time spent reading in ms (field 7 in /proc/diskstats)
wr_ticks - Time spent writing in ms (field 11 in /proc/diskstats)
Back to the await calculation, we can see that it's set to this:
xds->await = (sdc->nr_ios - sdp->nr_ios) ? ((sdc->rd_ticks - sdp->rd_ticks) + (sdc->wr_ticks - sdp->wr_ticks)) / ((double) (sdc->nr_ios - sdp->nr_ios)) : 0.0;
One last bit of key information: in C, what you're looking at here with the "?" is a conditional operator (sometimes called a ternary operator). It evaluates to its second argument if the first argument evaluates to true. It evaluates to its third argument (the bit after the :) if the first argument evaluates to false. In English, if there is no difference between the current count for number of I/Os and the previous counter it means there was no disk activity, so set await to 0.0. Otherwise, set await to:
((sdc->rd_ticks - sdp->rd_ticks) + (sdc->wr_ticks - sdp->wr_ticks)) / ((double) (sdc->nr_ios - sdp->nr_ios))
Rewriting that in English:
await = (The difference between the time spent reading in ms plus the time spent writing in milliseconds), divided by (the number of writes completed plus the number of reads completed)
Therefore:
await is the time performing read/write operations divided by the number of read/write operations performed.
PART 4: Conclusion
We know that in the 1000ms between iostat runs, there can not possibly be more than 1000ms worth of reading/writing done. If iostat is sampling 1 second apart, it's impossible for there to be a 15,000ms await. iostat is returning incorrect results. The customer should upgrade to a later version of sysstat, and if the bug persists then we should try and reproduce it, and then open a support case with Red Hat to get it fixed.
0 notes
Text
Build RPMs of CPAN Modules
Build RPMs of CPAN Modules
If you’ve been reading my blog for a while, you probably already know that I have an interest in building RPMs of CPAN modules. I run a small RPM repository where I make available all of the RPMs that I have build for myself. These will either be modules that aren’t available in other RPM repositories or modules where I wanted a newer version than the currently available one. I’m happy to take…
View On WordPress
0 notes
Text
making your own RPMs
this one is a little bit complicated, but then after you do it, you'll think it's not that complicated
redhat comes with a utility called rpmbuild, which you can use to build an RPM. but you need to set up a bunch of things first for it all to work
the first thing you need to do is create an environment and specify the build area so that rpmbuild knows where to do its thing its best to do this as a non-root user
$ mkdir -p ~/rpmbuild/{RPMS,SRPMS,BUILD,SOURCES,SPECS} $ echo '%_topdir %(echo $HOME)/rpmbuild' > ~/.rpmmacros
the directory structure should look like
. ├── .rpmmacros ├── rpmbuild ├── BUILD ├── SPECS ├── SOURCES ├── RPMS └── SRPMS
SOURCES is where you put your source files SPECS is where you put your spec file. these are your instructions for how you want rpmbuild to build the rpm BUILD is the temporary space where rpmbuild combines your source files into an RPM RPMS is where rpmbuild spits out the final RPM SRPMS are source RPMs that you can use instead of SOURCES (i think)
the .rpmmacros file contains global macros, which are essentially variables you can pass to your rpmbuild. there are built-in macros like
%_prefix /usr %_sysconfdir /etc %_localstatedir /var %_infodir /usr/share/info %_mandir /usr/share/man %_initrddir %{_sysconfdir}/rc.d/init.d %_defaultdocdir %{_usr}/share/doc
and you can define your own like
#%define macro_name value %define major 2 # Accessing macro %{major}
the second thing to do is to put your source file(s) into SOURCES
the third thing to do is to create a spec file
$ vim ~/rpmbuild/SPECS/package.spec
%define __spec_install_post %{nil} %define debug_package %{nil} %define __os_install_post %{_dbpath}/brp-compress Summary: A very simple rpm package Name: package Version: 1.0 Release: 1 License: MIT Group: Development/Tools SOURCE0 : %{name}-%{version}.zip BuildRoot: %{_tmppath}/%{name}-%{version}-%{release}-root %description %{summary} %prep unzip %{SOURCE0} %build # empty section. %install # should reflect how directories will actually look, but must be done within the buildroot rm -rf %{buildroot} mkdir -p %{buildroot} cp -a * %{buildroot} %clean rm -rf %{buildroot} %files # set permissions on the files/directories created # %defattr(<file mode>, <user>, <group>, <dir mode>) # %attr(<mode>, <user>, <group>) file %defattr(-,root,root,-) # next indicates that the file in the package should be installed with extension .rpmnew if there is already a modified file with the same name on the installed machine %config(noreplace) %{_sysconfdir}/%{name}/%{name}.conf # this is the standard place to put binaries, relative to the build root %{_bindir}/* %changelog * Aug 27 2015 First Build EOF
as you can see, getting the spec file right is the most important step as it is basically the template for where you want files to be put when you install the rpm and what permissions and behaviour should follow
once you are ready, the last step is to actually run rpmbuild
$ rpmbuild -ba ~/rpmbuild/SPECS/package.spec # you can provide arguments too $ rpmbuild -ba --define "macro_name value" ~/rpmbuild/SPECS/package.spec
if all goes well, you'll have a shiny new rpm in the RPMS directory that you can take and install with
$ rpmbuild -Uvh mygroovyrpm.rpm
0 notes
Text
Resolved: Can one require "this OR that" package in an RPM spec file? #development #dev #programming
Resolved: Can one require "this OR that" package in an RPM spec file? #development #dev #programming
Can one require "this OR that" package in an RPM spec file?
Does anyone know how to (or whether one can) specify an alternate requirement or set of requirements in a spec file, as opposed to a single requirement?
For example, say there are two packages available, conveniently named foo-bar and bar-foo. My package requires one of these but not both, and I don’t care which one is present. At…
View On WordPress
0 notes
Text
Answer: Creating symlink in /usr/bin when creating an RPM #fix #it #programming
Answer: Creating symlink in /usr/bin when creating an RPM #fix #it #programming
Creating symlink in /usr/bin when creating an RPM
I’m creating an RPM for an application that doesn’t already have one. I’ve got it building and installing fine in the /opt directory using $RPM_BUILD_ROOT, but I would also like to create a couple symlinks in /usr/binso that the application is available on the path. All of my attempts to do this have yielded “permission denied” errors because I’m…
View On WordPress
0 notes
Link
Annotated spec file
годно откомментированный spec файл.
0 notes
Text
How to rpm build & rebuild for CentOS
먼저 rpmbuild가 설치되어 있는지 확인
# yum install rpm-build # yum install redhat-rpm-config
rpm 작업을 할 디렉토리 생성
$ mkdir -p ~/rpmbuild/{BUILD, RPMS, SOURCES, SPECS, SRPMS}
$ echo '%_topdir %(echo $HOME)/rpmbuild' > ~/.rpmmacros
그 외 필요할 기타 기능들
# yum install make
# yum install gcc
rpm build
$ rpmbuild -ba ~/rpmbuild/SPECS/package.spec
rpm rebuild
$ rpm -i package.src.rpm or $ rpm --nomd5 -i package.src.rpm $ rpmbuild -ba ~/rpmbuild/SPECS/package.spec
or just
$ rpmbuild --rebuild package.src.rpm
0 notes
Text
RPMBUILD for gtk-recordmydesktop
Just uploaded my SPEC file for gtk-recordmydesktop with the only difference between the upstream Fedora version being that the default working directory is set to /var/tmp instead of /tmp, which is dumb because it results in a maximum of 20 minute videos on my system. https://github.com/rpmbuild/gtk-recordmydesktop
0 notes
Text
Rpmbuild and CentOS 6
I wanted to document this particular problem because it took me a few days to figure out and it's very frustrating.
So first some background information. At this time I was working at AppFirst which is essentially a monitoring SaaS solution so we are in charge of collecting system, application, log, and so on data. In order to do this we install a collector program on our customer's servers which are ultimately built via RPMs. Whenever a customer first requests a collector we build that custom package for them in real time and send it back to them. Simple enough right? Well here's where things get out of whack.
We had recently made the switch from CentOS 5 to CentOS 6. Everything was more or less working as expected except (wouldn't you guess it) rpmbuild. We had a shell script called "blah.sh" that ran rpmbuild and made sure it was pointing to all the correct files/directories and that was run using python's subprocess module. Before I continue let me first list the system we were on.
CentOS 6.4 (previously CentOS 5.8)
python 2.6.6
rpmbuild 4.8 (previously rpmbuild 4.4.2
Everytime blah.sh was run with subprocess it kept exiting out with status 1 so my first assumption was to just print out it's stdout. Refer below for code snippet on how to do this.
proc = subprocess.Popen(["./blah.sh"], stdout=subprocess.PIPE) logger.error(proc.communicate())
Calling "communicate" will display all the stdout messages and any error message that may pop up as well in the following format: (<info stdout put>, <error message>). Unfortunately what was being displayed was utterly useless because it only showed the following two info messages and no errors...
('Building target platforms: x86_64\nBuilding for target x86_64\n', None)
Now what's really interesting is that this script runs fine through the command line so I went through many steps to see what the actual difference was. I validated that the user was the same, the same environment variables, I tested to see if subprocess was the issue, and so on.
What it ultimately boiled down to was permissions error. v4.8 of rpmbuild will no longer use /usr/src/redhat and instead default to /root/rpmbuild. And since you are doing this from an apache server (assuming you are not running apache as root user which is a huge security risk) apache will automatically block anything that is trying to access the root directory which caused the entire script to fail out with exit 1. To fix this modify the rpmbuild line to define __topdir as a folder you have permission to write to. Refer to this link to set up your system accordingly.
This link above tells you to update your .rpmmacros file but these settings will unfortunately not get loaded in this specific scenario so you'll have to either modify the .spec file or define it in the commandline argument. I chose the latter so here was my solution. Note that this is the contents of blah.sh
cwd='pwd' rpmbuild --define "_topdir /home/sample_home/rpmbuild/" --bb $cwd/sample.spec --target x86_64
And that should solve your problem. Hopefully this made your transition from CentOS 5 to 6 much smoother. Until next time.
0 notes
Text
How to cleanly remove mod_pagespeed?
I recently upgraded a Cpanel sever to EasyApache 4 and PHP 7. I later installed mod_pagespeed but I think I may have made some errors as nearly all the sites are very slow now and with issues such as not being able to insert images into blog posts. I can see from a Google Analytics report that the traffic took a dive on the 13th which is when I installed mod_pagespeed so Im guessing it has to be that.
This is how I installed it according to my history:
yum install rpm-build cpio ea-apache24-mod_version yum update && upgrade yum install rpm-build cpio ea-apache24-mod_version wget https://github.com/Prajithp/cPanel_Mod_PageSpeed/blob/master/EA4/ea-apache24-mod_pagespeed-latest-stable.src.rpm rpmbuild --rebuild ea-apache24-mod_pagespeed-1.9-32.11.src.rpm rpmbuild --rebuild ea-apache24-mod_pagespeed-latest-stable.src.rpm yum install ea4-experimental yum install ea-apache24-mod_pagespeed service httpd restart
so whats the best way to cleanly remove all this? Just do yum remove on ea-apache24-mod_pagespeed, ea-apache24-mod_version and ea4-experimental ?
thanks
Submitted December 21, 2017 at 12:30AM by easy_c0mpany80 https://www.reddit.com/r/webhosting/comments/7l7y92/how_to_cleanly_remove_mod_pagespeed/?utm_source=ifttt from Blogger http://webdesignersolutions1.blogspot.com/2017/12/how-to-cleanly-remove-modpagespeed.html via IFTTT
0 notes