#scnnode
Explore tagged Tumblr posts


Text
Augmented Reality App Development Using ARKit

Augmented Reality (AR) has transformed the way users interact with the digital world, blending virtual elements with the real environment. ARKit, Apple's powerful framework for AR development, provides developers with the tools they need to create immersive AR experiences on iOS devices. This post will guide you through the basics of ARKit, its features, and how to get started with AR app development.
What is ARKit?
ARKit is a framework developed by Apple that enables developers to create augmented reality applications for iOS. It uses advanced computer vision and device motion tracking to integrate virtual content into the real world seamlessly. ARKit is designed to work with iPhone and iPad devices, making it accessible to a wide range of users.
Key Features of ARKit
Motion Tracking: Tracks the device's position and orientation in 3D space.
Environmental Understanding: Detects flat surfaces, such as tables or floors, to place virtual objects accurately.
Light Estimation: Adjusts the lighting of virtual objects to match the real-world environment.
Face Tracking: Recognizes and tracks facial features, enabling immersive experiences like filters or animations.
AR Anchors: Allows you to place virtual objects in the real world and keep them in place as the user moves around.
Getting Started with ARKit
Set Up Your Development Environment:
Install Xcode, Apple's integrated development environment (IDE).
Create a new project and choose the "Augmented Reality App" template.
Choose a Programming Language: ARKit supports both Swift and Objective-C. Swift is recommended for new projects.
Familiarize Yourself with ARKit API: Explore the ARKit documentation to understand key classes like ARSession, ARConfiguration, and ARAnchor.
Basic Example: Creating a Simple AR App
This example shows how to create a simple AR app that places a virtual cube on a detected flat surface:import UIKit import ARKit class ViewController: UIViewController, ARSCNViewDelegate { @IBOutlet var sceneView: ARSCNView override func viewDidLoad() { super.viewDidLoad() sceneView.delegate = self sceneView.showsStatistics = true let tapGesture = UITapGestureRecognizer(target: self, action: #selector(didTapScreen)) sceneView.addGestureRecognizer(tapGesture) let configuration = ARWorldTrackingConfiguration() configuration.planeDetection = [.horizontal] sceneView.session.run(configuration) } @objc func didTapScreen(gesture: UITapGestureRecognizer) { let location = gesture.location(in: sceneView) let hitTestResults = sceneView.hitTest(location, types: .existingPlaneUsingExtent) if let result = hitTestResults.first { let cube = SCNBox(width: 0.1, height: 0.1, length: 0.1, chamferRadius: 0) let material = SCNMaterial() material.diffuse.contents = UIColor.red cube.materials = [material] let cubeNode = SCNNode(geometry: cube) cubeNode.position = SCNVector3(result.worldTransform.columns.3.x, result.worldTransform.columns.3.y + 0.05, result.worldTransform.columns.3.z) sceneView.scene.rootNode.addChildNode(cubeNode) } } }
Best Practices for AR Development
Optimize 3D Models: Keep the polygon count low for better performance.
Test on Real Devices: Always test AR experiences on actual iOS devices for accurate performance.
Consider User Experience: Provide clear instructions for users on how to interact with the AR elements.
Leverage Lighting: Use realistic lighting to enhance the integration of virtual objects into the real world.
Advanced Features to Explore
Image Tracking: Recognize and track images in the environment.
Object Detection: Place virtual objects based on recognized physical objects.
Face Tracking: Utilize ARKit's face tracking capabilities for interactive experiences.
Multi-user Experiences: Implement shared AR experiences where multiple users can interact in the same virtual space.
Conclusion
ARKit provides developers with a robust framework for creating immersive augmented reality experiences on iOS. By leveraging the powerful features of ARKit, you can build innovative applications that engage users in new and exciting ways. Start exploring ARKit today and be part of the future of technology!
0 notes
Photo

SceneKit Tutorial Part 1
We are going to start a new serie of tutorials about SceneKit, the framework that allows you to build and manipulate 3D objects in a 3D scene. SceneKit was introduced for the first time in macOS 10.8 (Mountain Lion) and sucessively in iOS 8. Recently, SceneKit was added to watchOS 3.0 and tvOS 9.
SceneKit allows developers to create 3D games and add 3D content to apps using high-level scene descriptions. Because of the recent introduction of ARKit, SceneKit is today a very relevant framework. If you want to build Augmented Reality application, you should learn SceneKit. The framework provides a reach set of APIs that make easy to add animations, physics simulation, particle effects, and realistic physically based rendering.
Keep reading
0 notes
Text
Augmented Reality Flight Status on iOS
At WWDC2018, Apple announced and released an addition to their family of AR technologies: image recognition. This feature allows an iOS device to detect a given image within a scene, and track it in 3 dimensional space in real time. They gave some impressive demonstrations, and I had an idea to try to overlay an image of the world with little aeroplanes, denoting where real world aircraft are in realtime. Here’s a video of the end result, and the rest of this post will contain some implementation details.

As you can see in the video, the tracking of the image works remarkably well. Even when the physical image is shaken rather violently, ARKit has no trouble tracking the positioning of the image in 3d space. Also impressive is the ability to maintain tracking when the image is only partly in view.
Once you enable image detection in ARKit and load a reference image, iOS will add an anchor for you which tracks around as the camera and image moves. The reference image must be pre-defined, have a fairly evenly spread histogram, and you must let Xcode know of the physical image dimensions as accurately as possible.
Once image detection is set up, we need to overlay the little aeroplane images. The data source used provides the latitude, longitude, altitude and heading of the aircraft. All of these values are used when placing the image. The altitude was originally ignored, but because so many aircraft end up at similar points (especially around Sydney) and the images are not to scale, the image positions would conflict and a strange shimmering effect happened which looked wrong. So the real altitudes are used as a slight height offset, which fixed the shimmering and also happened to increase the realism.
To convert latitude and longitude to an x,y coordinate in 2d space requires some simple trigonometry. But this also requires the correct type of map projection: equidistant cylindrical projection. This type of projection conserves distances along the meridian, making lat/lon to x/y mapping accurate:

Then the heading is used to rotate the plane (side node: aeroplanes on geometry planes can be incredibly confusing nomenclature) around the Y-axis to show which direction the aircraft is going. The first image used when developing was not of the correct projection type, making the placements incorrect - it was incredibly satisfying to see the aircraft placed correctly over landmarks once the correct map projection was used!
The code to place each aeroplane looks like this:
func loadAeroplanes(image: ARReferenceImage) { AeroplaneDataSource.getRealtimePositioning { aeroplanes in aeroplanes.forEach { aeroplane in guard let lat = aeroplane.Lat, let lon = aeroplane.Long, let call = aeroplane.Call else { return } let material = SCNMaterial() material.diffuse.contents = UIImage(named: "plane") let geometry = SCNPlane(width: 0.01, height: 0.01) geometry.materials = [material] let planeNode = AeroplaneNode(geometry: geometry) planeNode.originalColour = material.diffuse.contents as? UIColor let x = Float(image.physicalSize.width / 360 * CGFloat(180 + lon)) - Float(image.physicalSize.width / 2) let z = Float(image.physicalSize.height / 180 * CGFloat(90 - lat)) - Float(image.physicalSize.height / 2) var y: Float = 0.005 if let altitude = aeroplane.Alt { y = Float(altitude) * 0.000000025 } planeNode.simdPosition = float3(x: x, y: y, z: z) planeNode.eulerAngles.x = -.pi / 2 if let heading = aeroplane.Heading { planeNode.eulerAngles.y = Float(heading) * Float.pi / 180 } planeNode.flightData = aeroplane self.imageAnchorNode?.addChildNode(planeNode) } } }
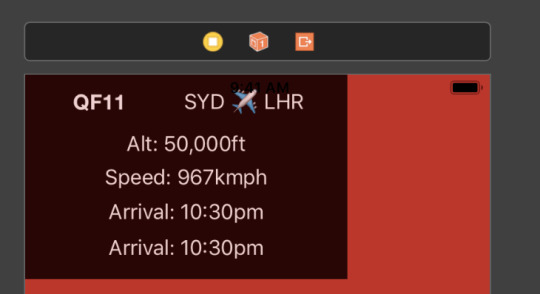
Then, to create a HUD on top of the aircraft when the user types a flight number in, we need to:
Find the appropriate plane node in our set of planes
Display the hud view controller on top (and slightly behind) the relevant node
Interestingly, although it’s undocumented, you can use a UIView as the plane’s material’s diffuse contents. This allows you to create a layout in storyboards, and display it on a plane in your scene. Here’s a screenshot of the storyboard layout used in this example:
And the code to attach this view to a SCNPlane:
let plane = SCNPlane(width: 0.16, height: 0.1015) let view = self.hudViewController.view.subviews.first view?.layer.cornerRadius = 40 view?.layer.borderColor = UIColor(red: 0.7, green: 0.0, blue: 0.0, alpha: 0.8).cgColor view?.layer.borderWidth = 2 plane.firstMaterial?.diffuse.contents = view plane.firstMaterial?.isDoubleSided = true //required if you place the camera behind the view self.hudNode = SCNNode(geometry: plane) self.hudNode?.eulerAngles.x = -.pi / 4 self.hudNode?.opacity = 0
Then a UIViewController is used to configure the text on the UILabels. We also iterate through all the non-matching nodes and decrease their opacities so that the searched flight number stands out. The position of the hud node is updated to hover in the correct space above the aircraft:
statusViewController.flightNumberHandler = { number in if number == "" { self.hudNode?.opacity = 0.0 self.imageAnchorNode?.childNodes.forEach { node in node.opacity = 1.0 } return } self.imageAnchorNode?.childNodes.forEach { node in guard let planeNode = node as? AeroplaneNode else { return } if (planeNode.flightData?.Call?.lowercased() == number.lowercased()) { node.opacity = 1.0 AeroplaneDataSource.getFlightStatus(flightNumber: number.lowercased().replacingOccurrences(of: "qf", with: "")) { flightStatus in DispatchQueue.main.async { self.hudViewController.configureFrom(flightStatus: flightStatus) self.hudViewController.update(altitude: planeNode.flightData?.Alt, speed: planeNode.flightData?.Speed) self.hudNode?.simdPosition = float3(x: node.simdPosition.x, y: node.simdPosition.y + 0.01, z: node.simdPosition.z - 0.08) self.hudNode?.opacity = 1.0 } } } else { node.opacity = 0.2 } } }
And voila! While the data source and ARKit boilerplate are left as an exercise to the reader, hopefully this gives some insight into how computer generated images can be mapped on to real world images and objects.
0 notes
Photo

In my previous post I used ARKit horizontal plane detection to detect surfaces and then I placed SCNNodes on the place at the location of the user’s touch. Here’s just a snippet of that code👩🏽💻 . . . . . #coder #html #software #computer #code #php #javascript #art #marketing #photooftheday #startup #developer #entrepreneur #photography #tech #webdeveloper #webdevelopment #innovation #design #love #geek #webdesign #computerscience #programmer #css #technology #coding #programming #business #science (at Williamsburg, Brooklyn) https://www.instagram.com/p/BxaX5aHgEM_/?utm_source=ig_tumblr_share&igshid=17rif56vkyfc0
#coder#html#software#computer#code#php#javascript#art#marketing#photooftheday#startup#developer#entrepreneur#photography#tech#webdeveloper#webdevelopment#innovation#design#love#geek#webdesign#computerscience#programmer#css#technology#coding#programming#business#science
0 notes
Text
Primitives in Scene Kit iOS Tutorial
SceneKit is a high-level framework for adding 3d graphics to your application. In this tutorial the primitive objects will be positioned in 3d-coordinates and each primitive is assigned a color. This tutorial is made with Xcode 10 and built for iOS 12.
Open Xcode and create a new Prjoject. Choose the Game template.
For product name, use IOS12SceneKitTutorial and then fill out the Organization Name and Organization Identifier with your customary values. Enter Swift as Language and SceneKit as Game Technology and choose Next.
Add a new File to the project, name it MyScene and make it a sublass of SCNScene
At the top of the MyScene.swift file import the SceneKit framework
import SceneKit
Next, add the required initializer methods inside the class.
class MyScene: SCNScene { override init() { super.init() } required init(coder aDecoder: NSCoder) { fatalError("init(coder:) has not been implemented") } }
The custom code will be filled in at then end of the init method. First navigate to the GameViewController.swift file. The Game template has created some boilerplate code in this class. Delete all code inside the GameViewController class and add the viewDidLoad method
override func viewDidLoad() { super.viewDidLoad() let scnView = self.view as! SCNView scnView.scene = MyScene() scnView.backgroundColor = UIColor.black }
A SCNView is created with the scene property set to MyScene and with a black background. Go back to the MyScene.swift file and add the following code at the end of the init method.
let plane = SCNPlane(width: 1.0, height: 1.0) plane.firstMaterial?.diffuse.contents = UIColor.blue let planeNode = SCNNode(geometry: plane) rootNode.addChildNode(planeNode)
A plane object is created with a width and height of 1 unit. Scene Kit is node-based, which means the scene contains one rootNode and child nodes can be added to it. A node is created containing the blue plane object and this node is added as a child node to the root node. Build and Run the project.
The front view of the plane is visible. It should be nice if some camera control is available and some lightning is applied to the scene. Go to GameViewController.swift file and add the following lines to the end of viewDidLoad
scnView.autoenablesDefaultLighting = true scnView.allowsCameraControl = true
The default lightning of our scene is enabled and also the control of cameras on the simulator/device is allowed by using a one or two finger tap. Go back to the MyScene.swift file and add a new object at the end of the init method.
let sphere = SCNSphere(radius: 1.0) sphere.firstMaterial?.diffuse.contents = UIColor.red let sphereNode = SCNNode(geometry: sphere) sphereNode.position = SCNVector3(x: 0.0, y: 3.0, z: 0.0) rootNode.addChildNode(sphereNode)
A sphere is created with a radius of 1 unit. and a red color. The firstMaterial property is the type of material and the diffuse property is the base color of the material. With the SCNVector3 function the node can be positioned in 3 dimensions(x,y,z). Build and Run the project.
Two primitives are visible. The sphere is positioned above the plane, because the y-coordinate has value 3. The default coordinates of the plane is (0,0,0). Now add all other primitive objects at the end of the init method.
let box = SCNBox(width: 1.0, height: 1.0, length: 1.0, chamferRadius: 0.2) box.firstMaterial?.diffuse.contents = UIColor.green let boxNode = SCNNode(geometry: box) boxNode.position = SCNVector3(x: 0.0, y: -3.0, z: 0.0) rootNode.addChildNode(boxNode) let cylinder = SCNCylinder(radius: 1.0, height: 1.0) cylinder.firstMaterial?.diffuse.contents = UIColor.yellow let cylinderNode = SCNNode(geometry: cylinder) cylinderNode.position = SCNVector3(x: -3.0, y: 3.0, z: 0.0) rootNode.addChildNode(cylinderNode) let torus = SCNTorus(ringRadius: 1.0, pipeRadius: 0.3) torus.firstMaterial?.diffuse.contents = UIColor.white let torusNode = SCNNode(geometry: torus) torusNode.position = SCNVector3(x: -3.0, y: 0.0, z: 0.0) rootNode.addChildNode(torusNode) let capsule = SCNCapsule(capRadius: 0.3, height: 1.0) capsule.firstMaterial?.diffuse.contents = UIColor.gray let capsuleNode = SCNNode(geometry: capsule) capsuleNode.position = SCNVector3(x: -3.0, y: -3.0, z: 0.0) rootNode.addChildNode(capsuleNode) let cone = SCNCone(topRadius: 1.0, bottomRadius: 2.0, height: 1.0) cone.firstMaterial?.diffuse.contents = UIColor.magenta let coneNode = SCNNode(geometry: cone) coneNode.position = SCNVector3(x: 3.0, y: -2.0, z: 0.0) rootNode.addChildNode(coneNode) let tube = SCNTube(innerRadius: 1.0, outerRadius: 2.0, height: 1.0) tube.firstMaterial?.diffuse.contents = UIColor.brown let tubeNode = SCNNode(geometry: tube) tubeNode.position = SCNVector3(x: 3.0, y: 2.0, z: 0.0) rootNode.addChildNode(tubeNode)
Build and Run the Project. All primitives are positioned in the scene and they are all visible.
You can download the source code of the IOS12SceneKitTutorial at the ioscreator repository on Github.
0 notes
Text
15 Best Free IOS Games For IPhone And IPad
Zynga is a leading designer of the world's most popular social video games that are played by millions of people around the world each day. Check Out 360-degree PhotoSpheres in this easy app which works with Cardboard, iOS and - in theory - any VR viewer from third-party makers such as DodoCase. For a total list of all iOS high (and low) ratings, visit Metacritic's iOS Games section final fantasy xv a new empire cheats. To browse video games, visit the App Store. While Sweeney's pronouncement may be surprising to some who play video games, smartphone video game development has been gradually marching toward this minute given that 2008 and the release of titles like Trism and Crash Bandicoot Nitro Kart 3D. If you want to start broadly with your iOS software application establishing abilities, AppCoda might be your area. Due to the fact that these video games are only offered in choose countries, you'll Final Fantasy XV a New Empire hack have to bypass Apple's area restrictions to set up the games listed below. Eventually video games will become exceptionally chaotic, with so much going on on-screen, however knowing exactly what Plants to put at which points on the grid is the difference in between the green green grass and the zombie armageddon. We'll deliver all of our weekly curated mobile and TV video games best to your inbox every Friday. I likewise spoke with Apple vice president Greg Joswiak about the significance of video games to Apple. But Kentucky Route No quickly ends up final fantasy xv a new empire guide being a mystical adventure through a land left behind by time, an odyssey in wonderful realism that feels mystical and grand in a manner that really, few contemporary video games can summon. If you have actually played previous video games in the series, you'll find a familiar set-up similar to a single-player board game. Google's Chromecast is an useful tool for any household that does not have access to a clever TV or a linked final fantasy xv a new empire guide video games console. On a platform loaded with free-to-play games that aren't in fact so free-to-play thanks to intricate microtransaction plans, just a few video games achieve the kind of success Experience has without IAP. I have actually seen some reports that older gadgets do not deal with the game so well, and my iPad Pro with an A9X processor didn't run nearly along with my iPhone X. Those issues might be solved by the time Fortnite is offered final fantasy xv a new empire hack to all iOS and Android gamers, though. Here' check my site hoping it introduces a brand-new pattern of considerable mobile video games based on TV shows and films. The SCNAudioPlayer and SCNNode classes can be used to include spatial audio effects that immediately track a gamer position to an iOS app. Nevertheless, with all that being said, there are a few essential functions missing out on from the Apple TV app that exist in its iOS equivalent. I had the pleasure Final Fantasy XV a New Empire cheats to check a lot of video games, and I can state that despite the supremacy of other platforms in comparison to the mobile platform if you desire a fast vacation that is both effective and fun, you can't beat video gaming on a smart phone. The indisputable king of mobile golf games, Golf Star takes multiplayer gaming to the next level. NBA Live is generally thought about to be the very best among the iPhone ports of Electronic Arts' sports video games, and for good Final Fantasy XV a New Empire guide reason. Driving games can be hard to obtain right on a touch screen, however Asphalt 8 Airborne has an excellent sense of speed and throws realism out the window in the name of fun. I tried my finest to cover as many remarkable video games as possible in order to ensure that all the readers have something to play. Odds are you'll discover this one a bit of a riot if you're sweet Final Fantasy XV a New Empire hack on soccer video games and enjoy physics-based gameplay. Traffic Rider takes things in a different way as it is one of the couple of first-person racing video games available on the mobile. Get going with Swift by downloading Xcode for free from the Mac Apple Shop Apple calls it the Mac app used to build every other Mac app and every iOS app, too." Essentially, it has whatever you need for the complete iOS app advancement experience (other Final Fantasy XV a New Empire Guide than for the experience itself, that comes as you deal with the app ... wink). Obviously taking a little inspiration from The Room series by Fireproof Games, The Trace is an investigator game with a strong puzzle-solving component. This will suggest that in the future, fans on different platforms will be able to party up and join each other's video games in the future. If you've simply picked up your first iPhone (or simply wish Final Fantasy XV a New Empire hack to ensure there's absolutely nothing golden you've missed out on), our list of the 25 Finest iPhone Games of All Time need to inform you whatever you need to understand.
1 note
·
View note
Text
Building a Portal App in ARKit: Materials and Lighting
This is an excerpt taken from Chapter 9, “Materials and Lighting”, of our book ARKit by Tutorials. This book show you how to build five immersive, great-looking AR apps in ARKit, Apple’s augmented reality framework. Enjoy!
In the first and second parts of this three-part tutorial series on ARKit, you learned how to add 3D objects to your scene with SceneKit. Now it’s time to put that knowledge to use and build the full portal. In this tutorial, you will learn how to:
Create walls, a ceiling and roof for your portal and adjust their position and rotation.
Make the inside of the portal look more realistic with different textures.
Add lighting to your scene.
Getting Started
Download the materials for this tutorial using the link at the top, then load up the starter project from the starter folder. Before you begin, you’ll need to know a little bit about how SceneKit works.
The SceneKit Coordinate System
As you saw in the previous part in this tutorial series, SceneKit can be used to add virtual 3D objects to your view. The SceneKit content view is comprised of a hierarchical tree structure of nodes, also known as the scene graph. A scene consists of a root node, which defines a coordinate space for the world of the scene, and other nodes that populate the world with visible content. Each node or 3D object that you render on screen is an object of type SCNNode. An SCNNode object defines the coordinate space transform (position, orientation and scale) relative to its parent node. It doesn’t have any visible content by itself.
The rootNode object in a scene defines the coordinate system of the world rendered by SceneKit. Each child node you add to this root node creates its own coordinate system, which, in turn, is inherited by its own children.
SceneKit uses a right-handed coordinate system where (by default) the direction of view is along the negative z-axis, as illustrated below.
The position of the SCNNode object is defined using an SCNVector3 which locates it within the coordinate system of its parent. The default position is the zero vector, indicating that the node is placed at the origin of the parent node’s coordinate system. In this case, SCNVector3 is a three component vector where each of the components is a Float value representing the coordinate on each axis.
The SCNNode object’s orientation, expressed as pitch, yaw, and roll angles is defined by its eulerAngles property. This is also represented by an SCNVector3 struct where each vector component is an angle in radians.
Textures
The SCNNode object by itself doesn’t have any visible content. You add 2D and 3D objects to a scene by attaching SCNGeometry objects to nodes. Geometries have attached SCNMaterial objects that determine their appearance.
An SCNMaterial has several visual properties. Each visual property is an instance of the SCNMaterialProperty class that provides a solid color, texture or other 2D content. There are a variety of visual properties for basic shading, physically based shading and special effects which can be used to make the material look more realistic.
The SceneKit asset catalog is designed specifically to help you manage your project’s assets separately from the code. In your starter project, open the Assets.scnassets folder. Notice that you already have images representing different visual properties for the ceiling, floor and walls.
With SceneKit, you can also use nodes with attached SCNLight objects to shade the geometries in a scene with light and shadow effects.
Building the Portal
Let’s jump right in to creating the floor for the portal. Open SCNNodeHelpers.swift and add the following to the top of the file just below the import SceneKit statement.
// 1 let SURFACE_LENGTH: CGFloat = 3.0 let SURFACE_HEIGHT: CGFloat = 0.2 let SURFACE_WIDTH: CGFloat = 3.0 // 2 let SCALEX: Float = 2.0 let SCALEY: Float = 2.0 // 3 let WALL_WIDTH:CGFloat = 0.2 let WALL_HEIGHT:CGFloat = 3.0 let WALL_LENGTH:CGFloat = 3.0
You’re doing a few things here:
You define constants for the dimensions of the floor and ceiling of your portal. The height of the roof and ceiling corresponds to the thickness.
These are constants to scale and repeat the textures over the surfaces.
These define the width, height and length of the wall nodes.
Next, add the following method to SCNNodeHelpers:
func repeatTextures(geometry: SCNGeometry, scaleX: Float, scaleY: Float) { // 1 geometry.firstMaterial?.diffuse.wrapS = SCNWrapMode.repeat geometry.firstMaterial?.selfIllumination.wrapS = SCNWrapMode.repeat geometry.firstMaterial?.normal.wrapS = SCNWrapMode.repeat geometry.firstMaterial?.specular.wrapS = SCNWrapMode.repeat geometry.firstMaterial?.emission.wrapS = SCNWrapMode.repeat geometry.firstMaterial?.roughness.wrapS = SCNWrapMode.repeat // 2 geometry.firstMaterial?.diffuse.wrapT = SCNWrapMode.repeat geometry.firstMaterial?.selfIllumination.wrapT = SCNWrapMode.repeat geometry.firstMaterial?.normal.wrapT = SCNWrapMode.repeat geometry.firstMaterial?.specular.wrapT = SCNWrapMode.repeat geometry.firstMaterial?.emission.wrapT = SCNWrapMode.repeat geometry.firstMaterial?.roughness.wrapT = SCNWrapMode.repeat // 3 geometry.firstMaterial?.diffuse.contentsTransform = SCNMatrix4MakeScale(scaleX, scaleY, 0) geometry.firstMaterial?.selfIllumination.contentsTransform = SCNMatrix4MakeScale(scaleX, scaleY, 0) geometry.firstMaterial?.normal.contentsTransform = SCNMatrix4MakeScale(scaleX, scaleY, 0) geometry.firstMaterial?.specular.contentsTransform = SCNMatrix4MakeScale(scaleX, scaleY, 0) geometry.firstMaterial?.emission.contentsTransform = SCNMatrix4MakeScale(scaleX, scaleY, 0) geometry.firstMaterial?.roughness.contentsTransform = SCNMatrix4MakeScale(scaleX, scaleY, 0) }
This defines a method to repeat the texture images over the surface in the X and Y dimensions.
Here’s the breakdown:
The method takes an SCNGeometry object and the X and Y scaling factors as the input. Texture mapping uses the S and T coordinate system which is just another naming convention: S corresponds to X and T corresponds to Y. Here you define the wrapping mode for the S dimension as SCNWrapMode.repeat for all the visual properties of your material.
You define the wrapping mode for the T dimension as SCNWrapMode.repeat as well for all visual properties. With the repeat mode, texture sampling uses only the fractional part of texture coordinates.
Here, each of the visual properties contentsTransform is set to a scale transform described by anSCNMatrix4 struct. You set the X and Y scaling factors to scaleX and scaleY respectively.
You only want to show the floor and ceiling nodes when the user is inside the portal; any other time, you need to hide them. To implement this, add the following method to SCNNodeHelpers:
func makeOuterSurfaceNode(width: CGFloat, height: CGFloat, length: CGFloat) -> SCNNode { // 1 let outerSurface = SCNBox(width: SURFACE_WIDTH, height: SURFACE_HEIGHT, length: SURFACE_LENGTH, chamferRadius: 0) // 2 outerSurface.firstMaterial?.diffuse.contents = UIColor.white outerSurface.firstMaterial?.transparency = 0.000001 // 3 let outerSurfaceNode = SCNNode(geometry: outerSurface) outerSurfaceNode.renderingOrder = 10 return outerSurfaceNode }
Taking a look at each numbered comment:
Create an outerSurface scene box geometry object with the dimensions of the floor and ceiling.
Add visible content to the box object’s diffuse property so it is rendered. You set the transparency to a very low value so the object is hidden from view.
Create an SCNNode object from the outerSurface geometry. Set renderingOrder for the node to 10. Nodes with a larger rendering order are rendered last. To make the ceiling and floor invisible from outside the portal, you will make the rendering order of the inner ceiling and floor nodes much larger than 10.
Now add the following code to SCNNodeHelpers to create the portal floor:
func makeFloorNode() -> SCNNode { // 1 let outerFloorNode = makeOuterSurfaceNode( width: SURFACE_WIDTH, height: SURFACE_HEIGHT, length: SURFACE_LENGTH) // 2 outerFloorNode.position = SCNVector3(SURFACE_HEIGHT * 0.5, -SURFACE_HEIGHT, 0) let floorNode = SCNNode() floorNode.addChildNode(outerFloorNode) // 3 let innerFloor = SCNBox(width: SURFACE_WIDTH, height: SURFACE_HEIGHT, length: SURFACE_LENGTH, chamferRadius: 0) // 4 innerFloor.firstMaterial?.lightingModel = .physicallyBased innerFloor.firstMaterial?.diffuse.contents = UIImage(named: "Assets.scnassets/floor/textures/Floor_Diffuse.png") innerFloor.firstMaterial?.normal.contents = UIImage(named: "Assets.scnassets/floor/textures/Floor_Normal.png") innerFloor.firstMaterial?.roughness.contents = UIImage(named: "Assets.scnassets/floor/textures/Floor_Roughness.png") innerFloor.firstMaterial?.specular.contents = UIImage(named: "Assets.scnassets/floor/textures/Floor_Specular.png") innerFloor.firstMaterial?.selfIllumination.contents = UIImage(named: "Assets.scnassets/floor/textures/Floor_Gloss.png") // 5 repeatTextures(geometry: innerFloor, scaleX: SCALEX, scaleY: SCALEY) // 6 let innerFloorNode = SCNNode(geometry: innerFloor) innerFloorNode.renderingOrder = 100 // 7 innerFloorNode.position = SCNVector3(SURFACE_HEIGHT * 0.5, 0, 0) floorNode.addChildNode(innerFloorNode) return floorNode }
Breaking this down:
Create the lower side of the floor node using the floor’s dimensions.
Position outerFloorNode such that it’s laid out on the bottom side of the floor node. Add the node to the floorNode which holds both the inner and outer surfaces of the floor.
You make the geometry of the floor using the SCNBox object initialized with the constants declared previously for each dimension.
The lightingModel of the material for the floor is set to physicallyBased. This type of shading incorporates a realistic abstraction of physical lights and materials. The contents for various visual properties for the material are set using texture images from the scnassets catalog.
The texture for the material is repeated over the X and Y dimensions using repeatTextures(), which you defined before.
You create a node for the floor using the innerFloor geometry object and set the rendering order to higher than that of the outerFloorNode. This ensures that when the user is outside the portal, the floor node will be invisible.
Finally, set the position of innerFloorNode to sit above the outerFloorNode and add it as a child to floorNode. Return the floor node object to the caller.
Open PortalViewController.swift and add the following constants:
let POSITION_Y: CGFloat = -WALL_HEIGHT*0.5 let POSITION_Z: CGFloat = -SURFACE_LENGTH*0.5
These constants represent the position offsets for nodes in the Y and Z dimensions.
Add the floor node to your portal by replacing makePortal().
func makePortal() -> SCNNode { // 1 let portal = SCNNode() // 2 let floorNode = makeFloorNode() floorNode.position = SCNVector3(0, POSITION_Y, POSITION_Z) // 3 portal.addChildNode(floorNode) return portal }
Fairly straightforward code:
You create a SCNNode object to hold the portal.
You create the floor node using makeFloorNode() defined in SCNNodeHelpers. You set the position of floorNode using the constant offsets. The center of the SCNGeometry is set to this location in the node’s parent’s coordinate system.
Add the floorNode to the portal node and return the portal node. Note that the portal node is added to the node created at the anchor’s position when the user taps the view in renderer(_ :, didAdd:, for:).
Build and run the app. You’ll notice the floor node is dark. That’s because you haven’t added a light source yet!
Now add the ceiling node. Open SCNNodeHelpers.swift and add the following method:
func makeCeilingNode() -> SCNNode { // 1 let outerCeilingNode = makeOuterSurfaceNode( width: SURFACE_WIDTH, height: SURFACE_HEIGHT, length: SURFACE_LENGTH) // 2 outerCeilingNode.position = SCNVector3(SURFACE_HEIGHT * 0.5, SURFACE_HEIGHT, 0) let ceilingNode = SCNNode() ceilingNode.addChildNode(outerCeilingNode) // 3 let innerCeiling = SCNBox(width: SURFACE_WIDTH, height: SURFACE_HEIGHT, length: SURFACE_LENGTH, chamferRadius: 0) // 4 innerCeiling.firstMaterial?.lightingModel = .physicallyBased innerCeiling.firstMaterial?.diffuse.contents = UIImage(named: "Assets.scnassets/ceiling/textures/Ceiling_Diffuse.png") innerCeiling.firstMaterial?.emission.contents = UIImage(named: "Assets.scnassets/ceiling/textures/Ceiling_Emis.png") innerCeiling.firstMaterial?.normal.contents = UIImage(named: "Assets.scnassets/ceiling/textures/Ceiling_Normal.png") innerCeiling.firstMaterial?.specular.contents = UIImage(named: "Assets.scnassets/ceiling/textures/Ceiling_Specular.png") innerCeiling.firstMaterial?.selfIllumination.contents = UIImage(named: "Assets.scnassets/ceiling/textures/Ceiling_Gloss.png") // 5 repeatTextures(geometry: innerCeiling, scaleX: SCALEX, scaleY: SCALEY) // 6 let innerCeilingNode = SCNNode(geometry: innerCeiling) innerCeilingNode.renderingOrder = 100 // 7 innerCeilingNode.position = SCNVector3(SURFACE_HEIGHT * 0.5, 0, 0) ceilingNode.addChildNode(innerCeilingNode) return ceilingNode }
Here’s what’s happening:
Similar to the floor, you create an outerCeilingNode with the dimensions for the ceiling.
Set the position of the outer ceiling node so that it goes on top of the ceiling. Create a node to hold the inner and outer sides of the ceiling. Add outerCeilingNode as a child of the ceilingNode.
Make innerCeiling an SCNBox object with the respective dimensions.
Set the lightingModel to physicallyBased. Also set the contents of the visual properties that are defined by various texture images found in the assets catalog.
repeatTextures() wraps the texture images in both the X and Y dimensions to create a repeated pattern for the ceiling.
Create innerCeilingNode using the innerCeiling geometry and set its renderingOrder property to a high value so that it gets rendered after the outerCeilingNode.
Position innerCeilingNode within its parent node and add it as a child of ceilingNode. Return ceilingNode to the caller.
Now to call this from somewhere. Open PortalViewController.swift and add the following block of code to makePortal() just before the return statement.
// 1 let ceilingNode = makeCeilingNode() ceilingNode.position = SCNVector3(0, POSITION_Y+WALL_HEIGHT, POSITION_Z) // 2 portal.addChildNode(ceilingNode)
Create the ceiling node using makeCeilingNode() which you just defined. Set the position of the center of ceilingNode to the SCNVector3 struct. The Y coordinate of the center is offset by the Y position of the floor added to the height of the wall.
You also subtract SURFACE_HEIGHT to account for the thickness of the ceiling. The Z coordinate is set to the POSITION_Z offset similar to the floor. This is how far away the center of the ceiling is from the camera along the Z axis.
Add ceilingNode as a child of the portal.
Build and run the app. Here’s what you’ll see:
Time to add the walls!
Open SCNNodeHelpers.swift and add the following method.
func makeWallNode(length: CGFloat = WALL_LENGTH, height: CGFloat = WALL_HEIGHT, maskLowerSide:Bool = false) -> SCNNode { // 1 let outerWall = SCNBox(width: WALL_WIDTH, height: height, length: length, chamferRadius: 0) // 2 outerWall.firstMaterial?.diffuse.contents = UIColor.white outerWall.firstMaterial?.transparency = 0.000001 // 3 let outerWallNode = SCNNode(geometry: outerWall) let multiplier: CGFloat = maskLowerSide ? -1 : 1 outerWallNode.position = SCNVector3(WALL_WIDTH*multiplier,0,0) outerWallNode.renderingOrder = 10 // 4 let wallNode = SCNNode() wallNode.addChildNode(outerWallNode) // 5 let innerWall = SCNBox(width: WALL_WIDTH, height: height, length: length, chamferRadius: 0) // 6 innerWall.firstMaterial?.lightingModel = .physicallyBased innerWall.firstMaterial?.diffuse.contents = UIImage(named: "Assets.scnassets/wall/textures/Walls_Diffuse.png") innerWall.firstMaterial?.metalness.contents = UIImage(named: "Assets.scnassets/wall/textures/Walls_Metalness.png") innerWall.firstMaterial?.roughness.contents = UIImage(named: "Assets.scnassets/wall/textures/Walls_Roughness.png") innerWall.firstMaterial?.normal.contents = UIImage(named: "Assets.scnassets/wall/textures/Walls_Normal.png") innerWall.firstMaterial?.specular.contents = UIImage(named: "Assets.scnassets/wall/textures/Walls_Spec.png") innerWall.firstMaterial?.selfIllumination.contents = UIImage(named: "Assets.scnassets/wall/textures/Walls_Gloss.png") // 7 let innerWallNode = SCNNode(geometry: innerWall) wallNode.addChildNode(innerWallNode) return wallNode }
Going over the code step-by-step:
You create an outerWall node which will sit on the outside of the wall to make it appear transparent from the outside. You create an SCNBox object matching the wall’s dimensions.
You set the diffuse contents of the material to a monochrome white color and the transparency to a low number. This helps achieve the see-through effect if you look at the wall from outside the room.
You create a node with the outerWall geometry. The multiplier is set based on which side of the wall the outer wall needs to be rendered. If maskLowerSide is set to true, the outer wall is placed below the inner wall in the wall node’s coordinate system; otherwise, it’s placed above.
You set the position of the node such that the outer wall is offset by the wall width in the X dimension. Set the rendering order for the outer wall to a low number so that it’s rendered first. This makes the walls invisible from the outside.
You also create a node to hold the wall and add the outerWallNode as its child node.
You make innerWall an SCNBox object with the respective wall dimensions.
You set the lightingModel to physicallyBased. Similar to the ceiling and floor nodes, you set the contents of the visual properties that are defined by various texture images for the walls.
Finally, you create an innerWallNode object using the innerWall geometry. Add this node to the parent wallNode object. By default, innerWallNode is placed at the origin of wallNode. Return the node to the caller.
Now add the far wall for the portal. Open PortalViewController.swift and add the following to the end of makePortal() just before the return statement:
// 1 let farWallNode = makeWallNode() // 2 farWallNode.eulerAngles = SCNVector3(0, 90.0.degreesToRadians, 0) // 3 farWallNode.position = SCNVector3(0, POSITION_Y+WALL_HEIGHT*0.5, POSITION_Z-SURFACE_LENGTH*0.5) portal.addChildNode(farWallNode)
This is fairly straightforward:
Create a node for the far wall. farWallNode needs the mask on the lower side. So the default value of false for maskLowerSide will do.
Add eulerAngles to the node. Since the wall is rotated along the Y axis and perpendicular to the camera, it has a rotation of 90 degrees for the second component. The wall does not have a rotation angle for the X and Z axes.
Set the position of the center of farWallNode such that its height is offset by POSITION_Y. Its depth is calculated by adding the depth of the center of the ceiling to the distance from the center of the ceiling to its far end.
Build and run the app, and you will see the far wall attached to the ceiling on top and attached to the floor on the bottom.
Next up you will add the right and left walls. In makePortal(), add the following code just before the return portal statement to create the right and left side walls:
// 1 let rightSideWallNode = makeWallNode(maskLowerSide: true) // 2 rightSideWallNode.eulerAngles = SCNVector3(0, 180.0.degreesToRadians, 0) // 3 rightSideWallNode.position = SCNVector3(WALL_LENGTH*0.5, POSITION_Y+WALL_HEIGHT*0.5, POSITION_Z) portal.addChildNode(rightSideWallNode) // 4 let leftSideWallNode = makeWallNode(maskLowerSide: true) // 5 leftSideWallNode.position = SCNVector3(-WALL_LENGTH*0.5, POSITION_Y+WALL_HEIGHT*0.5, POSITION_Z) portal.addChildNode(leftSideWallNode)
Going through this step-by-step:
Create a node for the right wall. You want to put the outer wall on the lower side of the node so you set maskLowerSide to true.
You set the rotation of the wall along the Y axis to 180 degrees. This ensures the wall has its inner side facing the right way.
Set the location of the wall so that it’s flush with the right edge of the far wall, ceiling and floor. Add rightSideWallNode as a child node of portal.
Similar to the right wall node, create a node to represent the left wall with maskLowerSide set to true.
The left wall does not have any rotation applied to it, but you adjust its location so that it’s flush with the left edge of the far wall, floor and ceiling. You add the left wall node as a child node of the portal node.
Build and run the app, and your portal now has three walls. If you move out of the portal, none of the walls are visible.
Adding the Doorway
There’s one thing missing in your portal: an entrance! Currently, the portal does not have a fourth wall. Instead of adding another wall, you will add just the necessary parts of a wall to leave room for a doorway.
Open PortalViewController.swift and add these constants:
let DOOR_WIDTH:CGFloat = 1.0 let DOOR_HEIGHT:CGFloat = 2.4
As their names suggest, these define the width and height of the doorway.
Add the following to PortalViewController:
func addDoorway(node: SCNNode) { // 1 let halfWallLength: CGFloat = WALL_LENGTH * 0.5 let frontHalfWallLength: CGFloat = (WALL_LENGTH - DOOR_WIDTH) * 0.5 // 2 let rightDoorSideNode = makeWallNode(length: frontHalfWallLength) rightDoorSideNode.eulerAngles = SCNVector3(0,270.0.degreesToRadians, 0) rightDoorSideNode.position = SCNVector3(halfWallLength - 0.5 * DOOR_WIDTH, POSITION_Y+WALL_HEIGHT*0.5, POSITION_Z+SURFACE_LENGTH*0.5) node.addChildNode(rightDoorSideNode) // 3 let leftDoorSideNode = makeWallNode(length: frontHalfWallLength) leftDoorSideNode.eulerAngles = SCNVector3(0, 270.0.degreesToRadians, 0) leftDoorSideNode.position = SCNVector3(-halfWallLength + 0.5 * frontHalfWallLength, POSITION_Y+WALL_HEIGHT*0.5, POSITION_Z+SURFACE_LENGTH*0.5) node.addChildNode(leftDoorSideNode) }
addDoorway(node:) is a method that adds a wall with an entrance to the given node.
Here’s what you’re doing:
Define constants to store the half wall length and the length of the front wall on each side of the door.
Create a node to represent the wall on the right side of the entrance using the constants declared in the previous step. You also adjust the rotation and location of the node so that it’s attached to the front edge of the right wall, ceiling and floor. You then add rightDoorSideNode as a child of the given node.
Similar to step 2, you create a node for the left side of the doorway, and set the rotation and location of leftDoorSideNode so that it is flush with the front edge of the left wall, ceiling and floor nodes. Finally, you use addChildNode() to add it as a child node to node.
In makePortalNode(), add the following just before return portal:
addDoorway(node: portal)
Here you add the doorway to the portal node.
Build and run the app. You’ll see the doorway on the portal, but the top of the door is currently touching the ceiling. You’ll need to add another piece of the wall to make the doorway span the pre-defined DOOR_HEIGHT.
Add the following at the end of addDoorway(node:):
// 1 let aboveDoorNode = makeWallNode(length: DOOR_WIDTH, height: WALL_HEIGHT - DOOR_HEIGHT) // 2 aboveDoorNode.eulerAngles = SCNVector3(0, 270.0.degreesToRadians, 0) // 3 aboveDoorNode.position = SCNVector3(0, POSITION_Y+(WALL_HEIGHT-DOOR_HEIGHT)*0.5+DOOR_HEIGHT, POSITION_Z+SURFACE_LENGTH*0.5) node.addChildNode(aboveDoorNode)
Create a wall node with the respective dimensions to fit above the entrance of the portal.
Adjust the rotation of aboveDoorNode so that it’s at the front of the portal. The masked side is placed on the outside.
Set the position of the node so that it’s placed on top of the doorway that you just built. Add it as a child node of node.
Build and run. This time you’ll notice the doorway is now complete with a proper wall.
Placing Lights
That portal doesn’t look too inviting. In fact, it’s rather dark and gloomy. You can add a light source to brighten it up!
Add the following method to PortalViewController:
func placeLightSource(rootNode: SCNNode) { // 1 let light = SCNLight() light.intensity = 10 // 2 light.type = .omni // 3 let lightNode = SCNNode() lightNode.light = light // 4 lightNode.position = SCNVector3(0, POSITION_Y+WALL_HEIGHT, POSITION_Z) rootNode.addChildNode(lightNode) }
Here’s how it works:
Create an SCNLight object and set its intensity. Since you’re using the physicallyBased lighting model, this value is the luminous flux of the light source. The default value is 1000 lumens, but you want an intensity which is much lower, giving it a slightly darker look.
A light’s type determines the shape and direction of illumination provided by the light, as well as the set of attributes available for modifying the light’s behavior. Here, you set the type of the light to omnidirectional, also known as a point light. An omnidirectional light has constant intensity and a direction. The light’s position relative to other objects in your scene determines its direction.
You create a node to hold the light and attach the light object to the node using its light property.
Place the light at the center of the ceiling using the Y and Z offsets and then add lightNode as a child of the rootNode.
In makePortal(), add the following just before return portal.
placeLightSource(rootNode: portal)
This places the light source inside the portal.
Build and run the app, and you’ll see a brighter, more inviting doorway to your virtual world!
Where to Go From Here?
The portal is complete! You have learned a lot through creating this sci-fi portal. Let’s take a quick look at all the things you covered in this tutorial series.
You have a basic understanding of SceneKit’s coordinate system and materials.
You learned how to create SCNNode objects with different geometries and attach textures to them.
You also placed light sources in your scene so that the portal looked more realistic.
Going forward, there are many changes you can make to the portal project. You can:
Make a door that opens or shuts when the user taps on the screen.
Explore various geometries to create a room that spans infinitely.
Experiment with different shapes for the doorway.
But don’t stop here. Let your sci-fi imagination run wild!
If you enjoyed what you learned in this tutorial, why not check out our complete book, ARKit by Tutorials, available on our online store?
ARKit is Apple’s mobile AR development framework. With it, you can create an immersive, engaging experience, mixing virtual 2D and 3D content with the live camera feed of the world around you.
If you’ve worked with any of Apple’s other frameworks, you’re probably expecting that it will take a long time to get things working. But with ARKit, it only takes a few lines of code — ARKit does most of the the heavy lifting for you, so you can focus on what’s important: creating an immersive and engaging AR experience.
In this book, you’ll create five immersive and engaging apps: a tabletop poker dice game, an immersive sci-fi portal, a 3D face-tracking mask app, a location-based AR ad network, and monster truck simulation with realistic vehicle physics.
To celebrate the launch of the book, it’s currently on sale as part of our Game On book launch event. But don’t wait too long, as this deal is only good until Friday, June 8th!
If you have any questions or comments on this tutorial, feel free to join the discussion below!
The post Building a Portal App in ARKit: Materials and Lighting appeared first on Ray Wenderlich.
Building a Portal App in ARKit: Materials and Lighting published first on https://medium.com/@koresol
0 notes
Text
Tutorial: Real world snapshots with ARKit and Xcode
## Introduction
Using an AR platform for the first time can be really intimidating (I've been there!), that's why I want to demystify using ARKit with Xcode.
The goal is making an app that takes pictures and hangs them in the place where they were taken (Similar to some art projects we've seen in class)
## First steps
Let's first open Xcode and create a new project based on the **Augmented Reality App** template. This template does the heavy lifting of setting up everything you need to get you started right away.
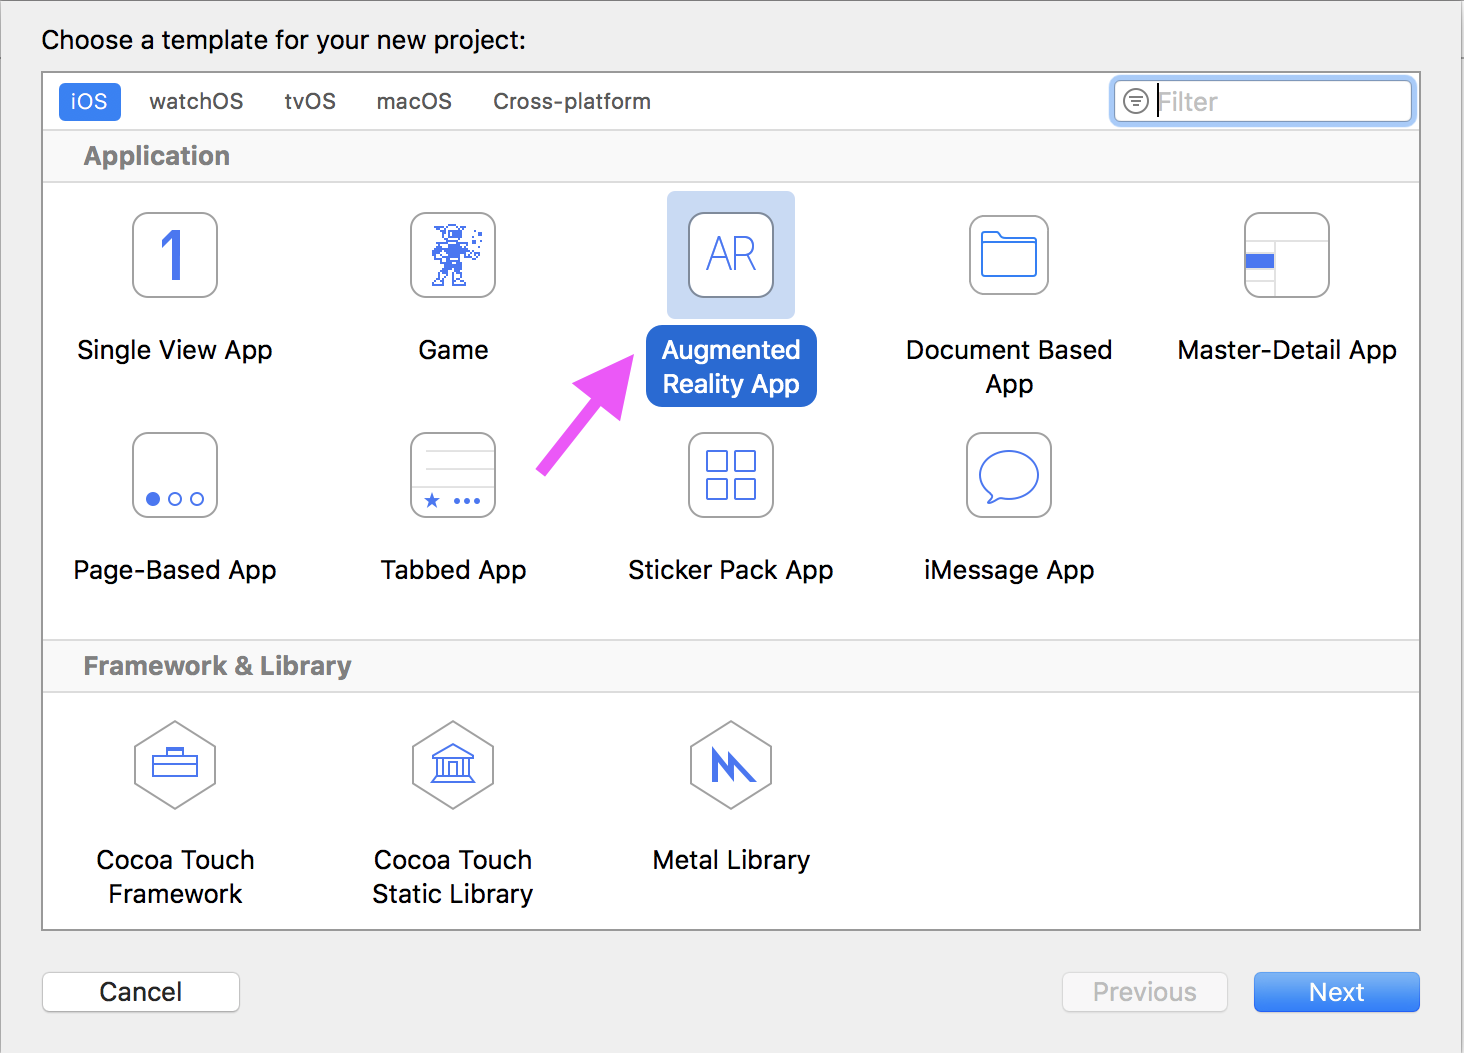
Make sure to select **SceneKit** as *content technology* (the engine ARKit uses for rendering stuff. SceneKit is for 3D, SpriteKit for 2D and Metal is Apple's OpenGL equivalent)
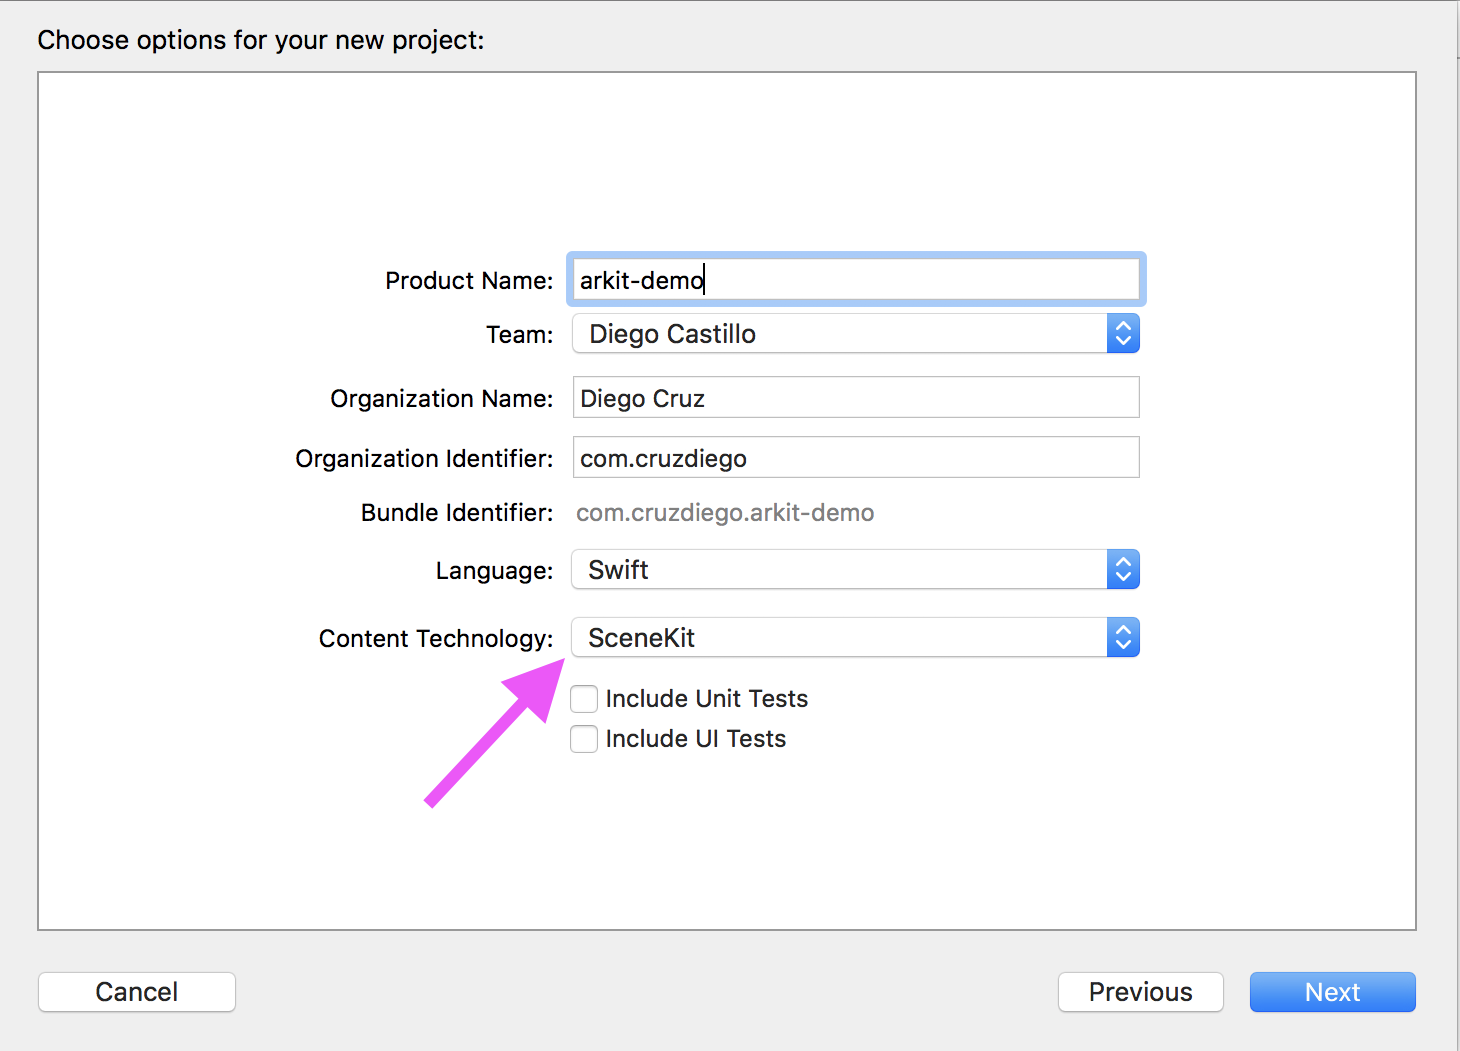
Now press the Play button and run the project on your device. You've just made an awesome AR ship app without even coding anything!
## Let's add some code
For making the app we want, we basically need 2 things:
1. Take a picture 2. Place it in the real world
Add this piece of code anywhere on **ViewController.swift** for doing just that:
``` @IBAction func takeAndPlacePicture(sender: Any) { //Validating the framework and camera is working guard let currentFrame = sceneView.session.currentFrame else { return }
//1. Taking a picture let imagePlane = SCNPlane(width: sceneView.bounds.width / 6000, height: sceneView.bounds.height / 6000) imagePlane.firstMaterial?.diffuse.contents = sceneView.snapshot() imagePlane.firstMaterial?.lightingModel = .constant
//2. Placing it on the screen (by default it's 0,0,0 ) let planeNode = SCNNode(geometry: imagePlane) sceneView.scene.rootNode.addChildNode(planeNode)
//2.5 Moving it to the camera's position planeNode.simdTransform = currentFrame.camera.transform } ```
## Plugging things together
We need to run that code every time we tap the screen. So now we need:
1. Identify a tap on the screen 2. Trigger the code
On **Main.storyboard** find a *UITapGestureRecognizer* on the bottom right of the screen, and drag it to the screen's top bar.
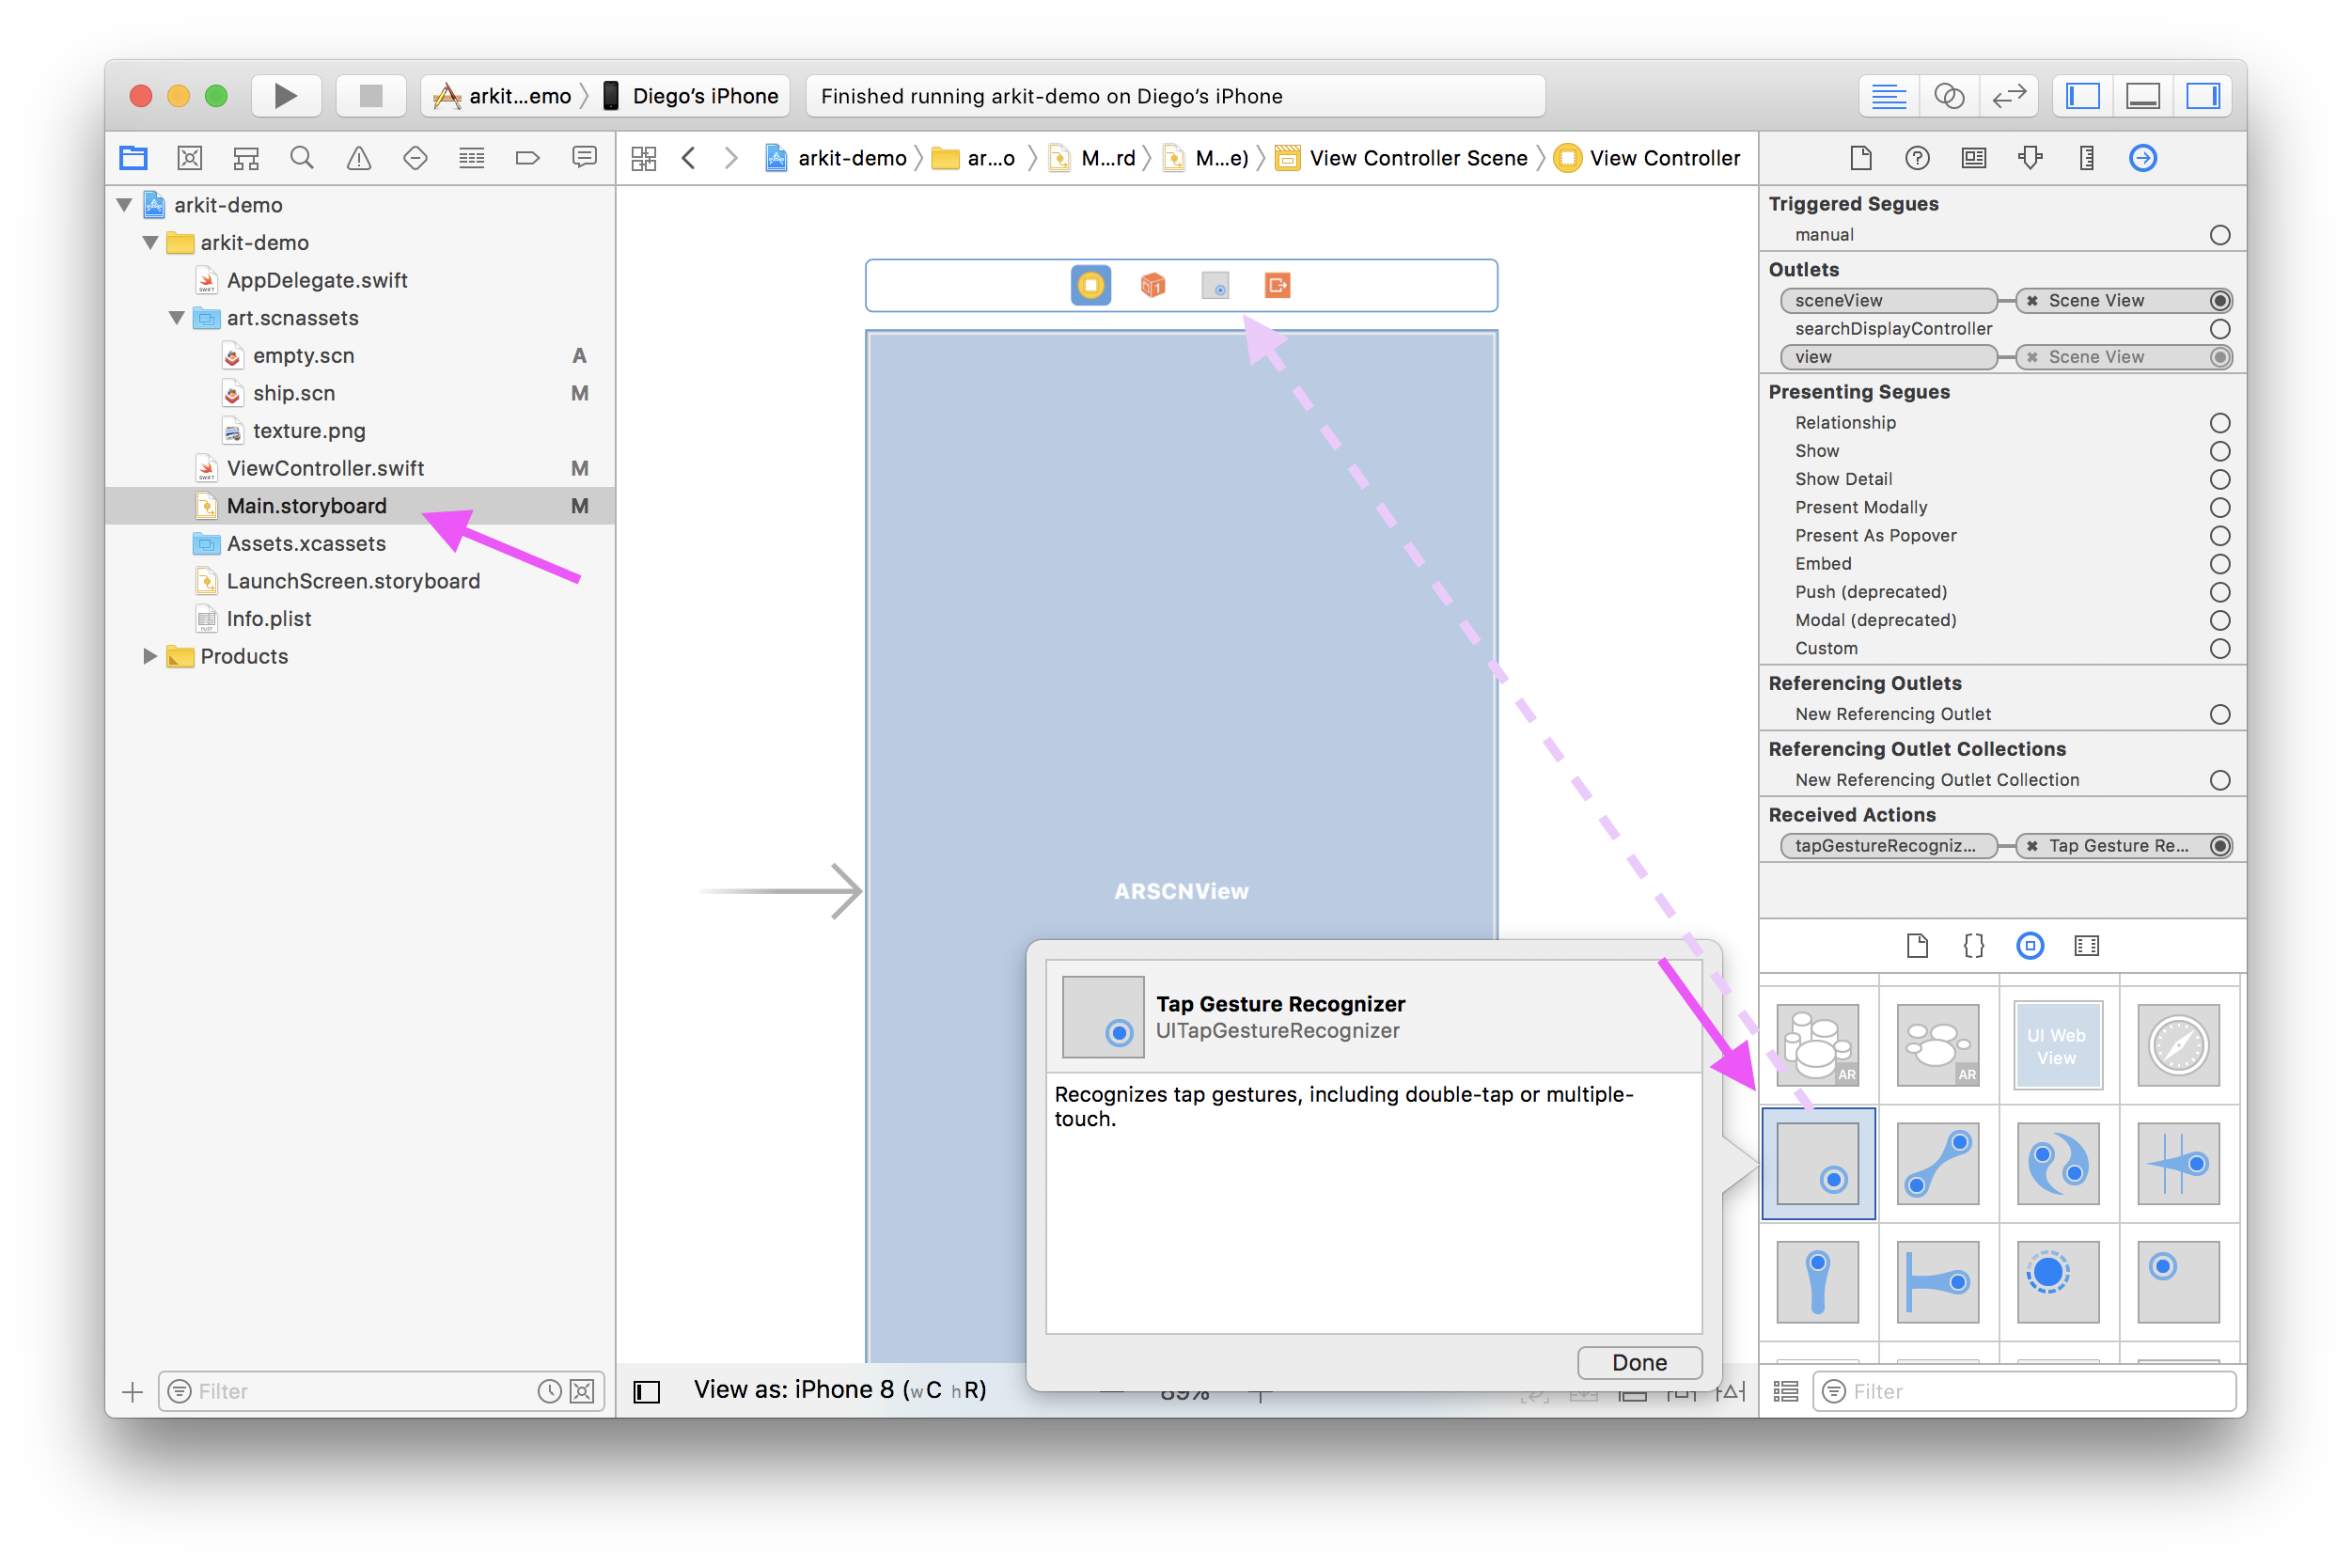
Select it and drag *Sent actions* to the top bar's first icon (which represents **ViewController.swift**). Select **takeAndPlacePicture** from the popup list. This means our function will run every time our *UITapGestureRecognizer* recognizes a tap.
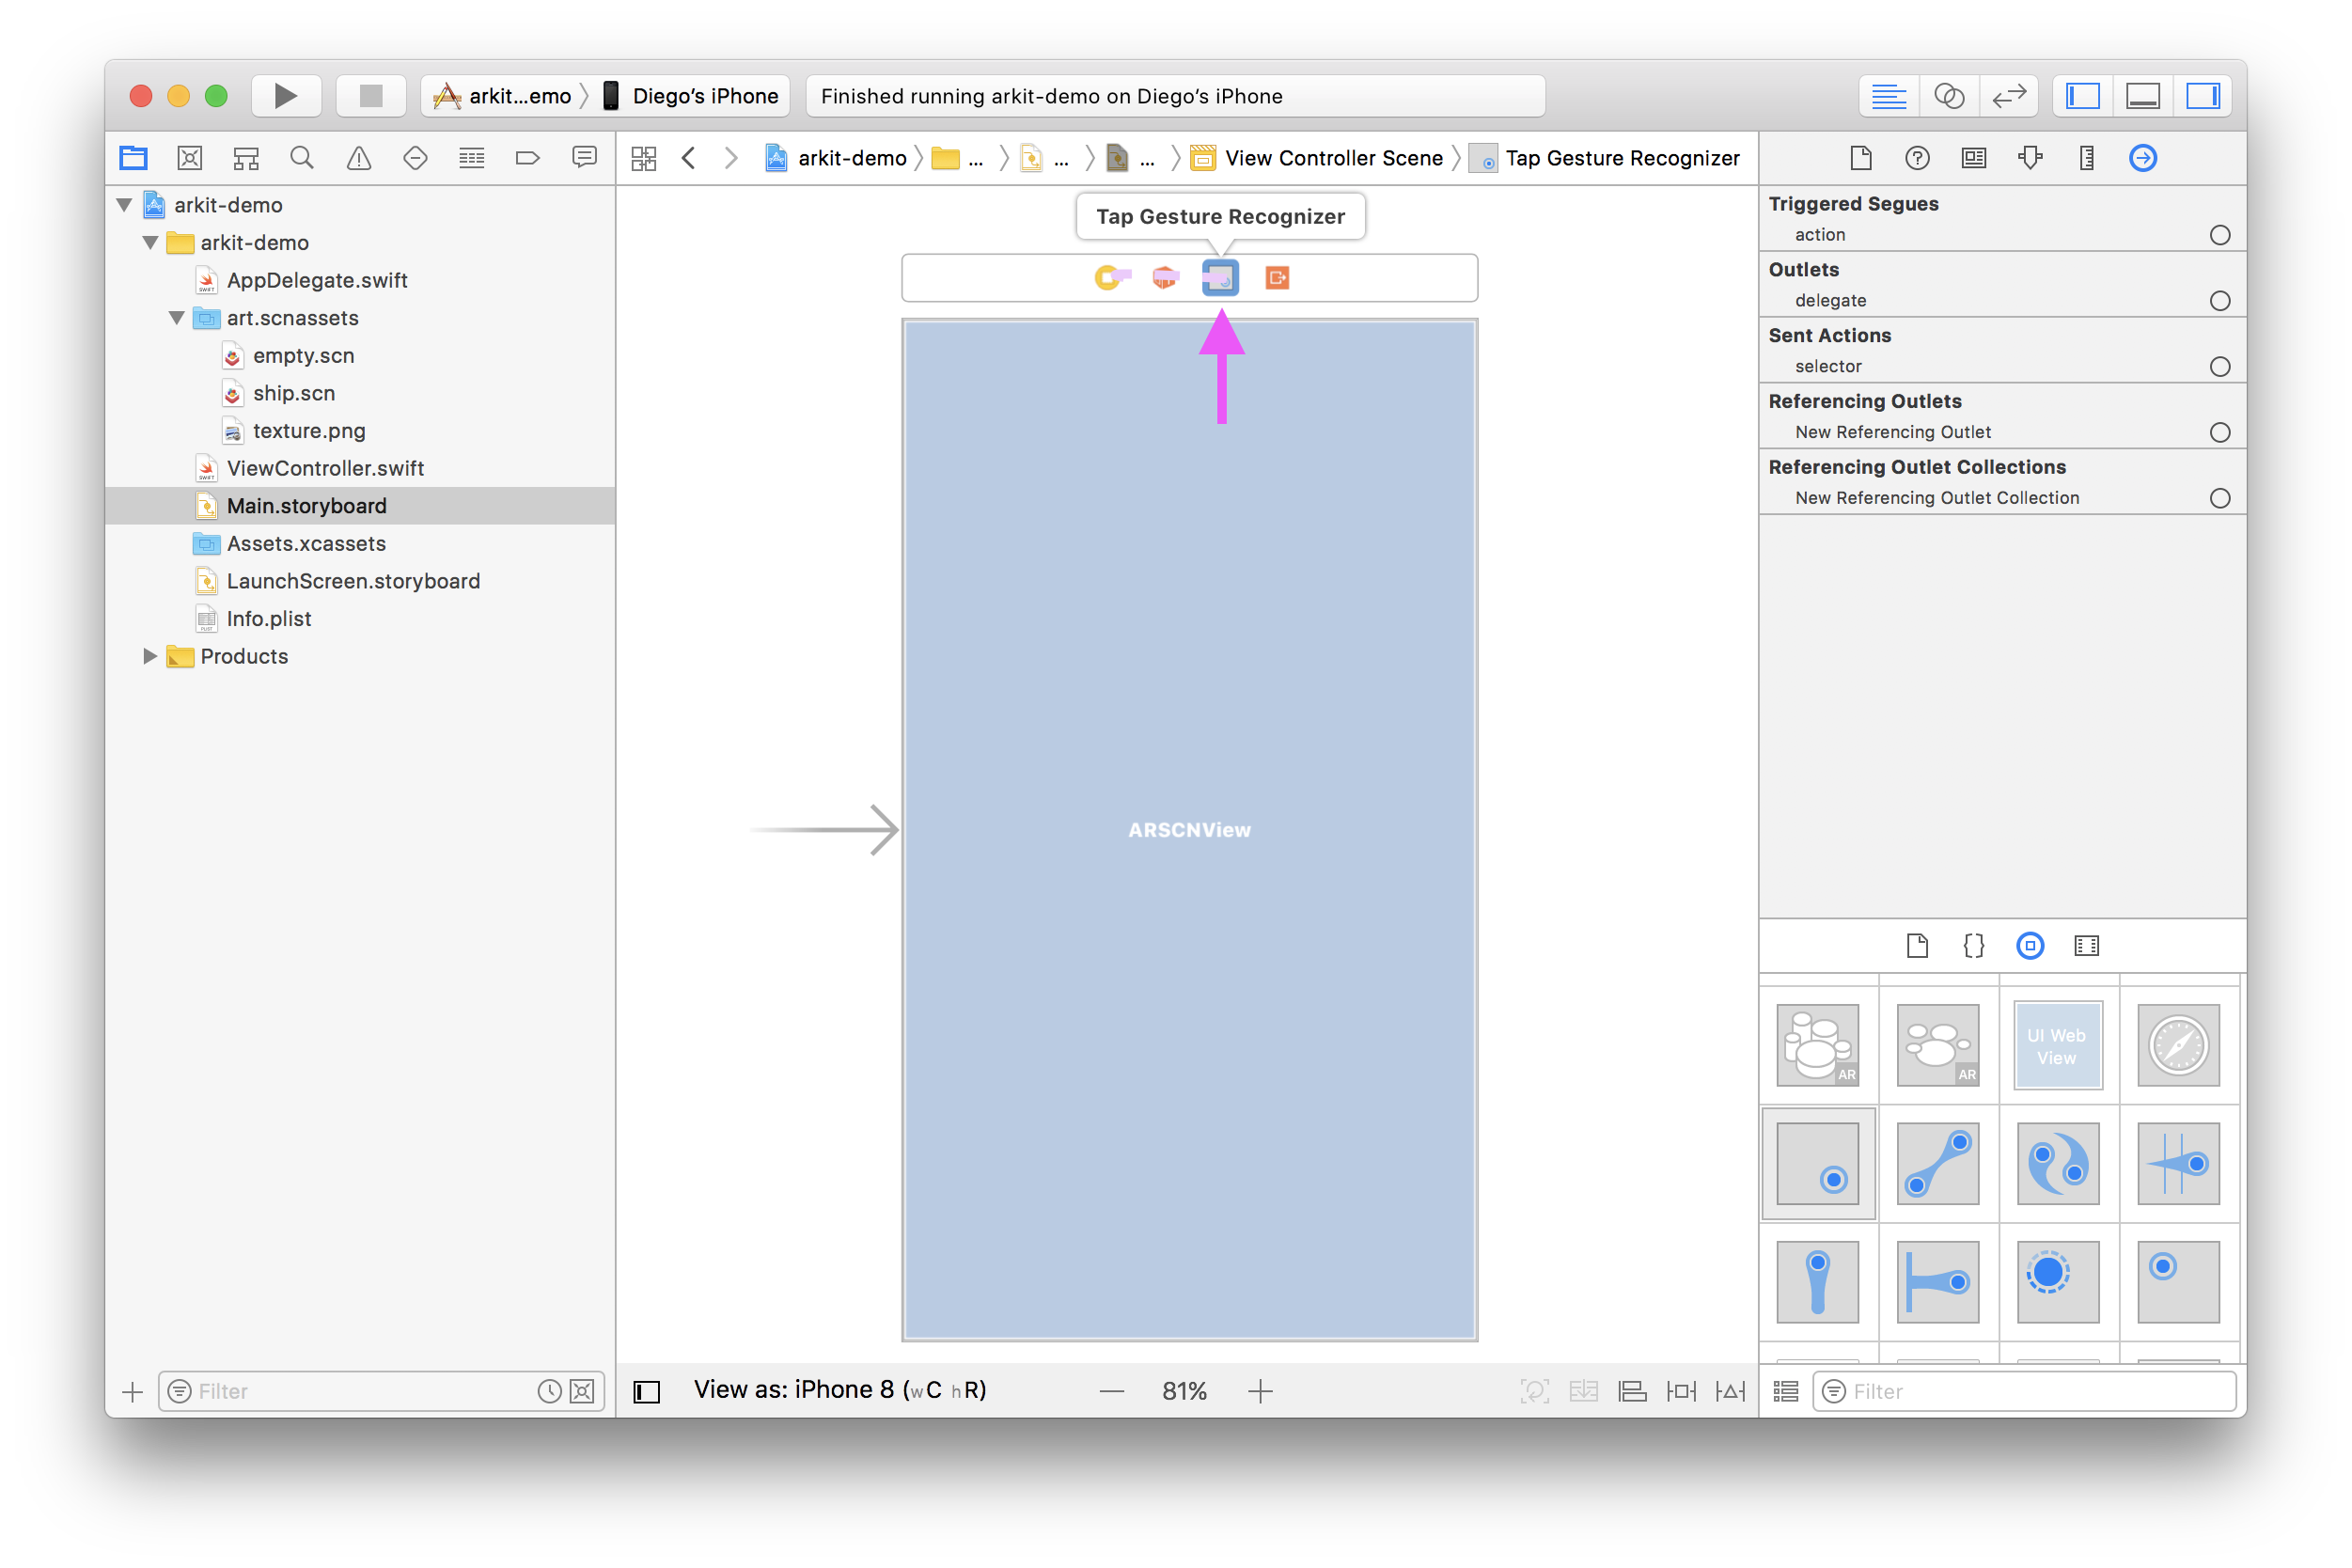 
Last step is telling the *UITapGestureRecognizer* where it needs to recognize taps on (since you could have many different views on your screen). Select the big blue view on top of your screen and *gestureRecognizers* from the right sidebar to our *UITapGestureRecognizer*'s icon on the screen top bar.

## And that's it!
Run the code again (with your device in landscape) and try it out. It works!
## Next steps
We can tweak just a bit more our code for having a better experience.
#### Remove the 3D ship
The plane is awesome, but maybe you don't want it on your app. So let's take it out.
Go to **ship.scn**, select the ship and hit *Delete*. That's it.
#### Better placing the snapshots
The snapshots look great, but they might be too close to the camera. Go to our function and replace 2.5 step with this:
``` //2.5 Moving it 10cm away from the camera's position var translation = matrix_identity_float4x4 translation.columns.3.z = -0.1 planeNode.simdTransform = matrix_multiply(currentFrame.camera.transform, translation) ```
Run again and the snapshots should appear at a more convenient distance from your device.
## More resources
You can check out the complete project on my Github page: https://github.com/cruzdiego/arkit-demo
This tutorial has been heavily based from Apple's own video session on ARKit: https://developer.apple.com/videos/play/wwdc2017/602/
For more videos like that and even more examples and documentation, make sure to visit Apple's website: https://developer.apple.com/arkit/
0 notes
Text
Building a Portal App in ARKit: Getting Started
This is an excerpt taken from Chapter 7, “Creating Your Portal”, of our book ARKit by Tutorials. This book show you how to build five immersive, great-looking AR apps in ARKit, Apple’s augmented reality framework. Enjoy!
Over this series of tutorials, you’ll implement a portal app using ARKit and SceneKit. Portal apps can be used for educational purposes, like a virtual tour of the solar system from space, or for more leisurely activities, like enjoying a virtual beach vacation.
The Portal App
The portal app you’ll be building lets you place a virtual doorway to a futuristic room, somewhere on a horizontal plane in the real world. You can walk in and out of this virtual room, and you can explore what’s inside.
In this tutorial, you’ll set up the basics for your portal app. By the end of the tutorial, you’ll know how to:
Set up an ARSession
Detect and render horizontal planes using ARKit
Are you ready to build a gateway into another world? Perfect!
Getting Started
In Xcode, open the starter project, Portal.xcodeproj. Build and run the project, and you’ll see a blank white screen.
Ah, yes, the blank canvas of opportunity!
Open Main.storyboard and expand the Portal View Controller Scene.
The PortalViewController is presented to the user when the app is launched. The PortalViewController contains an ARSCNView that displays the camera preview. It also contains two UILabels that provide instructions and feedback to the user.
Now, open PortalViewController.swift. In this file, you’ll see the following variables, which represent the elements in the storyboard:
// 1 @IBOutlet var sceneView: ARSCNView? // 2 @IBOutlet weak var messageLabel: UILabel? // 3 @IBOutlet weak var sessionStateLabel: UILabel?
Let’s take a look at what each one does:
sceneView is used to augment the camera view with 3D SceneKit objects.
messageLabel, which is a UILabel, will display instructional messages to the user. For example, telling them how to interact with your app.
sessionStateLabel, another UILabel, will inform the user about session interruptions, such as when the app goes into the background or if the ambient lighting is insufficient.
Note: ARKit processes all of the sensor and camera data, but it doesn’t actually render any of the virtual content. To render content in your scenes, there are various renderers you can use alongside ARKit, such as SceneKit or SpriteKit.
ARSCNView is a framework provided by Apple which you can use to easily integrate ARKit data with SceneKit. There are many benefits to using ARSCNView, which is why you’ll use it in this tutorial’s project.
In the starter project, you’ll also find a few utility classes in the Helpers group. You’ll be using these as you develop the app further.
Setting Up ARKit
The first step to setting things up is to capture the device’s video stream using the camera. For that, you’ll be using an ARSCNView object.
Open PortalViewController.swift and add the following method:
func runSession() { // 1 let configuration = ARWorldTrackingConfiguration.init() // 2 configuration.planeDetection = .horizontal // 3 configuration.isLightEstimationEnabled = true // 4 sceneView?.session.run(configuration) // 5 #if DEBUG sceneView?.debugOptions = [ARSCNDebugOptions.showFeaturePoints] #endif }
Let’s take a look at what’s happening with this code:
You first instantiate an ARWorldTrackingConfiguration object. This defines the configuration for your ARSession. There are two types of configurations available for an ARSession: ARSessionConfiguration and ARWorldTrackingConfiguration.
Using ARSessionConfiguration is not recommended because it only accounts for the rotation of the device, not its position. For devices that use an A9 processor, ARWorldTrackingSessionConfiguration gives the best results, as it tracks all degrees of movement of the device.
configuration.planeDetection is set to detect horizontal planes. The extent of the plane can change, and multiple planes can merge into one as the camera moves. It can find planes on any horizontal surface such as a floor, table or couch.
This enables light estimation calculations, which can be used by the rendering framework to make the virtual content look more realistic.
Start the session’s AR processing with the specified session configuration. This will start the ARKit session and video capturing from the camera, which is displayed in the sceneView.
For debug builds, this adds visible feature points; these are overlaid on the camera view.
Now it’s time to set up the defaults for the labels. Replace resetLabels() with the following:
func resetLabels() { messageLabel?.alpha = 1.0 messageLabel?.text = "Move the phone around and allow the app to find a plane." + "You will see a yellow horizontal plane." sessionStateLabel?.alpha = 0.0 sessionStateLabel?.text = "" }
This resets the opacity and text of messageLabel and sessionStateLabel. Remember, messageLabel is used to display instructions to the user, while sessionStateLabel is used to display any error messages, in the case something goes wrong.
Now, add runSession() to viewDidLoad() of PortalViewController:
override func viewDidLoad() { super.viewDidLoad() resetLabels() runSession() }
This will run the ARKit session when the app launches and loads the view.
Next, build and run the app. Don’t forget — you’ll need to grant camera permissions to the app.
ARSCNView does the heavy lifting of displaying the camera video capture. Because you’re in debug mode, you can also see the rendered feature points, which form a point cloud showing the intermediate results of scene analysis.
Plane Detection and Rendering
Previously, in runSession(), you set planeDetection to .horizontal, which means your app can detect horizontal planes. You can obtain the captured plane information in the delegate callback methods of the ARSCNViewDelegate protocol.
Start by extending PortalViewController so it implements the ARSCNViewDelegate protocol:
extension PortalViewController: ARSCNViewDelegate { }
Add the following line to the very end of runSession():
sceneView?.delegate = self
This sets the ARSCNViewDelegate delegate property of the sceneView as the PortalViewController.
ARPlaneAnchors are added automatically to the ARSession anchors array, and ARSCNView automatically converts ARPlaneAnchor objects to SCNNode nodes.
Now, to render the planes, all you need to do is implement the delegate method in the ARSCNViewDelegate extension of PortalViewController:
// 1 func renderer(_ renderer: SCNSceneRenderer, didAdd node: SCNNode, for anchor: ARAnchor) { // 2 DispatchQueue.main.async { // 3 if let planeAnchor = anchor as? ARPlaneAnchor { // 4 #if DEBUG // 5 let debugPlaneNode = createPlaneNode( center: planeAnchor.center, extent: planeAnchor.extent) // 6 node.addChildNode(debugPlaneNode) #endif // 7 self.messageLabel?.text = "Tap on the detected horizontal plane to place the portal" } } }
Here’s what’s happening:
The delegate method, renderer(_:didAdd:for:), is called when ARSession detects a new plane, and the ARSCNView automatically adds an ARPlaneAnchor for the plane.
The callbacks occur on a background thread. Here, you dispatch the block to the main queue because any operations updating the UI should be done on the main UI thread.
You check to see if the ARAnchor that was added is an ARPlaneAnchor.
This checks to see if you’re in debug mode.
If so, create the plane SCNNode object by passing in the center and extent coordinates of the planeAnchor detected by ARKit. The createPlaneNode() is a helper method which you’ll implement shortly.
The node object is an empty SCNNode that’s automatically added to the scene by ARSCNView; its coordinates correspond to the ARAnchor’s position. Here, you add the debugPlaneNode as a child node, so that it gets placed in the same position as the node.
Finally, regardless of whether or not you’re in debug mode, you update the instructional message to the user to indicate that the app is now ready to place the portal into the scene.
Now it’s time to set up the helper methods.
Create a new Swift file named SCNNodeHelpers.swift. This file will contain all of the utility methods related to rendering SCNNode objects.
Import SceneKit into this file by adding the following line:
import SceneKit
Now, add the following helper method:
// 1 func createPlaneNode(center: vector_float3, extent: vector_float3) -> SCNNode { // 2 let plane = SCNPlane(width: CGFloat(extent.x), height: CGFloat(extent.z)) // 3 let planeMaterial = SCNMaterial() planeMaterial.diffuse.contents = UIColor.yellow.withAlphaComponent(0.4) // 4 plane.materials = [planeMaterial] // 5 let planeNode = SCNNode(geometry: plane) // 6 planeNode.position = SCNVector3Make(center.x, 0, center.z) // 7 planeNode.transform = SCNMatrix4MakeRotation(-Float.pi / 2, 1, 0, 0) // 8 return planeNode }
Let’s go through this step-by-step:
The createPlaneNode method has two arguments: the center and extent of the plane to be rendered, both of type vector_float3. This type denotes the coordinates of the points. The function returns the SCNNode object created for the plane.
You instantiate the SCNPlane by specifying the width and height of the plane. You get the width from the x coordinate of the extent and the height from its z coordinate.
You initialize and assign the diffuse content for the SCNMaterial object. The diffuse layer color is set to a translucent yellow.
The SCNMaterial object is then added to the materials array of the plane. This defines the texture and color of the plane.
This creates an SCNNode with the geometry of the plane. The SCNPlane inherits from the SCNGeometry class, which only provides the form of a visible object rendered by SceneKit. You specify the position and orientation of the geometry by attaching it to an SCNNode object. Multiple nodes can reference the same geometry object, allowing it to appear at different positions in a scene.
You set the position of the planeNode. Note that the node is translated to coordinates (center.x, 0, center.z) reported by ARKit via the ARPlaneAnchor instance.
Planes in SceneKit are vertical by default, so you need to rotate the plane by 90 degrees in order to make it horizontal.
This returns the planeNode object created in the previous steps.
Build and run the app. If ARKit is able to detect a suitable surface in your camera view, you’ll see a yellow horizontal plane.
Move the device around and you’ll notice the app sometimes shows multiple planes. As it finds more planes, it adds them to the view. Existing planes, however, do not update or change size as ARKit analyzes more features in the scene.
ARKit constantly updates the plane’s position and extents based on new feature points it finds. To receive these updates in your app, add the following renderer(_:didUpdate:for:) delegate method to PortalViewController.swift:
// 1 func renderer(_ renderer: SCNSceneRenderer, didUpdate node: SCNNode, for anchor: ARAnchor) { // 2 DispatchQueue.main.async { // 3 if let planeAnchor = anchor as? ARPlaneAnchor, node.childNodes.count > 0 { // 4 updatePlaneNode(node.childNodes[0], center: planeAnchor.center, extent: planeAnchor.extent) } } }
Here’s what’s happening:
renderer(_:didUpdate:for:) is called when the corresponding ARAnchor updates.
Operations that update the UI should be executed on the main UI thread.
Check that the ARAnchor is an ARPlaneAnchor and make sure it has at least one child node that corresponds to the plane’s SCNNode.
updatePlaneNode(_:center:extent:) is a method that you’ll implement shortly. It updates the coordinates and size of the plane to the updated values contained in the ARPlaneAnchor.
Open SCNNodeHelpers.swift and add the following code:
func updatePlaneNode(_ node: SCNNode, center: vector_float3, extent: vector_float3) { // 1 let geometry = node.geometry as? SCNPlane // 2 geometry?.width = CGFloat(extent.x) geometry?.height = CGFloat(extent.z) // 3 node.position = SCNVector3Make(center.x, 0, center.z) }
Going through this code step-by-step:
Check if the node has SCNPlane geometry.
Update the node geometry using the new values that are passed in. Use the extent or size of the ARPlaneAnchor to update the width and height of the plane.
Update the position of the plane node with the new position.
Now that you can successfully update the position of the plane, build and run the app. You’ll see that the plane’s size and position shifts as it detects new feature points.
There’s still one problem that needs to be solved. Once the app detects the plane, if you exit the app and come back in, you’ll see that the previously detected plane is now on top of other objects within the camera view; it no longer matches the plane surface it previously detected.
To fix this, you need to remove the plane node whenever the ARSession is interrupted. You’ll handle that in the next tutorial.
Where to Go From Here?
You may not realize it, but you have come a long way in building your portal app! Sure, there’s more to do, but you’re well on your way to traveling to another virtual dimension.
Here’s a quick summary of what you did in this tutorial:
You explored the starter project and reviewed the basics of ARKit.
You configured an ARSession so that it displays camera output within the app.
You added plane detection and other functions so that the app can render horizontal planes using the ARSCNViewDelegate protocol.
In the next tutorial, you’ll learn how to handle session interruptions and place rendered 3D objects in the view using SceneKit. Click here to continue on to Part 2 of this tutorial series!
If you enjoyed what you learned in this tutorial, why not check out our complete book, ARKit by Tutorials, available on our online store?
ARKit is Apple’s mobile AR development framework. With it, you can create an immersive, engaging experience, mixing virtual 2D and 3D content with the live camera feed of the world around you.
If you’ve worked with any of Apple’s other frameworks, you’re probably expecting that it will take a long time to get things working. But with ARKit, it only takes a few lines of code — ARKit does most of the the heavy lifting for you, so you can focus on what’s important: creating an immersive and engaging AR experience.
In this book, you’ll create five immersive and engaging apps: a tabletop poker dice game, an immersive sci-fi portal, a 3D face-tracking mask app, a location-based AR ad network, and monster truck simulation with realistic vehicle physics.
To celebrate the launch of the book, it’s currently on sale as part of our Game On book launch event. But don’t wait too long, as this deal is only good until Friday, June 8th!
If you have any questions or comments on this tutorial, feel free to join the discussion below!
The post Building a Portal App in ARKit: Getting Started appeared first on Ray Wenderlich.
Building a Portal App in ARKit: Getting Started published first on https://medium.com/@koresol
0 notes