#second set with pure ffmpeg
Explore tagged Tumblr posts
Visit Tumblr Blog
Explore Tumblr blogs with no restrictions, modern design and the best experience.
Last Seen Tumblr Blogs


Fun Fact
69% of Tumblr users are millennials.
Text
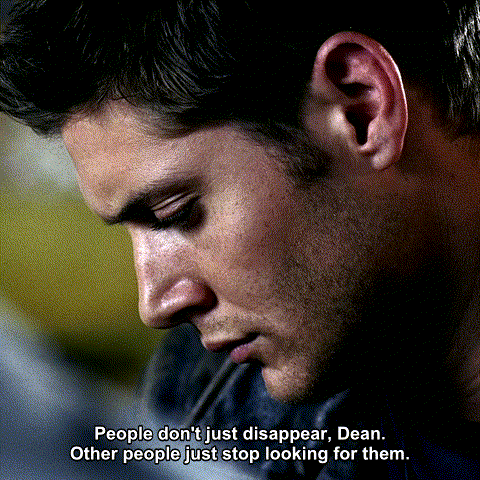
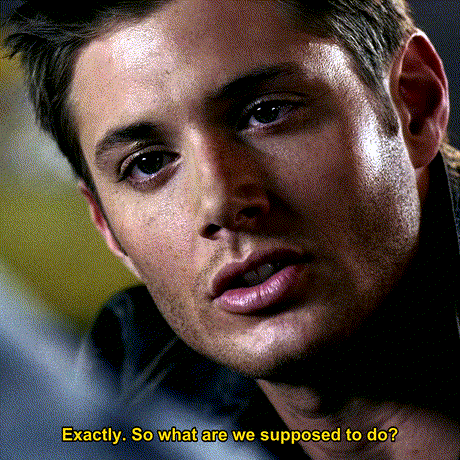

"Dean has no time for fruitless quests to find God. He's got people to protect" | 1.03 "Dead In The Water
Quote is tags from @ilarual ♥️
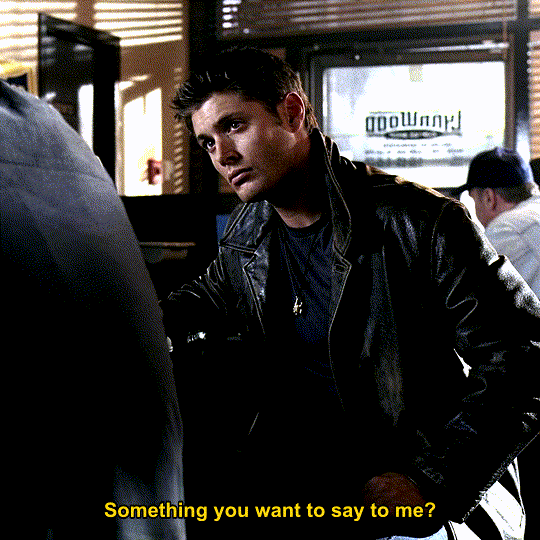
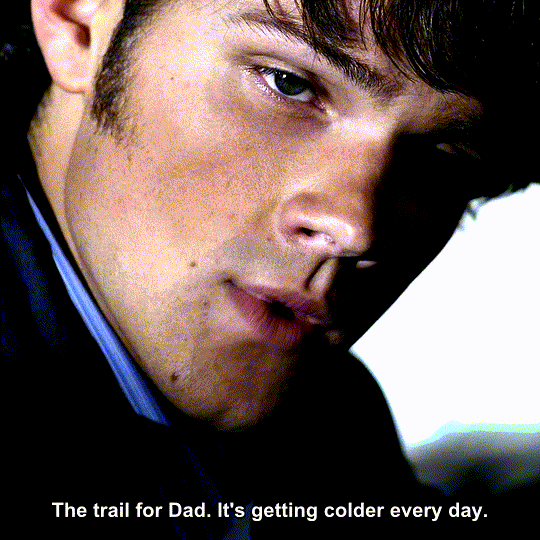
#i couldn't think of what to caption this one then thought of those tags! hope it's okay :O#i know this part has been giffed a million times#but I wanted to try another bash scripted set#and this interaction fascinates me.#The way Sam has zero plan zero leads and he just wants Dean to fix it. But Dean already got their first two leads in 1.01 and 1.02!#1.03#the one who cares#good gifs with free tools challenge#second set with pure ffmpeg#had to compress these a good bit#but I think they still turned out nice!#deans moral compass#sams moral compass#projecting displaced aggression and scapegoating in spn#youre such a control freak
94 notes
·
View notes
Text
TUTORIAL 3
Making Gifs Purely with FFmpeg Scripts
FULL TUTORIALS | RECOLORED GIFS
Directly opposite to the last tutorial, this tutorial is for girls who LOVE command lines. You can make a goddamned motherfucking pristine, RECOLORED gif set from your command line, and feel cool as fuck while you're at it. And doing so is probably not quite as devoid of visual stimulus as you think!!
FULL SIZE EXAMPLE SET HERE | FULL CODE FOR THE SET HERE
Operating systems: Mac, Windows, and Linux
Quality potential: High
Software needed: FFmpeg
Difficulty: Advanced as far as gif-making, but this is actually a good first bash scripting project in my opinion if you've ever wanted to learn how.
Requirements: General familiarity with your computer's shell (Powershell on Windows, Terminal on Mac) helps a lot! I will try to make it as easy as possible to follow.
LIMITATIONS: 1) Frame by frame gif-making methods take up a lot of space on your drive in the interim. 2) The captioning method currently provided in the tutorial is not good for longer captions (there is a better method I plan to append eventually). 3) Recoloring options are minimal in this tutorial. Curves and many other color adjustments are available in FFmpeg but I haven't yet explored them.

First, let me get this response out of the way:
"I don’t understand how I can possibly do this if I can’t see what I’m doing!"
That’s the neat part—you DO get to see what you’re doing!
The first visual is your file browser.
If you were using Photoshop or GIMP to make these gifs, you’d view all of your frames in a sidebar as small thumbnails and select and scroll through them to add delete, and group select and manipulate them. The FRAMES folder in our file browser will serve this function, letting us see every frame in our set, delete any frames we don't want, and group them to apply the same crop, coloring, or caption to the same selection of frames.
The second visual is provided by FFplay.
FFplay is part of FFmpeg. When you use this command in your system shell, it opens an image or gif so you can see the results of a crop, recolor, caption (or all three!) on your work before actually applying it! This is how we will actually see, at full resolution on our screen, exactly how our image is looking.
WINDOWS USERS: CHANGE ALL FORWARD SLASHES IN THIS SCRIPT TO BACK SLASHES!!!
___________________________________________
1. Installing FFmpeg
___________________________________________
I recommend you install via Homebrew if you're on Mac or Linux by pasting this into your terminal (if/once Homebrew is installed):
brew install ffmpeg
Windows users or other users who don't want Homebrew can follow directions on the FFmpeg website.
___________________________________________
2. Screencapping Frames with FFmpeg
___________________________________________
There are many ways to do this. However, since this is the Pure FFmpeg tutorial, I'm going to point you to these instructions on how to automate this process with a script template I have already written for you and an example (screencapping for this exact set).
If you follow that tutorial exactly, you should come back for step 3 with a folder on your Desktop called FRAMES.
___________________________________________
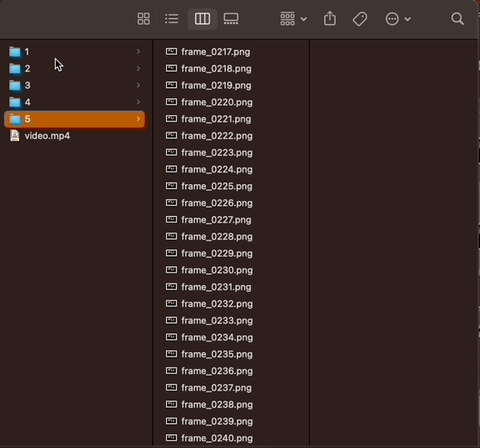
3. Organize in the FRAMES Folder
___________________________________________
Go to your FRAMES folder in your file browser. Your frames are already ordered for you in the correct time sequence.
Delete any unwanted frames.
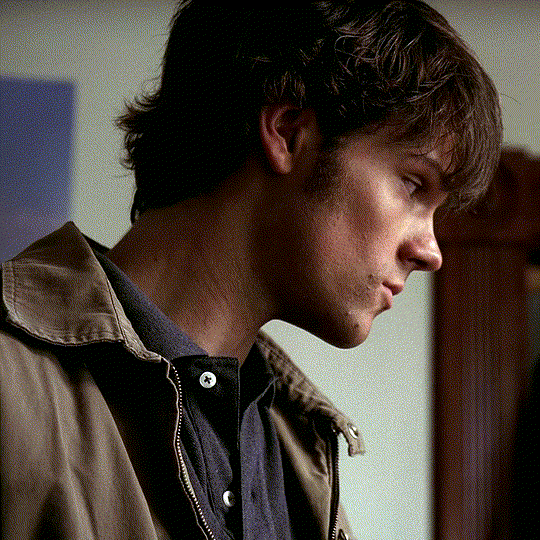
I need to "trim" some frames from the beginning and end of my set. For example, at the beginning of my set, the first 17 screencaps are of Sam from the first 564 milliseconds of the start of the 8.02 time stamp. I don't want this these frames in my gifset. I want my first gif to start on Dean when he appears starting in the 18th screencap.

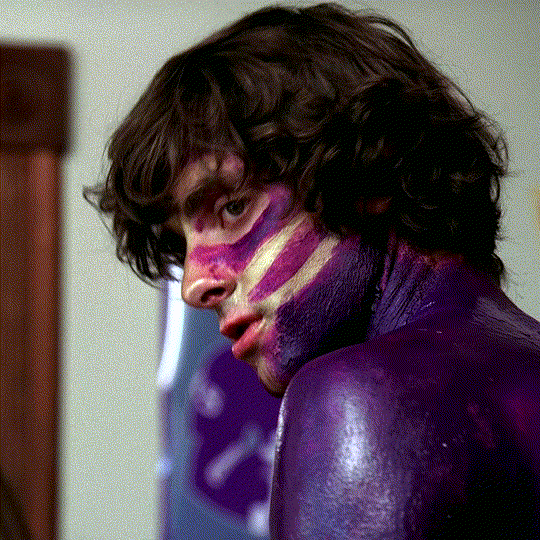
If I hold shift and select all of the unwanted frames, I can delete them. Similarly, my screencaps end at the 8:11 mark, and only the first 156 milliseconds are on Dean. After that, the shot switches back to the purple guy. I don't want those shots of the purple guy, so I'll delete frames 247 through 280 at the end of the set, leaving me with frame_0018.png through frame_0246.png as all the frames of my gifset.
Make "Shot Folders".
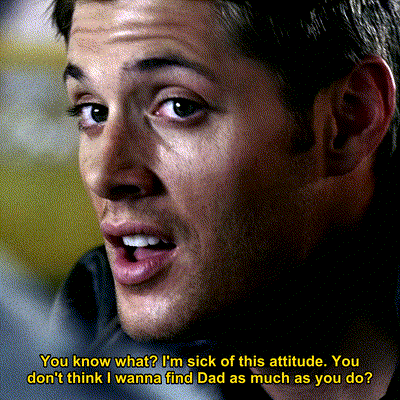
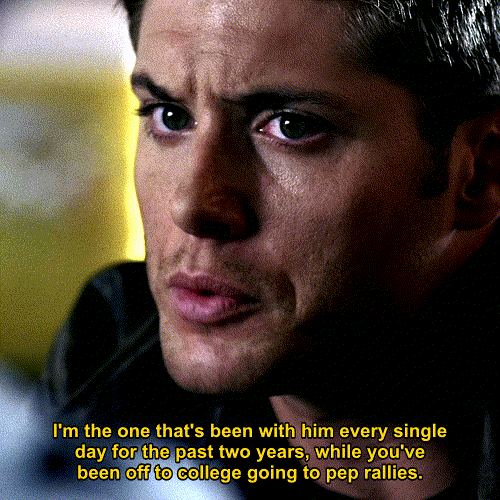
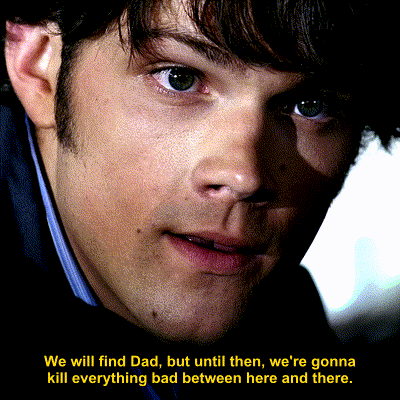
As an example of what I mean by shots, look at the three example gifs at the top of the tutorial. The first gif has just one shot (i.e., the camera stays on Dean). The second gif has two shots (the camera is on the guy painted purple, and then it's on Dean again. In the third gif, there are two shots again—one on Sam, then one on Dean. So that's 5 shots. I want to separate frames belonging to each of the 5 shots into subfolders labeled 1 through 5 (see gif below).
______________________________
4. Setting up FFplay
______________________________
Now that we have all of our frames organized, we want to set up FFplay—the method we'll use to view our image manipulations before applying them.
NOTE: Type down all of the commands as you run through this whole tutorial!! In a word document, a text editor, etc. Do NOT just type your commands in the shell without keeping track of what you typed! You can also see an example of how to map out your scripts by following how I wrote them for Github here, and even download/copy paste my fulls script there and use it as a template for your own set.
Template for Creating Our Preliminary Gifs for FFplay
The first thing we need to do is make a preliminary test gif of every shot in our gifset. To do this, use the template below, changing only the parts in red:
cd ~/Desktop/FRAMES/ShotNumber ffmpeg -start_number FileNumberOnFirstFrame -i frame_%04d.png -vf "fps=30" ffplay -vf Test.gif
The first line, beginning with "cd", tells me the file path to my shot folder where my frames are located.
The line below that combines the frames of my shot into a gif called Test.gif.
ffmpeg envokes the FFmpeg utility.
-start_number FileNumberOnFirstFrame -i frame_%04d.png tells FFmpeg to order the frames in the gif by the 4-digit number at the end of their file name, starting with FileNumberOnFirstFrame, which you should replace with the 4-digit number in the file name of the first frame in your shot folder.
-vf "fps=30" tells FFmpeg I want the gif to move at 30 frames per second (if you screencapped at a rate other than 30 FPS, you can simply change the number to match your frame rate).
In my example:
Say I want to generate a gif of my first shot. Then I need ShotNumber to be 1, and FileNumberOnFirstFrame to be 0018 (that's the 4-digit number on the first frame in my first shot, after deleting the first 17 frames). So my command looks like this:
cd ~/Desktop/FRAMES/1 ffmpeg -start_number 0018 -i frame_%04d.png -vf "fps=30" Test.gif
See Step 4 in my script on Github to see the script for all 5 shots.
Playing a gif from FFplay
Now if I want to play the gif I just made in FFplayer. I just type the following:
ffplay -loop 0 Test.gif
A window should pop up and loop through my gif (edit: I have adjusted this tutorial so the FFplay gif loops infinitely, by adding the setting -loop 0).
After repeating the above commands to generate a Test.gif in every shot folder, we're ready to move on to the rest of the steps.
__________________
5. Test Crop
_________________
Now that FFplay is set up, it's time to start manipulating our shots by applying changes to Test.gif in every shot folder. The first thing we want to do is crop.
NOTE 1: Cropping is different from scaling. At the very end of the tutorial, when we export, we will scale our gifs down to 540 px. For now, we want to work in full resolution, which for Supernatural is 1080p.
NOTE 2: Throughout this tutorial, when I add to an existing command, I will bold the new portion, and mark all the parts you can/should change in red.
Cropping Template
To crop a gif in FFplay, we add -vf "crop=w:h:x:y" to our FFplay command as follows:
cd ~/Desktop/FRAMES/ShotNumber ffplay -vf "crop=w:h:x:y" -loop 0 Test.gif
Where
w is the width you want your cropped frames to be (in pixels)
h is the height you want your cropped frames to be (in pixels)
x and y are coordinates of the top left corner of your crop selection (in pixels)
To understand the x and y coordinates, think about if you wanted to use crop an image in a drawing software. You would generally select your crop tool, start in the top left corner, and drag your cursor down and right (blue dot in the illustration below represents where the crop starts in an example). So FFmpeg asks you to specify the top left corner where your crop starts with an x and y coordinate (in pixels), and uses the w and h variables to determine how large the crop should be.

My frames are all 1920x1080 pixels. I would like my gifset to be square—1080x1080 pixels. So I already know I want my w and h to both be 1080. Since I want to start my crop at the top of a frame, losing no height, my y-coordinate (height to start my crop from) should also 1080. My x-coordinate is the only think I'm not sure about. I only know it needs to be bigger than 0 (0 would start my crop on the left edge) and smaller than 960, which would be the midway point.
So what am I going to do? ...I'm gonna make an educated guess of what x-coordinate would center Dean in a square frame in my FFplayer command, and if I don't like how he's centered, I'll simply move the x-coordinate over a little (decrease to move left, increase to move right).
So in my Example...
In FFmpeg, for my first shot, I'm going to guess x=300.
cd ~/Desktop/FRAMES/1 ffplay -vf "crop=1080:1080:300:1080" -loop 0 Test.gif
The FFplayer window shows me this:
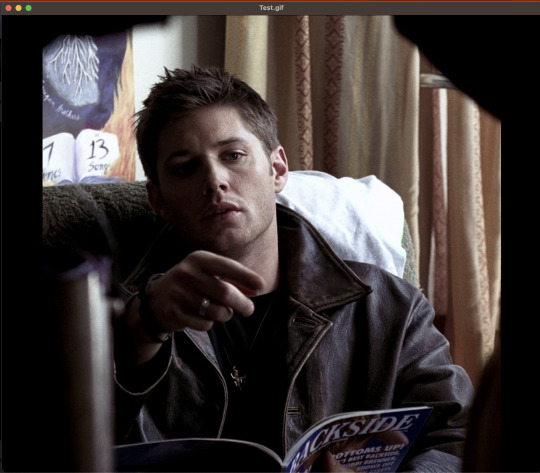
And I feel like the crop starts a little too far to the right. So I'm going to decrease my x-coordinate just a little—to 250. After replacing the 300 with a 250 and running again in FFplay, I feel good about 250, so that's the crop I'll set: -vf "crop=1080:1080:250:1080".
I need to follow this same process to determine the crop of my other shots (and keep a copy of the commands I used later!). What is useful however, is that 3 of my shots are all on Dean sitting (shots 1, 3, and 5). This means I can apply the same crop I made for shot 1 to shots 3 and 5.
See Step 5 in my script on Github to see all 5 shots.
___________________________________________
6. Test Coloring and Sharpening
___________________________________________
Because the lighting in this scene is pretty good, I did a very simple recoloring on this set. I may update later with a more extensive coloring tutorial with more options later (I'll link the post to this section if I do). Previously, we added a crop to our command: -vf "crop=1080:1080:250:1080" and now we want to test coloring options and a sharpening effect.
Coloring Template
I'm going to throw in the basics, and give you an updated FFplay template (new parts are bolded, variables you can adjust are in red and set at their default values).
cd ~/Desktop/FRAMES/ShotNumber ffplay -vf "crop=w:h:x:y,eq=brightness=0.00:saturation=1.00:contrast=1.00,smartblur=1.5:-0.35:-3.5:0.65:0.25:2.0" -loop 0 Test.gif
NOTE: Notice that inside the quotes, a comma separates the command options crop, eq, and smartblur. Equals signs and colons distinguish between sub-options belonging to each of those three categories.
EQ:
brightness=0.00. Values can be adjusted anywhere between -1 and 1, with 0 as the default). I would adjust this setting in 0.01 unit increments.
saturation=1.0. Values between 0 and 3 are possible. 1 is the default value. I would adjust this setting in 0.1 unit increments at a time.
contrast=1.00. Increases contrast between light and shadow in the image (values between -1000 and 1000 are possible. I recommend you change this setting in 0.1 unit increments.
There are more color and image adjustment options than these available in FFmpeg. You can see a full list of properties you can adjust from eq here.
Smartblur:
smartblur=1.5:-0.35:-3.5:0.65:0.25:2.0 sharpens the frames. I recommend you not touch this setting. If you do want to adjust it, check the FFmpeg documentation. You can also remove this whole portion (and the associated comma) if you don't want a sharpening adjustment.
NOTE: It is also possible to add a curves adjustment to brighten certain parts of an image instead of the whole image. I haven’t worked with curves enough from the command line to give you good ideas on setting your curve and this set didn’t really need it, but if I get into it more in the future, I'll include it in a supplementary tutorial and link it here.
If you feel like you are losing all sense of objectivity and just want to see the images without your coloring at any point, simply re-run your ffplay from the end of the cropping section.
ffplay -vf "crop=w:h:x:y" Test.gif
In my example (shot 1):
Because all my characters are in the same room with similar lighting, I ended up applying the same color adjustment to all of my shots. But here's all my settings tested together on my first shot in FFplay:
cd ~/Desktop/FRAMES/1 ffplay -vf "crop=1080:1080:250:1080,eq=brightness=0.06:saturation=1.70:contrast=1.10,smartblur=1.5:-0.35:-3.5:0.65:0.25:2.0" -loop 0 Test.gif
See Step 6 in my script on Github to see all 5 shots.
___________________________________________
7. Apply crop and coloring to frames
___________________________________________
Up until this point, you have not actually applied your crop and color adjustments to your frames. You have simply tested your crop and coloring manipulations on a gif of all your frames that is still, if you go look at it in your file browser, not cropped.
So let's actually apply our adjustments to these frames!
NOTE: Captioning needs to be done after this step because auto centering the text won't work properly without actually cropping first). This is probably all for the better as our command is getting long and difficult to decipher!
Template to ACTUALLY Crop and Color
cd ~/Desktop/FRAMES/ShotNumber mkdir crop for i in *.png; do ffmpeg -y -i "$i" -vf "fps=30,crop=w:h:x:y,eq=brightness=0.00:saturation=1.00:contrast=1.00,smartblur=1.5:-0.35:-3.5:0.65:0.25:2.0" crop/${i%.png}.png; done
The first line (beginning with cd) tells us to go to our shot folder.
mkdir crop tells our computer to make a new subfolder in our shot folder called "crop".
for i in *.png; do ffmpeg -y -i "$i"; and the closing: crop/${i%.png}.png; done tells FFmpeg to do the same crop and color on every .png file in our shot folder, and save these adjusted shots into the crop subfolder.
In my example (shot 1)
cd ~/Desktop/FRAMES/1 mkdir crop for i in *.png; do ffmpeg -y -i "$i" -vf "crop=1080:1080:250:1080,eq=brightness=0.06:saturation=1.7:contrast=1.1,smartblur=1.5:-0.35:-3.5:0.65:0.25:2.0" crop/${i%.png}.png; done
See Step 7 in my script on Github to see all 5 shots.
___________________________________________
8. Captioning
___________________________________________
Now we need to apply captions. You can also do an FFplay command here, but I'm going to show you something a little different with FFplay this time to see your caption. Instead of looking at captions over a whole gif, let's just test how our captions look on the first frame in our shot, since that's really all we need for captioning.
Captioning FFplay Template
Not all sets (and not all shots!) need captions (and if your set doesn't, you can skip down to the next section!) However, two of my shots need captions: Shot 1 and Shot 3. If you want to add captions, you can test them in FFplay on a single shot using this command:
cd ~/Desktop/FRAMES/ShotNumber/crop ffplay -vf "drawtext=text='Your Text Goes Here':x=(w-text_w)/2:y=(h-text_h*2):fontsize=40:bordercolor=black:borderw=3:fontcolor=white" input.png
The default font is Arial. There are ways to set other fonts, but I haven't looked into them much because I'm pretty happy with Arial. This basic template with the existing numbers should give you a decent result, but if you want to change font sizing or colors or anything:
drawtext=text='Your Text Goes Here' | This is the most important bit. You place your caption in the red part. Note that your text will appear on just one line. If you have a longer statement from a character that will need two lines, you can draw your box twice. (I will add a link here for this alternative when I eventually try it).
x=(w-text_w)/2:y=(h-text_h*2) | This part centers the text on the bottom of the screen. I recommend you leave it alone as it’s intended to auto-center your text for you no matter what your crop ratio is. You will need to change the the y=(h-text_h*2) argument only if you have two lines of text to caption your frames with.
fontsize=40 | Changes the font size, of course.
bordercolor=black | changes the border color.
borderw=3 | changes the border weight.
fontcolor=white | This changes the font color.
input.png is the file name of the frame you want to view your caption on.
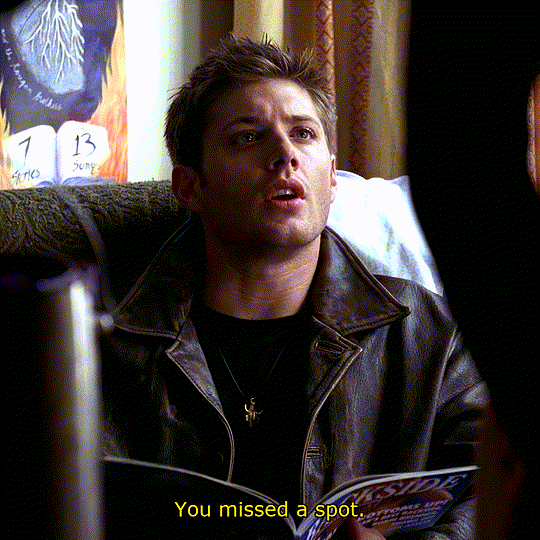
By the way, when changing text or border colors, you can type in colors coded into the documentation (the default is black) or insert a HEX color code in this field. For example, I always use yellow captions for Dean, so I found a yellow HEX code (#FDDA0D) I liked on htmlcolorcodes.com.
Here's how I FFplay my caption "You missed a spot."
cd ~/Desktop/FRAMES/1/crop ffplay -vf "drawtext=text='You missed a spot.':x=(w-text_w)/2:y=(h-text_h*2):fontsize=40:bordercolor=black:borderw=3:fontcolor=#FDDA0D" frame_0018.png
See Step 8 in my script on Github to see both captioned shots.
Template for applying your caption:
If you like the way your caption looks in FFplay, you can apply it to all the frames in your shot folder with:
cd ~/Desktop/FRAMES/ShotNumber/crop mkdir captioned for i in .png; do ffmpeg -y -i "$i" -vf "drawtext=text='Your Text Goes Here.':x=(w-text_w)/2:y=(h-text_h2):fontsize=40:bordercolor=black:borderw=3:fontcolor=white" captioned/${i%.png}.png; done
Where
mkdir captioned makes a folder in the crop folder called "captioned"
for i in *.png; do ffmpeg -y -i "$i"; and the closing: crop/${i%.png}.png; done tells FFmpeg to place the same caption over every .png file in our shot folder, and save these adjusted shots into the captioned subfolder.
Here's the settings to apply captions to my first shot.
cd ~/Desktop/FRAMES/1/crop mkdir captioned for i in .png; do ffmpeg -y -i "$i" -vf "drawtext=text='You missed a spot.':x=(w-text_w)/2:y=(h-text_h2):fontsize=40:bordercolor=black:borderw=3:fontcolor=#FDDA0D" captioned/${i%.png}.png; done
See Step 8 in my script on Github to see both captioned shots.
___________________________________________
9. Organize shots into GIF folders
___________________________________________
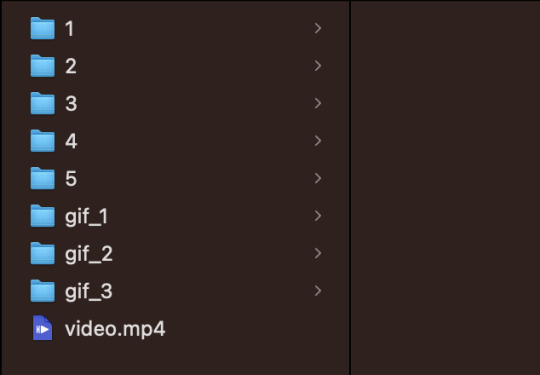
We're almost done!!! It's time to go back to our file browser! Now that all of our frames in all of our shots are prepared how we want, we need to reorganize our shots into GIF folders. This is our way of group selecting all the frames that go into one gif for export.
In my case, I want three gifs, so I'm going to make three new folders in the FRAMES folder: gif_1, gif_2, and gif_3. My FRAMES folder should now look like this:
Now I want to take my finished shots from my shot folders and copy their frames into the gif folder they are associated with. For example:
Gif 1 just contains the first shot. I also captioned shot 1. So I'm going to copy all the frames in FRAMES/1/crop/captioned into the gif_1 folder.
Gif 2 contains shots 2 and 3. Shot 2 has captions, so I need to take all the frames from FRAMES/2/crop/captioned and all the frames in FRAMES/3/crop and copy them in the gif_2 folder.
Gif 3 contains shots 4 and 5. I'm going to copy the contents of the crop folders for shots 4 and 5 into this folder (no captions on this gif).
___________________________________________
10. Compiling into GIF
___________________________________________
To combine all the frames from one gif folder into a gif, I'm going to use this template script:
cd ~/Desktop/FRAMES/GifFolder ffmpeg -y -start_number FileNumberOnFirstFrame -i frame_%04d.png -vf "fps=30,scale=540:-1:flags=lanczos" ~/Desktop/FRAMES/GifName.gif
This is very similar to the script in step 4. This template opens one of our new gif folders, and takes all the frames, starting with the first frame in the folder (recall: you need to tell FFmpeg the 4-digit number on that first frame with FileNumberOnFirstFrame) and then turns it into a gif running at 30 FPS, scaled down to 540 by 540 pixels.
The parts we can/should adjust are as follows:
GifFolder is the name of our gif folder where our frames for our gif are located.
scale=540:-1:flags=lanczos is the command to scale down our gif (using what's called the lanczos method) to 540 x 540 pixels so it'll be small enough to upload to Tumblr.
fps=30 tells FFmpeg the proper FPS for our set (if you made your frames using this tutorial, 30 FPS is correct. If you took screencaps manually, it will be the frame rate of whatever you giffed. For TV, this might be 23 FPS for example).
~/Desktop/FRAMES/GifName.gif names our gif (specify with GifName) and outputs it to the FRAMES main folder.
Here's the command for Gif 1 in my set:
cd ~/Desktop/FRAMES/gif_1 ffmpeg -y -start_number 0018 -i frame_%04d.png -vf "fps=30,scale=540:-1:flags=lanczos" ~/Desktop/FRAMES/1.gif
See Step 10 in my script on Github to the script on all three gifs.
THE END!!!!
Do this step on all your gif folders and you're done!!!
You can view my full script for this example gifset on Github here and if you'd like, simply modify that script to make your own gifset!
15 notes
·
View notes
Text
CDA To MP3. How To Convert CDA To MP3?
The right way to convert CDA to MP3 on-line with CDA to MP3 Converter ? The very first thing you must know isCDA recordsdata aren't audio files, they're only a way that Home windows uses to let you entry an Audio CD index. When I say that they don't seem to be audio recordsdata, I imply that they do not include sampled sound in any respect! Which means that you can't convert them to another format (such like MP3), simply click the up coming internet site because they do not contain audio samples! The best way to convert CDA files to MP3? When you copy aCDA file to our arduous drive and attempt to play it with an audio player, nothing occurs. And because of this you want FreeRIP to extract audio tracks from an Audio CD and convert CDA files to MP3.
FreeRIP is powerful and loaded with spectacular options to supply the customers with a better MP3 conversion and CD ripping experience. We are able to convert CDA to mp3 in addition to mp3 to CDA. It also helps many of the well-liked audio codecs. Select the 'Disc' tab on the top of the 'Open Media' display screen and select the 'Audio CD' button. ConverterLite is free software program that uses the highly effective FFmpeg challenge to transform audio and video information quickly and easily. If all the pieces is OK, click "End" to rip the Audio CD. The transformed MP3s might be found within the folder specified by you within the step 3. Quite presumably the best free audio converter out there, Freemake Audio Converter is certainly the best to make use of. Extremely beneficial". Uncheck the test-box for any song you don't wish to convert into MP3 format. Windows Media Player is the pre-installed multimedia player on Home windows PCs. Though it solely supports restricted formats, you need to use it to transform CDA recordsdata to MP3 simply. The largest profit is to not set up anything on your LAPTOP, however you can not use it on Mac. With the assistance of Avdshare Audio Converter, changing CDA to WAV is really easy. As a matter of fact, Avdshare Audio Converter can't solely convert between standard audio codecs, like MP3, WAV, FLAC, and so forth, but in addition can convert between unpopular audio codecs, resembling CDA, speex, aax, aa, WV or from unpopular codecs to standard codecs.
After introducing CDA to MP3 converter freeware names iTunes, there may be necessary to say Home windows Media Participant, which may do related CD ripping job. And if you happen to tick Rip CD robotically in Rip settings throughout CDA file conversion, all of your CDs will likely be detected and transformed into the MP3 audio format you set automatically, in free way too. In addition, Windows Media Participant has audio high quality adjustable slider, with which to vary bitrate customizable. Convert and break up large FLAC or APE albums to particular person MP3 tracks using info from CUE recordsdata. A WMA file is in most circumstances encapsulated, or contained, within the Advanced Programs Format (ASF) container format, that includes a single audio track in one among following codecs: WMA, WMA Pro, WMA Lossless, or WMA Voice. These codecs are technically distinct and mutually incompatible. The ASF container format specifies how metadata concerning the file is to be encoded, much like the ID3 tags utilized by MP3 recordsdata. Metadata might embrace music name, monitor quantity, artist identify, and likewise audio normalization values. By utilizing direct digital extraction, pure audio quality is maintained while you convert CD audio to mp3 or wav. Particular Rip can be the quickest CD ripper on the planet using proprietary optimizing techniques. Complete Audio Converter can simply convert virtually any audio to WAV, MP3, OGG, WMA, APE, FLAC, MP4, AAC, MPC. The wonderful thing about this app is that it operates in batch mode. This means you possibly can create a list of recordsdata to be transformed and let the app run within the background whilst you stick to one thing else. Use File Explorer to navigate to the location of the CDA file. Right-click on the CDA file and choose Rename. Then, simply modify the extension after" from cda to mp3 and hit Enter to save. The conversion course of will start instantly. You'll discover the audio extraction process occur as it's indicated by the player's progress slider. As soon as the slider reaches the top, you'll be able to browse to and locate the vacation spot audio file. The dimensions shall be low and the MP3 file could be simply copied to your smartphone, music player or another mobile audio playing system. Lately, a user despatched us a 44-bytescda file that might not be performed, and asked for help for how can he convert CDA to MP3. Actually, CDA to MP3 Ripper CDA stands for Compact Disc Audio observe, CDA shouldn't be an audio format. It's a file extension for CDA to MP3 Ripper a CD Audio shortcut file format, which doesn't embrace any audio information, but as an alternative tell where on the disc every observe begins and stops. So regardless of the size of the music CD, we always see that Observe##.cda" recordsdata are 44 bytes. These CDA files cannot be played on a pc with out the CD. Hence, it's not possible to transform CDA to MP3 online. That's the rationale why I say that so-known as CDA to MP3 on-line converter is a falsehood. Rip CDs to MP3, WMA, WAV, AAC, FLAC, OGG, APE and many different audio formats. Step 1: Put an audio CD into your pc and begin FreeRIP. Right here the FreeRIP can show your CD info together with artist, album, titles, 12 months, and so forth. which may be edited. Convert any CDA to WMA, FLAC, AIFF, OGG, MP2, RM, and so on for taking part in CDA on extra other units or purposes. Thecda information do not contain the actual PCM sound wave knowledge, but inform the place on the disc each observe starts and stops. Some audio modifying and CD creation applications will from the user's perspective, loadcda file as if they're actual audio knowledge files. The "Prelisten conversion" field, if checked, will make the program convert just a few seconds of every observe. As we need to convert whole tracks, we keep it unchecked. Step 1Launch CDA Recorder in your Windows COMPUTER. Click "Audio Recorder". Once you're prepared, simply hit the Convert Now button and watch for the method to complete. Once the software finished the conversion, you should mechanically see a File Explorer popping up with the situation of the transformed information. If you find yourself prepared, click on the Convert button alongside the underside of the interface to convert audio to mp3 and wait only a few seconds or several minutes.

1 note
·
View note
Text
How Convert Audio Raw To Flac In Android
The Free Lossless Audio Codec (FLAC) is the most well-liked lossless format, making it a good choice if you want to retailer your music in lossless. The capabilities of this program lengthen past accepting traditional audio codecs. It converts digital movies to and from just about any format you can imagine. It's sure to satisfy nearly each one in every of your video conversion wants. There are useful options, too, such as automatic audio normalization and the ability to hearken to the ensuing audio beforeyou truly initiate the conversion.There's even a free model of the software if you don't want the complete set of options, though, it's good to have the ability to combine and match to create your individual sound-modifying answer. The essential concept of any conversion with these compressed audio codecs: source format -> uncompressed PCM (wav) -> vacation spot format. The uncompressed PCM (wav) is the only universal format that every tool understands so the first step is always uncompressing the supply file to PCM and no matter is done then is done on the uncompressed information. You don't have to store the uncompressed data into a temporary file, the instance above uses piping of the uncompressed PCM into a compressor program (lame).

Click Convert or Convert All to proceed with FLAC to MP3 conversion. I attempted the 14 day freebee and it was easy to make use of changing audio recordings from my Android telephone to MP3. Open your FLAC information in xACT, All2MP3, or Tunesify, and start the conversion process. The file containing a typical three-minute music on a CD is 30-40 megabytes in size. A four-gigabyte iPod could subsequently include simply one hundred thirty or so songs—say, solely 9 CDs' price. To pack a helpful variety of songs onto the player's drive or into its reminiscence, some kind of knowledge compression must be used to cut back the scale of the files. This may even usefully scale back the time it takes to obtain the track. FlicFlac is a transportable (no installation required) utility for changing WAV, FLAC, MP3, OGG and APE information to any of the other codecs. It's secure to say, no other audio program converts extra multi-format audio files than dBpoweramp, now we have spent 15 years perfecting format-compatibility and conversion stability. If converting FLAC to mp3, wma to mp3, or wav to mp3, dBpoweramp is the appropriate alternative. Many various audio file codecs exist for storing recorded audio knowledge on a pc system. This post compares multiple file types and provides ideas on which formats and bitrates one ought to use, especially when producing podcasts or different on-line audio.

This script makes use of ffmpeg to convert a folder tree of FLAC information into another folder tree of MP3 files. Cover art is included, when present. You may set a CORES variable to create background jobs to convert a number of recordsdata at a time. It additionally helps conversion of wide selection of unprotected audio codecs, resembling M4A, AAC, free online flac to mp3 converter AC3, WAV, MP3, AU, AIFF, FLAC, M4R, MKA, CDA, Www.audio-transcoder.Com Apple Lossless, and so forth. Simple M4P Converter is a solid resolution to your iTunes music conversion wants.
Choose MP3 because the output format you need to convert FLAC file(s) to. Versatile toolbox combines repair video metadata, GIF maker, cast video to TV, VR converter and display recorder. Channels: Most audio file formats do not solely enable to store a mono or stereo audio stream but in addition multi-channel audio streams (-> encompass). FLAC ((Free Lossless Audio Codec)is an audio format that assist lossless compression whereas WAV is a regular digital audio format in Home windows that's uncompressed and lossless. The flac files you've got collected from various sources (Internet downloads, ripping vinyl long plays, music CDs, etc.) have many ups and downs in the quantity level? converter normalize audio online flac editor free obtain audio editor loud. elevating the quantity of an audio file increase quantity wav file audio degree free mobile flac songs volume enhance software program. Enhance Acquire of a video file online Software to REDUCE Mp3 File dimension? loudness sound pc. The right way to Maximize Quantity in Audio Recording? flac dimension reducer converter wav to flac normalize mp3 ringtone louder on-line converter. Shut the format selection dialog and click the Convert button on the toolbar. Wait until the conversion course of finishes. Though, this won't be too long, as MediaHuman Audio Converter utilizes your entire computation power your CPU offers of all cores it has. For those who would like to release some cores for other duties, please check the Preferences for that. Thanks to the Batch conversion feature, you may convert as many recordsdata as you need - as long as you are changing them to the identical output. After you have chosen all the files you need to convert, simply click on Convert and Free Audio Converter will do all of the hard be just right for you. FreeRIP's supports the prime quality, lossless, audio compression format named Flac. Now it can save you your CD tracks making the most of quality of Flac format, finish ultimately convert Flac to MP3 if your moveable Mp3 participant doesn't assist Flac. Use our Flac to MP3 converter. With Any Audio Converter, you'll be able to easily convert your audio recordsdata to MP3, WMA, WAVE corresponding to M4A to MP3, APE to MP3, RA to WMA, free online flac to mp3 converter FLAC to WAVE, and so on. You can too extract audio from video clips equivalent to AVI to MP3, MP4 to MP3, WMV to WMA, RMVB to MP3, and so forth.I love ALAC and almost my total music library is lossless, however claiming that it's not much greater than MP3 is just pure bullshit. The recordsdata are huge, but the quality is certainly worth it. Now, it's possible you'll know the reply about how to play FLAC on iTunes. At first, you could convert FLAC file to MP3, WAV, AIFF, AAC codecs that are supported by iTunes. And second, you just need to import transformed FLAC file to iTunes. On the online discussion board for MakeItOne it was discovered this system is intended for streams between 96 and 320 kbps. This was quite a surprise as a result of 100s of mp3s have been beforehand joined at sixty four kbps and at 32 kbps, all with 100% success.
1 note
·
View note
Text
Another Pure FFmpeg set.
The scripts I used to make this set are here.
I tried some new things with this set with captioning (a subtitle option instead of the texdraw textbox), and also figured out how to apply a blur box to blur a title card in the second gif. Tool tutorial later.
"Dean has no time for fruitless quests to find God. He's got people to protect" | 1.03 "Dead In The Water
Quote is tags from @ilarual ♥️
94 notes
·
View notes