#semismeltingtutorial
Explore tagged Tumblr posts
Visit Tumblr Blog
Explore Tumblr blogs with no restrictions, modern design and the best experience.
Last Seen Tumblr Blogs


Fun Fact
69% of Tumblr users are millennials.
Text
Learning to Smelt - 1
I've been wanting to talk about this for a while. Last year, I wanted to pick up smelting. It seemed fun, and felt right up my field in the realm of making things. I did all the research, got the equipment and earlier this year I finally managed to start! My goal is, once I'm comfortable enough to do it solo (since I had help from my insane uncle during my training adventure) to have it livestreamed and smelt things on request! Honestly at this point I reckon my skills have advanced to the point of almost competence (huzzah!) Nonetheless I want to post some stuff showing the process, just in case anyone's curious!
First off, I made an AGGREGIOUS error when it came to choosing the smelter brand. The one I bought didn't have a connector that worked with Australian Gas tanks, only US ones. I was very luck my uncle had a bunch of spare fittings/hoses lying around otherwise it would've been impossible to do anything from the start. Funnily enough too, despite it eventually getting to +1000 C temperatures, it didn't need that much fuel overall! Only had to slightly open the valves with one full rotation on the gas tank. I guess that's by design, since the whole idea is keep heat in (this just in, local hoplite PNGTuber discovers how heat works!) Also, fun fact! Don't buy a shitty $50 temperature gun that says it can get to 1000+ C and expect it to do so! So many infrared sensors are so pricey and there was no way in tartarus that I would use that kinda money on a glorified nerf gun but then it turns out the cheap one I got was incapable of reading anything beyond 400 C. Fortunately you can just eyeball it when it comes to smelting using this simple rule! If metal = solid: Wait If metal = liquid: Congratulations, you've done it!
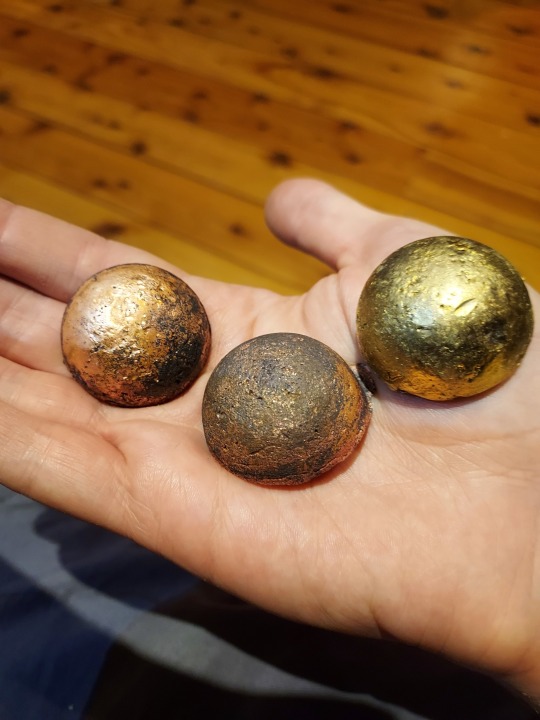
Have to make sure it's done in a well-ventilated area too. Doubly so if you're melting brass since that garbage can burn and make zinc oxide which is NOT GOOD. First time I melted stuff was just done to make sure I knew what I was doing, not to cast anything. All I did was melt down brass and copper separately to make small ingots.

(btw if you ever plan to make casted finery, don't bother with a specific ingot mold, those things are pricey. Just get a cast iron muffin tray w/o the teflon on it or something similar. You can make a lot more that way and they're more likely to fit in the crucible if you want to re-melt). Also another piece of advice: DON'T OVERLOAD THE CRUCIBLE. My uncle wanted us to melt down all the copper we had (which was a lot, I had been going to town on the neighbourhoods wiring/plumbing in preparation for this) since "it was more energy efficient to smelt more instead of letting it cool down!" While technically true, a crucible full of copper is VERY HEAVY and picking that thing up with crucible tongs is gonna be a legendary struggle. We did end up spilling a bit, fortunately it didn't go anywhere. The vid attached to this post shows it: A crucible full of copper and regret for our lack of forethought. Following day I did try to cast one thing: My channel emblem as a medallion. I poured molten copper into an open sand mold and well, you be the judge:
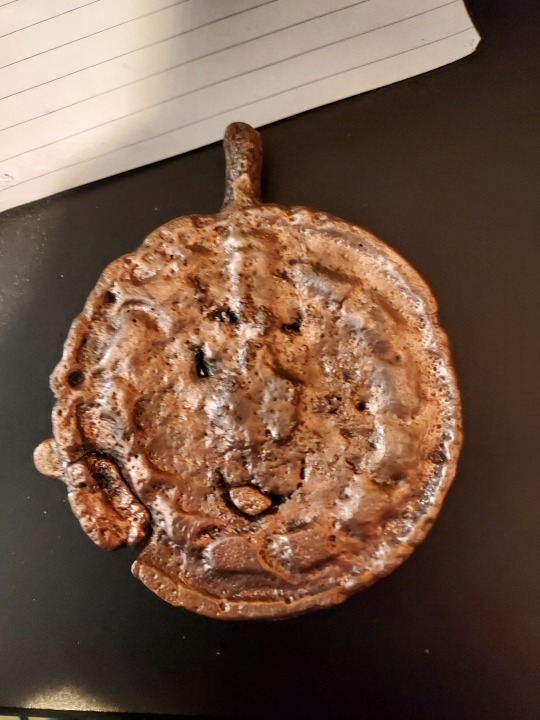
Still, twas a good first go! Thanks to the ingot molder we used the cast metal in it's default form comes out in a style akin to that of a paperweight.
I'll be posting details on the second and third smelt soon, so stay tuned!
8 notes
·
View notes