
talopeiros
18 posts
Hybrid Flesh/PNGtubing hoplite streamer who likes games, music and just making things in general! Gonna post many a finely crafted meme or two here as well as any progress on some craft projects I've been working on.
Last active 4 hours ago
Don't wanna be here? Send us removal request.
Statistics
We looked inside some of the posts by talopeiros and here's what we found interesting.
Average Info
Notes Per Post
365
Likes Per Post
300
Reblog Per Post
65
Reply Per Post
0
Time Between Posts
2 months
Number of Posts By Type
Text
14
Video
1
Photo
2
Last Seen Tumblr Blogs


Fun Fact
Tumblr was the first site to host the blog for President Barack Obama in 2011.
Text
Learning to Smelt - 3
Here's the final part before I start doing smelting on stream! Basically at this point after these three different melts I understand enough about what to do/not do that I will be able to have everything ready to go without additional support! This melt had a similar goal to the previous one, but was meant to correct the mistakes previously made to get a better metal colour and casting quality. Here's the TLDR of what went down:
Now the details!
Instead of trying to make the channel logo like before, this time I put together a medallion based on the Chronos Hourglass Obol in the game Hades 2. Since the symbol is less intricate than the broken ouroboros logo, I figured it'd be less likely to catch sand in the grooves (which y'know can make the result look less like what you've made, I'm still trying to find a workaround to that particular issue).
ALRIGHTY
Forge lighting was the same, sand compacting was the same (except I used a 7:3 Sand:Clay ratio (next time it will be a 6:4)) and alloy composition was the same. The Copper was loaded into the crucible at the beginning, while the aluminium was rested on top to warm up so it wasn't dropping in at room temp.

There's a very important reason to do this! If you don't have a flux that works (like I foolishly didn't have) then you're gonna have a problem with the aluminium. Weird Al tends to oxidize pretty quickly and Weird Al Oxide has a similar density to Normal Weird Al. So not only are you gonna need to scoop out a lot of Weird Al Oxide, but also it tends to just float within the Weird Al fluid, so it'll be harder to ensure there are no impurties in your Solid Weird Al once poured.
In the case of Weird Al bronze, if you have liquid Copper already in the crucible, then dropping the aluminium in there will immediately have it melt/dissapear below the surface and won't have a chance to oxidize.
Putting the casting flask together of course took forever as is the norm. Once it was time though, the video above took place (please PLEASE see the video above).
You'll notice around the halfway point, my uncle saying to "Keep going" as I was strangely alarmed by the flask bursting into flames in front of me. Not so! Although you can't see it I was actually alarmed by the liquid metal bursting out of the seam in the flask right towards me and to the side (you can see a bit of it come out the side around the same almost halfway point of the vid). So that was me backing up to save my crotch.
Crisis averted!
It is fun however watching the metal splat against the ground/table, it looks very cool!


Of course this is collected and used in the next melt, otherwise I shall be derided and pariah'd as a wasteful buffoon.
The casting flask got pretty badly scorched this time. Although it shouldn't really impact it too bad, as long as it can still hold sand.

That being said though, I probably wouldn't use this one in the future. Although the clasps are a neat idea, the heat/pressure on the inside always seems to pop em open so holding it together with something that can't be easily opened by people will probably work better in the future.
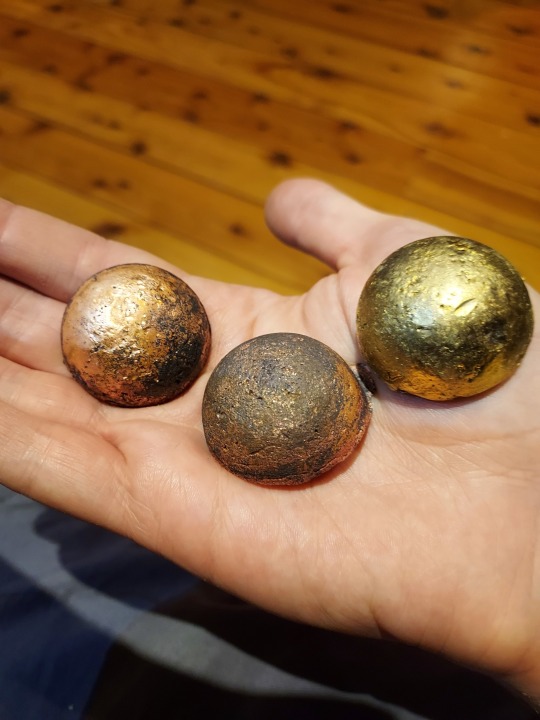
Still, I'm happy with the end result of this one! Has a cool, ancient look to it. The Chronos side came out pretty good, although the Hades side seems to be the one that took the brunt of the explosion.


How fitting!
Next time this is done, it'll be on stream once I get the last camera extension thing I need. It'll be a repeated attempt at this design using a new flask/sand composition but once that's out of the way, I'll be trying a lot of ways to make the design smoother/easier!
2 notes
·
View notes
Text
Learning to Smelt - 2
Part 2! The main goal of my second smelt was to A: Figure out how the sand casting worked B: Try mixing copper and aluminium together to make Aluminium bronze! TLDR: Here was how it went down:
Now into the details! The whole reason I got into smelting was to cast metal into cool items and the like, and to do that I needed a casting flask and some casting sand. All a casting flask is is a wooden or metal box that comes in two sections that you can pack sand and your design into. You want to be able to clasp the box shut so that the heat and pressure of the liquid metal doesn't cause it to pop off. Part of the reason the box in the vid burst into flames at the mid point is because we only clamped down one side of the box, thinking it would be enough (IT WASN'T) For the casting sand we made a mix of bentonyte (bentonite?) clay and yellow bricklayers sand in a volume ratio of 2:8. A lot of other casting vids and forums suggest a similar combination. Bentonyte clay is super fine so use a mask when handling it. With the sand part, you can't use regular sand since the grain shape of that does not lock together too well and will fall out of the vessel really easily (trust me I tried and it was impossible to hold anything in it). Once it's been mixed, you then need to put in 2 or 4 stroke motor oil into it and mix it thoroughly. Don't really have any specific measurements/amounts but what you're going for is to use a little oil as possible for it to be "wet" all throughout. Best way to test is to mix in a bit of oil, clasp a chunk of the sand mix in your hand and, if it can hold its shape, you're good. otherwise, MOAR OYLE
Now a quick heads up, the sand mix we used didn't work so well. best volume mix of sand-clay we used (which I'll go into a bit in the next post) was 6 sand for 4 clay.
Once you have your template, sand and flask, you start loading up the sand into the flask, and packing it in as tightly as possible. If it's not, then there's a chance that some of the sand could fall into the gaps and cause the design to be a bit scuffed.
Once you get to the halfway point of your flask (i.e. 1 of the two sections, the second section should not be on top yet) you press your design into the sand and keep it in there. Once you're satisfied it's evenly at the halfway point, get some talcolm powder or some other separating powder and coat your design/exposed sand in it, using a brush to spread it evenly (YOU NEED TO DO THIS IF YOU DON'T WHEN YOU TRY AND REMOVE THE DESIGN IT WILL NOT SPLIT AT THE HALFWAY POINT EVENLY)
After that, lock your top half on (with the design still in there) and start filling in the sand and really packing it in there as best you can. Once you're done you simply separate the 2 halves and voila! You have your negative space for the metal to FLOW LIKE FINE WINE. (Also sorry I didn't have many pictures in my second smelt, probs should've taken more photos over this part) Of course for it to flow (like fine wine) you need to then carve channels into the sand so you can pour it in in the first place. You NEED to take special care when carving because, even if the sand is packed in tightly, too much force may dislodge the whole thing. You'll need either a drill or a sharpened section of pipe to allow you to make a hole in the top piece for the fluid to flow. Make sure it's large enough for the metal to pour. You also need to make one (or more) vent holes. These holes you aren't pouring down there but they need to be there to make sure there's a place for the gases to vent out. Probably a sharp piece of wire coathanger would be best for these (and of course make sure they connect to your design.
Speaking of your design, you never want to pour directly onto it! Make sure your pouring hole if off to the side a bit with a channel that leads into the main design. This is mainly so you don't damage if from the inital collision of the liquid metal onto the sand.
In the end, you should have something that looks like this! (Hopefully better than it though since again, this one did NOT go according to plan)

There were a couple of reasons this one didn't go well.
The sand composition. 2 Clay for 8 sand was not a good ratio, it needed more clay
More talcom powder as a separation layer. You can't see it but that middle layer was very uneven since some parts of the top layer fused to the bottom layer and it was a whole thing)
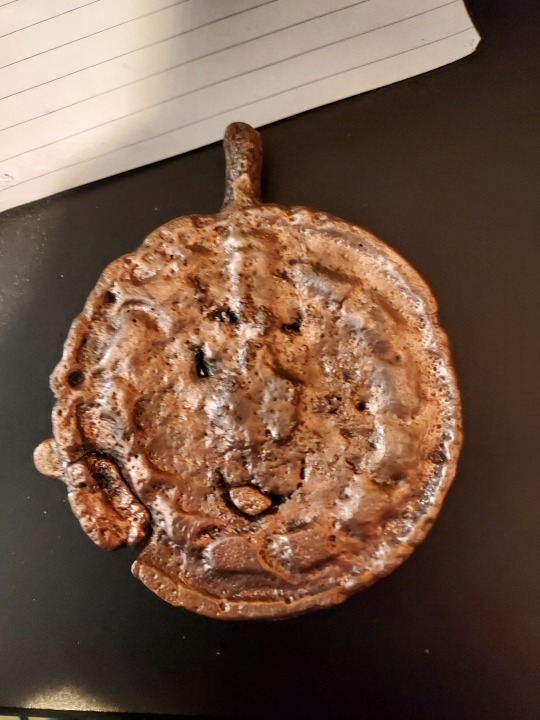
The end result of the above pour was this! Another attempt at the channel emblem:

Yeah not too good, looks like really bad aluminium bronze. Plus there are a few holes in it, where I'm guessing the mold began to break down while the sand was burning.
Another reason this one didn't work too well! We used almost exactly the amount we needed! Because we didn't put too much in the crucible, I believe that too many impurities got poured out with the molten metal which caused it to look like a mess. Still, not too shabby! And I can certainly say the next one went a lot more smoothly too! On a side note, make sure if you want to do this that you don't have a crazy uncle nearby. After we had poured out the aluminium bronze, he wanted to "take advantage" of the hot crucible/smelter and put some scrap brass he had into it. Certainly sounds like a good idea if you like efficiency, but of course mixing metals you don't want to mix is a very bad idea. When poured, the brass ended up looking really bad since it was mixed with the leftover aluminium bronze already in the crucible and also I could not use the bronze crucible again until I filed out all the traces of brass I could find. More to come!
1 note
·
View note
Text
Learning to Smelt - 1
I've been wanting to talk about this for a while. Last year, I wanted to pick up smelting. It seemed fun, and felt right up my field in the realm of making things. I did all the research, got the equipment and earlier this year I finally managed to start! My goal is, once I'm comfortable enough to do it solo (since I had help from my insane uncle during my training adventure) to have it livestreamed and smelt things on request! Honestly at this point I reckon my skills have advanced to the point of almost competence (huzzah!) Nonetheless I want to post some stuff showing the process, just in case anyone's curious!
First off, I made an AGGREGIOUS error when it came to choosing the smelter brand. The one I bought didn't have a connector that worked with Australian Gas tanks, only US ones. I was very luck my uncle had a bunch of spare fittings/hoses lying around otherwise it would've been impossible to do anything from the start. Funnily enough too, despite it eventually getting to +1000 C temperatures, it didn't need that much fuel overall! Only had to slightly open the valves with one full rotation on the gas tank. I guess that's by design, since the whole idea is keep heat in (this just in, local hoplite PNGTuber discovers how heat works!) Also, fun fact! Don't buy a shitty $50 temperature gun that says it can get to 1000+ C and expect it to do so! So many infrared sensors are so pricey and there was no way in tartarus that I would use that kinda money on a glorified nerf gun but then it turns out the cheap one I got was incapable of reading anything beyond 400 C. Fortunately you can just eyeball it when it comes to smelting using this simple rule! If metal = solid: Wait If metal = liquid: Congratulations, you've done it!
Have to make sure it's done in a well-ventilated area too. Doubly so if you're melting brass since that garbage can burn and make zinc oxide which is NOT GOOD. First time I melted stuff was just done to make sure I knew what I was doing, not to cast anything. All I did was melt down brass and copper separately to make small ingots.

(btw if you ever plan to make casted finery, don't bother with a specific ingot mold, those things are pricey. Just get a cast iron muffin tray w/o the teflon on it or something similar. You can make a lot more that way and they're more likely to fit in the crucible if you want to re-melt). Also another piece of advice: DON'T OVERLOAD THE CRUCIBLE. My uncle wanted us to melt down all the copper we had (which was a lot, I had been going to town on the neighbourhoods wiring/plumbing in preparation for this) since "it was more energy efficient to smelt more instead of letting it cool down!" While technically true, a crucible full of copper is VERY HEAVY and picking that thing up with crucible tongs is gonna be a legendary struggle. We did end up spilling a bit, fortunately it didn't go anywhere. The vid attached to this post shows it: A crucible full of copper and regret for our lack of forethought. Following day I did try to cast one thing: My channel emblem as a medallion. I poured molten copper into an open sand mold and well, you be the judge:
Still, twas a good first go! Thanks to the ingot molder we used the cast metal in it's default form comes out in a style akin to that of a paperweight.
I'll be posting details on the second and third smelt soon, so stay tuned!
8 notes
·
View notes
Text
Odysseus meeting Polyphemus for the first time (colorized)
#greek mythology#mythology memes#odysseus#polyphemus#bcs#bcs memes#bcs spoilers#I don't know why I made this
15 notes
·
View notes
Text
Wow I can’t believe it

Damian The Flagellant was actual Damian “Dune” Duneson of Dune fame the entire time!
2 notes
·
View notes
Text
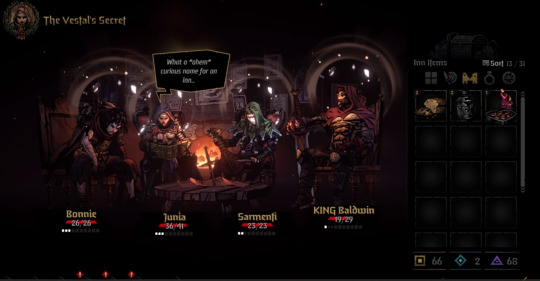
I’m so glad they gave the vestal an interaction for the “Vestal’s Secret” Inn 10/10
20 notes
·
View notes
Text
The Knight and the Lady

a rather sudden shift from my usual drawings but i've looked around and not seen those two being shipped together? and they are so cute?? and adorable??? being together????
this started as a joke but those two grew on me rapidly. and sir Gilman into Jodi tying him into knots? canonically? and he gushes about her any chance he gets? what more can you want?
i dunno, i just think they're very cute. i wonder what name this pair can even get? horny gills?
30 notes
·
View notes
Text
In This House We Love Our Highwayman Rat Son

10 notes
·
View notes
Text
Returning to the Crossroads after killing a Dreamer be like:
One day your killing ghosts in the dream dimension and before you know it you are blasted with pure Vitamin C Energy.

23 notes
·
View notes
Text
So I’ve had some time to digest the Outer Wilds DLC...

13 notes
·
View notes
Text

Often times I feel the urge to swash and/or buckle
#video games#darkest dungeon II#My mind keeps thinking of DD2's The Shroud because of this fact#pirates
4 notes
·
View notes
Text

Playing a lot of surviving mars and dooming several colonies simply because I cannot stop myself from wasting money on Greenhouse gas collection
12 notes
·
View notes
Text
Plague Doctor Surgeon path is by far the best one in the game. I’ll take the stabby rage gremlin over the academic scholar any day.

79 notes
·
View notes
Video
tumblr
Uncovered some super secret director’s cut leaked cut dialogue for the Ancestor
#Darkest Dungeon#Darkest Dungeon meme#Darkest Dungeon II#was gonna just keep it on my twitter but realized it's too good to have#undertale meme
33 notes
·
View notes
Text

So that new update looks interesting
#darkest dungeon#darkest dungeon II#darkest dungeon meme#everything's better down where it's wetter...
106 notes
·
View notes
Photo

Pictured: King Dedede committing the egregious crime of violating cutscene etiquette (circa 2025, post-human population of Earth)
#kirby and the forgotten land#I can't believe he'd do such a thing#king dedede#kirby#he's gone too far this time
7 notes
·
View notes
Photo

Gotta get ready for the hot new game everyone’s talking about
0 notes