#sequencenumbers
Explore tagged Tumblr posts
Visit Tumblr Blog
Explore Tumblr blogs with no restrictions, modern design and the best experience.
Last Seen Tumblr Blogs


Fun Fact
Hackers stole 65M passwords from Tumblr in 2013.
Link
How to Create Sequence Numbers in Odoo 16
#odoo16#sequencenumbers#uniqueidentifiers#documentmanagement#business processes#efficiency#automation#productivity#customization#configuration#businesssoftware#erp#smallbusiness#mediumbusiness#enterprise#technology#digitaltransformation#businessmanagement#odoo
1 note
·
View note
Photo

11-11-2017 #1111 #sequencenumbers #numbers #divine #divineenergy #numerology #energy #energyhealing #intention (at Leeds)
0 notes
Text
How to be productive with Oracle NoSQL Database in less than 5 mins!
We often get requests from our users and customers on how they can get started with using Oracle NoSQL Database on-premises. I am starting this series of blogs where we look into the various options for deployment that are available with the Oracle NoSQL Database. In this first edition, we’ll look at the simplest and the easiest option to start with NoSQL Database called KVlite. KVLite Are you looking to be productive with Oracle NoSQL Database in less than 5 mins? Are you looking to try the NoSQL Database APIs and quickly test your application business logic without setting up a flow-blown database server? Are you looking to evaluate Oracle NoSQL DB with a small dataset without allocating resources that a production server requires? If the answer to any of the above questions is yes, then you need KVlite. KVLite is a simplified, lightweight version of the Oracle NoSQL Database. It provides a single-node store that is not replicated. It runs in a single process without requiring any administrative interface. Users can configure, start, and stop KVLite using a command-line interface. KVlite KVLite is intended for use by application developers who need to unit test their Oracle NoSQL Database application. It is not intended for production deployment or performance measurements. KVLite is installed when you install Oracle NoSQL Database. It is available in the kvstore.jar file in the lib directory of your Oracle NoSQL Database distribution. KVLite can be run within a docker container or on a VM or on bare metal machines. At the time of writing the blog, the current version of NoSQL DB is 19.3 and following are the prerequisite for running KVLite : * Java 8 or greater * Minimum of 5GB disk space. KVLite Starting KVLite You start KVLite by using the kvlite utility, which can be found in KVHOME/lib/kvstore.jar. If you use this utility without any command line options, then KVLite will run with the following default values: * The store name is kvstore. * The hostname is the local machine. * The registry port is 5000. * The directory where Oracle NoSQL Database data is placed (known as KVROOT) is./kvroot. * The administration process is turned on using port 5001. Let’s dive in. Open any terminal and type the following command: $ java -Xmx64m -Xms64m -jar lib/kvstore.jar kvlite Expected Output: Generated password for user admin: password User login file: ./kvroot/security/user.security Created new kvlite store with args: -root ./kvroot -store kvstore -host localhost -port 5000 -secure-config enable In a second shell, ping the KVLite instance to verify that KVLite got started $ java -Xmx64m -Xms64m -jar lib/kvstore.jar ping -host localhost -port 5000 -security kvroot/security/user.security Expected output: Pinging components of store kvstore based upon topology sequence #14 10 partitions and 1 storage nodes Time: 2017-05-02 09:34:43 UTC Version: 12.2.4.4.6 Shard Status: healthy:1 writable-degraded:0 read-only:0 offline:0 Admin Status: healthy Zone [name=KVLite id=zn1 type=PRIMARY allowArbiters=false] RN Status: online:1 offline:0 Storage Node [sn1] on localhost:5000 Zone: [name=KVLite id=zn1 type=PRIMARY allowArbiters=false] Status: RUNNING Ver: 12cR2.4.4.6 2017-04-13 06:54:25 UTC Build id: d6a9b947763f Admin [admin1] Status: RUNNING,MASTER Rep Node [rg1-rn1] Status: RUNNING,MASTER sequenceNumber:204 haPort:5006 The status indicates that the KVLite is up and running. Here we started KVLite in secured mode, if we want to start in unsecure mode execute the kvstore.jar file using the -enable-secure disable flag to disable security and start KVLite in unsecure mode. That’s it you are done! http://bit.ly/2x4xXtz
0 notes
Photo

[Amazon Web Services] DynamoDBローカル導入手順 https://ift.tt/2O2cQg2
Amazon DynamoDBはAWSクラウド上だけでなくローカルでも実行できるバージョン(DynamoDBローカル)が提供されている。ローカルで実行することにより課金を気にせず動作確認や開発が可能になる。 ここではUbuntu 18.04にDynamoDBローカルを導入してテーブルの作成やデータの操作を行ってみる。
DynamoDBローカル動作環境
DynamoDBローカルはjarファイルとDockerイメージの2種類が提供されている��、ここでは前者の方法で確認する。
jarファイルを利用する場合はあらかじめ以下をインストールしておく。
⦿ Java Runtime Environment (JRE) 6.x 以降
DynamoDBローカルインストール
まず以下からDynamoDBローカルのtar.gzをダウンロードする。
コンピュータ上の DynamoDB (ダウンロード可能バージョン)
ダウンロードしたら任意の場所に展開する。インストールはこれだけである。
$ tar zxvf dynamodb_local_latest.tar.gz
DynamoDBローカルサーバ起動
サーバの起動も簡単で、以下のようにすればよい。Ctrl + cで停止する。
$ java -Djava.library.path=./DynamoDBLocal_lib -jar DynamoDBLocal.jar -sharedDb Initializing DynamoDB Local with the following configuration: Port: 8000 InMemory: false DbPath: null SharedDb: true shouldDelayTransientStatuses: false CorsParams: *
尚、デフォルトの待受ポートは8000なので必要に応じて変更する。(-port <n>で指定)
テーブル作成
サーバの起動ができたら実際にテーブルを作成してみる。
AWS CLIを使って以下のようにする。ここでは「test」というテーブルを作り、キーを「num」とする。
$ aws dynamodb create-table --table-name test \ --attribute-definitions AttributeName=num,AttributeType=N \ --key-schema AttributeName=num,KeyType=HASH \ --provisioned-throughput ReadCapacityUnits=1,WriteCapacityUnits=1 \ --endpoint-url http://localhost:8000 { "TableDescription": { "TableArn": "arn:aws:dynamodb:ddblocal:000000000000:table/test", "AttributeDefinitions": [ { "AttributeName": "num", "AttributeType": "N" } ], "ProvisionedThroughput": { "NumberOfDecreasesToday": 0, "WriteCapacityUnits": 1, "LastIncreaseDateTime": 0.0, "ReadCapacityUnits": 1, "LastDecreaseDateTime": 0.0 }, "TableSizeBytes": 0, "TableName": "test", "BillingModeSummary": { "LastUpdateToPayPerRequestDateTime": 0.0, "BillingMode": "PROVISIONED" }, "TableStatus": "ACTIVE", "KeySchema": [ { "KeyType": "HASH", "AttributeName": "num" } ], "ItemCount": 0, "CreationDateTime": 1571411233.367 } }
テーブルができていることを確認する。
$ aws dynamodb list-tables --endpoint-url http://localhost:8000 { "TableNames": [ "test" ] }
データ操作
テーブルが作成できたらデータを挿入/更新/削除してみる。
⦿ データ挿入
$ aws dynamodb put-item --table-name test \ --item '{"num":{"N":"1"},"data":{"S":"first"}}' \ --endpoint-url http://localhost:8000
⦿ データ取得
$ aws dynamodb get-item --table-name test \ --key '{"num":{"N":"1"}}' \ --endpoint-url http://localhost:8000 { "Item": { "num": { "N": "1" }, "data": { "S": "first" } }
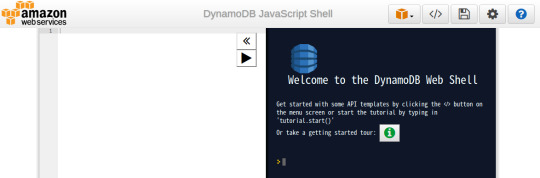
AWS CLIだけでなくブラウザからアクセスしてJavaScriptで操作することもできるので、以降はブラウザ上で実行する。
http://localhost:8000/shell/
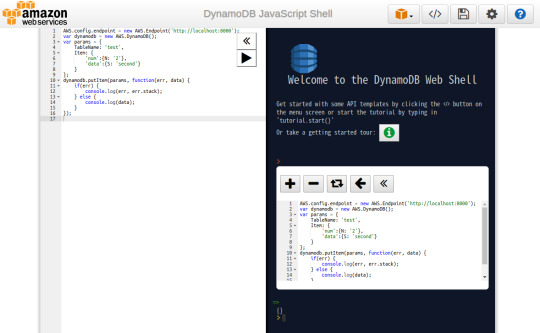
⦿ データ挿入
左ペインに以下のコードを入力し、実行ボタン(

)をクリックすると右ペインに実行結果が表示される。
AWS.config.endpoint = new AWS.Endpoint('http://localhost:8000'); var dynamodb = new AWS.DynamoDB(); var params = { TableName: 'test', Item: { 'num':{N: '2'}, 'data':{S: 'second'} } }; dynamodb.putItem(params, function(err, data) { if(err) { console.log(err, err.stack); } else { console.log(data); } });
⦿ データ取得
AWS.config.endpoint = new AWS.Endpoint('http://localhost:8000'); var dynamodb = new AWS.DynamoDB(); var params = { TableName: 'test', Key: { 'num':{N: '2'} } }; dynamodb.getItem(params, function(err, data) { if(err) { console.log(err, err.stack); } else { console.log(data); } });

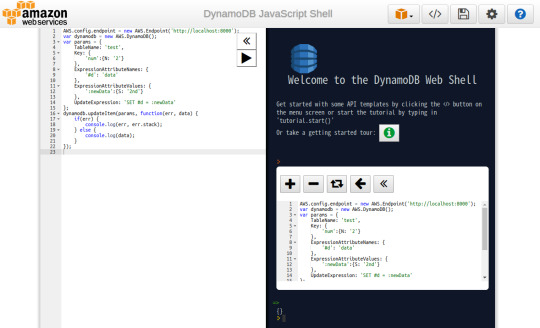
⦿ データ更新
AWS.config.endpoint = new AWS.Endpoint('http://localhost:8000'); var dynamodb = new AWS.DynamoDB(); var params = { TableName: 'test', Key: { 'num':{N: '2'} }, ExpressionAttributeNames: { '#d': 'data' }, ExpressionAttributeValues: { ':newData':{S: '2nd'} }, UpdateExpression: 'SET #d = :newData' }; dynamodb.updateItem(params, function(err, data) { if(err) { console.log(err, err.stack); } else { console.log(data); } });
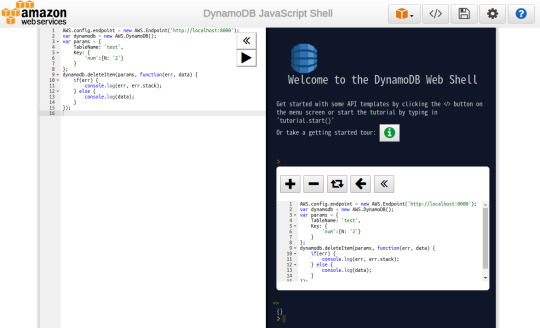
⦿ データ削除
AWS.config.endpoint = new AWS.Endpoint('http://localhost:8000'); var dynamodb = new AWS.DynamoDB(); var params = { TableName: 'test', Key: { 'num':{N: '2'} } }; dynamodb.deleteItem(params, function(err, data) { if(err) { console.log(err, err.stack); } else { console.log(data); } });
⦿ テーブル削除
ひと通り確認が終わったのでテーブルを削除する。
$ aws dynamodb delete-table --table-name test \ --endpoint-url http://localhost:8000 { "TableDescription": { "TableArn": "arn:aws:dynamodb:ddblocal:000000000000:table/test", "AttributeDefinitions": [ { "AttributeName": "num", "AttributeType": "N" } ], "ProvisionedThroughput": { "NumberOfDecreasesToday": 0, "WriteCapacityUnits": 1, "LastIncreaseDateTime": 0.0, "ReadCapacityUnits": 1, "LastDecreaseDateTime": 0.0 }, "TableSizeBytes": 14, "TableName": "test", "BillingModeSummary": { "LastUpdateToPayPerRequestDateTime": 0.0, "BillingMode": "PROVISIONED" }, "TableStatus": "ACTIVE", "KeySchema": [ { "KeyType": "HASH", "AttributeName": "num" } ], "ItemCount": 1, "CreationDateTime": 1571411233.367 } }
AWS CLIやJavaScriptを使って他にも様々な操作ができるので以下のドキュメントを参照のこと。
DynamoDB – AWS CLI Command Reference
DynamoDB – AWS SDK for JavaScript
DynamoDBローカルのバックエンドはSQLite
DynamoDBローカルのバックエンドはSQLiteを使っているのでSQLiteの各種ツールで中身を参照することができる。
ファイルはDynamoDBローカルのサーバを起動したカレントディレクトリに「shared-local-instance.db」として作成される。
ファイルは一つだけなのでバックアップや別ホストへのコピーも容易に行える。
$ sqlite3 shared-local-instance.db SQLite version 3.22.0 2018-01-22 18:45:57 Enter ".help" for usage hints. sqlite> .tables cf dm sm ss test tr us
テーブルはそれぞれ以下の用途に使われている。
⦿ cf DynamoDBローカルのバージョン
sqlite> .schema cf CREATE TABLE cf (version TEXT); sqlite> select * from cf; v2.4.0
⦿ dm DynamoDBローカル内に定義したテーブルの情報
sqlite> .schema dm CREATE TABLE dm (TableName TEXT, CreationDateTime INTEGER, LastDecreaseDate INTEGER, LastIncreaseDate INTEGER, NumberOfDecreasesToday INTEGER, ReadCapacityUnits INTEGER, WriteCapacityUnits INTEGER, TableInfo BLOB, BillingMode INTEGER DEFAULT 0, PayPerRequestDateTime INTEGER DEFAULT 0, PRIMARY KEY(TableName)); sqlite> select * from dm; test|1571441645458|0|0|0|1|1|{"Attributes":[{"AttributeName":"num","AttributeType":"N"}],"GSIList":[],"GSIDescList":[],"SQLiteIndex":{"":[{"DynamoDBAttribute":{"AttributeName":"num","AttributeType":"N"},"KeyType":"HASH","SQLiteColumnName":"hashKey","SQLiteDataType":"BLOB"}]},"UniqueIndexes":[{"DynamoDBAttribute":{"AttributeName":"num","AttributeType":"N"},"KeyType":"HASH","SQLiteColumnName":"hashKey","SQLiteDataType":"BLOB"}],"UniqueGSIIndexes":[]}|0|0
⦿ sm / ss / us DynamoDB Stream管理情報
sqlite> .schema sm CREATE TABLE sm (StreamID TEXT, StreamStatus TEXT, TableName TEXT, StreamInfo BLOB, CreationDateTime INTEGER, DeletionDateTime INTEGER, PRIMARY KEY(StreamID)); sqlite> .schema ss CREATE TABLE ss (StreamID TEXT, ShardID TEXT, CreationDateTime INTEGER, DeletionDateTime INTEGER, InitialSequenceNumberStart INTEGER, SequenceNumberEnd INTEGER, ParentShardID TEXT, PRIMARY KEY(ShardID)); sqlite> .schema us CREATE TABLE us (StreamID TEXT, ShardID TEXT, SequenceNumber INTEGER, CreationDateTime INTEGER, StreamRecord BLOB, OperationType TEXT, PRIMARY KEY(SequenceNumber)); sqlite> select * from sm; sqlite> select * from ss; sqlite> select * from us;
⦿ test 今回の導入手順でテスト用に作成したテーブル
sqlite> .schema test CREATE TABLE IF NOT EXISTS "test" (hashKey BLOB DEFAULT NULL, hashValue BLOB NOT NULL, itemSize INTEGER DEFAULT 0, ObjectJSON BLOB NOT NULL, PRIMARY KEY(hashKey)); CREATE INDEX "test*HVI" ON "test" (hashValue); sqlite> select * from test; >=E10000000000000000000000000000000000000|-��,q���� �T �����|14|{"data":{"S":"first"},"num":{"N":"1"}}
⦿ tr トランザクション管理情報
sqlite> .schema tr CREATE TABLE tr (TransactionId TEXT, TransactionSignature BLOB, CreationDateTime INTEGER, PRIMARY KEY(TransactionId)); sqlite> select * from tr;
参考サイト
Amazon DynamoDB情報 (Qiita)
元記事はこちら
「[Amazon Web Services] DynamoDBローカル導入手順」
November 11, 2019 at 12:00PM
0 notes
Text
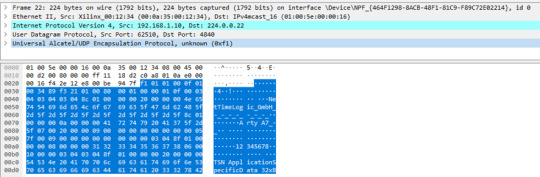
open62541 publishing performance on a Soft-Core CPU in an FPGA
Overview
In the first steps to get OPC UA PubSub running on MicroBlaze Soft-Core the performance was not in the focus. At the TSN/A conference in October 2019 was an interesting presentation about the processor cycles for the publisher. It was known that this is a bottleneck, especially on low performance CPUs. Therefore, an improvement with some static configuration was presented on the roadmap. At the SPS in Nurnberg we saw first figures with this performance improvement. Now it will be very interesting what does this mean on a low performance CPU like the Xilinx MicroBlaze Soft-Core in the FPGA. If this performance is sufficient, a smart combination with NetTimeLogic’s TSN products and an open62541 PubSub application in a MicroBlaze Soft-Core will fulfill many market requirements.

As a starting point, the OPC UA PubSub tutorial on a FPGA is used (OPC UA PubSub on a FPGA using open62541). To get the latest RtLevel features of the open62541 implementation the master branch is used.
The example FPGA project and the application are available here:
https://github.com/NetTimeLogic/opcua/tree/PubSub_RtLevel_example
The open62541 implementation is available here (master):
https://github.com/open62541/open62541/tree/master
Introduction
The main change compared to the previous open62541 posts is that now the master branch of open62541 is used. There were some small adjustments needed in the application code, otherwise the old tutorial on how to generate the libraries is still valid.
Also the MicroBlaze FPGA image running on the Arty A7-100T development board from DIGILENT is still unchanged.

The main focus is to compare the publish performance of frames with the different PubSub RT levels. Deterministic behavior was not investigated and also not the PubSub conformance (OPC UA part 14) since the feature is still under development.
Description of the RT Modes:
UA_PUBSUB_RT_NONE
Default "none-RT" Mode. For each DataSetField the value is read out of the information model. This is slowing down the publishing process.
UA_PUBSUB_RT_DIRECT_VALUE_ACCESS
Within this RT-mode, the value source of each field is configured as static pointer to a DataValue. The publish cycle is improved by prevent the value lookup within the information model. All fields must be configured with a static value source. The DataSetFields can still have a variable size. The published fields are not visible in the information model.
UA_PUBSUB_RT_FIXED_SIZE
All DataSetFields have a known, non-changing length. The server will pre-generate some buffers and use only memcopy operations to generate requested PubSub packages. The configuration must be frozen while it is operational. The published fields are not visible in the information model.
Design preparation
For the detailed design preparation steps please check the post OPC UA Server on a FPGA using open62541 and OPC UA PubSub on a FPGA using open62541.
Basic OPC UA Server PubSub application
In the Xilinx SDK the available OpcServer.c can be imported to the OpcServer application project.
In the basic server the thread stack size was defined with 4096. This is not enough anymore and the application will report with the hook functions a StackOverFlow. Therefore, the THREAD_STACKSIZE was increased to 16384.
In a first step the network initialization and the basic OPC UA Server configuration is done. Before the server starts, the PubSub specific setup is needed. The application is targeted to be compatible with the Pub/Sub format for the IIC TSN Testbed interoperability application.
With different defines the tested configurations can be selected.
Changes compared to the last version
For the new PubSub feature some changes compared to the previous version are needed.
On the open62541 repository are examples available how the new feature can be used. With the help of the following examples the OpcServer.c was extended.
https://github.com/open62541/open62541/blob/master/examples/pubsub/server_pubsub_publisher_rt_level.c
Beside some small cosmetic adjustments and some added defines to compile the different versions mainly three adaptations were needed. The first one is how the data set field is added (addDataSetField function), then how the data set value is updated (valueUpdateCallback) and the last one is the freeze of the writer group before publishing starts (UA_Server_freezeWriterGroupConfiguration).
addDataSetField / UA_Server_addDataSetField:
The field needs to be set as static value source and the value must be assigned. A dynamic node is not added as before because of the pointer assignment of the published value.
valueUpdateCallback:
The updates of the values is done here (Pointer to the value).
UA_Server_freezeWriterGroupConfiguration:
This must be done before the publishing starts (only for the RT modes). It means that no dynamic changes of the write group are possible anymore. Before any change can be done, publishing must be stopped and the command UA_Server_unfreezeWriterGroupConfiguration called.
Measurements
As already mentioned in the beginning, the tests are only focusing on how many frames can be published. For all tests the same pub sub message was used and the measurement was done over 180 seconds. The MicroBlaze Soft-Core is running on 100MHz. No other connections to the server (e.g. disconnect UA Expert) are established.
The measurement was done with three different payload configurations for the three different modes. The header was always the same (Timestamp deactivated).
1. 1 published variable, with 1 dynamic value (payload: 24 bytes)

2. 15 published variables, with 1 dynamic value (payload: 182 bytes)
3. 15 published variables, with 2 dynamic values (payload: 182 bytes)
As a fourth frame format the example RT level PubSub application from open62541 was also tested. This has 10 published variables and all are dynamic (payload 80 bytes)

Measurement overview:

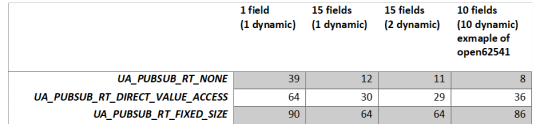
Observed problems with the RtLevel UA_PUBSUB_RT_FIXED_SIZE:
Header information update seems no to work as for the other modes (e.g Seq.-Nr).
With UA_UADPNETWORKMESSAGECONTENTMASK_TIMESTAMP enabled the dynamic value does not update anymore. Therefore, all tests were done without this flag. The reason was not investigated.
Summary
The RT level PubSub update of open62541 brings a substantial performance improvement already on a very low performant CPU. With the enhancement, also some limitations were added. Dynamic changes of the published Datasets are not possible while it is operational. This is most probably negligible for many applications. Another constraint of the RT level is that the values are not visible in the information model anymore. Updating the information model would decrease again the performance.
Especially the RT_FIXED_SIZE concept does show the benefit when many fields are published. It seems definitely as an option to use open62541 in combination with a Soft-Core in the FPGA. Of course, high-performance applications can’t be achieved, but for such cases usually a high perfmance CPU is anyhow already in place for the application part.
However, there are still some open points when it comes to dynamic fields of the header like timestamps or sequence number. There seems to be some remaining work (Updates in the header in the UA_PUBSUB_RT_FIXED_SIZE mode).
Some general updates in the header seems not to work as expected:
GroupHeader
GroupVersion was not assigned
SequenceNumber was not assigned
ExtendedNetworkMessageHeader
Timestamp was empty
For our testing we have done the same quick fix as described in the previous post.
As a next step the deterministic behavior will be the focus. Preferable already in combination with our TSN End Node.
0 notes