#setting up a guides/faq page next
Explore tagged Tumblr posts
Visit Tumblr Blog
Explore Tumblr blogs with no restrictions, modern design and the best experience.
Last Seen Tumblr Blogs


Fun Fact
Premium Tumblr themes are available from anywhere between $9 to $49.
Text
a simple navigation page is set up ! link is now updated in pinned post !!
#xiao talks#it's a very simple standard layout page bc this blog does not have javascript :(#setting up a guides/faq page next
0 notes
Text

What is CalanMine?
Calanmine is a non-profit fan-made dating simulation game based off A Court of Thorns and Roses. It's not official. The original characters and plot are property of Sarah J. Maas and Bloomsbury.
Where do I play CalanMine?
Click here to download the game.
What do I need to run the game?
You need a laptop or PC. This game is NOT optimized for tablets or phones.
Simply download the file from the download page. Pick the version designated for Windows if you are on Windows, or the Mac version if you use a Mac. It is a fairly light game and should run on most current laptops and PCs. Please let us know if you run into any trouble!
How do I play CalanMine?
Once you’ve downloaded the game file, you first have to de-compress (i.e. unzip) it. After that, simply click the file ending in “.exe” in the folder to start playing. The game will open a new window. To play, you can select different options in the menu screen with your mouse. To go through the text simply click either your mouse or hit enter. The mouse wheel allows you to cycle back and forth between text, hit enter to go to the next screen.
Enjoy and explore the different choices to discover all the story lines! Don’t have time to go through them all in one go? The game automatically saves your progress on what endings you have uncovered. Additionally, you can also manually save at any time during your game.
Help, there is a pop-up warning that won't let me run the game!
Since you are running an .exe file, your computer will need extra permission to run it! No worries, the file is completely safe and you only have to give the permission once.
For Windows, just give it permission in the drop down menu of the warning that appears (choose ''run anyway'') -> then it let's you click ''run''. If you have a more zealous anti-virus program, we got an anon who made a guide (click here).
For Mac, go to System settings -> Privacy & Security. Then scroll down to Security and look for the message that says “CalanMine was blocked because it is not from an identified developer" and click "open anyway". You may have to click "cancel" on the first popup and try to re-launch the game. It should give you the option to run it now.
How do I know how many endings I’ve unlocked?
In the main menu, select ‘Gallery’ to see how many endings you’ve unlocked and how many remain. We’ve added little hints to show you who to approach to find the ones you’re still missing.
Why is Tamlin the focus of the game? Why are only Rhysand, Lucien and Eris available?
The game was originally created as a surprise for Tamlin Week 2025 and we’re big fans of the High Lord of Spring. We chose Rhysand and Lucien because of their rich history and unique dynamics with Tamlin - and we added Eris simply because we like him! If we had more time and resources, we would have done more, but keep in mind that this game was created as a side project and hobby for all of us! We also hope that this might inspire other fans to do their own projects!
Will we see other characters in the game?
There are no plans to expand CalanMine as of now. The game as it is was a lot of work and for now we’re done. Maybe one day we’ll all meet in a whole different game, who knows? It’s up to the stars.
I have a question that’s not in the FAQ.
Feel free to send us an ask! We’re more than happy to help.

56 notes
·
View notes
Text
alright since RGG seems bent on putting merch behind things like UFO catcher shit, here's my crappy how to use a proxy guide lol

gonna be using buyee as an example but most proxies are more or less the same so it's your choice on what to use. I look at fee prices and customer service reviews to decide on my proxies. sorry if it's wordy! but I think I cover the most important bits for general use.
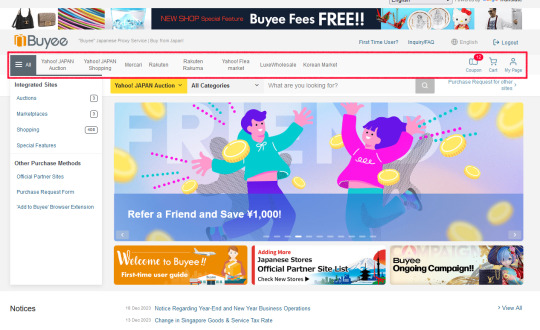
so on the landing page you got all the goobly gook but what you'll mainly be looking at is the stuff in the red box. all the shops are listed there - the ones I mainly use are yahoo! japan auctions and mercari. the other shops are more like regular shopping sites. pretty much all proxies use the same sites as they're just a directory for wherever you wanna shop.
auctions are self explanatory - you bid on things till the time runs out or some auctions offer an immediate buyout price.
mercari is largely a secondhand seller marketplace but you can find companies on there as well.

when I search for stuff, I prefer putting in the actual terms for better accuracy over auto translating. so here I put in ryu ga gotoku (龍が如く). on buyee, I have rgg and dead souls as saved searches so I can just click on them to easily autofill the search bar which is handy.
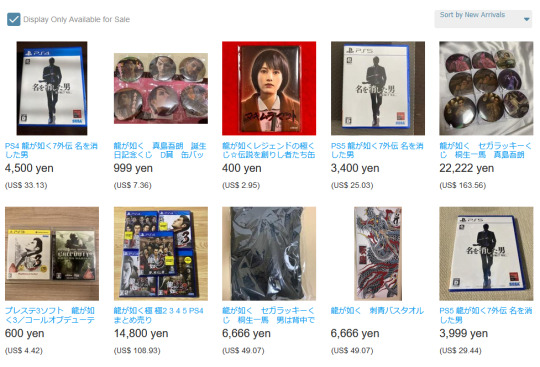
items will populate and you'll see prices in yen and for me, usd. these are the *listing prices, not the *final price. since I'm using a proxy, there will be additional fees per item I get. also, the currency exchange rate occasionally changes so if something goes up or down in price, that be why.
💥 pls also note prohibited items that proxies cannot ship internationally such as items with flammable fluid which can include perfumes, lighters, etc. other things like alcohol, which may be okay for like 99% of countries is not okay, for example, in the US lol unless you go thru customs paperwork n shit. *ebay is usually where you want to go for prohibited items as those sellers *will go thru the process of filing the proper forms to send such items.
💥 pls be aware of scalpers! I tend to browse multiple pages and multiple listings of the same item to see what the prices typically fall around. if it looks too cheap, be aware of an item's description. if it looks too expensive, it probably is.

let's use this bad boy as an example. the main things you wanna look at on any item is the condition and the photos to be *sure* you are happy with what you're getting. if you see the same photos across listings, be a lil wary. you can see estimated shipping times and the seller's general ratings. always read item explanations if there is one in case the seller makes any notes of defects or other things.
you can add to shopping cart to keep browsing or you can go to the order page to immediately purchase.
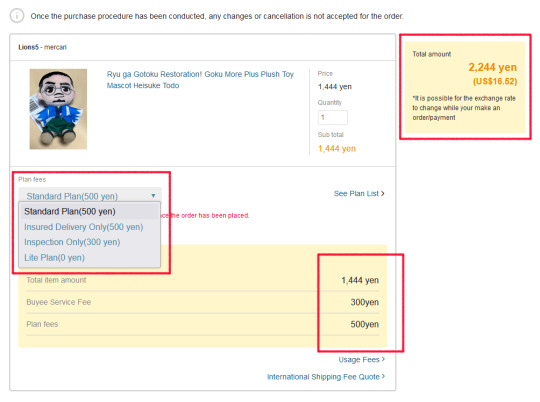
so proxies typically have different plans you can choose when you buy items and that adds towards the fees. these can include inspections, insurance, etc of items when they arrive at the proxy warehouse (see your proxy's FAQ for plan descriptions). it's up to you what you deem worth choosing, if at all. for most things, I just go with whatever costs me 0 lol - especially if it's a cheaper item that I really don't feel needs to be inspected or insured, like a plushie or keychain. regardless of plan, you'll have to pay some proxy service fee (here the "buyee service fee"). in the top right, you'll see the total cost of everything. once you're happy, then you pick your form of payment. I usually go with paypal.

you can go to your page and see typical stuff like orders, settings, and the like. there's often specific tabs for certain sites like auctions so you can go there for anything you purchase in that way. the cart is anything you've added but haven't bought.
the orders tab is for anything bought and you may see the status of its shipping to the proxy warehouse which I'll get to in the next bit.
package information is everything that has arrived to the warehouse so here you can see I have 12 items currently waiting to be shipped to me.
user information, pretty basic but do MAKE SURE your addresses and things are 100% correct. it would really suck nuts if you pay out the ass for international shipping and it gets sent to the wrong place.
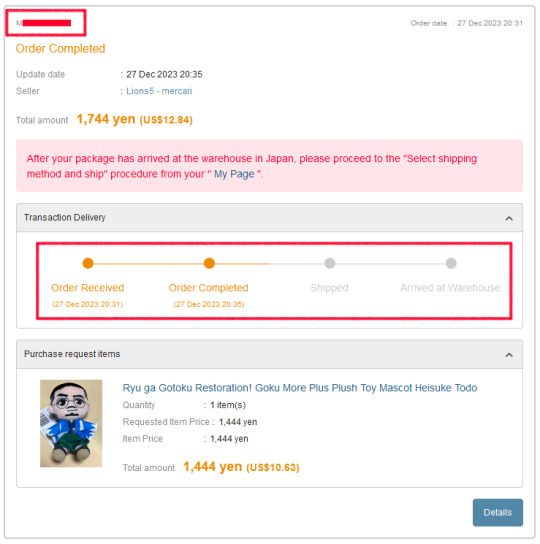
on the orders tab, you can see the status of the item. it contains important bits like date ordered and order # (I've blotted out mine). order received is *you* paying for the order. order completed is *buyee* paying for the order. shipped means the seller has shipped to buyee's warehouse address and arrived at warehouse is self explanatory.
*sometimes, a seller may cancel an order after you've paid for it and you will be refunded. this is often due to the seller unable to actually send the item for whatever reason or they don't sell to proxies. nothing you can really do about it but I've only had it happen a couple of times in dozens of purchases.
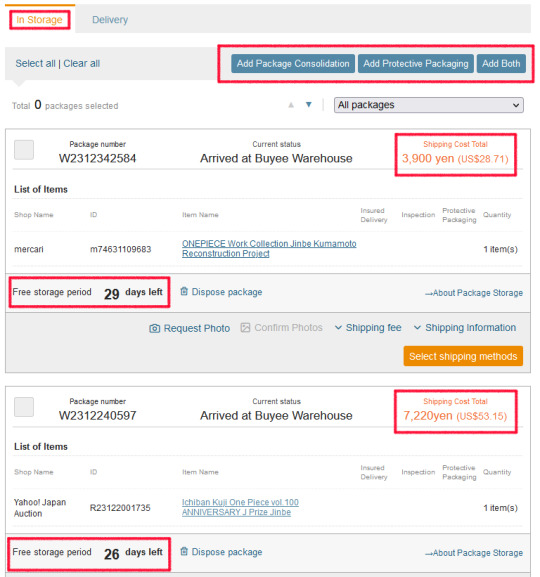
back to the package information tab, here you can see all the packages that have arrived at the warehouse waiting for shipment. proxies will store packages for free for a certain number of days - buyee being 30 while I've seen other go to 45 days, etc. after that time is up, you will be charged for storage per day so be aware of that!
here you can consolidate packages which means putting everything into one shipment instead of going individually. you can see estimated costs of shipping per item which, if you did each item individually, that would be mad expensive. when you consolidate, things can still be pretty pricey but imo better to pay idk 150 bucks in shipping for 10 items instead of 300 bucks for all 10 individually.
💥 shipping is calculated by weight so be aware of that when you buy items - however baseline costs will be the same for lighter items regardless of how much they weigh. baseline costs for me is around 15-30 bucks regardless of what I get. for example, I have a teeny tiny keychain in storage and several figures. the shipping for that keychain is the same cost as the figures so it's only sensible to lump them into one package cuz I ain't paying out the ass to ship 1 keychain lol.
you are free to consolidate what you want and how. if you wanna consolidate some packages to ship now and you wanna do others later, you are free to. just keep in mind your budget and storage time!
proxies also offer services to protectively wrap your packages. if you're concerned about damage, then choose that option when you consolidate. I don't often do it unless what I'm buying can break otherwise all my packages have arrived relatively unharmed.
💥 proxies will consolidate things AS IS so if you have a buncha figures that don't have their boxes, the proxy will put them in a shipping box just as they are, however they received them from the seller. so if the seller only bubble wrapped the figure, it will be sent to you just like that, no additional protection unless you pay for that option.
*consolidation can take some days and you'll be informed when items are ready to ship. at that point, you pay the shipping and that's it! you can choose what type of shipping you wanna go with (such as DHL, EMS, sea mail (if it's available), etc at differing prices and arrival times. pick what's best for you. *note, sea mail is often the cheapest but the slowest (like several months arrival time) and not available to every country (plus you'd want protective packaging for this just in case cuz boat rides be bumpy)
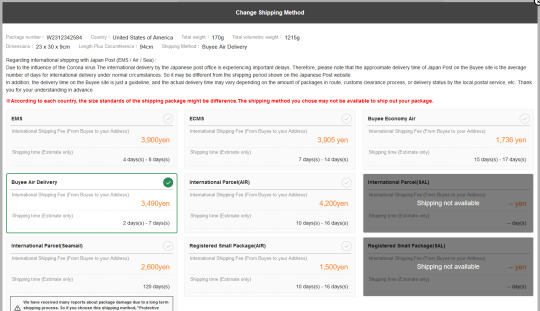
here are some examples of shipping costs for a single one of my items. some of these options will disappear when I consolidate cuz shipping a lil figure is very different from shipping a larger box full of multiple things.
💥 be sure to read EVERYTHING and make sure you know what options you're choosing to make sure it fits your budget and expectations of arrival time.
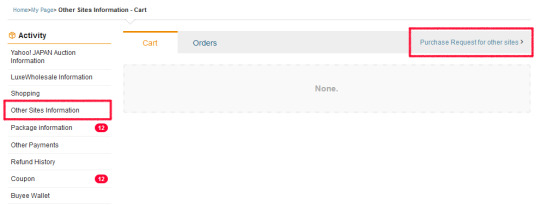
one more thing proxies can do is order from a number of sites that aren't on the main page. for buyee, you want to go to the other sites information tab and then click "purchase request for other sites."
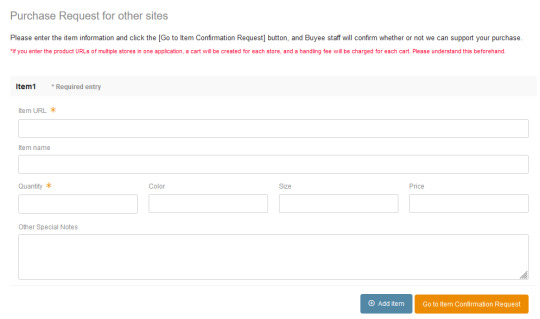
here you can input the information of whatever site you want to see if the proxy can purchase it for you. this is how I buy things on ebten like the jpn only preorders. if the proxy cannot buy the requested item, they'll let you know.
if they can go thru with the order, they will confirm your payment and it goes thru the same process as any other order.
258 notes
·
View notes
Text
Love and Deepspace Version 2.0 Client Update Guide
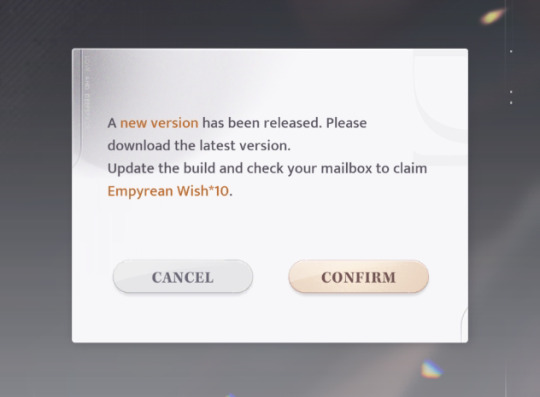
With the release of Love and Deepspace Version 2.0 on July 15th, a mandatory update for the game client will be required. You may need to download and update to the latest version of the client, as the old version will no longer grant access to the game. It is recommended to perform an overlay installation without uninstalling the old client beforehand. The new client will be available during the server maintenance on July 15th. You can download it following the pop-up notice in the game to complete the overlay installation.
*Uninstalling the old version may result in the loss of local data, such as photos not uploaded to the cloud. Please take notice and do not uninstall the old client in advance.
iOS Update Instructions
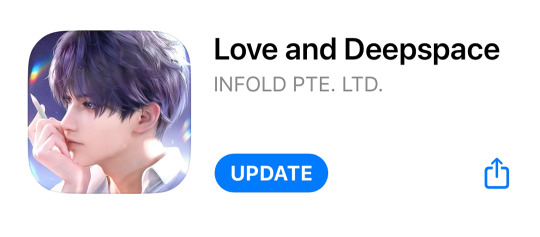
During the server maintenance on July 15th, after the new version is released, you will see a pop-up notice when you open the game. Tap "Confirm" to be redirected to the "Love and Deepspace" update page on the App Store, then tap "Update" to download and install the new version.
*There may be a 1-2 hour delay in the release time. If the pop-up does not appear, please wait patiently.
*If you have enabled automatic updates in your iOS device settings under App Store, the update will automatically download and install over Wi-Fi. In this case, you can skip the following update steps.
Update Steps:
1. Open the game and tap the "Confirm" button on the pop-up notice.
2. Tap "Update" after being redirected to the "Love and Deepspace" update page on the App Store.
3. The game client icon on your home screen will enter"loading" state.

4. A blue dot will appear next to the game name "Love and Deepspace," indicating the update is complete.

Android Update Instructions
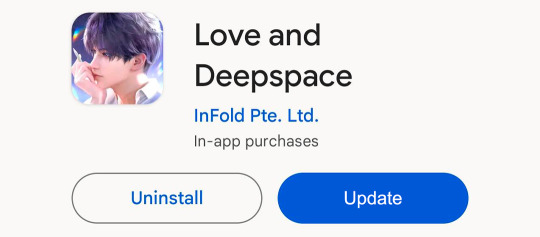
During the server maintenance on July 15th, after the new version is released, you will see a pop-up notice when you open the game. Tap "Confirm" to be redirected to the "Love and Deepspace" update page in Google Play Store, then tap "Update" to download and install the new version.
*There may be a 1-2 hour delay in the release time. If the pop-up does not appear, please wait patiently.
*If you have enabled automatic updates in your Android device settings under Google Play, the update will automatically download and install over Wi-Fi. In this case, you can skip the following update steps.
Update Steps:
Open the game and tap the "Confirm" button on the pop-up notice.
Tap "Update" after being redirected to the "Love and Deepspace" update page on Google Play Store.
The update is complete.
If you encounter any issues, such as installation failures or account problems, during or after the update, please contact our customer service for assistance. If you are unable to enter the game, you can also reach out to us via the customer service email for help.
Regular FAQs
1. Do I have to download the new client for this update?
After the game Version 2.0 is officially launched, the client will require mandatory updates to ensure all hunters can better enjoy the new content. You need to download and update to the latest version of the client, as the old client will no longer grant access to the game.
When can I start updating to the new client?
During the server maintenance on July 15, the new client will become available on the official website and app stores. After the new version is released, you will see a pop-up notice when you open the game. Follow the on-screen instructions to complete the update.
*There may be a 1-2 hour delay in the release time. If the pop-up does not appear, please wait patiently.
What is the size of the new client installation package?
The iOS package size for this update is approximately 3.7 GB, and the Android package size is around 3.4 GB. Before installing, please ensure your device has at least 15 GB of free storage space to download and run the game smoothly.
*It is recommended to perform an overlay installation without uninstalling the old client beforehand. Uninstalling the old version may result in the loss of local data, such as photos not uploaded to the cloud. Please take note.
I've previously downloaded all Main Story, Memories, and Dates resources within the game. Will I need to re-download them after this update?
Due to changes in the underlying logic of game resource files, you will need to manually re-download historical resources of Main Story, Memories, Dates, etc. in [Manage Resource] after this update. We apologize for any inconvenience this may cause.
*Additionally, customized login background previously set by hunters will be reset to the default background after the update. You can readjust your settings in [Custom] once the update is complete.
Account-related FAQs
What should I do if I receive an "account not found" error or find that my account has reset to a new character after logging in post-update?
Please check if your account number and password are correct. If problems persist, contact customer support for assistance.
What should I do if I forget my login password after the update?
You can click "Forgot Password" on the login page to recover it. Please contact customer support if you encounter any issues.
If you encounter any other issues during updates or while playing the game, please don't hesitate to contact our online customer support for assistance. Thank you for your understanding.
9 notes
·
View notes
Text
s5 script info/faq
hi guys! in exactly a week, i'm going to start posting my original stranger things s5 script. here's a general info/faq post for easy reference :)
about the script:
what: this script is designed to be a culmination of my ongoing rewrite series, which is a fanfic version of each season of stranger things, written through the lens of alternating byler pov. since season 5 hasn't released yet, and we've still got a ways to go, i decided to write an original script to base my last installment off of. the script will be 10 episodes, at about 60 pages each, and serve as a companion to my season 5 fic.
where: script episodes will be posted here on my tumblr, and be linked to a pinned post (which will go up in a few minutes). fic chapters will be posted on my ao3, as usual.
when: currently, i'm planning to have at least one post a week: the script episode will release on a sunday, and then the two accompanying chapters on the next two fridays. so, for example, the first few releases will look like this: script 1 on sunday 9/3, chapter 1 on friday 9/8, and chapter 2 on friday 9/15. this gives you about a week to read each new post! of course, you can read however you'd like: script first, or fic first, depending on your preference. i decided to post the scripts first to try and mimic the rest of the rewrite experience: "watching" the show, then reading the fic. if there's any schedule delays due to typical life stuff, i'll let you guys know!
frequently asked questions:
will the script cover every plotline?: yep! with 60 pages per episode, there's a bit of time dedicated to every character, as much as i can feasibly manage. of course, this means that the script will be less byler-focused than the fic series has been (but still more than the original show, lol). but not to worry—the fic companion will add extra scenes and plenty of byler content. this also means that some of the plots will only be accessible through the script, as the fic is entirely from byler pov. but it's still up to you whether you would like to read or not!
will there be any character deaths?: i'm going to answer this right now: there will be no character deaths. i want the script to be realistic, but it's also my version, and i always try to give my characters happy endings :) this doesn't mean that there won't be some close calls, though. we'll have to see. :)
will there be a playlist?: yes! i've spent some time testing out playlists for the first two episodes, and they're both fully completed. they'll be linked along with the script, along with a timing guide for anyone (like me) who likes being insane about the details. playlists are always tricky because everyone reads at different speeds, so i've written out which scenes go with each song, and you can skip along as needed. if you prefer not to listen with music, of course you don't have to—though i will say that most songs are just soundtrack instrumentals to set the mood :) it might be a little finicky, so i'm sorry in advance! i'll always try to perfect them as much as possible before posting.
will you do another rewrite after s5 releases?: currently, i'm planning on it. of course, we have no idea how much longer it's going to take, or what exactly will happen in canon (or in life), but if i'm in a place to write fic, then yes! i'll do a typical rewrite and add it to the end of my series, so you guys can have your choice of endings :)
how do we leave comments?: if you want to leave a comment on the script, i'm happy to receive them in asks, messages, or post comments! you can also leave them on the fic chapters if you'd like. edit 9/1: you should be able to leave comments in the google doc! be mindful of what account you are using, as these comments will be public. for a more comprehensive comment policy, click here.
do i have to read the rest of the rewrite series first?: reading the rest of the rewrite isn't necessary, but it is a good idea. i know it's a lot to read, so don't feel pressured, just know that some things might not make as much sense without the prior context! my rewrite series is pretty canon-compliant, but a lot of relationship dynamics are developed in a very specific way, and we pick up right where we left off at the end of a new place to be from. so, essentially: no, but you'll probably want to.
do i have to read the script?: definitely not. if you prefer to just read the fic, you absolutely can! it'll make sense on its own, you might just miss out on some of the extra plotlines and context.
that's about all i can think of for now—if you have any questions that weren't answered in this post, please send me an ask and i'll edit this post to include your question! i've been working on this project for a few months now, and i'm really excited to share it with you guys :) thank you all for giving it a shot! see you next sunday <3
48 notes
·
View notes
Text
Why Most Dental Websites Don’t Convert and How to Fix It

A sleek dental website might look great, but if it’s not helping you book appointments, it’s just digital wallpaper.
Too many dentists have websites that underperform—not because of lack of effort, but because of common (and fixable) missteps.
Here’s what’s going wrong—and how to fix it.
1. Weak or Hidden Call-to-Actions (CTAs) If visitors can’t clearly see how to book, call, or contact you, they won’t.
💡Fix: Place bold CTAs—“Book Now,” “Call Today”—on every page, especially your homepage and service pages.
2. Poor Mobile Experience Over 60% of dental searches happen on mobile. If your site isn’t mobile-optimized, you’re losing patients.
💡Fix: Ensure responsive design, fast loading, and thumb-friendly buttons.
3. Missing Trust Signals Patients want proof before they pick a provider. No reviews, dentist bios, or real photos? Big mistake.
💡Fix: Add real testimonials, certifications, and photos of your clinic, staff, and happy patients.
Check out this case study of how one dental clinic built trust and doubled new appointments.
4. Outdated Website Design Still rocking a design from 2015? That’s like wearing Crocs to a job interview.
💡Fix: Update your layout, branding, and performance every few years. Patients judge your practice by how your website feels.
5. Generic or Dry Content If your copy sounds robotic or full of jargon, people will bounce.
💡Fix: Write like a human. Use plain English, answer common questions, and make services easy to understand. Need help? Try professional dental content writing.
6. No Local SEO Your website might look good—but if you’re not ranking for “dentist near me,” it’s invisible.
💡Fix: Add your location in page titles, meta descriptions, and headings. Also, optimize your Google Business Profile.
7. No Way to Capture Leads Not every visitor will call on their first visit. Are you collecting emails? Offering downloads?
💡Fix: Use pop-ups or forms to offer a “Free Whitening Guide” or “Invisalign Quiz.” Capture the lead, nurture later.
8. No Tracking = No Growth Without knowing where people click—or why they leave—you can’t improve.
💡Fix: Set up Google Analytics, call tracking, and form conversions to see what’s working (and what’s not).
9. Services Are Hard to Find People want to know what you do, fast. If your services are hidden or buried, they’ll leave.
💡Fix: Showcase your main treatments on the homepage. Create individual pages for each. Make it skimmable!
10. No Personality, No Difference Why should someone choose you over the next dentist down the block?
💡Fix: Add dentist bios, your clinic’s story, staff photos, and community involvement. Let your brand shine.
Final Thoughts
If your site isn’t converting, it’s not doing its job. Your website should build trust, show value, and make it easy to book.
Need help revamping your website, messaging, or SEO? Reach out to Remedo’s dental marketing experts.
FAQs
Q: How often should I update my dental website? Every 2–3 years for design; monthly or quarterly for content and SEO.
Q: What’s the #1 thing that improves conversions? A clear, mobile-friendly CTA that makes it easy to book.
Q: Should I blog as a dentist? Yes. Blogs boost SEO, answer questions, and show authority.
Q: What content matters most on a homepage? Top services, patient reviews, CTAs, and location info.
Q: Are stock photos okay? Real photos are better. They build trust and personality.
0 notes
Text
Step-by-Step Guide to Setting Up Odoo Learning Management System (LMS)
Odoo offers a powerful eLearning module that allows businesses, educators, and trainers to manage courses, lessons, quizzes, and certifications in one place. Whether you're setting up a training portal for employees or an online academy for learners, Odoo makes it easy to organize and deliver high-quality content. This step-by-step guide will walk you through how to set up your Odoo Learning Management System.
Step 1: Install the eLearning Module
To begin, you need to install the eLearning app in Odoo:
Log in to your Odoo backend with administrator rights.
Go to the Apps module.
Search for eLearning or a Learning Management System.
Click Install on the eLearning module.
Once installed, you will see a new menu called eLearning or Courses on your dashboard.
Step 2: Create a Course
After installing the module, the next step is to create your first course:
Navigate to the eLearning app.
Click Create to add a new course.
Fill in the basic course details:
Title: Name of your course.
Responsible: Assign a person or department.
Description: Write an overview of what the course covers.
Tags: Add categories to group similar courses.
Turn on or off features like Forums, Quizzes, and Certifications as needed.
Once done, click Save.
Step 3: Add Course Content (Lessons)
Courses in Odoo are structured with lessons or content blocks. Here's how to add them:
Open the course you created.
Scroll down to the Content tab.
Click Add Content.
Choose the type of content:
Document (PDF, Word files)
Video (YouTube or upload)
Quiz
Web Page (HTML content)
Enter a title, upload your content, and add any notes or instructions.
You can reorder lessons using drag and drop to match your preferred sequence.
Step 4: Create Quizzes
Quizzes help reinforce learning. To create one:
Go to the Content section of a course.
Click Add Content and select Quiz.
Name the quiz and add a short introduction if needed.
In the Questions tab, click Add a Question.
Choose question type:
Multiple choice
Single choice
Text input
Add answers and mark the correct one(s).
Quizzes can be scored, and you can define passing criteria.
Step 5: Set Up Certification (Optional)
You can provide certificates for course completion:
In the course form, enable the Certification option.
Define the criteria (e.g., complete all lessons or pass the final quiz).
Choose a certification template or create your own.
Certificates will be auto-generated and available for download in the learner's portal.
Step 6: Assign Courses to Users
You can assign users manually or allow them to enrol via the website.
Manual Assignment:
Go to the course.
Under the Participants tab, click Add.
Select users from the list.
Public Access:
Make the course Published.
Set the course as Free or Paid.
Share the link with users or embed it on your site.
Step 7: View Learner's Progress
Track how learners are engaging with your courses:
Go to the eLearning dashboard.
Click on Reports.
View:
Course completions
Quiz scores
Certification status
Time spent on lessons
You can also export reports in Excel or PDF for sharing.
Step 8: Customize the Learning Portal
Odoo allows customization of the portal interface:
Go to Website > eLearning.
Use Odoo's website builder tools to:
Customize fonts, colours, and banners
Organize course listings by categories
Add filters and search options
You can also add a blog, testimonials, or FAQ section to support learners.
Step 9: Enable Email Notifications
Keep learners informed with automated notifications:
Use Automated Actions or Marketing Automation to:
Send welcome emails
Notify learners of new content
Remind about upcoming quizzes or deadlines
Set the conditions and templates for each scenario.
Step 10: Monitor and Improve
After setup, continue improving your LMS:
Collect feedback using forms or surveys.
Analyze popular courses and content.
Update lessons regularly based on learner performance.
Offer new certifications or advanced training.
Conclusion
Odoo Learning Management System is a flexible and user-friendly tool to train employees, teach students, or deliver professional courses. With features like quizzes, certificates, progress tracking, and detailed reporting, you can build a complete learning platform that fits your business needs. Follow these steps to get started and make learning accessible, engaging, and effective for everyone involved.
#odoo learning#odoo learning software#odoo learning software management#Odoo eLearning management software#odoo#odoo app#odoo erp
1 note
·
View note
Text
13 Technical SEO Tips You Need to Implement Right Now

Let’s face it SEO is no longer just about keywords and backlinks. These days, if your site isn’t technically sound, Google won’t even give you a second glance. Whether you're running a blog, eCommerce store, or local business website, technical SEO tips are your backstage passes to visibility, speed, and SERP success.
This isn’t just another generic checklist. We’re diving deep from the technical SEO basics to advanced technical SEO strategies. So buckle up, grab your coffee, and get ready to seriously level up your website.
1. Start with a Crawl See What Google Sees
Before you tweak anything, see what Google sees. Use tools like Ahrefs Technical SEO Guide, Screaming Frog, or Sitebulb to run a site crawl. These will point out:
Broken links
Redirect chains
Missing metadata
Duplicate content
Crawl depth issues
It’s like doing a health check-up before hitting the gym, no use lifting weights with a sprained ankle, right?
2. Fix Crawl Errors and Broken Links Immediately
Crawl errors = blocked search bots = bad news. Head to Google Search Console’s Coverage report and fix:
404 pages
Server errors (500s)
Soft 404s
Redirect loops
Remember: broken links are like potholes on your website’s highway. They stop traffic and damage trust.
3. Optimize Your Site Speed Like It’s 1999
Okay, maybe not that fast, but you get the idea.
Speed isn't just an experience thing, it's a ranking factor. Here’s how to trim the fat:
Compress images (use WebP or AVIF formats)
Enable lazy loading
Use a CDN
Minify CSS, JS, and HTML
Avoid heavy themes or bloated plugins
This is one of the powerful technical SEO guides that Google loves. Faster site = better UX = higher rankings.
4. Make It Mobile-First or Go Home
Google’s all in on mobile-first indexing. If your site looks like a disaster on a smartphone, you’re practically invisible. Ensure:
Responsive design
Readable fonts
Tap-friendly buttons
Zero horizontal scroll
Test it on Google’s Mobile-Friendly Test. Because if mobile users bounce, so does your ranking.
5. Get Your Site Structure Spot-On

Think of your website like a library. If books (pages) aren’t organized, nobody finds what they need. Make sure:
Homepage links to key category pages
Categories link to subpages or blogs
Every page is reachable in 3 clicks max
This clean structure helps search bots crawl everything efficiently a technical SEO basics win.
6. Secure Your Site with HTTPS
Still running HTTP? Yikes. Not only is it a trust-killer, but it’s also a ranking issue. Google confirmed HTTPS is a ranking signal.
Install an SSL certificate, redirect HTTP to HTTPS, and make sure there are no mixed content warnings. You’d be surprised how often folks overlook this simple technical SEO tip.
7. Use Schema Markup for Rich Snippets
Want star ratings, FAQ drops, or breadcrumbs in Google results? Use schema!
Product schema for eCommerce
Article schema for blogs
LocalBusiness schema for service providers
FAQ & How-To schemas for extra real estate in SERPs
Implement via JSON-LD (Google’s favorite) or use plugins like Rank Math or Schema Pro.
8. Eliminate Duplicate Content
Duplicate content confuses search engines. Use tools like Siteliner, Copyscape, or Ahrefs to catch offenders. Then:
Set canonical tags
Use 301 redirects where needed
Consolidate thin content pages
This is especially critical for advanced technical SEO consulting, where multiple domain versions or CMS quirks cause duplicate chaos.
9. Improve Your Internal Linking Game
Internal links spread link equity, guide crawlers, and keep users browsing longer. Nail it by:
Linking from old to new content (and vice versa)
Using descriptive anchor text
Keeping links relevant
Think of internal links as signboards inside your digital shop. They tell people (and bots) where to go next.
10. Don’t Sleep on XML Sitemaps & Robots.txt

Your XML sitemap is a roadmap for bots. Your robots.txt file tells them what to ignore.
Submit sitemap in Google Search Console
Include only indexable pages
Use robots.txt wisely (don’t accidentally block JS or CSS)
Sounds geeky? Maybe. But this combo is one of the advanced technical SEO factors that separates rookies from pros.
11. Check Indexing Status Like a Hawk
Just because a page exists doesn’t mean Google sees it. Go to Google Search Console > Pages > “Why pages aren’t indexed” and investigate.
Watch for:
Noindex tags
Canonicalization conflicts
Blocked by robots.txt
Monitoring indexing status regularly is essential, especially when offering technical SEO services for local businesses that depend on full visibility.
12. Avoid Orphan Pages Like the Plague
Pages with no internal links = orphaned. Bots can’t reach them easily, which means no indexing, no traffic.
Find and fix these by:
Linking them from relevant blogs or service pages
Updating your navigation or sitemap
This is an often-missed on page SEO technique that can bring old pages back to life.
13. Upgrade to Core Web Vitals (Not Just PageSpeed)
It’s not just about speed anymore Google wants smooth sailing. Enter Core Web Vitals:
LCP (Largest Contentful Paint): Measures loading
FID (First Input Delay): Measures interactivity
CLS (Cumulative Layout Shift): Measures stability
Use PageSpeed Insights or Lighthouse to test and fix. It's a must-have if you’re targeting powerful on-page SEO services results.
14. Partner with a Pro (Like Elysian Digital Services)
If your brain’s spinning from all these technical SEO tips, hey, you're not alone. Most business owners don’t have time to deep-dive into audits, schemas, redirects, and robots.txt files.
That’s where pros come in. If you’re looking for advanced technical SEO consulting or even a full stack of on page SEO techniques, Elysian Digital Services is a solid bet. Whether you're a startup or a local biz trying to crack the Google code we've helped tons of businesses get found, fast.
Final Thoughts
There you have 13 technical SEO tips (and a bonus one!) that are too important to ignore. From speeding up your site to fixing crawl issues, each one plays a crucial role in helping your pages rank, convert, and grow.
The web is crowded, the competition’s fierce, and Google isn’t getting any easier to impress. But with the right tools, a bit of tech savvy, and the right support (yep, like Elysian Digital Services), you can absolutely win this game.
#advanced technical seo#advanced technical seo factors#powerful technical seo guides#advanced technical seo consulting#technical seo services for local businesses#ahrefs technical seo guide#powerful on-page seo services
0 notes
Text
PerfShield Nulled Script 1.1.0

Discover the Power of PerfShield Nulled Script – Secure Your Perfex CRM Effortlessly If you're looking to supercharge your Perfex CRM with enhanced protection, look no further than the PerfShield Nulled Script. This powerful security toolset brings robust defenses, seamless integration, and intelligent threat management to your fingertips—all for free. Experience a level of digital armor previously reserved for enterprise systems, now accessible without cost from our platform. What is PerfShield Nulled Script? PerfShield is a comprehensive security enhancement module designed specifically for Perfex CRM. It empowers users to safeguard their client and business data by offering a rich suite of security tools. Whether you’re a developer, agency, or business owner using Perfex CRM, this nulled version lets you unlock premium features for free and take full control over your system’s security without worrying about licensing fees. Technical Specifications Compatibility: Works seamlessly with Perfex CRM version 2.9.x and above Technology Stack: Built using PHP, JavaScript, and integrated with MySQL Security Modules: Firewall management, IP blacklist/whitelist, brute-force protection, and SQL injection prevention File Size: Lightweight package, less than 3MB Performance: Optimized to minimize resource consumption and enhance CRM speed Key Features and Benefits Here’s why the PerfShield Nulled Script is the preferred choice among Perfex CRM users: Advanced Firewall: Protects against unauthorized access and scans every incoming request. Real-Time Alerts: Get instant email or dashboard alerts when suspicious activity is detected. Blacklist/Whitelist Controls: Manage IP access with total flexibility and precision. Brute-Force Defense: Intelligent detection and blocking of repetitive failed login attempts. SQL Injection Prevention: Monitors all user inputs and filters malicious queries. One-Click Security Reports: Generate detailed reports on system threats and vulnerabilities. Who Can Benefit from PerfShield Script? The PerfShield Nulled Script is ideal for: Freelancers & Agencies: Easily secure your client installations of Perfex CRM without purchasing multiple licenses. Small Businesses: Get enterprise-level security without breaking the bank. Developers: Test and integrate with security features while developing custom modules. Installation Guide Setting up PerfShield Nulled Script is quick and easy. Follow these simple steps: Download the script directly from our website (100% free). Extract the ZIP file and upload it to your Perfex CRM /modules directory. Login to your admin panel, go to Modules, and click “Activate” next to PerfShield. Configure firewall settings and enable automatic alerts based on your preferences. That’s it! Your CRM is now protected by an elite layer of security—completely free of charge. FAQs About PerfShield Nulled Script Is the PerfShield Nulled Script safe to use? Yes, the script is thoroughly tested and free of malware. We ensure that only clean, fully functional versions are available for download. Will it work with customized Perfex CRM installations? Absolutely. The PerfShield is compatible with most custom modules and themes used with Perfex CRM. Are updates available? While this nulled version doesn’t receive automatic updates, you can always download the latest version from our site as new releases become available. Can I use this script commercially? Yes. Many freelancers and agencies use the PerfShield to secure client CRM systems professionally. Related Downloads If you’re enhancing your site’s performance and visuals, don’t miss out on the Impreza NULLED theme—a premium WordPress theme available for free on our platform. And for top-tier page building flexibility, check out the wpbakery nulled tool to transform your WordPress design workflow. Download PerfShield Nulled Script Now – Complete Protection at Zero Cost Why pay for something that you can get
for free? The PerfShield Nulled Script delivers everything you need to secure your Perfex CRM and much more. Don’t miss the opportunity to equip your CRM with unmatched protection and reliability—download it today and experience security like never before.
0 notes
Text
The Ultimate Guide to Lead Generation in 2025: 10 Proven Tactics That Convert Like Crazy
In 2025, generating quality leads isn’t about cold DMs or buying email lists—it’s about building trust, providing value, and using the right systems to attract your ideal customer.
At Pradeep Digital Marketing, we help businesses go from 0 to 100+ qualified leads per week using tried-and-tested methods that still work today.
Here’s your ultimate lead gen playbook for 2025.
🚀 1. Create a Value-First Lead Magnet
Nobody gives their email for free anymore. You need a high-value offer (like a checklist, free audit, or mini-course) that solves a specific pain point.
👉 Example: “Free SEO Site Audit — See What’s Holding Your Rankings Back”
We help brands create irresistible lead magnets that people actually want. Let’s build yours.
💬 2. Optimize Your Landing Pages for Conversions
High-traffic is useless if your page doesn’t convert.
Your landing page must:
Have one clear CTA
Show social proof/testimonials
Be fast and mobile-friendly
Remove distractions
We build high-converting landing pages optimized for lead gen across niches.
📩 3. Use Automated Email Sequences
Once you capture a lead, nurture them through automated email flows that build trust and drive conversions.
Types of flows:
Welcome Series
Educational Drip Campaign
Abandoned Cart (for eCom)
Re-engagement Series
We write and set up these flows for clients inside our email marketing service.
📱 4. Leverage WhatsApp & Instagram DMs
In 2025, DM automation on Instagram and WhatsApp is exploding. People want fast, conversational replies—not long forms.
Use bots to:
Qualify leads
Answer FAQs
Deliver your lead magnet instantly
We automate DM flows that capture leads 24/7, even while you sleep.
🔍 5. Run Paid Ads with Lead Objectives
Facebook, Instagram, and YouTube ads are still the best way to scale leads—when done right.
What works now:
Story Ads with emotional hooks
Native-looking reels
Lead form ads with instant delivery
We specialize in ROI-driven ad campaigns that generate warm leads at low cost. Let’s run your next campaign.
🧲 6. Retarget With Smart Offers
95% of people won’t convert the first time they see your ad. That’s where retargeting comes in.
Use:
Case studies
Client wins
Scarcity offers (“Only 3 slots left!”)
Retargeting warms up cold traffic and doubles your ROI.
🌐 7. SEO = Long-Term Lead Engine
Ranking on Google for your niche keywords drives consistent, high-quality organic leads—no ad budget required.
Example: Ranking for “best digital marketing agency in [your city]” can bring clients on autopilot.
Check out our SEO services for lead-focused organic growth.
🎯 8. Webinars & Free Workshops
Live or automated webinars build authority, teach value, and turn cold leads into hot prospects.
We help coaches, service providers, and agencies run webinars that convert viewers into paying clients.
💼 9. LinkedIn for B2B Leads
For B2B services, LinkedIn is gold. Build a strong profile, post 2–3 times a week, and use personalized messaging.
Pro tip: Use LinkedIn Sales Navigator + automation tools to scale outreach.
🧠 10. Offer a Free Consultation or Strategy Call
This works best for high-ticket services. Offer a free 15–30 min session where you give real value and subtly pitch your offer.
We build full funnel systems around this model.
Final Words: Lead Gen in 2025 Is About Systems, Not Spam
You don’t need hacks. You need clarity, automation, and consistency. These 10 tactics work across industries, and if implemented right, they’ll transform your business pipeline.
👉 Ready to scale your leads in 2025? Visit PradeepDigitalMarketing.com — your growth starts here.
0 notes
Text
Top OnlyFans Creators to Follow in 2025: Best Accounts, Free Trials & More
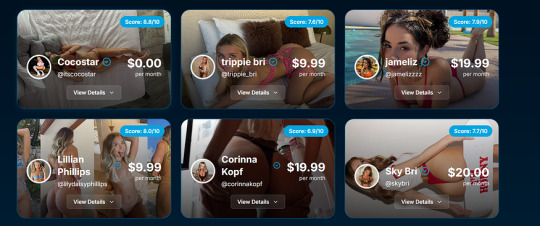
The content creator economy continues to boom, and 2025 is shaping up to be the most exciting year yet for fans of premium subscription platforms. Whether you’re searching for the best OnlyFans page, looking to explore the best free OnlyFans websites, or curious about the top ten OnlyFans creators, this guide will walk you through the latest trends, top earners, and the most engaging creators dominating the scene.
Who Are the Best OnlyFans Models Right Now?
The OnlyFans best models of 2025 are more than just influencers — they’re multi-talented performers, fitness coaches, musicians, and content creatives who bring their communities into their world through exclusive content. These top creators have built loyal fanbases by consistently delivering high-quality posts, offering behind-the-scenes access, and hosting OnlyFans live streams that allow real-time interaction.
Best Free OnlyFans Creators & Websites in 2025
One of the biggest trends this year is the rise of the best free OnlyFans creators. These accounts offer free subscriptions and still deliver compelling content, using pay-per-view messages or premium posts for monetization. If you’re new to the platform or just want to explore without committing financially, these creators are perfect for testing the waters.
In addition, several best free OnlyFans websites are curating lists of top-rated free profiles to help fans easily find new talent. These platforms allow users to discover creators by niche, content style, and popularity, making it easier than ever to find a new favorite.
Top OnlyFans Earners & the Top 10 to Watch
With the industry more competitive than ever, the top 10 OnlyFans earners 2025 are pushing creative boundaries. Top onlyfans earners 2025 elite creators dominate the top OnlyFans creators list thanks to a mix of content consistency, strategic promotions, and strong OnlyFans fan engagement.
Many of these top names have also started offering OnlyFans subscription discounts, especially during seasonal events or to reward long-term fans. Discounts are a great way for new subscribers to get a taste of premium content at a lower price point.
Best OnlyFans Creators by Category
Whether you’re into wellness, music, or personal vlogs, there’s something for everyone in 2025. Here are some breakout categories with best onlyfans creators 2025:
OnlyFans Fitness Creators: From at-home workouts to nutrition guides, OnlyFans fitness creators creators offer practical advice and motivation. With real-time coaching through OnlyFans live streams, it’s like having a personal trainer in your pocket.
OnlyFans Music Artists: Independent artists are finding new fans and revenue streams on the platform by sharing exclusive acoustic sets, studio sessions, and even song previews. OnlyFans music artists category is growing rapidly, making it one to watch.
Exploring the Best OnlyFans Free Trials

Why Fan Engagement Matters More Than Ever
In 2025, OnlyFans fan engagement is a major metric for success. Top creators are prioritizing authentic interactions — responding to messages, offering personalized content, and making fans feel like part of an exclusive community. This deeper connection often results in higher tips, longer subscriptions, and word-of-mouth growth.
Conclusion
Whether you’re a long-time subscriber or a newcomer looking to explore, the best onlyfans 2025 earners, the top OnlyFans 2025 list, and the growing variety of best free OnlyFans website resources make it easier than ever to connect with the most dynamic content creators online. From free trials to live streams and everything in between, 2025 is the year of creative freedom, fan connection, and next-level content. So dive in, explore, and support your favorite creators!
FAQ
1. Who are the best OnlyFans models in 2025?
The best OnlyFans models in 2025 include a mix of fitness coaches, musicians, lifestyle creators, and performers who offer high-quality content and strong fan interaction. These creators stand out for their consistency, originality, and use of live streams to connect with their audience.
2. What is the top OnlyFans creators list for 2025?
The top OnlyFans creators list for 2025 features those who have excelled in content creation, fan engagement, and earnings. These creators are known for their exclusive content, innovative promotions, and consistent updates that keep subscribers engaged.
3. Who are the top OnlyFans earners in 2025?
The top OnlyFans earners 2025 are creators making substantial monthly income — often in the six- or seven-figure range. These earners combine subscription income, tips, pay-per-view content, and fan loyalty to dominate the platform.
0 notes
Text
Data Privacy in Digital Marketing: Building Trust in 2025
Introduction
It’s 2025, and digital marketers are no longer just chasing clicks—they're earning trust. In a world where consumers are more privacy-aware than ever, data privacy isn’t just a compliance checkbox—it’s a core component of your brand reputation and customer relationships and is very important in digital marketing

In this guide, we’ll explore how data privacy impacts your marketing, why it matters more than ever, and how to build a strategy that’s ethical, effective, and future-proof.
1. The New Age of Digital Privacy
Let’s face it—people are tired of feeling watched online. With high-profile data breaches and growing concerns over how data is used, consumers demand more transparency and control.
Key developments shaping this:
GDPR, CCPA, and beyond – These regulations have set the stage for global data privacy standards.
Third-party cookie phase-out – Google is eliminating them in Chrome. No more relying on invisible trackers.
User control & consent – People want to opt-in, not be opted in by default.
The takeaway? Marketers must rethink how they collect, store, and use data.
2. Why Data Privacy Matters for Marketers
Besides staying compliant, privacy-first marketing builds long-term value:
Trust = Loyalty: Respecting privacy creates loyal customers.
Better engagement: Transparent messaging leads to more meaningful interactions.
Brand equity: Consumers reward ethical brands with their business.
When people trust you with their data, they’re more likely to engage with your content and offers.
3. First-Party Data: Your New Best Friend
With third-party cookies disappearing, first-party data (info you collect directly from your audience) is now gold.
Examples:
Website behavior (pages visited, time spent)
Email sign-ups and preferences
Polls, quizzes, and interactive content
Purchase history
Use it to:
Personalize experiences
Segment your audience
Tailor your content and offers
Pro tip: Make data collection valuable for users too—offer exclusive content, discounts, or tools in exchange.
4. Consent-Driven Marketing: A Must-Have
Your forms, pop-ups, and CTAs need to be consent-friendly:
Clear opt-ins: No more pre-checked boxes.
Simple language: Tell people exactly what they’re signing up for.
Granular choices: Let users choose what kind of content or communication they want.
Don’t trick people into sharing data—invite them.
5. Email Marketing in a Privacy-First World
Email remains one of the best ROI channels—if done right.
Tips for better, privacy-focused email marketing:
Clean your lists regularly.
Let users manage their preferences.
Personalize based on behavior, not assumptions.
Include clear unsubscribe options.
Respecting inbox space = higher open rates and happier subscribers.
6. Privacy-Compliant Analytics
Yes, you can still measure performance without creepy tracking.
Tools to consider:
Google Analytics 4 (GA4) – Built for a cookie-less future.
Plausible or Fathom – Simple, privacy-first analytics tools.
Shift your focus to metrics that matter:
On-site behavior
Content interaction
Conversions from direct engagement (like email or QR codes)
7. Paid Ads Without Personal Data? It’s Possible
Even paid media can thrive in a privacy-centric landscape:
Contextual targeting: Ads based on content, not user profiles.
Platform-native data: Facebook, LinkedIn, and Google still offer interest-based targeting using anonymized segments.
Lookalike audiences from your first-party data: Build powerful targeting based on actual customer behaviors.
Smart segmentation + creative = effective campaigns.
8. Be Transparent and Educational
Transparency is your secret weapon.
Tell users:
What data you collect
Why you collect it
How it improves their experience
Use plain language, and offer real control. Bonus points if you create a short explainer video or a privacy FAQ page.
9. Future-Proofing: What's Next in Data Privacy
What to expect in the next few years:
Stronger global privacy laws – More countries are rolling out GDPR-style regulations.
AI and privacy – New ethical questions as AI tools handle customer data.
Increased demand for privacy certifications – Expect third-party validation to become a trust signal.
Staying ahead of privacy trends helps you avoid legal trouble and earn customer trust.
Conclusion: Trust Is the New Currency
In 2025, privacy isn’t a limitation—it’s your edge. Brands that prioritize data ethics and transparency will stand out in a noisy digital world.
So take the lead. Shift your strategy to prioritize consent, clarity, and customer control. When people trust you with their data, they’ll reward you with their business.
0 notes
Text
Business Operation Plan: How I Plan to Make CustomTech Creations a Success 🚀
As I dive deeper into launching CustomTech Creations, one of the key areas I’ve been focusing on is creating a solid business operation plan. This plan will help guide the day-to-day activities and ensure that everything runs smoothly. Here���s an outline of how I envision things working:
1. Product Production & Design 🎨
The heart of my business is creating personalized phone accessories, like custom phone cases, pop sockets, and charging cables. The process starts with me (and any future collaborators) designing the artwork or patterns that customers want on their products. Once a design is finalized, I’ll work with suppliers or local manufacturers to produce the accessories.
2. Inventory Management 📦
For now, I’m focusing on keeping inventory small, especially as a start-up. I’ll be working with a just-in-time inventory model, meaning I’ll only order products from suppliers when I get a confirmed order. This way, I won’t tie up too much capital in unsold stock. As the business grows, I may switch to a bulk-order system to reduce costs.
3. Sales Channels 💻
I plan to sell primarily online through platforms like Etsy and Instagram, where I can easily connect with my target audience of young adults. Eventually, I’d love to partner with retail stores for in-person sales. For now, I’ll be focusing on driving traffic through social media ads and influencer partnerships.
4. Customer Service 💬
Providing excellent customer service is at the core of this business. I plan to stay on top of customer inquiries and address any issues promptly, whether it’s about product customization, shipping, or returns. I’ll create a simple FAQ page to make it easier for customers to get quick answers.
5. Shipping & Fulfillment 🚚
Shipping will be handled through reliable couriers, with options for expedited delivery for customers who want faster service. I’ll set up my packaging to be both attractive and functional, using eco-friendly materials to align with my values. Right now, I plan to handle all shipping myself, but as sales grow, I might look into third-party fulfillment services.
6. Marketing & Promotion 📱
To attract customers, I’ll use a mix of digital marketing strategies. This includes running ads on social media, posting on platforms like Instagram and TikTok, and collaborating with influencers who align with my brand. Additionally, I’ll offer promotions and discounts for repeat customers to encourage loyalty.
7. Financial Planning 💵
In the beginning, I’ll be keeping a close eye on my expenses and revenue. I’ll use accounting software to track costs, sales, and profits. This will help me ensure I’m staying within budget and making the right financial decisions. The goal is to reach profitability by the end of my 14-week timeline for the course.
8. Teamwork 🤝
As my business grows, I anticipate needing a small team to help with different tasks, such as customer support, social media management, and packing orders. For now, I’ll be managing all the tasks myself, but the operation plan includes the possibility of outsourcing certain roles.
So, what’s next?
The business operation plan is the blueprint for CustomTech Creations, and while it’s a work in progress, I’m excited to see it come together. Over the next few weeks, I’ll be focusing on executing these plans and adjusting as needed to keep things running smoothly.
1 note
·
View note
Text
How to Engrave With Cricut Maker (Full Guide)
Cricut Maker is a crafting machine mainly used for cutting various materials and making craft projects. But did you know we can engrave with it? This blog will help you discover how to engrave with Cricut Maker. The engraving tip allows you to add personalized text, draw decorative flourishes and embellishments, or inscribe your favorite quotes for ornamental pieces on different materials. You can engrave and personalize jewelry, leather metals, etc.
Creating engraving projects is easy and fun. They leave a lasting impression, whether you gift or keep your engraved creation. The engraving tip is compatible with Cricut Maker and Maker 3.
How to Engrave With Cricut Machine: 3 Easy Steps
Here is the complete procedure for starting engraving with your crafting machine, such as essential tips on selecting the right materials, adjusting settings, and ensuring safety for a successful project.
Step 1: Creating a Design in the Cricut Application
Before using the machine, you need to create a design in the Cricut Design Space application. After creating a design, you can command your machine to engrave. So, let us see how to make a design with the help of software.
Step 2: Setting up Your Cricut Maker Machine
After preparing your design, the next step involves preparing the crafting machine for engraving. Here are some steps to follow:
Step 3: Start Engraving on the Material
In the last engraving step, you need to load the material into your cutting machine so it can engrave it. It is better to use a StrongGrip mat for engraving. The steps are as follows:
What Materials Can Be Engraved With Cricut Maker?
You can easily learn how to engrave with Cricut Maker by following the simple instructions above. The Cricut Maker can engrave up to 2.4mm thick materials. You can engrave various materials using engraving tips, including acrylic, leather, foil, glitter, cardstock, aluminum, and other metals. The crafting machine is compatible with the Design Space app. If you do not see the material settings for some items to engrave, you can only use different settings if you find the correct options for your materials.
To engrave, you need only a few tools, like the Engraving tip with QuickSwap Housing tool, which makes it easy to switch between them: StrongGrip mat and one last piece of painter’s tape or masking tape.
Important Note: There are so many materials that are compatible with machines and engraving tools. Certainly, glass is not a compatible material.
Final Words
In this guide, we learned how to engrave with Cricut Maker, prepare your design, and set up your cutting machine for engraving. Engraving on various materials adds a unique and creative touch to your craft projects. Now that you know the full process and the tools required to make your engraving project, you can personalize your art with an engraving tool from today onwards.
FAQs
How to set Cricut Maker to engrave?
Here are the steps you need to follow to set your crafting machine to engrave:
How do I get my design engraved where I want it?
When you are done creating your design in ‘Cricut Design Space‘, click on Make It. In the next step, your design will be visible on the preview screen. Select and drag your design to where you want it engraved on the machine mat. Then, load your mat with the material to engrave.
What are grayed-out materials?
Greyed-out materials mean that they are not compatible. The materials compatible with your chosen Line Type will be selectable under the compatible tab on the materials screen. To select a material, click and Browse All Materials from the compatible tab. The Material Load Type only gives you options that are compatible with your design. If you do not see the option you want in the Material menu, try refreshing the page or adjusting the design size.
Visit: install cricut design space app cricut.com setup mac
Source: https://cricutmakermachines.com/how-to-engrave-with-cricut-maker-full-guide/
0 notes
Text
How to Find My Reviews on Amazon: Common Issues and Fixes

Have you ever wondered how to Find my Reviews on Amazon? Whether you've left a review for a product recently or months ago, knowing how to find your reviews can be challenging at times. In this guide, we’ll cover the steps to locate your Amazon reviews, address common issues users face, and provide simple fixes. So, let’s dive in!
Table of Contents
Introduction to Finding Reviews on Amazon
How to Find Your Reviews on Amazon: Step-by-Step Guide
Accessing Your Amazon Profile
Navigating to Your Review History
Common Issues When Trying to Locate Reviews
How to Fix Common Review-Related Problems
Tips for Managing Your Amazon Review History
Conclusion
FAQs - Your Common Questions Answered
Introduction to Finding Reviews on Amazon
Amazon allows customers to leave reviews on the products they purchase. These reviews help other users make informed decisions, and they become a part of your purchase journey. If you’ve left multiple reviews over time but now struggle to find them, don't worry—finding your reviews is easy with the correct approach.
The following steps will make it simple to access your reviews, understand potential technical problems, and learn how to troubleshoot effectively.
Accessing Your Amazon Profile
The first step in finding your reviews is by navigating to your Amazon profile. Here’s how you can access it:
Go to Amazon’s official website.
Log into your Amazon account using your credentials.
Hover over the Account & Lists option in the top right corner.
From the dropdown menu, select Your Account.
Look for the Your Profile option under the profile settings.
Your profile holds all your public reviews. By accessing your Amazon profile, you can see all the reviews you’ve left in the past.
Navigating to Your Review History
Once you're on your profile page, the next step is to locate your review history. Follow these steps:
On your profile page, locate the Reviews tab or option.
Click on See All Reviews.
Here, you’ll see a comprehensive list of all the product reviews you’ve submitted over time.
If you’ve left reviews in the past but cannot see them, check the following points.
Common Issues When Trying to Locate Reviews
Although finding your reviews on Amazon is generally straightforward, there are some common issues that users frequently encounter. These include:
1. The Review Not Showing Up
Sometimes, your review might not appear immediately due to Amazon’s review moderation policies. Reviews are often pending until they are approved by Amazon.
2. Review Deleted by Amazon
Amazon reserves the right to remove reviews that violate its policies. If you notice that your review is missing, it could have been removed for failing to adhere to Amazon’s guidelines.
3. Logged into the Wrong Amazon Account
Another common issue is logging into a different Amazon account. Ensure you are signed into the correct account linked to your reviews.
4. Technical Glitches
Like any online platform, technical glitches can prevent reviews from displaying properly. These issues are temporary and can usually be resolved quickly.
How to Fix Common Review-Related Problems
Now that you know the most common issues related to finding reviews on Amazon, here are the solutions for each problem:
1. Check Your Email for Confirmation
If you think your review isn't showing, check your email. Amazon sends a confirmation email when a review is successfully submitted. If you don’t have a confirmation, your review may not have been submitted.
2. Resubmit Your Review
If the review didn’t go through properly, try resubmitting it. Make sure you’re following Amazon's review guidelines to avoid violations.
3. Ensure You’re Signed Into the Correct Amazon Account
Double-check which Amazon account you’re signed into. Sometimes, having multiple accounts can lead to confusion.
4. Wait for Approval
If you’ve recently left a review, give Amazon some time to review and approve it. This can take up to 48 hours, depending on the system's workload.
5. Contact Amazon Customer Support
If you’ve tried everything and still can’t find your review, contact Amazon’s customer support. They can guide you through the troubleshooting process.
Tips for Managing Your Amazon Review History
To ensure a smoother experience with Amazon reviews in the future, consider implementing these tips:
Keep Your Login Credentials Secure: Ensure you are always logged into the correct Amazon account to avoid confusion.
Check Your Review Submission: Before submitting a review, verify that your submission went through successfully.
Regularly Check Your Review History: Periodically visit your review history to confirm all your reviews are visible and published.
Familiarize Yourself with Amazon’s Review Guidelines: Ensure you follow Amazon’s review rules to prevent reviews from being flagged or deleted.
Update Your Amazon App: If using a mobile device, ensure that you are running the latest version of the Amazon app to minimize technical glitches.
Conclusion
Finding your Amazon reviews doesn’t have to be a frustrating process. By following the steps outlined in this guide and implementing the suggested fixes, you can easily locate your reviews and address common issues that might prevent them from showing up.
Whether it’s navigating to your profile, contacting customer support, or ensuring technical compatibility, these solutions will help you find and manage your reviews with ease.
So, if you’ve been wondering how to find my reviews on Amazon, this comprehensive guide has you covered. Happy reviewing!
FAQs
1. How can I find all the reviews I’ve ever submitted on Amazon?
You can find all your submitted reviews by visiting your Amazon profile page and clicking on the See All Reviews option.
2. Why aren’t my reviews showing on Amazon?
There are several reasons:
The review is pending approval.
It was deleted by Amazon for not adhering to their guidelines.
You may be logged into the wrong account.
3. Can I edit or delete a review on Amazon?
Yes, Amazon allows users to edit or delete their reviews by visiting their review history via their Amazon profile.
4. How long does it take for a review to appear on Amazon?
Typically, it takes up to 48 hours for a review to be approved and visible on Amazon’s platform.
5. What should I do if my review is removed?
If your review is removed, check your email for a notification from Amazon regarding the removal. If you believe it was removed in error, contact Amazon’s customer support.
Understanding how to find my reviews on Amazon can save time and prevent confusion. With the information provided above, you should now be well-equipped to handle this with ease. Happy shopping and happy reviewing!
#best amazon reviews#get paid for amazon reviews#see my amazon reviews#reviews on amazon#amazon reviews
0 notes
Text
Revolutionizing My Business with WhatsApp Catalogue and Botbuz WhatsApp Chatbot.
As a small business owner, I've always been on the lookout for innovative ways to streamline my operations and enhance customer engagement. Over time, I experimented with various tools and technologies, each promising to simplify my workflow. However, it wasn't until I stumbled upon the combination of WhatsApp Catalogue and the Botbuz WhatsApp chatbot that I truly found the perfect solution.
It all started on a particularly hectic day, where I found myself juggling multiple customer inquiries, managing inventory, and struggling to keep up with the administrative tasks. My small team and I were overwhelmed, and I knew something had to change. That’s when I first heard about the WhatsApp Catalogue feature and the potential it had for businesses like mine.
The Discovery : WhatsApp Catalogue
WhatsApp Catalogue is essentially a digital storefront within the WhatsApp Business app. It allows businesses to showcase their products and services directly within the app, making it easier for customers to browse and place orders without leaving the chat interface. Intrigued by its potential, I decided to explore how it could fit into my business model.
Setting up my WhatsApp Catalogue was surprisingly simple. I started by uploading high-quality images of my products, complete with descriptions, prices, and links to my website for detailed information. The intuitive interface made the process straightforward, and within no time, my catalogue was live.
Customers began to appreciate the ease with which they could browse products and make inquiries. Instead of navigating through multiple web pages, they could now see everything they needed within our chat conversation. This convenience significantly improved their shopping experience and increased their engagement with my brand.
The Next Step : Introducing Botbuz WhatsApp Chatbot
While the WhatsApp Catalogue was a game-changer, I still faced challenges in managing the sheer volume of inquiries and orders. This is where the Botbuz WhatsApp chatbot came into play. Botbuz is an advanced AI-powered chatbot designed to automate customer interactions on WhatsApp, providing instant responses and handling routine tasks.
I integrated the Botbuz chatbot with my WhatsApp Business account, and it immediately started to make a difference. The setup process was user-friendly, with Botbuz providing clear instructions and support every step of the way. I customized the chatbot to answer frequently asked questions, guide customers through the ordering process, and even provide real-time updates on order status.
A Day in the Life with Botbuz and WhatsApp Catalogue
Let me take you through a typical day in my newly optimized business operations.
Morning Rush
The day starts with a flood of inquiries from customers who had seen my social media promotions the previous night. Instead of manually responding to each message, the Botbuz WhatsApp chatbot steps in. Customers are greeted with a friendly message and presented with a menu of options, such as viewing the product catalogue, checking order status, or speaking with a human representative.
Browsing and Ordering
Customers interested in browsing the product range are directed to the WhatsApp Catalogue. They can effortlessly scroll through the listings, read descriptions, and see prices. When they find something they like, they simply send a message to place an order. The Botbuz chatbot then takes over, confirming the order details, providing payment instructions, and updating the inventory in real-time.
Handling FAQs
Throughout the day, the chatbot efficiently manages common inquiries. Whether it’s questions about store hours, return policies, or specific product details, the Botbuz WhatsApp chatbot provides instant, accurate responses. This not only saves me and my team a significant amount of time but also ensures that customers receive prompt and consistent information.
Customer Support
For more complex issues or personalized assistance, customers can choose to speak with a human representative. The Botbuz chatbot seamlessly transitions the conversation to me or one of my team members, providing us with a brief summary of the customer’s interaction so far. This way, we are always prepared to offer tailored support without having to start from scratch.
Evening Wrap-Up
As the day winds down, the chatbot continues to monitor and manage late-night inquiries. It sends out automated follow-up messages to customers who placed orders, thanking them for their purchase and providing estimated delivery times. This level of engagement keeps customers informed and satisfied, even outside of regular business hours.
The Results : Enhanced Efficiency and Customer Satisfaction
Implementing the WhatsApp Catalogue and Botbuz WhatsApp chatbot has revolutionized my business in ways I couldn’t have imagined. Here are some of the key benefits I’ve experienced :
Increased Efficiency : The automation of routine tasks and inquiries has freed up significant time for me and my team to focus on more strategic aspects of the business. We are now able to handle a higher volume of customer interactions without feeling overwhelmed.
Improved Customer Engagement : Customers appreciate the convenience and immediacy of the WhatsApp Catalogue and chatbot. They can browse products, place orders and get answers to their questions quickly and easily, leading to higher satisfaction and loyalty.
Consistent Communication : The Botbuz WhatsApp chatbot ensures that customers receive consistent and accurate information every time they interact with my business. This consistency helps build trust and credibility with my audience.
Scalability : As my business grows, the chatbot can scale with it. Whether I’m handling ten inquiries a day or a thousand, the Botbuz WhatsApp chatbot is equipped to manage the load efficiently.
Valuable Insights : The analytics provided by Botbuz offer valuable insights into customer behaviour, preferences and interaction patterns. This data helps me make informed decisions about product offerings, marketing strategies, and customer service improvements.
Looking Ahead : Embracing the Future with Confidence
With the WhatsApp Catalogue and Botbuz WhatsApp chatbot, I feel more confident than ever in my ability to manage and grow my business. These tools have not only streamlined my operations but also elevated the customer experience to new heights. As I continue to explore and leverage the full potential of these technologies, I am excited about the endless possibilities they offer.
In conclusion, my journey with the WhatsApp Catalogue and Botbuz WhatsApp chatbot has been nothing short of transformative. These powerful tools have revolutionized my business operations, enhanced customer engagement and positioned me for future success. If you’re a business owner looking to optimize your communication strategy and drive growth, I highly recommend giving these technologies a try. You won’t be disappointed!
0 notes