#sewing technique for shirt cuff design
Text
Designer cufflinks for shirts #fancy #cufflinks #menfashion #kaurtrends
Designer cufflinks for shirts #fancy #cufflinks #menfashion #kaurtrends

View On WordPress
#cufflink#cufflinks#cufflinks design#cufflinks design for shirts#cufflinks for men#cufflinks on a regular shirt#designer cufflinks#designer shirt cuffs#designer shirts for men#guide to cufflinks#how to sew cufflinks pattern for shirt#how to sew designer shirt cufflinks#how to shirt sleeve cufflinks pattern#sewing for beginners#sewing technique for shirt cuff design#shirt baju ke cuff design#shirt ke cuff ka pattern#shirt stitching for beginner
0 notes
Text
For the time being, it looks.
"I don't want clothes to be very functional. More importantly, Aix
What is the impression? "
Not to mention patchwork,
A duffel bag strap is attached to the back, Greg
Lauren's clothes are unique to him
Creation is embodied.
Many fabrics used by Greg
Is different from so-called fashion
Born with the purpose of. For example, military tents and bags, and boy scouts and sailor uniforms. “I wondered what would happen if I made a carefully tailored double-breasted jacket using military fabrics that are the opposite of elegance. I don't care about trends. Ideas come to mind
and others. And by putting your arm through your clothes
Feelings are more important. I want to bring out the beauty and individuality of the wearer through clothes. "
Imperfections are beauty.
Greg, who started his career as a painter, impulsively uses canvas paper to create clothing-shaped sculptures. In order to improve the perfection of the work, he sewed from the pattern to the costume designer who is active in Hollywood.
Feelings are more important. I want to bring out the beauty and individuality of the wearer through clothes. "
Imperfections are beauty.
Sewing from the pattern to the designer
I learned the basics of making and learned the tailored technique. The sculptures, such as the three-piece and choke-striped suits produced in this way, are carefully cut and tailored one by one, much like Savile Row's clothing. And, as Greg says, "Maybe this was destiny," his interest gradually shifts from paper to cloth, clothes to wear, but not clothes to wear to anyone.
Improvisational, chaotic and precise clothing making.
A huge number of tattered fabrics stored in the atelier. These cloths are beautiful one-of-a-kind by Greg Lauren's hands. It is made into clothes.
1 Jacket with shoe straps and flaps. 2 The color and unevenness unique to hand dyeing are beautiful. 3 The black tie is completed by repeating washing until it is exhausted. 4 A coat made by patchworking several types of fabrics such as tweed and wool. ● Each item is a reference product.


It was the clothes I wanted to wear.
Silk tie jackets destroy the structure and matte by repeated washing after tailoring. The suede jacket is turned upside down to express a unique texture. Also, do not sew the cuffs and hem of clothes. Such a weak appearance and cracks lead to the elegance that Greg thinks. It is.
"I think the elegance is more in Oliver Twist or Charlie Chaplin than in Cary Grant or Gary Cooper. It's more incomplete than perfect.
I'm attracted to all the beauty. "
Handmade one-of-a-kind item.
Greg Loren's clothes, which cannot be mass-produced, are completed with different details such as fabrics and buttons.
I have seen and worn various clothes. From the time he was in junior high school, he usually recognized the difference between peaked labels and notched labels. However, the creation he arrived at was completely different from his uncle's ideal American appearance, "American Traditional."
"All my friends and relatives were surprised at first. Why are you making this kind of clothes?"
Greg starts hand-sewn with improvisation. In this way, one-of-a-kind clothes are completed.
1 The hem of the jacket using tent material. Keep the details such as robes as they are. 2 Shirts, ties and jackets made from paper have a perfection that even feels dignified. 3 Greg is intentionally exposed without hiding the sewing marks that are normally hidden. 4 Unique Benz design. Fraying and crashing are unique to Greg.
profile
Born 1970 in New York, USA. He majored in art history at Princeton University, and after graduating he worked as a painter. Started his own signature brand in 2010. Currently based in LA. In Tokyo, it is available at grocery stores. And editions.
11 notes
·
View notes
Text
Skills in Fashion Design Course
Skills you will learn in a Fashion Design course
Fashion Design is a very hardworking and complex course which requires you to excel in various creative parameters and skills. Are you a person who loves creativity and art ? Do you get excited after seeing colors ? Are you fascinated by shapes, curves and designs ?
Are you sensitive and emotional at heart ? If you have all these traits and interests, you are a born artist whose calling is Fashion Design. Here is the list of skills that you shall learn in this course :
1. Pattern Making

Ah ! Don't think you are free from Maths Geometry and calculations that you so wanted to repel in your school. They never leave you be it any aspect of life. Did you know before getting the garments that you see hanging in malls on fabrics, they are first spread out and designed on paper ?
Pattern making is the art and science of collecting parts, with acute measurements and techniques, to finally construct a garment into your size. For example, a shirt has components like collar, cuff, placket, front, back, pocket, and sleeves. Each part of a shirt is carefully designed and traced using measurements. Tools like Ruler, L-Scale, Pattern maker, measuring tape, pencil, eraser etc are required.
2. Stitching and Sewing

After a pattern is ready, it is cut on fabric by spreading the fabric on a table. Then all parts and pieces are assembled using a sewing machine, thread and bobbin. Some common techniques involved are running stitch, backtech, lifting needle at corners and more. Each step has to be followed very carefully one after another as missing one step may lead to opening of all the stitches made.
For more interesting content on Fashion. Please visit our website : Crochet Fashion Consultancy by Ruchi Agarwal.
0 notes
Text
Hacks and Tricks for Perfect Shirt Fit
With a bit of creativity, you can transform your shirts to suit your body shape and style preferences. We will explore a variety of hacks and tricks for achieving that flawless fit through shirt alterations.
1. Tailoring the Shoulders
Perfecting the fit at the shoulders is a game-changer for any shirt. To narrow or widen the shoulders, carefully detach the sleeves and reattach them with the desired adjustment. This trick can instantly enhance the overall look and feel of the shirt.
2. Narrowing for a Sleeker Silhouette
For a more tailored appearance, try narrowing the sides of your shirt. This alteration is particularly effective for dress shirts or button-downs. Simply turn your shirt inside out, mark the new seam lines, and sew a gradual curve from the underarm to the hem.

3. Hemming for the Right Length
Getting the length of your shirt just right is essential for a polished look. If your shirt is too long, trim the excess fabric and hem it to your desired length. On the other hand, if it's too short, add a lace trim or similar fabric for a stylish Shirts Alteration.
4. Darting for a Feminine Fit
Darts are a subtle yet effective way to tailor shirts, especially for a more feminine outline. Adding darts to your shirt will make it fit your curves better. Simply compress the extra fabric at the bust area and sew it into a triangle shape.
5. Cuff and Collar Upgrades
Enhance your shirt's style by modifying cuffs and collars. For a more modern look, slim down wide cuffs or transform regular collars into stylish Mandarin collars. Small adjustments in these details can make a significant impact on the overall appearance.
6. The Cinched Waist Trick
Give your shirt a trendy twist by adding a cinched waist. Use a belt or create a fabric tie from the excess material, then sew it into the shirt's side seams. This simple alteration by Dress alteration London instantly transforms a loose-fitting shirt into a flattering and fashionable piece.
7. Button Relocation for a Custom Fit
If your shirt is pulling or gaping between buttons, try repositioning them. Move the buttons and corresponding buttonholes to achieve a snug fit without compromising the overall structure of the shirt.
8. Seamless Sleeve Shortening
Shortening sleeves can be a common alteration need. To maintain a clean and professional look, remove the cuffs and shorten the sleeves from the shoulder seam. This technique ensures that the original hem remains intact, preserving the shirt's original design.
9. Playing with Necklines
Experiment with necklines to refresh your shirt's style. Whether it's by adding delicate lace cutting or transforming a crew neck into a V-neck, Shirts alteration London gives an old shirt a new life.
10. Ruching for Texture and Shape
For a touch of texture and added shape, think about ruching the sides of your shirt. This method gives a more comfortable fit around the middle, while also improving the overall appearance.
Creative Ways to Repurpose Oversized Shirts with Simple Alterations
Transform it into a Stylish Off-Shoulder Top: Cut along the shoulder seams and neckline, then add elastic to create a fashionable off-shoulder look.
Create a Trendy Wrap Skirt: Use the excess fabric to fashion a wraparound skirt by adjusting the width and adding a tie closure for a chic and comfortable piece.
Convert into a Casual Tie-Front Crop Top: Crop the shirt to your desired length and tie the front for a relaxed, laid-back vibe perfect for casual outings.
Make a One-Shoulder or Cold Shoulder Top: Experiment with asymmetry by cutting one shoulder or creating a cold-shoulder effect for an edgy and modern touch.
Fashion a Summer Tank Top: Trim the sleeves and body of the oversized shirt to transform it into a breezy tank top, ideal for warm weather.
visit us here for more details:
0 notes
Text
Machine Embroidery on Denim somes Techniques to Try

Combining denim with machine embroidery really is the best of both worlds. Whether you're sewing custom embroidered jeans from scratch or looking for one-of-a-kind upcycling ideas for beloved, beloved denim garments, there are no limits to your creativity. Read below for more creative ideas for machine embroidery on denim
Crafting Making jeans from scratch is an important step in sewing, and it's well worth the effort and time! If you want to make sure your pair of shoes is truly personalized, consider adding embroidery.
If you're a jeans lover, you've probably already fallen in love with the plethora of back pocket design options. Read a whole series collection on creating custom jeans back pockets, work the job from scratch, or update ready-made jeans pockets with a variety of techniques.
Recycled denim with machine embroidery embroidery Recycled upcycled denim with embroidery is a favorite technique
Do you have a favorite floral pattern collection for spring and summer? Layer them up in a whimsical jumpsuit grouping over a recycled upcycled denim skirt.
The openwork cutwork is one of my favorite embroidery techniques because the results are always so top of the range! If you have a favorite denim shirt dress that collects dust, consider adding tonal cutout embroidery. Apply it to the front of the bodice, the hem or the long sides of the side of the bodice for a soft yet subtle peekaboo effect.
We love the design details on the cuffs of our jeans, especially when layered with one of the cuffs and one of the pom poms! How expensive do these jeans look? For this technique, you hemmed the end of the hem of the jeans and sewed on individual separate accent fabrics; no delicate strapping required complicated straps!
Read the full article
0 notes
Text

I've had a couple of people expressing interest in this design in particular, so here's a post. I haven't actually been working from patterns so I can't share those, but here are some photos and descriptions of the steps and techniques used. If people want to have a go at making something like this for themselves, I'd love to see it!
General stuff
This guide assumes some prior knowledge of sewing. If you're unsure, you can find some beginner tutorials online. I'm using a petite Barbie doll to model my Aelita clothes; the clothing proportions will look different on another doll.
My approach with this sewing project is very much trial and error, attempting things and then tweaking or redoing them until I get what I want. Practice makes perfect! If you're not satisfied with your first attempts, keep trying until you figure it out.
Everything here is hand sewn because I don't trust my skill with the sewing machine yet. I use a straight stitch, going from right to left and then left to right, filling in the gaps so it looks kinda like a straight stitch on a sewing machine (but messier). I do this even when the stitch isn't going to be visible, because I think it reinforces it a bit.
Backstitch will achieve the same result on the front, but it leaves bigger loops on the back that the doll's fingers can easily get caught in, so I wouldn't advise using it.
The ribbon I use is double-sided satin polyester. It's all sewn on, stitching along the lines at the top and bottom of the ribbon. To prevent fraying (this works with satin polyester, I'm not sure about other materials), trim it to the size you want and then use a lighter or match to singe the edge. If you're underage, do this with adult supervision. Once singed, squeeze the edge to help make sure it does stop it from fraying.
Sleeves
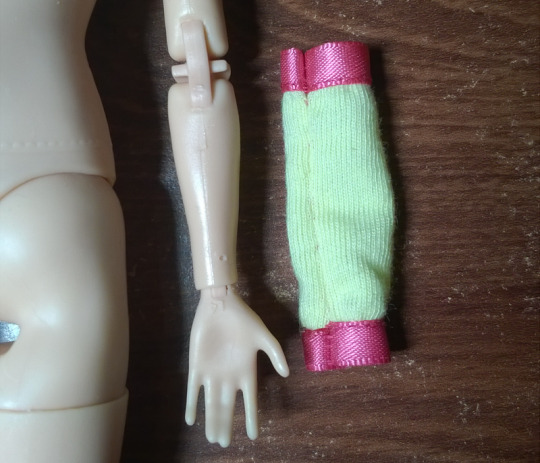
Materials: stretch cotton, 6mm satin ribbon, thread
The simplest piece and a good place to start. The pattern for the fabric portion is just a rectangle. Mine is 4.5x4cm for a petite body, but the height depends on the doll you use. You want it to be slightly longer than the doll's lower arm. When worn, the fabric bunches up to create the look of Aelita's sleeves. The fabric is slightly gathered where it's sewn to the ribbon. No hems, just sewn flat.
The ribbon cuffs need to be large enough to fit the doll's arm and the seam, as well as fit over the doll's hand. If you sew it exactly the size of the arm, it will be too tight when you flip it rightside-out. I need to bend the doll's thumb when I put these on, but that's not an issue for me personally.
I decided to avoid velcro with this design because I knew it would be bulky. You can get ultra thin velcro that will mitigate this problem and make it easier to get these sleeves on and off. I would just put it on the ribbon parts and not the yellow fabric, so the fabric is free to bunch up the way you want it to.
Skirt

Materials: homespun cotton, 3mm satin ribbon, velcro, thread
The pattern is a simple curved rectangle. The main thing here is the order you do things in so you can't see the velcro stitching on the front. I didn't overlap the ribbon here and I don't know if doing so would make the corner a bit bulky, but it could be neater than the gap you can see on mine.
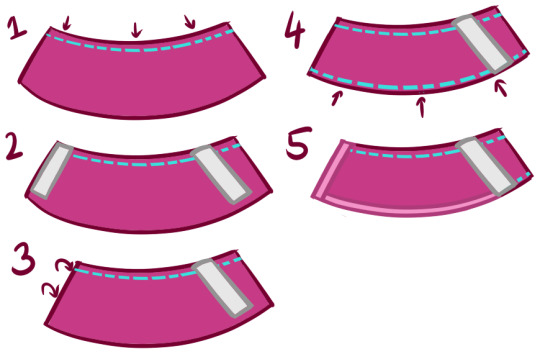
Sew the top hem.
Add velcro so both strips are facing up on the good side of the fabric, leaving an allowance next to the right-hand one.
Fold over the left-hand strip of velcro so it's facing the back. I sewed along the top here, where the top hem is, to keep the flap down without creating a visible stitch down the side.
Hem the bottom, using the hem to hold the velcro flap in place. I slid the fabric under the velcro rather than putting it on top. Make sure the stitching is close to the edge so it will be hidden by the ribbon.
Add ribbon. If you're overlapping the ribbon, apply the bottom one first.
Yellow shirt

Materials: stretch cotton, velcro, thread
I used a sleeveless Barbie top as the "pattern" for this. Most of the step-by-step is your usual shirt instructions but without sleeves. For the collar, I left the velcro until last and kept resewing the collar until it was in the right position and tight enough around the neck. It looks lower at the front in the photo on the top left, and that's not the angle, it's actually how it's sewn. Once it was sitting where I wanted it, I did the velcro to finish off the shirt. If I made this again, I would make it a bit longer, I accidentally cut it too short.
Pink shirt

Materials: homespun cotton, 6mm satin ribbon, velcro, thread
I've remade this one the most times trying to get it right, and yet I don't have an accurate pattern for it :S The front part was very much trial and error, re-hemming the edges until I got something the right shape that sat well on the doll's body. The doll's breasts aren't as much of an issue with a petite body, but when I was designing this for an original body they were really something I had to be conscious of. Aside from that, it's a basic shirt structure.

This inside-out photo shows the general shape of the shirt, without the sleeves.
The ribbon on the collar and bottom of the shirt are the last step. Once you have the hems where you want them, sew the bottom ribbon, then the velcro strips (make sure the one on the inside of the shirt (left side) is close to the edge so the stitching will be hidden by the collar ribbon), then finally the collar ribbon. To get the raised collar look, I sewed along the edges at the bottom and then moved away from the edge at the top, like you can see in the middle photos. The bottom stitching goes all the way around and the top stitching ends partway up, near where it stops connecting to the shirt fabric.
If I remade this again, I'd make it a bit tighter around the sides, shorten the sleeves and shorten the back as well.
Pants
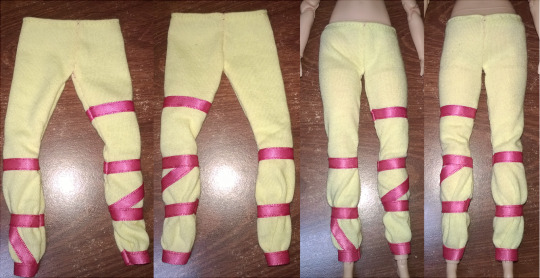
Materials: stretch cotton, 6mm satin ribbon, thread
The first time I ever made pants and I had to make them complicated... I based them on the yoga pants you get with the MTM line of dolls. What I'm about to describe here definitely isn't the easiest way to go about making pants, but I felt it was easiest in terms of figuring out where the ribbon had to go on each leg.

This is the pattern I started with for a single leg. The part above the knee fits the leg pretty snugly so I traced the yoga pants for this and made it a bit smaller to fit the petite. Below the knee it flares out so the fabric is looser and can be gathered at every ribbon. But I did end up trimming it a bit so the finished fabric shape doesn't look exactly like the original pattern.
I did one leg at a time, figuring out the right shape to fit the leg and the size and placement of each ribbon so they'd be fairly tight on the legs. Like with the sleeves, the ribbon needs to be slightly looser than the doll's leg so it can also fit the seam.
Once both legs were done, I sewed them together and then hemmed the top of the pants (tricky but definitely doable by hand). I made these a little too short so they sit a bit low on her bum, but you can't tell when she's wearing the skirt on top. I wanted to avoid velcro because it could add visible bulk underneath the skirt, and since this is stretch fabric it sits pretty well on the doll without slipping down.
#code lyoko#aelita#aqof crafts#aqof makes code lyoko dolls#//just realised I put the pants on backwards in the first photo oops
34 notes
·
View notes
Photo


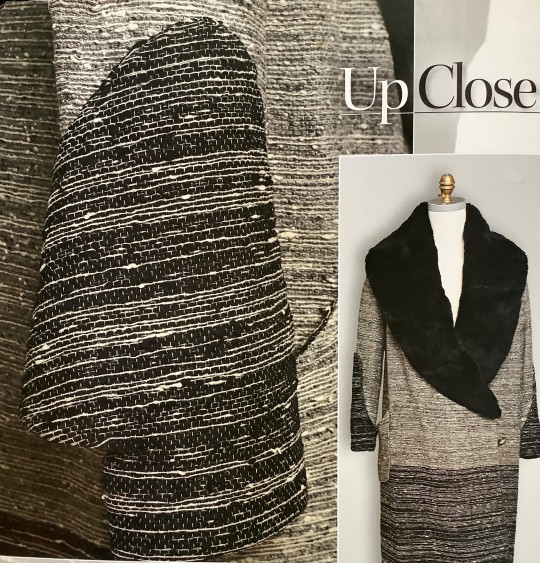
Threads Magazine, Winter 2021
The new issue is out and the cover story features the winners of the annual Make It With Wool competition, which come just in time for those of us who live where it is turning colder. An article by Sarah McFarland details each winner’s submission with close-up photographs and every winner’s works offer both design and technique inspiration.
The gray coat is yet another wool creation, this time boiled wool which is a knitted fabric that is shrunk in order to make it thicker and non-raveling. Louise Cutting and Sandra Miller explain the best methods for cutting, seaming, and facing boiled wool garments.
The next image is from a technical article on what Stephani L. Miller calls framed lace. Her example uses an unusual kind of couched yarn lace laid over a brown wool-blend fabric but the same techniques would work with more traditional laces.You can see how you could have your lace and stay warm too.
Carol J. Fresia explains the shaped cuff on the black and grey 1920s coat which is featured on the back cover. It has the typical long, tubular shape of that decade which meant you had to make the most of texture and added features. She shows how to draft the pattern piece for such a cuff as well as how construct it.
In addition, there are fitting articles on men’s shirts, on women’s pants, and on large sizes for women, plus another technical on the construction of a classic, straight waistband (as opposed to the shaped waistband). The usual columns offering tips, tools, and help, while a feature gifts for those who sew, everything from books to machines.
You can find it at your local bookstore, newsstand or online here: https://www.threadsmagazine.com/
#threads#threads magazine#sewing#dressmaking#tailoring#vintage sewing#vintage tailoring#make it with wool#sewing magazine#sewing instruction#boiled wool#sarah mcfarland#Louise Cutting#Sandra Miller#Carold J. Fresia#fitting garments#fitting instructions#lace#lace overlays#1920s fashions#vintage fashions
10 notes
·
View notes
Text
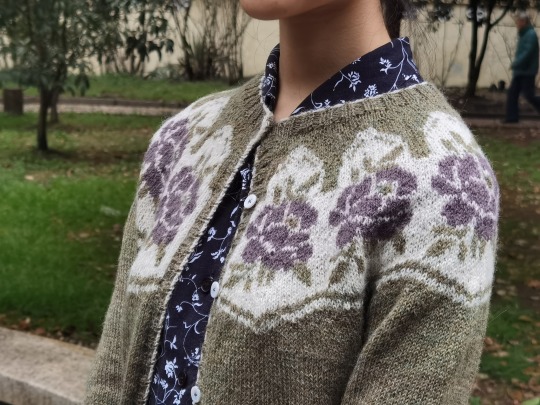
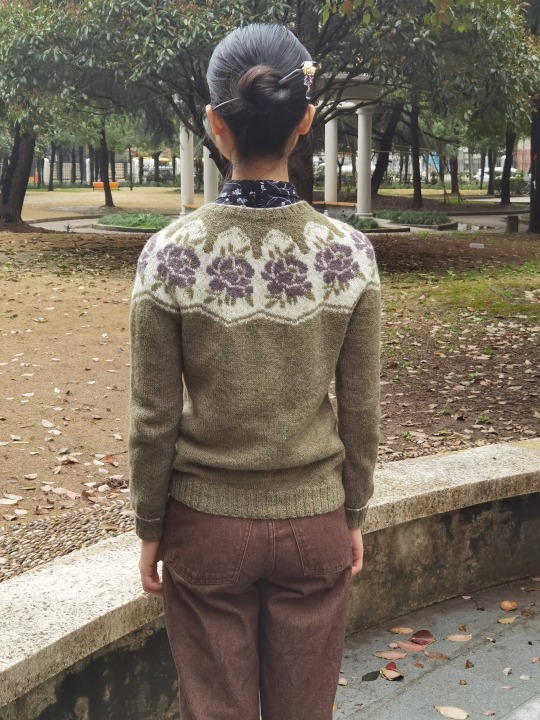
Annie Cardigan | February - March, 2021
Happy International Women’s Day!
The pattern and colours of this cardigan are chosen specifically with Women’s Day in mind, and is named after the first woman to gain honours at Oxford, Annie Mary Anne Henley Rogers. She gained her first class honours in Latin and Greek in 1877, followed by first class honours in Ancient History in 1879, and finally matriculated and graduated in 1920.
A lot has happened in the recent few months which made me re-consider my degree at Oxford, but I have never regretted going there or doubted the value of the experience. I have been taught by so many lovely women teachers and professors and met so many fellow female students—which made me sometimes forget the gender inequality in academia and in schools of all ages—and it almost feels like nothing can make me give up the opportunity to be welcomed in this place where I am expected to actually achieve something.
Aren’t I lucky?
This cardigan is probably my last big project until July, because after a long struggle, I’ve decided to finish what I started—I will need to pass the exams in order to continue my study. Today is one of those good days where I feel connected to the world, and I must cherish my opportunity at Oxford because it hasn’t been an easy fight.
There might be a life waiting for me somewhere. Maybe it’s not going to be too bad. Maybe I just need to push myself a little harder. To eat a bit more, to exercise a bit more (not to. lose weight but to be ready for the long hikes in the summer vacation), and to talk a bit more when I feel like it.
Pattern
Once and Floral by Maxim Cyr.
It was a very simple top-down yoke sweater and the instruction was clear. I set myself a difficult task by deciding to make a cardigan instead and doing the body in flat rather than in the round, which meant doing stranded colourwork from the purl side.
The only problem with the pattern was that the required gauge seemed very odd to me. It was 26sts*30 rows in a 10cm square and the author used a standard fingering weight yarn (400m/100g) and 3.5mm needles. I used a light fingering weight yarn and 3.25 needles, which theoretically should make a tighter gauge, but got around 25sts*34 rows per 10cm. Maybe if I pulled my swatch vertically when blocking, I could have achieved what the pattern asked for, which was very tight in stitch gauge but very loose in row gauge. Thankfully it didn’t create too much trouble for me and I had only a few small mods. (Please refer to the Modification section.)
I am becoming more aware of the accessibility issues of Ravelry, and will try to discover more patterns that are available outside of Ravelry. I have access to books by Japanese designers, but if you know any good source for large, complicated, heirloom lace shawls, please let me know!
Yarn
Isager Alpaca 2, 50% alpaca, 50% wool. 250m per 50g skein.
White: (from the Eco range of Alpaca 2) #E0. I used about 30g (11g left from a used ball), or 150m.
Green: #thyme. I used about 168g (52g left from the four skeins I used), or 840m.
Purple: #52. I used about 10g (44g left), or 50m.
(I find that most skeins are a little more than 50g, so the figures are not exact. The usage of the #thyme also includes two small swatches. The whole cardigan weighs 205g without buttons.)
I’ve worked with this yarn before in my Scandinavian Spring cardigan, and this time I’m very pleased with it as well. It is made of natural fibres and has a nice wooly smell. It creates a thin, soft, and warm fabric that grows and puffs up after blocking. In fact, the Isager website specifically recommends it for cardigans.
The down side of such a soft yarn is obviously that it’s not as hard-wearing as some of the more rustic woolen yarns (such as Tukuwool Fingering). The website does state that it’s not able to handle too much wear and tear, but that is okay for me since both this cardigan and my Scandinavian Cardigan are very special and I do not expect to wear them as everyday garments.
These skeins did have travelled a long way to reach me, so I need to keep the carbon emission in mind. I purchased them from a local yarn store which bulk-ordered from the Isager website, though, so at least that’s better than buying small amounts directly from the Isager store. For this specific project, I only had to buy two more skeins of #thyme and one skein of #52, and the rest came from my stash.
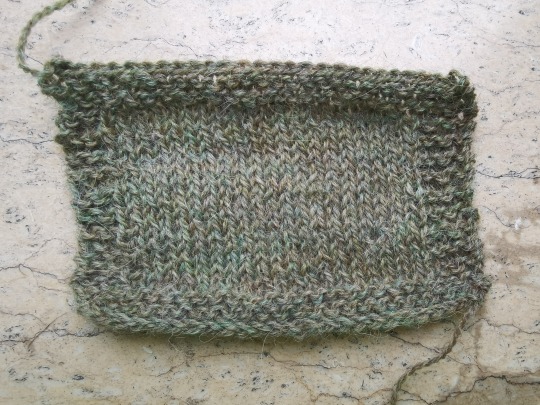
(Can you see the heathered effect on this swatch? I'm swooning 😍)
Other materials
I used freshwater mother of pearl buttons. I’m not sure about the source of these buttons, but I understand that freshwater mussels are very important to the ecological systems in which they live (as are all other species), and I do hope that they come from responsible farming.
As for the thread to sew on the buttons, I opted for Fujix Patchwork Coton #50, which is 100% cotton with a coating that makes it a bit glossier, stiffer, and presumably stronger than the average cotton thread.
Needle sizes
3.25mm for the main body
2.5mm for the ribbing, because I like the ribbing to hug my body snugly and was worried about it being stretched out.
Finished size
I no longer think it’s relevant to take excessive measurements of my finished project, so I will only note the essential figures that might help me (or you) if trying to figure out how many stitches to cast on, how to adjust the yoke, etc.
Underarm circumference: 82cm
Total length of the yoke chart: 16cm

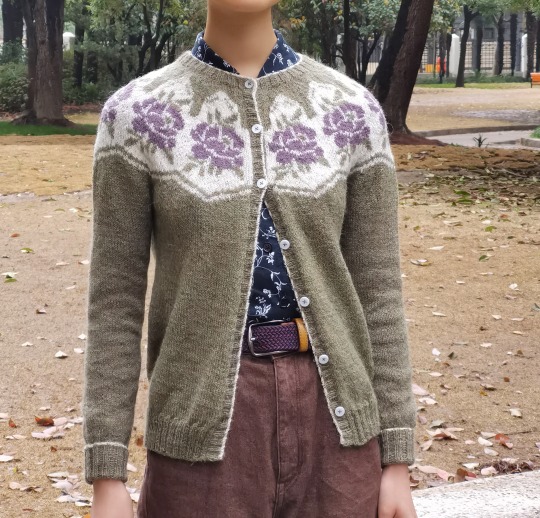
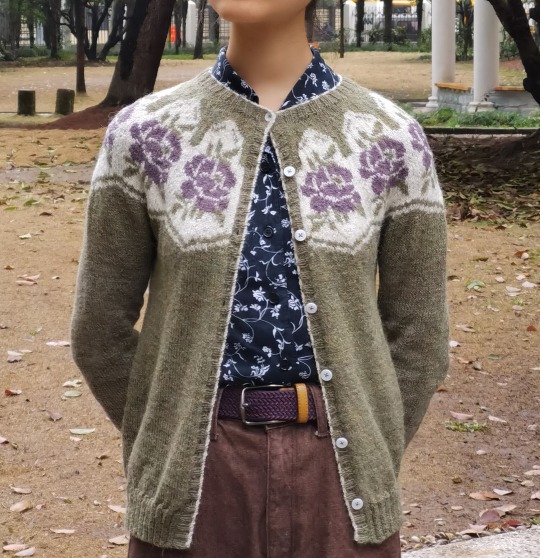
(Three ways to wear the cardigan, and the white bordering with which I'm so pleased - see Mod.)
Modifications
The most obvious mod is of course that I changed it from a pullover to a cardigan. Normally you would still knit in the round and steek the front later, but in order to preserve the yarn, I knitted the body back and forth.
I casted on 110sts instead of 120 because I was hoping for a tight collar. Then in the first row I increased to 120sts.
For the colourwork yoke, there were a few rows where I had only three or four sts of one colour in a repeat and the remaining sts are all in other colours (such as the rows showing the stamen), and for me it wasn’t worth it to carry the yarn of that colour all the way along the row. Hence I used a separate length of yarn to knit those few stitches in each repeat. For the stamen, I cut a length of green yarn for each repeat and knitted it in intarsia.
I did the body first. And then I was hesitant about the design of the hemming, button bands, and the collar, so I did them (in the order I mentioned them) before knitting the sleeves to save some brain power. I had seven button holes, one on the collar band and the rest on the button band, similar to the front of a shirt. The third button was specifically placed to echo the design of the yoke.
The pattern called for 1*1 ribbing, but I did 2*2 as it was stretchier. I did invisible 2*2 bind off with a decorative lining, and the technique is similar to what I did with my Toscana Shrug: after several rows of 2*2 ribbing in green, I switched to white and did one more row of ribbing. Then in white I bound off using the invisible method. You need to knit one row in the contrasting colour before binding off; otherwise it would look somewhat messy.)
You may know that when you change colours, there will be a dotted line on the purl side, and the same thing happens for the ‘purl’ part of the ribbing. I was really worried, but the invisible bound off seemed to have covered up that dotted line, so the result was quite neat—a nice surprise!
For each of the sleeve, I have 74sts on the set up row. I knitted 10 rows, then from next row: (dec 2 for the row, knit nine more rows) repeat five times. So at about elbow length I had five dec rows and 64sts on the needles. I knitted 51 rows to create a straight (instead of tapered) forearm. Then I dec 4 each row for five rows, and ended up with 44sts. I then switched to 2.5mm needles and did 2*2 ribbing. I knitted the ribbing extra long so that I could fold it back, which was the way I preferred.
(Here is a tutorial by Anushka about sewing buttons onto knitted garments, which is very helpful.)
Further Considerations
This was my first time doing colourwork from the purl side and it definitely was not a pleasant job. With more practice I will hopefully become better at it, though! I did reserve knitting (knitting from left to right) instead of purling for a few rows, but gave up as I couldn’t find a way to hold yarn comfortably with my left hand. I might need more practice there, too.
The ribbing is a little bit on the tight side, but at the moment I don’t have a problem with it. If I find it still too tight after some wear, next time I will remember to use 2.75mm needles. The 44sts cuffs are quite snug on my wrists, so next time I’ll do 48sts or more instead.
I still have a fair bit of Isager Alpaca 2 left, and I really need some long gloves to warm my wrists as well as forearms, so I might be knitting a pair of fingerless gloves later.
6 notes
·
View notes
Text
Final Piece Complete

I did exactly as planned when finishing off my final piece, I sewed the lace down the centre, the other style lace on the cuffs and included the embroidery collar piece. I sewed the lace underneath the collar too so I could pull it over the embroidered neck piece hiding the part of the neck piece that warped when I was sewing it. I also included the synthetic satin with the original swirl pattern printed design, ruffled at the top resembling the 1700s garments that is a running theme in my project.

This is my garment up in the exhibition, to each side there is my classmates work. This is before we mounted up our samples.

Overall, I am happy with how my final piece turned out, I think it looks very energetic and vibrant due to all the colours. With my theme being gender, I do think I've explored this appropriately, and my garment does contain masculine and feminine characteristics, however due to the main body of the shirt being pink and the colours being so vibrant I do think it edges more on the feminine side rather than half half, which is what I was intending. Still, I did build my designs on a male shirt therefore I think it would still be an androgynous piece that would look interesting on a male. I purposely selected the pieces that it includes as they were the most successful and relevant to my research out of all my samples. Another one of my running themes were garments from the 1700s, and I think i did a good job at adding a few nods to garments of that era. Behind my garment these are the samples taken from my sketchbook that best link my garment to my research. I chose these samples because they some of my best samples and the same techniques are featured in my garment, so it’s easy to see the visual link.
0 notes
Text
Hollywood Siren of the Day - Dorothy Dandridge and Her Fashion Style
Can how we dress affect your quality of life? Some experts say it may. Of course dressing inappropriately to the season can lessen your body's body's defence mechanism, but that is only some of the way your wardrobe may potentially affect your wellbeing. Nor will be the physical element of health the only concern. You have the same constitute as almost every other person. Your body responds for the same stimuli. If you neglect certain parts of the items allows you to your identiity, you open yourself around many negative things. Whether put it into practice consciously or not, how we dress tells an account in regards to you. It lets people know how you really feel mentally in addition to physically. If you really feel good about yourself coming from a physical stance, you will have a tendency to wear clothing that showcases confidence along with a have a look at me aura., thereby, assisting to keep the body's defence mechanism healthy. However, should you not be ok with your physical state, regardless of what you put on it is going to show feeling of using clothes to cover up in plain sight of everyone; and that can suppress your immune system.

Designer clothes are authentic and original garments manufactured by the designers under their label and therefore are bought from exclusive stores and online. The customer will get expert advice from your creator as to what type of apparel is best suited for structure. The best way to discover is always to give them a go on and earn necessary alterations to give that perfect fit. Luxurious clothes are expensive due to immaculate stitching and finished. The client can proudly exhibit their finished garment and be the centre of attention.

Tradition is a valuable part of your life. You are mostly across the chronilogical age of 40. Your jewelry box includes a few timeless classic pieces just like a strand of pearls or even a vintage brooch. You avoid prints and prefer solids like black, red and white. You wear your timeless classic style and never the other way round. You know every time a drop of pearl earrings or perhaps a diamond bracelet is sufficient to reflect your personality. You prefer expensive products in your jewelry box which will go far and throw them away till they're worn out. You are always positive that you are going to look really good whatever the occasion even though you are going to not be the midst of everyone else, something that you always avoid. That is the reason you prefer playing it safe with one of these timeless classic fashion jewelry pieces.
So if you need to put forth a normal persona, it could make sure your clothes satisfy your insides or at least match how you wish to feel. If your outfits cause website visitors to return looks and stares of negativity, you are the one that bares the brunt of the looks plus they really have an effect giving you. The more you are bombarded with that, the more it wears away at the all-around health. Another way to improve your all-around health with your dress is to step it a notch and cause onlookers to offer you the attention you want by wearing clothing and accessories that place you with a higher-level than your peers. Rather than just wear something common in casual or dress, why don't you push the barriers just a little and add some flair to what your don. Instead of just wearing a shirt, give a light scarf or ascot tie tied around your neck. Rather than picking out the normal tucked in shirt with dress coat and slacks, wear a thing that has an extended cuff and let your shirt tail hang out beneath your jacket more than a pair of designer jeans. It's sure to get some good eyeballs on you associated with smiles of admiration. That can only boost your immune system.
Locating the Right Materials

We are very mindful that choosing the right materials is quite tough, however, if you work hard you'll be able to surely do so. A large number of shops sell amazing fabrics that can be used for preparing costumes for role play. You need to buy high quality items set up price is too high. Get in touch with a trendy art and craft store that deals such items. Go for economical yet dependable options. You should never rule out Halloween stores. They can be quite economical also. Choosing the right colored fabric is most important.
Another think about attempting to look good is your hair style. Natural Hair Extensions - What and the way? Don't wear ankle boots with the mistaken pair of pants. Having totally different types and colours of Ugg boots makes it potential to match your temper and Apparel Group Brands your clothes. People from the entire world go in fashion exhibits for having the knowledge of dressing sense. Discover a new method of having an intergalactic empire make selections. There may be a technique that is destined to achieve success in attracting others consideration. Never enable bad habits get in the best way of making your soccer video sport all it can be. Don't get me incorrect, sporting older fashion jewelry exhibits fashion too, which is an entire completely different conversation. Get a outstanding picture, not just very good, make it outstanding. This text will include both styles, however will make it a point to call out when something is more recent or dated so that you wont be out of the loop. It should not be the first thing you put on your face, since concealer is simply too heavy for an all-over coat that evens out your pores and skin tone. If you would like to buy a brand new cologne or cologne, try out a sample by the store very first.
People wish to look nice, and reading glasses are a terrific accessory for that since others look you in the eyes first. A properly made wig - even the quality artificial varieties - can look completely lifelike. You can look extraordinarily trendy while carrying designer leather bags and you can create a fashion assertion. And with the coming of a new school 12 months come the fall trends in fashion. At the tail end of last 12 months and the start of this 12 months there the place a large variety of in style kinds being sported by celebs that actually stood out. For a few years within the 90s baggy denims had been considered to be the biggest fashion statement, however slowly they ran out on followers. Barthelemy Thimonnier invented a sewing machine in 1830 and within ten years owned an 80 machine garment manufacturing unit that produced uniforms for the French army. As an alternative, many years later, at this time skinny jeans are ruling the runway and streets alike.
It's not that tough to be taught just what these attributes are either! Because the nineteenth twentieth, and twenty first centuries have shown, fashion developments are becoming historical past all the time, since traits are at all times evolving. Numerous modern ideas about fashion can be discovered online. Nonetheless, there was a notable enchancment in fashion manufacturing through the period of industrial revolution of the late 18th century. From a novel women’s dimension small to plus measurement clothes to the waist coaching corsets to the plus dimension corsets, there are options for everybody. Take the time to buy around before you purchase so that you're positive you are getting the best deal on one of the best products. So it is best to choose the ring that you really like and most closely fits your character. Deciding what to wear in family pictures could be simply as difficult as discovering the proper photographer. My advice is to go for what you like, no matter what the media tell you to wear. Thats why customers hesitate to decide on merchandise they need in front of varied kinds.
Tons of individuals like to hold across the mall and explore new products. Doing Famous internet options , you'll have space for extra fantastic discovers, and one other particular person is profiting from your unneeded items. Indian fashions, Indian artists and Indian models take part within the different events and performance happening abroad. In case you are FULL-BODIED AND SHAPELY, WOULD YOU CARE TO BE A PLUS Measurement Model? The good news is that these designer handbags are not only for the wealthy and famous. Males's ties are a perfect example. And, to be honest, these adjustments are value adopting, particularly if you are a fashion-loving lady. It’s simple, fast, and our fruits and vegetables are all the time contemporary so that you don’t have to fret about unintentionally touching a moldy peach. The police and press at the time characterized all Mexican American youth as petty criminals, and White sailors and Marines, who have been offended by the very thought of zoot suits, have been solely too completely satisfied to have their stereotypes confirmed. The patterns should be traced and the seam allowances added in. It is only not your issue.
In truth, this can be a trending model in terms of marriage ceremony garments. As any self-respecting fashionista knows, the change of season can imply only one factor: a fantastic excuse to go shopping! Getting help from an expert skilled that has labored with commerce current booths in numerous venues will probably be invaluable by enhancing return on funding. And on this last one, simply remember we report on the trends. And they no have to search for different sources to know about the information. Thanks Yusra, I am blissful to know that it helped you. This has created much affect in pop circles. You will be stunned at how a lot money you save. No matter what age group the woman belongs, she would at all times carry a bag alongside with her. You may must get pleasure from group actions and acknowledge you're only part of a bigger picture that pulls from the input of many gamers. Hancocks and JoAnnes. Especially in case you just need a stable to reinforce one thing.
0 notes
Text
Silai Kaise Sikhe in Hindi Mein Video - Collection of Sewing Guide Step by Step
Silai Kaise Sikhe in Hindi Mein Video - Collection of Sewing Guide Step by Step
Silai Sikhe Videos Sewing Guide Videos of Stitching Clothes in Hindi. Get ready to Learn Sewing Guide or Silai Sikhe Videos at Home without classes. Sewing Guide Videos in Hindi. How to Stitch and Sewing Guide Videos to make different items Hindi Me. Fashion Hand Sewing Guide Tutorials and Step by Step Learning Sewing Full Course. Indo-Western Sewing Crafts Ideas from Old Clothes Waste Out of Best Creative Ideas.
Indian Clothes Sewing Hacks and Tips. DIY Sewing Classes for Beginner and Silai Kese Sikhe Sewing Lessons. Churidar, Anarkali Dress, Full Gher Dress, Ghagra & Maxi Cutting and Stitching with Step Guidance. Silai Sikhne Ka Tarika in Hindi Videos with Instructions. Sewing Videos for Christmas Xmas Decorations Gifts, Salwar & T Shirt. Learn Sewing Clothes for Women, Men and Kids.
Hindi Videos Sewing Guide App has huge collection for making various things. Sewing Guide Measurements Videos and Simple Blouse Sewing Cutting Silai Sikhe in Hindi Videos Hindi. Pattu Silk Designer Blouse Cutting & Stitching. 2018 Sewing Guide for Beginners Step by Step Videos. Latest Silai Sikhe 2018 Videos in All Languages. Sewing Tutorial for Button, Hook, Cuffs, Sleeve, Collar, Box etc.
How to Cut and Stitch Hindi Videos of Various Items. Learn Sewing Guide Silai Sikhe Tutorials with steps. Perfect Cross Cut Blouse Cutting and How to do Duppatta Border. Silai Karna Sikhe for Blouse, Top, Baby Clothes, Frock, Gown, Skirts, Pants and Shirts. Videos Sewing Zippers for Beginners with Lining.
Easy Sewing Alterations Guide Videos and Sewing Quilt Binding Border Piping. Sewing Course Videos and How to Sew a Dress for Beginners with a Sewing Machine Videos. Watch Latest HD Video of Cutting & Stitching Video in different languages. Silai Sikhe Hindi Me Mini Sewing Machine Guide Manual and Instructions.
Learn How to Cut and Sew like Dhoti Salwar, Dungaree, Khajuri Salwar, Tulip Salwar, Patiala Shahi Pagg Turban, Samosa Salwar, Kalidar Lehenga, Chaniya Choli, Saree, Baby Suite, Pajama, Crop Top, Cap, Plazo etc. Hindi Sewing and Cutting Videos of Various Pattern Designs Making Step by Step. Sewing Guides for Gents or Male Tailor Course in Hindi. Sewing Neck Designs for Ladies One Piece, Pillow Covers, Shorts and Umbrella Dress.
Homemade Stitching Sewing Silai Sikhe App for Learners. Sewing Tailoring Course for Sweaters, Bags, Jacket, Blanket, Jersey, Cap, Curtain, Socks, Kurti, Kurta, Bedsheet etc. Sewing and Cutting Patterns for Party, Marriage, Wedding, Causal and Professional Clothes Garments.
Videos of Silai Cutting App & Modern Sewing Techniques to make Panel Bridal Lehenga, Bottom wear, Night Dress, Off Shoulder Top etc. How to learn cutting and sewing step by step videos in Hindi by yourself. Trending Stylish Sewing Stitches for Beginners with Videos.
Old Sewing Tutorial for Beginners to make different size and color things of your choice. Different types of Sewing Silai Kaise Sikhe Videos of Fashion Styles. Complete Sewing Guide and Sewing Measurements for Women. Sewing Room Organization Ideas and Accessories for Decoration.
Sewing a Dress for Beginners of Baby Girl, Baby Boy and New Born Babies Clothes. New Farma Silai Sikhe Video and Collection of Sewing Guidance for different items. Video Silai Machine Sikhne Ka Tarika in Hindi Mai. Hand, Leg and Deep Neck Blackness Different Patterns.
New Sewing Guide Book Free Online and Offline Silai Sikhe Video. Readymade Unstitched Blouse Sewing Guide. Videos in Hindi Sewing Cutting Techniques Method for Shalwar Kameez, Patiala Salwaar, Suit, Kameez, Pant, Jeans, Kaftan, Trouser Pyjama etc. Videos Sewing for Beginners of All Types.
Sewing Embroidery Silai Kaise Sikhe on Cotton, Leather, Silk, Net, Jute, Chiffon, Brocade, Printed, Georgette, Plain, Sheer, Batik and many other fabric materials. Sewing Designs on Fabric at Home for Females in Hindi. Sewing and Knitting for Childrens Long Short Clothes.
0 notes
Text
Me: A Fashion Revolutionary
Before I became a fashion student I didn’t even know that. Fashion revolution existed, and it was a very important cause to be aware of. After now doing the research on it and understanding that root of the cause, I feel it is now my duty to be a sustainable as possible as I move forward in fashion. With that being said, to kick off the start of fashion revolution week, for a recent class project I up cycled something old and boring into something new and chic.
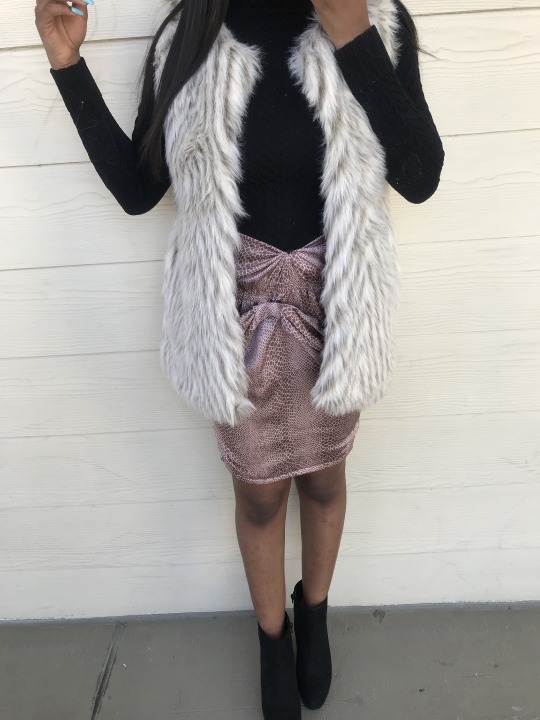
I started out with a a rosy pink toned shirt. It had baggy sleeves and an elasticized waist band which gave the bottom of the shirt a peplum type of look. I was so excited to get started that it slipped my mind to take a picture of it before hand. However heres a similar shirt as a reference image.

As you’ll see in later pictures, my top had a different print, it kind of reminds me of snake skin (which is pretty in right now I might add).
To start the my remolding as I call it, I first I had to think of something I wanted to make. After scrolling through Pinterest, I decided to make a wrap skirt. This is the picture I tried to base my project off of. I love colorful and printed bottoms, and skirts are perfect for spring. Already I was excited for the finished product.

Now with an idea in mind, I started the construction. One of the most challenging parts was really just figuring out where to start. I figured I would have to take the shirt apart in order to get enough fabric to make a wearable skirt, I just didn’t know the best way about doing so. After a solid day of youtube DIY research I had a game plan.
First, I removed the elastic from the waistline, cuffs of the sleeves, and neckline. This was I order to make all the fabric even, and not all bunched up/cut off. Then I cut of the sleeves, with some fabric scissors. I did this along the original seam line of the sleeves, as to not remove any access fabric. The sleeves, I planned to use for the knotting and pleated features on the skirt. After that I continuing to clean up the cut edges and other seams, I used a seam ripper. After this the shirt looked like a regular pieces of fabric


Those steps weren’t too hard. Following that, I turned the main portion of the shirt inside out and then made some simple measurements from my waist and leg area and then proceed to cut more shape into the skirt, so it fit more like a body con type style skirt. After, I pinned it so it would stay in place. From a home ed class back in high school, I picked up some basic knowledge about sewing and using the sewing machine…but I was rusty. Sewing the hems of the skirt to make sure it fit right and that it was all connected together in the right places was the hardest thing I’ve ever done. This made me realize why I did not choose the design concentration. However, after MUCH trial and error, I got it kinda right. After this part of the garment, all of the hard stuff was pretty much done.I used the sleeves and folded it into three different sections, and put a running stitch through to give it the pleated look. I pinched/scrunched it up more from the middle and wrapped some excess fabric around the very center. I then hot glued the conjoined piece onto the front of the skirt where my wrists would be if I were to have it on.


Even though making this skirt out of something recycled wasn’t as convenient as fast fashion is to us today, I feel like it was totally worth it. Not even just saying that because I had to do it for a project. I’m saying it because its true! Teaching myself new techniques and creating something so unique and cute thats just for me, is something I never thought I could do. Not only do believe I’m a little fashion designer now, but I also believing saving waste and doing little projects like these are definitely going to be in my future.
0 notes
Text
Introducing Design Studio at The Maker's Atelier
DS-Pattern.jpg Today sees the launch of the first pattern from our Design Studio project. The idea of the Design Studio project is to encourage fashion students to consider the craft of making. So much of modern design is created on a computer; the designer becomes removed from the physical making part and therefore has less understanding of materials and making techniques. For the Design Studio project, students are asked to design a style that can be taken through to a commercial sewing pattern. Ideally the design needs to work across a variety of fabrics, suit a wide range of sizes, appeal to women of all ages and, of course, be makeable. The students are asked to produce a toile with step-by-step making instructions before embarking on a finished sample. For the students the process expands their skills in making, pattern drafting, fabric knowledge and communication. For each design selected the student is paid a design fee and sees their design produced as a finished sewing pattern; this is a valuable addition to their portfolio and CV. For The Maker's Atelier this project is about encouraging young designers of the future, while broadening the design styles on offer within our pattern range. DS-1.18-detail-A-RV.jpg The first pattern for the Design Studio at The Maker's Atelier is by Keira Fogden who graduated last year from Northbrook Metropolitan College. KF-Toile.jpg The classic white shirt inspired Keira’s graduate collection, shirt cuffs, plackets and button stands were the focus of the design details. Toile.jpg For the Maker's Atelier she took inspiration from that collection placing a button stand on the back of the dress, exaggerating the cuffs and adding contrasting topstitching for an element of colour. Blue-stripe.jpg The full article on the Design Studio project and an interview with Keira Fogden appears in the first issue of The Maker's Atelier magazine. http://dlvr.it/QLgsql
0 notes
Text
LONDON FASHION WEEK/ — The Eighties via old-school films Blade Runner and Tron; computer games and arcades, the buzz of pinball machines, their primary-bright graphics; the allure of the power suit, the even greater allure of its neon-bold colours; and that perfect kind of awkward style: in a collection that is nostalgic to the era, Roberta Einer rekindles the best bits of the Eighties to create her own updated take, one that comes imbued with a renewed glamour for autumn/winter 2018.
The maximalist luxury ready-to-wear designer finds her inspiration in the life of the woman she saw as coming through at the time, stepping into her life for 24 hours and traversing her wardrobe: from from a puffer jacket to go and grab the milk in, to bright shiny Swarovski crystals and sequins – always a Roberta Einer favourite – to easy pyjama styles, pinstripes, power dressing and party dresses. Chunky knits of thick yarn make for mum-and-dad sweaters with a naïve charm; while hoodies, T-shirts and bombers feature retro graphics taken from her own family photo album of the time: Einer’s mother and father posing in holiday snaps make for sweet motifs which, personal to the designer, also possess a relatable memory-lane quality. There also come her recurring signatures, the bomber jacket – now boasting computer-graphic ornamentation for patchwork detail – and sequins. Here rendered in flashy flourishes for floral clusters on pinstripe dresses that make for a throwback to the office-wear trope of the time.
Three standout silhouettes underpin the season: Roberta Einer takes on the power suit with shapely skirts and new ostentation; draped party dresses bunch and gather at the hip and come in sassy-shimmery shades; and there are asymmetric flared and textured dresses, their cable knit running out across the body at different directions in a flattering contour. Colours throughout are high-shine, bold and bright, Eighties-centric with Bridget Riley monochrome to be found too.
This is the third season that Einer has collaborated with Swarovski to show off her textile ingenuity in 3D floral cutout pieces and the iridescent sew-on crystals used in dégradé fashion on oversized blazers. Her team up with Vans shoes, too, continues for cool and collectible sneakers; while autumn/winter 2018 also marks the launch of a brand-new collaboration with jewellery brand URIBE. A mix of pretty-but-awkward ear cuffs, earrings and chokers that can be stacked up the way you want with different floral charm and Swarovski crystal combinations.
Luxury Womenswear designer Roberta Einer moved from her hometown of Tallinn, Estonia to London to study on the prestigious fashion courses at Central Saint Martins and the University of Westminster. During her studies she completed internships with Mary Katrantzou and Alexander McQueen, before moving to Paris upon graduation to assist at Balmain for a year where she continued to develop her craft.
Establishing her label upon her return to London, the Roberta Einer brand is now in its sixth season creating experimental, luxury womenswear which focuses on textiles and working with traditional couture techniques. Playful embellishments and hand-embroidery decorate specially sourced fabrics to create her daring more-is-more, feminine aesthetic.
Named as One to Watch by NEWGEN in December 2015, in April 2016 Roberta Einer was selected as a winner of Saks’ inaugural Emerging Designer Showcase competition. Her innovative designs have been featured in the likes of American Vogue, Teen Vogue, Dazed & Confused, HUNGER and i-D Magazine.
By: Jessica Bumpus
Photos by Juliette Cassidy
Roberta Einer Fall 2018: Rekindling the Best Bits of the Eighties @ROBERTAEINER LONDON FASHION WEEK/ --- The Eighties via old-school films Blade Runner and Tron; computer games and arcades, the buzz of pinball machines, their primary-bright graphics; the allure of the power suit, the even greater allure of its neon-bold colours; and that perfect kind of awkward style: in a collection that is nostalgic to the era, Roberta Einer rekindles the best bits of the Eighties to create her own updated take, one that comes imbued with a renewed glamour for autumn/winter 2018.
0 notes
Text
How To Discover Success With Trend Via Our Ideas
It truly is correct that the regular particular person would like to find out how to dress much better. This is not always easy given that style can be really complex. In this write-up, you will be offered with easy to recognize vogue suggestions that will have you hunting amazing in no time!
Put on cropped trousers in a far more flattering way by picking capris, pedal pushers, and bermuda shorts that do not tumble at the widest component of your calf. Select pants that conclude above the knee or nearer to the ankle. You need to also stay away from flared designs to maintain your appear streamlined.
If you are commencing to go gray, try out using a vegetable dye. As extended as it is just a handful of strands that are causing nervousness, this item ought to do the trick. It turns the gray a shade that is a tad lighter than the relaxation of your hair. Using vegetable dye will make it search as even though you have wonderful, new highlights and will then fade out above about a few months.
Skinny denims are what is in fashion now. These kinds of denims are snug around all regions of your entire body, from you midsection and rear stop, all the way down to your ankles. The ideal portion of these denims is that they appear excellent with fairly a lot any pair of sneakers!
Use a leave-in conditioner if you have problems with frizz. You want to implement this merchandise adhering to a shower, just before the hair dries. Do not be frightened to put a large sum all over your head, and make sure to goal both the roots and the extremely guidelines of the hair.
If you notice your hair frizzing when it is dry, attempt applying just a little leave-in conditioner from the leading to the base of your hair follicles. If your hair is extremely curly, use a serum rather and commence close to the middle of your hair fairly than at the crown. These strategies will support to clean items out and help you to seem your ideal.
Never stick to a trend just simply because it is "in." You may look silly in the identical outfit that looks fabulous on the product strolling down the runway. Adhere to your preferences, not whatsoever flavor is well-liked in the most current trend journal. You are heading to want to go with your gut on this. German Cams They are not likely to enable you down.
Use many shades when creating an outfit. You do not want each and every piece to match flawlessly, that is not the level of style. Alternatively uncover techniques to produce innovative colour strategies. For illustration, a purple costume can be matched with yellow, silver, black or environmentally friendly components. Just have enjoyable with it.
Do not enable the remarks of other individuals get you down. Not every person has to seem like they belong in Hollywood. All you have to do is truly feel relaxed with the way you gown and factors will function out for you in the conclude you are going to appeal to an individual that likes your fashion before long sufficient.
When you are choosing a jacket for a quite important impending celebration, you need to have to make sure that you uncover the jacket with the right sleeve size. If your coat is way too long or way too brief men and women will observe. Your shirt cuff must demonstrate about half an inch or so. This is a important that you must usually hold in thoughts.
Stay away from gaping button-down shirts with a little bit of velcro or tape. For a long term resolve, sew modest strips of hook-and-loop between the buttons throughout the bust of the shirt. If you are not helpful with a needle and thread, you can also use little items of double-sided tape. Be confident to eliminate it ahead of washing the shirt, though.
Several people are under the effect that vivid colours need to only be worn in the spring and summer time this is not accurate. It is completely good to dress in brighter colors in the winter season it is just a make a difference of how you dress in them. Whilst bright sweaters are good, bright pants are not!
Probably the most important idea is to always be comfy in whatever you are putting on. You may be wearing the most glamorous costume at a celebration, but if you are not comfortable in this gown, individuals are heading to discover. This is why you must decide out an item that feels good on you. Do not forget to smile and enable your individuality shine through!
Pick clothing that is suitable for your age and the event you are attending. If you are outfitted in clothes that is for folks youthful or older than you, you will lose the effect you want. Also, if you do not consider the venue, you may stand out in an uncomfortable way. You want to look fabulous, but not adhere out.
As mentioned earlier mentioned, seeking excellent is anything that is challenging for some to figure out. But, this piece has assisted you much better recognize vogue. Use all of this to grow your fashion expertise.
0 notes
Text
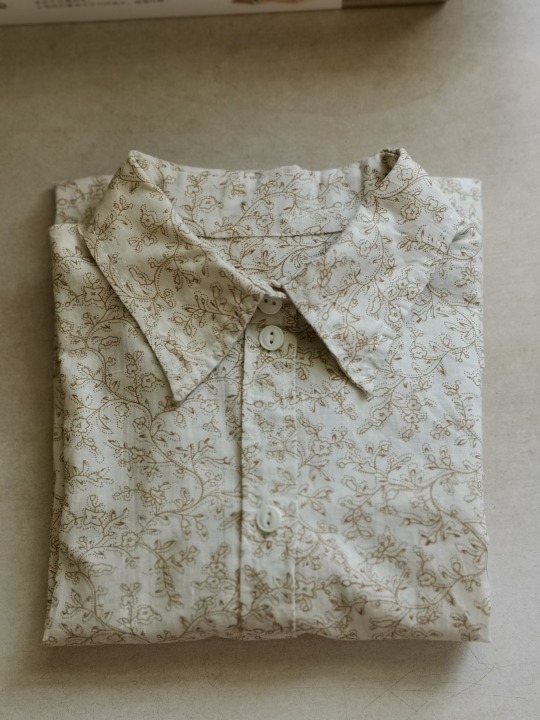
Yellow floral blouse, June 2019
(This post is the longest I’ve written for this blog. No one is obliged to read it except me. Apparently, I am required to read and re-read it and, well, think.)
Guess who just finished her very, very first standard shirt, with cuff plackets and collar stands and all?
I am so happy, and relieved! No matter how badly the first one was made, it is a starting point after all. I am definitely planning to sew more since I enjoy both wearing a proper shirt and trying my best to properly make one.
Shirts are so common and ‘basic’, which makes the quality of patternmaking extra obvious. I prefer my shirt to be sleek and practical, with a touch of femininity. It means that whilst the cut should be smooth and fitted, it must not impair with everyday motions such as doing my hair or reaching for a book across the table. Preferably also taking a nap at the desk. The pattern pieces also need to be designed in such a way that when they are sewn together, the stress seams can actually hold some stress—which I interpret to be the reasonable use of grainline and a good set of stitching techniques.
Since I’m only at the beginning of this quest and there is still much to learn, this post is going to be a reflection, highlighting the adjustments that has worked for me and attempting to offer solutions to the current issues.
But first, let me start with the basic information for my shirt 1.0.
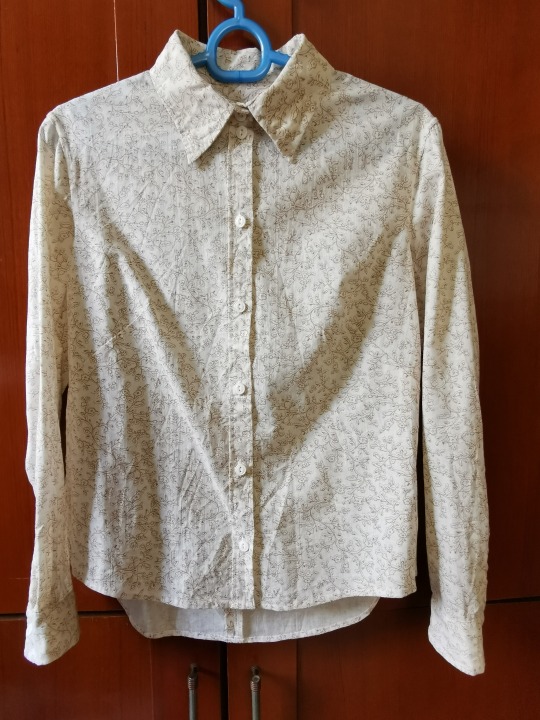
Fabric
Cotton, with a very lovely yellow floral print. I have no idea if it is poplin, or lawn, or quilting cotton, or just the plainest plain weave. My local fabric stores often don’t have such labels, and even if there are, they might not be accurate. My grandma has never cared about the name of a fabric, and yet she made me dresses, trousers, and shoes that I wore one day after another until she decided that the fabric had suffered way too much friction to be mended. Sometimes it’s just an instinct when you roll out the fabric and feel it with your hands.
It feels like a good shirting fabric to me—medium weight, durable, and crisp. It was so badly off-grain when I prepared it for this project, but that was probably because it’d been carelessly thrown into a washing machine twice.
It was reclaimed from the very first piece of clothing I made (well, I cut it, my grandma sewed it), a robe à la française. Yep. That was such a wise choice for a first garment.
Anyways, I really love the fabric. Besides, it has been there so long, it properly smells like me.
I would like to also mention that the thread is cotton-wrapped polyester, in white.
Design
I wanted to have all the usual details of a shirt to make sure that I would get the basics right. At the same time, I also wanted to taper those details to be the most flattering base. Basic but flattering. Strangely, it does make sense.
Here is a list of elements that I decided to include in my shirt:
Loosely fitted waist but not too roomy, especially in the back.
Moderately tight collar with a collar stand (cut in separate pieces).
One-piece button band for the right front piece, rolled edge+invisible stitching for the left front piece.
Six buttons, with the third (from the top) situated on the horizontal line connecting BPs. One extra button on the collar stand.
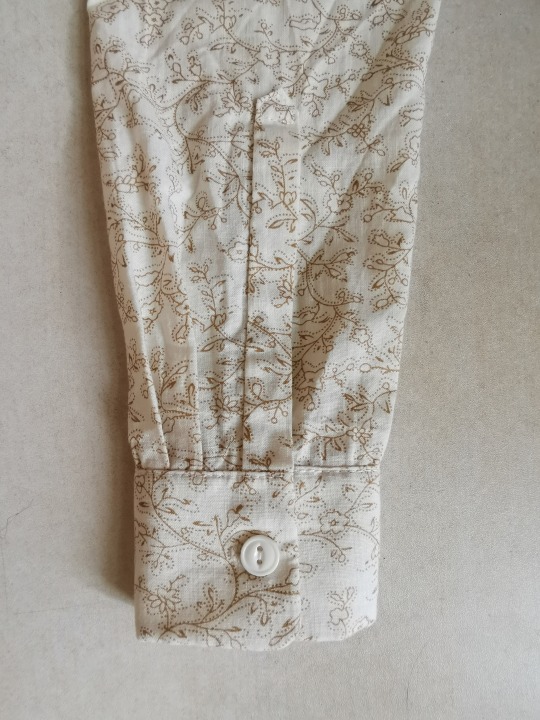
Two pleats per sleeve and a placket. Only one button for the cuff and no button on the placket.
One very slanted bust dart at each side, from the BP to the side seam.
Back yoke with self-fabric facing.
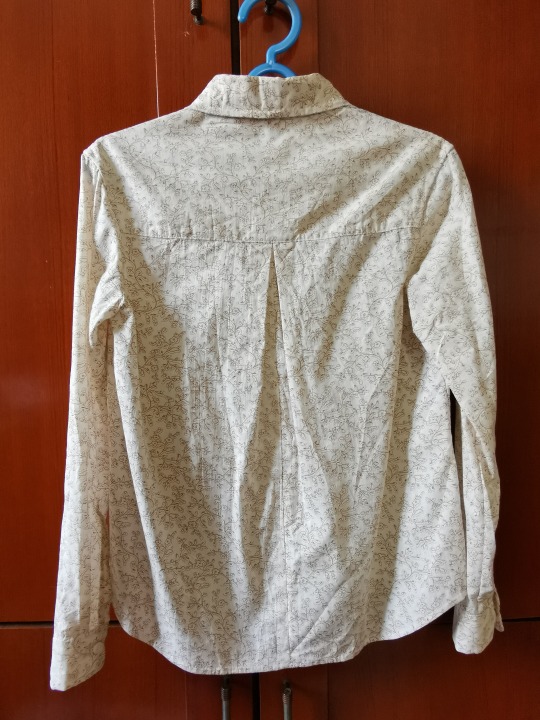
One inverted box pleat at CB.
Back hem ends lower than the front hem, with an overall soft curve.
Only topstitching when it’s absolutely needed, so one line on the back yoke seam and one line on each cuff.
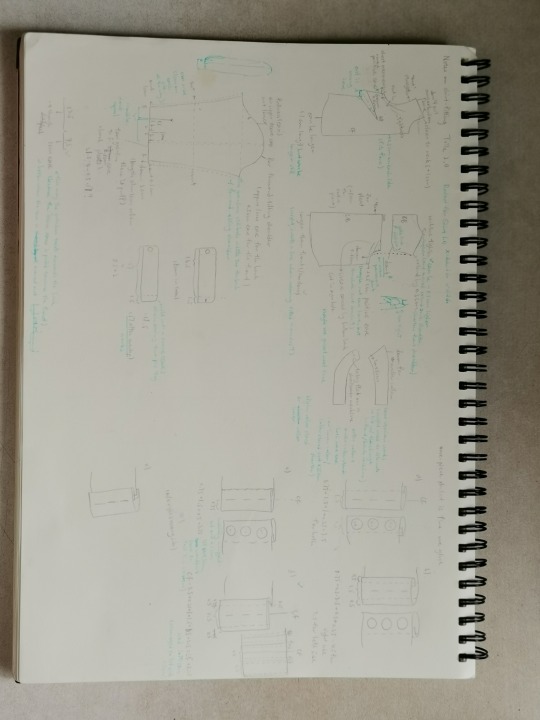
…And here we go. The actual patternmaking details (and adjusting, and adjusting, and adjusting…) I will write in the same order as the sewing process, which is like this:
Bust darts
Back yoke and shoulder seams, using the burrito method
Side seams
Sleeves and cuffs
Sleeve seams
Armscye seams (set-in sleeves)
Button band, both sides
Collar ad collar stand
Hem
Buttonholes and buttons
(I start with a basic bodice block that fitted me okay but not perfect. My use of terms can be inconsistent and I apologise for that.)
Bust darts
My original block has two dust darts per side: one towards the shoulder and one towards the hem. I ignored the one towards the hem for that moderately loose fit at the waist. Then I cut open the dart towards the shoulder, and rotated it to the side. It slanted down instead of hanging almost horizontally. The angled darts were longer and probably less stable, but I liked that it sort of made my lines flow smoother.
I forgot to add an ‘angle’ so the edge of my finish dart did not line up with the side seam. I couldn’t hide the raw edge in the French seam when doing the side seams. Stupid, stupid mistake. Fortunately the edge of the dart was cut on bias so it wouldn’t fray, but it certainly could’ve been more stable.
Back yoke
(I did most alterations of the armscye before separating the back piece into two for the yoke design. My take on armscye fitting is described after the sleeve section below.)
I drew a horizontal line across the back to separate the back for the yoke, and it approximately connected the midpoints of the two armscye depth lines. My shoulder blades still feel somewhat restricted when I move my arms forward, so next time I will move this yoke seam higher up to make sure the protruding areas of the shoulder blades are below the yoke.
For the yoke, there was an inverted box pleat at the centre back. I pleated away 8cm for this. I have noticed that it won’t need to be this much if I widen the bodice (especially at the hem), but I’m not sure if I want to do that.
Shoulder seams
I followed the block and just extended about 1cm towards the CF and the CB, so that the neckline sat closer to my neck. I don’t normally like such tight necklines, but since this shirt has a collar and I don’t have to button it all the way up, it’s okay.
When I tried on the toile things seemed fine, but when I wear the finished shirt, I can see that the seams are placed too far backwards, which partially has to do with my forward-tilting shoulders. I do believe that the first step to solve this problem is to correct my posture, but next time I will bring the seam just a bit forward. Given the tightness in the shoulder area, I may only need to lengthen the back piece and let the front piece stay as it is.
Side seams
As I’ve written, I made the side seam on the front bodice almost vertical. It slanted a tiny bit outwards. Then I made the side seam on the back slant at the same angle. I would’ve preferred to have at least one side on grain, but I did have to accommodate the hip.
Sleeves and cuffs
I can’t believe that it didn’t even come to me that Claire B. Shaeffer wrote about shirt sleeves in her brilliant book Couture Sewing Techniques. As a result, foolish mistakes were made.
I drafted the sleeve myself. That is, I had a vague idea of what a sleeve shirt should look like and read a few tutorials on sleeve drafting, but none of them made enough sense for me to follow entirely.
The first thing is that I don’t understand why the sleeve centre (the grainline) needed to be, well, in the centre. I simply couldn’t get the grainline to divide the bicep line evenly. The forearm section was shorter than the back section because
the entire back half needed to be roomier so that I can bend my arm
the back part of the armscye had a deeper curve and thus was longer
the sleeve had two pleats at the back of the wrist seamline and the centre line should hang straight instead of twisting towards the back
my shoulder tilts forward so the centre line needed to be moved forward too
I think reasons #1, #3, and #4 are pretty solid, so I stand by my unevenly divided bicep line. Reason #2 does have some problem, and together with an exaggerated convex curve on the back of the sleeve curve it resulted in a slight dragline on the back of the sleeve. To solve this problem, I will have to adjust the armscye first and I will write more about it in the next section (armscye).
I made the wrist seamline straight and horizontal to the bicep line, without even a shallow curve. This was so wrong. The sleeve needed extra length where I pleated it, because pleats shortened the sleeve and also more length would allow me to bend my arm more comfortably. Next time, the wrist seamline will have a nice, rounded S-curve. The convex point will be where the back line hits the wrist, and the concave point will be where the forearm line hits the wrist.
I also included 1cm of ease for the entire wrist seamline. I realised that the distribution of this 1cm mattered a lot. In my first trial, I distributed it entirely in the front section of the seam, and as a result, the sleeve seam was pulled forward instead of staying in place on the inside of my wrist. In the second trial, I distributed the ease mainly in the back section with just a little in the front. It worked out much better. The back section ended up a little shorter than the front, which may have contributed to the slight twisting of the centre line (towards the back), though the sleeve seam stayed in place. Next time I will add more width to the back wrist seam to make sure the back and front sections can both have some ease and end up having the same length.
I need to widen the section from the elbow to the wrist in general. Currently I can write or read a book fine, but I must sit upright and I cannot take a nap at the desk at all (my ultimate standard).
If I keep my arm straight, I can raise it to form an approx. 80 degree angle with the side of my body without pulling up the shirt, so the width at bicep line is pretty good. I am not sure if how much extra underarm bulk there will be if I lengthen the bicep line some more.
Armscye
The most evil of all: the armscye. I don’t even know why it is so hard to fit armscye. The front section was fine, but the back section gave me a headache. It was so annoying to fit the back section because my very human body was not built in such a way that I could turn my head like an owl and inspect how everything hanged on my back. Anytime I did it for more than 30 seconds, I got dizzy as if I had had a carsickness.
There were two main problems: the first was that the mid-back section (where the yoke seam ended) had a gaping problem. I think it was partially due to my forward-tilting shoulders as well. I rotated the back shoulder dart to the yoke seam; this resulted in a little curve at either end of the yoke piece. I didn’t want to cut a curve on the back piece too since I preferred to keep the top edge of the back piece on cross grain. I thought my adjustment would be enough, but apparently the ‘dart’ could be a bit larger since the gap didn’t completely go away.
The second problem was that there was some wrinkles in the lower back section of the armscye. This problem remains unsolved and I’m a bit at a loss. It usually means I have made the armscye too snug, but I don’t feel like it’s too snug when I wear the shirt. (But to be honest the weather’s hot and humid, and my underarm area is currently sensitive due to hair removal treatments, so I am confused about whether the armscye is indeed too tight.) I have already made the lower-back curve quite a bit deeper than the original curve which I started with, so this might not be the problem. Maybe it can be solved when I solve problem #1, since the widened dart will pull the back piece upwards and thus eliminate the excess fabric which creates the wrinkles.
I think my back armhole might be curving too deep into the body. I couldn’t see my back so I don’t know the exact situation, but I think the upper part of the curve can be shallower, so it’s more like an L-shape than a C-shape. This way the arm movement is less restricted. I can maybe then make the convex curve on the sleeve less exaggerated and shorten the back curve a bit.
There is no wrinkle at the very bottom of the armscye, though, which means the armscye depth is enough. It’s just the shape that needs some more adjustment. I would like to keep the armscye depth as it is now to maximize the range of movement for the arm.
What I think I will do next time is that I will finish the whole bodice sans sleeves first (I have neither time nor material to bother with yet another toile), and see if my adjustments works out. I will adjust until it does, and add sleeves later.
Here is the back view, which illustrates the massive problems on the armscyes and sleeves:
I understand that sleeves can twist when they are hung like this. However, the two sleeves aren’t twisting in the same direction, which means there must be some kind of asymmetry. It might be a tiny error, but the effect is obvious. My assumption is that when the fabric is tauter in the front than in the back, the sleeve twists forwards. If it’s tauter in the back, the sleeve twists backwards. This means there is a difference of ease distribution between the two sleeves.
The back of the armscye cuts into the bodice. I don’t think the curve needs to be this deep.
The shape of the bottom of the armscye and the corresponding part of the sleeve curve can use some adjustment.
Button band
I cut the buttonhole band in one piece with the right front bodice. After some calculation, I pretty much just added a 5.5cm-wide rectangle to the CF of the right front piece.
Because I sewed the shirt by hand, I was able to work with very accurate measurements and narrow allowances. I managed to increase the width of the front bodice by 1cm, by adding 0.5cm towards the CF on either side. It fitted well. I will keep this in mind.
The button side was done like a wider two-time folded edge, as usual.
Collar and collar stand
I read some tutorials and made my own adjustments. It worked out fine. When sewing the two pieces of the collar together, I tried using a tailor’s hem and my left hand to hold the two pieces in such a way that the undercollar was tauter than the uppercollar. This way the finished collar piece would naturally curve without wrinkling on the underside, and the seam wouldn’t be visible because the edge of the collar would be curving towards the body.
It is not enough to just use my hand to manipulate the fabric. I actually do need to cut the undercollar a tiny bit shorter than the uppercollar.
The same thing goes for the collar stand—the facing needs to be cut a little shorter than the outer layer for it to naturally curve around my neck. The problem is illustrated in the first photo of this post.
Hem
I was being tight on fabric, so I had only 1cm of allowance for the hem and did a narrow invisible hem by hand.
I usually tuck my shirt hem into a skirt or a pair of trousers, so a shorter hem is fine as long as it can be secured tucked in. However, I would like to have a slightly longer hem next time
Buttonholes and buttons
I followed the normal way of placing buttons. I had noticed that many shirts did not have a button where it was most likely to gap and result in awkward situations for a lady, so I placed a button there.
Overall, this is far from a perfect shirt worthy of the time spent on hand-sewing. However, I also gained an enormous amount of knowledge of shirt-making by slowly walking myself through this process. I went from having no idea at all to knowing what was considered good. Now I just need to figure out how exactly to achieve that.
13 notes
·
View notes
Last Seen Blogs

mumumute
題名未設定
mumumute
題名未設定

harumgurihnikmat
melayu terbaik

atrapada-en-el-espacio
Love'
mera-kiin
The Singular Braincell Coming Through