#sewing instruction
Photo
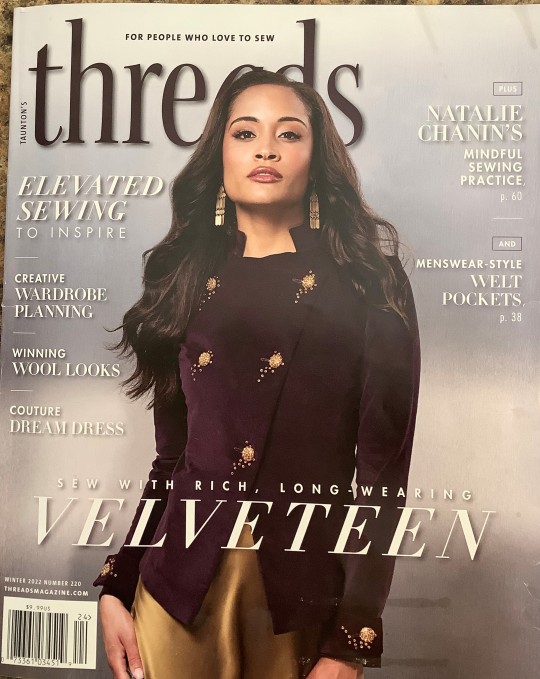


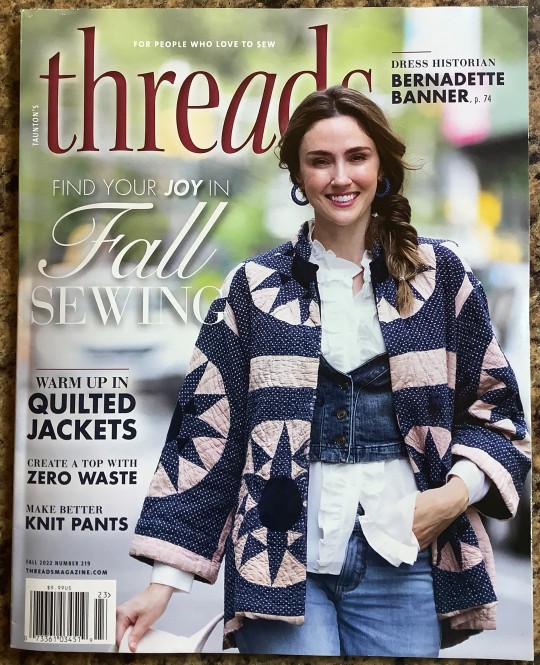
Threads Magazine, Winter 2022
This issue offers a lot of special items for fancy occasions, but it also offers coverage of more common sewing projects.
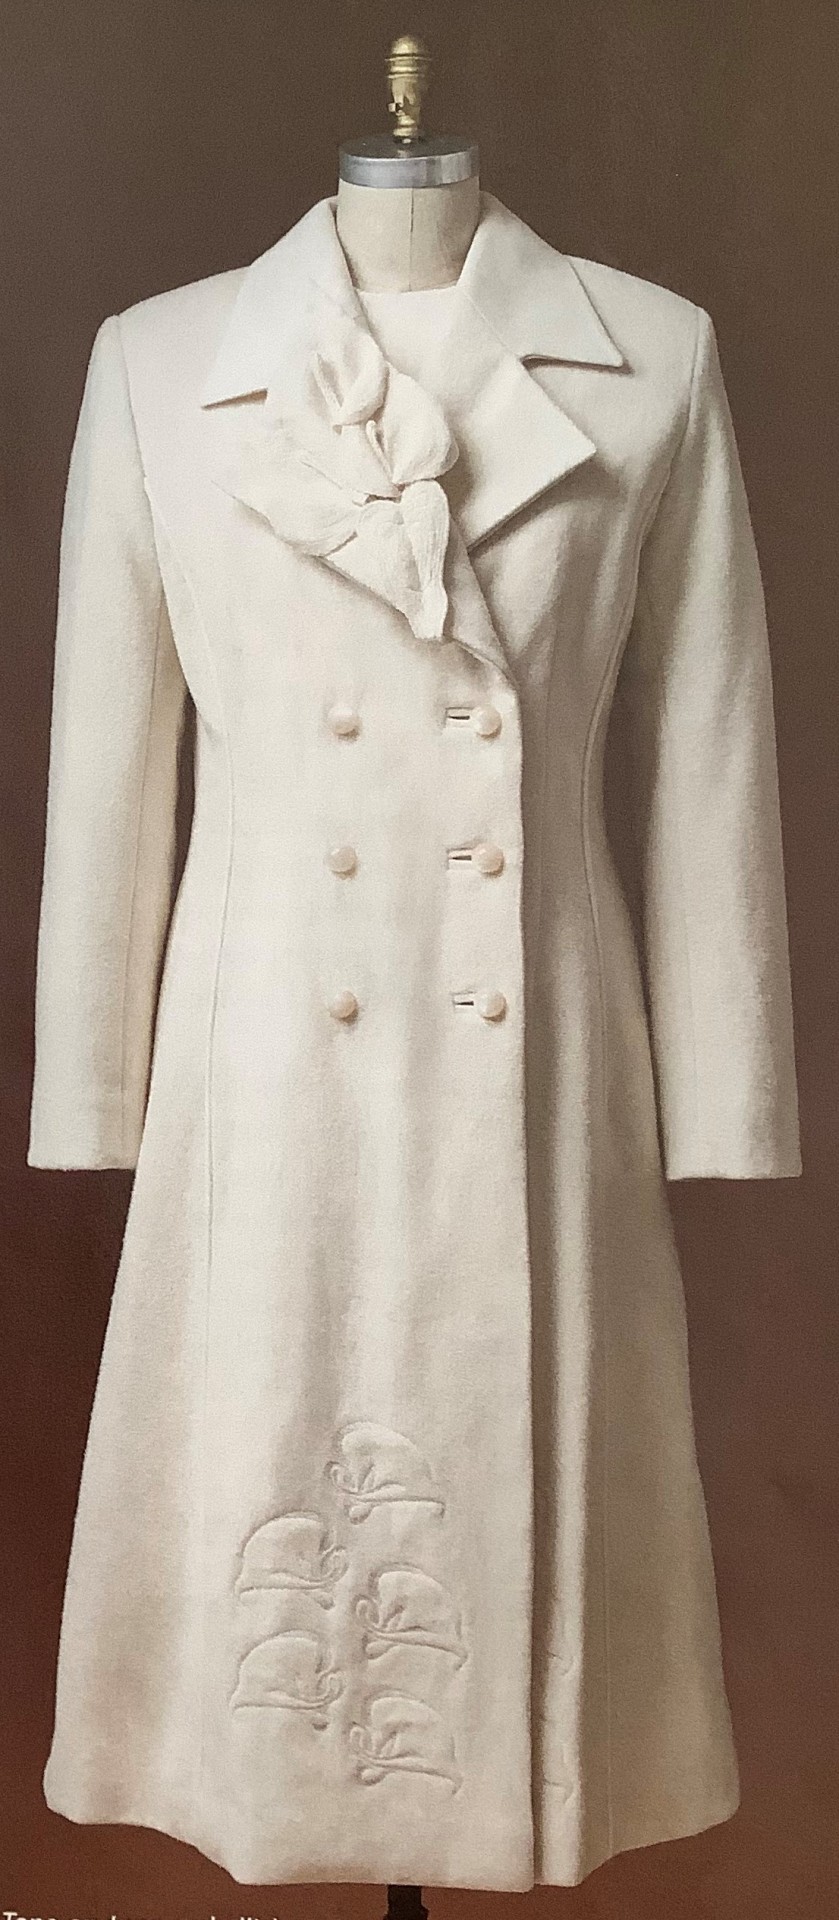
It begins with a seasonal dress-up fabric, velveteen, see the rich purple jacket on the cover. Sandra Betzina offers advice on using this fabric, and that jacket which is BurdaStyle 6661, offers a clever embellishment with golden beads and buttons shooting like comets. The Up Close feature on the back of this issue is a jacket with a doubled peplum which Kenneth D. King explains how to copy. In between we get an an article by Katherine Seeburger on her “opera dress,” which you see in the floral brocade, a special occasion dress which she planned and created with the help of King and Susan Khalje. And we get the winners of the Make It With Wool contest which includes this felted white wool coat, embroidered and embellished, by Kim Vogley which comes with a dress.
Duane MacLeod offers a technical article on sewing welt pockets which I am ready to try, and Linda Lee offers advice on creating a capsule wardrobe, an old idea of coordinating colors and shapes which is always worth reviving to my mind. There is also a gift section suggesting everything from a new machine to a trip to France. All this plus reviews of new patterns, and interviews including one with Natalie Chanin known for the Alabama Chanin company and its striking but simple embellishments.
You can find it at your local fabric store, newsstand or online here: https://www.threadsmagazine.com/
#threads magazine#threads#sewing#sewing instruction#sewing magazine#dressmaking#dressmaking instruction#tailoring#tailoring instruction#fall fashion#fall fabric#sandra betzina#burdastyle patterns#burdastyle 6661#kenneth d king#katherine seeburger#susan khalji#make it with wool#kim vogley#duane macleod#welt pockets#linda lee#capsule wardrobe#gifts for dressmakers#gifts for makers#gifts for sewers#natalie chanin#alabama chanin
10 notes
·
View notes
Text

youtube
#diy#diy bookmark#sewingaustralia#sewing instruction#diy projects#diy project#bookmark#sydney#australia#brisbane#handmade#perth#aussiemums#craft#goldcoast#melbourne#Youtube
1 note
·
View note
Text
Novice sewing pattern: Cut out shapes. Line up the little triangles on the edges. Stitch edges together. We've also included step-by-step assembly instructions with illustrations.
Novice knitting pattern: yOU MUSt uNDerstANd thE SECret cOdE CO67 (73, 87, 93) BO44 (63, 76, 90) 28 (32, 34) slip first pw repeat 7x K to end *kl (pl) 42 * until 13" (13, 13, 15) join new at 30 pl for 17 rows ssk 27 k2tog mattress lengthwise BO and sacrifice a goat to the knitting gods. WHAT DO YOU MEAN YOU WANT "INSTRUCTIONS," I JUST GAVE THEM TO YOU
#knitting#no it's not a real pattern but I can't write one that makes sense because I have no freaking clue what any of that means#How do you make things that aren't basic rectangles#Why has every knitter I've asked for help just said 'patterns are easy; you just have to know how to read them' & then refused to teach me#Where do I even find a goat to sacrifice#How do I join the pattern cult#I am so confused#I've been knitting for almost a decade but I can only make scarves and potholders#I learned one (1) stitch by watching a YouTube video and none of my friends or family knit so I have no IRL resources#And nobody I meet seems to want to take the time to explain the rest to me#I taught myself to sew through trial and error but that doesn't really work with knitting because error is pretty much just... Unraveling?#Anyway sorry for the tag rant I'm just frustrated that I see pretty things I want to make but the instructions are in an alien language#And the gap between 'absolute novice' and 'intermediate' seems to be about 20 years of experience and formal instruction
626 notes
·
View notes
Text
I think everyone needs to have a go at a new hobby every once in a while because:
1. You might find something you enjoy
2. You gain more respect for those who can do said hobby
3. You remind yourself what it actually feels like to not know anything about a subject
#i looked at many instructions for 1h before getting so overwhelmed and having to walk away#knitting#crochet#cross stitching#needlework#sewing#hobbies#crafting#creativity#cute cross stitch#creative writing#this is about crochet#embroidery#crafts#art and crafts#like skills
247 notes
·
View notes
Text
Cloaks for all! A cloak sewalong for beginners
Step 1: Cutting/the pattern


The pattern of this cloak consists of three pieces. A (half) circle for the body and then two pieces for the hood.
We'll start with cutting the cloak itself:
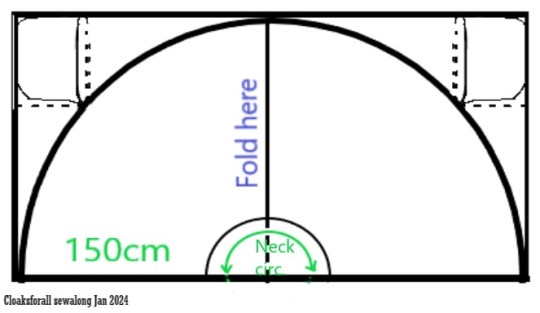
The longest cloak you can make will (with this pattern) be the length of the shortest side of your fabric. If you want it shorter, measure from your neck over your shoulder down over your arm to find the length you want, that will be the radius of your cloak circle. My fabric is 150cm wide, so my circle radius and cloak length are both 150cm.
You're gonna want to clear a large piece of floor for this one.
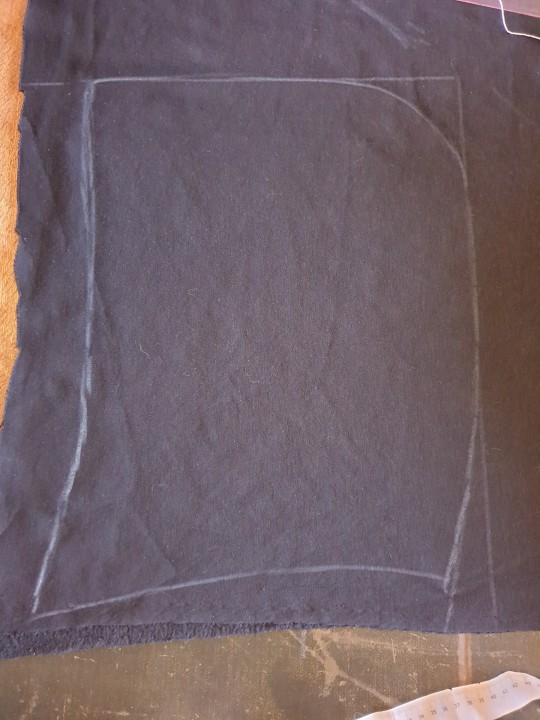
Cut the cloak
Fold your fabric in half (short side to short side). Now you mark a quarter circle. Get a 150cm piece of string, tape the end to your surface at the folded corner. Circling the piece around will give you an easy way to draw a circle with your chalk.
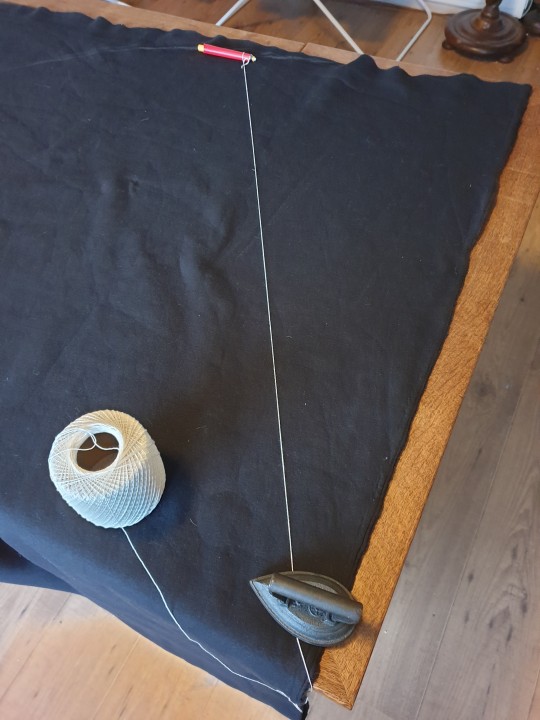
Cut the half circle you just drew while the fabric is still folded.
2. Cut the neckhole
You'll need your neck measurement. (make sure to leave breathing room).
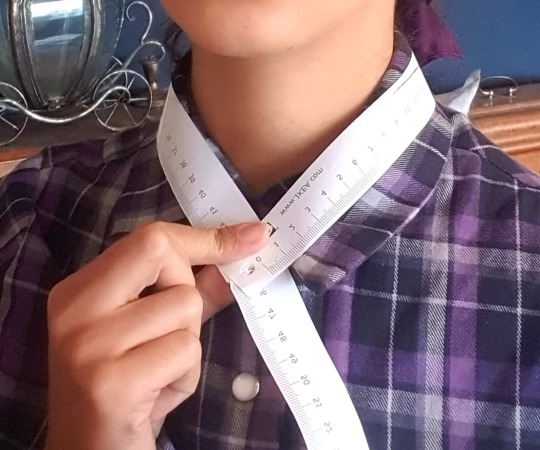
You can either do math about it, or lay your tape measurement on your fabric in a circle and cut slightly smaller than half your neck measurement.
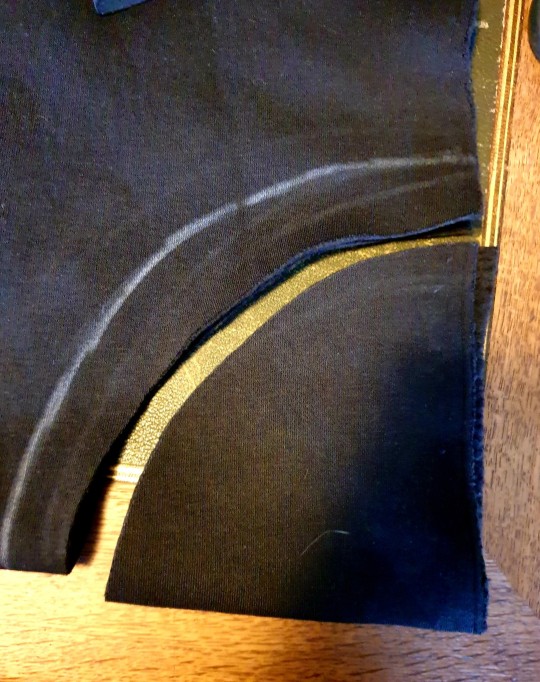
3. Cut the hood
For the hood, you have to make sure it is bigger than your head. Start with the largest rectangle that is left from your fabric. Curve the top right corner with some chalk.

The height of the hood controls how oversized it is. Measure from your collarbone over your head to your other collarbone and you'll have the minimum size. My hood is 45 cm high.
(Optional: hollow out the left line and curve the right bottom corner)
Putting a hoodie on this rectangle to get a nice shape makes it a lot easier.
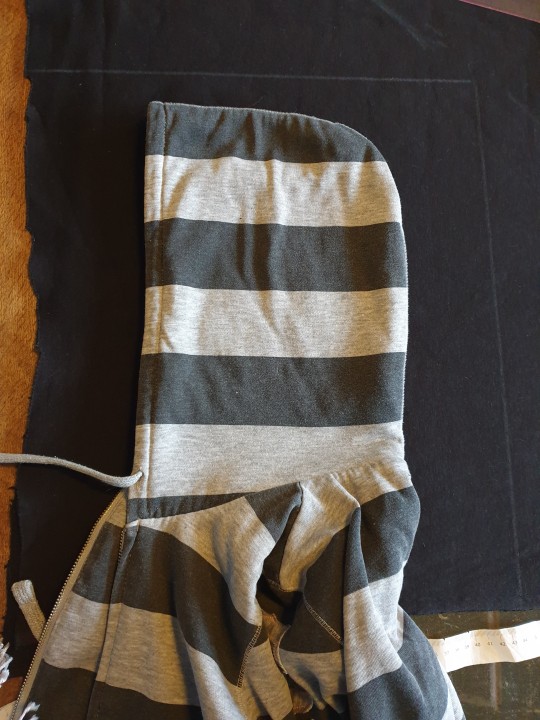
Draw the hood shape and cut two (this can be done while the fabric is folded double).
That's it for step 1. Tomorrow we start sewing!
#cloaksforall sewalong#cloaksforall#cloaksforall step 1#image id in alt#wow i may have underestimated how long is takes to write really thorough instructions...#sewing#this is meant for beginners#so i hope this is clear#feel free to ask questions
172 notes
·
View notes
Text
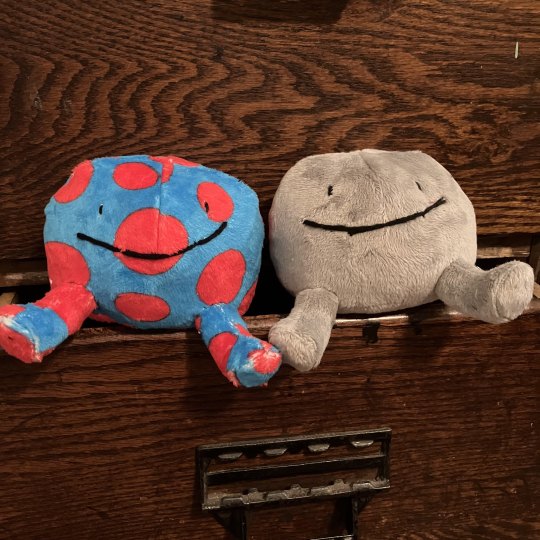
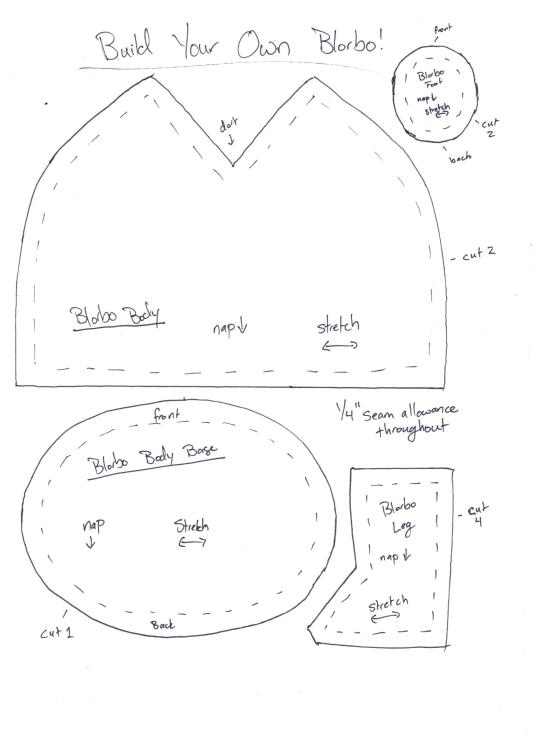
Blorbo pattern is below the read more! Based on this post by @thewiglesswonder
Sew the darts on the two Blorbo body pieces
Sew the two Blorbo body pieces to each other, right sides together (sew the curved edge, and leave the straight line at the bottom unsewn)
Sew the Blorbo body base to the bottom of the Blorbo body pieces (pin it well, with the front roughly in line with the dart on the front half of the body; this does not have to be precise, Blorbo can be a little irregularly shaped, it’s fine). Leave an opening for turning of a few inches left unsewn, turn the body right side out
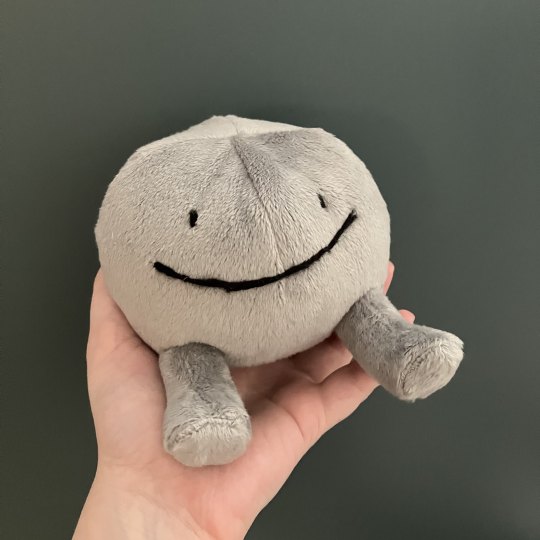
Put two leg pieces right sides together and sew the side seams (leave the top, where it attaches to the body, and the bottom, where it will attach to the foot, unsewn). Repeat with the second leg.
Pin a foot piece to the bottom of a leg, with the front of the foot roughly lined up with the seam at the front of the foot. Sew around (this can be a little tricky, it might be easier to hand sew than to machine sew this part). Repeat with second leg and foot. Turn legs right side out through the opening at the top of the leg
Finishing:
Embroider the face, either before step 2 or after step 3
Stuff the body at any point after step 3, after embroidering the face
Sew the opening for turning in the body closed
Stuff the legs after step 5. Tuck the seam allowance at the top inside the leg; I ended up tucking about ½” of fabric in instead of ¼” to make the leg a bit shorter, but if you are using an extra fluffy fabric you might want it closer to the ¼”
Pin the legs in place on the front of Blorbo and ladder stitch around the base of the leg
You’re done!!! Enjoy your new blorbo, and if you post it on tumblr I’d love to be tagged @tj-crochets (that’s not a requirement for using the pattern, you do not have to do it, I just love seeing things people make from patterns I wrote)
#free sewing pattern#blorbo sewing pattern#build your own blorbo#plushie sewing pattern#this is a pretty simple pattern but I also forget about some plushie instructions sometimes#like that xkcd comic about the chemical composition of feldspar lol#so if you have any questions let me know! I will be happy to clarify#I had to fight my scanner to get this done#because I hadn't set it up since I moved#and after many many tries I ended up pushing a bunch of buttons randomly after I hit scan and it worked!#well. it worked the second time I hit a bunch of random buttons
321 notes
·
View notes
Text
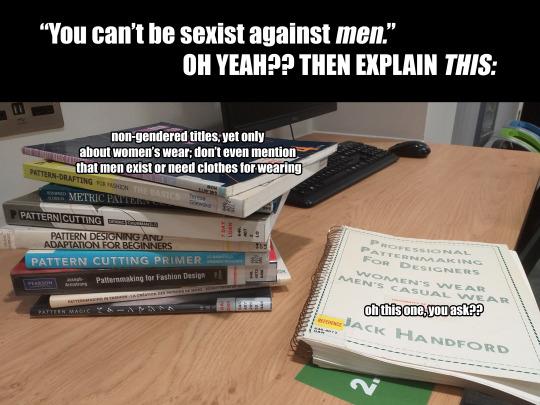

A summary of my excursion to the local (publicly accessible) uni library to look at some books to learn proper pattern drafting for my highly customisable sewing needs/goals
I'd assumed the problem would be a nonbinary one of binary gendering above base theory, but ALAS, THE MATRIARCHY IS STRONG WITH THIS ONE
#sewing#pattern drafting#matriarchy#misandry#men's lib#that single one that had a men's section also ONLY covered 'CASUAL men's wear' WHICH DID NOT INCLUDE THE MF SUIT JACKET INFO I NEED#there were *several* books on suit wear BUT ONLY FOR WOMEN'S I just-#I did take pictures of the entire men's wear chapter tho cause it at least had pants-drafting instructions I'll be able to use#and it WASN'T TOO LONG so easy enough to take pics of real quick
105 notes
·
View notes
Text
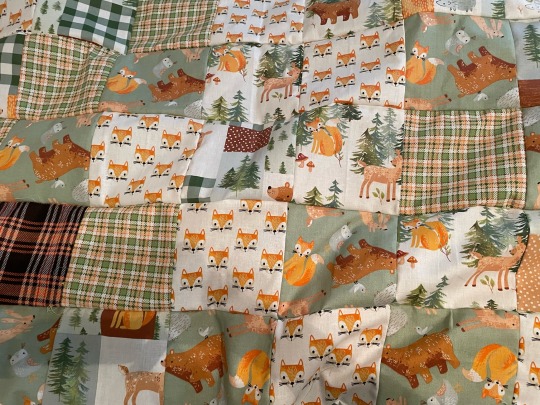
sneak peek at the quilt i’m making my sister
99 notes
·
View notes
Text
The (Fanmade) Virabot Plushie!


HAPPY HOLIDAYS AND HAPPY NEW YEARS EVERYONE!!
THIS IS THE BIG SURPRISE I'VE BEEN WORKING ON FOR THE PAST HALF A YEAR!
A (fanmade) VIRABOT PLUSH INSPIRED BY ALAN BECKER'S ANIMATOR VS ANIMATION SERIES!!
And guess what?
YOU CAN GET THE TEMPLATE AND INSTRUCTION GUIDE
COMPLETELY FREE!
You can download the PDF files for free by following this link!
[Virabot Plush Template + Instructions]
The plush itself comes out to be roughly 8.5 inches tall by 11 inches wide (21.6 x 28 cm).

I had a BLAST creating and designing this! I hope you can enjoy it too if you ever want to take a crack at sewing it for yourself!
Have a Happy New Year everyone!
I'll see you all in 2023!! 8D
#Sammy8D makes#plushies#Virabot plush#Animator vs Animation#Alan Becker#AvA Short#AvA Shorts#AvA Virabot#animation vs animator#sewing#ALSO IF YOU'RE ASKING WHY IT'S WHITE AND NOT RED#I RAN OUT OF RED FABRIC#ALKSLDJGDS#Plus white fabric in general makes it easier to see the stitches#Which is helpful when making an instruction guide#Sammy8D Stick Stuff
304 notes
·
View notes
Note
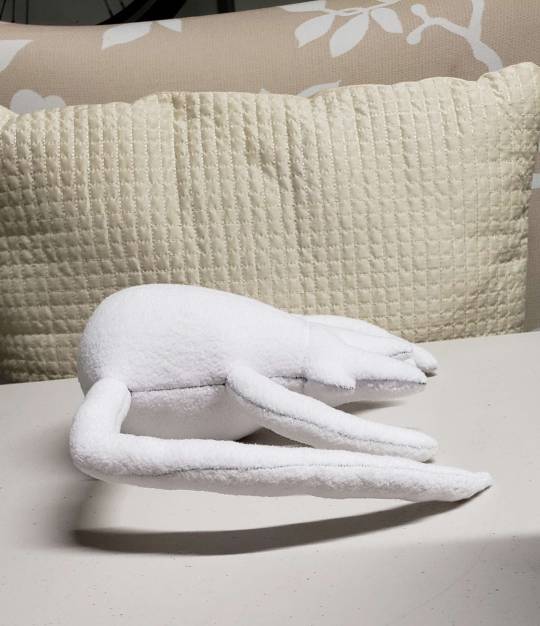
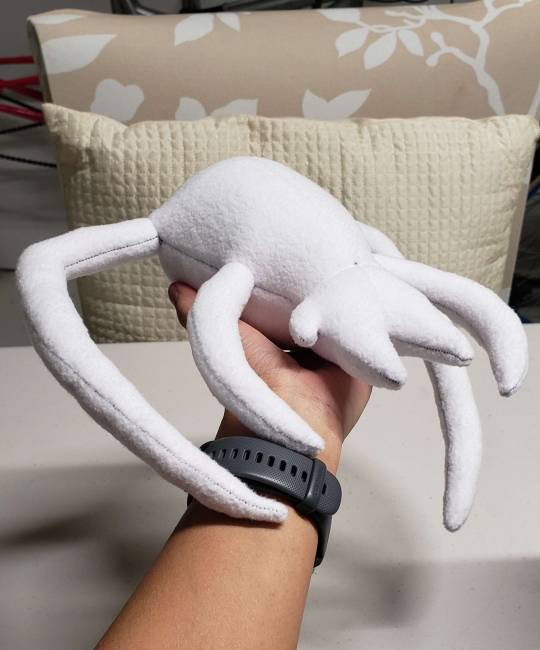
Your plushies look so so amazing! Have you considered selling patterns for them?
Thank you! I have considered it. Short answer, no, sorry. I won't be selling patterns for the foreseeable future.
Ok story time.
Last year I prepped a pattern for someone for use in a PhD research project. I learned very quickly that pattern prepping for someone else is a very different skill than designing that pattern and making the plush.
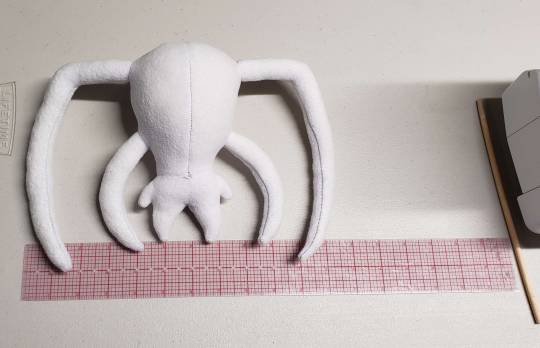
My patterns are loose pieces of tape and paper with scribbled labels. In order to prep them I have to digitize them (difficult for pieces that are larger than printer paper), label them clearly, and then create comprehensive instructions.
The one pattern I prepped, one of my simplest, took me about six months to prep. That was mostly because, well, I hated the entire process. It's slow. It's boring. It's just not my cup of tea. (It probably would have taken me a month if I'd enjoyed it, even so. It's very time-consuming.)
What's more, pattern sellers need to be available for troubleshooting and answering questions, and I don't really have the bandwidth for that. Or time for the array of other issues that pattern sellers have to contend with on a near-constant basis.
Even if I did sell patterns, it wouldn't be for every pattern I design. My plush are more than plush to me--they're my art, my soul, and I'm not really keen on my exact design choices being recreated. So while I am utterly delighted to inspire and share my process, there are some things I'd like to keep within my own artistic voice.
My hat off to all the plush artists who sell patterns. They are true heroes.
~~~
P.S. If you're looking for realistic canine patterns, FreakHound Studios has a couple nice wolves, and is currently releasing a fox pattern with a Q&A session set to go live on Patreon on Nov. 24th. NazFX also has a realistic fox pattern but I don't think she has it up on Gumroad yet.
#plush artist#sewing#answered asks#send me asks#I haven't heard back about the research project#I was probably too late tbh#plus some of my patterns have over 100 pieces which would make the instruction guide a legit novel#purringfayestudio#art plush tips and resources#purringfaye info
183 notes
·
View notes
Photo

Threads, Fall 2022
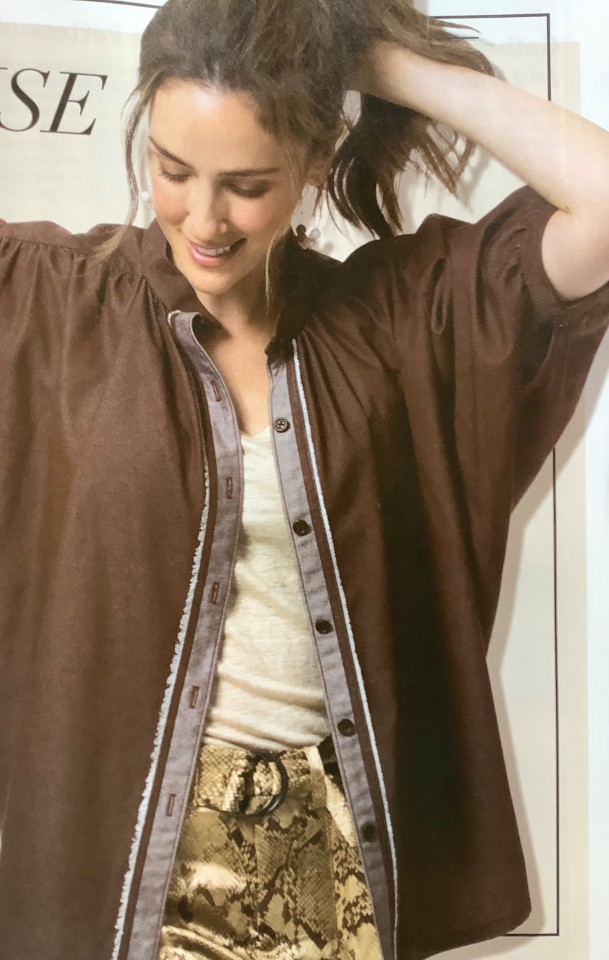
This article has a good range of topics from making use of quilts to replicating a vintage collar to fitting and embellishments. The cover story by Judith Neukam on quilted jackets ponders re-using a vintage quilt as well as collaging with new fabric scraps. Related to this accidentally is the article by Lindsay Ostlie who offers a zero-waste blouse which you see here in brown with cut-on dolman sleeves and the fabric selvedges used as trim along the buttoned opening. Now, if all the dressmakers could get together with the quiltmakers, I think we could put to good use all those fabric scraps from more conventionally cut garments.
Anna Mazur explains how to create a flower motif using self-fabric petals with sealant applied around the edges and paillettes, crystals and beads. You see here the pale green blouse that results. You can well imagine different designs to develop using this technique from the quieter self-trim like this to more dramatic contrasting colors.
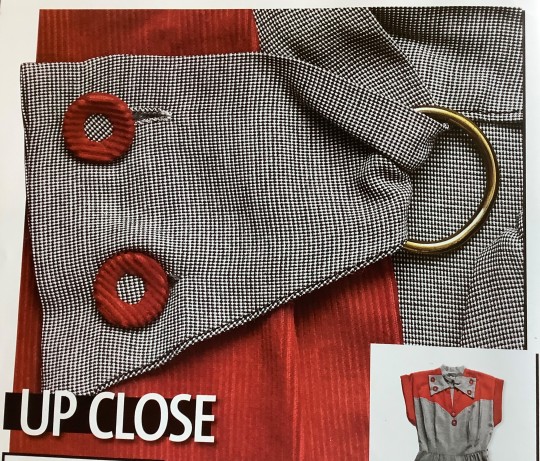
Kenneth King analyzes the circa 1940 dress in black, white and red on the back cover with an unusual collar created with a center ring through which the two scarf collar edges loop to button down high up on the bodice. He explains how it can be done and his version is quieter than the playful version on the back cover with two-tone covered buttons in order to avoid what he calls a “costumey” look. If on the other hand you are interesting in theater costuming, you will enjoy the articles on Bernadette Banner who recreates period clothing from the late 19th and early 20th Century and on Arnold S. Levine, author and millinery, who does Broadway and carnival millinery work of all kinds and who shares some of his favorite supplies.
There are also more technical articles on ways to make knit pants, on fitting garments through the shoulders, bust and torso, plus reviews of new patterns and fashion trends for fall.
Threads is my favorite airplane reading as you can enjoy the pictures when your brain is tired or dig into the details of a new technique and learn how to do it.
You can find it at your favorite bookstore, fabric store, or online here: https://www.threadsmagazine.com/
#threads magazine#threads#sewing#sewing instruction#dressmaking#dressmaking instruction#makers#making#diy#diy projects#judith neukam#kenneth d king#bernadette banner#arnold s levine#millinery#milliner#dressmaker#vintage fashion#19th century fashion#broadway costumes#anna mazur#lindsay ostlie#quilts#quilted garments#quilting#fall fashion#sewing patterns
19 notes
·
View notes
Text
Making our floral fabric neck lanyard 🪡🌸
#sewingaustralia#sewing instruction#sewing#cute lanyard#pink lanyard#cute lanyards#lanyards#lanyard#sydney#australia#brisbane#handmade#perth#aussiemums#craft#goldcoast#diy#melbourne#nurse Lanyard#teacherlanyard
0 notes
Text
I have a Ko-fi!
okay so a little while ago I started building a Ko-fi so that if anyone liked my work and wanted to toss a coin my way, they could!
I also liked the idea of doing little informal thank-you doodles, so if you tip me $6 or more, i will try to do a little doodle of a character that you name (the guidelines for all this are written down on my kofi page)
the thank you doodles aren't commissions, they're just tiny little heartfelt little "hey! thank you for supporting me!" drawings
#blogkeeping#thank you doodles#image desc in alt text#i know i've been pretty quiet here! i'm working on some non-drawn projects at the moment#including maybe. HOPEFULLY. some useful sewing patterns + instructions at an absolute beginner level 👀#i'm talking like “haven't used a sewing machine before” level beginner#naruto related. of course#but making stuff like that requires using a skillset i'm still developing so it's taking a LOT out of me
121 notes
·
View notes
Text
video tutorial this video tutorial that. i am begging you to understand that written instructions are also an accessibility need.
#actual written instructions!!!!!#not like recipe blog style single sentence -it will look like this- instructions#or -you can't find instructions in my maze of photographs-#downloaded a knitting pattern it was like follow my video instructions for this technique#it's fine bc she did do some written instructions and i have my beloved montse stanley#but it bugs me especially in knitting patterns because in my experience#knitting people are more focused on accessibility than sewing peoplr#and i Know that asking individuals to meet ALL of the accessibility options is a) a lot b) often unworkable#but this lady is all. professionally graded! professionally tech edited! size inclusive! cup options! and i do TRY not to complain about it#and like i say she did put written instructions but the like -look how helpful i am! watch this video! obviously this is how you learn!-#just made me GRRRRR
15 notes
·
View notes
Photo
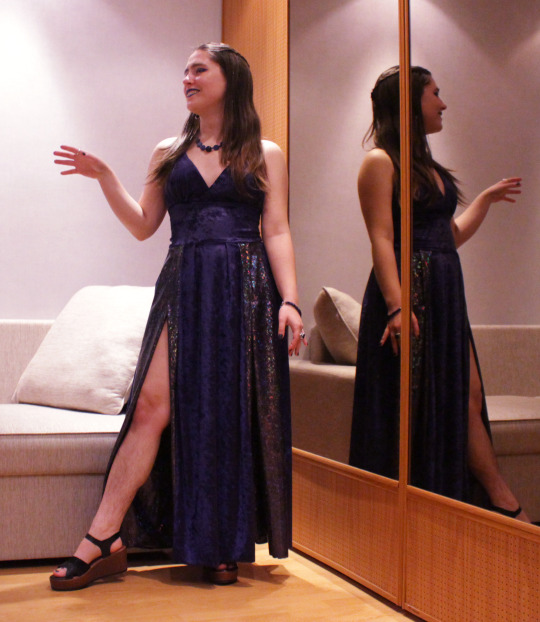

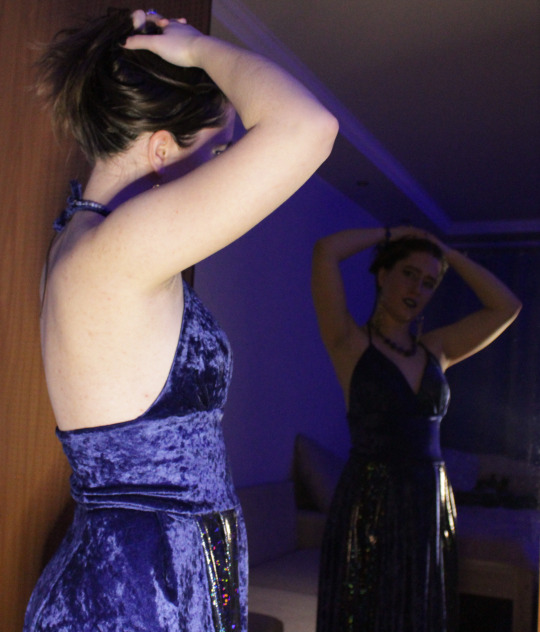

ok so this isnt exactly my usual brand of art but like. SPECIAL CIRCUMSTANCES: I MADE A DRESS
myself. from scratch. behold!!!!!!!!!!!!!!!!!!!!!!!!!!!!!!!
It was wild bcs i got GRIPPED by insanity for like a week n would not stop working on this thing. ive never sewed clothes before. i do believe i may have been possessed,
big huge thanks to my bestiest bestie @blu3mila for being the photographer 🥰🥰🥰🥰🥰
#kunst huli#anywaysssss at first i tried looking for patterns online bcs i was like#ive never done this before i cannot possibly do it by myself ill make so many mistakes ill just look up instructions#found one vid which explained everything very nicely. did the measurements did the fucking#paper template#used a fabric no one would miss to try it out#failed miserably#re-measured everything#re-did the paper pattern#used fabric no one would miss to try it out again#FAILED MISERABLY ALSO#went to sleep sad#but as i was falling asleep of course i cant just like. stop#so i was like OMG I CAN. DO IT MYSELF#this dress is basically.#4 triangles. two rectangles. one trapezoid#it took a lot of Trying On and pinning n saying hmmmmmmmmmmmmmmm#and praying to fuck knows who before using the sewing machine#but i did it!!!!!!!!!!!!!!#n it even looks good!!!!!!!!!!!!!!!!!!#i wanted to do it in red at first bcs um. the initial inspiration came to me because of#noel. also of course rodya dearest#but yeah anyway i wanted to dress in a noel inspired outfit for a thing#but i couldnt. find anything fitting to wear#n u know. clothes can be expensive#and our local fabrics store always has 70% off of fabrics...................#but i COULDNT. FIND THE MATERIAL I NEEDED. IN THE RIGHT COLOR#and at that point it was either i do it with what i have or the fixation runs out#also the lipstick is actually an eyeliner pencil. improvise adapt overcome etc#also if u see that the shoes are a bit too big for me no you didnt. its hard to find stuff in my size ok
88 notes
·
View notes
Text
Sewing machines, man
Normal instructions: Hey be careful not to do X, or the results might not be as neat! Avoid Y, as it could waste materials. Make sure not to Z, or you'll have to start over!
Sewing machine instructions: Don't you DARE so much as TOUCH X. You see X, right there? DON'T TOUCH IT! I'M WARNING YOU! The machine will become possessed by vengeful ghosts and stab you to death while you sleep, we warned you! Make ABSOLUTE SURE you NEVER do Y. The needle will EXPLODE and PEPPER YOU WITH SHRAPNEL. And if you EVER, I mean EVER even THINK about doing Z, your entire living space will be ravaged by the literal hellfire that spews forth from your sewing machine. This also voids the warranty.
#sewing#I understand why but it's still funny#and a little ominous while I read the instructions#Most things we use today are very safe#Any possible thing that could hurt you or your thing is usually removed#or otherwise put behind a ton of obvious safeguards#but when we get to sewing machines...#There's only so much you can do safety wise with a machine designed to stab thick fabric hundreds of times as quickly as possible
16 notes
·
View notes
Last Seen Blogs

helluva-hazbins-most-fuckable
Helluva/Hazbin's Most Fuckable

findmyservicecenter
Findmyservicecenter

energysoda
Happiness Is Worth Fighting For

rookaroos
rooka 🙏
fiksashen
/fikˈsāSH(ə)n/