#shadowous shader
Explore tagged Tumblr posts
Visit Tumblr Blog
Explore Tumblr blogs with no restrictions, modern design and the best experience.
Last Seen Tumblr Blogs


Fun Fact
Tumblr’s website traffic is steadily declining.
Text
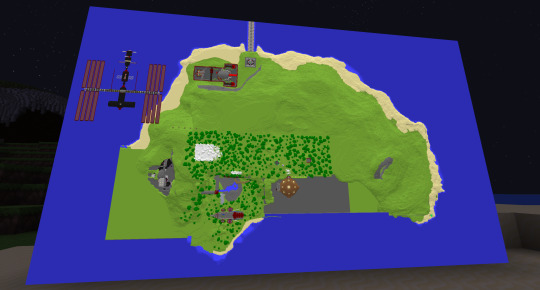
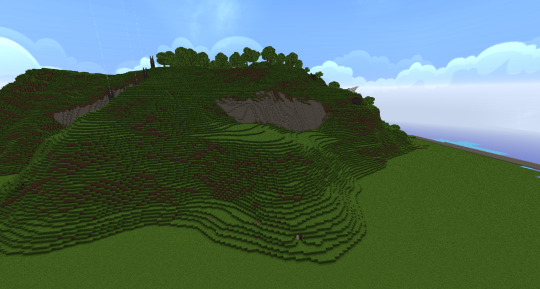
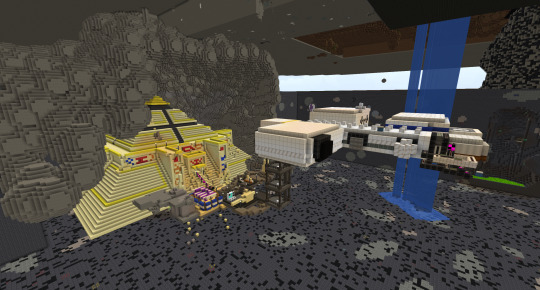
Alright! Let's get into it shall we, beginning right where we left off about a decade ago! But first some backstory. I had left this map on my hard drive after deciding it was too late to even bother working on it. Yoglabs had already died off and so did it's fandom, looking at the Yogscast channel recently and I see they barely even do Minecraft anymore. I realize at most 100 people will see this but that doesn't matter to me. I feel like I owe it to myself, specifically my childhood self to see this map through to the end, it is and will probably always be my largest and most time consuming personal project, so I will make one last push, one last big effort to finish it or atleast make it as good as I can possibly make it. That being said one of the last things I shared about the map was the sheer scale of the island I had made, it was very world-edit-y looking and I had to smooth it out largely by hand and with the smooth tool. As you can see above I have made some insane progress over the last couple of weeks and the island is starting to look nearly finished. Currently what I still have to do is the following: -Smooth out the terrain even further -Finish any exits that are shown in the series and then extend the terrain from there to connect to the rest of the mountain (largely the front of the mountain) -Finish the resourcepack (4-5 textures left) -Finish all the areas from episodes (several left) -re-do the entrance
REDO THE ENTRANCE? WHY? It looks done Well you see when I started this project I had built off of a map someone else had already made. It's probably lost to time right now but this person had the hill pretty well to scale, only the door was way too small so I enlarged it but didn't touch most of the cliffside. While you wouldn't say it at first it is in fact way too small. The pipe extends way further left before hitting the cliff and the hill on the right extends further too, I already started correcting it a bit with worldedit as you can see but continuing that is for later though.


What's with that massive hole in the side of the mountain? Well I'm glad you asked, this was at first a finished hill but I had severely miscalculated where the Batcave™ would be. Having largely built it now I had to know the side of the cliff down. What you see now is one of those exits like in the show where I now have to carefully build it and then connect it to the rest of the terrain so it looks natural. Now here's an import part of info. I had previously held myself to making this map 100% accurate which includes any and all blocks seen on-screen, I regret to say now however that I will need to walk back on this rule as there is simply not enough footage to get the terrain correct, so the walls you can see here are all placed from the episode block per block but I will build the rest without referencing the episode since stuff is either out of view or way too dark, it's simply not possible. This will be applied to other areas as well where I have struggled in the past to make it 100% accurate.
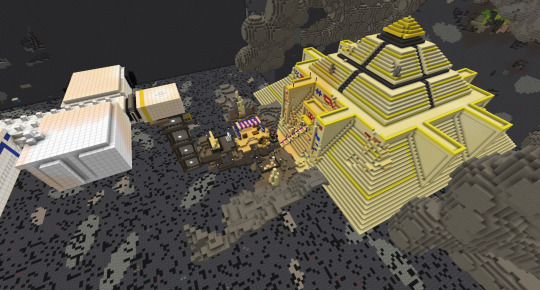

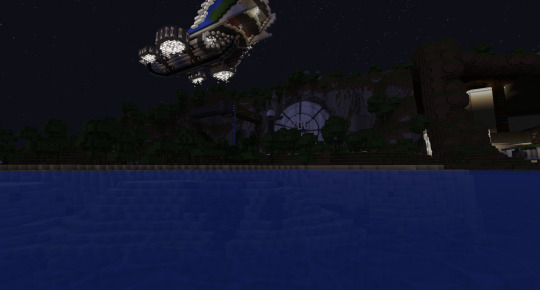
Next up is this little build Haha little who am I kidding. This took a week to build! But yes I had no place to put this thing before but seeing as I'm now on a more recent version of Minecraft the build limit got magically increased which allowed me to now plonk this pyramid down. Just like before the cave this pyramid resides in is way too dark on their videos to build block per block so I will make a rough interpretation and it won't be 100% accurate.

Next up some textures!
I have been spending some time learning how on earth minecraft works right now, the last time I touched textures was in 1.12.2 and A LOT has changed since then including what blocks and items Sphax uses custom models for as well as what names are used for textures. I'm happy to report the whole pack has been updated to work with Sphax on 1.20 with the exception of redstone not behaving as intended with the custom textures. As some of you may have known as well, the official pack has been leaked a few years ago and is available on the yogscast wiki. So naturally you probably wonder why I don't just use that one since it's the real textures right? Well I had already largely made the pack years before it got leaked so I'm sadly not going to let all that hard work go to waste. It was actually really cool to see how accurate I got some textures just from looking at the videos back in the day. In any case I have the pack saved on my pc and can pull references from it to make mine more accurate. As you can see I have updated the above textures and they look more accurate now than before. I will do this for a lot of the textures down the road but right now the following are updated: Blocks:
-smooth stone (added subtle circles and fixed the color) -tiles (they were slightly off-colour) -Melon (added a subtle gradient to the blue) -oak trapdoor (grate in the middle was incorrect as were the borders) -furnace (added a furnace_on version) -Piston (completely re-drew piston_inner and piston_bottom) -Netherrack (added subtle cracks to the texture)
Paintings:
-added sharper version of the periodic table texture (I found the source image) -added unused texture that was in the official yoglabs textures. Kinda cool and sad it's never seen in their series...

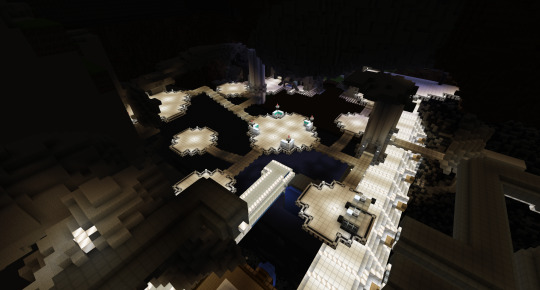
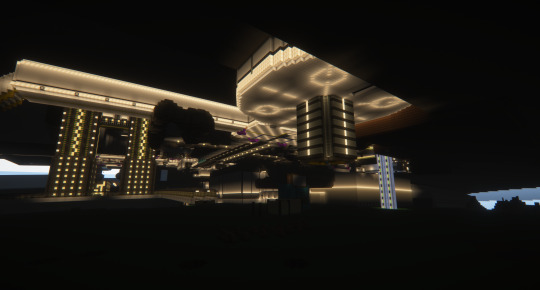
Wow that was surely an update! The scale is unlike anything I could have ever imagined myself building, I'm so incredibly blow away anytime I travel underneath the mountain seeing the insane scale of it all. I wanna leave this new update off on a small compilation of screenshots showing off the insane scale of the project and some areas that back then never saw the public eye. It gives you some idea of where I was going and still am going with this map. I hope to get some people maybe back into this blog and we can make this map finally done for all to see. Thank you for taking your time to read this. If you have any questions or comments feel free to leave them. My DM's are open as well if you have some cool ideas! In any case here are the patch notes and enjoy the images!
-Updated the map and resource pack to 1.20.1 (will try to make it available when done for both 1.20 up until 1.21 or whatever the latest version is by then) -Updated textures by referencing the leaked resource pack and added 1 new painting -Fixed and finished various areas around Yoglabs that were still left unfinished -Added Pyramid section (WIP) -Added Batcave™ (WIP) -Added new area to one of the Holohall rooms (WIP) -Added library at the end of the main hall -continued working on deep search III area (cave and storage room WIP) -started building exit from the Bigger Boat episode (WIP) -Continued working on expansion areas to Yoglabs that aim to connect it to Shadow of Israphel (WIP headcanon) -expanded the ocean area with A LOT, it should now make sure far off chunks are not visible up to 16 render distance! -added beach all around the island (WIP) -brainstormed about how to fill the rest of the mountain -moved stuff around so I can build a better connected network between places through the pipes that you see all around yoglabs


#minecraft#yogscast#yogs#shadow of israphel#yoglabs#honeydew#xephos#lalna#yogscastlewis#yogscastsimon#minecraft buildings#inspiration#laboratory#minecraft shaders#minecraft pics#yogs yogscast yoglabs
32 notes
·
View notes
Text


#alan wake 2#alan wake#*#**#***#mk.op#mk.edit#mk.photo#otis_inf cam shots#ReShade tools used#i wish i turned on ReShade from the start#at one point when playing as saga i had installed it and tried it but i had no idea what i was doing lmao#i'm about to reload for a 3rd time after turning installing ALL the shaders to see what i can play wish#i did get that one that takes away the shadows#but even if i get to the subway i'm gonna have to do night springs and god knows how long i'll be in that
50 notes
·
View notes
Text
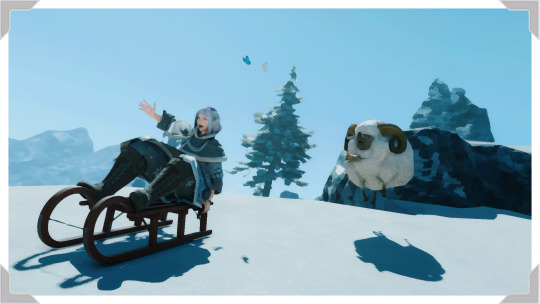
Day 27: Snow
A small painting tucked into a worn album of similar paintings. The cover of the album is worn leather made shiny by many hands over the years.
All of the paintings are of the convent's errant daughter through the years. The most recent a sledding scene with her karakul companion and those moths.
Tucked at the back of the book is a bundle of letters. Each from Odette, each detailing one of the painted adventures.
#decembhyur2023#Pigeon Screens#Odette Hollows#the mother superior was apprenticed to a great artist before she felt the call of Menphina#sometimes she still paints#most often when she misses the little thief she help to raise#(I just wrapped up most of Matoya's quests in the highlands and I have FEELINGS about stubborn old women and the girlchild they raised)#but also sometimes you struggle so fucking much with shadows and lighting that you just#find a way for it to look not so crisp#this shader is one of Elva's !!!#I believe her still life one !!!#all the painting ones are beautiful tho
66 notes
·
View notes
Text

everybody shut up. pearl in minecraft
#she’s a functional figura model rn but she needs some idle animations and poses and such#her legs and head move rn but that’s it#so far she took me like bit over 6 hours to make? i think. and it’s so fucking funny to me.#the first person perspective IS short as hell to match how tiny the model is and i cannot stop laughing abt it#the shadows from my shaders made the whiskers look dark as hell. they are not.
3 notes
·
View notes
Text
finally got my new pc, got all my mods plus some more, and got photo mode
expect SO MANY skyrim digital photography moments
#bishop.txt#also if anyone knows any warm-ish enb shaders without suuuuuper dark shadows that would be lovely mwah mwah
5 notes
·
View notes
Text
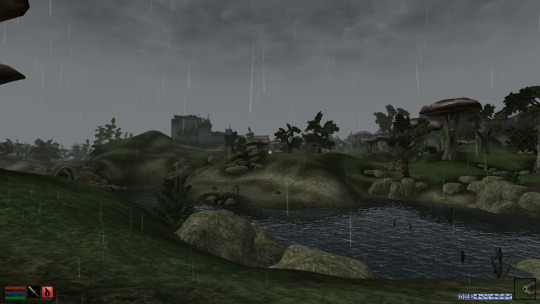
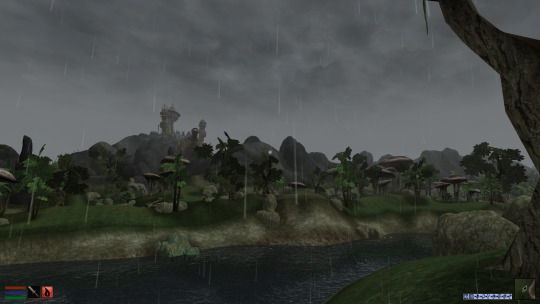

you need to play morrowind on openmw for distant land, shaders, bugfixes, stability, etc
#MORROWIND WITH DISTANT LAND IS SO COOL#IT'S SO WEIRD BEING ABLE TO ACTUALLY SEE MY DESTINATION IN THE DISTANCE...#current release build also has a framework for rendering shadows but it's not super well optimized rn#i had to turn it off bc it was eating my frames lol#my distant land settings are also not cranked up too crazy high but are still really cool to play with#the shader im using is corona the cold shade bc it's a solid shader without impacting my frame rates#just look how vibrant everything is#tes#tes morrowind#screenshots
22 notes
·
View notes
Text
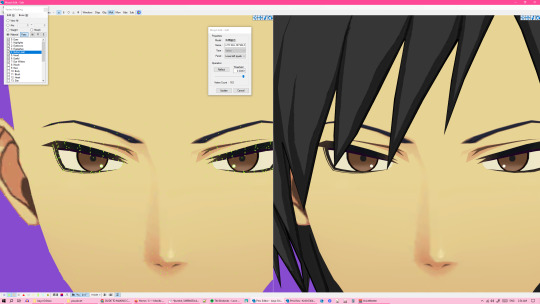
got motivated to work on my izaya model and update his face after 4 years of it being embarrassingly lackluster we are so fucking back
#im gonna try and make some lightmaps so i can get it to work w the genshin shader#bc it's kinda meant for toon shading and i rly like genshin's shaders#i need to update the textures too...#they're from a mobile game so theyre very low quality and i tried upscaling them and redrawing them a little back in 2020#but it's not rly enough...#ideally i'd love to redraw them at least a little on the shadows#but i cant draw... </3
9 notes
·
View notes
Text
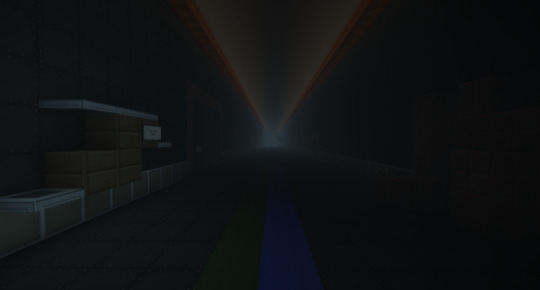
A distant memory washes over you as the seemingly endless corridor looms before you, the void it emanates could swallow you whole. You take a deep breath and ask yourself:
"Have I been here before?"
#minecraft#yogscast#yogs#minecraft pics#shadow of israphel#yoglabs#honeydew#xephos#lalna#minecraft shaders
8 notes
·
View notes
Text
Just tried this experimental feature out in Bedrock Edition, it was very pretty but also made my laptop fan pretty loud. Looking forward to the full release*, as I wasn't able to run the RTX graphics when those came out and am excited at the idea of fancy shaders in vanilla Minecraft!
*which will hopefully be more well optomised and not super-heat peoples computer\consoles.
#minecraft#minecraft bedrock edition#experimental features#bloom#shaders#shadows#lighting#graphics#RTX#optomization
0 notes
Text
gonna be spending so much time readjusting my shaders so i get realistic values and saturation again x.x
#i originally got shaders because the green haze over everything made the game too bright for me#but then i found a preset that was very realistic and deepened the shadows in such a good way#but they're hazing over the haze they're making it WORSE WHY#sorry im gonna be complaining about this for a While lmfao
1 note
·
View note
Text
I never really worried about my parents finding out I was queer as a kid, because as savvy as they thought they were, they really were completely oblivious to most things. The amount of things we got away with right under their noses was astonishing, I remember being 16 and standing in front of my dad stone-faced for 2 hours as he talked about some political events that were happening at the time, completely oblivious to the fact that I was on seven tabs of acid and my pupils were the size of dinner plates
#its weird how Minecraft causes intense motion sickness unless you use shaders#my theory is that the shadows help yoir brain orient itself#so turning your head in game isnt as confusing on your sense of direction
1 note
·
View note
Text
The Sims 2 Legacy Collection: shadow fix
The rerelease of The Sims 2 introduced a fix for the black rectangles under Sims. You may have experienced this bug in the Ultimate Collection version.
As the creator of the Sims Shadow Fix, I was curious to know how it was done. But first, I'd like to explain what the problem with Sim shadows is.
What's the cause of the shadow bug?
When the game works as intended, a Sim shadow texture is a light bluish blob on a white background. It also has transparency, but it's unused. It looks like this:

However, many modern graphics cards render the texture as plain black with transparency:

That's why black rectangles appear under the Sims.
What does my mod do?
My mod is only a workaround for the bug. It uses the transparency to recreate the shadows.
The first versions released in 2015 and 2016 were achromatic, while the original shadows were bluish. Back then I didn't even know why and how my mod worked.
On 2 January 2025 I released new versions based on my research into shaders. I also recreated the original bluish shadows.
How does the Legacy Collection fix the shadow bug?
Thanks to @ivycopur I was able to examine the code. It uses a workaround, just like my mod.
In fact, it looks almost exactly like the really not misty 0.4 version of my mod, which, ironically, is now legacy. The shader code in the Legacy Collection contains the same nonsense. And a bit more.
Code comparison
The left side is the original code extracted from the Materials.package file in The Sims 2 Ultimate Collection. The right side is my code or the Legacy Collection code:


The differences between my code and the LC code:
the debug part: I removed it from my code as players will never see it. The LC has this feature untouched.
alphaBlend srcFactor: despite the difference, it actually changes nothing. Explained later.
The identical changes:
alphaBlend dstFactor,
the same colorScalar has been added,
textureBlend.
Nonsense #1: textureBlend
The textureBlend defines how the colors of the incoming texture are transformed. The first argument is responsible for the color channels, the second – for the transparency.
Originally it's just:
textureBlend select(texture) select(texture)
And it means that the texture is taken as it is.
My and LC code transforms it though. The colorScalar is defined as a partially opaque (40%) black color. The transparency argument takes the transparency of the original texture and darkens it with the 40% factor:
multiply(colorScalar texture)
And this makes sense. The color channels argument takes the transparency part of the texture and makes it pure black, because the color scalar is black:
multiply(colorScalar texture:alphaReplicate)
It's pointless. I could go:
select(colorScalar)
instead. It would be effectively the same.
The texture after the transformations looks like this:

Nonsense #2: alphaBlend
The alphaBlend defines how to mix the source colors (in this case the transformed texture from the textureBlend step) with the destination colors (in this case, the ground under Sim's feet).
The srcFactor argument defines the source color transformations, the dstFaction – defines the destination color transformations. And then they're put together.
Originally it's:
alphaBlend srcFactor(destColor) add dstFactor(zero)
The srcFactor says that the shadow colors are darkened with the ground colors. The dstFactor doesn't really matter because it's multiplied by zero (black). Also, transparency isn't used.
If I understand correctly, you could achieve the same effect with:
alphaBlend srcFactor(zero) add dstFactor(srcColor)
And the final effect is:

My and LC code had to do it differently. The dstFactor says to darken the floor color with inverted transparency:
dstFactor(invSrcAlpha)
It sounds complicated, but the inversion actually means that black becomes white and vice versa. So the transparency texture, which is a dark gray blob on a black background, becomes a light gray blob on a white background.
The srcFactor is actually useless because the shadow texture (from the textureBlend step) is black. So it doesn't matter if you use:
srcFactor(one)
like I did, or:
srcFactor(destColor)
as in the LC code, it will always be black because you can't make black any darker. To make the intention clear, I'd personally go with:
srcFactor(zero)
instead. The final effect would always be:

It's different from the original intended effect. You can even see the difference in the official screenshots:

Source 1 | Source 2
Conclusion
It doesn't look like a coincidence. The cause of the shadow bug hasn't been fixed, and I doubt that an experienced shader creator would come up with such a workaround. There are better ways.
Before you point out that it's against my terms of use to take my code and sell it, especially without credit, hear out. It doesn't matter – EA's policy allows it. And I'm not even angry. It's just funny that they trusted such a messy code. I wouldn't be surprised to see other creators' fixes in the Legacy Collection.
The good thing is that EA has addressed the shadow issue at all. ���
979 notes
·
View notes
Text

I've shared a few pretty straightforward images using my CRT effect, but not much yet that really shows off what an over-engineered monstrosity I've created.
For a start, it's actually 3D. I built most of this in Blender.

Except for the optional bit that simulates composite video artifacts. I wrote that part in shader code and apply it to the base image as a separate step.

I made a high-res shadow mask texture, so it looks pretty good even from absurdly close up.

I can also adjust the scanline hardness and swap the slot mask for a dot mask or aperture grille to simulate different types of display.


Raytracing the whole thing ensures that all of these little details look nice and get sampled correctly, and if I want to change the glare reflecting off of the screen...
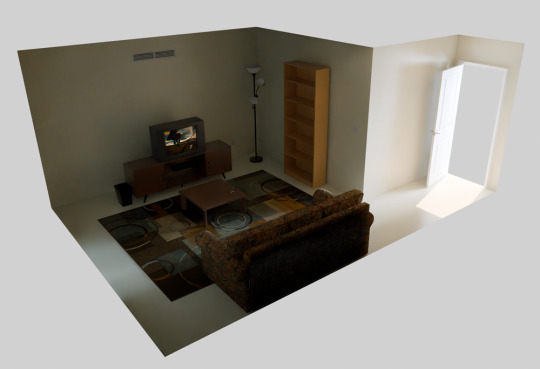
...I can adjust it by rearranging the furniture in the room.
So... yeah. That's what is current going on whenever I post pixel art with my CRT effect. It's not quite perfect yet, but I think it's getting pretty good.

#This would probably be way easier if I actually had a real CRT for reference#Instead I'm relying mostly on photos and technical documents from the internet#And memories of course#I really like working on technical art projects like this. I have several that I just haven't found a good way to share yet.#crt#simulation#pixel art#digital art#artists on tumblr#art process
2K notes
·
View notes
Text


Live Nero reactions
#gpose#arr#hmm the night ones prob need more strong layering really... but ingame shader treats ehr the same and im tired right now so#kinda late to go back#wait no tis rather the fuckign shadows being a light gray green so its gonna look light anyways even if i u se multiply#ah well#its hard to fight some screenshots sometimes
0 notes
Text

that me
#i love the pixelated shadows in shaders. great look#trying to get some good shots of my test build one sec#minec
0 notes
Text
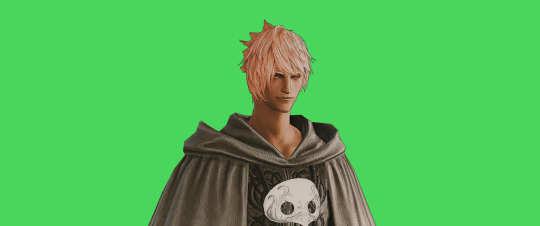
FF14 Battle Portrait Tutorial
For the past few weeks I was trying to find a way to recreate the battle portrait from FF14 as there was a few characters that I want to see in that style but don't officially have one yet. I think I got it down more or less (see image below) so I thought it's a good time to share what I did.

First of all, I made a few files that would help make life a little easier. They can be grabbed here .
Note: I did use Reshade to do a bit of work at the screenshot stage to help speed up the process but the same effect can be recreated in Photoshop with a vanilla screenshot. There are a lot of tutorials on how to do comic/cartoon effect in photoshop and those would make good bases to work off of.
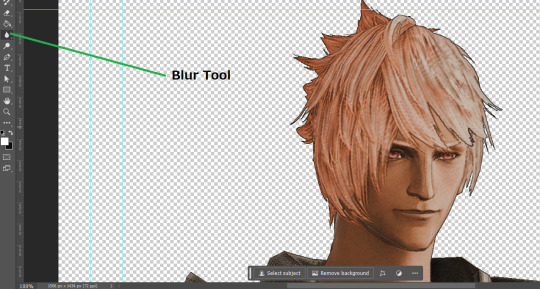
Step 1: Take the screenshot with the PortraitBase Shader on. I usually take two screenshots. One with "Comic" on and one with it turned off. This is so that I have more to work with if needed.

Step 2: Drag all the screenshots into photoshop and remove the background. In photoshop, arrange the layer so that the screenshot with the Comic lines visible is on top of the one with the effect off.
Step 3: Duplicate the the layer with the "comic" effect and apply Blur->Gaussian blur (radius 0.5)
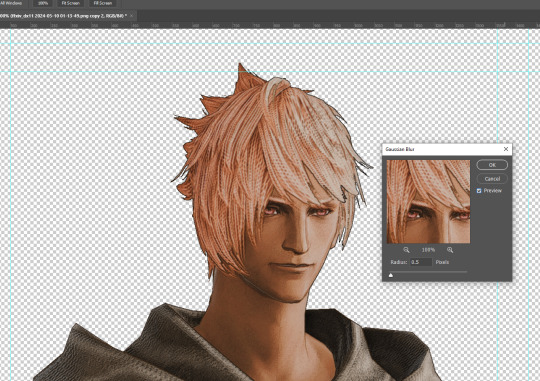
Step 4: Take a look at the hair. In Eric's case, It still doesn't look blur enough to me so I used the blur tool and blurred it a bit more
Step 5: Create a new layer above the layer in the previous step and use the brush tool to start outlining the edges. Where to outline is up to you but the idea is to make edges defined so that it looks more like a drawing.

Step 6: Duplicate the outline layer and then hide that layer. Step 7: Merge everything under the outline layer. Step 8: Drag and drop the "Texture.png" into the project and Clip it to your character layer. Set the blending of the texture to "soft light". Step 9: Drag and drop the "stroke Texture.png" into the project and Clip it to your character layer. Adjust the size till you are happy then set the blending to "overlay". Step 10: Adjust the opacity settings of both texture layers until it looks good to you.
Step 11: Click on your character layer and go to image->Adjustments->Hue/Saturation (note: you will see I dragged in the official Hades portrait as a point of reference to work off of). Adjust the saturation till you are happy.
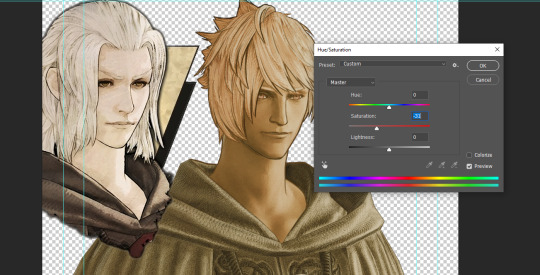
Step 12: Go to image->Adjustments->Color Balance and adjust the color till you are happy. In this example, since Eric is also wearing the Sophist robe, I tried to match that color to Hades' Sophist robe color.
Step 13: Once you are happy, drag the "Template.png" into the project and scale that to the size you want. Make sure it is completely covering the character. If it's not, you can just use paint more of it with the brush tool to extend it till it covers everything.

Step 14: Hide the "template.png" layer and select your character layer. Use the magic wand tool to select the outside of the character.
Step 15: With the selection still selected, click on the "Template.png" layer and press delete on your keyboard. You should now be left with a blank in the shape of your character.

Step 16: Drag the"Template.png" layer to be below your character layer. Then click on your character layer and clip it.
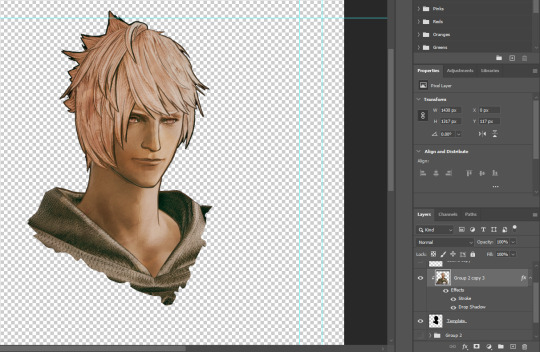
Step 17: Click on the "Template.png" layer and add a 2px stroke and shadow to it.
Step 18: Drag "Back_Deco.png" into the project and place it behind your character. Scale it till you are happy with it.
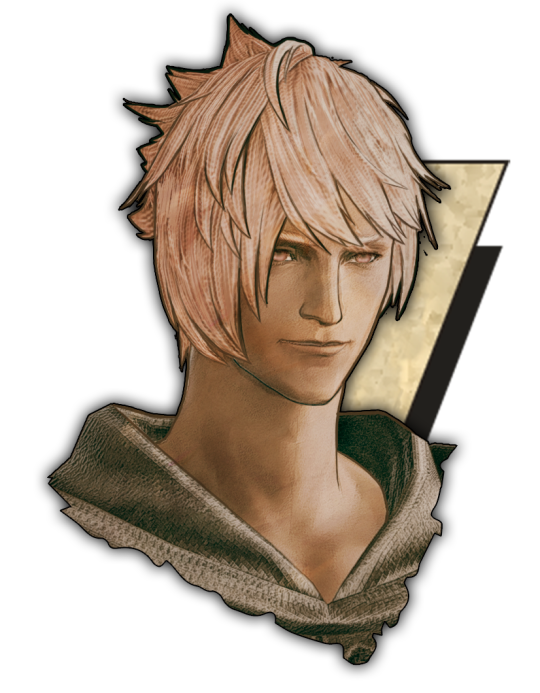
And that's it! Now you can recreate portraits for any NPCs that you want (in theory). A lot of it is also fine tuning to what you want but this should at least give you a decent base to work off of :)
2K notes
·
View notes