#slicer for fusion 360
Explore tagged Tumblr posts
Visit Tumblr Blog
Explore Tumblr blogs with no restrictions, modern design and the best experience.
Last Seen Tumblr Blogs


Fun Fact
130K people were victims of a chain letter scam that affected Tumblr in May 2011.
Text
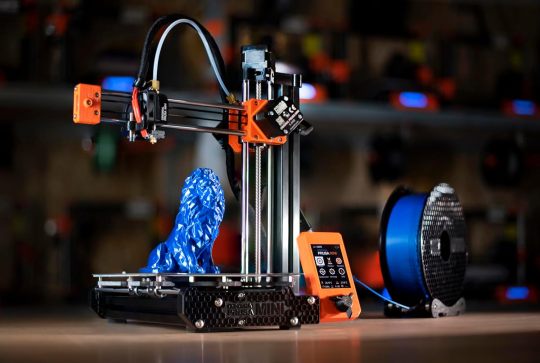
Melon Baller HPG
Scoop broke off after years of use, took some measurements, modeled some things in Fusion 360 and pow, satellite dish.
Fusion: I ended up making 23 versions of this damn model before it got where I wanted. Coming from VFX used to explicit modeling for animation, the implicit modeling software for manufacturing was breaking my brain a bit.


Bambu slicer: This also had its own iterations and failed prints while I dialed it in, I modeled it too tight and had to go back to widen the tolerances to get the dish to fit in. And had to reinforce the holding arms so they wouldn't snap off when I pushed the dish in. 0.2mm nozzle, PETG HF.


Then some supergluing of pieces together, some lighter to burn off wispy strands, and some scraping with a knife to clean up the rougher edges later, here we are:


Might model a building to go next to it sometime. Can't imagine this dish just sitting by its lonesome out in the middle of nowhere.
#battletech#mechwarrior#art#scifi#gaming#military#tabletop#mecha#3d modeling#3d printing#upcycling#reduce reuse recycle#creative reuse
6 notes
·
View notes
Text
Coaster making process
This post is dedicated to my future self who always forgets how to do this, then resolves to write down the steps for next time.
Make the .svg in Illustrator (You don't usually forget how to do this)
Open Fusion 360
Insert>>Insert SVG
Scale Plane XY = 4/3
E (for Extrude)
Extrude low points to 4 mm
Ok
Turn sketch back on
Extrude high points to 6mm (Operation = Join)
Right click on the body>>Save as mesh
Binary STL High Refinement (should be defaults)
Go to Lychee Slicer and set up for printing (you don't forget this either)
Video tutorial: https://www.youtube.com/watch?v=DETMYzpWTEw
5 notes
·
View notes
Text
3D Printing for Prototyping and Art: Unlock Your Creative Potential
Introduction: 3D printing has revolutionized the way we design and create. Whether you’re a designer refining your product prototype or an artist exploring new forms of expression, 3D printing lets you bring your ideas to life faster and more freely than ever before. It’s a game-changer that opens up endless possibilities—whether you’re pushing the limits of innovation or diving into intricate, one-of-a-kind art.
What is 3D Printing?
At its core, 3D printing (or additive manufacturing) builds objects layer by layer from a digital file. Unlike traditional methods that cut away material, 3D printing adds material, creating shapes and structures that were once impossible to achieve. Here are some of the key technologies you’ll encounter:
FDM (Fused Deposition Modeling): Great for budget-friendly prototypes. It extrudes plastic filament layer by layer.
SLA (Stereolithography): Offers stunning detail with a smooth finish, ideal for high-quality prototypes and art pieces.
SLS (Selective Laser Sintering): Perfect for creating strong, functional parts by using a laser to fuse powdered material.
Applications:
Prototyping: 3D printing speeds up product development by allowing you to quickly prototype, test, and refine your designs—helping you move from concept to production in record time.
Art: Artists are embracing 3D printing to craft complex, interactive sculptures that push the boundaries of traditional art. The freedom to create without limits is transforming the artistic landscape.
Challenges to Consider:
While the technology is incredibly powerful, there are a few things to keep in mind:
Print Quality: Factors like material type, printer calibration, and even room temperature can affect the final print quality.
Material Options: Though there are more options than ever, 3D printing materials are still somewhat limited compared to traditional manufacturing. But with ongoing research, the possibilities are constantly expanding.
Getting Started with 3D Printing:
Choose the Right Printer:
FDM: Affordable and versatile, great for basic prototypes.
SLA: Offers exceptional detail and a smooth finish, perfect for high-quality models.
SLS: Ideal for creating durable, functional parts.
Master 3D Modeling: Learn how to use design software to bring your ideas to life. Whether it’s Fusion 360 for engineering, Blender for artistic work, or ZBrush for sculpting, mastering the right tools will elevate your creations.
Optimize Your Designs:
Avoid overhangs and make sure your walls are thick enough for strength.
Design with the print orientation in mind to reduce material waste and improve print efficiency.
Select Your Materials: Choose based on your project’s needs—PLA and ABS for sturdy models, or flexible filaments for parts that need to bend and stretch.
Prepare Your Files: Use slicer software like Cura or PrusaSlicer to convert your 3D model into a printer-ready file.
Print & Post-Process: After printing, remove support structures, sand rough edges, and add a paint finish if needed to bring your object to life.
Advanced Techniques to Try:
Multi-Material Printing: Combine materials for parts that have different properties—like flexible hinges and rigid support structures in the same piece.
Generative Design: Use AI to create complex, organic shapes that optimize strength and functionality.
Large-Scale Printing: Need bigger objects? Split your design into sections and print them separately to assemble later.
Bioprinting: Explore the future of medicine with 3D printing using living cells.
4D Printing: Create objects that change shape or function over time, responding to heat, moisture, or other stimuli.
Common Pitfalls to Avoid:
Material Settings: Each material has specific requirements. Always adjust your printer’s settings accordingly.
Forget About Supports: Don’t skip adding supports for complex shapes—your printer won’t magically print them without help.
Printer Maintenance: Keep your printer in top shape with regular calibration and care to prevent issues.
Rushing the Process: 3D printing takes time. Be patient and avoid speeding up the process—it will pay off in better results.
FAQs:
What's the best 3D printer for beginners? The Creality Ender 3 and Prusa i3 MK3S+ are great options for getting started. They’re affordable and highly customizable.
How much does it cost to start? Entry-level 3D printers usually start around $200–$300, with additional material costs depending on your projects.
Can 3D printing be used for mass production? While it’s perfect for rapid prototyping and custom items, 3D printing is also expanding into small-batch production.
Is 3D printing safe? Yes, as long as you use proper ventilation and follow safety guidelines, it’s safe for home use.
Key Takeaways:
3D printing opens up a world of possibilities, whether you’re designing innovative prototypes or creating detailed works of art. By mastering the basics—design, material selection, and post-processing—you’ll be able to produce high-quality prints and push the boundaries of your creativity. Keep experimenting, refining your skills, and watching as your designs come to life in ways you never imagined.
Ready to get started? Let’s bring your ideas to life with 3D printing. Whether you’re prototyping or creating stunning art, we have the tools and expertise to help you succeed. Explore our printers, materials, and support to take your creations to the next level.
1 note
·
View note
Text
Unveiling The Power Of 3D Printing Design Software

Source – AnkerMake
In the realm of modern manufacturing and creativity, 3D printing has emerged as a transformative technology, enabling the fabrication of intricate objects with unprecedented precision and efficiency. At the heart of this revolution lies 3D printing design software, the digital toolkit that empowers designers, engineers, and enthusiasts to bring their visions to life in three-dimensional form. In this article, we explore the landscape of 3D printing design software, uncovering its capabilities, features, and the creative possibilities it unlocks.
Introduction to 3D Printing Software
Before diving into the intricacies of 3D printing software, it’s essential to understand its fundamental role in the 3D printing process. At its core, 3D printing design software serves as the bridge between the digital realm and the physical world, allowing users to create, modify, and optimize digital models that can be translated into physical objects through additive manufacturing.
From simple geometric shapes to complex assemblies, 3D printing design software accommodates a wide range of design requirements and skill levels, making it accessible to novices and experts alike. Whether you’re a hobbyist experimenting with DIY projects or a professional engineer developing prototypes for a new product, there’s a 3D printing design suite tailored to your needs.
Key Features and Functionality

Intuitive User Interface: A user-friendly interface with intuitive navigation tools and easy-to-understand commands is essential for beginners and experienced users alike.
Modeling Tools: Robust modeling tools for creating and manipulating 3D geometry, including tools for extrusion, lofting, sweeping, and sculpting.
Parametric Design: Parametric modeling capabilities that allow users to define geometric relationships and constraints, enabling rapid iteration and design optimization.
Support for Multiple File Formats: Compatibility with a wide range of file formats, including STL, OBJ, STEP, and IGES, to facilitate seamless collaboration and interoperability with other software applications.
Advanced Rendering and Visualization: High-quality rendering and visualization tools that allow users to create realistic renderings of their designs, helping to communicate ideas and concepts effectively.
Mesh Repair and Analysis: Built-in tools for repairing and analyzing mesh geometry to ensure watertight models suitable for 3D printing without errors or defects.
Integration with 3D Printing Hardware: Integration with 3D printing hardware and slicer software, allowing users to prepare models for printing directly within the design environment.
Popular 3D Printing Software
There is a plethora of 3D printing softwares available in the market, catering to different needs, preferences, and budgets. Some of the most popular 3D printing design software packages include:
Autodesk Fusion 360: A cloud-based CAD/CAM platform that offers a comprehensive set of design tools for mechanical engineering, industrial design, and product development.
Blender: A powerful open-source 3D modeling and animation software suite that is widely used by artists, designers, and animators for creating complex 3D models and visualizations.
SolidWorks: A professional-grade CAD software package known for its robust parametric modeling capabilities and extensive library of design features and tools.
Tinkercad: A beginner-friendly web-based 3D modeling software platform that is ideal for educators, students, and hobbyists looking to learn the basics of 3D design and printing.
Rhino: A versatile 3D modeling software package popular among architects, industrial designers, and jewelry designers for its flexible modeling tools and support for organic shapes.
SketchUp: An intuitive 3D modeling software package that is widely used by architects, interior designers, and hobbyists for creating detailed 3D models of buildings, furniture, and other objects.
Creative Applications and Use Cases

Art and Sculpture: Artists and sculptors are using 3D printing software to create intricate sculptures, installations, and mixed-media artworks that push the boundaries of creativity and expression.
Fashion and Wearable Technology: Designers are leveraging 3D printing software to create bespoke fashion accessories, jewelry, and wearable technology that blend cutting-edge design with functional innovation.
Healthcare and Biomedical Engineering: Researchers and medical professionals are harnessing the power of 3D printing design software to develop customized prosthetics, implants, and surgical guides that improve patient outcomes and quality of life.
Education and STEM Learning: Educators are integrating 3D printing software into STEM curricula to engage students in hands-on learning experiences and foster creativity, problem-solving, and critical thinking skills.
Future Trends and Developments
As technology continues to evolve and new advancements emerge, the landscape of 3D printing design is poised for further innovation and growth. Some of the key trends and developments shaping the future of 3D printing design include:

Cloud-Based Collaboration and Workflow Automation: Cloud-based collaboration tools and workflow automation solutions are streamlining the design process and facilitating real-time collaboration between remote teams, enabling faster iteration and design iteration.
Integration with Augmented Reality and Virtual Reality: Integration with augmented reality (AR) and virtual reality (VR) technologies is enabling designers to visualize and interact with 3D models in immersive virtual environments, enhancing the design review process and enabling more intuitive design exploration.
Moreover, 3D printing design software enables on-demand manufacturing, eliminating the need for costly inventory management and reducing the risk of overproduction and waste. By leveraging digital manufacturing technologies, companies can respond quickly to changing market demands and offer consumers a wider range of options for personalized products.
Conclusion
In conclusion, 3D printing design software is a powerful tool that is driving innovation and creativity across a wide range of industries and disciplines. From mechanical engineering to art and fashion, the capabilities of 3D printing software are virtually limitless, empowering individuals and organizations to bring their ideas to life in ways that were once unimaginable.
As technology continues to advance and new developments emerge, the future of 3D printing design promises to be even more exciting and transformative. Whether you’re a seasoned professional or a novice enthusiast, there has never been a better time to explore the world of 3D printing design and unleash your creativity on the digital frontier.
0 notes
Text
Please note that PK Stylus Stand Process Post is provided as is and with no guarantee of functionality or safety to the degree permitted by local legislation. More seriously, I'm a self-taught hobbyist and this probably isn't the best way to do this sort of thing - It's just the way I do it. I used blender for this project, but I imagine this functionality is available in other 3d tools as well. I just happen to know and like Blender. It's very good nowadays, and also extremely free.


I don't normally start with a lowpoly form of the object, but I decided it would be easiest to get the regular contour here by starting with a sphere and doing some basic box-modeling. I notched out the spikes by making a keyhole form from a cylinder with one side extruded upwards, duplicating and rotating it a few times, and then used a boolean difference operator.

Once I had a starting point I was happy with, I switched over to sculpt mode and used the voxel remesh to get myself an even polygon density to work with. The spikes were an opportunity to play with the radial symmetry options which are always a blast, and this is just generally the fun bit.


To get the stylus to sit nicely, I cut out a cone using another boolean modifier and a quick model of the stylus. This is the point where you need to start worrying about scale - a cheap pair of digital calipers is more than precise enough to measure this sort of thing, but you definitely want to set the blender scene unit to match. If you're comfortable with an actual CAD tool you can also make your dimensionally precise models in that before exporting to .stl and importing the stl into blender, I normally use Fusion 360 if I need to do something mechanically complex. Oh, and absolutely do remember to use a decimate modifier on your sculpt to reduce the polycount to something reasonable before applying the boolean - blender will lock up your computer trying to do the math otherwise.

And that's it! Now all that's left is exporting to .stl and taking your finished product over to your slicer of choice, where you'll realize you should have been worrying about overhang angles when you were sculpting.
2 notes
·
View notes
Text
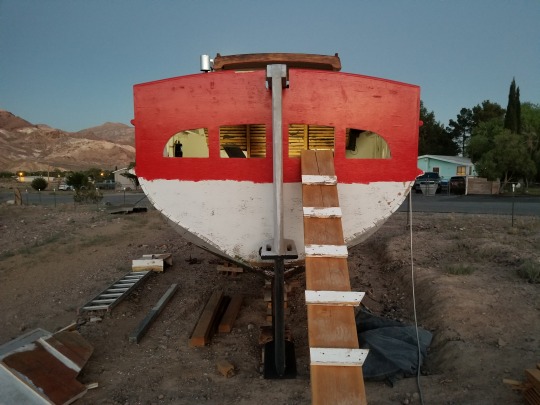
How to Get Real-World Shapes (especially weird ones) Into the Computer for 3D Printing
Many 3D printers end up used mostly to create knick-knacks, though we justified buying the machine with all the useful stuff we could make! One of the reasons for this is that Baby Yoda’s dimensions aren’t exactly critical to it’s purpose, but the broken knob you wanted to replace has a weirdly shaped fitting that won’t work unless it’s just right, and how do you measure that? Then how do you design something to fit it?
There are a few methods! What follows is my low-cost, low-math method for replicating weird shapes for 3D printing.
You’ll need: the part you want to work with, paper large enough to cover it, a pencil, a ruler (the finer the measurement, the better), your 3D design software of choice, and your slicer.
For my example, I needed to make porthole trim rings with a lip. My boat had 10 portlights with beautiful cast bronze trim rings on the hull, but on the stern it had four strangely shaped holes cut roughly, exposing the edge of the plywood.

I taped paper over the portholes, and traced the outline from the inside. If you’re working with a small piece or can’t get inside the thing for whatever reason, take a rubbing by rubbing the side of a pencil lead or a crayon on the paper where the edges of the object are. The edges should come out clearly enough to take measurements from. Then, draw a grid on your tracing or rubbing.
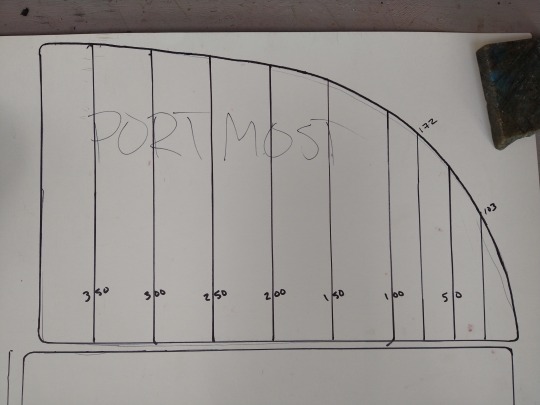
The more curved your piece is, the more reference lines you’ll want in your grid. This piece had a nice right angle with two flat sides to reference, but if yours doesn’t, just extend the lowest and leftmost parts of your piece so they meet at a right angle, and build your grid from there.
This is how I gather measurements to input into a 3D design program- how you input them will depend somewhat on your program of choice, and I’ll save an in-depth description of that for a later post. Here’s how the rest of this project went, though.
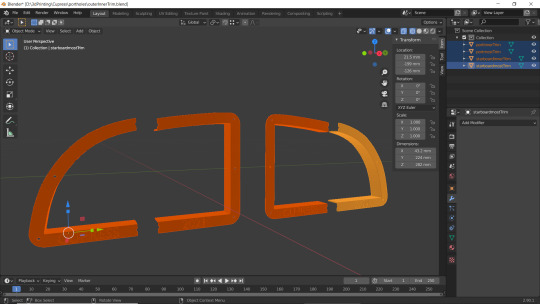
I created a rectangle in Blender, then used the slice tool to create vertices at each of my measured distances from the y axis (Fusion 360 is more optimized for dimensional design, but Blender can do it and is open source). In Blender, you can make a slice and then input the exact measurement for its placement. Then I did the same from the x axis. That placed vertices at the measured points along the curve of my object. Deleting faces from the rectangle and joining vertices into new faces “carved” the basic shape from my rectangle, and then I mostly used the extrude tool to get my final shape.
Turn on mirroring to save yourself time if it applies to you, but also pay attention to when to turn it off! For me, I created the object, but turned off mirroring to emboss the words I wanted into the design. Your slicer can be a good tool for checking whether your design is “manifold.” Usually it’ll highlight the areas that aren’t, and show an error. Sometimes you can print even if it isn’t manifold, but it’s best practice to fix it, because it can affect printing in unpredictable ways.
I printed a prototype in cheap, recycled PTEG.


Then in bronze filled filament from Protopasta!
https://www.proto-pasta.com/collections/all/products/bronze-metal-composite-htpla?variant=7154346098733


This filament has so much bronze in it that it will patina like bronze, and can even be polished. It isn’t cheap, but this was much more doable for me than casting from real bronze, and having all four portlight rings custom cast would have been over a thousand dollars.
#3D printing#3d design#diy#product design#design#design process#measurements#protopasta#portlight#boat#woodenboat#budget#Blender#Fusion360#Cura#slicer#3D printer#3D#window#sailboat#liveaboard#crafting#self sufficiency#weird shapes#dimensions
3 notes
·
View notes
Text
Cobra Head

We found the stl. file on the website. And put into Meshmixer to cut cobra body, because we just needed to use the head.

And we would like to make the head look like symmetric, so we cut the half away. And saved.

And we used Fusion 360 to make the other half side, so that would be the symmetric head. And saved as stl. file.

And then we imported the new Cobra file to the Slicer 360. To select the folded panels in the construction technique. Also, low-polygon was the requirement. So we changed the vertex down to 49.

And saved as PDF file.

And printed with a 100 lbs. paper to make a prototype.

And then used the slicer 360 again to break down all of the triangle pieces. Saved as PDF file.

And wrote down each number to the prototype and made the color template.
We decided that the acetate would be the base, and make the sticker to cover the surface.
So we used the same panels which were used for the prototype for the acetate base.
And we used the Illustration to paint the red and black color for each piece.

Because we would use Vinyl cutter/printer, so don’t forget to make the cutting line around each triangle.

And put everything together. Punched the eyes hole. Set the LED lights inside.
And the head is ready to connect to its neck.
1 note
·
View note
Text
Fish Fabricaton Step 2: Sculpting the Face and Jaw
Hi there! Alex again. After making the body of our fishy boy both solid and with a whole lot less polys, it was time to bring him into Fusion 360. The first and most pressing issue was separating the jaw from the rest of the face so that they could be printed and moved independently of one another.
First, I separated the head and hind regions of the fish model. I knew I wasn’t going to print the tail portion of the fish until much later, so I gave myself some wiggle room by separating them. I also cut the sad little fin off of the body, as the geometry of it had somehow gotten really messed up going from Meshmixer to Slicer and to Fusion.

Moving on from here, I started to hollow out the inner region of the face. My methods were a bit unorthodox, making it seem a bit messy, but it got the job done.

To seperate the jaw from the rest of the head, I made a sketch on the back plane and oriented the viewing area so it was top down. This let me sketch a line that connected along a “natural” seam that the polys made, which I then used to extrude cut away the jaw, keeping it as a new body in Fusion.


I wanted the jaw to slide under the rest of the face, so I scaled it down to 90% of its original size. This looked perfect, but there wasn’t enough clearance for the jaw to slide under.


To fix this, I made some cutting tools that would leave just a sliver of material behind. I made one body by extruding a sketch, and then added on to it by creating a loft from one face to another sketch. This worked really well, leaving just enough material behind for the jaw to slide under.


From here, I modeled in some blocks that we could use as attachment points for our pivots and servo mechanism and got to printing! I had the best success using a full raft and Cura’s auto generated supports at around the default percentage. This was the best way to keep both my prints and the support material from being nudged off of the build plate during printing!
youtube
youtube


Now physical, we were ready to try out our servo mechanism and see our boy speak!
youtube
youtube
1 note
·
View note
Text
My best friend is planning on getting his wife a 3d printer for Christmas because she loves her cricut and is doing some crazy stuff with it. (and she’s planning on buying him the same printer, because he’s into robotics, drones and model making. I need to find a way to defuse this so they don’t buy 2 printers, but that’s a problem for the a different post...) Meanwhile I’m a 3d modeler with a 3d printer and I’m really hyped to get her set up with recommendations and resources.
The good news for aspiring mom crafters is this:
3d printers are cheap, super easy to set up and use. It takes a few hours and a couple days of trial and error to get everything calibrated perfectly, and every printer has it’s own quarks you’ll have to learn, but generally speaking, it’s something I could totally see a stay at home mom doing. And there’s a wealth of tutorials and guides, and a big community of people to help with that. 3d printing is already becoming a thing a lot of DIYers have in their garage or workshop, so there’s also a lot of tutorials for the less technologically literate (a surprising amount of middle aged dads making fishing lures and stuff, so even for older people, there’s resources that are their speed). So If you have $300 for a Creality Ender 3 or whatever number they’re on now, and time to learn, that’s the entry level right there.
Free 3d software and tutorials are super accessible. Personally, I use Blender in my day to day work, and I’ll be the first to tell you that blender might be a little too complicated for some people, but also it’s free and once you get the hang of it (and maybe get a cheat sheet of hotkeys, which as a professional I still use), it’s very powerful and you can do pretty much anything with it. And it’s free. Alternatively, Autodesk fusion 360 is also free, also very powerful, and might be easier for people who are already used to Cricut design space. Another option might be sketchup, which has a free version. Both of these alternatives have tons of tutorials and stuff.
Don’t want to make your own models? Thingiverse is a website where people share their files for people to print. It’s free, I think there’s a tip feature and people link their shops and stuff. The downside is you can’t sell most things you print from there because they’re most commonly listed as creative commons non-commercial, but if you just want to make things for yourself, friends, family, D&D group, Thingiverse probably has what you want. (And I mean everything from Ikea furniture mods to very specific replacement parts to appliances, to toys and games, statues and decor, musical instruments, everything.)
The software that turns 3d models into something you can print, often called a slicer because it slices your model into printable layers, is also free and easy to use. I use Ultimaker Cura, and I basically set it up once by following a tutorial on youtube, saved those settings, and tweak a single setting depending on if I’m printing something big, small, or tiny. And all that setting does is lay down extra plastic around the base of smaller parts so they stick to the bed of the printer without falling over and ruining the print. There are more settings you can tweak and adjust if needed, and as your skill increases you can always experiment with better settings, but this one very commonly used setting works for 99% of what I print.
So yeah, 3d printing is super accessible and something more moms should get into. I’m also trying to teach my 62yo mother in law how to use it, and she can print stuff she finds thingiverse, and calibrate the printer when something doesn’t work, but the 3d modeling is going to take some time. Still, if she, one of the most tech illiterate people I know, can get this far, I’m sure the average person can too.
We desperately need to get stay at home moms into 3D modeling/3D printing. I say this every day and it never gets any less true.
47K notes
·
View notes
Text
3D-Druck ist eine faszinierende Technologie, die es Ihnen ermöglicht, Ihre eigenen Objekte aus Kunststoff, Metall oder anderen Materialien zu erstellen. Sie können damit praktische Dinge für Ihren Alltag herstellen, kreative Kunstwerke gestalten oder sogar Prototypen für Ihre Erfindungen anfertigen. Aber wie fangen Sie an, wenn Sie ein 3D-Druckprojekt umsetzen wollen? In diesem Artikel geben wir Ihnen einige Tipps und Inspirationen, wie Sie Ihre eigenen 3D-Druckideen verwirklichen können. Schritt 1: Finden oder erstellen Sie eine 3D-Vorlage Zunächst brauchen Sie eine 3D-Vorlage, die Sie drucken wollen. Das kann ein Modell sein, das Sie selbst entworfen haben, oder eines, das Sie aus dem Internet heruntergeladen haben. Es gibt viele Websites, die kostenlose oder kostengünstige 3D-Vorlagen anbieten, die Sie nach Ihren Wünschen anpassen können. Zum Beispiel finden Sie bei uns eine Auswahl von 100 nützlichen 3D-Druck-Vorlagen, wie zum Beispiel einen Smartphone-Ständer, ein Lautsprechergehäuse oder einen Blumentopf. Oder Sie schauen sich auf Technoguru einige coole 3D-Druckprojekte für Ihr Zuhause an, wie zum Beispiel ein Mini Raspberry Pi Notebook, einen Touchscreen Raspberry Pi oder einen Schmuckhalter. Wenn Sie etwas mehr Herausforderung suchen oder Ihre eigene Kreativität ausdrücken wollen, können Sie auch Ihre eigene 3D-Vorlage erstellen. Dazu brauchen Sie eine Software, mit der Sie 3D-Modelle entwerfen können. Es gibt viele Programme, die sowohl für Anfänger als auch für Fortgeschrittene geeignet sind, wie zum Beispiel Tinkercad, Blender oder Fusion 360. Mit diesen Programmen können Sie Ihre Ideen in virtuelle Form bringen und sie nach Ihren Wünschen gestalten. Sie können auch bestehende Modelle bearbeiten oder kombinieren, um etwas Neues zu schaffen. Schritt 2: Bereiten Sie Ihre 3D-Vorlage für den Druck vor Wenn Sie Ihre 3D-Vorlage fertig haben, müssen Sie sie noch für den Druck vorbereiten. Dazu brauchen Sie eine weitere Software, die als Slicer bezeichnet wird. Diese Software schneidet Ihr Modell in dünne Schichten und erzeugt einen Code, der Ihrem 3D-Drucker sagt, wie er das Objekt drucken soll. Dabei müssen Sie verschiedene Einstellungen beachten, wie zum Beispiel die Schichtdicke, die Druckgeschwindigkeit oder die Temperatur. Diese Einstellungen hängen von Ihrem Drucker und dem verwendeten Material ab und beeinflussen die Qualität und die Dauer des Drucks. Schritt 3: Drucken Sie Ihr Objekt aus Nun sind Sie bereit für den eigentlichen Druck. Dazu müssen Sie Ihr Modell auf eine Speicherkarte oder einen USB-Stick übertragen und in Ihren 3D-Drucker einlegen. Dann müssen Sie den Drucker einschalten und das Modell auswählen. Der Drucker wird dann beginnen, das Objekt Schicht für Schicht aufzubauen, indem er das Material durch eine Düse schmilzt und auf eine Plattform aufträgt. Dies kann je nach Größe und Komplexität des Modells einige Minuten bis mehrere Stunden dauern. Nachdem der Druck abgeschlossen ist, müssen Sie das Objekt vorsichtig von der Plattform entfernen und eventuelle Stützstrukturen oder überschüssiges Material entfernen. Dann können Sie Ihr fertiges 3D-Druckprojekt bewundern und verwenden. Fazit: Mit 3D-Druck Ihre Ideen verwirklichen Wenn Sie keinen eigenen 3D-Drucker haben oder sich nicht mit der Technik auskennen, können Sie auch einen professionellen Dienstleister beauftragen, der Ihr Modell für Sie druckt. Einer dieser Dienstleister ist 3D Druck München, der Ihnen einen schnellen und zuverlässigen Service für Ihre 3D-Druckprojekte bietet. Sie können einfach eine 3D-Vorlage hochladen und den online Kalkulator nutzen, um den Preis und die Lieferzeit zu erfahren. Sie können aus verschiedenen Materialien und Farben wählen und sich Ihr Modell bequem nach Hause oder ins Büro liefern lassen. Ob Sie ein Geschenk für einen Freund, ein Ersatzteil für ein Gerät oder ein Modell für eine Präsentation brauchen, 3D Druck München erfüllt Ihre Wünsche. 3D-Druck ist eine spannende Möglichkeit, Ihre eigenen Ide
en zu verwirklichen. Mit 3D Druck München haben Sie einen kompetenten Partner an Ihrer Seite, der Ihnen hilft, Ihre 3D-Druckprojekte zu realisieren. Schauen Sie sich auf unserer Website um und lassen Sie sich inspirieren von den vielen Beispielen, die wir bereits gedruckt haben. Sie werden staunen, was alles möglich ist mit 3D-Druck.
0 notes
Text
What is fusion 360 for linux linux

Overview of Fusion 360 for Linux
Fusion 360 is the initial 3D CAD, CAM, and CAE tool of its kind, that connects your entire development method in a very single cloud-based platform that works on computer, Mac, and mobile devices. Aside from Its quality CAD tools, it conjointly features a CAM setting, an intrinsical 3D slicer, and top-notch simulation tools. These options combined create a really fascinating CAD program for every kind of user, from beginners level to professionals level. Here We will learn What is fusion 360 for Linux? Download fusion 360 for Linux. Read more..
#What is fusion 360 for linux ? Download fusion 360 for linux#What is fusion 360 for linux#Download fusion 360 for linux#fusion 360 for linux#fusion 360#download fusion 360
0 notes
Text
Week 9 - Studio Tutorial - Preparing a 3d scan for printing
This week I have unfortunately missed out on the lecture because of an unforeseen and unexpected situation, which meant I was basically unable to go to or do uni work for about a week, which as it was the end of the term is quite upsetting. But back to the actual exercise, lets just start of with, the process was a bit disastrous, and just let me explain and you will see.
The exercises required us to have our models scanned in, which due to my unforeseen situation I was unable to attend. But I was got an email with access to someone else's file, which I was able to work with.
My first issue began with Rhino, where it didn't want to launch properly because I have already used the evaluation of it once, and I tried a different new licence key with a new account and it just didn't let me, because it detected it... somehow. So I decided to open the STL file straight into 3ds max, which did work.

After I arranged it correctly to be at 0, 0, 0; the exercise required me to fix the model up, by smoothing it, making it more symmetrical etc. However after trying many things none of them seemed to work, none of them seemed to do anything, it wouldn't smooth or do anything really, which left me confused. After many horrible hours, I decided to just move on and edit the shapes proportions a bit. I decided to make it a bit taller and then bend it a tad bit to give it a more dynamic appearance.

After that I exported it to an STL file, which I opened in Cura. Cura is a slicing software which essentially takes an STL file and slices it up in such a way, which the 3D printer will interpret as coordinates which form a path, which layer by layer will form the desired shape. Luckily for me I have quite a bit of experience with 3D printing, as I have a 3D printer and I am familiar with Cura, as it is the slicer software which I have been using all this time, so things turned around a little bit. After I put in the file and set up the settings to be what I would use for a normal print which is 0.2 mm layer height, 10% infill for something as big as this, and because it is mainly an aesthetical model, there is no point in really making it more dense it, it turned out to be an over 8 hour print. I didn't decide to print it though, because the hand in for the Studio subject already happened and because I was unable to smooth it out, so it wouldn't have looked all that good in the first place.

On another note, I did make a CAD model of my actual perfume bottle design, for my project using Fusion 360, which I did from scratch, and used to create renderings and other drawings which were required of us. And I was planning to 3D print this just so I have it for myself, but again would have taken about 8 hours, so I decided not to and also 3D printing wasn't allowed for the Studio project so I didn't really see a point in it. But at least I could use that to show in this weeks blog post since all my other things failed so miserably, that it hurts to write this post. If anything I have been honest...


0 notes
Text
Autodesk Slicer For Mac
Autodesk Slicer Mac
Autodesk Slicer For Mac Os
Fusion Slicer Autodesk
Autodesk Slicer For Mac Installer
Autodesk Meshmixer free software for making awesome stuff Home. Download NEWS (April 2018): Meshmixer 3.5 is now available for Windows and macOS! This 3D slicer is a free open source software, and is designed to be able to integrate with 3D CAD software tools like SolidWorks and Autodesk Inventor for easier cross platform workflow. Since it’s made by Ultimaker, Cura is perfect for Ultimaker 3D printer owners, as well as featuring specialized settings for dozens of other printers too. Autodesk Fusion 360 keeps on adding functionality and this time a long lost tool friend of mine. The 123D Make functionality has been added to the capabilities of Fusion 360 as an free app Slicer for Fusion 360 for both Windows and Mac. You can now import models or create models then create a 2D slice pattern for them to create something in cardboard, wood, or metal. Slicer for Autodesk Fusion 360 is a tool to turn your digital 3D models into appealing artefacts. It slices and converts 3D models into 2D patterns that you can cut out of any flat material. The program also creates 3D instructions you can interact with to help build a model.
It is mind-boggling to witness that the skip from 2D to 3D is opening up so many new arenas and possibilities in the digital world. After all, recreating the world on a computer, just the way we see it is a big deal. 3D modeling software makes this task easier. If you are a 2D designer looking to venture into the new realm of 3D or an already established 3D designer who is searching for more fuel for his creative engines, this list of the best 3D modeling software will definitely help you. Before jumping to that though, here is a gist of what a basic 3D modeling program is.
What is 3D Modeling Software?
3D modeling is a mathematical method of creating designs in the virtual three dimensions (height/depth, length, and breadth) and a 3D modeling program helps one do that in an efficient and user-friendly way. 3D modeling attempts to recreate some real-world entity, or a blueprint for a future structure, or even a work of art. With 3D software, the possibilities are infinite. Nowadays, 3D modeling is used in diverse fields like medicine, architecture, entertainment, etc.
Like any trending product or service, the internet offers a vast variety of 3D modeling programs, both free and paid. Selecting the right 3D software can be a little challenging, but we’ll give it our best shot. Let’s go.
Best Free 3D Modeling Softwares
Blender
Blender is an open source (free, and anyone can contribute to its code to make it better) 3D modeling software which is an excellent alternative to its paid brethren. Like any open source software, Blender has a large community of developers, artists, and designers who are always willing to help. Blender, a free 3D modeling software for Mac, works on Windows and Linux as well. If you are looking to enter the amazing world of 3D modeling, Blender is a great choice; it has impressive toolset capabilities, and the support is strong. However, this free 3D program is a little non-conventional, and jumping from Blender to other paid 3D design programs might take a little getting used to.
MakeHuman
Another one picked ripe from the basket of the best free 3D modeling software, MakeHuman targets a particular use case; character design (as the name suggests). Just like Blender, MakeHuman is one of the best 3D modeling software for beginners. Its simple UI/UX is easy to grasp, and the tools are also not very complicated to use. You can use MakeHuman to create beginner projects and small modules as a precursor to future, more complex endeavors. It's a great community of developers backing it up and a very responsive forum portal where getting support is quick and fruitful.
Autodesk Maya
The Autodesk Maya is a strong, robust, and versatile 3D program which offers a 30 day free trial (hence in the free section). If you are looking for 3D modeling software for beginners, Autodesk Maya presents an excellent opportunity to work on an actual professional platform. You cannot publish any of the projects commercially that you create in these 30 days, but you can sharpen your skills. It also has a student’s license for learners and enthusiasts who are just beginning to take an interest in the world of 3D designing.
SketchupFree
It’s free, says the title; this 3D modeling program is one of the most versatile free software on the internet, compatible with almost all the operating systems (great for both windows and mac users, even Chromebook). It is simple to understand and easy to use. SketchupFree is ideal for interior designers and home furnishers. This 3D software avoids the shenanigans of rigging and UV maps, which is terrific if you are just focused on completing your job quickly and correctly. It has paid versions (shop, pro, and studio) as well, which bulk up the functionalities of the toolkit that comes with it. Check for this 3D modeling software online to know more.
Houdini Apprentice
Houdini Apprentice is the free version of the popular and award-winning program, Houdini FX. Ideal for people who practice 3D designer as a hobby or are learning this wonderful art. Also, what is great is that the free version has all the features of the paid version, except the capability of publishing your designs on a commercial platform. One of the most powerful tools on this list, the Houdini Apprentice is an amazing program to learn the tricks of the trade without shelling the big bucks. Thanks to the generous developers!
OpenSCAD
There is no denying that digital 3D modeling requires a lot of creative prowess, but the fact that it is based on mathematical algorithms cannot be neglected. OpenSCAD is one such free 3D modeling software that focuses more on the technical area of 3D modeling rather than the creative portion. It is an ideal designing tool for creating digital models which are meant to be 3D printed later; toys, small gadgets, handy utilities, etc. can all be created using this 3D modeling program. OpenSCAD is also versatile and runs on all major operating systems like Mac, Windows, and Linux.
FreeCAD
Another open source 3D modeling software, which is still in its development phase is the FreeCAD. However, the features that it currently has is enough to develop stunning 3D designs and models. The primary arena where FreeCAD dominates over its competitors is its ability to create elaborate and complex shapes with ease, based on properties and relations to other shapes. If you are familiar with Object Oriented Programming, FreeCAD has a lot of relatability with it. It is a visual representation of objects and their attributes and how these objects interact with other objects. This may all sound a little technical, but it all takes a little getting used to.
Vue
It is amazing that all there are so many 3D modeling programs available in the market, both paid and free, an all of them have some advantage over the other. Vue is miles ahead of the other 3D modeling program when it comes to designing landscapes. With tons of features to give your designs a glamorous look, Vue comes with a paid version as well. With the free version, all your designs will have a watermark, and these designs won’t be used commercially. However, Vue is a software for those who are interested in creating beautiful sceneries, which look almost as good as the real world.
Sculptris
Like we mentioned before, each of these 3D software has some cutting edge features, which makes them better than the rest in some area of expertise. Sculptris, as its name suggests, is ideal for developing digital sculptures. It is easy to learn and use. After a few minutes of tutorial and practice, you can start designing faces and characters. Sculptris is one of the best free 3D modeling software for beginners that are out there. After learning this tool, you can start using ZBrush, the paid 3D modeling program by the same developers to create some mind-blowing sculptures and character prototypes.
Daz Studio
Daz Studio is one such free 3D program that has a huge pool of tools and functionalities. The software is free for all, but some of the utilities are paid. The marketplace is full of content which you can use free of cost. With Daz Studio, 3D modeling, animating, and rendering becomes a lot easier. For software which is so rich in capabilities, it has a reasonably easy UI. Whatever you create with this easy 3D modeling software is owned only by you, royalty free! It is a highly robust program which requires only 1 GB of RAM to run. However, a RAM of more than 2 GB is recommended for optimum performance.
TinkerCAD
TinkerCAD is one of the most versatile free 3D software; it is a browser-based tool, which makes it highly accessible. Developed by the giants in 3D modeling, Autodesk, it is a beginners’ software which is ideal for learning the tricks of the trade. Many 3D designing teachers prefer using TinkerCAD because of its versatility and its simple UI. It also has an excellent support team and generous contributors who make it better to use every day. If you want to create designs quickly and efficiently, TinkerCAD is a great choice.
Leopoly
Autodesk Slicer Mac
Leopoly is a 3D modeling software engineered by Hungarian developers keeping in mind ease of use and robustness. It offers various plans, both paid and unpaid, and has a vast client base to show off. The free version is ideal for students and newbies who are just gaining interest in the enormous realm of 3D designing. Just like TinkerCAD, Leopoly is an online 3D modeling program that runs on browsers. It makes VR modeling and texture designing very simple and uncomplicated.
NanoCAD
NanoCAD is a Windows-only free 3D modeling program for users who are looking for a free counterpart of AutoCAD. It also has a paid version which bolsters the functionalities offered by the free version. One of the best features of this free program is that it allows you to view your previous changes and work on them to create other projects (much like branching in Github). NanoCAD is ideal for designers who pursue this art as a hobby or a side interest. Also, it is great for students who can’t afford AutoCAD; the only downside is that this drawing program is not available for Mac users.
MeshMixer
Meshmixer is another software belonging to the Autodesk lineage. Unlike most of the software on this list, this free 3D modeling software is used over pre-designed projects. MeshMixer offers incredible flexibility in working with animations, texture designing, hollowing, etc. It makes your designs better and improves its quality. Available for both Mac and Windows, the MeshMixer requires a low system configuration to run. It has an almost negligible learning curve and has a great responsive UI. Excels in designing 3D meshes (the skeleton for 3D designs). You can check their website for the different use cases where this 3D drawing program is applicable.
Best Paid 3D Modeling Softwares
ZBrush
ZBrush appears first in the list of paid 3D modeling software only because of its capability of creating a stunning quality of 3D designs which are ideal for 3D printing. As you will go down the list, you will find many software which matches or are better than ZBrush in terms of toolsets and ease of use; however, the fact mentioned above makes it a prevalent choice among artists who want to print their designs in high-quality materials. It is a bit on the expensive side and is more robust to learn that many software that appears on this list, but most of the times if the output is good, it is worth spending the money and the effort.
Autodesk 3ds Max
This 3D modeling software is one of the best choices for Windows operating system. It boasts of a vast pool of tools and is comparatively easy to learn than its counterparts. The 3ds Max is moderate in price with a subscription model backing its payment structure. Since its free version offers a 30 day trial period, it is easier for amateurs to jump to this paid version, making it very popular amongst new paying users. The Achilles heel of this 3D modeling tool is that it is only available for Windows. A huge loss for Mac users, since it is one of the best tools in this list.
Modo
The Modo developed by Foundry is a versatile and powerful 3D modeling program that makes texturing and rendering very easy. Modo is developed around the idea that speed and efficiency are paramount while creating 3D designs. Therefore, Foundry has made considerable efforts to reduce technical glitches and obstacles as much as possible. As mentioned before, it is very easy to learn as compared to Maya and ZBrush. Modo is excellent at creating medium level designs, but working with extensive projects becomes complicated. Also, the toolset needs a little work if it needs to reach the level of the giants in the 3D modeling software business.
Autodesk Maya
The paid version of the same software that you saw in the free section of this blog, Autodesk Maya, is the best 3D modeling software hands down. It has an immense brand value attached to it, and it boasts of a stellar user base. Yes. Pixar uses this 3D modeling program. However, the price tag is a bit hefty, which does cut down on some potential users. Autodesk Maya has been added with amazing functionalities over the past few years, making it cross its competitors in terms of revenue and clientele. If you are serious about making 3D designing into a career, or if you are already a professional and want to add that X factor to your resume, Autodesk Maya should be your first choice, hands down!
Autodesk Mudbox
Mudbox is another fantastic product by Autodesk. It is simple to use when compared to Maya and is ideal for 3D editing and sculpting. To add animations and other features, you will need additional software. It is a great add on tool to learn though. It is a versatile tool that runs on Linux based operating systems, Mac systems, as well as on Windows. It is a heavy software requiring 4GB RAM and runs smoothly on 8GB of RAM. Use Mudbox as a complementary tool to other 3D modeling software, and you will not regret it.
Houdini
Houdini is another excellent 3D program that is in the market at the moment. Many established corporate designers use Houdini to serve their clients. Just like other industry giants, Houdini is hard to learn and is a little harsh on the wallet. But the designs created are on another level. You can visit their official website to view their glistening portfolio. It offers more flexibility of controls than the Autodesk Maya and uses different algorithms for animations and rendering (node-based procedural). With a little bit of patience and a strong will, Houdini won’t take long to be mastered and staying true to its name, after learning Houdini, you will become a magician in the field of 3D designing.
Cinema 4D
With you are more inclined toward 3D motion graphics, Cinema 4D is the software for you. It has a huge price attached to it though, so make sure your requirements match the capabilities this 3D modeling software offers. They do offer a free trial of around 40 days that will help you in making this decision. Once you start using the Cinema 4D, you will find that the learning curve attached to it is pretty undemanding and simplistic. It requires 4GB of RAM and a graphics card for smooth running and is available for Mac, Linux, and Windows operating systems.
Rhinoceros
Strength and robustness radiate from the name of this 3D modeling program, which is also very versatile when it comes to operating systems and CPU specifications. Rhinoceros focuses on creating unhindered designing with its easy to learn tools and add-ons. As mentioned before, the rendering is smooth and does not slow down the system, which ideal for complex animations and morphing 3D designs. It comes with a 90 days trial version, after which you have to pay some bucks to continue using the software. The price is a bit high, but this 3D modeling platform deserves a tryout.
Substance Designer
One of the cheapest paid 3D modeling software in the list, Substance Designer focuses on creating realistic textures. All its gadgets are engineered, keeping texturing and skinning in mind. You can use this software as a precursor to the other software in this list because indeed, the capabilities as mentioned above offered by Substance Designer are beyond par. It is one of those 3D modeling programs which are easy to learn and that create outputs quickly. Another strong point of Substance Designer is material authoring (creating different materials with a variety of textures, attributes, and properties; used as a base for other 3D models).
Revit
Revit is paid 3D modeling software developed by Autodesk. It specializes in 3D architectural design and structural engineering. It is priced a little higher than the other architectural tools but is worth it. The technical support is impressive, and the software comes with a 30-day money back guarantee. There are a lot of online tutorials and educational content available with Revit, which is great for architectural students. It is easy to share your work with team members, and the rendering features are also very efficient. Like all Autodesk products, Revit radiates quality and robustness in its operations and results. A fantastic pick for both students and industry professionals, this epitome of 3D software runs smoothly on both Mac and Windows.
SelfCAD
This is another great program released just recently. It is an online 3D modeling software that is meant for both beginners and professionals in 3D modeling. SelfCAD has a simple and intuitive interface, which makes it easier for one to get started. It is the only program that has combined technical, artistic, and 3D printing tools in one application. In addition to that, one can also animate their designs in the program using the animation feature. SelfCAD’s in-built slicer allows you to slice your designs to generate the G-Code that you can send to your printer. There are many Youtube tutorials on Youtube and on the tutorial section of their website to help one get started quickly. SelfCAD has both free and paid options. With the free account, one has access to all the tools, but you can’t export your designs.
AutoCAD
One of the most widely used 3D modeling software in both institutions and corporates, AutoCAD, is a versatile and powerful tool for creating blueprints for buildings and architectural designs. AutoCAD has a plethora of online tutorials and walkthroughs, which makes it a students’ favorite. With its state of the art toolset and efficient rendering algorithms, AutoCAD is the best of its kind. It works great on both Mac and Windows and guarantees a glitch-free user experience. AutoCAD skills are considered as a prerequisite for many civil engineers who are applying for construction and architecture firms.
Related: You may check out open source alternatives to AutoCAD
OnShape
OnShape offers a central workspace where different team members can collaborate to create stunning 3D models. Professionals and corporate employees prefer using OnShape for their fantastic project management capabilities. Apart from this, OnShape is a 3D modeling software that works on a cloud-based SaaS model. It has a central repository which can have branches, very similar to the programming repositories like Github. It works on both Mac and Windows and is not so harsh on the budget. It has a free version too, but it does not offer many features.
Poser
Poser revolves around designing human faces and characters using algorithms that help in rapid designing via changing a ‘base figure.’ Not only can you create human characters, but you can also design backgrounds importing huge materials. A poser is an independent tool that is enough to cater to all your requirements from A to Z. Like the other software in this list, you can work with cr2, pz2, and obj formats with ease. Renderosity is Poser's official marketplace.
Conclusion

We know that picking just the right software is a tough decision, especially when the prices are so high. But trust us, the money is worth the results. 3D modeling is an art on its own, which requires a highly creative approach from the artist. Along with this, a sound technical mind is also necessary. Some of the 3D modeling software (mostly the free ones) in this list will help you start this incredible journey. Once you get the hang of it, you can judge on your own and choose which software is compatible with your working style, which satiates all your requirements, and most importantly, gives the best results. Happy designing!
Ready to showcase your design skills to the world? Make an online portfolio and present your designs there. Pixpa has many visually appealing themes for you. Sign up for a 15 days free trial today.
Disclaimer: The images shown are for illustration purposes only and may not be an exact representation of the final product. All images are copyright to their respective owners.
Liked this post? Share it now.
Assists you in printing 3D models and simplifies the whole process by offering you built-in printing profiles and the option to control almost every aspect of the procedure
Autodesk Slicer For Mac Os
3DimMaker is powerful software solution that aims to make it as easy as possible for you to print complex 3D models and, with the help of its “slicer” feature, to generate accurate G-code.
Getting to grips with this application is no big challenge since it comes with an intuitive user-interface that features large buttons and easy to understand functions.
Powerful application that features a straightforward workflow
In order to take advantage of 3DimMaker’s capabilities, obviously, you will have to make sure that your 3D printer is connected with your Mac and properly configured.
Subsequent to this step, you will need to either load the 3D model from a STL file and manipulate the object in the scene in order to determine a good position, as well as to adjust its dimensions with the help of the draggers located on the three axes.
From here onwards, you will have to specify the exact output options, like the extruder width, speed, and temperatures, the dump area and certain preheat settings.
Take full control over the process of printing three-dimensional objects
Probably the best feature is the fact that 3DimMaker bundles a robust slicer that optimizes generated G-code and uses complex solution for rendering high quality 3D models.
If the overall printing configuration process seems a little too complex, then rest assured because 3DimMaker comes with a collection with handy built-in printing profiles that have the potential to save you a lot of time.
Another plus is the fact that during the printing process, 3DimMaker automatically controls the temperature of the model so it doesn’t overheat. Also welcomed is the ability to manually change the temperature and other parameters during the printing process yourself.
Robust yet user-friendly software solution for 3D printing
Taking all things into consideration, it can be accurately stated that 3DimMaker is a competent and handy application that does a very good job of helping and assisting you in printing 3D models from STL files.
Filed under
Fusion Slicer Autodesk
3DimMaker was reviewed by Vladimir Ciobica
4.0/5
LIMITATIONS IN THE UNREGISTERED VERSION
30 days trial
Can only print up to 30 items in total
SYSTEM REQUIREMENTS
64-bit processor
4 GB RAM or more
512 MB video card or better
3D printer
This enables Disqus, Inc. to process some of your data. Disqus privacy policy
3DimMaker 1.0.18
add to watchlistsend us an update
8 screenshots:
Autodesk Slicer For Mac Installer
runs on:
Mac OS X 10.7 or later (Intel only)
file size:
34.7 MB
filename:
3DimMaker_1.0.18.pkg
main category:
Graphics
developer:
visit homepage
top alternatives FREE
top alternatives PAID
0 notes
Text
RESOURCES
Readings RESERVED BOOKS:
Product Design and Development – Karl T. Ulrich;Steven D Eppinger (TS171 .U47 2016)
Understanding Comics – Scott McCloud (PN6710 .M335 1994)
Emotional Design why we love (or hate) everyday things – Donald Norman (PN6710 .M335 1994)
Toys as Culture – Brian Sutton-Smith (HQ784.T68 S88 1986)
The First Book of Toys – Helen Hoke and Walter Pels (TS2301.T7 H58)
ONLINE BOOKS AND ARTICLES:
Play Makes Us Human I: A Ludic Theory of Human Nature
Homo ludens: a study of the play-element in culture Chapter 1: Nature and Significance of Play as Cultural Phenomenon
The Play Pyramid: A Play Classification and Brainstorming Tool for Toy Design
The First Book of Toys
Karakuri by Keisuke Saka. Chapter 2: How Karakuri Works
Marcel Duchamp: “Twisting Memory for the Fun of It” or a Form of Retroactive Interference?—Recalling the Impacts of Leaving Home on the Readymade
READYMADE, Tate Art Terms
The Future of Design: When you come to a fork in the road, take it. Donald Norman
How to Make Almost Anything, Neil Gershenfeld
Metamaterial Mechanisms
Making Things Move
Other Resources
Objectified
Arvind Gupta: Toys from trash for learning
Toys from Trash
DRAWING AND ILLUSTRATION
Ed Emberley
Allemaal Artis
E-TEXTILES
http://etextile-summercamp.org/
PAPER TOYS AND MECHANISMS
Free Automata
Paper Toys Flickr Resource
Kazuyuki Motoyama – Paper Mechanisms
Rob Ives – Mechanism animations
Paper Mechanism – Penguin
Papier Machine
Mechanical Toys
Cabaret Mechanical Theater
Kazuyuki Motoyama – Paper Mechanisms
Paper Mechanism – Penguin
3D MODELING CINEMA 4D:
eyedesyn
greyscalegorilla
3D MODEL TO PAPER:
MeshLab
Slicer for Fusion 360
Fusion 360
Panda 3D Model
ILLUSTRATOR
DIY rubber stamp on the Laser Cutter
MaterialsCRAFT SUPPLIES
Craft Supplies: Knitting and Sewing, ONE DAY SHIPPING
Yarn 2mm
Yarn 3mm
Yarn Needles Plastic
Yarn Needles Metal
Pompom Maker Set
Ergonomic Crochet
Toy Eyes
Toy Eyes: Buttons
Purse Magnets
TEXTILES
Furry Cloth:
furry cloth
furry cloth
lamb fabric: jacket inside fabric felt fabric plush fabric decorative fabric (Peruvian Syle) Dish Sponge Rectangular Shape for Stuffing
ART SUPPLIES
Micron Sketch Pens Color Sketch Pens Staedtler Erasers Staedtler Pencil Sharpener Faber-Castell 9000 Pencils Shape Drawing Rulers
Shape Drawing Rulers
Shape Drawing Rulers
1 note
·
View note
Text
Week 10 - Measurements and Model Making
Tutorial
This week we were taught how to measure our chosen product and had to construct the profile and contour lines. There were multiple tools such as skewers, calliper and profile gauge to measure out the contour of the object. I found the profile gauge to be the most useful for the contours and irregular faces.
Prac
During the practical lesson we were divided into different groups to learn about the tools we could use in order to complete this task. I found this very helpful as the tutors were very informative on how the tools worked and what they were used for.
Method
I used fusion 360, which i learned from high school when doing Design and technology, to create my object in 3D. As my object was a metal kettle, which meant it had a lot of curved surfaces. Knowing that i couldn’t just use regular ruler to measure the diameter, i used string to measure around the kettle. While doing this i measure diameter every 1cm. After inputing the measurements onto the fusion 360 and creating my object, i used an application called Slicer in order to split my object into individual sliced pieces. This allowed me to see all the different shapes and slits that were needed in order to create my 3D object. The total pieces i had to cut was 42 pieces and was printed on an A3 paper with 1:1 scale. I placed the printed shapes on a 3mm foam-core, cutting the foam-core following the print. When all cut, i joined each pieces together, weak or flimsy pieces glued together to hold it together.

(Above Picture - my chosen object on Fusion 360)
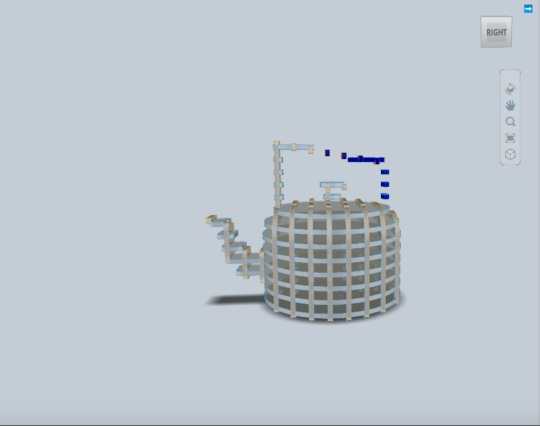
(Above Picture - my kettle imported from Fusion 360)

(Above Picture - my 2D pieces)
Outcome
What did i enjoy and dislike? Why?
I enjoyed using the Fusion 360 to create my object in 3D form. I disliked the measuring the contour of the kettle as it took a long time and effort.
What went well/ what difficulties did i face? Why?
Creating my object on Fusion360 went well as i had some knowledge on the software, however i did face difficulty when measuring the tip of the kettle which was curvy.
What did i learn?
I learned how to export things onto slicer, which will create 2D shapes that will form into a 3D shape. I also learned how to measure contours and curvy shapes.
What do i need to improve on?
I need to improve on learning how to finish my product more neatly and aesthetically pleasing. My object had little glue stains and accidental cuts that were quiet visible, downgrading the objects aesthetics.
3 notes
·
View notes
Text
Week 10 - Blog Entry
Tutorial This week, we were taught to measure our models using a variety of different tools. This included vernier calipers and skewers. The skewer tool in particular intrigued me. It was a great device to use for the contours and irregular faces of the object.
Prac
During the practical lesson, we were split into groups to learn about different tools to measure our objects.
My process
In previous years of high school, I developed a skill for using fusion 360, an Autodesk software that was similar to AutoCad. Using Fusion 360, I was able to create a three-dimensional object using the X, Y and Z plane. This was a very useful solution to creating the bare bones project as it allowed me to put in accurate dimensioning and measurements of my polaroid. Additionally, it allowed me to view the object In a three-dimensional plane. After using Fusion360, I used a software called Slicer for Fusion. This software is specifically designed for slicing fusion objects into either separate sliced pieces, or interlocking pieces, ready for laser cutting. This software allowed me to explore all the different 2D shapes I needed to cut to assemble the object. Eventually there were 28 pieces. All pieces were printed onto A3 paper, and scaled, then traced onto 3mm foamcore and cut and assembled, joining all flimsy pieces with glue.
What went well/What did I have difficulty with? Why?
Measuring the objects were difficult at first, as I was unsure of the best tool to use for measurement. Eventually I opted with vernier calipers which definitely helped me with the overall dimensions. As for the curved edges, I made myself a tool using cardboard and skewers which was very useful in determining the contours of my object. Luckily, the object I chose (a polaroid) had limited curved edges, making it easier to make.
What did I enjoy/dislike? Why?
Throughout the process of creating a skeletal object, the most enjoyable part was moving the Fusion object into slicer and watching all of the parts interlock and slice into place. One part that I disliked was the cutting of all the shapes, especially the small parts. Another part I liked was finally joining, assembling and gluing the whole object together.
What would I do differently if I had my time again? Why? Next time, I would play around and tweak around the numbers of layers and parts that interlocked together. I think if I sliced it in a different direction or at a different angle, it would’ve capture more of the essence and detail of the polaroid.
What were some of the key things I learnt, or insights which I developed? I learnt to use the slicer for fusion tool which is quite definitely a tool that I will use forever. Slicer for Fusion has made me think of other objects to slice to eventually laser cut into sculptures or models for leisure.
What do I need to learn more about? Where are my knowledge gaps?
I need to learn more about CAD and how to set the page up properly, especially with the dimensioning and measurements, as well as the text.


3 notes
·
View notes