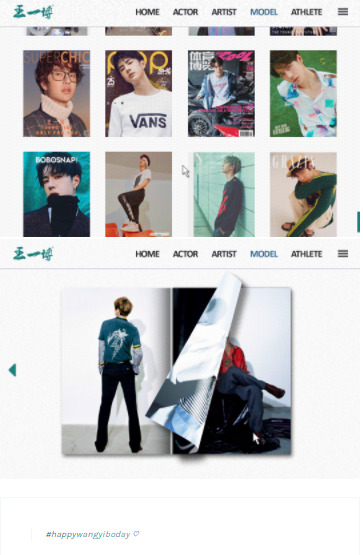
#some low quality gifs within to illustrate
Text
The Many Illustrators of
A Tale of Two Cities
1: Hablot Knight Browne (a.k.a. Phiz)
...& a century-and-a-half-long game of telephone...
For the first post in a series on the book's illustrators, how could we start with any but the very first one?
"Although a number of critics have pilloried Hablot Knight Browne ('Phiz') for his supposed ineptitude in the program of illustration for A Tale of Two Cities, the fact that he so astutely realized and graphically elaborated so many significant elements of Dickens's letterpress is evidence that his pictorial series reflects an extremely careful reading of the printed text...The visual accompaniment [that these illustrations provided to the novel's monthly installments] was not mere ornamentation, but an aide-mémoire intended to facilitate the monthly reader's keeping track of a discontinuous narrative over a period of seven months."
from "Charles Dickens's "A Tale of Two Cities" (1859) Illustrated: A Critical Reassessment of Hablot Knight Browne's Accompanying Plates" by Philip V. Allingham from the 2003 volume of the journal Dickens Studies Annual.
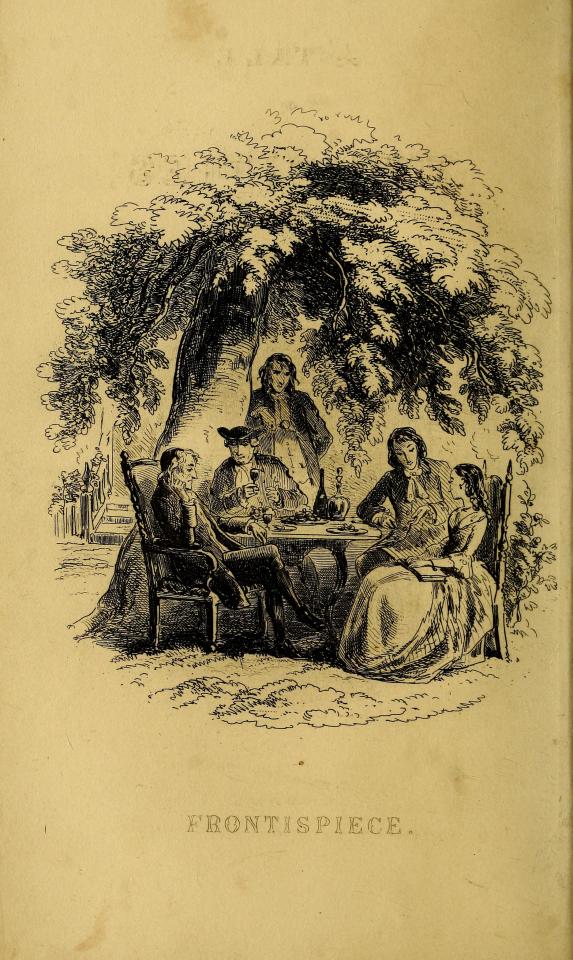
Frontispiece
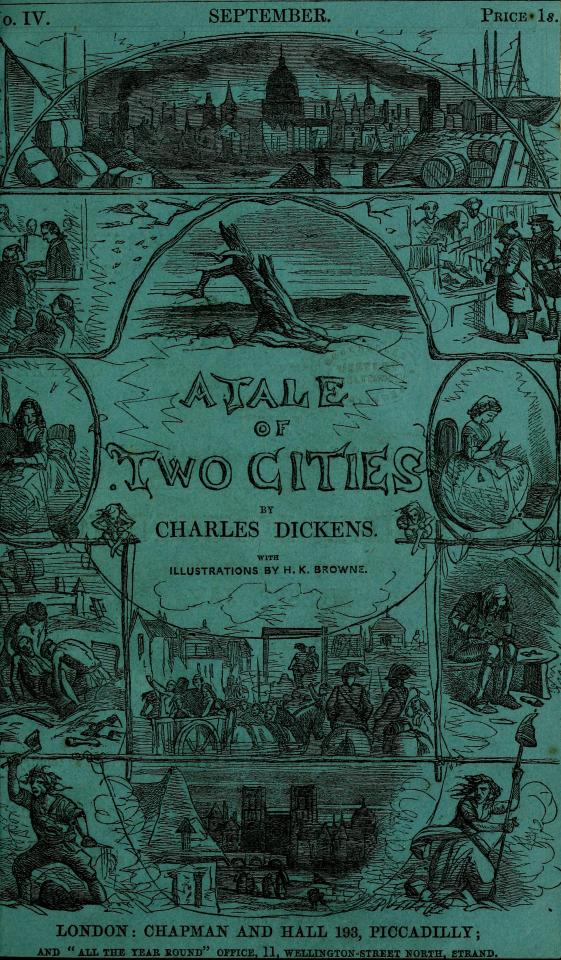
Cover to the Monthly Installments
Vignette
For some perspective on the significance of this first set of illustrations - published initially within monthly installments of the novel in 1859 (the text of which was collected from the original weekly installments published in All the Year Round, also in 1859) - that single quote comes from an entire article on these illustrations that is itself 49 pages long.
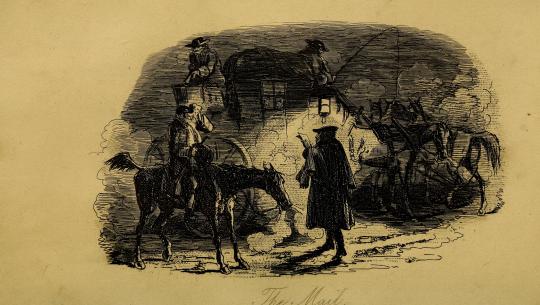
The Mail
As such, suffice it to say that this particular post will not be a thorough examination of the history, context, and impact of these illustrations (though, for those interested, be sure to click on any links you see throughout this post for all sorts of further reading!).
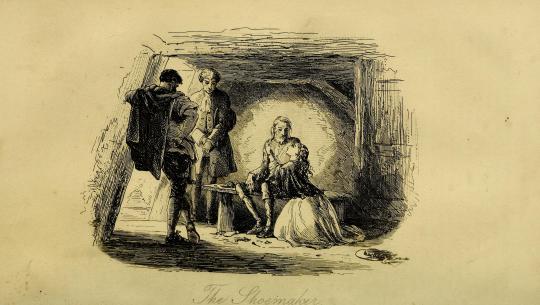
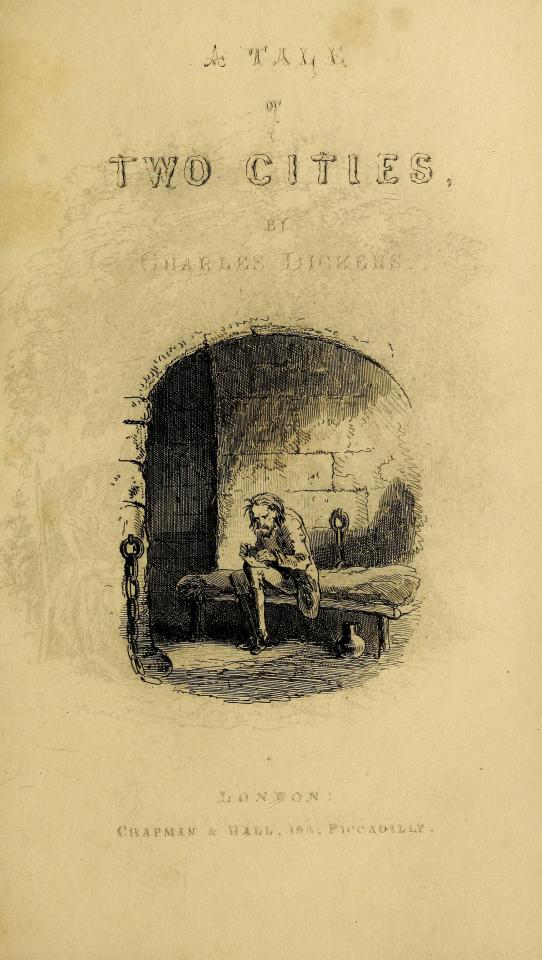
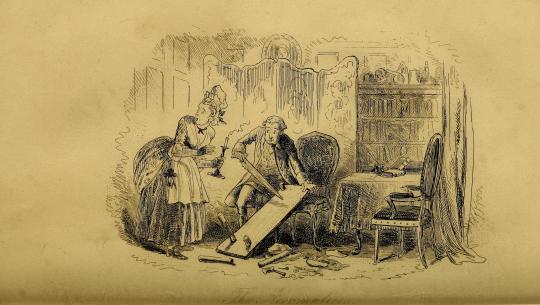
The Shoemaker
Instead, it will simply be a place to observe and appreciate these illustrations for what they are, in their "original" glory.
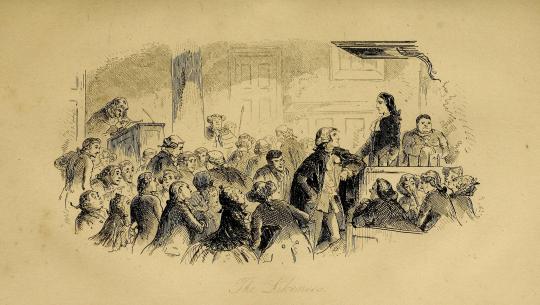
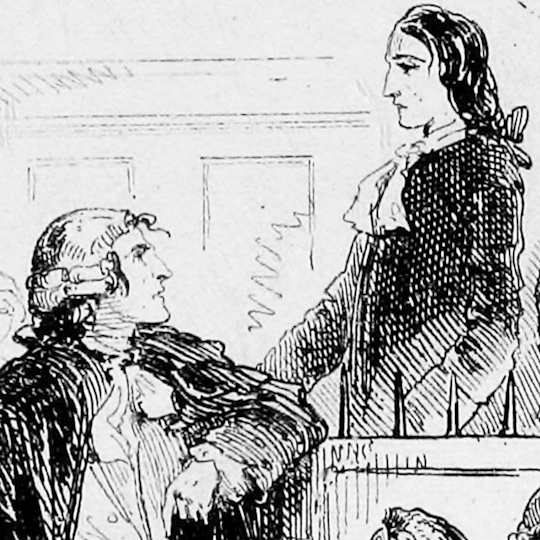
The Likeness
...I mean, just look at these things! (I'm of course gonna break formality after this one because it's my favorite😌)
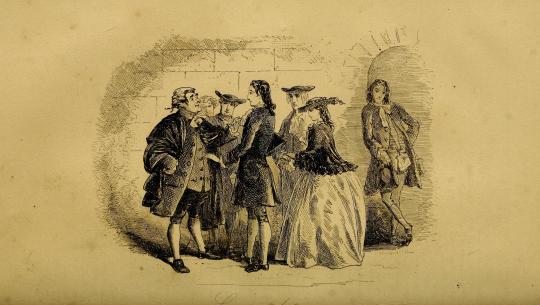
Congratulations
In terms of the odyssey of finding the proper edition of these to post, "original" is the operative word.
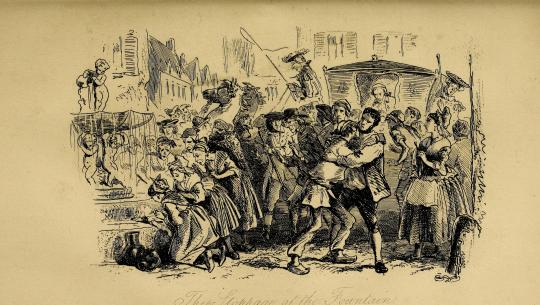
The Stoppage at the Fountain
These are the oldest (except for some or possibly all of McLenan's...more on that many months from now though) and certainly the most iconic of the illustrations of this novel and thus have also had the most mileage, having been passed from edition to edition to edition countless times over the last 164 years.
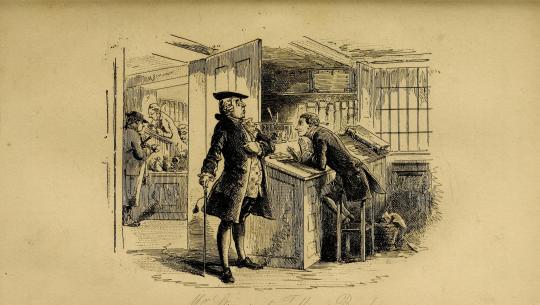
Mr. Stryver at Tellson's Bank
That means - as the gif at the top of this post demonstrates - that these illustrations have slowly been "translated" over time into dozens of distinct images - in ways as innocuous as a change in a shadow and as striking as a change in a character's facial expression.
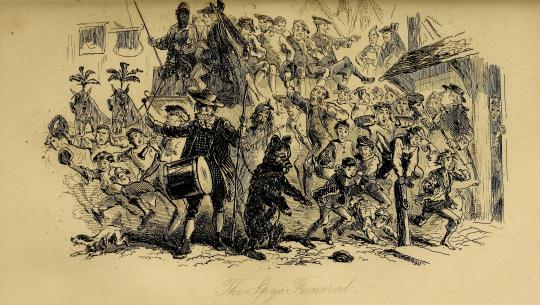
The Spy's Funeral
These translations have happened in all sorts of ways over the development of printing technology - blemishes, xeroxing errors, low-quality or blurry scans, too much ink being used in printing, image compression, sometimes even actual tracing of the original illustrations! - and as interesting as they can be on their own, for someone determined to find the most accurate representation of Phiz's phenomenal work, they can be...phrustrating.
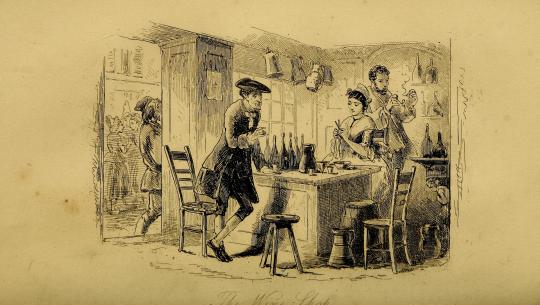
The Wine-shop
In fact, as a sidebar, the illustrations that I used for the Best Character Showdown bracket turned out to themselves be traces and not originals! I am Ashamed and disheartened!
You could even say that I am yet another...
The Accomplices
accomplice in the mistranslation of Phiz's work!
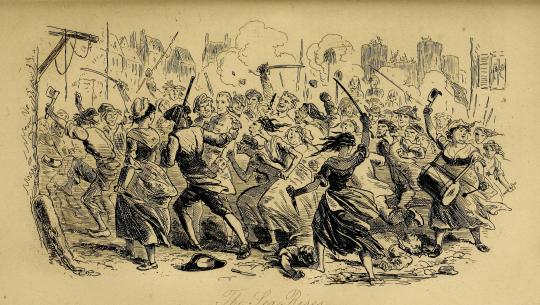
The Sea Rises
Rest assured, though - although they are not from the monthly installments themselves (which as far as my research has gone do not seem to be anywhere on the Internet), these particular scans are sourced directly from an online scan at the Open Library project (contained within the Internet Archive) of the first edition of A Tale of Two Cities, itself also published in 1859.
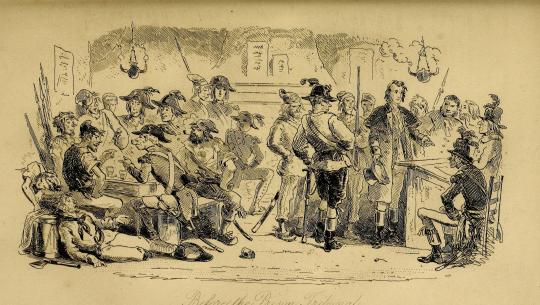
Before the Prison Tribunal
I do wish that they hadn't been cropped the way that they have and that they were available in a (much) higher resolution, but as of now, they're the best representation of Phiz's original work that we netizens have!
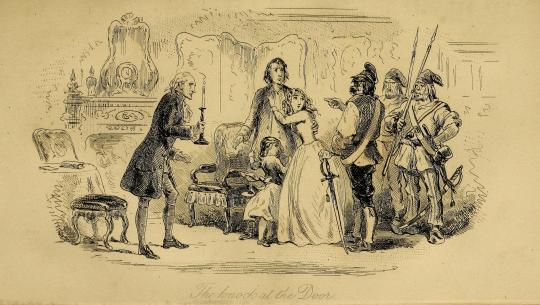
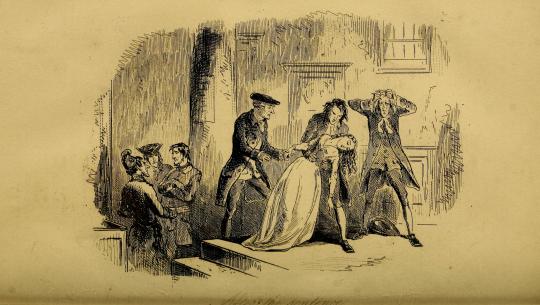
The Knock at the Door
A Tale of Two Cities was the final novel that Phiz illustrated for Dickens - and marked the complicated ending to a twenty-three-year (yes) professional partnership between the author and illustrator - but his work here will mark a beautiful beginning to the long archiving project we will experience together here on this blog.
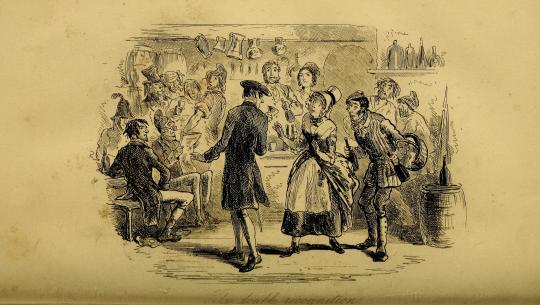
The Double Recognition
Throughout the work of this project, there will be quite a variety of sources being used - from direct scans by me to the two-tone abstractions of PDFs clearly not created for the purpose of storing image information - depending on the needs and availability of each edition.
After the Sentence
All of it goes to show the importance of accuracy and attention to detail in archiving art, which is itself an art form to be appreciated.

Hope you've enjoyed!
& the standard endnote for all posts in this series:
This post is intended to act as the start of a forum on the given illustrator, so if anyone has anything to add - requests to see certain drawings in higher definition (since Tumblr compresses images), corrections to factual errors, sources for better-quality versions of the illustrations, further reading, fun facts, any questions, or just general commentary - simply do so on this post, be it in a comment/tags or the replies!💫
#A Tale of Two Cities#AToTC#classic literature#victorian literature#dickens#charles dickens#engraving#illustration#illustrators#Phiz#Hablot Knight Browne#1850s#HOUUGHHHAGHGUHGGHHHHOUHGHHOUHGHHGAHGHSGHGHGH#how long have i been working on this today? has it been eight hours?#well? how did I get here?#again most of them won't even remotely be like this#but it's phiz! i gotta do phiz right!#also for the record: for the first gif I made all eight variations grayscale and modified their contrast#and for the second gif I sepia-toned and modified the contrast of one of the illustrations#all for the sake of readability and reducing flashing!
27 notes
·
View notes
Note
please write an essay on everything happening there (no pressure of course, but if you feel so inclined <3)
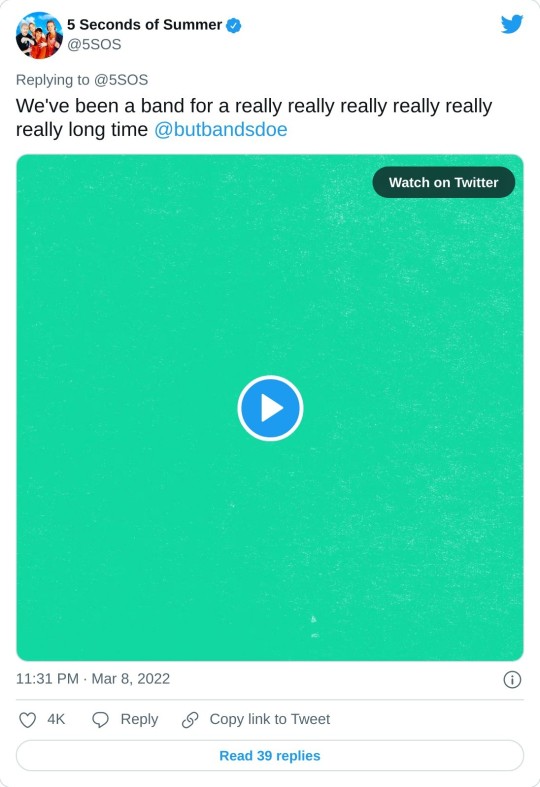
oh team, i should have known you would appear to indulge me.... a short report on the approximately seven seconds of calum touching luke’s wrist:
so first of all the video in question is this one:
View on Twitter
as soon as the tweet mentions luke's tattoos and we cut back to the boys, calum scooches in and reaches right over to poke luke's wrist and tell him to tell everyone about it. he decides to immediately touch him as he leans over his shoulder (who wouldn't take this train of thought when luke's wrists are so nicely on display for us!)
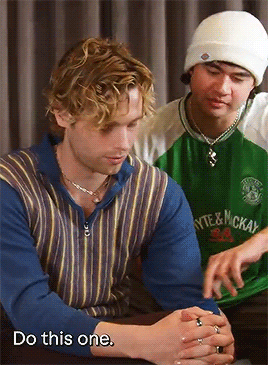
calum leans back for a second, but as soon as luke carries on talking about it, he's back in to touch luke's wrists again. the act of this in itself is such a testament to how casually they touch each other. oh! luke's talking about his tattoos! oh! i should touch them! it’s like we’re watching them have their own little moment with no one else there
he starts by hovering over his wrist but then he goes for a an initial hesitant little touch as luke points. then he slowly runs his index finger over it, his finger kind of sliding off luke's skin. it's very gentle, just a light brush, but also incredibly lingering. it's kind of slow and tender as he just strokes luke’s wrist??? what’s that about????
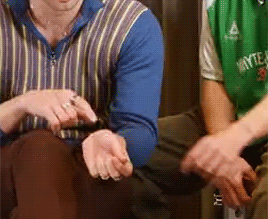
but that's not all! because after his finger slides over luke's skin, he then goes back in to hold his wrist between his thumb and forefinger. he stops for a second, like he's considering he can get a better grip on luke's wrist, and stretches his forefinger out as if he's going to loop it around to encircle it.
he seems like he's going to hold onto luke’s wrist to get a better look, or just to hold it for a moment. luke moves his hand away, almost unconsciously, as he points at his other wrist, but calum's hand is still there. and as luke moves away, calum’s hand drifts towards it as if he can catch Luke back in his grip. his hand hovers there a little questioningly for a moment before he draws back, like he can possibly keep luke there, or his arm will fall back into calum’s grip. then he just rests his hand back on his own knee.
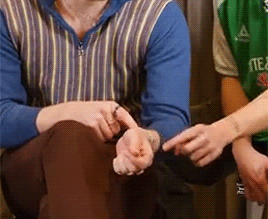
we also get a split second where calum goes back in for another point right at the end. because he can't get enough! it gets cut too quickly to see if he makes contact, but we know he’s going for it.
the way this tells us so much about how these boys are with each other, delicate little touches just because they can, an automatic response to be in contact, calum’s unconscious movement to chase luke when he moves away from him, the inherent intimacy of these tiny touches. them<3333
#ask#4thbrighteststar#thanks team !!!#i feel so insane about them actually#cake#some low quality gifs within to illustrate
42 notes
·
View notes
Text
Cataloguing Homestuck’s Art Styles
Hussie deploys a number of distinct art styles throughout Homestuck, each serving different purposes in the narrative. A number of these, especially those mentioned in the published book series’ author commentary, have been catalogued in the Homestuck wiki [1]. These officially named styles are well-known enough to appear in quora answers. However, Homestuck employs a much larger variety of stylistic manipulations than explicitly mentioned in the book commentary or wiki. While scanning through the comic again for this project, I wanted to catalogue the rest of them!
This post constitutes a working list of all distinct art styles present in Homestuck. I’ve chosen not to include the distinct styles of the fanartists/outside artists who contributed to the comic; that will be a project for another day. As far as I know, this list only comprises the different styles Hussie develops throughout the comic. I have tried to bring a degree of specific formal analysis (also known as art-historical language) into my description of each style.
1. “Classic” Style

Page 1 of Homestuck

Page 1349 of Homestuck
Page 4227 of Homestuck
The “Classic” Homestuck style appears on the first page of the comic. Although not officially described by the wiki, it is widely understood as the comic’s typical graphic norm. Characters have simplified faces and clothes, and they frequently lack arms. Elements are often outlined in a black stroke, especially to differentiate them from other adjacent, similarly-colored elements. In more colorful panels, scenery may be made up of solid blocks with bright colors. Sprites (base character illustrations) and elements are repurposed from panel to panel in new combinations. Homestuck even takes up the repurposing of sprites as a gag, as in page 1349 above where the ability to flip one’s sprite allows Noir to regain his lost wrist barcode.
This style obviously shares characteristics with Hussie’s style in Problem Sleuth. General characteristics that frequently appear in Hussie’s art are present, such as circular faces and rounded edges on quadrilaterals. The Classic Style umbrella actually covers the broadest range of visuals out of any style catalogued here. The uber-simplistic sprites, such as John on page 1, have typically been lumped in with, for example, the illustration on the cover of Homestuck Book 1, or the two other examples I pulled for this post. So, in the Classic Style, characters can sometimes appear with arms, sometimes without, and in outfits of varying detail, but they retain the same facial features and simplistic quality. The circular facial shape is especially characteristic of this style, along with the lack of a neck. The neck-less quality, static poses, and simplistic detail chiefly differentiate some instances of Classic Style from Hero Mode, though there are still some grey areas.
2. Scribble Mode

Page 1931 of Homestuck

Page 1937 of Homestuck
Page 1798 of Homestuck
Page 3140 of Homestuck
This style is recognized by the Homestuck wiki, which describes it as emphasizing “a particularly silly/stupid moment in the story, particularly those to be imagined by a character.” That is to say, this style often denotes imagined scenarios which do not actually occur in the comic but instead in a character’s imagination, and especially those which form the butt of jokes. It is also employed simply to highlight silliness. This style is constructed to appear as if the author has “scribbled” rapidly between the outlines of forms to fill in color, creating gaps in those forms. Generally, strokes are made to seem more careless, and less detail is used. While the style is meant to mimic a scribbling motion, it does not always end up crude or parodic. For example, in this “charming vignette” (in Hussie’s words) depicting the Mayor’s dream, the scribble style actually illustrates a remarkably beautiful and almost impressionistic series of panels. Although the dream vignette has certain obvious scribbley elements and certainly depicts an imagined scenario, I would argue that it combines aspects of both Scribble Mode and Hussnasty Mode (#4 in this post) throughout.
I have also identified two distinct styles within the Scribble Mode umbrella. One always uses a thin, apparently single-pixel-wide black line to outline forms, while the other uses a thicker stroke for both its filling and outline. You can see the difference between these in the four examples I’ve pulled; they are sometimes even combined within one single Scribble Mode panel.
3. Hero Mode
Page 1815 of Homestuck

Page 2063 of Homestuck
Hero Mode was officially named as such by Hussie. The Homestuck wiki page describes it as cropping up to “emphasize a particularly epic moment in the story.” Hussie originally called the style “action panels” before hitting upon the current name, emphasizing the link to action scenes and dynamic poses. Along with dynamic posing, characters are drawn in greater detail and tend to have elongated limbs. Some crossover can be seen between Hero Mode and Hussnasty Mode. I would argue that characters in Hero Mode usually retain the original style’s characteristic lack of a neck, while Hussnasty Mode often adds one. Compared with the Classic style, Hero Mode always adds arms. The degree to which Hero Mode drawings include the “hatching-type effect” characteristic of Hussnasty Mode varies from panel to panel. The difference between Hero Mode and Classic Mode can be observed clearly on these two pages, where Damara shifts between the two styles at the behest of Scratch, who asks her to “render [herself] in a more symbolic manner.”
The wiki asserts that “Hero Mode dispenses with the black outline that typifies sprite-style animation and scribble mode,” but I don’t think it can actually be characterized as the only lineless style. Scribble Mode and Hussnasty Mode also sometimes feature a lineless graphic style depending on which part of a character is being depicted, or the need for a line to differentiate two features of a similar color. A willingness to move between lined and lineless blocks of color characterizes Hussie’s art as a whole.
4. Hussnasty Mode
Page 2805 of Homestuck
Page 2976 of Homestuck
This art style is also named by the author. In his commentary on page 2805, he writes: “Someone asked me what I called the style, and I replied by naming it "Hussnasty Mode" myself, because well… it's a bit nasty, isn't it? Kind of raw, a little over-illustrated, and making use of a lot of jagged aliased pixel edges for a hatching-type effect. It was sort of the point to make it a little nasty, kind of aggressively incongruous with the other styles previously established.” This quote sums up the style’s characteristics pretty well. Hussie also describes how this style is more naturalistic, or less symbolic, and was meant to work in direct contrast to the extremely symbolic RPG Sprite Mode. He writes that “drawings like this are introduced in contrast with this simple RPG sprite mode, which was also established very recently as something that Homestuck was "allowed" to use as a stylistic presentation of characters and settings… Every time HS does something like this, it's widening its own umbrella in terms of what it's allowed to do stylistically, which includes dramatically simplifying and abstracting its forms. Which implicitly asks another question: Can HS "allow" itself to go in the other direction? To render characters with higher degrees of definition, regardless of congruity, and freely navigate this full artistic palette at any time, resulting in sharp stylistic contrast and a certain amount of visual thrashing? The answer to that question, almost immediately after it's asked in the form of dropping RPG-sprite Rose into a standard panel shot, is yes, HS can do that, and clearly it WILL do that.”
5. RPG Sprite Mode
Page 2804 of Homestuck
Page 2824 of Homestuck
Despite being officially described by the author, RPG Sprite Mode hasn’t gained much representation as a distinct style (it does not have a wiki page, for example). This style appears after Homestuck’s first walk-around game, now incorporated as a style for static or gif panels. After their joint introduction, this style is juxtaposed against the Hussnasty style. The quotes pulled above in the section on Hussnasty Mode nicely describe the contrast between these two styles and their greater impact on Homestuck’s graphic norms. RPG Sprite Mode always shows characters from an aerial view, mimicking the style of the first walk-around game, which in turn mimics a wealth of RPG sprite games (such as the original Pokemon games). Sprites from these sorts of early games can be characterized by their almost pointillistic use of individual pixels to carefully construct forms.
6. Terezi’s Perspective

Page 2756 of Homestuck
Page 2128 of Homestuck
This style hasn’t been officially described yet. It only crops up as a representation of Terezi’s perspective, conveying some of her experience tasting and smelling colors. While it only appears a few times in the comic, I think it is uniquely visually interesting, and it includes “blurring” techniques which are only rarely employed in the rest of the comic. I’d guess that the effect is created by layering low-opacity strokes over one another and then sliding the different layers’ opacity up and down.
7. SBAHJ Style

Page 8 of Sweet Bro and Hella Jeff
Page 3451 of Homestuck
The SBAHJ comic, featured both within Homestuck and as a spin-off, has its own recognizable style. In the first few pages it has a lot of commonalities with Homestuck’s two versions of Scribble Mode, but later takes on distinct characteristics. It can be characterized in part by its image clipping, an effect where an element is made to look like it has been selected within a square box (in MS Paint or Photoshop) and dragged around the page with little care for the size and accuracy of the selection box. Commenting on page 3451, Hussie describes this effect as follows: “In the SBaHJ comics, one of my cool tactics—which I'm almost positive I invented as a sequential artist—was to elaborately render someone ‘turning around’ by taking one shot of them and gradually altering the pose by crudely rectangle-selecting pieces of their face and nudging them around until they're facing the other way in a totally unconvincing and utterly hideous manner.” Different from Scribble Mode, the SBAHJ style also frequently features blocks of color that appear to be filled with the “paint bucket” tool. When the paint bucket tool is used to fill anti-aliased stokes, it creates a small transparent space between the filling and the original outline, visible in the SBAHJ graphics. Finally, SBAHJ comes to include image compression and glitching, created through “deep frying” compression techniques. Overall, the breadth of manipulative techniques made apparent to the viewer in SBAHJ is much greater than any other style. SBAHJ panels are reproduced wholesale or hyperlinked in Homestuck, but on these two pages Gamzee is also drawn in the SBAHJ style.
8. Caliborn’s Styles

Page 5075 of Homestuck (hyperlinked in pesterlog)

Page 6259 of Homestuck

Page 6929 of Homestuck
Page 6864 of Homestuck
While Calliope’s in-world art was contributed by Shelby Cragg, Hussie gives Caliborn has three styles of his own. The first is his “angular” style, which Calliope aptly characterizes on page 5109 as containing “inscrutable squiggles” and demonstrating a “penchant for arbitrary, completely baffling straight lines and right angles, almost as if trying unsuccessfully to begin constructing a grid.” The second is the style he uses in Homosuck, which retains elements of his original “baffling right angles” but generally takes on the black outlines characteristic of Homestuck’s Classic style, while employing even cruder detail. Finally, after reading a “How to Draw Manga” book, he develops his “manga” style which uses black strokes, somewhat messy coloring (usually with the paint-bucket tool), and shows an attempt at naturalistic representation despite a complete lack of understanding of human anatomy. This style is specifically meant to emulate manga styles, so it features the characteristic white dots as highlights in the eyes, among other features.
————————————————————————
As becomes apparent through Hussie’s commentary, the different art styles employed in Homestuck do more than just emphasize certain moments; they form part of the comic’s visual language and ask us to question our understanding of graphic representation. The scope of this post also illustrates the attention paid to Homestuck’s visual elements throughout the story’s production and within its readership, even if these visual distinctions have received less attention in scholarship. Despite the variety of styles, we can see Hussie’s characteristic artistic tools, techniques, and sensibilities reflected across the comic.
If you find any styles recurring in the comic that I haven’t mentioned here, feel free to shoot me a message! Again, I haven’t included styles from other contributors; only those developed and drawn by Hussie.
————————————————————————
As we approach the close of the semester, I’ll probably be putting out one more post sometime soon! If you liked this post, you can follow the blog on tumblr for updates or, if you don’t frequent tumblr, sign up for the mailing list to receive an email whenever I publish a new mini-essay!
————————————————————————
[1] These include Hussnasty Mode, Scribble Mode, and Hero Mode.
91 notes
·
View notes
Text
#showyourprocess
From planning to posting, share your process for making creative content!
To continue supporting content makers, this tag game is meant to show the entire process of making creative content: this can be for any creation.
RULES — When your work is tagged, show the process of its creation from planning to posting, then tag 5 people with a specific link to one of their creative works you’d like to see the process of. Use the tag #showyourprocess so we can find yours!
Tagged by @leonzhng and @yiling-recesses thank you sm for tagging me!!! 🥰 i did the yibo gfx one, sorry mimi i lost all photoshop files for the genshin edit you mentioned, like i literally can;t find them lmao 😅 but the process is pretty much the same as this!
tagging:
@theghostvalley for this set - i love your colouring, your gifs always look so quality!!
@claudiablack for this set - your colouring is always stunningly gorgeous and i'm just blown away how well the colours work together in this set??
@runqings for this set - i love the scene choices and the colouring is beautiful as well!
0. Software
photoshop (cc 2015 when making the yibo edit but currently 2021)
topaz clean + denoise
after effects cc 2020
1. Planning
whenever i do an animation gfx i usually always write a notepad for what i plan to do - ideas, the animations, aesthetic etc

also cos i have no idea about web design i subscribed to some webdesigner websites and checked sites like awwwards for popular/trending website design features + i've gotten quite into the aesthetics and animations of websites now!
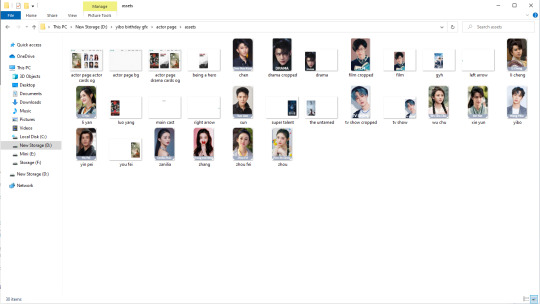
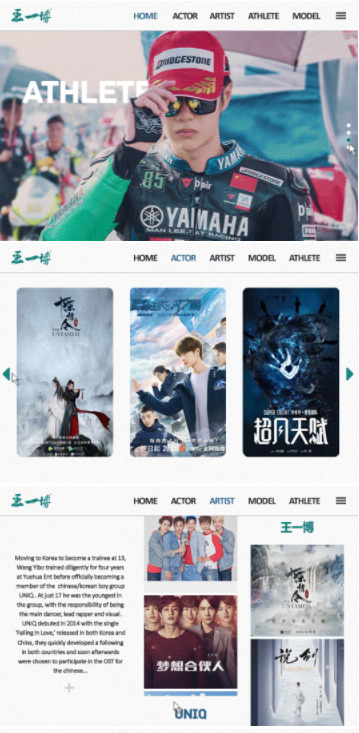
after i have a basic plan for what all the panels are gonna include, i find and download all the images i need, so for the yibo website that was all his magazine covers, pics of his albums + drama posters, other pics of him + pics of the cast and their characters for legend of fei
then i trawl through color schemes trying to find one i like, tho with website gfx the predominant colour has to be white otherwise the gifs will end up being too large/super grainy/photoshop will mess with the colours so they aren't the same anymore 😩
2. Creation
i design all the panels in photoshop first which is the longest step in all this cos i'm super indecisive and don't usually have a clear idea in mind for what it should look like 😅
i'll only focus on the actor panel cos otherwise this would be wayyy too long - i resized, coloured, denoised + sharpened the yibo pics so they matched more then added a mask to make the corners more round,
chose a font for the txt and added it to the bottom

then i decided the layout for the rest of the elements + just like the yibo pics, i edited + resized + masked the drama posters, character + actor pics, then added the name txt + a low opacity bg for the txt so it's easier to read

finally i individually save all the elements (either alone if it's gonna move alone or with other elements if they'll move together) as a png with no background so i can load them into after affects ready to animate
after that i import all the pngs to after effects (i lost all the yibo website after effects saves cos of a hard drive reformat 😢 so i'll use my recent zzh website saves to illustrate instead)

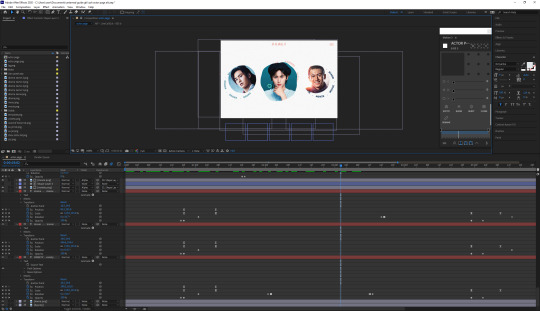
the first thing i animated was the circle pics - just a scale animation with overshoot at the end
then the rotating circle txt - first i made the txt layer follow a circle path then i placed it where i wanted it to end up, added a keyframe for all the properties i'm going to animate, backtrack on the timeline however long i want the animation to be, add a new keyframe to all the chosen properties, reduced the scale + changed the position so it was hidden behind the picture, then changed the rotation so it would rotate continually for as long as it would appear
then i made the kinda wobbly circle animation?? on mouse over - the zzh pics are actually larger than shown, they just have a circle shape layer above them which i set as an alpha matte so only what's within that circle is shown

first i increase the scale of the shape layer alpha matte so more of the zzh pic is revealed + change the position slightly so the txt circle isn't completely covered, for these keyframes i also adjust the easing on them to make the speed of the animation slower at the beginning + end and faster in the middle
then i added a wiggle paths + wave warp effect, made a keyframe with the settings i wanted to change on zero then went forward in the timeline for the duration, added a new keyframe and adjusted the settings on the effects till i was happy with how the wobbly animation looked
after that pretty much just copied + reversed the keyframes for the animation to go back to normal then animated the same thing for the next zzh pic
i'll stop there cos i feel like this is already super long 😅 but if anybody is looking into using after effects + wants to know more?? you can just message me if you want, if you have any questions or anything!
when i've finished all the animations i'll check how the whole thing looks and make any final adjustments, then render it to make it a video
final step i import the video into photoshop, check it through there, change any of the frame timings if necessary and save it as a gif
3. Posting
i save the gfx set in drafts first to check how all the panels look together then add the gradient txt caption using jsfiddle
then i add the tags and schedule it to be posted at 10pm the same day
9 notes
·
View notes
Text
"lee donghyuck's makeup looks horrible and unprofessional" a thesis
as you may have noticed, and as I have talked about previously, haechan of nct has continuously been seen with, quite frankly, amateur and low quality makeup looks. in this essay we will be discussing what actually is wrong with his makeup, why it looks bad, the reasons behind this malpractice, and improvements that could be made to enhance his beauty rather than ruin it.


(figure 1, left) (figure 2, right)
as can be seen in figure 1, haechans base makeup has been mismatched so badly, to the extent that it looks ghostly and inhuman. this is because his makeup artist has used a foundation that is at least 4/5 shades lighter than his actual skin tone and is completely the wrong undertone. it closely resembles the infamous image of James charles in 2017 that can be seen in figure 2, known commonly as "Flashback Mary". it is not a rare occurrence for haechan to be seen with mismatched foundation, but it is usually not this bad. the question must be asked; who let him outside in public looking like this? this is unacceptable and is a very very amateur mistake to make. i would like to mention that this is most likely intentional, as the makeup artist may have wanted to lighten haechans skin due to the Asian beauty standard of white skin. it is up to the reader to form their own opinion on these standards, but i am sure we can all agree that this is not a good look at all.


(figures 3, 4 and 5, left to right)
moving forward, another topic for discussion is haechans eye makeup. in all the images above it can be seen that haechan is wearing dark eyeliner all around the circumference of his eyes. although this is subjective, some would say this is unflattering to haechans eyes, as he has smaller round eyes. it is to be noted that haechans eye shape is not unique within the group, and is similar to taeil's. the two images below illustrate this point.


(figure 6,left, taeil) (figure 7, right, haechan)
however, it is strange that only haechan is made to sport a dark smokey eye, or tightlined eyes, and taeil is usually seen with better, more subtle and more flattering makeup on stage and off stage. there is no accusation being made, nevertheless this is something that looks odd to an observant outsider.
finally, let's look at haechans lipstick. haechan is often seen with gradient lips; concealer around his lipline and pink/ red lipstick in the center.

(figure 8)
this is a popular technique in kbeauty, often used by women. despite this, it is not flattering on everyone, and this is the case with haechan. he has beautiful heart shaped lips and golden skin; gradient lips hide his naturally beautiful lip shape and the shade of lipstick applied to his lips is just not the right undertone. he would benefit from a subtle nude brown lip colour, or a slightly orange brown, to complement his skin tone. again, it is usually only haechan who has this issue, other members of the group are seen with nudes if they have a yellow undertone, and pinks and slightly red lips if they have a pink undertone (for example, jaehyun or chenle).
in conclusion, haechan's makeup is subpar. his facial structure, shape and tone has not been taken into consideration when doing his makeup for performances and public appearances. as aforementioned, it is strange that he is usually the only one with such unflattering makeup, whilst the other members do not face this problem as often as he does. it can be said that this is a form of injustice, but that depends on the perspective of the reader. many people would probably agree with the notion that Lee donghyuck's makeup looks horrible and unprofessional, and I would be happy to listen to any opinions you guys may have on this.
THIS IS ALL SUBJECTIVE
#i will rb with some examples of his better more natural makeup looks#lol this is so long....... but i did it just for u guys who asked hope u like it#haechan
19 notes
·
View notes
Photo


Interview with Shaw Nielsen
https://motillu.com/articles/2018/6/20/interview-with-shaw-nielsen
“Interesting, quality work, delivered on time and with a smile. That has been, and always will be, the growth area for illustrators. ”
Shaw Nielsen is an award-winning illustrator who creates fun, colorful, and graphic work for a huge roster of exciting clients including Disney, The New York Times, The Wall Street Journal, IBM, ESPN, US Airways, and so many more. His portfolio shows off his ability to apply his unique vision on projects suitable for any age group, and to solve illustration problems ranging from inventive infographics to narrative storytelling, and everything in-between. His work is often figurative, featuring bold geometric character designs that lend themselves beautifully to animation. Because Nielsen is also a talented animator, I was eager to hear his thoughts on how animation is impacting the business of illustration. Enjoy the interview below and check out Shaw Neilsen’s work here: www.shawnielsen.com
You describe yourself as an illustrator, but your work showcases some incredible animation skills. How did you get started with animation, and how does this fit into your identity as an illustrator?
Nielsen: I started animating my own illustrations for fun. I saw others doing it, and like a sheep, I headed that direction. Animated illustrations really do catch the eye in a way few other things do and so I knew I had to add motion to my portfolio.
Being an illustrator means that you solve visual problems - you’re presented with an article or a brief and its your job to come up with something interesting, thoughtful, or provocative. There are no rules about how to solve the problem and being able to show motion is an incredible tool to have at your disposal. Animation is another arrow in my illustration quiver.
It seems that more and more clients are using motion-based illustration for editorial and commercial work. When did you notice a shift? Has the growth been surprising?
Nielsen: I’d say within the past couple of years motion has become more prevalent and its only going to get bigger. The visual world of the average person is a cluttered place and motion stands out. It’s a lizard brain response - people look at things that move before they look at things standing still - so I’m not at all surprised to see motion growing in popularity.
Are there any other areas of growth you think illustrators should keep an eye on?
Nielsen: Interesting, quality work, delivered on time and with a smile. That has been, and always will be, the growth area for illustrators. The media industry will change, the publishing industry will change, the way content is delivered will change, but people will always need quality, interesting content produced by people who are good to work with.
What is your process like working with a client on an illustration that moves? Is there anything you have to do differently from your 2D pieces to get the idea across?
Nielsen: I use the same process for both my animated illustrations and my static illustrations. I start every illustration off by writing down a list of words and phrases that are pulled from the article, story, or brief and develop thumbnails and sketches from that list of words. For me the concept always comes first and the motion gets developed once I’ve completed the illustration.
I love the simple 2-frame animation technique you’ve used in “ESPN’s The Undefeated-Zombie Fans.” This one feels very different from the complex, multi-layered character animation in much of your other work. How do you decide where to put movement, and how complex to make the animation?
Nielsen: ‘The Undefeated’ blog uses really big images and the MB limit on animations is fairly low, so in order to be able to animate the image I had to do something really simple and small. Sometimes necessity drives style and concept more than anything else.
What tools do you use to create your animated work? Is there any technology that you are experimenting with or eager to try out?
Nielsen: Adobe illustrator, Photoshop and After Effects, though I’m still working on mastering After Effects. It’s such a powerful program that I feel like I could spend a lifetime bouncing around inside it.
Are there any illustrators working with motion that you admire or are influenced by? What makes their work exciting to you?
Nielsen: Saul Bass’s work is iconic and bold and I absolutely love his movie title sequences. I think what always draws me back to to Saul Bass’s work is his ability to boil his illustrations down to only the most essential elements.
Thanks to Shaw Nielsen for taking the time to talk about motion and illustration. Please check out his portfolio at www.shawnielsen.com and follow him on instagram @shaw_nielsen
3 notes
·
View notes
Text
How to Write a KNOCKOUT Instagram Bio for Business (+Tips!)
Do you want to revamp your Instagram account? Then start with revamping your Instagram bio for business purposes!
After all, it’s the very first thing people see when they land on your profile. And when that happens, what you want them to do is to click that “follow” button.
And yet, it’s not that easy.
When people land on your profile, their mind immediately races through a range of questions. Who are you? What do you do? Why should I follow you? If you haven’t managed to provide answers within 0.05 of a second, you lost an opportunity to gain a follow. And god knows, those are hard to get nowadays!
To make an A+ first impression, I’m going to share 6 tips on how to stand out from the crowd with your Instagram bio.
Note: To take full advantage of all of the tips in this article, it’s highly recommended that you convert to an Instagram Business Profile, otherwise you won’t be able to implement some of the tactics described here.
Ready? Then let’s start!
How to Write a Good Instagram Bio for Business (+Tips!)

1. Your avatar
Choosing the right avatar is easier said than done. Even some of the big brands out there make mistakes, such as posting a low-resolution avatar that looks pixelated. Currently, the dimensions for a profile picture on Instagram are 110x100px for mobile, but as avatars look slightly bigger on desktop, it makes sense to upload a larger pic — Instagram will resize it automatically. Just make sure to crop it to 1:0 ratio, so that you don’t lose parts of your image.
But those are technicalities.
The tricky part is to choose an avatar that does a good job at representing who you are.
If you’re a brand, the best thing to do is, of course, choose your brand logo that is instantly recognizable. This is also the easiest solution as it helps you stay visually consistent across all your channels. However, if you’re, say, an influencer, or an entrepreneur, or a blog owner, the best practice is to put a picture of yourself that clearly narrates who you are and what you do.
To illustrate what I mean, check out this example from @alexstrohl, an Instagram photography influencer, whose avatar depicts him at his best — holding a camera, taking pictures. Just from looking at Alex’s avatar, it is instantly clear that his account will be all about photography:

Or here’s another example from @kori_nikkonen, a Berlin-based ballerina and fitness influencer. Her choice of avatar, where she’s depicted wearing a flowy dress, ballet shoes and a ballet bun, clearly represents the lifestyle fundamentals of her brand:

To summarize:
Always make sure your avatar is high-quality, not pixelated, and will look good on any device
If you’re a brand, opt for your own logo for an avatar
If you’re not a brand, put a picture of yourself showing what you’re best at, preferably depicting your work in progress
Choose something memorable, something that stands out
Make sure your avatar resonates with the color palette of your whole feed.
Once you cracked the avatar code, proceed to the next point: choosing your name.
2. Your name
The second step to building a perfect Instagram bio for business lies in making sure that your name is, in fact, your name and NOT your Instagram username. Thing is, your name and username are the only two factors that Instagram takes into consideration when it’s answering people’s search queries. If people decide to look you up on Instagram, they will use either your real name or your company’s name, so it’s counterintuitive to have your name match your Instagram handle as you’re decreasing your own searchability.
But of course, another way you can be found on Instagram is through keywords. By putting one in your name, you’re tripling your searchability scores — even if your handle doesn’t contain the keyword, people would still be able to find you through the keyword in your name. Like here in the example below, where I just typed “vegan” in the Instagram search, and @aniahimsa came up, even though the word “vegan” is not part of her official Instagram handle:

It’s up to you (and your business’ specifics) what you want to add to your name to increase the searchability. Think about a target keyword that your potential users use to research for inspirational accounts, cool hashtags or specific locations to follow. Say you want to attract a target audience based in Berlin — then you’d want to have the word “Berlin” next to your name, because then people can find you through by typing the name of the city in the “People” search bar:

Whatever you think your target audience looks for on Instagram — put that next to your name. If you know your followers look for Instagram coaches, put “Instagram Business Coach” next to your name. If your followers look for interior inspiration, put “Interior Inspiration” next to your name.
Hope I made my point.
Whatever you choose your keyword to be, adding one to the Instagram bio is simple, and you can even do it from desktop. All you need to do is this: Go to your Instagram Profile → Click “Edit Profile” next to the “gear” icon

→ Find your “Name” category → Put the keyword in.

If you choose, you can also separate your real name and your target keyword with an emoji — but more on that later.
To summarize:
Make sure you use your REAL name on Instagram
Add a target keyword in addition to your name
Keywords are not just useful for searchability, but also for scannability of your profile — which leads us to the next point:
3. Make your bio easily scannable
As I said in the beginning, you only have ⅛ of an eyeblink to make a first impression — that means you basically need to turn your Instagram bio into a QR code, so that when people quickly scan your profile at one glance (as they do), they instantly get what you’re all about.
How do you do that?
Again: target keywords are your best friend!
By adding target keywords to your profile, you’re setting a clear expectation for people as to what kind of content they can find on your account. Take a look at @adashoffash to see what I mean. Just by a quick glance, you’re able to see that her three main Instagram “focus points” are fashion, travel, and lifestyle. Including these serves as an introduction to her account, and might also determine if people will click that “follow” button:

BONUS TIP: you should also take advantage of Instagram’s recent feature that enables you to add hashtags and profile links in your bio. It’s a perfect place to promote your branded hashtag, which is also possible to follow as well. Nowadays, your community includes not only the number of your followers on your own account, but also the number of tags and follows on your branded hashtag. Or follows on your side accounts, if you have more than one!
If you’re looking to add hashtags and profile links to Instagram, it’s easy to do so. Go to your Instagram → then click “Edit Profile” and find the “Bio” section. There, you can add whatever #hashtag and whatever @username you want people to associate you with. For hashtags, don’t forget to use the “#” (obviously) and for usernames — the “@” sign:

Once you save and exit, those hashtags and usernames you just added will be fully clickable on your profile and people can go and check them out.
Using keywords from your niche that your target audience understands will make it clear what you stand for, what you have to offer, and whether or not your account is relevant to them! Ultimately, it is one of the determinants in the “follow” consideration process. So don’t ignore!
In its essence, keywords basically should represent your strongest skills, or your interests that you’re highlighting on your account. So if you have a particular skill that you want to stand out for — include it in your bio! If you don’t know what that skill is — take a look at accounts similar to yours and see what sets you apart from them. Do you have something unique to offer? Do you have a different interest to add to your skill set? Think of your bio as if it’s a CV, where you put forward your best skills, in the strongest combination.
To summarize, the most important thing to remember is that your Instagram account must be:
Easily found through search (hint: add keywords)
Easily scannable (hint: add keywords!)
Up next…
4. Add a URL
Instagram wants its users to stay on the platform — so it’s pretty strict as to where it allows you to put URLs that drive the audience to external domains. Driving traffic and measuring your website clicks is, however, one of the most important Instagram metrics for Business. Currently, if you have over 10K followers, you can put a link in Stories and drive traffic from there — but if you’re a smaller account, that obviously wouldn’t work. The only place, really, is your Instagram bio. So if you don’t have a URL there, you’re missing out on your only opportunity to organically drive traffic to your domain or your special offer.
For an example, take a look at this account from @tylerjmccall, an Instagram marketing strategist. Not only does he put a URL to his latest offer (an Instagram master class), but he also supports it with an “emojified” CTA, which makes the offer even stronger:

BONUS TIP: Putting a link to a website or a blog (say, a particular article) is a great start. However, if you’re promoting various offers every week and want to send followers to specific product pages, the lack of hot links can become a challenge, as you’ll be needing to change the links in your bio all the time. If you need to get around this, check out LinkTree, arguably the best tool out there to add multiple links to your Instagram bio for business.
To summarize:
Place a URL to your latest offer OR your main website OR use LinkeTree to showcase multiple links
Don’t forget to use a call-to-action to your URL, by adding a line in your “Bio” category when you edit your profile
5. Be in right Business category & allow people to get in touch
Another thing your bio should have is the business description of your account — this is where having an Instagram Business Profile is a must. If you’re looking to build a brand on Instagram, it’s essential to appear professional and, well, brand-like. While having an Instagram for Business account is essential if you want to get access to insights, analytics, and be able to make data-driven decisions, it also offers two perks for your Instagram bio for business: choosing a Business category that represents your brand and adding contact information.
You might not even remember this anymore, but you already picked a Business category once, when you created your Facebook Business Page — which is what you need to have in order to use Instagram for Business. As Instagram is connected to Facebook, the very same Business category you used on your Facebook Page will automatically appear on your Instagram. Here’s an example from ZARA, where it says “Clothing (Brand)” on their Facebook:

And, as you can see, it says exactly the same on their Instagram:

You can, however, modify your Instagram business category if you want to add a little bit more specificity to your bio. Go to your Instagram profile (mobile) → click “Edit Profile” → scroll down a tiny bit → and find the “Business information” category. You’ll see the Facebook Page your Instagram is linked to, and also the “Category” which was automatically pulled from your Facebook Page:

If you click into “Category”, you’ll see a variety of other categories that you can choose from. Currently, there are: Books and Magazines, Events, TV, Film, Local business, Brands and Products, Music, Public person, Other, Sports, Business and Organization, Websites and Blogs. Once you decide which one fits your business best, you can select a subcategory from a drop-down menu:

Remember: it’s what you choose in those subcategories that is going to eventually appear in your Instagram bio.

Once you’ve covered that, next thing to do is give Instagram users an opportunity to get in touch with you. How to add contact options? Easy peasy. Go back to your “Business information” section → click “Contact options”. There, you will be able to add the three basic contact options — Email, Phone, and Address — that will appear on your Instagram bio if you choose to fill them in:

As of late, Instagram also gives you an additional option to add an action button, which connects your profile with other online services — such as Yelp or Eventbrite, for instance — so that your customers can interact with your business and, say, buy tickets or make a reservation without leaving your Instagram profile. All you need to do is click on “Add an action button” → choose the online service you’re using to do your business (e.g. Yelp) → click “Next” → put a specific URL that your business uses → click “Done”. Et voila, the new Action button now appears in your Bio:

You don’t need to make all the contact options available — in fact, if you do, they won’t fit in and you’ll be left with ugly dots on your profile that cut off important information and force the user to click to see more, unnecessarily extending the user journey:

So choose wisely!
To summarize:
Select a Business sub-category that represents your brand
Add contact and action buttons (but not too many!) for people to get in touch and do business with you
6. Add personality and be creative
After you’ve covered the fundamentals — keywords, URLs, cross-promoted hashtags, etc — the final touch is to add some personality to your bio. Be creative — you have all the tools for that! Have a favorite quote you live by? Or came up with a funny line that represents your brand well? Use that — like @gypsea_lust and her wander-ful travel account:

Emojis are your best friend here, too. You can use them to space out the text when you write your bio paragraph, like in the example above, which spreads out your whole paragraph into separate lines and makes it more scannable.
To add line breaks, go to “Edit Profile” in your Instagram settings and click “Bio”. From there, you’ll be able to break your bio down if you click the “Return” button. Just remember that line breaks don’t appear on desktop, where your bio will look like Kanye West’s stream of consciousness — but that’s why emojis come in so handy to split the text into parts.
Emojis are also useful when you want to emphasize different keywords in your bio, that help you get your message across visually. Take a look at @emilyskyefit, a fitness influencer from Australia who runs 3 accounts on the side: one for her newborn baby, one for her workouts, and one for her makeup tutorials. The placement of emojis is a smart way to strengthen the focus key points of her account:

I already explained where to add emojis in your Instagram bio, but in case you already forgot: go to Profile → Edit profile → “Bio” section. Just don’t go too wild there!
BONUS: Another way to get creative about your bio is to use a different font. Textizer is a great (freemium) app for that.
Conclusion
As important as your Instagram content and captions are, they are not the first impression you make on the platform — your bio is! With the limited time you have to make that impression count, use the tips above to tweak your Instagram bio for business and improve the return on your efforts.
Sign up for a free 2-week trial with Iconosquare to get valuable analytics stats, schedule posts, and save time on managing your Instagram!
PS. This post was originally published on Social Media Examiner.
https://growinsta.xyz/how-to-write-a-knockout-instagram-bio-for-business-tips/
#free instagram followers#free followers#free instagram followers instantly#get free instagram followers#free instagram followers trial#1000 free instagram followers trial#free instagram likes trial#100 free instagram followers#famoid free likes#followers gratis#famoid free followers#instagram followers generator#100 free instagram followers trial#free ig followers#free ig likes#instagram auto liker free#20 free instagram followers trial#free instagram followers no#verification#20 free instagram likes trial#1000 free instagram likes trial#followers instagram gratis#50 free instagram followers instantly#free instagram followers app#followers generator#free instagram followers instantly trial#free instagram followers no survey#insta 4liker#free followers me#free instagram followers bot
0 notes
Last Seen Blogs
springbon-t-art
Commissions are CLOSED!

9myself8-blog
MichinQueen

chocloasesino
Chocloasesino

illesthn
ιℓℓєѕт.

ronnychieng
Ronny Chieng