#sparkfun
Explore tagged Tumblr posts
Visit Tumblr Blog
Explore Tumblr blogs with no restrictions, modern design and the best experience.
Last Seen Tumblr Blogs


Fun Fact
Celebrities use Tumblr as well.
Text

Rubber Duck Debugging is the method of working through a problem by verbalizing the problem at hand. There is something that happens once you verbalize your problem that makes your brain skirt around the log jam, and jump over to the solution. No really, it works! It turns out, it doesn't matter who you're talking to, the solution follows the action; you might as well be talking to a rubber duck. Try it out if you want: ask any person "what are you stuck on?". While they are describing the problem, 50% of the time you'll see them pause, and then regroup as they realize a solution to the issue they just described. You've been made into a rubber duck. Congrats!
The SparkFun Debugging Duck is a flexible, exceedingly buoyant, clearly fabricated, cognitive device for hardware debugging. Guaranteed to reduce debugging times and increase productivity and conversation. Before you ask your coworker, ask your Debugging Duck "Can I bother you for a minute?".
This is a product that is 50% tongue in cheek, and 50% legit. Ask any engineer and they'll tell you similar stories.
8 notes
·
View notes
Photo
I dont Understand...

Robotics Hand at Vision World Tech Pvt Ltd - Follow for new Updates @visionworldtech 🎯 🌍 - #uav #yuneec #hexacopter #djiinspire1 #quadcopter #miniquad #ironman #robotics #robot #skynet #fpv #drones #aerialphotography #octocopter #robots #djiphantom #arduino #dronepilot #drone #tesla #elonmusk #rcplane #spacex #sparkfun #nasa #mavicpro #2 #staypositive #lawofattraction #3dprinting (at Vision World Tech Pvt. Ltd.) https://www.instagram.com/p/BvOJ59aHmiY/?utm_source=ig_tumblr_share&igshid=1xlx1v8pzqg3q
#uav#yuneec#hexacopter#djiinspire1#quadcopter#miniquad#ironman#robotics#robot#skynet#fpv#drones#aerialphotography#octocopter#robots#djiphantom#arduino#dronepilot#drone#tesla#elonmusk#rcplane#spacex#sparkfun#nasa#mavicpro#2#staypositive#lawofattraction#3dprinting
1 note
·
View note
Text
Quake runs in just 276 kB RAM on the Arduino Nano Matter board
https://community.silabs.com/s/share/a5UVm000000Vi1ZMAS/quake-ported-to-arduino-nano-matter-and-sparkfun-thing-plus-matter-boards?language=en_US
2 notes
·
View notes
Text
Exploring the Possibilities with Raspberry Pi: A Guide to Buying and Utilizing Raspberry Pi 4 and Its Camera Kit
Introduction:
In the world of single-board computers, Raspberry Pi stands out as a powerful and versatile option. The Raspberry Pi Foundation has continuously pushed the boundaries of what can be achieved with these compact devices. In this blog post, we will explore the benefits of Raspberry Pi 4 kit, Raspberry pi buy, and delve into the exciting projects you can undertake using this remarkable technology.
Why Choose Raspberry Pi 4 Camera? Raspberry pi 4 camera is the latest iteration of the Raspberry Pi series, offering improved performance and enhanced features. It comes equipped with a Broadcom BCM2711 quad-core Cortex-A72 processor, clocked at 1.5GHz, which ensures smooth multitasking and faster execution of complex tasks. The availability of up to 8GB of RAM allows for efficient handling of data-intensive applications. With its support for dual-band Wi-Fi and Bluetooth 5.0, Raspberry Pi 4 provides seamless connectivity options for your projects.
Exploring the Camera Capabilities: One of the most exciting features of Raspberry Pi 4 is its compatibility with a dedicated camera module. The Raspberry Pi Camera Module v2 is a high-quality camera that can be easily connected to the board via the camera interface. The camera module offers an 8-megapixel sensor and supports video resolutions up to 1080p, enabling you to capture stunning photos and videos. Its compact size and versatility make it perfect for various applications, including surveillance systems, time-lapse photography, and even computer vision projects.
Where to Buy Raspberry Pi 4 Online: When it comes to purchasing Raspberry Pi 4 and its accessories online, there are several reputable platforms to consider. Some popular options include:
Online Retailers (e.g., Amazon, Robomart, SparkFun) Established Raspberry pi buy online platforms like Amazon, Robomart, and SparkFun also stock Raspberry Pi 4 boards, camera modules, and kits. These retailers often provide customer reviews and ratings, giving you insights into the products before making a purchase.
Specialized Electronics Retailers Various specialized electronics retailers cater specifically to the Raspberry Pi community. These retailers often have a wide range of Raspberry Pi products, including kits that include the camera module.
Exciting Raspberry Pi 4 Projects: Once you have your Raspberry Pi 4 and camera kit, the possibilities for projects are virtually endless. Here are a few ideas to get you started:
Home Surveillance System: Set up a motion-activated camera system to monitor your home remotely and receive alerts on your smartphone.
Wildlife Monitoring: Create a wildlife camera trap that captures photos or videos of animals in their natural habitats.
Time-Lapse Photography: Capture the beauty of nature or the progress of a construction project by creating stunning time-lapse videos.
Facial Recognition: Develop a facial recognition system using the camera module and explore applications in security or access control.
Virtual Assistant: Transform your Raspberry Pi 4 into a voice-controlled assistant by integrating a microphone and speaker.
Conclusion: Raspberry Pi 4, along with its camera module, opens up a world of possibilities for hobbyists, educators, and professionals alike. Whether you're interested in building a smart home system or exploring computer vision applications, Raspberry Pi 4 provides the necessary power and flexibility. With numerous online platforms available to purchase Raspberry Pi 4 and its accessories,
4 notes
·
View notes
Text
Global Flexible Lead Piezo Film Sensor Market to Reach US$ 148.6 Million by 2032

Flexible Lead Piezo Film Sensor Market Analysis:
The global Flexible Lead Piezo Film Sensor Market size was valued at US$ 89.4 million in 2024 and is projected to reach US$ 148.6 million by 2032, at a CAGR of 6.6% during the forecast period 2025-2032
Flexible Lead Piezo Film Sensor Market Overview
This report provides a deep insight into the global Flexible Lead Piezo Film Sensor market covering all its essential aspects. This ranges from a macro overview of the market to micro details of the market size, competitive landscape, development trend, niche market, key market drivers and challenges, SWOT analysis, value chain analysis, etc. The analysis helps the reader to shape the competition within the industries and strategies for the competitive environment to enhance the potential profit. Furthermore, it provides a simple framework for evaluating and accessing the position of the business organization. The report structure also focuses on the competitive landscape of the Global Flexible Lead Piezo Film Sensor Market, this report introduces in detail the market share, market performance, product situation, operation situation, etc. of the main players, which helps the readers in the industry to identify the main competitors and deeply understand the competition pattern of the market. In a word, this report is a must-read for industry players, investors, researchers, consultants, business strategists, and all those who have any kind of stake or are planning to foray into the Flexible Lead Piezo Film Sensor market in any manner.
Flexible Lead Piezo Film Sensor Key Market Trends :
Rising Adoption in Medical Devices Flexible lead piezo film sensors are increasingly used in medical applications for patient monitoring and diagnostics due to their flexibility and sensitivity.
Growth in Industrial Automation Industries are integrating these sensors in automated systems for precise motion detection and control, boosting demand.
Advancements in Flexible Electronics Innovations in flexible and wearable electronics are driving the integration of piezo film sensors into new product designs.
Expansion in Defense Applications Defense sectors are utilizing these sensors for surveillance, vibration monitoring, and advanced weaponry systems.
Increased Research & Development Activities Continuous R&D efforts focus on improving sensor durability, accuracy, and miniaturization to expand applications.
Flexible Lead Piezo Film Sensor Market Regional Analysis :
https://semiconductorinsight.com/wp-content/uploads/2025/01/download-34_11zon-1.png
North America:Strong demand driven by EVs, 5G infrastructure, and renewable energy, with the U.S. leading the market.
Europe:Growth fueled by automotive electrification, renewable energy, and strong regulatory support, with Germany as a key player.
Asia-Pacific:Dominates the market due to large-scale manufacturing in China and Japan, with growing demand from EVs, 5G, and semiconductors.
South America:Emerging market, driven by renewable energy and EV adoption, with Brazil leading growth.
Middle East & Africa:Gradual growth, mainly due to investments in renewable energy and EV infrastructure, with Saudi Arabia and UAE as key contributors.
Flexible Lead Piezo Film Sensor Market Segmentation :
The research report includes specific segments by region (country), manufacturers, Type, and Application. Market segmentation creates subsets of a market based on product type, end-user or application, Geographic, and other factors. By understanding the market segments, the decision-maker can leverage this targeting in the product, sales, and marketing strategies. Market segments can power your product development cycles by informing how you create product offerings for different segments. Key Company
TE Connectivity
SparkFun Electronics
E-Touch
Market Segmentation (by Type)
Surface
Implant
Market Segmentation (by Application)
Industry
Defense
R&D Laboratories
Technical Education
Medical
Drivers
Increasing Demand for Lightweight and Flexible Sensors The need for lightweight, flexible, and thin sensors in electronics and healthcare is a major growth driver.
Rising Industrial Automation Automation in manufacturing and process industries requires precise sensing technologies, boosting market demand.
Growth in Healthcare Monitoring Systems Flexible piezo film sensors are favored in wearable health devices, increasing their adoption in the medical sector.
Restraints
High Production Costs The complex manufacturing process of flexible piezo film sensors leads to higher costs, limiting widespread adoption.
Limited Durability in Harsh Environments Some sensor materials may degrade under extreme conditions, restricting use in certain industrial applications.
Technological Complexity Integrating these sensors with existing systems can be challenging, hindering fast market penetration.
Opportunities
Expansion into Emerging Markets Growing electronics and healthcare sectors in Asia-Pacific offer lucrative opportunities for market expansion.
Development of Customized Sensor Solutions Tailoring sensors for specific applications can open new revenue streams for manufacturers.
Integration with IoT and Wearable Devices The rise of IoT and wearable tech creates strong demand for flexible sensors in consumer electronics and fitness monitoring.
Challenges
Competition from Alternative Sensing Technologies Other sensor types like MEMS and capacitive sensors compete for market share, challenging growth.
Regulatory and Compliance Issues Stringent regulations in medical and defense applications can slow down product approvals and adoption.
Supply Chain Disruptions Global supply chain issues can impact the availability of raw materials and components, affecting production timelines.
Key Benefits of This Market Research:
Industry drivers, restraints, and opportunities covered in the study
Neutral perspective on the market performance
Recent industry trends and developments
Competitive landscape & strategies of key players
Potential & niche segments and regions exhibiting promising growth covered
Historical, current, and projected market size, in terms of value
In-depth analysis of the Flexible Lead Piezo Film Sensor Market
Overview of the regional outlook of the Flexible Lead Piezo Film Sensor Market:
Key Reasons to Buy this Report:
Access to date statistics compiled by our researchers. These provide you with historical and forecast data, which is analyzed to tell you why your market is set to change
This enables you to anticipate market changes to remain ahead of your competitors
You will be able to copy data from the Excel spreadsheet straight into your marketing plans, business presentations, or other strategic documents
The concise analysis, clear graph, and table format will enable you to pinpoint the information you require quickly
Provision of market value (USD Billion) data for each segment and sub-segment
Indicates the region and segment that is expected to witness the fastest growth as well as to dominate the market
Provides insight into the market through Value Chain
Market dynamics scenario, along with growth opportunities of the market in the years to come
6-month post-sales analyst support
Customization of the Report In case of any queries or customization requirements, please connect with our sales team, who will ensure that your requirements are met.
0 notes
Photo
sharing something like this...

When I was about to go outside, I received a call from my grandfather. I wondered why my grandpa called so early today. It might be something urgent. On the phone, the old man was relieved: “I finally called you. My phone is broken and now I know. I said why you haven’t called me for so long. Is there something wrong? Is TYC’s teeth better? "I haven’t had time to answer. . It was warm and guilty, and I was really busy recently, and my usual habit of calling my grandfather once a week was affected. No matter how busy you are in the future, remember to call your family if you are outside… #djiphantom4 #djiglobal #uav #3drobotics #djiinspire1 #quadcopter #miniquad #djiphantom3 #robotics #robot #aerialphotography #fpv #drones #hexacopter #octocopter #djiphantom #arduino #hobbyking #drone #multirotor #dronephotography #rcplane #spacex #sparkfun #adafruit #nasa #raspberrypi #mavicpro #skynet #blackmirror https://www.instagram.com/p/CGtawHAHTwT/?igshid=1rey1qj8wmy9v
#djiphantom4#djiglobal#uav#3drobotics#djiinspire1#quadcopter#miniquad#djiphantom3#robotics#robot#aerialphotography#fpv#drones#hexacopter#octocopter#djiphantom#arduino#hobbyking#drone#multirotor#dronephotography#rcplane#spacex#sparkfun#adafruit#nasa#raspberrypi#mavicpro#skynet#blackmirror
1 note
·
View note
Link
[ad_1] The launch of the Raspberry Pi Pico 2 marks a significant upgrade from its predecessor, the Raspberry Pi Pico. by Blade November 13, 2024 4:30 pm UTC 8 Favorited Favorite 0 Back in August, Raspberry Pi launched the Raspberry Pi Pico 2 with the onboard RP2350 microcontroller. At the same time, SparkFun came out with the SparkFun Pro Micro - RP2350. Both sold out quickly and it took some time to get them back in stock. Now that we have healthy stock of both the Pico 2 and the Pro Micro - RP2350 we thought we'd go through the technical differences between Raspberry Pi's RP2350 and its predecessor, the RP2040. Overview of the RP2040 The RP2040 chip, introduced in January of 2021 alongside the original Raspberry Pi Pico, was a groundbreaking entry into the microcontroller market by Raspberry Pi. It featured: Dual-core ARM Cortex-M0+: Operating at 133 MHz, the RP2040 provided ample power for a variety of embedded applications. 264kB of SRAM: Sufficient memory for lightweight applications and real-time tasks. 2MB of Flash memory: Provided ample storage for most embedded projects. 30 GPIO Pins: Including programmable IO (PIO) for flexible, custom peripherals. USB 1.1 Device and Host Support: Allowing for basic connectivity options. 2 × Programmable IO (PIO) blocks, 8 state machines total: Enabling custom peripheral implementations such as SD Card and VGA. These features made the RP2040 an excellent choice for hobbyists and professionals alike, offering an affordable platform for a wide range of applications. See Full RP2040 Datasheet Products offering the RP2040 SparkFun Pro Micro - RP2040 In stock DEV-18288 The SparkFun Pro Micro RP2040 is a low-cost, high performance board with flexible digital interfaces featuring the Raspberry … 3 Raspberry Pi Pico In stock DEV-17829 The Raspberry Pi Pico is a low-cost, high-performance microcontroller board with flexible digital interfaces featuring the ne… 3 Overview of the RP2350 The RP2350, the heart of the Raspberry Pi Pico 2, builds upon the strengths of the RP2040 while introducing several enhancements: Dual ARM CortexM33 and Hazard3 RISC-V Processors at 150 MHz: A significant boost in clock speed, offering improved performance for more demanding applications. Users can select two processors to run on boot. 520kB of SRAM: An increase in memory, supporting more complex operations and larger datasets. Up to 16 MB of external QSPI flash/PSRAM: Accessible via optional second chip-select catering to applications that require more extensive codebases or data logging. 30-48 GPIO Pins (depending on model): Expanding the I/O options, offering more flexibility in interfacing with external hardware. 12 Programmable IO (PIO) state machines: Increasing the number of custom peripheral implementations that can be run simultaneously. Optional RISC-V Cores: Unique to the RP2350, users can choose between dual ARM Cortex-M33 cores and dual Hazard3 RISC-V cores, offering flexibility in architecture choice. Advanced Security Features: Includes Arm TrustZone for Cortex-M, signed boot, 8kB of antifuse OTP for key storage, SHA-256 acceleration, a hardware TRNG, and fast glitch detectors, providing robust security options for professional-grade applications. The RP2350’s advanced security features and dual-core, dual-architecture capability highlight its suitability for professional and industrial applications, while still retaining the accessibility and affordability that made the original Raspberry Pi Pico so popular. See Full RP2350 Datasheet Products offering the RP2350 SparkFun Pro Micro - RP2350 In stock DEV-24870 The SparkFun RP2350 Pro Micro provides a powerful development platform in our compact Pro Micro form factor built around the… 5 Raspberry Pi Pico 2 In stock DEV-26124 Raspberry Pi Pico development board featuring the RP2350 Cortex M processor with dual RISC-V Hazard3 cores. 1 Key Differences To provide a clearer view of the advancements, here’s a comparison table highlighting the main differences of the RP2040 and RP2350 chips: Feature RP2040 RP2350 Processor Dual-core ARM Cortex-M0+ at 133 MHz ARM® Cortex® M33 processors and two Hazard3 RISC-V processors at 150 MHz (user-selectable for dual-cores) SRAM 264kB 520kB (in 10 banks) Internal Flash Memory 2MB 0/2MB (model dependent) GPIO Pins 30 30—48 USB Support USB 1.1 Device and Host USB USB 1.1 controller and PHY, with host and device support Programmable IO (PIO) 8 state machines 12 state machines Security Features No security features Arm TrustZone, signed boot, 8kB antifuse OTP, SHA-256 acceleration, hardware TRNG, glitch detectors Performance and Security Implications The increase in clock speed from 133 MHz to 150 MHz in the RP2350 translates to a noticeable performance boost, particularly beneficial in real-time applications. The optional RISC-V cores offer flexibility in processing architecture, catering to various application needs. Additionally, the enhanced security features make the RP2350 suitable for applications requiring robust protection against tampering and unauthorized access. Conclusion The RP2350 chip offers significant upgrades over the RP2040, making it a strong candidate for more demanding embedded applications. Whether you’re developing a new project or looking to upgrade an existing one, the enhancements in performance, memory, I/O options, security, and architectural flexibility make the Raspberry Pi Pico 2 a compelling choice moving forward. [ad_2] Source link
0 notes
Text
Persistent Storage in Zephyr: Saving Data to Files
Introduction
In this series of blog posts introducing The Zephyr Project RTOS, we have primarily concentrated on Zephyr internals and infrastructure. Recall that Zephyr wants to be a leading RTOS for devices with limited resources that are connected. To guarantee a platform that is secure, dependable, and vendor-neutral, Zephyr incorporates open-source and security best practices.

I'll demonstrate how to make an application in Zephyr to store data on a microSD card in this blog post. Even though the majority of embedded systems today can upload sensor data via the internet, the connection might be erratic. There are two benefits to having a microSD card. It can be expanded, to start. A micro-SD card of one size can be changed for a larger one, but onboard RAM and flash storage are fixed. Second, a desktop computer can be used to access data from a microSD card.
Hardware
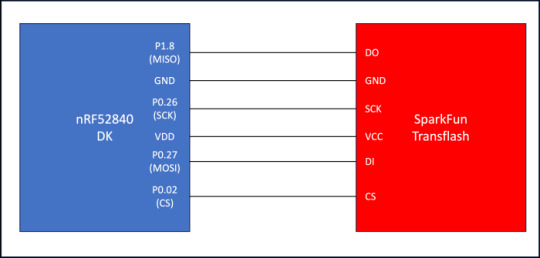
This blog post will use the Nordic nRF52840 development kit (https://www.nordicsemi.com/Products/Development-hardware/nrf52840-dk). We will connect the nRF52840 development kit to the SparkFun microSD Transflash Breakout board (https://www.sparkfun.com/products/544). Any microSD card from a reputable vendor will suffice.
The following diagram shows the connections between the SparkFun microSD module and the nRF52840 development kit:
Embedded Software
We will go over the pertinent parts of the embedded software that interface with the SD card in this section. First, we can use West to get Zephyr v3.5 by running the following command: $> west init -m <a href="https://github.com/zephyrproject-rtos/zephyr">https://github.com/zephyrproject-rtos/zephyr</a> --mr v3.5.0 zephyrproject$> cd zephyrproject$> west update
Second, we can clone the repository that contains our test application: $> git clone https://github.com/mabembedded/zephyr-sd-spi.git
Third, we need to make sure that the exFAT scheme—which is Windows' default—is used to format our SD card. Lastly, we can open a terminal interface and use the USB connection to connect the nRF52840 development kit to our PC. We can build and flash the application by executing the following commands: $> cd zephyr-sd-spi$> cmake –preset build$> west build && west flash
We should see the following output in the terminal interface: *** Booting Zephyr OS build zephyr-v3.5.0 ***[00:00:00.402,770] <inf> sd: Maximum SD clock is under 25MHz, using clock of 24000000Hz[00:00:00.414,215] <inf> main: Block count 384503808Sector size 512Memory Size(MB) 187746Disk mounted.Listing dir /SD: ...[DIR ] System Volume Information[FILE] test_data.txt (size = 13)Successfully mounted SD cardmain - successfully created file
If we plug in the SD card to our PC and open it up in File Explorer, we should see “test_data.txt” with the string “hello world!” on the first line, as seen below:
Kconfig
The following relevant Kconfig options are enabled in the “prj.conf” file, with a description of each:
CONFIG_DISK_ACCESS: This option allows for the disk access subsystem.
CONFIG_FILE_SYSTEM: This option allows for the filesystem subsystem.
CONFIG_FAT_FILESYSTEM_ELM: This option instructs Zephyr to use the “ELM” FAT FS implementation, found on http://elm-chan.org/.
CONFIG_FS_FATFS_MOUNT_MKFS: This option instructs Zephyr to create a disk with a FAT filesystem if none is found.
CONFIG_FS_FATFS_EXFAT: This option enables the exFAT partition scheme.
CONFIG_DISK_DRIVER_SDMMC: This option enables the SD/EMMC driver.
CONFIG_SPI: This option enables the SPI subsystem.
CONFIG_GPIO: This option enables the GPIO subsystem.
Devicetree Overlay
Additionally, there are two reasons why we must create a Devicetree overlay. The nRF52840 development kit's pins for the SPI connection to the SparkFun Transflash breakout board must first be updated. Secondly, we need to tell the application firmware that an SD card is plugged in. As indicated below, we must first add a new entry to the pinctrl block in order to update the SPI pins: &pinctrl { custom_spi: custom_spi { group1 { psels = <NRF_PSEL(SPIM_SCK, 0, 26)>, <NRF_PSEL(SPIM_MOSI, 0, 27)>, <NRF_PSEL(SPIM_MISO, 1, 8)>; }; };};
Then, we need to update the SPI block in the overlay with our custom pinctrl (and also add the GPIO for the CS line): &spi1 { status = "okay"; pinctrl-0 = <&custom_spi>; pinctrl-1 = <&custom_spi>; pinctrl-names = "default", "sleep"; cs-gpios = <&gpio0 2 GPIO_ACTIVE_LOW>;...
The following needs to be added in the “spi1” node to inform the application of the existence of the SD card: ... sdhc0: sdhc@0 { compatible = "zephyr,sdhc-spi-slot"; reg = <0>; status = "okay"; label = "SDHC_0"; mmc { compatible = "zephyr,sdmmc-disk"; status = "okay"; }; spi-max-frequency = <24000000>; };};
Application Source
With the Devicetree Overlay and Kconfig installed, we can go over the implementation step-by-step. To make sure our program can accurately read the files on the SD card, I made two helper functions. The prototype for the first function, "lsdir," is as follows:staticintlsdir(constchar *path);
This function prints all of the directories and files contained in a given path when it receives it as input. The second function, "mount_sd_card," makes use of "lsdir." The following tasks are carried out by this function:
Initializes the underlying disk via “disk_access_init.”
Retrieves the number of sectors via “disk_access_ioctl” with “DISK_IOCTL_GET_SECTOR_COUNT” as a parameter.
Retrieves the sector size via “disk_access_ioctl” with “DISK_IOCTL_GET_SECTOR_SIZE” as a parameter.
Prints the total space of the SD card using the information retrieved above.
Mounts the SD card. If the SD card was successfully mounted, the function lists the files and directories at the root of the SD card. If not, the function tries to mount again.
In "main," "mount_sd_card" is used as the first function. It initializes the "fs_file_t" data structure, which is displayed below, upon success. Every subsequent file operation will make use of the data structure.structfs_file_t data_filp;fs_file_t_init(&data_filp);
The "fs_unlink" function is then used to remove "test_data.txt" from the SD card's root, if it exists. The following line creates a new file named "test_data.txt" and opens it for writing: fs_open(&data_filp, "/SD:/test_data.txt", FS_O_WRITE | FS_O_CREATE);
Finally, the following lines are used to write “hello world!” to the file that was created: sprintf(file_data_buffer, "hello world!\n");ret = fs_write(&data_filp, file_data_buffer, strlen(file_data_buffer));fs_close(&data_filp);
Summary
In this blog post, we demonstrated how to mount a microSD card, write data to it, and create a new file on the microSD card using a Zephyr application. Devices in the field that need to periodically write data to off-board memory can benefit from the lessons learned from such an application, particularly in situations where Internet access may be intermittent. We will continue our journey of writing a custom BLE application that runs on Zephyr in the upcoming blog post!
If you're looking to enhance your embedded systems with advanced storage capabilities like microSD integration or custom BLE applications, Silicon Signals is here to help. Our team specializes in hardware design, software development, and integration of cutting-edge solutions using Zephyr and other RTOS platforms.
👉 Contact Us Today to explore how we can elevate your projects with tailored embedded systems solutions!
0 notes
Text
Arduino Projects
Arduino is a microcontroller platform made to facilitate hardware integration and programming. Each of its boards, including the Arduino Uno, Nano, and Mega, is designed to meet a distinct set of requirements. When used in conjunction with the Arduino IDE, users may easily write, upload, and execute code.
Users can design projects ranging from basic LED blinkers to intricate robotics and Internet of Things systems thanks to the platform's extensive library of sensors, modules, and components.
Top Arduino Project Ideas
System for Home Automation
An Arduino with a smartphone app can be used to control lights, fans, and other appliances. Your system can become more intelligent and energy-efficient by integrating sensors like temperature or motion detectors.
The weather station
Construct a personal weather station to track air pressure, temperature, and humidity. You can gather data using sensors like the DHT11 and BMP180, show it on an LCD screen, or post it online for remote access.
Robot That Avoids Obstacles
This well-liked project for robotics novices is teaching a robot to use ultrasonic sensors to navigate around obstacles.
Intelligent Plant Monitoring System
An Arduino-based monitoring system that measures temperature, light intensity, and soil moisture can help you keep your plants healthy. Even when it's time to water your plants, it may let you know.
Alarm System with Arduino
Create an Arduino-powered alarm system with a buzzer, keypad, and motion sensors to increase security. For workplace or home security, this project is perfect.
Pet Feeder with Automation
Construct a pet feeder that automatically delivers food depending on a weight sensor reading or at predetermined intervals.
Internet of Things Door Lock
Create a smart door lock that you can operate from a distance using Bluetooth or Wi-Fi by integrating an Arduino with an RFID scanner or fingerprint sensor.
Make Your Own Game Console
Convert an Arduino board with basic buttons and a display into a vintage game console.
How to Get Started with Arduino Projects
Select the appropriate board:
Choose an Arduino board based on the needs of your project. The Arduino Uno is an excellent place to start for the majority of novices.
Assemble the parts:
Determine the sensors, actuators, and other parts your project needs. A wide range of Arduino-compatible components are available on websites like Adafruit, SparkFun, and Amazon.
Set up the Arduino IDE:
Install the Arduino IDE by downloading it from Arduino.cc. You can develop code and upload it to your board using this software.
The universe of creativity and invention is unlocked by Arduino projects. Arduino offers the resources and network to realize your ideas, whether you want to study robotics, automate your house, or develop a ground-breaking technology.
Explore the world of Arduino now and unleash your creative side! Do you have a favorite idea for an Arduino project? Tell us about it in the comments section below.
To know more, click here.
0 notes
Text
Arduino what now??
This project is SUPPOSED to open doors and insights into the world of makerspaces and coding through the Arduino circuit board. Right now it's making me want to pull my hair out and drink way more Diet Dr. Pepper than I need.
This is the code from example circuit #3. I learned that if i anything is out of place- IT WILL NOT WORK!! This is the rainbow circuit...
/*
Example sketch 03
RGB LED
Make an RGB LED display a rainbow of colors!
Hardware connections:
An RGB LED is actually three LEDs (red, green, and blue) in
one package. When you run them at different brightnesses,
the red, green and blue mix to form new colors.
Starting at the flattened edge of the flange on the LED,
the pins are ordered RED, COMMON, GREEN, BLUE.
Connect RED to a 330 Ohm resistor. Connect the other end
of the resistor to Arduino digital pin 9.
Connect COMMON pin to GND.
Connect GREEN to a 330 Ohm resistor. Connect the other end
of the resistor to Arduino digital pin 10.
Connect BLUE to a 330 Ohm resistor. Connect the other end
of the resistor to Arduino digital pin 11.
This sketch was written by SparkFun Electronics,
with lots of help from the Arduino community.
Visit http://www.arduino.cc to learn about the Arduino.
Version 2.0 6/2012 MDG
*/
// First we'll define the pins by name to make the sketch
// easier to follow.
// Here's a new trick: putting the word "const" in front of a
// variable indicates that this is a "constant" value that will
// never change. (You don't have to do this, but if you do, the
// Arduino will give you a friendly warning if you accidentally
// try to change the value, so it's considered good form.)
const int RED_PIN = 9;
const int GREEN_PIN = 10;
const int BLUE_PIN = 11;
// This variable controls how fast we loop through the colors.
// (Try changing this to make the fading faster or slower.)
int DISPLAY_TIME = 100; // In milliseconds
void setup()
{
// Here we'll configure the Arduino pins we're using to
// drive the LED to be outputs:
pinMode(RED_PIN, OUTPUT);
pinMode(GREEN_PIN, OUTPUT);
pinMode(BLUE_PIN, OUTPUT);
}
void loop()
{
// In this sketch, we'll start writing our own functions.
// This makes the sketch easier to follow by dividing up
// the sketch into sections, and not having everything in
// setup() or loop().
// We'll show you two ways to run the RGB LED.
// The first way is to turn the individual LEDs (red, blue,
// and green) on and off in various combinations. This gives you
// a total of eight colors (if you count "black" as a color).
// We've written a function called mainColors() that steps
// through all eight of these colors. We're only "calling" the
// function here (telling it to run). The actual function code
// is further down in the sketch.
mainColors();
// The above function turns the individual LEDs full-on and
// full-off. If you want to generate more than eight colors,
// you can do so by varying the brightness of the individual
// LEDs between full-on and full-off.
// The analogWrite() function lets us do this. This function
// lets you dim a LED from full-off to full-on over 255 steps.
// We've written a function called showSpectrum() that smoothly
// steps through all the colors. Again we're just calling it
// here; the actual code is further down in this sketch.
showSpectrum();
}
// Here's the mainColors() function we've written.
// This function displays the eight "main" colors that the RGB LED
// can produce. If you'd like to use one of these colors in your
// own sketch, you cancopy and paste that section into your code.
void mainColors()
{
// Off (all LEDs off):
digitalWrite(RED_PIN, LOW);
digitalWrite(GREEN_PIN, LOW);
digitalWrite(BLUE_PIN, LOW);
delay(1000);
// Red (turn just the red LED on):
digitalWrite(RED_PIN, HIGH);
digitalWrite(GREEN_PIN, LOW);
digitalWrite(BLUE_PIN, LOW);
delay(1000);
// Green (turn just the green LED on):
digitalWrite(RED_PIN, LOW);
digitalWrite(GREEN_PIN, HIGH);
digitalWrite(BLUE_PIN, LOW);
delay(1000);
// Blue (turn just the blue LED on):
digitalWrite(RED_PIN, LOW);
�� digitalWrite(GREEN_PIN, LOW);
digitalWrite(BLUE_PIN, HIGH);
delay(1000);
// Yellow (turn red and green on):
digitalWrite(RED_PIN, HIGH);
digitalWrite(GREEN_PIN, HIGH);
digitalWrite(BLUE_PIN, LOW);
delay(1000);
// Cyan (turn green and blue on):
digitalWrite(RED_PIN, LOW);
digitalWrite(GREEN_PIN, HIGH);
digitalWrite(BLUE_PIN, HIGH);
delay(1000);
// Purple (turn red and blue on):
digitalWrite(RED_PIN, HIGH);
digitalWrite(GREEN_PIN, LOW);
digitalWrite(BLUE_PIN, HIGH);
delay(1000);
// White (turn all the LEDs on):
digitalWrite(RED_PIN, HIGH);
digitalWrite(GREEN_PIN, HIGH);
digitalWrite(BLUE_PIN, HIGH);
delay(1000);
}
// Below are two more functions we've written,
// showSpectrum() and showRGB().
// showRGB() displays a single color on the RGB LED.
// You call showRGB() with the number of a color you want
// to display.
// showSpectrum() steps through all the colors of the RGB LED,
// displaying a rainbow. showSpectrum() actually calls showRGB()
// over and over to do this.
// We'll often break tasks down into individual functions like
// this, which makes your sketches easier to follow, and once
// you have a handy function, you can reuse it in your other
// programs.
// showSpectrum()
// This function steps through all the colors of the RGB LED.
// It does this by stepping a variable from 0 to 768 (the total
// number of colors), and repeatedly calling showRGB() to display
// the individual colors.
// In this function, we're using a "for() loop" to step a variable
// from one value to another, and perform a set of instructions
// for each step. For() loops are a very handy way to get numbers
// to count up or down.
// Every for() loop has three statements separated by semicolons:
// 1. Something to do before starting
// 2. A test to perform; as long as it's true,
// it will keep looping
// 3. Something to do after each loop (usually
// increase a variable)
// For the for() loop below, these are the three statements:
// 1. x = 0; Before starting, make x = 0.
// 2. x < 768; While x is less than 768, run the
// following code.
// 3. x++ Putting "++" after a variable means
// "add one to it". (You can also use "x = x + 1")
// Every time you go through the loop, the statements following
// the loop (those within the brackets) will run.
// And when the test in statement 2 is finally false, the sketch
// will continue.
void showSpectrum()
{
int x; // define an integer variable called "x"
// Now we'll use a for() loop to make x count from 0 to 767
// (Note that there's no semicolon after this line!
// That's because the for() loop will repeat the next
// "statement", which in this case is everything within
// the following brackets {} )
for (x = 0; x < 768; x++)
// Each time we loop (with a new value of x), do the following:
{
showRGB(x); // Call RGBspectrum() with our new x
delay(10); // Delay for 10 ms (1/100th of a second)
}
}
// showRGB()
// This function translates a number between 0 and 767 into a
// specific color on the RGB LED. If you have this number count
// through the whole range (0 to 767), the LED will smoothly
// change color through the entire spectrum.
// The "base" numbers are:
// 0 = pure red
// 255 = pure green
// 511 = pure blue
// 767 = pure red (again)
// Numbers between the above colors will create blends. For
// example, 640 is midway between 512 (pure blue) and 767
// (pure red). It will give you a 50/50 mix of blue and red,
// resulting in purple.
// If you count up from 0 to 767 and pass that number to this
// function, the LED will smoothly fade between all the colors.
// (Because it starts and ends on pure red, you can start over
// at 0 without any break in the spectrum).
void showRGB(int color)
{
int redIntensity;
int greenIntensity;
int blueIntensity;
// Here we'll use an "if / else" statement to determine which
// of the three (R,G,B) zones x falls into. Each of these zones
// spans 255 because analogWrite() wants a number from 0 to 255.
// In each of these zones, we'll calculate the brightness
// for each of the red, green, and blue LEDs within the RGB LED.
if (color <= 255) // zone 1
{
redIntensity = 255 - color; // red goes from on to off
greenIntensity = color; // green goes from off to on
blueIntensity = 0; // blue is always off
}
else if (color <= 511) // zone 2
{
redIntensity = 0; // red is always off
greenIntensity = 255 - (color - 256); // green on to off
blueIntensity = (color - 256); // blue off to on
}
else // color >= 512 // zone 3
{
redIntensity = (color - 512); // red off to on
greenIntensity = 0; // green is always off
blueIntensity = 255 - (color - 512); // blue on to off
}
// Now that the brightness values have been set, command the LED
// to those values
analogWrite(RED_PIN, redIntensity);
analogWrite(BLUE_PIN, blueIntensity);
analogWrite(GREEN_PIN, greenIntensity);
}
3. The pictures that follow are the Arduino Board and the first successful code...A BLINKING LIGHT!!


4. The husband and I decided we would play around with creating the "Love Meter". It has not worked yet but here is our first attempt!

5. This video is of the first code the "blinking light". I was pretty excited that it worked the first time!
6. My post only allows for one video so text it is! When I first started this project, I opened the box and saw all the pieces and became overwhelmed. You'd think as someone who literally works as an Instructional Technologist I would have been a little more excited. I got to work on reading ALL about the materials and their functions. The starter guide book has been my best friend and YouTube. the husband may have helped when the tears began to start. 😂
7. Really I was just learning about the pieces and the mechanics of each piece and the coding examples. I read the user manual, looked at examples, and watched YouTube videos to help me through the process. Through lots of frustration, trial and error, and time, I was able to successfully download the software, get the light to blink and create the rainbow light circuit. Well, put the pieces and wires where they go and run the code provided. Learning how to actually "code" is going to be my greatest challenge.
0 notes
Text
I guarantee you Lil Wayne would adore the MicroMod RP2040 from SparkFun electronics🤩

0 notes
Text
Load Cell Amplifier Market Share 2024 by Applications and Forecast to 2032
"Load Cell Amplifier Market Dynamics: Growth, Trends, and Future Outlook 2024-2032"
The Load Cell Amplifier market is expected to experience substantial growth from 2024 to 2032, fuelled by technological advancements, the expansion of digital marketing, and an increasing emphasis on data-driven decision-making. This report provides an in-depth analysis of market dynamics, focusing on key players, product types, applications, and regional growth trends. While challenges such as economic fluctuations and regulatory changes may arise, the market presents ample opportunities for innovation and strategic partnerships.
Get a sample PDF of the report at - https://www.themarketintelligence.com/enquiry/request-sample-pdf/1647
Who are the largest manufacturers of Load Cell Amplifier Market worldwide?
Applied Measurements (U.K.)
Anyload (Canada)
FUTEK (U.S.)
Synectic Electronics (U.S.)
Flintec (U.K.)
SparkFun (U.S.)
Rudrra Sensor (India)
The report covers a research period from 2019 to 2030, featuring extensive quantitative analysis alongside comprehensive qualitative insights. It provides an overview of the global Load Cell Amplifier market, highlighting key metrics such as sales, revenue, and growth rate. Furthermore, the report offers segmented market analysis by region, product type, and downstream industry, giving readers a clear and detailed understanding of the market's distribution from multiple perspectives.
Get Sample Copy of Load Cell Amplifier Market Report
Load Cell Amplifier Market Dynamics Covers:
Load Cell Amplifier market dynamics covers the analysis of the forces that influence the behaviours and prices in a market. These dynamics include various elements such as supply and demand fluctuations, competitor actions, market trends, and economic models, all of which contribute to the overall landscape of a given market.
Components of Market Dynamics:
Supply and Demand: The core of market dynamics lies in the relationship between supply and demand.
Market Positioning: This involves understanding where a product fits among competitors and what makes it unique.
Competitive Analysis: Analysing competitors' strengths, weaknesses, and market positions helps businesses identify opportunities and threats.
Load Cell Amplifier market dynamics involves analysing various factors that influence market behaviours and prices. It helps businesses stay competitive, adapt to changes, optimize resources, and develop better products.
Inquire or Share Your Questions If Any Before the Purchasing This Report – https://www.themarketintelligence.com/checkout-page/1647
What are the factors driving the growth of the Load Cell Amplifier Market?
Load Cell Amplifier Market Segmented by Types:
digital load cell amplifier
analog load cell amplifier.
Load Cell Amplifier Market Segmented by Applications:
aerospace
automation and controls
transportation
manufacturing
others.
Regional Segmentation:
North America (United States, Canada and Mexico)
Europe (Germany, UK, France, Italy, Russia and Turkey etc.)
Asia-Pacific (China, Japan, Korea, India, Australia, Indonesia, Thailand, Philippines, Malaysia and Vietnam)
South America (Brazil, Argentina, Columbia etc.)
Middle East and Africa (Saudi Arabia, UAE, Egypt, Nigeria and South Africa)
Browse Full Report at: https://www.themarketintelligence.com/market-reports/load-cell-amplifier-market-1647
Key Takeaways from the Global Load Cell Amplifier Market Report:
Market Size Estimates: Estimation of the Load Cell Amplifier market size in terms of value and sales volume from 2018 to 2028.
Market Trends and Dynamics: Analysis of Load Cell Amplifier market drivers, opportunities, challenges, and risks.
Macro-economy and Regional Conflict: Impact of global inflation and the Russia-Ukraine conflict on the Load Cell Amplifier market.
Segment Market Analysis: Load Cell Amplifier market value and sales volume by type and application from 2018 to 2028.
Regional Market Analysis: Current situations and prospects of the Load Cell Amplifier market in North America, Asia Pacific, Europe, Latin America, the Middle East, and Africa.
Country-level Studies on the Load Cell Amplifier Market: Revenue and sales volume data for major countries within each region.
Load Cell Amplifier Market Competitive Landscape and Major Players: Analysis of 10-15 leading market players, including sales, price, revenue, gross margin, product profile, and application.
Trade Flow: Import and export volumes of the Load Cell Amplifier market in key regions.
Load Cell Amplifier Industry Value Chain: Overview of raw materials and suppliers, manufacturing processes, distributors, and downstream customers in the Load Cell Amplifier market.
Load Cell Amplifier Industry News, Policies, and Regulations: Updates on relevant industry news, policies, and regulations.
Reasons to Purchase This Report:
Comprehensive Analysis: Gain access to extensive quantitative and qualitative analysis covering a research period from 2019 to 2030.
Market Overview: Understand the global Load Cell Amplifier market through detailed metrics on sales, revenue, and growth rates.
Segmented Insights: Benefit from segmented market analysis by region, product type, and downstream industry for a nuanced understanding of market distribution.
Competitive Landscape: Stay ahead with insights into the competitive landscape, including key players and their market strategies.
Future Prospects: Make informed decisions with projections and future market prospects.
Regional Analysis: Gain insights into regional growth trends and market status.
Emerging Trends: Identify and understand emerging market trends and opportunities.
Strategic Planning: Utilize the report’s insights for strategic planning and market positioning.
0 notes
Photo

SparkFun's Latest RFID Reader Scans up to 300 Tags Per Second — But Don't Stand in Its Way
0 notes
Text
This Week in Rust 531
Hello and welcome to another issue of This Week in Rust! Rust is a programming language empowering everyone to build reliable and efficient software. This is a weekly summary of its progress and community. Want something mentioned? Tag us at @ThisWeekInRust on Twitter or @ThisWeekinRust on mastodon.social, or send us a pull request. Want to get involved? We love contributions.
This Week in Rust is openly developed on GitHub and archives can be viewed at this-week-in-rust.org. If you find any errors in this week's issue, please submit a PR.
Updates from Rust Community
Foundation
Q4 2023 Recap from Rebecca Rumbul
Project/Tooling Updates
Ruffle 2023 in review
Four challenges cargo-semver-checks has yet to tackle
rustc_codegen_gcc: Progress Report #29
Roadmap for the Xilem backend in 2024
rust-analyzer changelog #217
pq-sys 0.5.0
What's new in SeaORM 0.12.x
Rust on Espressif chips - January 24 2024
Observations/Thoughts
Making Rust binaries smaller by default
My Best and Worst Deadlock in Rust
Why SQL hang for exactly 940s? TCP and Async Rust!
Making Async Rust Reliable
Identifying Rust’s collect::() memory leak footgun
[video] embassy is now on crates.io
[video] Rust full stack web frameworks have a bright future
[video] Rust Halifax - Rust & Tell #1
[video] Why Rust will keep growing in 2024
Rust Walkthroughs
Using mem::take to reduce heap allocations
Writing your own Rust linter
Using Serde in Rust
Parsing JSON in Rust
Billion-row challenge: Rust walkthrough
Embassy on ESP: Timers
Supporting LoRa on the SparkFun expLoRaBLE Thing Plus with Rust
How to work with !Sized types in Rust
Rocket - logging in the web application
Rocket - access custom configuration in the routes
Testing with tempfiles and environment variables
Research
Profiling Programming Language Learning
Rust-lancet: Automated Ownership-Rule-Violation Fixing with Behavior Preservation
Crate of the Week
This week's crate is apistos, an OpenAPI documentation tool.
Thanks to Romain Lebran for the self-suggestion!
Please submit your suggestions and votes for next week!
Call for Participation; projects and speakers
CFP - Projects
Always wanted to contribute to open-source projects but did not know where to start? Every week we highlight some tasks from the Rust community for you to pick and get started!
Some of these tasks may also have mentors available, visit the task page for more information.
* Ockam - Have a single SqlxDatabase instance per process * Ockam - Improve database migrations to pair sql and rust migration code * Ockam - Make install.sh not fail during upgrade process * Hyperswitch - [FEATURE]: Make cache configuration configurable at runtime * Hyperswitch - [FEATURE]: Implement Code cov for local system using makefile * Hyperswitch - [FEATURE]: Setup code coverage for local tests & CI * Hyperswitch - [FEATURE]: Add domain type for client secret * Hyperswitch - [FEATURE]: Have get_required_value to use ValidationError in OptionExt
If you are a Rust project owner and are looking for contributors, please submit tasks here.
CFP - Speakers
Are you a new or experienced speaker looking for a place to share something cool? This section highlights events that are being planned and are accepting submissions to join their event as a speaker.
If you are an event organizer hoping to expand the reach of your event, please submit a link to the submission website through a PR to TWiR.
Updates from the Rust Project
453 pull requests were merged in the last week
HashMap/HashSet: forward fold implementations of iterators
dead_code treats #[repr(transparent)] the same as #[repr(C)]
fix(rust-analyzer): use new pkgid spec to compare
large_assignments: Lint on specific large args passed to functions
maybe_lint_impl_trait: separate is_downgradable from is_object_safe
never_patterns: Count ! bindings as diverging
never_patterns: typecheck never patterns
pat_analysis: Don't rely on contiguous VariantIds outside of rustc
pattern_analysis: Remove Ty: Copy bound
proc_macro: Add Literal::c_string constructor
single_use_lifetimes: Don't suggest deleting lifetimes with bounds
add #[track_caller] to the "From implies Into" impl
add Ipv6Addr::is_ipv4_mapped
add PatKind::Err to AST/HIR
add help message for exclusive_range_pattern error
add private NonZero<T> type alias
add way to express that no values are expected with check-cfg
added NonZeroXxx::from_mut(_unchecked)?
allow any const expression blocks in thread_local!
always use RevealAll for const eval queries
avoid ICEs in trait names without dyn
consolidate logic around resolving built-in coroutine trait impls
deny braced macro invocations in let-else
detect NulInCStr error earlier
improve let_underscore_lock
improved collapse_debuginfo attribute, added command-line flag
make unsafe_op_in_unsafe_fn migrated in edition 2024
restrict access to the private field of newtype indexes
simplify closure_env_ty and closure_env_param
suggest .swap() when encountering conflicting borrows from mem::swap on a slice
undeprecate lint unstable_features and make use of it in the compiler
make MIR pass name a compile-time constant
make stable_mir::with_tables sound
SMIR: make the remaining "private" fields actually private
use an interpreter in MIR jump threading
use implied bounds compat mode in MIR borrowck
validate AggregateKind types in MIR
sandwich MIR optimizations between DSE
cache local DefId-keyed queries without hashing
pack u128 in the compiler to mitigate new alignment
use UnhashMap for a few more maps
fold arithmetic identities in GVN
optimize large array creation in const-eval
implement iterator specialization traits on more adapters
optimize EscapeAscii's Display and CStr's Debug
stabilise bound_map
stabilize round_ties_even
stabilize slice_first_last_chunk
stabilize single-field offset_of!
implement strict integer operations that panic on overflow
core: introduce split_at{,_mut}_checked
un-hide iter::repeat_n
fix deallocation with wrong allocator in (A)Rc::from_box_in
use bool instead of PartialOrd as return value of the comparison closure in {slice,Iterator}::is_sorted_by
regex: make Input::new guard against incorrect AsRef implementations
cargo-rustdoc: use same path by output format logic everywhere
cargo: use pkgid spec in in JSON messages
cargo: remap common prefix only
cargo doc: add a heading to highlight "How to find features enabled on dependencies"
cargo: inherit jobserver from env for all kinds of runner
cargo: fix precise-prerelease tracking link
cargo: go back to passing an empty values() when no features are declared
cargo: improve GitHub Actions CI config
rustdoc: Allows links in headings
rustdoc: hide modals when resizing the sidebar
rustfmt: check that a token can begin a nonterminal kind before parsing it as a macro arg
rustfmt: add config option generated_marker_line_search_limit
clippy: blocks_in_conditions: do not warn if condition comes from macro
clippy: default_numeric_fallback: improve const context detection
clippy: no_effect_underscore_binding: _ prefixed variables can be used
clippy: unused_io_amount captures Ok(_)s
clippy: add suspicious_open_options lint
clippy: correctly handle type relative in trait_duplication_in_bounds lint
clippy: don't emit derive_partial_eq_without_eq lint if the type has the non_exhaustive attribute
clippy: find function path references early in the same lint pass
clippy: fix FP on semicolon_if_nothing_returned
clippy: fix multiple_crate_versions to correctly normalize package names to avoid missing the local one
clippy: fix warning span for no_effect_underscore_binding
clippy: respect #[allow] attributes in single_call_fn lint
clippy: improve wording and fix dead link in description of arc_with_non_send_sync lint
rust-analyzer: add "One" import granularity
rust-analyzer: add a new config to allow renaming of non-local defs
rust-analyzer: goto type actions for notable trait hovers
rust-analyzer: show additional value information when hovering over literals
rust-analyzer: show notable implemented traits on hover
rust-analyzer: add error recovery for use_tree_list parsing
rust-analyzer: fix panic when extracting struct from enum variant
rust-analyzer: fix progress reporting getting stuck
rust-analyzer: handle SelfParam better in "Inline call"
rust-analyzer: include for construct in convert to guarded return conditions
rust-analyzer: infer OUT_DIR when workspace root contains a symlink
rust-analyzer: make value_ty query fallible
rust-analyzer: parse macro_rules as macro name
Rust Compiler Performance Triage
This week saw a bunch of regressions caused by correctness fixes and in general doing more work in the compiler. These were offset by many improvements (especially around hashing in the compiler) that improved performance by ~2% across a large number of benchmarks. Don't get too excited about the large 45+% wins though, these were only for tiny benchmarks like helloworld. They were caused by a change in Cargo which introduces stripping of debug symbols from Rust release binaries by default, and in turn also improves compilation time for small crates.
Triage done by @kobzol. Revision range: f9c2421a..d6b151fc
Summary:
(instructions:u) mean range count Regressions ❌ (primary) 0.7% [0.2%, 1.5%] 11 Regressions ❌ (secondary) 2.2% [0.2%, 9.9%] 26 Improvements ✅ (primary) -3.2% [-47.5%, -0.2%] 191 Improvements ✅ (secondary) -7.9% [-46.5%, -0.1%] 123 All ❌✅ (primary) -3.0% [-47.5%, 1.5%] 202
4 Regressions, 4 Improvements, 9 Mixed; 4 of them in rollups 48 artifact comparisons made in total
Full report here
Approved RFCs
Changes to Rust follow the Rust RFC (request for comments) process. These are the RFCs that were approved for implementation this week:
No RFCs were approved this week.
Final Comment Period
Every week, the team announces the 'final comment period' for RFCs and key PRs which are reaching a decision. Express your opinions now.
RFCs
No RFCs entered Final Comment Period this week.
Tracking Issues & PRs
[disposition: close] Add a default flag for enum documentation
[disposition: merge] impl From<&[T; N]> for Cow<[T]>
[disposition: merge] Tracking Issue for array_methods
Language Reference
No Language Reference RFCs entered Final Comment Period this week.
Unsafe Code Guidelines
No Unsafe Code Guideline RFCs entered Final Comment Period this week.
New and Updated RFCs
eRFC: Iterate on and stabilize libtest's programmatic output
Call for Testing
An important step for RFC implementation is for people to experiment with the implementation and give feedback, especially before stabilization. The following RFCs would benefit from user testing before moving forward:
No RFCs issued a call for testing this week.
If you are a feature implementer and would like your RFC to appear on the above list, add the new call-for-testing label to your RFC along with a comment providing testing instructions and/or guidance on which aspect(s) of the feature need testing.
Upcoming Events
Rusty Events between 2024-01-24 - 2024-02-21 🦀
Virtual
2024-01-24 | Virtual (Berlin, DE) | WeAreDevelopers Community
WeAreDevelopers LIVE - Rust Day
2024-01-25 | Virtual (Charlottesville, NC, US) | Charlottesville Rust Meetup
Crafting Interpreters in Rust Collaboratively
2024-01-25 | Virtual (Linz, AT) | Rust Linz
Rust Meetup Linz - 36th Edition
2024-01-25 | Virtual (Mexico City, DF, MX) | Rust MX
Iniciando 2024 con Rust
2024-01-28 | Virtual (Wrocław, PL) | Stacja IT Wrocław
Wprowadzenie do języka Rust
2024-01-30 | Virtual | Bevy Game Development
Bevy Meetup #1
2024-01-30 | Virtual (Buffalo, NY, US) | Buffalo Rust User Group
Buffalo Rust User Group
2024-01-30 | Virtual (Dallas, TX, US) | Dallas Rust
Last Tuesday
2024-01-31 | Virtual (Cardiff, UK) | Rust and C++ Cardiff
Rust for Rustaceans Book Club launch!
2024-02-01 | Virtual + In Person (Barcelona, ES) | BcnRust
12th BcnRust Meetup - Stream
2024-02-01 | Virtual (Berlin, DE) | OpenTechSchool Berlin + Rust Berlin
Rust Hack n Learn | Mirror: Rust Hack n Learn
2024-02-03 | Virtual + In-person (Brussels, BE) | FOSDEM 2024
FOSDEM Conference: Rust devroom - talks
2024-02-03 | Virtual (Kampala, UG) | Rust Circle
Rust Circle Meetup
2024-02-04 | Virtual | Rust Maven
Web development with Rocket - In English
2024-02-07 | Virtual (Indianapolis, IN, US) | Indy Rust
Indy.rs - with Social Distancing
2024-02-08 | Virtual (Charlottesville, NC, US) | Charlottesville Rust Meetup
Crafting Interpreters in Rust Collaboratively
2024-02-08 | Virtual (Nürnberg, DE) | Rust Nüremberg
Rust Nürnberg online
2024-02-10 | Virtual (Wrocław, PL) | Stacja IT Wrocław
Rust – budowanie narzędzi działających w linii komend
2024-02-13 | Virtual (Dallas, TX, US) | Dallas Rust
Second Tuesday
2024-02-15 | Virtual (Berlin, DE) | OpenTechSchool Berlin + Rust Berlin
Rust Hack n Learn | Mirror: Rust Hack n Learn
2024-02-21 | Virtual (Vancouver, BC, CA) | Vancouver Rust
Rust Study/Hack/Hang-out
Europe
2024-01-24 | Zagreb, HR | impl Zagreb for Rust
Rust Meetup 2024/01: WebGPU intro using Rust
2024-01-25 | Augsburg, DE | Rust Meetup Augsburg
Augsburg Rust Meetup #5: Async Part2 and Async in action
2024-01-25 | Vienna, AT | Rust Vienna
Rust Vienna Meetup - January - Blockchains and Data Pipelines
2024-02-01 | Hybrid (Barcelona, ES) | BcnRust
12th BcnRust Meetup
2024-02-03 | Brussels, BE | FOSDEM '24
FOSDEM '24 Conference: Rust devroom - talks | Rust Aarhus FOSDEM Meetup
2024-02-03 | Nürnberg, BY, DE | Paessler Rust Camp 2024
Paessler Rust Camp 2024
2024-02-06 | Bremen, DE | Rust Meetup Bremen
Rust Meetup Bremen [1]
2024-02-07 | London, UK | Rust London User Group
Rust for the Web — Mainmatter x Shuttle Takeover
2024-02-08 | Bern, CH | Rust Bern
Rust Bern Meetup #1 2024 🦀
North America
2024-01-24 | Austin, TX, US | Rust ATX
Rust Lunch - Fareground
2024-01-27-28 | Calgary, AB, CA | Rust Calgary
Harnessing Rust for Real-World Problems hackathon: Day 1
Harnessing Rust for Real-World Problems hackathon: Day 2
2024-01-25 | Mountain View, CA, US | Mountain View Rust Meetup
Rust Study/Hack/Hang-out
2024-01-30 | Cambridge, MA, US | Boston Rust Meetup
Harvard Square Rust Lunch
2024-02-07 | Brookline, MA, US | Boston Rust Meetup
Coolidge Corner Brookline Rust Lunch, Feb 7
2024-02-12 | Minneapolis, MN, US | Minneapolis Rust Meetup
Minneapolis Rust: Open Source Contrib Hackathon & Happy Hour
2024-02-13 | New York, NY, US | Rust NYC
Rust NYC Monthly Mixer
2024-02-13 | Seattle, WA, US | Cap Hill Rust Coding/Hacking/Learning
Rusty Coding/Hacking/Learning Night
2024-02-15 | Boston, MA, US | Boston Rust Meetup
Back Bay Rust Lunch, Feb 15
2024-02-15 | Seattle, WA, US | Seattle Rust User Group
Seattle Rust User Group Meetup
Oceania
2024-02-06 | Perth, WA, AU | Perth Rust Meetup Group
Rust Feb 2024 Meetup
If you are running a Rust event please add it to the calendar to get it mentioned here. Please remember to add a link to the event too. Email the Rust Community Team for access.
Jobs
Please see the latest Who's Hiring thread on r/rust
Quote of the Week
The functional ML roots of the language, Graydon's first Rust compiler was written in OCaml, shine through, influencing it right from the start.
It's not "C++ but better".
It's Haskell standing on Lisp's shoulders, hiding in C's coat to sneak into PRDCTN. (The fancy nightclub where all the popular language's hang out)
– tris on his "No Boilerplate" Youtube channel
Thanks to PrototypeNM1 for the suggestion!
Please submit quotes and vote for next week!
This Week in Rust is edited by: nellshamrell, llogiq, cdmistman, ericseppanen, extrawurst, andrewpollack, U007D, kolharsam, joelmarcey, mariannegoldin, bennyvasquez.
Email list hosting is sponsored by The Rust Foundation
Discuss on r/rust
1 note
·
View note
Link
[ad_1] This Friday, we take a look back on 2024 to see the best products, videos, blogs, and more! Favorited Favorite 0 As another year comes to a close, we at SparkFun can't help but look back at all we've accomplished in 2024. From groundbreaking new products that pushed the boundaries of what's possible, to insightful tutorials and engaging videos that empowered makers of all levels, 2024 has been a year of growth, learning, and shared passion for electronics. In this week's "Look Back at 2024" post, we're taking a moment to celebrate the highlights. Join us as we revisit our most popular product releases, delve into the blog posts and tutorials that sparked the most interest, and relive the captivating moments captured in our videos. Whether you're a seasoned engineer, a curious beginner, or simply someone who appreciates the magic of electronics, we invite you to reminisce with us and discover something new along the way. 2024's Top Products SparkFun RTK mosaic-X5 28 available GPS-23748 Unleash centimeter-level GPS accuracy with SparkFun's RTK mosaic-X5. Web interface, RINEX logging, WiFi / Ethernet, rugged de… 4 This year saw the release of some truly exceptional tools for makers, engineers, and robotics enthusiasts. Leading the pack was the SparkFun RTK Torch and the SparkFun RTK mosaic-X5, a dynamic duo that brought high-precision GPS within reach of everyday projects. The RTK Torch, with its easy-to-use interface and centimeter-level accuracy, proved invaluable for navigation, surveying, and even autonomous vehicle development. Meanwhile, the RTK mosaic-X5 offered a powerful, compact solution for integrating RTK capabilities for base station designs. These products redefined what's possible with affordable, accessible GPS/GNSS technology. But we didn't stop there! The SparkFun Optical Tracking Odometry Sensor - PAA5160E1 (Qwiic) opened up a world of possibilities for robotics and motion tracking with its ability to accurately measure displacement and speed. This tiny sensor, easily integrated with its Qwiic compatibility, allowed for precise navigation in robots and detailed motion detection in interactive projects. For those interested in exploring the world of robotics education and research, the Experiential Robotics Platform (XRP) - DIY Kit proved to be a strong option for XRP users, providing a hands-on learning experience for building and programming robots. Cellular connectivity became more accessible than ever with the SparkFun Digi XBee® Cellular Kit, simplifying the process of adding cellular communication to projects for remote monitoring, data logging, and IoT applications. And let's not forget the SparkFun GNSS L1/L5 Breakout - NEO-F10N, SMA, which offered a versatile and high-performance solution for integrating GNSS capabilities into various projects. For those seeking advanced sensing capabilities, the SparkFun Pulsed Coherent Radar Sensor - Acconeer XM125 (Qwiic) provided a powerful tool for detecting objects, measuring distances, and even monitoring human vital signs. Last but certainly not least, the PINECIL Soldering Iron Kit equipped makers with a reliable and affordable soldering solution for bringing their electronic creations to life. 2024's Top Blogs Carbon Dioxide Sensing: PAS vs NDIR vs TVOC January 31, 2024 Raising your Buzzer Projects to the Next Level February 22, 2024 ENGINEERS HATE HIM: LOCAL MAN DISCOVERS 5 TECH SECRETS THEY DON’T WANT YOU TO KNOW April 1, 2024 SparkFun DataLogger: The Easiest Way to Log and Push Data to Your Favorite IoT Platform April 19, 2024 LiDAR, Radar, and PCR: What's The Difference? April 25, 2024 Rocky Mountain RepRap Recap May 23, 2024 Can ChatGPT Successfully Develop a SparkFun Product? May 15, 2024 Local Pickup At SparkFun HQ Is Back! August 19, 2024 This year, our blog was full of insightful articles, helpful tutorials, and thought-provoking explorations of technology. From practical guides to in-depth analyses, we covered a wide range of topics that we hoped would resonate with you. One of the highlights was a series of articles focused on enhancing everyday projects. "Raising your Buzzer Projects to the Next Level" provided makers with creative techniques and coding tips to transform simple buzzers into sophisticated sound generators. We also delved into the world of sensor technology with articles like "LiDAR, Radar, and PCR: What's The Difference?", which demystified these powerful sensing modalities and explored their unique applications. We went a little tongue and cheek with "ENGINEERS HATE HIM: LOCAL MAN DISCOVERS 5 TECH SECRETS THEY DON’T WANT YOU TO KNOW", which offered a lighthearted look at some common engineering misconceptions. Our blog also served as a platform for sharing valuable insights from industry events, as seen in the "Rocky Mountain RepRap Recap", which provided a glimpse into the exciting world of 3D printing and open-source hardware local to SparkFun HQ. We even explored the potential of artificial intelligence with "Can ChatGPT Successfully Develop a SparkFun Product?", a thought-provoking experiment that examined the role of AI in the creative process. Beyond the technical realm, we celebrated the return of in-person interactions with "Local Pickup At SparkFun HQ Is Back!", a heartwarming announcement that reconnected us with our local community. And for those eager to explore the world of data logging and IoT, "SparkFun DataLogger: The Easiest Way to Log and Push Data to Your Favorite IoT Platform" offered a comprehensive guide to our user-friendly data logging solutions. Finally, "Carbon Dioxide Sensing: PAS vs NDIR vs TVOC" blog provided a deep dive into the various technologies used for measuring CO2 levels. 2024's Top Tutorials How to Play Mulitple Buzzers at Once This tutorial demonstrates the SparkFun Qwiic Buzzer's ability to control multiple buzzers simultaneously by playing a 3-part arrangement of a segment of the Super Mario Bros Theme! Calibrating Your Odometry Sensor In this tutorial, we will cover how to calibrate your Qwiic Optical Tracking Odometry Sensor (or "OTOS") with Arduino and Python Examples. Our tutorial section this year was a treasure trove of knowledge, guiding makers through exciting projects and equipping them with valuable skills. From harnessing the power of Odometry sensors for precise motion tracking in "Calibrating Your Odometry Sensor" to unlocking the creative potential of alphanumeric displays in "Moving Beyond the Ordinary With the Qwiic Alphanumeric Display", we helped to empower you to push the boundaries of your projects. We delved into the intricacies of sensor fusion with "IMU Data to Motion: Tutorial for Translating Sensor Data into Real-World Movement", helping makers bridge the gap between raw sensor data and meaningful motion control. For those seeking to add a touch of auditory flair to their creations, "How to Play Multiple Buzzers at Once" provided the tools and techniques to orchestrate a symphony of sounds. We took a look at the vibrant world of color sensing with "Detecting Colors with the SparkFun Tristimulus Color Sensor", enabling makers to build projects that respond to the nuances of light and color. "How To Take Multiple RFID Readings Simultaneously" unlocked the potential of RFID technology for advanced tracking and identification applications. For those with a thirst for adventure, "GeoFence Treasure Hunt With Artemis Global Tracker" combined the thrill of a treasure hunt with the precision of GPS technology. And finally, "Display Distance Measurements On an OLED" provided a practical guide to visualizing sensor data on sleek and compact OLED displays. 2024's Top Videos [embed]https://www.youtube.com/watch?v=videoseries[/embed] Our videos this year were also packed with exciting product showcases! Don't miss our deep dives into the Optical Tracking and Odometry Sensor, the Pro Micro 2350, the RTK EVK, the RTK Torch, and the RTK mosaic-X5. We even assembled a playlist for you to check them all out! That's it for this week and 2024. As always, we can't wait to see what you make! Shoot us a tweet @sparkfun, or let us know on Instagram, Facebook or LinkedIn. Please be safe out there, be kind to one another! Happy New Year from all of us here at SparkFun Electronics! Never miss a new product! [ad_2] Source link
0 notes
Text

Build Your Own Breadboard Phone!
“Have you ever wanted to build your own phone from scratch? Preferably on the most ubiquitous electronics prototyping platform for maximum flexibility and minimum ergonomics? Now you can!”
Maker shop SparkFun has a new tutorial on how to literally build your own cellphone from parts — add a SIM card and you can make phone calls with it. If you’ve ever complained about how today's phones are “boring” or “all look the same”, here’s your chance to do something about it.
(It only makes voice calls, but you could add smartphone features — one of those boards is an ESP32 microcontroller, a reasonably powerful computer with WiFi and Bluetooth that you could plug a touchscreen into for another $20 or so.)
It’s not going to be cheaper than a basic off the shelf phone, though. The cellular module (the skinny board between the rabbit ears and speaker) costs $150, and a bunch of other parts are in the $20 range. And you’ll need a case because this isn’t going to stay together after you’ve pulled it out of your purse or pocket a few times.
1 note
·
View note