#spokeshave
Text

A spokeshave is a modified flake that has a concave worked area with retouch along that edge to create a concave scraper. It was probably used to scrape curved items such as in removing the bark and smoothing a spear shaft. Spokeshaves can be of different sizes, suggesting use on different kinds of materials.
8 notes
·
View notes
Text
I Want To Shout About It — JOE BONAMASSA #jbonamassa #bluesguitar #BluesRoots
I Want To Shout About It — JOE BONAMASSA #jbonamassa
The blues rock legend JOE BONAMASSA is back with a brand-new single from his eagerly awaited new studio album, due later this year on his J&R Adventures label.
Joe performs a mesmerising cover of “I Want To Shout About It,” which was originally recorded by “Speakeasy” Ronnie Earl and the Broadcasters, a Queen’s New York blues-elder statesman that’s never before properly celebrated until this…

View On WordPress
#Asbury Jukes#Charles Jones#Dannielle DeAndrea#Darrell Nulisch#Flushing railcar#I Want To Shout About It#J&R Adventures#Josh Smith#neil mach#Paulie Cerra#raw ramp#rawramp#Reese Wynans#Ronnie Earl and the Broadcasters#Southside Johnny#spokeshaved rasp
0 notes
Text

Spent a few days building a three legged staked stool out of some Ash. It was a great practice project for staked furniture.

Ended up shaping the legs into octagons with a simple jig and a few hand planes. Then used a mix of my lathe, spokeshave, and a tenon cutter for angled tenons.

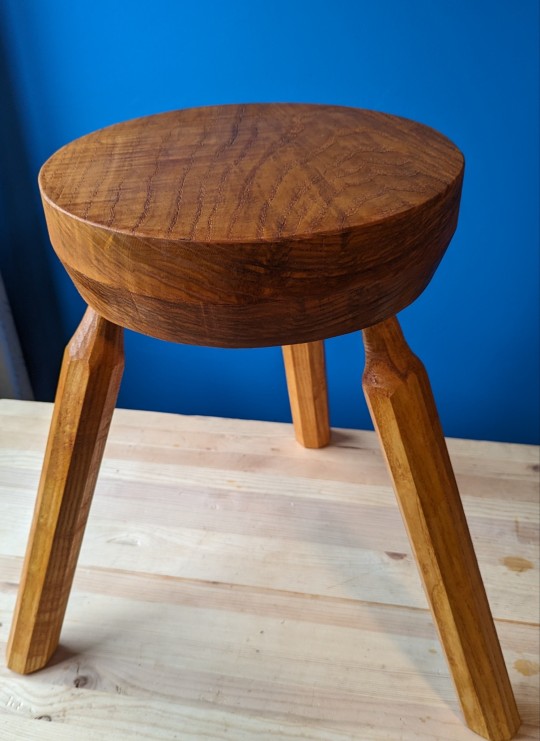

I ended up following this guide by Christopher Schwarz on the Lost Art Press Blog: https://blog.lostartpress.com/2023/04/09/3-legged-staked-stools/
#woodworking#woodturning#lathe#hand tools#crafts#stools#staked furniture#ash#ruby shellac#shellac#carpentry#furniture#hobby
48 notes
·
View notes
Text


The two kingdoms
Due to the recent signs of possible offspring from the females, I have decided to split the colony in two. The females (Cloud Final Fantasy VII, Spokeshave, Lunette, and Puzzle) will have their castle and the males (Casque, Twill, Gordon Freeman, and Hexeris) will have theirs.
☾
Should the kingdoms/ castles be given their own titles? The Castle of Dusk and the Castle of Dawn? Or should the castles be ruled under the same?
Let me know what you think!
#arthropods#cockroach colony#hissing cockroach#insect colony#insects#princisia vanwaerebeki#blattodae#cockroaches#vibrant hisser#vibrant hissers#castleofdusk#madagascarhissers#madagascarhissingcockroach#insectposting
3 notes
·
View notes
Photo
There’s something very satisfying about having your most used hand tools at arms reach. Safely stored, ready to work. This week I’ve been fitting out the drawers in my workbench, French fitting planes and building sliding trays that will hold chisels, spokeshaves and rasps. This is something that’s been on my “to-do” list for quite some time now so it feels great to finally make time to do it. I’m waiting for my wood to arrive before I can begin work on my exterior wooden doors so this is a quick little project while I wait. Follow along with this week’s episodes… details on the Unplugged Woodshop website. #theunpluggedwoodshop #anunpluggedlife #woodworking #workbench #handtools #handplanes #handtoolsonly #unpluggedwoodworking #woodworkingproject #madebyhand #handcrafted #frenchfit #toronto #leslieville #unplugged (at The Unplugged Woodshop) https://www.instagram.com/p/CoGuZUEODZY/?igshid=NGJjMDIxMWI=
#theunpluggedwoodshop#anunpluggedlife#woodworking#workbench#handtools#handplanes#handtoolsonly#unpluggedwoodworking#woodworkingproject#madebyhand#handcrafted#frenchfit#toronto#leslieville#unplugged
7 notes
·
View notes
Note
learn to use a spokeshave and a vinyl cutter
to...make a yaoi paddle? anyway does anyone think theres a place you can buy a wooden paddle in person. does... does home depot have paddles. im feeling impatient, i dont wanna wait 2 weeks
4 notes
·
View notes

Text
Custom Handcrafted Cricket Bat In India | WOLFER
Cricket is a sport that has been played for centuries, and the equipment used to play the game has evolved with time. One piece of equipment that has seen a lot of changes over the years is the cricket bat. While modern-day cricket bats are made using advanced machinery, there is still a demand for handcrafted cricket bats.
A Handcrafted Cricket Batsis a thing of beauty. It is made entirely by hand using traditional methods, and the result is a bat that is not only functional but also a work of art. The process of making a handcrafted cricket bat is a labour-intensive one that requires skill and patience.
The first step in making a handcrafted cricket bat is selecting the right piece of wood. The wood used for making a cricket bat is usually English willow. The wood needs to be of the right quality, with straight grains and no knots. The willow needs to be seasoned for at least a year before it can be used for making a cricket bat.
Once the wood has been selected, the next step is to shape the bat. The bat is shaped using traditional hand tools, such as a drawknife and spokeshave. The craftsman will carefully shape the bat, ensuring that it is the correct length and weight and that the blade is the right shape.
Once the bat has been shaped, the next step is to add the handle. The handle is usually made from cane or willow and is inserted into the blade of the bat. The handle needs to be strong and sturdy, as it will absorb the shock of hitting the ball.
After the handle has been inserted, the bat is sanded and polished. The craftsman will carefully sand the bat, ensuring that it is smooth and free of any rough spots. Once the bat has been sanded, it is polished using wax or oil, giving it a smooth finish.
The final step in making a Handcrafted Cricket Batsis to add the stickers and the grip. The stickers are usually applied to the blade of the bat and feature the brand name and logo. The grip is added to the handle, ensuring that the bat is easy to hold and doesn’t slip during use.
Handcrafted Cricket Batsare popular among cricket enthusiasts for several reasons. Firstly, they are made using traditional methods, which many people appreciate. Secondly, they are often of higher quality than mass-produced cricket bats, as each bat is made by hand with care and attention to detail. Finally, many people enjoy owning a handcrafted cricket bat because they are unique, with each bat having its own character and personality.
In conclusion, Handcrafted Cricket Bats are a testament to the skill and craftsmanship of the people who make them. They are a thing of beauty, with each bat being unique and special. While they may be more expensive than mass-produced cricket bats, they are often of higher quality and are a worthwhile investment for anyone who takes their cricket seriously.
0 notes
Link
🪚 Looking to get into woodworking? A shave horse is an essential tool for any woodworker. It's a simple device that holds a piece of wood in place while you shape it with a drawknife or spokeshave. 🔨 But why spend a fortune on a store-bought shave horse when you can make your own? With the right DIY plans, building a shave horse is a fun and easy project that even beginners can tackle. 🌳 In this article, we'll share some of the best DIY shave horse plans available online. Whether you prefer a traditional design or a modern twist, we've got you covered. Get ready to unleash your inner carpenter and create a custom shave horse that will last for years to come.1. Introduction to DIY Shave Horse Plans for Easy Woodworking🪚 DIY Shave Horse Plans are an excellent way to get started with woodworking. This tool is perfect for beginners and experienced woodworkers alike. With the right materials and a little bit of effort, you can build your own shave horse in no time. 🪵 A shave horse is a woodworking tool that holds a piece of wood in place while you work on it. It's a versatile tool that can be used for a variety of tasks, including shaping, carving, and sanding. With a shave horse, you can work on your projects with greater precision and control. 📝 There are many different DIY shave horse plans available online. Some are more complex than others, but all of them are designed to be easy to follow. You can choose a plan that fits your skill level and the tools you have available. 🛠️ To build a shave horse, you'll need some basic woodworking tools, including a saw, drill, and hammer. You'll also need some lumber, screws, and other materials. You can find all of these items at your local hardware store or online. 💪 Building your own shave horse is a great way to save money and develop your woodworking skills. With a little bit of effort and some patience, you can create a tool that will serve you well for years to come. So why not give it a try?2. Materials Needed for Building a Shave Horse🪵 Wood: 2x4 lumber for the legs, 1x6 lumber for the seat, and 2x2 lumber for the pivoting arm. Choose a sturdy wood like oak or maple. 🔩 Hardware: Screws, bolts, and washers to secure the legs and arm. A carriage bolt and wing nut for the pivot point. A wood screw for the footrest. 🔨 Tools: A saw, drill, screwdriver, and wrench. A compass and ruler to measure and mark the wood. A jigsaw or coping saw to shape the seat and arm. 🧰 Optional: A spokeshave or drawknife to shape the arm. A rasp or file to smooth the edges. A wood finish like oil or wax to protect the wood. 📐 Measure twice, cut once. Follow a plan or template for accuracy. Sand the wood before assembly. Test the pivot point for smoothness. 🛠️ Build the legs first, then attach the seat. Add the arm and footrest. Adjust the height and angle for comfort. Use a clamp or vise to hold the wood while working. 👨🔧 Customize your shave horse with a tool tray, leather padding, or decorative carving. Use it for green woodworking, chairmaking, or carving. Enjoy the satisfaction of making your own tool!3. Step-by-Step Instructions for Building a Shave Horse Materials needed: 2x4 lumber 1x4 lumber 1x2 lumber Wood screws Wood glue Wood dowels Leather or canvas for the seat 1. Cut the 2x4 lumber into two 36-inch pieces and two 24-inch pieces. 2. Cut the 1x4 lumber into two 36-inch pieces. 3. Cut the 1x2 lumber into four 12-inch pieces. 4. Assemble the legs using the 2x4 lumber and wood screws. 5. Attach the 1x4 lumber to the top of the legs using wood glue and screws. 6. Attach the 1x2 lumber to the top of the legs for the footrest using wood glue and screws. 7. Drill holes in the legs for the dowels to hold the workpiece. 8. Sand and finish the shave horse. 9. Attach the leather or canvas to the seat using staples or tacks. Congratulations! You've built your own shave horse 🎉4. Tips for Using a Shave Horse in Woodworking ProjectsUsing a shave horse in woodworking projects can be a game-changer. Here are some tips to help you make the most of this tool: Adjust the height of the shave horse to match your body Use a sharp drawknife for better results Secure the wood in the horse with a wedge Keep your body weight on the foot pedal for stability Use a stop block to ensure consistent cuts Don't forget to take breaks and stretch to avoid fatigue and injury. A well-maintained shave horse can last for years and improve your woodworking skills. Happy crafting! 🔨🪚5. Common Mistakes to Avoid When Building a Shave HorseWhen building a shave horse, there are common mistakes that you should avoid to ensure the best results. Using the wrong wood: Avoid using softwood as it can easily break or wear out. Use hardwood like oak or maple. Not measuring accurately: Take accurate measurements to avoid errors in the construction process. Skipping the sanding process: Sanding the wood smooth helps prevent splinters and ensures a comfortable grip. Not tightening the clamps: Ensure the clamps are tight to prevent the wood from slipping while in use. Ignoring safety precautions: Wear protective gear and follow safety guidelines to prevent accidents. By avoiding these mistakes, you can build a sturdy and functional shave horse that will serve you well for years to come. Happy woodworking! 🔨🪚6. Modifications and Customizations for Your DIY Shave HorseLooking to make your DIY shave horse even better? Here are some modifications and customizations to consider: Replace the wooden clamping mechanism with a metal one for better grip. Add a foot pedal to free up your hands while adjusting the clamping mechanism. Install a leather pad on the clamping mechanism to prevent damage to your workpiece. Attach a tool tray to keep your tools within reach. Adjust the height of the horse to suit your needs. Install a swivel vise for greater flexibility. Don't be afraid to get creative with your modifications. Consider adding: Decorative carvings or designs to personalize your shave horse. A cup holder to keep your beverage close at hand. A built-in sharpening stone to keep your tools sharp. Wheels for easy mobility. A built-in workbench to expand your workspace. 🤔 What other modifications can you think of? 7. Conclusion: The Benefits of Using a DIY Shave Horse in WoodworkingUsing a DIY shave horse in woodworking has several benefits: It saves time and money compared to buying a commercial one. It allows customization to fit the user's needs and preferences. It enhances woodworking skills by providing hands-on experience. It improves physical health by promoting good posture and exercise. It promotes sustainability by using recycled or repurposed materials. Additionally, a DIY shave horse can be a fun and rewarding project to undertake. It provides a sense of accomplishment and pride in creating something useful from scratch. Overall, using a DIY shave horse in woodworking is a practical and enjoyable way to improve skills, save money, and promote sustainability. So why not give it a try? 🤔 In conclusion, building your own shave horse is a great way to enhance your woodworking skills. With the right tools and materials, you can easily create a functional and durable horse that will make your woodworking projects easier and more efficient. Plus, it's a fun and rewarding DIY project that you can be proud of. Don't be intimidated by the idea of building your own shave horse. With the help of these DIY plans, you can easily create a custom horse that meets your specific needs and preferences. Whether you're a beginner or an experienced woodworker, building a shave horse is a great way to improve your skills and take your projects to the next level. So why wait? Start planning your DIY shave horse project today and enjoy the benefits of a versatile and efficient woodworking tool. 🪚🔨🪵 https://shavingformen.com/diy-shave-horse-plans-for-easy-woodworking/?_unique_id=647e75ded3fb5
#Uncategorised#DIYwoodworking#shavehorseplans#woodworkingplans#woodworkingprojects#woodworkingtools#aiomatic_0
0 notes
Photo

It’s getting late in the shop, so I’ll save paring this leather until the morning when the light is better. We thin the edges of the leather to make it easier to turn over the edges of the cover boards. #leatherbinding #bookbinding #bookarts #bookconservation #bookrepair #spokeshave #paringknife (at Big River Bindery) https://www.instagram.com/p/ChTdXUDMkna/?igshid=NGJjMDIxMWI=
7 notes
·
View notes
Photo

It was fresh in my mind, so out came the #zylissvise for a little spokeshave work. @o1crane, I’m using the little centers attachments here. #woodworking #workholding #vise #zyliss #spokeshave #nankinkanna #南京鉋 #handmade #craft #handtools #greensboronc #dgso #205collaborative (at 205 Collaborative) https://www.instagram.com/p/CV029-kLbaT/?utm_medium=tumblr
#zylissvise#woodworking#workholding#vise#zyliss#spokeshave#nankinkanna#南京鉋#handmade#craft#handtools#greensboronc#dgso#205collaborative
2 notes
·
View notes
Text


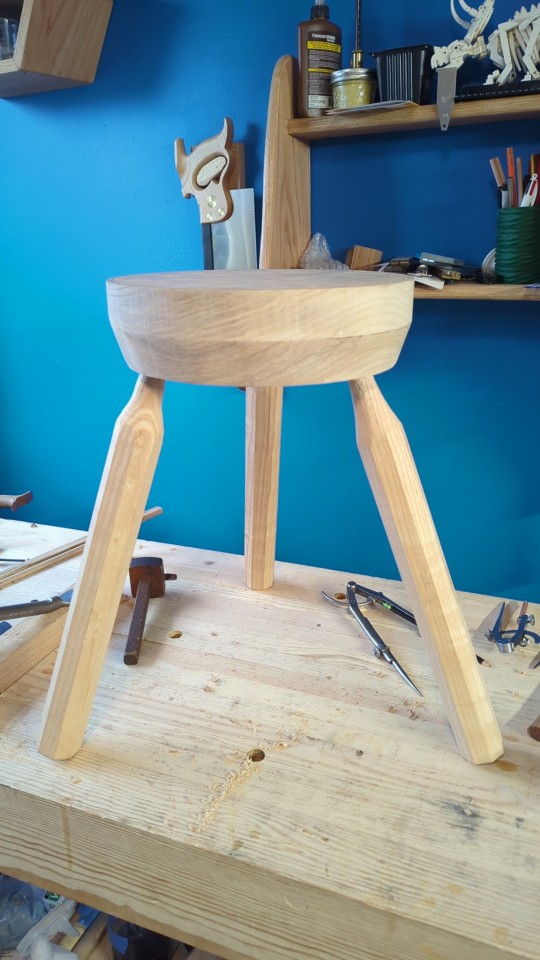
Spent the last week slowly building another stool, this time completely by hand. This came out of my last post where there was a discussion about how hard it would be. Overall it wasn't that much harder then the first one. Only arduous part was ripping the legs out of the stock, and part of that was my rip saw needed sharpening.
I think it turned out pretty great, but my leg placement makes it look a bit wonky. The grain pattern on the seat is nice though.
Full pictures and process below the break

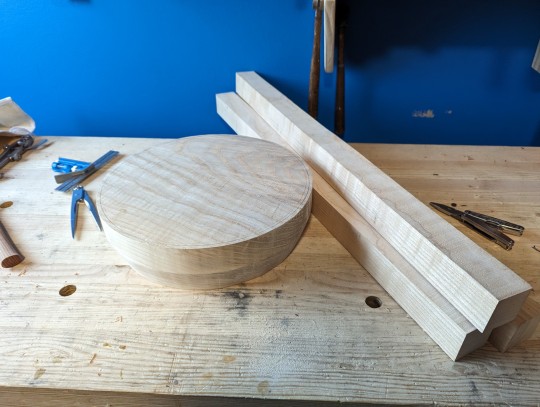
Step one find (or glue up) a large slab of wood, this one was sitting out in the garage. It's a piece of Ash.

Step two cut off part of the slab for the seat. (Also I still haven't made a proper handle for my vice. It's fine. It's only been 6 months)
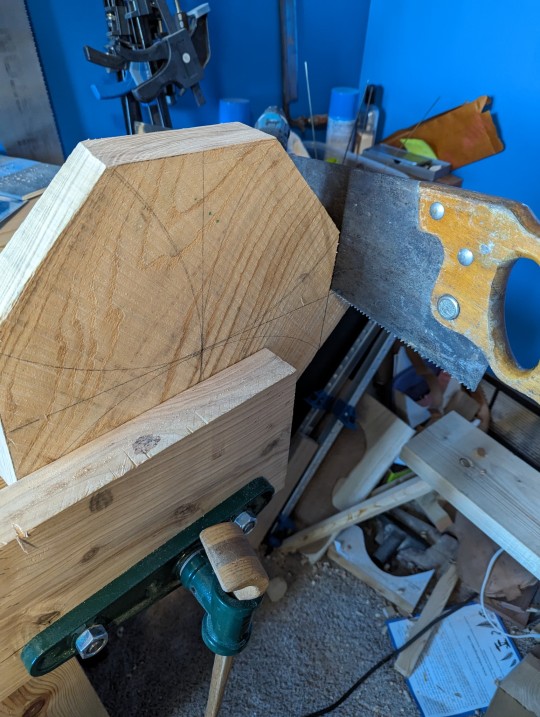
Step three mark and cut the corners to make an octagon. I tried cutting a couple as I did in the picture, and a couple across the face. Both ways worked.
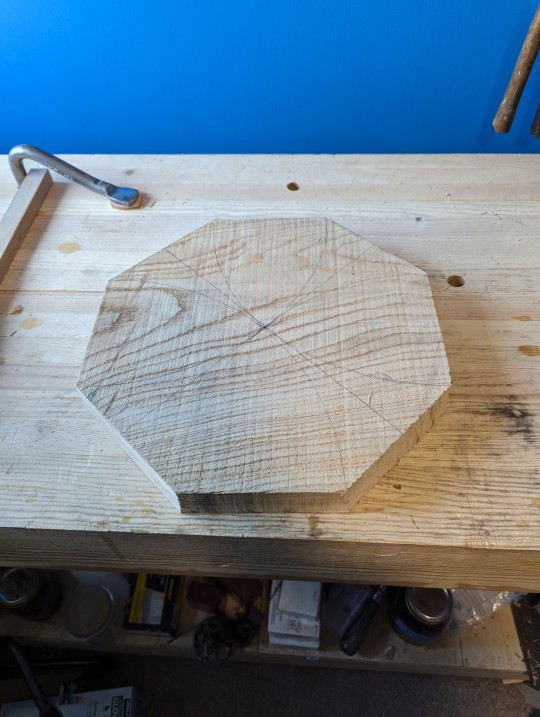

End up with a nice octagon, now plane it smooth
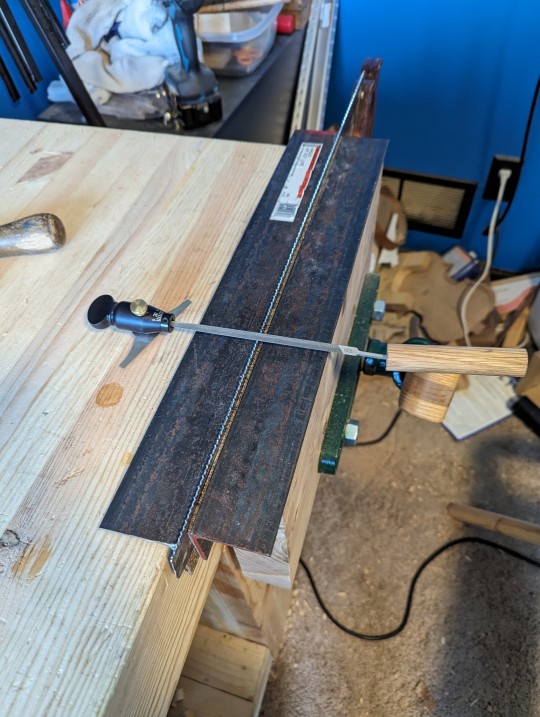
Then take the remaining bit of the original slab and rip it into three legs. (Forgetting to take a picture is optional.) Also take a break half way through and sharpen your saw. It makes the second half a lot easier
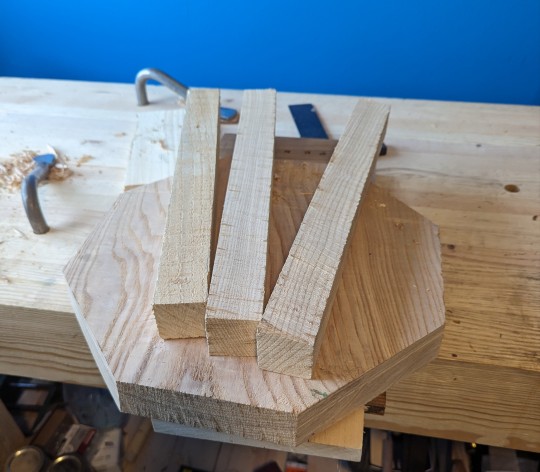
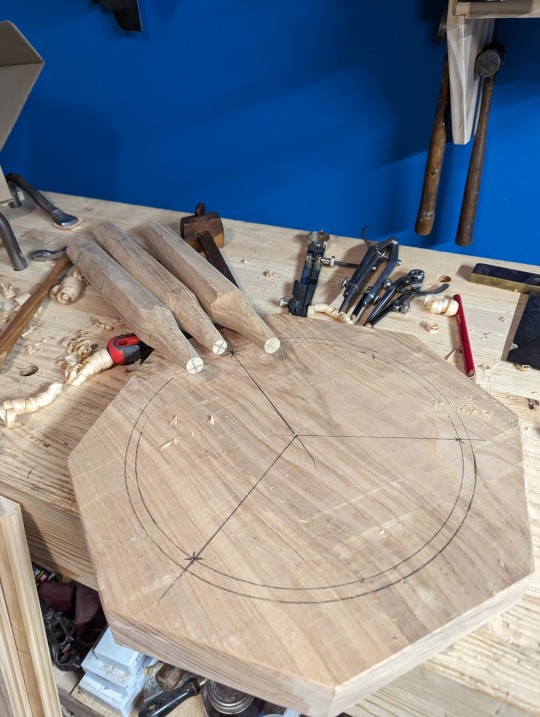
Finally end up with three legs, turn those legs into octagons and shave down the ends, My previous posts have a bit more info on that process.
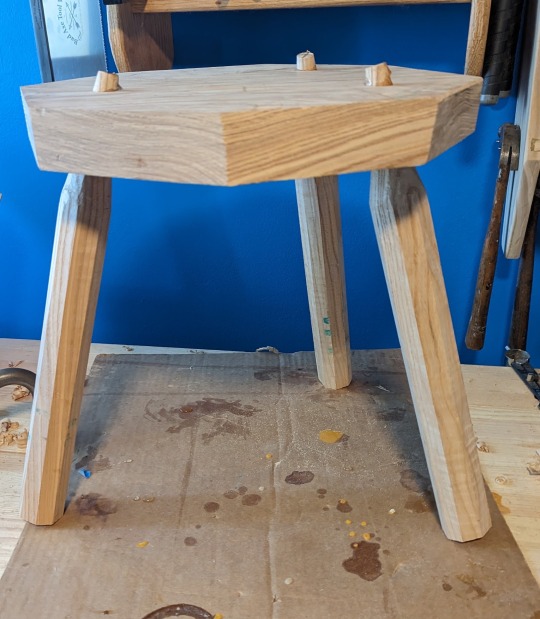
Glue some legs on, and you have yourself a stool. All it needs now is some bits cut off, some sanding, and it’s ready for some shellac.
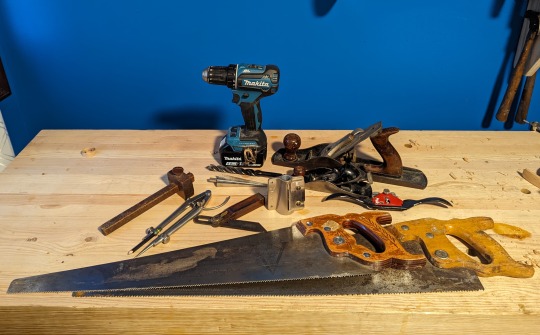
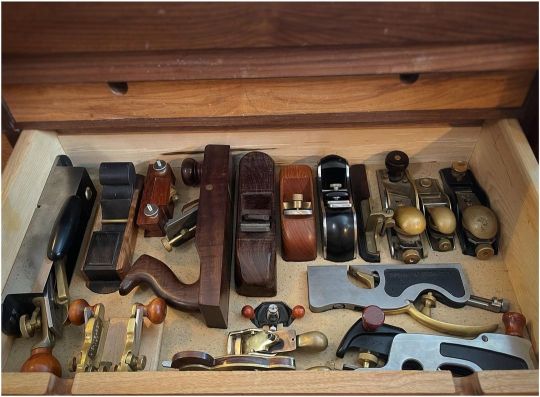
These were all the tools I used. (Yes I did cheat a bit with the hand drill, but I don’t have the right bits to put into my brace).
Tools:
1. Marking Gauge (Could use a combination square as well)
2. Compass
3. 5/8th drill Bit, and 5/8th reamer, 5/8th tenon cutter.
4. Power Drill
5. Jack Plane
6. Block Plane
7. Spokeshave
8. Rip Saw
9. Crosscut saw
10. Bevel Gauge.
#woodworking#hobby#crafts#hand tools#learning#carpentry#furniture#staked furniture#process#how to#I thought I took more pictures#long post#saws#plane#it looks a tad wonky
24 notes
·
View notes
Text
𝐖𝐞𝐥𝐜𝐨𝐦𝐞 𝐭𝐨 𝐭𝐡𝐞 𝐂𝐚𝐬𝐭𝐥𝐞 𝐨𝐟 𝐃𝐮𝐬𝐤!
𝖳𝗁𝗂𝗌 𝗂𝗌 𝖺 𝖻𝗅𝗈𝗀 𝖽𝖾𝖽𝗂𝖼𝖺𝗍𝖾𝖽 𝗍𝗈 𝗆𝗒 new 𝖬𝖺𝖽𝖺𝗀𝖺𝗌𝖼𝖺𝗋 h𝗂𝗌𝗌𝗂𝗇𝗀 c𝗈𝖼𝗄𝗋𝗈𝖺𝖼𝗁 𝖼𝗈𝗅𝗈𝗇𝗒. 𝖨 𝗐𝗂𝗅𝗅 𝖻𝖾 𝖺𝗍𝗍𝖾𝗆𝗉𝗍𝗂𝗇𝗀 𝗍𝗈 𝗆𝖺𝗄𝖾 𝗐𝖾𝖾𝗄𝗅𝗒 𝗎𝗉𝖽𝖺𝗍𝖾𝗌 𝗈𝗇 𝗍𝗁𝖾 𝖼𝗈𝗅𝗈𝗇𝗒'𝗌 𝖺𝖼𝗍𝗂𝗏𝗂𝗍𝗂𝖾𝗌 𝖺𝗇𝖽 𝗌𝗁𝖺𝗋𝗂𝗇𝗀 𝗀𝖾𝗇𝖾𝗋𝖺𝗅 𝗂𝗇𝖿𝗈𝗋𝗆𝖺𝗍𝗂𝗈𝗇/ observations 𝖺𝖻𝗈𝗎𝗍 𝗍𝗁𝖾𝗌𝖾 𝗎𝗇𝖽𝖾𝗋𝖺𝗉𝗉𝗋𝖾𝖼𝗂𝖺𝗍𝖾𝖽 𝖺𝗋𝗍𝗁𝗋𝗈𝗉𝗈𝖽𝗌.
☾❂☽
Meet the castle dwellers:

Casque ♂


Hexeris ♂ Puzzle ♀


Cloud Final Fantasy VII ♀ Lunette ♀


Spokeshave ♀ Twill ♂

Gordon Freeman ♂
These are all supposedly pure stock of Vibrant Hissers (Princisia Vanwaerebeki) bought from Invertebrate Dude.
☾❂☽
Want more info?
#madagascar hissing cockroach#madagascar hissers#hissing cockroach#cockroaches#cockroach colony#vibrant hisser#vibrant hissers#Princisia Vanwaerebeki#insects#arthropods#Entomology#blattodae#CastleofDusk#deviouslittleguys#insect colony
3 notes
·
View notes
Photo


Helle Kletten pocket knife
#Helle Kletten#Jack Nobre#edcgear#EDC#Canada#Ontario#Axe restoration#original content#original photography#creative content#content creator#Lensblr#2020#Toronto#product photography#bushcraft#spokeshave#axe sharpening stone#Helle knives#Kletten#Jacknobre1
9 notes
·
View notes
Photo

Shaping the entry bench legs ... my HNT Gordon spokeshave is perfect for this. New episode of An Unplugged Life is up! Details on the Unplugged Woodshop website. #theunpluggedwoodshop #anunpluggedlife #handtoolsonly #furnituremaking #furnituredesign #spokeshave #hntgordon #madebyhand #unpluggedwoodworking #toronto #leslieville (at The Unplugged Woodshop) https://www.instagram.com/p/B-71zUWh-lE/?igshid=1v551w3dbjruf
#theunpluggedwoodshop#anunpluggedlife#handtoolsonly#furnituremaking#furnituredesign#spokeshave#hntgordon#madebyhand#unpluggedwoodworking#toronto#leslieville
3 notes
·
View notes
Last Seen Blogs

hamfactoryrecord
HamFactoryRecords

lauradreyar
Laura Dreyar

324b21-likecrazyscience
324b21-likecrazyscience

mark-beaks-is-gay
Beaks loves beefcake
lauradreyar
Laura Dreyar