#spring_framework
Explore tagged Tumblr posts
Visit Tumblr Blog
Explore Tumblr blogs with no restrictions, modern design and the best experience.
Last Seen Tumblr Blogs


Fun Fact
Total funding amounts to $125.3M.
Text
Spring_Web 248p
BootStrap으로 모달창 띄우기

본문 부분


return을 redirect로 처리하는 이유는 글등록에서 새로고침을 통해서 동일한 내용을 계속 서버에 등록할수 있는 문제가 발생하기 때문에 경고창이 나오지만 근본적으로 차단이 되지 않는다 따라서 등록 수정 삭제 작업은 처리가 완료된 후에 다시 동일한 내용을 전송할수 없도록 브라우저 URL을 이동하는 방식을 이동하는 방식을 사용합니다. 이때 등록수정 삭제의 결과를 알수있게 피드백이 필요한데 그것이 모달 창입니다.
BoardController에서 redirect를 처리를 할때 RedirectAttribute라는 특별한 타입의 객체를 이용한다 . addFlashAttribute()의 경우 이러한 처리에 적합한데 그이유는 일회성으로 데이터를 전달하기 때문이다
addFlashAttribute()로 보관덴 데이터는 한 한번만 사용할 수 있게보관된다( 내부적으로HttpSession을 이용해서 처리).
$(document).ready( function() {
var result = '<c:out value="${result}"/>';
checkModal(result);
function checkModal(result) {
if (result === '') { return; }
if (parseInt(result) > 0) { $(".modal-body").html( "게시글 " + parseInt(result) + " 번이 등록되었습니다."); }
$("#myModal").modal("show"); }
});
0 notes
Text
Why you should learn Spring Framework ?
INTRODUCTION :
Spring Framework is an application framework that supports Java platform. It is a lightweight framework that can be used to develop Java applications. Spring make easy to development of a JavaEE application.
It can be called as a framework of frameworks because it provides support to various frameworks such as Struts, Hibernate, Tapestry, EJB, JSF etc. The framework can be defined as a structure where we find a solution of the various technical problems. Spring core features can be used by any Java application and it is an open source and become widely popular in the Java community. Spring was developed by Rod Johnson in June 2003 and the first version released under the Apache 2.0 license. The latest version of Spring Framework is 4.3 has been launched in June 2016 and it is compatible with Java 6, 7 and 8.

Let's talk about Spring Boot :
· Overview of Spring Boot
· Features of Spring Boot
OVERVIEW :
Spring Boot is a module which provides RAD (Rapid Application Development) feature to Spring framework. It provides a set of tools for easily and fastly building applications that made easier to configure.
In other words, Spring Boot made it easier to create stand-alone and its applications need very little spring configuration. It does not generate code and there is absolutely no requirement for XML configuration.

FEATURES :
Spring Application - It is a class which provides the suitable way to bootstrap a spring application which can be started from the main method. You can call start your application just by calling a static run() method.
Web Development - It is a well-suited Spring module for web application development. We can easily create a self-contained HTTP server using embedded Tomcat, Jetty or Undertow (no need to arrange WAR files). We can use the spring-boot- starter-web module to start and running application quickly.
Admin Support - Spring Boot gives the facility to enable admin related characteristics for the application. It is used to access and manage application remotely. We can enable it by simply using spring.application.admin.enabled property.
Externalized Configuration - Spring Boot gives the facility to externalize our configuration so that we can work with the same application in a different domain. Spring application uses YAML files to externalize configuration.
Type-safe Configuration - Strong type-safe configuration is provided to guide and validate the configuration of the application. Application configuration is always an essential task which should be type-safe. We can also use annotation provided by this library.
Logging - Spring Boot uses Common logging for all internal logging. Logging dependencies are managed by default. We should not change logging dependencies.
Security - Spring Boot applications are spring based web applications. So, it is secure by default with basic authentication on all HTTP endpoints. A rich set of Endpoints are available to develop a secure Spring Boot application.
References:
https://spring.io/projects/spring-framework
https://en.wikipedia.org/wiki/Spring_Framework
www.javatpoint.com
0 notes
Text
Remote Execution Flaw Threatens Apps Built Using #Spring_Framework — Patch Now http://dlvr.it/QNcWqf pic.twitter.com/eZwIWQ2Au4
Remote Execution Flaw Threatens Apps Built Using #Spring_Framework — Patch Now http://dlvr.it/QNcWqf pic.twitter.com/eZwIWQ2Au4 Source: New feed
View On WordPress
0 notes
Link
Spring Framework 6 has a declarative REST client out of the box, and you don't need to add a library like Feign to have a declarative REST client. Read this article to learn more about this new feature in Spring Framework 6.
0 notes
Link
Yet another framework for JVM! Kalix is a new framework for building cloud-native microservices and APIs introduced by Lightbend (the company behind the Scala programming language). Kalix recently provided a new SDK for the Spring framework, allowing developers with experience with Spring Boot to work with Kalix more easily.
0 notes
Link
The Spring Authorization Server project is important for the Spring Framework project because it provides a centralized authentication and authorization service for applications. This helps ensure that applications are secure and compliant and that users are correctly authenticated. The Authorization Server also makes managing user access and authorization easier across multiple applications and services. This makes it easier for developers to secure their applications and enforce security policies. Spring Authorization Server version 1 has finally been released, and in this article, you can read more about its features.
0 notes
Link
Spring Boot 3.0 is an important release for the Spring ecosystem and brings many significant improvements and features. It is based on the Spring Framework 6 and supports generating native images with GraalVM, better observability with Micrometer and Micrometer Tracing, and more. These features make Spring Boot 3.0 a robust and reliable framework for developing modern applications. This video discussed the new Spring AOT compilation to support the GraalVM native image and the benefits of native images.
0 notes
Link
The Spring I/O conference is an annual event dedicated to discussing and sharing best practices and advancements in software development using the Spring Framework and related technologies. By attending the Spring I/O conference, developers can stay updated on the latest trends in the software development industry, network with other developers, and learn from experts in the field. Additionally, the conference provides an opportunity to gain valuable insights into developing software solutions with the Spring Framework.
0 notes
Text
cos_web 191p


오타
(insert 문의 writer 앞에 #이 빠짐 )
insertSelectKey 에는 from dual임 (관리자가 가지고있는 한줄짜리 테이블)
BoardMapper의 insert()문 는 단순히 시퀸스의 다음 값을 구할때 사용합니다.
insert문은 몇건의 데이터가 변경되었는지만 알려주기때문에 추가된 데이터의 PK의 값을 알수 없지만 , 1번의 SQL처리만으로 작업이 완료되는 장점이있습니다.
insertSelectKey() 는 @SelcectKey 라는 Mybatis 어노테이션을 이용합니다.
@Selectkey는 주로 PK값을 미리(before) SQL 을 통해서 처리해두고
특정한 이름으로 결과를 보관하는 방식 .
@Insert 할때 SQL문을 보면 #{bno}와 값이 이미 처리된 결과를 이용하는 것을 볼수 있다
insert 코드에 대한 테스트 메서드


결과

0 notes
Text
오류해결2018_10_22
error while adding the mapper interface org.zerock.mapper.BoardMapper' to configuration.
boardMapper.xml과
org.zerock.mapper.BoardMapper 인터페이스 사이의 충돌 문제
--------------------------------------------------------------------------------------------------------
package org.zerock.mapper;
import java.util.List;
import org.apache.ibatis.annotations.Select; import org.zerock.domain.BoardVO;
public interface BoardMapper { //@Select("select * from tbl_board where bno > 0")(이 부분을 주석처리해야함) public List<BoardVO> getList(); }
0 notes
Text
spring) Mybatis의 로그 log4jdbc-log4j2 설정
디펜던시 추가
<dependency>
<groupId>org.bgee.log4jdbc-log4j2</groupId>
<artifactId>log4jdbc-log4j2-jdbc4</artifactId>
<version>1.16</version>
</dependency>
메이븐 디펜던시에
slf4j-log4j12-1.6.6.jar 파일이 추가됬는지 확인
root-contex.xml 파일 수정
<bean id="hikariConfig" class="com.zaxxer.hikari.HikariConfig"> <!-- <property name="driverClassName" value="oracle.jdbc.driver.OracleDriver"></property> <property name="jdbcUrl" value="jdbc:oracle:thin:@localhost:1521:xe"></property> --> <property name="driverClassName" value="net.sf.log4jdbc.sql.jdbcapi.DriverSpy"></property> <property name="jdbcUrl" value="jdbc:log4jdbc:oracle:thin:@localhost:1521:xe"></property> <property name="username" value="jspexam"></property> <property name="password" value="m1234"></property> </bean>
하고 log4j.xml파일에 추가및 수정
<logger name="jdbc.audit"> <level value="warn"/> </logger> <logger name="jdbc.resultset"> <level value="warn"/> </logger> <logger name="jdbc.connection"> <level value="warn"/> </logger> <!-- Root Logger --> <root> <priority value="info" /> <appender-ref ref="console" /> </root>
그리고 timemappertests파일 junit 실행
0 notes
Text
JPA의 개념
우리가 사용하는 대부분 프로그램은 사용자가 입력한 데이터나 비즈니스 로직 수행 결과로 얻은 데이터를 재사용할수 있도록 데이터 베이스에 저장한다.
하지만 자바의 객체와 데이터 베이스의 테이블이 정확하게 일치하지 ���는다. 따라서 둘 사이를 매핑하기 위해 많은 SQL 구문과 자바 코드가 필요할 수 밖에 없다 .
ORM(Object-Relation Mapping)은 이렇게 정확하게 일치하지 않는 자바객체와 테이블사이틀 매핑해준다 다시말하면 ORM 은 자바객체에 저장된 데이터를 테이블의 ROW 정보로 저장하고 , 반대로 테이블에 저장된 Row 정보를 자바객체로 매핑해준다 .
이 과정에서 사용되는 SQL 구문과 자바코드를 ORM 프레임워크가 자동으로 만들어준다 .
우리는 지금까지 스프링 JDBC나 Mybatis를 이용하여 자바객체와 테이블을 매핑해 왔다 . 하지만 어떤 DB 연동 기술이나 프레임 워크를 사용하더라도 SQL 명령어를 자바 클래스나 외부의 XML 파일에 작성해야 했다 . 그리고 이렇게 작성된 SQL은 유지보수 과정에서 지속적으로 수정되며 새로운 SQL이 추가되기도 한다.
ORM 프레임워크의 가장 큰 특징이자 장점은 DB연동에 필요한 SQL을 자동으로 생성한다는 것이다. 또한 이렇게 생성되는 SQL은 DBMS가 변경될때 자동으로 변경된다. 다만 ORM 환경설정파일 어딘가에 DBMS가 변경되었다는 것만 수정해주면 된다.
그 ORM 프레임 워크의 표준화된것이 JPA라고 한다
JPA의 특징
JPA는 모든 ORM 구현체(ORM 프레임워크)들의 공통 인터페이스를 제공한다.
JPA를 JDBC API 와 비교하여 이해하면 편하다

JDBC는 특정 DBMS에 종속되지 않는 DB 연동을 구현을 지원한다. DB연동 로직을 구현할때, JDBC API(java.sql)의 인터페이스들을 이용하면 실질적인 DB연동 처리는 해당 DBMS 드라이버 클래스들이 담당하는 구조이다. 따라서 DBMS가 변경되는 상황에서도 드라이버만 변경하면 JDBCAPI를 이용하는 어플리케이션은 수정하지 않는다 . 결국 개발 당시에는 MySQL을 사용하다가 실제 서비스가 오픈될때 Oracle로 변경할수도있다.
JPA도 JDBC와 마찬가지이다 . 애플리케이션을 구현할때 , JPA API(javax.persistence)를 이용하면 개발당시에는 Hiberinamte 를 프레임 워크를 사용하다가 실제 서비스에는 TOPLink로 변경할 수 있다.

0 notes
Text
다국어처리
javax.servlet.ServletException: javax.servlet.jsp.JspTagException: No message found under code


영어 메세지 파일

한글 메세지 파일
한글은 아시아 권 언어를 사용할때는 반드시 유니코드로 변환하여 등록해야한다.
그냥 메모장에 txt파일로 타이핑하고 sts에 복붙하면 자동으로 바뀐다.

메세지 파일들을 읽어들이는 MessageSource bean 객체를
presentaiton-layer.xml에등록

브라우저에서 요청받아 메세지를 변경하는
SessionLocalResolver를 등록한다.
LocaleChangeInterceptor까지 스프링 에 등록한다

로그인 화면에 Jstl tags를 추가하고
다음과같이 텍스트부분을 변경한다
직접 요청하면 오류가뜨니 index에서 들어가야함
발생오류
javax.servlet.ServletException: javax.servlet.jsp.JspTagException: No message found under code
이것 빈객체를 등록할때 경로를 잘못설정하거나
properties에 정확한 키값이 없어서 못찾았다는 소리다
나같은경우 properties에 키값을 잘못적었다
0 notes
Text
2-Layered 아키텍처
직접 Controller 에서 DAO 를 쓰면 안되는 이유
1.첫번째 이유
지금까지 컨트롤라가 직접 DAO를 사용하여 기능을 수행하였지만 그렇게하면
DAO가 바뀔때 Controller의 모든 메소드를 수정해야한다 유지보수가 어려움
해결
그래서 interface Service를 구현한 serviceimpl을 controller에 사용하게 만든다
ServiceImpl 에
@Autoiwired
private BoardDAO boardDAO;
어노테이션으로 적용한다
2.두번째 이유
AOP 적용때문이다
모든 비즈니스 컴포넌트의 메소드에서 공통으로 사용할 기등들을 횡단관심, 즉
어드바이스로 구현했다
이 어드바이스가 적절한 시점에 동작할수있도록 XML이나 어노테이션으로 처리했다 .그러나 지금까지 어드바이스가 동작하지 않았다
횡단관심에 해당하는 어드바이스가 동작하려면 반드시
Service 구현 클래스 (BoardServiceImpl)의 비즈니스 메소드가 실행되어야한다.
스프링설정에 파일에서 포인트컷 설정부분은

<Adviser>를 이용한 트랜젝션 포인트컷 설정

<Aspect>를 이용한 빈객체로 AOP 설정 (지금은 필요없어서 주석처리)
중요한 것은 DAO클래스 메소드를 지정한것이 아니라
Service 인터페이스를 구현한 ServiceImpl 클래스의 메소드를 설정했다는 것이다
DAO클래스를 직접 호출하는 상황에서는 어느 어드바이스의 동작을 할수가없다
앞에서 예제에서 실행된 이유
기존 앞의 예제들에서는
//1. Spring 컨테이너를 구동
GenericXmlApplicationContext container
= new GenericXmlApplicationContext (”applicationContext.xml”);
//2.Spring 컨테이너로부터 BoardServiceImpl( 객체이름을 boardService로 변경해둠 ) 객체를 Lookup한다.
BoardService boardService =(BoardService)container.getBean(”boardService”);
으로 해결했었다
또다른 문제
그러나 controller에서
BoardService boardservice @Autowired로 의존성을 주입하려고 하면
BoardService 타입의 객체가 메모리에 없어서 의존성을 주입을 할 수없다는 에러가 뜬다 (메모리에 boardService가 올라가지 않는이유는 다음그림과 같다)

클라이언트로 “.do” 요청이 들어오면 서블릿 컨테이너는 DispatcherServlet을 생성한다 .
DispatcherServlet은 스프링 설정 파일인 presentation-layer.xml 을 로딩하여
스프링 컨테이너를 구동한다
이때 BoardController 객체만 메모리에 생성되고 @Autowired로 의존성 주입할 BoardServiceImpl 객체는 생성되지 않는다
presentation-layer.xml 에설정된 범위에 Controller들 객체들만 컴포넌트 스캔하게 되어있다
그러므로 의존성 주입 대상이 되는 비즈니스 컴포넌트를 먼저 생성하려면 비즈니스 컴포넌트를 먼저 생성하는 또다른 스프링 컨테이너가 필요하다. 그리고 이컨테이너를 Controller를 메모리에 생성하기 전에 생성하면 된다.
2-Layered 아키텍쳐
일반적 웹프로젝트는 이런식이다
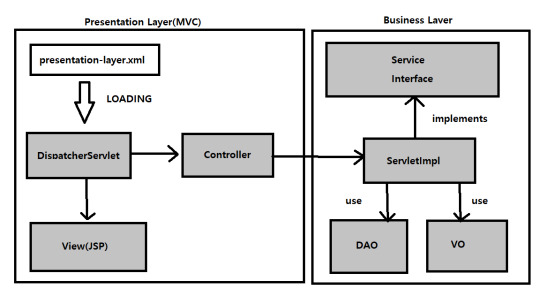
비즈니스 레이어에 해당하는 소스폴더의 설정파일
src/main/resources 폴더의 applicationContext.xml
프레젠테이션 레이어에 해당하는 설정파일
WEB-INF/config 폴더의 presentation-layer.xml
DispatcherServlet 이 생성되어 presentation-layer.xml 읽고 Controller 객체가 생성되기 전에 applicationContext.xml 파일을 읽어 컴포넌트를 메모리에 생성해야한다 .
이때 사용하는 것이 ContextLoderListener 이다
0 notes
Text
@SessionAttribute
1.null 업데이트
만약에 글수정을 하는데 작성자가 일부 부분을 비우고 수정을 한다면
빈 부분에 원래값이 아니라 null값이 들어가게된다
그것을 막기위해 클래스에SessionAttribute(”board”)라고 설정해놓고
매개변수에 @ModelAttribute(”board”) BoardVO vo 라고 설정해놓으면
Model에 board라느 이름으로 저장되는 데이터가 있다면 그데이터를 세션에서도
자동으로 저장하라는 설정이다
이렇게 updateBoard 메소드를호출하면 기존의 getboard로기존의 데이터를 할당하고 null이 아닌 새로운 값들만 할당이 된다
0 notes
Text
2018_10_01_SpringMVC

<!-- ViewResolver 등록
WEB-INF 폴더는 절대 브라우저에서 접근할수 없다 . 이제 WEB-INF 폴더로 이동한 JSP파일들은 절대 클라이언트 브라우저에서 접근할수 없다 . 하지만 Internal ResourceViewResolver를 다음과 같이 설정하면 WEB-INF폴더에 있는 JSP파일을 VIew 화면으로 사용할수 있다 결과적으로 직접적인 JSP호출을 차단하게 된다. --> <bean id="viewResolver" class="org.springframework.web.servlet.view.InternalResourceViewResolver"> <property name="prefix" value="/WEB-INF/board/"></property> <property name="suffix" value=".jsp"></property> </bean>
<!-- 작성된 Logincontroller 가 클라이언트 의 "/login.do"요청에 동작하게 하려면 스프링 설정 파일인presentation-layer.xml 에 HandlerMapping과 LoginController를 <bean> 에 등록해야 한다 -->
<!-- HandlerMapping 등록 --> <!-- login.do --> <bean class="org.springframework.web.servlet.handler.SimpleUrlHandlerMapping"> <property name="mappings"> <props> <prop key="/login.do">login</prop> <prop key="/getBoardList.do">getBoardList</prop> <prop key="/getBoard.do">getBoard</prop> <prop key="/insertBoard.do">insertBoard</prop> <prop key="/updateBoard.do">updateBoard</prop> <prop key="/deleteBoard.do">deleteBoard</prop> <prop key="/logout.do">logout</prop> </props> </property> </bean>
<!-- Controller 등록 --> <bean id="login" class="com.springbook.view.user.LoginController"></bean> <bean id="getBoardList" class="com.springbook.view.board.GetBoardListController"></bean> <bean id="getBoard" class="com.springbook.view.board.GetBoardController"></bean> <bean id="insertBoard" class="com.springbook.view.board.InsertBoardController"></bean> <bean id="updateBoard" class="com.springbook.view.board.UpdateBoardController"></bean> <bean id="deleteBoard" class="com.springbook.view.board.DeleteBoardController"></bean> <bean id="logout" class="com.springbook.view.user.LogoutController"></bean>
이후 controller 제공하는 Spring MVC로 controller를 implement해서
DB처리 및 화면을 ModelAndVeiw 객체에 담아서 보낸다
0 notes