#stepfunction
Explore tagged Tumblr posts
Visit Tumblr Blog
Explore Tumblr blogs with no restrictions, modern design and the best experience.
Last Seen Tumblr Blogs


Fun Fact
Tumblr has been banned in Indonesia for providing people with access to pornographic content.
Text
"6 Ways to Trigger AWS Step Functions Workflows: A Comprehensive Guide"
To trigger an AWS Step Functions workflow, you have several options depending on your use case and requirements:
AWS Management Console: You can trigger a Step Functions workflow manually from the AWS Management Console by navigating to the Step Functions service, selecting your state machine, and then clicking on the "Start execution" button.
AWS SDKs: You can use AWS SDKs (Software Development Kits) available for various programming languages such as Python, JavaScript, Java, etc., to trigger Step Functions programmatically. These SDKs provide APIs to start executions of your state machine.
AWS CLI (Command Line Interface): AWS CLI provides a command-line interface to AWS services. You can use the start-execution command to trigger a Step Functions workflow from the command line.
AWS CloudWatch Events: You can use CloudWatch Events to schedule and trigger Step Functions workflows based on a schedule or specific events within your AWS environment. For example, you can trigger a workflow based on a time-based schedule or in response to changes in other AWS services.
AWS Lambda: You can integrate Step Functions with AWS Lambda functions. You can trigger a Step Functions workflow from a Lambda function, allowing you to orchestrate complex workflows in response to events or triggers handled by Lambda functions.
Amazon API Gateway: If you want to trigger a Step Functions workflow via HTTP requests, you can use Amazon API Gateway to create RESTful APIs. You can then configure API Gateway to trigger your Step Functions workflow when it receives an HTTP request.
These are some of the common methods for triggering AWS Step Functions workflows. The choice of method depends on your specific requirements, such as whether you need manual triggering, event-based triggering, or integration with other AWS services.
#AWS#StepFunctions#WorkflowAutomation#CloudComputing#AWSManagement#Serverless#DevOps#AWSLambda#AWSCLI#AWSConsole#magistersign#onlinetraining#cannada#support#usa
0 notes
Photo

Step Function Graph - For more visit: mathculus.com #calculusnotes #calculus1 #calculus2 #calculus3 #calculusmemes #calculus #functionoftheday #stepfunction #stepfunctional #calculusproblems #integralcalculus #calculusclass (at USA) https://www.instagram.com/p/CD9mk0Whys8/?igshid=18mh0blnosz6r
#calculusnotes#calculus1#calculus2#calculus3#calculusmemes#calculus#functionoftheday#stepfunction#stepfunctional#calculusproblems#integralcalculus#calculusclass
0 notes
Text
GRETD 66 26 15cm Aerobic Stepper Multifunctional Adjustable Stepper Fitness Equipment Aerobic Stepper
GRETD 66 26 15cm Aerobic Stepper Multifunctional Adjustable Stepper Fitness Equipment Aerobic Stepper
Price: (as of – Details) Decoration Type: Mini TypeModel Number: Fitness SteppersDecoration Type: Non-ropeMaterial:plasticSize: 67x27x15cm (26.4"x10.7"x6"). Resistance Bands: NoType: Aerobic StepFunction: BodyPlease understand that due to differences in lighting or computer monitors, I cannot guarantee that the photos and actual colors are 100% the same.Due to different measurement methods,…

View On WordPress
0 notes
Text
Read Our Blog & Integrate Jenkins With Cloud Formation & Step Functions | Hands on Cloud
From my personal experience, many companies rely on Jenkins and Terraform while automating their cloud infrastructure. There’s no problem if you’d like to deploy something from Jenkins to the cloud, but what to do, if you want to call Jenkins job from to deploy a Terraform module as a Service Catalog product, or include Jenkins pipeline to a workflow orchestrated by StepFunctions? This article will describe a unified integration pattern, which will allow you to integrate Jenkins jobs with CloudFormation custom resources and Step Functions workflows.
Visit Us:- https://hands-on.cloud/how-to-integrate-jenkins-with-cloudformation-and-step-functions/
0 notes
Photo

[Amazon Web Services] aws-am-cliを使ってローカルでLambdaを動かし、AWS上にデプロイする https://ift.tt/2O3fK4g
AWS SAMのCLIであるaws-sam-cliを使うとローカルでLambda環境を作ってテストし、それをAWS上にデプロイできる。
ここではaws-sam-cliのインストールからローカルでのテスト、AWS上にデプロイするまでの手順を示す。
aws-sam-cliをインストールするOSはUbuntu 18.04とする。
AWS Serverless Application Model (SAM) コマンドラインインターフェイス。サーバレスアプリケーションをローカルで構築、テスト、デバッグする (Amazon Web Services ブログ)
aws-sam-cliのインストールと動作確認
動作環境
aws-sam-cliを使うにあたりあらかじめ以下をインストールしておく。
⦿ Pytyoh 3.x ⦿pip ⦿Docker ⦿AWS CLI
$ python --version Python 3.6.8 $ pip --version pip 19.3.1 from /usr/local/lib/python3.6/dist-packages/pip (python 3.6) $ docker --version Docker version 18.09.7, build 2d0083d $ aws --version aws-cli/1.16.263 Python/3.6.8 Linux/4.15.0-65-generic botocore/1.12.253
aws-sam-cliインストール
aws-sam-cliはpipで簡単にインストールできる。
$ sudo pip install aws-sam-cli $ sam --version SAM CLI, version 0.22.0
サンプルアプリケーション作成(Python3.6)
aws-sam-cliがインストールできたらサンプルアプリケーションを作成してみる。
Lambdaは様々な言語で記述できるが、ここではPython3.6のサンプルアプリケーションを作成する。
$ sam init --runtime python3.6 --name sam-python [+] Initializing project structure... Project generated: ./sam-python Steps you can take next within the project folder =================================================== [*] Invoke Function: sam local invoke HelloWorldFunction --event event.json [*] Start API Gateway locally: sam local start-api Read sam-python/README.md for further instructions [*] Project initialization is now complete $ tree sam-python sam-python ├── README.md ├── events │ └── event.json ................. Lambdaに渡すイベントの定義 ├── hello_world │ ├── __init__.py │ ├── __pycache__ │ │ ├── __init__.cpython-36.pyc │ │ └── app.cpython-36.pyc │ ├── app.py ..................... Lambda関数本体 │ └── requirements.txt ├── template.yaml .................. SAMテンプレート └── tests └── unit ├── __init__.py ├── __pycache__ │ ├── __init__.cpython-36.pyc │ └── test_handler.cpython-36.pyc └── test_handler.py 6 directories, 12 files
⦿ 単独実行
アプリケーションができたら実行してみる。
$ cd sam-python $ sam local invoke HelloWorldFunction --event events/event.json --log-file lambda.log Invoking app.lambda_handler (python3.6) 2019-10-20 23:13:06 Found credentials in shared credentials file: ~/.aws/credentials Fetching lambci/lambda:python3.6 Docker container image...(略)... Mounting ~/sam-python/hello_world as /var/task:ro,delegated inside runtime container
実行結果はログファイルに出力される。
$ cat lambda.log START RequestId: 6eab94c3-2835-4241-9b97-b94b2bd60f2f Version: $LATEST END RequestId: 6eab94c3-2835-4241-9b97-b94b2bd60f2f REPORT RequestId: 6eab94c3-2835-4241-9b97-b94b2bd60f2f Duration: 0 ms Billed Duration: 100 ms Memory Size: 128 MB Max Memory Used: 19 MB {"statusCode": 200, "body": "{\"message\": \"hello world\"}"}
--eventで指定したイベントの定義は以下のようにして作成できる。
$ sam local generate-event [OPTIONS] COMMAND [ARGS] > event.json
COMMANDには様々なAWSのサービスが指定でき、それぞれARGSが異なるのでhelpを参照する。
$ sam local generate-event --help : Commands: alexa-skills-kit alexa-smart-home apigateway batch cloudformation cloudfront cloudwatch codecommit codepipeline cognito config connect dynamodb kinesis lex rekognition s3 ses sns sqs stepfunctions
(S3用イベントの場合)
$ sam local generate-event s3 --help : Commands: delete Generates an Amazon S3 Delete Event put Generates an Amazon S3 Put Event $ sam local generate-event s3 put --help : $ sam local generate-event s3 put --help Usage: sam local generate-event s3 put [OPTIONS] Options: --region TEXT Specify the region name you'd like, otherwise the default = us-east-1 --partition TEXT Specify the partition name you'd like, otherwise the default = aws --bucket TEXT Specify the bucket name you'd like, otherwise the default = example-bucket --key TEXT Specify the key name you'd like, otherwise the default = test/key --debug Turn on debug logging to print debug message generated by SAM CLI. --help Show this message and exit.
⦿ API Gateway経由の実行
次にAPI Gateway経由で実行する。まずはAPI Gatewayを作成してリクエストを待ち受ける。
$ sam local start-api --log-file lambda.log Mounting HelloWorldFunction at http://127.0.0.1:3000/hello [GET] You can now browse to the above endpoints to invoke your functions. You do not need to restart/reload SAM CLI while working on your functions, changes will be reflected instantly/automatically. You only need to restart SAM CLI if you update your AWS SAM template 2019-10-20 23:15:33 * Running on http://127.0.0.1:3000/ (Press CTRL+C to quit)
この状態で別ターミナルからcurlでアクセスするとAPI Gateway経由でLambdaが起動する。
$ curl http://127.0.0.1:3000/hello {"message": "hello world"}
元ターミナルには以下のように出力される。
Invoking app.lambda_handler (python3.6) 2019-10-20 23:15:54 Found credentials in shared credentials file: ~/.aws/credentials Fetching lambci/lambda:python3.6 Docker container image...... Mounting /home/xxxxx/sam-python/hello_world as /var/task:ro,delegated inside runtime container No Content-Type given. Defaulting to 'application/json'. 2019-10-20 23:15:59 127.0.0.1 - - [20/Oct/2019 23:15:59] "GET /hello HTTP/1.1" 200 - -> Ctrl + cで中断
ログファイルには以下のように記録される。
$ cat lambda.log START RequestId: 7b951478-46f9-427a-a9fc-5c2ac8b9966f Version: $LATEST END RequestId: 7b951478-46f9-427a-a9fc-5c2ac8b9966f REPORT RequestId: 7b951478-46f9-427a-a9fc-5c2ac8b9966f Duration: 0 ms Billed Duration: 100 ms Memory Size: 128 MB Max Memory Used: 19 MB
またLambdaはDockerコンテナ上で実行されるのでDockerイメージがダウンロードされている。
$ docker images REPOSITORY TAG IMAGE ID CREATED SIZE lambci/lambda python3.6 2659a569a6df 2 weeks ago 866MB
⦿ ローカルエンドポイント経由の実行
ローカルエンドポイントを作成してAWS CLIから実行することもできる。
$ sam local start-lambda --log-file lambda.log Starting the Local Lambda Service. You can now invoke your Lambda Functions defined in your template through the endpoint. 2019-10-21 00:12:59 * Running on http://127.0.0.1:3001/ (Press CTRL+C to quit)
この状態で別ターミナルからAWS CLIでLambdaを実行させる。
$ aws lambda invoke --function-name HelloWorldFunction --endpoint-url http://127.0.0.1:3001 out.txt { "StatusCode": 200 } $ cat out.txt {"statusCode": 200, "body": "{\"message\": \"hello world\"}"}
元ターミナルには以下のように出力される。
Invoking app.lambda_handler (python3.6) 2019-10-21 00:14:35 Found credentials in shared credentials file: ~/.aws/credentials Fetching lambci/lambda:python3.6 Docker container image...... Mounting /home/xxxxx/sam-python/hello_world as /var/task:ro,delegated inside runtime container 2019-10-21 00:14:40 127.0.0.1 - - [21/Oct/2019 00:14:40] "POST /2015-03-31/functions/HelloWorldFunction/invocations HTTP/1.1" 200 - -> Ctrl + cで中断
ログファイルには以下のように記録される。
$ cat lambda.log START RequestId: c3da9704-d7a4-45bf-b484-a0fd274c8036 Version: $LATEST END RequestId: c3da9704-d7a4-45bf-b484-a0fd274c8036 REPORT RequestId: c3da9704-d7a4-45bf-b484-a0fd274c8036 Duration: 0 ms Billed Duration: 100 ms Memory Size: 128 MB Max Memory Used: 19 MB
⦿ Node.jsのサンプルアプリケーション
他にも例えばNode.jsのサンプルアプリケーションを作成する場合も–runtimeの指定を変えるだけでよい。
$ sam init --runtime nodejs --name sam-nodejs [+] Initializing project structure... Project generated: ./sam-nodejs Steps you can take next within the project folder =================================================== [*] Invoke Function: sam local invoke HelloWorldFunction --event event.json [*] Start API Gateway locally: sam local start-api Read sam-nodejs/README.md for further instructions [*] Project initialization is now complete $ tree sam-nodejs sam-nodejs ├── README.md ├── events │ └── event.json ................. Lambdaに渡すイベントの定義 ├── hello-world │ ├── app.js ..................... Lambda関数本体 │ ├── package.json │ └── tests │ └── unit │ └── test-handler.js └── template.yaml .................. SAMテンプレート 4 directories, 6 files
Lambdaの実行方法は先のPythonの時と同様なので割愛する。
AWS上にデプロイ
AWS上にデプロイ
ローカルで動作確認できたのでCloudFormationでAWS上にデプロイする。
まずテンプレートの正当性を確認する。
$ sam validate 2019-10-21 01:14:36 Found credentials in shared credentials file: ~/.aws/credentials /home/xxxxx/sam-python/template.yaml is a valid SAM Template
問題がなければ上記のように「valid」になるのでS3バケットにアップロードする。ここではバケット��を「l-w-i.lambda」とする。
$ aws s3 mb s3://l-w-i.lambda $ sam package --template-file template.yaml --s3-bucket l-w-i.lambda --output-template-file packaged.yaml Uploading to c0e3fc815ba0ece850ad243e5994a832 1897 / 1897.0 (100.00%) Successfully packaged artifacts and wrote output template to file packaged.yaml. Execute the following command to deploy the packaged template aws cloudformation deploy --template-file /home/<user>/sam-python/packaged.yaml --stack-name <YOUR STACK NAME>
アップロードが終わったらデプロイを行う。
$ sam deploy --template-file packaged.yaml --stack-name sam-python --capabilities CAPABILITY_IAM Waiting for changeset to be created.. Waiting for stack create/update to complete Successfully created/updated stack - sam-python
これによりCloudFormationのスタックが作成され、Lambda関数がデプロイされる。

$ aws cloudformation describe-stacks --stack-name sam-python --query 'Stacks[].Outputs[1]' [ { "OutputKey": "HelloWorldApi", "OutputValue": "https://xxxxxxxxxx.execute-api.ap-northeast-1.amazonaws.com/Prod/hello/", "Description": "API Gateway endpoint URL for Prod stage for Hello World function" } ]


API Gatewayのエンドポイントも作成されるのでcurlでアクセスしてみる。
$ curl https://xxxxxxxxxx.execute-api.ap-northeast-1.amazonaws.com/Prod/hello {"message": "hello world"} <pre class="brush:shell"> Lambdaが実行され、CloudWatch Logsにも実行ログが記録される。

デプロイしたLambda関数を削除する場合はCloudFormationのスタックを削除する。S3バケットとCloudWatch Logsのロググループは削除されないので別途削除する。
$ aws cloudformation delete-stack --stack-name sam-python
参考サイト
AWS SAM情報 (Qiita)
元記事はこちら
「[Amazon Web Services] aws-sam-cliを使ってローカルでLambdaを動かし、AWS上にデプロイする」
November 11, 2019 at 04:00PM
0 notes
Photo

Amazon Managed BlockchainでHyperledger Fabricのブロックチェーンネットワークをさくっと構築するAWS CloudFormationのテンプレートを作ってみた(解説編) https://ift.tt/2M19PhQ
Amazon Managed Blockchain(AMB)でブロックチェーンネットワークを構築するのが手間になったので、AWS CloudFormation(CFn)を利用して構築できるようにしてみました。使い方は下記をご参考ください。
Amazon Managed BlockchainでHyperledger Fabricのブロックチェーンネットワークをさくっと構築するAWS CloudFormationのテンプレートを作ってみた(使い方編) – Qiita https://cloudpack.media/48077
Cfnのテンプレートを作成するのにいくつかハマったりしたので解説がてらまとめてみます。 テンプレートはGitHubにアップしています。
kai-kou/amazon-managed-blockchain-cfn-template https://github.com/kai-kou/amazon-managed-blockchain-cfn-template
CFnがAMBリソースに対応していない
AMBのネットワークやメンバーなどのリソースがCFnでサポートされていません。(2019/07/03時点)
AWS Resource and Property Types Reference – AWS CloudFormation https://docs.aws.amazon.com/AWSCloudFormation/latest/UserGuide/aws-template-resource-type-ref.html
Release History – AWS CloudFormation https://docs.aws.amazon.com/AWSCloudFormation/latest/UserGuide/ReleaseHistory.html
そのためAWS Lambda-backedカスタムリソースを利用してLambda関数でAWS SDKを利用してAMBのネットワークやメンバーを作成する必要があります。
詳細は下記が参考になります。
AWS SDK for Python(boto3)でAmazon Managed Blockchainのブロックチェーンネットワークを作成してみた – Qiita https://cloudpack.media/47241
AWS CloudFormationのLambda-backedカスタムリソースでリソースの更新・削除をする方法 – Qiita https://cloudpack.media/48205
リソースの作成順を制御する
AMBのPeerノードはネットワーク(メンバー)が利用可能になってから追加する必要があるため、CFnのDependsOn 属性でリソースの作成順を制御してネットワーク(→メンバー)→Peerノードの順にリソースを作成します。 ※ネットワークで最初のメンバーはネットワークと同時に作成する必要があります。
DependsOn 属性 – AWS CloudFormation https://docs.aws.amazon.com/ja_jp/AWSCloudFormation/latest/UserGuide/aws-attribute-dependson.html
AWS Lambda-backedカスタムリソースでリソース作成完了を待ち受ける
DependsOn 属性でリソースの作成順を制御することができたのですが、AMBのリソース(ネットワーク、Peerノード)をAWS CLIやAWS SDKで作成するとNetworkIdなどがすぐにレスポンスとして返ってきます。AMBだと「レスポンスが返ってきた=リソース作成できた」ではなく「レスポンスが返ってきた=リソース作成が開始された」となります。リソースが作成完了し利用可能になるには20分ほどかかります。
なので、CFnでネットワーク作成してすぐにPeerノードを作成しようとするとネットワークが利用可能になっておらずエラーになります。
そのためCFnでリソースの作成を待ち受けるのにAWS Lambda-backedカスタムリソースでどうにかする必要がありますが、AMBネットワークの作成には20分程度かかり、AWS Lmabdaのタイムアウト(15分)を超えてしまうため、作成用のカスタムリソースだけでは待受けすることができません。 そこで、待受用のカスタムリソースを定義することで、AWS Lambdaのタイムタウト(15分) x リトライ回数(3回)で45分まで待ち受けられるようにします。詳細は下記が参考になります。
AWS CloudFormationのLambda-Backedカスタムリソースでリソース作成を待ち受けできるようにする – Qiita https://cloudpack.media/48222
このリソース作成を待ち受ける実装とDependsOn属性を利用することでAMBのリソースが作成できるようになりました。下記はCFnのテンプレートから抜粋したリソース定義となります。
テンプレート抜粋
Resources: # ネットワーク作成用のカスタムリソース CreateBlockchainNetwork: Type: Custom::CustomResource # リソース作成待受用のカスタムリソース BlockchainNetwork: Type: Custom::CustomResource DependsOn: CreateBlockchainNetwork # リソース情報取得用のカスタムリソース BlockchainMember: Type: Custom::CustomResource DependsOn: BlockchainNetwork # Peerノード作成用のカスタムリソース CreateBlockchainPeerNode: Type: Custom::CustomResource DependsOn: BlockchainMember # リソース作成待受用のカスタムリソース BlockchainPeerNode: Type: Custom::CustomResource DependsOn: CreateBlockchainPeerNode
AWS Lambdaで利用できるAWS SDKを最新にする
AMBは2019/05/01にGAとなったサービスです。
New – Amazon Managed Blockchain – Create & Manage Scalable Blockchain Networks | AWS News Blog https://aws.amazon.com/jp/blogs/aws/new-amazon-managed-blockchain-create-manage-scalable-blockchain-networks
AWS Lambdaの関数(Python)で利用できるAWS SDK(boto3 1.9.42)だとAMBが対応していないバージョンとなるため、AWS Lambda Layersを利用して最新のAWS SDK(boto3 1.9.139 以上)を利用する必要があります。(2019/07/03時点)
boto3/CHANGELOG.rst at develop · boto/boto3 https://github.com/boto/boto3/blob/develop/CHANGELOG.rst#19139
api-change:managedblockchain: [botocore] Update managedblockchain client to latest version
エラー例
Lambda関数の実装
import json import boto3 def lambda_handler(event, context): print(boto3.__version__) client = boto3.client("managedblockchain") return { 'statusCode': 200, 'body': json.dumps('Hello from Lambda!') }
実行ログ
START RequestId: 1f574950-f61d-4d05-a2b6-a56e11eb2201 Version: $LATEST 1.9.42 [ERROR] UnknownServiceError: Unknown service: 'managedblockchain'. Valid service names are: acm, acm-pca, alexaforbusiness, apigateway, application-autoscaling, appstream, appsync, athena, autoscaling, autoscaling-plans, batch, budgets, ce, chime, cloud9, clouddirectory, cloudformation, cloudfront, cloudhsm, cloudhsmv2, cloudsearch, cloudsearchdomain, cloudtrail, cloudwatch, codebuild, codecommit, codedeploy, codepipeline, codestar, cognito-identity, cognito-idp, cognito-sync, comprehend, config, connect, cur, datapipeline, dax, devicefarm, directconnect, discovery, dlm, dms, ds, dynamodb, dynamodbstreams, ec2, ecr, ecs, efs, eks, elasticache, elasticbeanstalk, elastictranscoder, elb, elbv2, emr, es, events, firehose, fms, gamelift, glacier, glue, greengrass, guardduty, health, iam, importexport, inspector, iot, iot-data, iot-jobs-data, iot1click-devices, iot1click-projects, iotanalytics, kinesis, kinesis-video-archived-media, kinesis-video-media, kinesisanalytics, kinesisvideo, kms, lambda, lex-models, lex-runtime, lightsail, logs, machinelearning, macie, marketplace-entitlement, marketplacecommerceanalytics, mediaconvert, medialive, mediapackage, mediastore, mediastore-data, mediatailor, meteringmarketplace, mgh, mobile, mq, mturk, neptune, opsworks, opsworkscm, organizations, pi, pinpoint, pinpoint-email, polly, pricing, rds, redshift, rekognition, resource-groups, resourcegroupstaggingapi, route53, route53domains, s3, sagemaker, sagemaker-runtime, sdb, secretsmanager, serverlessrepo, servicecatalog, servicediscovery, ses, shield, signer, sms, snowball, sns, sqs, ssm, stepfunctions, storagegateway, sts, support, swf, transcribe, translate, waf, waf-regional, workdocs, workmail, workspaces, xray (略)
AWS Lambda Layersを利用して最新のAWS SDKを利用する方法は下記が参考になります。
AWS CloudFormationのAWS Lambda-backedカスタムリソースで最新のAWS SDKを利用する – Qiita https://cloudpack.media/48058
AMBリソースの更新・削除に対応する
AMBリソースはAWS Lambda-backedカスタムリソースで作成しているので、更新や削除もLambda-backedカスタムリソースで行う必要があります。
詳細は下記が参考になりますが、こちらもリソース作成の待受と同じく、作成とは別のカスタムリソースを定義する必要があります。
AWS CloudFormationのLambda-backedカスタムリソースでリソースの更新・削除をする方法 – Qiita https://cloudpack.media/48205
作成待ちと更新・削除を担うカスタムリソースは共通化できたので、最終的には下記のようなリソース定義となりました。
テンプレート抜粋
Resources: # ネットワーク作成用のカスタムリソース CreateBlockchainNetwork: Type: Custom::CustomResource # リソース作成待受とリソース情報取得・更新・削除用のカスタムリソース BlockchainNetwork: Type: Custom::CustomResource Properties: NetworkId: !GetAtt CreateBlockchainNetwork.NetworkId DependsOn: CreateBlockchainNetwork # リソース情報取得用のカスタムリソース BlockchainMember: Type: Custom::CustomResource Properties: NetworkId: !GetAtt BlockchainNetwork.Network.Id MemberId: !GetAtt CreateBlockchainNetwork.MemberId DependsOn: BlockchainNetwork # Peerノード作成用のカスタムリソース CreateBlockchainPeerNode: Type: Custom::CustomResource Properties: NetworkId: !GetAtt BlockchainNetwork.Network.Id MemberId: !GetAtt BlockchainMember.Member.Id DependsOn: BlockchainMember # リソース作成待受とリソース情報取得・更新・削除用のカスタムリソース BlockchainPeerNode: Type: Custom::CustomResource Properties: NetworkId: !GetAtt BlockchainNetwork.Network.Id MemberId: !GetAtt BlockchainMember.Member.Id NodeId: !GetAtt CreateBlockchainPeerNode.NodeId DependsOn: CreateBlockchainPeerNode
AWS lambda-backedカスタムリソースで返すリソース情報(JSON)に気をつける
AWS lambda-backedカスタムリソースのLambda関数ではcfnresponse.send(event, context, cfnresponse.SUCCESS, data)のようにして処理結果をCFnに返すことができます。
最後のパラメータdataはJSONとなり、CFnのFn::GetAttで参照可能です。
カスタムリソースの応答オブジェクト – AWS CloudFormation https://docs.aws.amazon.com/ja_jp/AWSCloudFormation/latest/UserGuide/crpg-ref-responses.html
応答で送信される、custom resource providerによって定義された名前と値のペア。ここで指定する値には、Fn::GetAtt を使用して、テンプレート内の名前でアクセスできます。
ただし、ネストされたJSONをdataに含めてもNetwork.Idのようにして参照できないため、AWS SDKでAMBのリソース情報を取得して得られるJSONをそのままでは返すことができませんでした。
AWS CloudFormationのLambda-BackedカスタムリソースでネストされたJSONを返しても参照できない – Qiita https://cloudpack.media/48318
なので、AWS SDKでAMBのリソース情報を取得して得られるJSONを加工する必要があります。 JSONのキーをNetwork.Idとすると、CFn側でもNetwork.Idと参照できるようにしています。
LambdaからCFnにネットワーク情報を返す例
import cfnresponse import boto3 import json from datetime import date, datetime def handler(event, context): client = boto3.client("managedblockchain") networkId = event['ResourceProperties']['NetworkId'] response = {} if event['RequestType'] == 'Create': network = client.get_network( NetworkId=networkId ) orderingServiceEndpoint = network['Network']['FrameworkAttributes']['Fabric']['OrderingServiceEndpoint'] vpcEndpointServiceName = network['Network']['VpcEndpointServiceName'] response = { "Network.Id": networkId, "Network.FrameworkAttributes.Fabric.OrderingServiceEndpoint": orderingServiceEndpoint, "Network.VpcEndpointServiceName": vpcEndpointServiceName } cfnresponse.send(event, context, cfnresponse.SUCCESS, response)
詳細は下記が参考になります。
AWS CloudFormationのLambda-BackedカスタムリソースでネストされてるっぽいJSONを返す方法 – Qiita https://cloudpack.media/48329
Hyperledger FabricのクライアントをEC2インスタンスで構築する
Hyperledger FabricのクライアントをEC2インスタンスで構築する定義は下記を参考にさせてもらいました。
awslabs/amazon-managed-blockchain-client-templates: AWS CloudFormation templates to provision Amazon EC2 instances and install and configure clients for use with blockchain frameworks in Amazon Managed Blockchain https://github.com/awslabs/amazon-managed-blockchain-client-templates
こちらはHyperledger FabricのクライアントとなるEC2インスタンスを作成するテンプレートでしたので、自前のテンプレートへ組み込み、AMBで必要となるリソースの作成後、インスタンスが作成されるようにしました。
ポイントとしては以下となります。
CFnのcfn-signalヘルパースクリプトで完了シグナルをCFnに返す
CFnでEC2インスタンスを作成すると、EC2インスタンスのステータスがRunningとなった時点でリソース作成完了となります。 そのため、テンプレートのUserDataで定義しているコマンド実行でエラーとなっても正常完了扱いとなり不便だったので、CFnのcfn-signalヘルパースクリプトで完了シグナルをCFnに返すようにしました。
cfn-signalを利用するには、CreationPolicyを定義する必要があります。
EC2インスタンス定義_一部抜粋
BlockchainClient: Type: AWS::EC2::Instance UserData: Fn::Base64: Fn::Sub: - | #!/bin/bash (略) /opt/aws/bin/cfn-signal -e $? --stack ${AWS::StackName} --resource BlockchainClient --region ${AWS::Region} CreationPolicy: ResourceSignal: Timeout: PT20M
詳細は下記が参考になります。
cfn-signal – AWS CloudFormation https://docs.aws.amazon.com/ja_jp/AWSCloudFormation/latest/UserGuide/cfn-signal.html
Fn::Subで変数の取扱い
UserDataに指定する値はFn::Base64とFn::Subを用いて指定しています。 Fn::Subは文字列中に置き換えたい変数がある場合に利用する関数となっています。
Fn::Sub – AWS CloudFormation https://docs.aws.amazon.com/ja_jp/AWSCloudFormation/latest/UserGuide/intrinsic-function-reference-sub.html
テンプレートで、スタックを作成または更新するまで使用��きない値を含むコマンドまたは出力を作成するために、この関数を使用できます。
UserDataを編集しているとシェル変数を利用したくなるケースがでてきますが、そのまま利用するとエラーとなるため注意が必要です。シェル変数の利用方法は下記が参考になりました。
CloudFormationの中のEC2のユーザーデータでシェル変数を使用する | DevelopersIO https://dev.classmethod.jp/cloud/aws/using-variables-in-ec2-user-data-in-cloudformation/
UserDataで変数を利用する例
UserData: Fn::Base64: Fn::Sub: - | #!/bin/bash # これはOK echo ${HOGE} HOGE2=hogehoge # これはエラーになる echo ${HOGE2} # こうするとOK echo ${!HOGE2} - { HOGE: hoge }
Hyperledger Fabricのcliでコマンドを実行するタイミングに気をつける
以下は、UserDataの後半部分の抜粋となります。ところどころでsleepコマンドを実行して待受けています。 リソース作成を繰り返し試行錯誤した結果となりますが、主に下記の理由からとなります。
Peerノードが利用可能になるのを待ち受け
OrdererからPeerノードへのデータ送信待ち
UserData一部抜粋
(略) /usr/local/bin/docker-compose -f docker-compose-cli.yaml up -d sleep 5m # enroll fabric-ca-client enroll -u https://${ADMIN_USERNAME}:${ADMIN_PASSWORD}@${FABRIC_CA_ENDPOINT} --tls.certfiles /home/ec2-user/${FABRIC_CA_FILE} -M /home/ec2-user/admin-msp cp -r /home/ec2-user/admin-msp/signcerts /home/ec2-user/admin-msp/admincerts echo ' Organizations: (略) ' > /home/ec2-user/configtx.yaml docker exec cli configtxgen -outputCreateChannelTx /opt/home/mychannel.pb -profile OneOrgChannel -channelID mychannel --configPath /opt/home/ sleep 30s # Create Channel docker exec cli peer channel create -c mychannel -f /opt/home/mychannel.pb -o ${ORDERING_SERVICE_ENDPOINT} --cafile /opt/home/${FABRIC_CA_FILE} --tls sleep 30s docker exec cli peer channel join -b mychannel.block -o ${ORDERING_SERVICE_ENDPOINT} --cafile /opt/home/${FABRIC_CA_FILE} --tls sleep 30s # Install ChainCode docker exec cli peer chaincode install -n mycc -v v0 -p github.com/chaincode_example02/go docker exec cli peer chaincode instantiate -o ${ORDERING_SERVICE_ENDPOINT} -C mychannel -n mycc -v v0 -c '{"Args":["init","a","100","b","200"]}' --cafile /opt/home/${FABRIC_CA_FILE} --tls sleep 30s docker exec cli peer chaincode list --instantiated -o ${ORDERING_SERVICE_ENDPOINT} -C mychannel --cafile /opt/home/${FABRIC_CA_FILE} --tls /opt/aws/bin/cfn-signal -e $? --stack ${AWS::StackName} --resource BlockchainClient --region ${AWS::Region}
UserData の実行ログの確認方法
UserDataで指定したコマンドの実行ログが確認できないか調べてみたらしっかりと出力されていました。 下記が参考になりました。
Linux インスタンスでの起動時のコマンドの実行 – Amazon Elastic Compute Cloud https://docs.aws.amazon.com/ja_jp/AWSEC2/latest/UserGuide/user-data.html
AWSのCloud initのログの場所 | しびら http://yamada.daiji.ro/blog/?p=191
EC2インスタンス内
$ cat /var/log/cloud-init-output.log (略) + docker exec cli peer channel join -b mychannel.block -o orderer.n-xxxxxxxxxxxxxxxxxxxxxxxxxx.managedblockchain.us-east-1.amazonaws.com:30001 --cafile /opt/home/managedblockchain-tls-chain.pem --tls 2019-07-01 09:17:03.663 UTC [channelCmd] InitCmdFactory -> INFO 001 Endorser and orderer connections initialized 2019-07-01 09:17:03.903 UTC [channelCmd] executeJoin -> INFO 002 Successfully submitted proposal to join channel + sleep 30s + docker exec cli peer chaincode install -n mycc -v v0 -p github.com/chaincode_example02/go 2019-07-01 09:17:34.076 UTC [chaincodeCmd] checkChaincodeCmdParams -> INFO 001 Using default escc 2019-07-01 09:17:34.076 UTC [chaincodeCmd] checkChaincodeCmdParams -> INFO 002 Using default vscc 2019-07-01 09:17:34.490 UTC [chaincodeCmd] install -> INFO 003 Installed remotely response:<status:200 payload:"OK" > + sleep 30s + docker exec cli peer chaincode instantiate -o orderer.n-xxxxxxxxxxxxxxxxxxxxxxxxxx.managedblockchain.us-east-1.amazonaws.com:30001 -C mychannel -n mycc -v v0 -c '{"Args":["init","a","100","b","200"]}' --cafile /opt/home/managedblockchain-tls-chain.pem --tls 2019-07-01 09:17:44.686 UTC [chaincodeCmd] checkChaincodeCmdParams -> INFO 001 Using default escc 2019-07-01 09:17:44.686 UTC [chaincodeCmd] checkChaincodeCmdParams -> INFO 002 Using default vscc + sleep 30s + docker exec cli peer chaincode list --instantiated -o orderer.n-xxxxxxxxxxxxxxxxxxxxxxxxxx.managedblockchain.us-east-1.amazonaws.com:30001 -C mychannel --cafile /opt/home/managedblockchain-tls-chain.pem --tls Get instantiated chaincodes on channel mychannel: Name: mycc, Version: v0, Path: github.com/chaincode_example02/go, Escc: escc, Vscc: vscc + /opt/aws/bin/cfn-signal -e 0 --stack amb-cfn-test --resource BlockchainClient --region us-east-1 Cloud-init v. 0.7.6 finished at Mon, 01 Jul 2019 09:19:16 +0000. Datasource DataSourceEc2. Up 692.70 seconds
まとめ
AMBのリソースをCFnで管理するのにAWS Lambda-backedカスタムリソースを利用することができましたが、そこそこハマるところがあり、テンプレート作成に時間がかかりました。 1度作成できたら応用を効かせることができそうですので、個人的には良いテンプレートができたなと思ってます^^
参考
Amazon Managed BlockchainでHyperledger Fabricのブロックチェーンネットワークをさくっと構築するAWS CloudFormationのテンプレートを作ってみた(使い方編) – Qiita https://cloudpack.media/48077
kai-kou/amazon-managed-blockchain-cfn-template https://github.com/kai-kou/amazon-managed-blockchain-cfn-template
AWS Resource and Property Types Reference – AWS CloudFormation https://docs.aws.amazon.com/AWSCloudFormation/latest/UserGuide/aws-template-resource-type-ref.html
Release History – AWS CloudFormation https://docs.aws.amazon.com/AWSCloudFormation/latest/UserGuide/ReleaseHistory.html
AWS SDK for Python(boto3)でAmazon Managed Blockchainのブロックチェーンネットワークを作成してみた – Qiita https://cloudpack.media/47241
AWS CloudFormationのLambda-backedカスタムリソースでリソースの更新・削除をする方法 – Qiita https://cloudpack.media/48205
DependsOn 属性 – AWS CloudFormation https://docs.aws.amazon.com/ja_jp/AWSCloudFormation/latest/UserGuide/aws-attribute-dependson.html
AWS CloudFormationのLambda-Backedカスタムリソースでリソース作成を待ち受けできるようにする – Qiita https://cloudpack.media/48222
New – Amazon Managed Blockchain – Create & Manage Scalable Blockchain Networks | AWS News Blog https://aws.amazon.com/jp/blogs/aws/new-amazon-managed-blockchain-create-manage-scalable-blockchain-networks
boto3/CHANGELOG.rst at develop · boto/boto3 https://github.com/boto/boto3/blob/develop/CHANGELOG.rst#19139
AWS CloudFormationのAWS Lambda-backedカスタムリソースで最新のAWS SDKを利用する – Qiita https://cloudpack.media/48058
カスタムリソースの応答オブジェクト – AWS CloudFormation https://docs.aws.amazon.com/ja_jp/AWSCloudFormation/latest/UserGuide/crpg-ref-responses.html
AWS CloudFormationのLambda-BackedカスタムリソースでネストされたJSONを返しても参照できない – Qiita https://cloudpack.media/48318
AWS CloudFormationのLambda-BackedカスタムリソースでネストされてるっぽいJSONを返す方法 – Qiita https://cloudpack.media/48329
awslabs/amazon-managed-blockchain-client-templates: AWS CloudFormation templates to provision Amazon EC2 instances and install and configure clients for use with blockchain frameworks in Amazon Managed Blockchain https://github.com/awslabs/amazon-managed-blockchain-client-templates
cfn-signal – AWS CloudFormation https://docs.aws.amazon.com/ja_jp/AWSCloudFormation/latest/UserGuide/cfn-signal.html
Fn::Sub – AWS CloudFormation https://docs.aws.amazon.com/ja_jp/AWSCloudFormation/latest/UserGuide/intrinsic-function-reference-sub.html
CloudFormationの中のEC2のユーザーデータでシェル変数を使用する | DevelopersIO https://dev.classmethod.jp/cloud/aws/using-variables-in-ec2-user-data-in-cloudformation/
Linux インスタンスでの起動時のコマンドの実行 – Amazon Elastic Compute Cloud https://docs.aws.amazon.com/ja_jp/AWSEC2/latest/UserGuide/user-data.html
AWSのCloud initのログの場所 | しびら http://yamada.daiji.ro/blog/?p=191
元記事はこちら
「Amazon Managed BlockchainでHyperledger Fabricのブロックチェーンネットワークをさくっと構築するAWS CloudFormationのテンプレートを作ってみた(解説編))
August 05, 2019 at 04:00PM
0 notes
Photo

AutoScalingのライフサイクルフックでStepFunctionsを呼び出して処理を行う http://ift.tt/2H4i5H8
概要
AutoScalingするWebサーバーにCMSサーバーからコンテンツ同期を行っている環境があり、ELBに追加する前にコンテンツ同期が終わっているか確認したかったのでAutoScalingライフサイクルフックでStepFunctionsを呼び出して外部公開前にコンテンツ同期のチェックとライフサイクルアクションを完了させるようにしてみました。
構成図

実装
AutoScaling
コマンドもしくはコンソールからインスタンスの起動 autoscaling:EC2_INSTANCE_LAUNCHING なライフサイクルフックを追加します。 https://docs.aws.amazon.com/ja_jp/autoscaling/ec2/userguide/lifecycle-hooks.html#adding-lifecycle-hooks
Lambda
コンテンツの同期チェックとライフサイクルフックを完了させるLambdaFunctionを作成します。外部にはELB経由で公開しているので、LambdaはVPC内で起動しインスタンスのプライベートIPに確認しに行きます。 確認するURLはスクリプトを使いまわせるようにLambdaの環境変数に書いています。
# -*- coding: utf-8 -*- import boto3 import hashlib import os import requests ec2 = boto3.resource('ec2') autoscaling = boto3.client('autoscaling') def lambda_handler(event, context): """ AutoScalingのCloudWatch Events[EC2 Instance-launch Lifecycle Action]から起動。 コンテンツの同期を確認、完了していればLifecycle Actionを完了させELBに組み込む。 """ print(event) try: instance_id = event['detail']['EC2InstanceId'] instance = ec2.Instance(instance_id) host = os.environ['Host'] headers = {'Host': host} origin_req = {'timeout': 5} replica_req = {'timeout': 5, 'headers': headers} # TOPページをチェック origin_top = requests.get('https://{}/'.format(host), **origin_req) replica_top = requests.get('http://{}/'.format(instance.private_ip_address), **replica_req) # TOPページのコンテンツを比較 top_result = check_content(origin_top, replica_top) if top_result is True: # Lifecycle Actionを完了 print('Content sync is complete.') response = autoscaling.complete_lifecycle_action( LifecycleHookName=event['detail']['LifecycleHookName'], AutoScalingGroupName=event['detail']['AutoScalingGroupName'], LifecycleActionResult='CONTINUE', InstanceId=instance_id ) print(response) else: class ContentUnsyncException(Exception): """ StepFunctionに認識させるコンテンツが同期が完了していない例外 """ pass raise ContentUnsyncException('top_result:{} pre_result:{}'.format(top_result, pre_result)) except Exception as e: print(e) raise e def check_content(origin, replica): origin_hash = hashlib.sha256(origin.text.encode('utf-8')).hexdigest() replica_hash = hashlib.sha256(replica.text.encode('utf-8')).hexdigest() return origin_hash == replica_hash
IAM Roleは AWSLambdaVPCAccessExecutionRole AmazonEC2ReadOnlyAccess とautoscaling:CompleteLifecycleAction あたりを行えるよう許可します。
StepFunctions
Lambdaを呼び出すステートマシンを作成します。 コンテンツ同期に少し時間がかかるのでリトライを設定しています。
{ "Comment": "Check the sync status of content at instance startup.", "StartAt": "CheckContent", "States": { "CheckContent": { "Type": "Task", "Resource": "arn:aws:lambda:${region}:${account_id}:function:check_content", "Retry": [ { "ErrorEquals": [ "ContentUnsyncException", "States.TaskFailed", "States.Timeout" ], "IntervalSeconds": 30, "MaxAttempts": 10, "BackoffRate": 1.0 } ], "End": true } } }
IAM Roleは lambda:InvokeFunction を許可します。
CloudWatchイベント
CloudWatchイベントでAutoScalingのライフサイクルアクションからステートマシンを呼び出すよう設定します。
{ "detail": { "AutoScalingGroupName": [ "${autoscalinggroupname}" ] }, "detail-type": [ "EC2 Instance-launch Lifecycle Action" ], "source": [ "aws.autoscaling" ] }
IAM Roleは states:StartExecution を許可します。 StepFunctionsとCloudWatchはコンソールから作成するとRoleもいい感じのが作成されるかと思います。
実行結果
スケールアウトが発生するとスケールアウトした数だけStepFunctionが動いてコンテンツ同期状況をチェックしてくれます。
参考
Amazon EC2 Auto Scaling ライフサイクルフック
Amazon VPC 内のリソースにアクセスできるように Lambda 関数を構成する
CloudWatch イベント を使用してステートマシンの実行を開始する
Automating AWS Lambda Function Error Handling with AWS Step Functions
元記事はこちら
「AutoScalingのライフサイクルフックでStepFunctionsを呼び出して処理を行う」
March 05, 2018 at 02:00PM
0 notes
Photo

PHPカンファレンス関西2017に行ってきました http://ift.tt/2uEyUlf
PHPカンファレンス関西2017
PHPカンファレンス関西2017に参加してきました! それぞれの登壇でまとめられたものをご紹介いたします。
PHPの現場から
PHPはドキュメントが整っていることが素晴らしい
PHP The Right Way
PHPの現場でのノウハウや最近の考え方が書かれてる
PHPには型がない?
変数に型がないだけで値には型がある
型宣言
型を明示するメリット
意図しない値(型)を防ぐ
コードの意図を明確にでき、IDEにも伝えられる
暗黙的型変換を防ぐ
型の検査
IDE
Phanなどの静的解析ツール
自動テスト
オブジェクト指向開発言語
オブジェクト指向開発に必要なものが整っている
クラス、継承、カプセル化
型宣言
インターフェイス、抽象クラス
例外、トレイト
DDDの流行でOOPの再評価がされている
DDD in PHP
オブジェクトを扱い方がシンプルになるよう言語機能として用意されている
ArrayAccess []で値にアクセスできる
Traversable オブジェクトをforeachで回せる
ステートレスなランタイム
PHPの実行順序 リクエストが来る毎にこれが行われている 1.HTTPリクエストが来る 2.PHPコードをコンパイル(opcode生成) ・OPCacheで高速化できるのは2の動作を省けるため 3.実行環境を初期化 4.opcodeを実行 5.HTTPレスポンスを返す
単一リクエストで閉じている
リクエスト毎にリセットするので何も共有しない、何も残さない
メリット
アプリケーション開発だけに集中できる
リクエストで必要なメモリしか使わないためメモリリーク、GCが起こりにくい
うっかりデータを共有しての事故がない
今の潮流(クラウド、サーバーレス)との親和性がある
PHPの思想
PHPは歯ブラシのようなものです
PHP=ツール
誰もが使えるツール
使う人を否定しない言語
PHP=つなぐ言語
glue言語
PHPエンジニアよ胸を張れ!
世界中で多くのシステムを支えている言語
PHPから言語を変えたところ��どうなるか?
他の言語ユーザに何言われても気にするな
最近のPHPがわからない人のための基本文法おさらい講座
php7リリースから約1年半
php5.6が2018/12/31にサポート終了
今からPHP5系で実装するやつおる?
ライブラリ管理
Composer使うメリットを知ろう
require_once祭り殺し
ライブラリをいちいちrequireするのは面倒
配置がプロジェクトごとに異なる
smarty使ってるやつおる?
ライブラリバージョンが分かりやすい
最近の記法を覚えよう
ShortArraySyntax
null合体演算子
三項演算子の省略記法
private functionじゃなくてclousureを使おう
JSなどでおなじみのクロージャ
use句でレキシカルスコープの利用も可能
処理を変数に閉じ込めて引数渡しで持ち回す
share srevices
php5.4以降のtrait
多重継承も可能
type hinting
処理の引数が配列の場合は何をどういう形で受け取るのか不明になる
複雑な引数、クラス型を指定することができる
php7から戻り値の値を指定することも可能になった
何を受け取って何を返すのかを明記できる
名前空間
ビルトインサーバ
assert関数 などなど…
技術は変わった、現場は…?
新しい技術は必ず必要というわけではない
何故その技術が必要だったのか、どのように導入されたかをチェックしよう
現場を変えるには変化に対するコストを小さくするサイクルを作る
パネルディスカッション 〜PSRとDIとフレームワーク〜
DI設計
純粋な単体テスト・テストファーストが簡単に
PHPUnitでテストするためにフレームワーク起動が不要
EC-CUBE作ったやつ誰や出てこい
1p「はいぼくです」
各フレームワークの比較
symfony: 機能フレームワークの設計フレームワーク
CakePHP: いますぐ使える設計済みの骨組み
Laravel: 何をするにも使える設計を楽しむフレームワーク
どのフレームワークが良いかではなく本質を見極めて使うべし
実はPHPは学びの多い言語
言語、多様な思想を考えよう
Slim Frameworkで始めるPHPのmiddleware
middlewareってどういうもの?
Webアプリケーションの前段のフィルターという発想
Webアプリケーションの前や後にフィルターを通せる
Node.jsのExpressが元祖
routing
middleware
ルーティングの過程で任意の処理を差し込むための仕組み
app.get(‘/’, auth, logger, function())
authを通ってloggerを通ってfunctionが動く
アプリケーションを複数のmiddlewareでくるむ入れ子状態
StackPHP
セッションや認証を通ってアプリケーションに行き着く
Slim3
PSR-7、middleware、DI
middleware
関数の書き方とクラスの書き方がある
DIコンテナと組み合わせてもっと便利に
インスタンス生成はDIコンテナの責務
__invokeメソッドがあれば良い
PSR-15: HTTP Middlewares(Draft)
MiddlewareInterface
DelegateInterface
middleware流儀
Double Pass: リクエストとレスポンスを受け取る
Single Pass: リクエストのみを受け取る
他のフレームワークのmiddleware
laravel
PSR-15は意識してない
従来のcontrollerの補助的な役割
CakePHP
実装はSlimとほとんど同じだけど…
クラスではなくインスタンスを渡す
Symfony
Filterがベース
処理をmiddlewareに任せるとテスト容易性が高くなる
よく使ってる処理
sessionやauthはもちろん
validationはmiddlewareに任せる
Requestを受け取ってるからいくらでもこねられる
今すぐできるLaravelフレームワーク!~業務アプリ開発~
laravelって何?を思想から読み解く
web職人のためのフレームワーク と、書いてある
表現に富み簡潔に楽しく創造的な仕事=3E1Cな開発
アーキテクチャに専念できる
laravelで何を作りますか?
お題:業務アプリ 生産管理、在庫管理、販売管理など
入力業務の増大化で複雑化をもたらす
Validation機能
この機能が強ければ強いほど安定する
LaravelのValidation
‘required | unique:posts | max:255’
簡潔で分かりやすいvalidation
バリデーションとメッセージのパートが分かれている
他のフレームワークと違って横に延びるルール
ルールが多くなった時にも可読性を維持できる
デフォルトのバリデーションルールが40種以上ある
ひたすら楽してPHPアプリをコンテナ運用
楽をしないと危険な状況に陥ることもある
開発環境と本番環境の乖離があるとつらい
このあたりのツラミをコンテナを使って解決したい
動作確認やテストをコンテナで実行するように作り変えた
環境ごとの違いは環境変数で指定する
LaraDock
Laravelでコンテナ使って開発するには使うといい
Composerが入ってるだけだから別のフレームワークでも使える
コンテナ運用の標準形
コンテナの稼働状況を問い合わせる、デプロイ作業を依頼する
マネージャインスタンスがコンテナの起動・停止・入れ替えを指示
ホスト内のエージェントが処理を行いデプロイ状況を通知する
コンテナホスト郡は自分で構築する必要がある
docker swarmモード
Kubernetes コンテナ管理ツール
ECSを使うとうまくいく
ECR
コンテナのイメージを格納するプライベートなレジストリ
タスク
クラスタ
サーバは単純にアプリケーションを動かすためのリソースを提供
サービス
リソース状況をみてコンテナの実行・運用を包括的に管理
GitLab CIで更に楽になる
マージしたらテストして開発環境を更新
タグ付けしたら本番環境にデプロイも自動化
PHPでもサーバーレスしたい
サーバーレスアーキテクチャ
バックエンドの監視が面倒なので丸投げしてアプリ開発に専念しよう
サーバーを意識しないでよくて簡単にスケールする
使った分だけ課金なのでシステムが眠ってる間にお金がかからない
ユースケース
SPA
モバイルアプリのバックエンド
IoTバックエンド
ストリームプロセッシング
チャットボット
バッチ処理
運用の自動化
バッチ処理・運用の自動化をサーバレスするのが最初に試すのにオススメ
ServerlessといえばLambda
PHPは!?PHPはまだ!?
Azure functions
PHPで書ける
めっちゃ安い(月100万実行は無料?)
トリガーとバインディングが豊富
トリガー:Twitterの新しいポストのフックとか
バインディング:Twilio、SendGridと連携が簡単
Visual Studioを使ってデバッグができる
どんな機能があるか
function proxy
APIGatewayみたいなもの
デプロイメントスロット
Blue−Greenデプロイが簡単
Console
そのままコンソールが叩ける
Application Insite
アプリの挙動を可視化
Durable Functions
複数のFunctionの連携を比較的簡単に実装できる
StepFunctionsみたいなもの
今はまだα版でC#でしか書けない
Functionsの作り方
バインディングの使い方
入力バインディングを読み込んで出力バインディングに書き込む
簡単!
でもテストは!?
VisualStudioでテストできるよ
Macは!?
「…」
まとめ
バッチとか重い処理をさせるにはとても便利
PHPで書けるのは楽
Durable Functionsは期待大
課題
Serverless Frameworkでデプロイしたい
httpTriggerは従量課金プランだとツラい
LT
天高くそびえ立つ巨塔によってPHPをJavaScriptに変換する
babel
任意のテキストをJavaScriptコードに変換できる
PHPのコードをJavaScriptコードに変換できた
namespaceもfile_get_contentsも動かない
つらい
staticおじさんになろう
難しかった事例を寄せ集めただけ
あるメソッドの引数・返り値を変えたい
call_user_funcで関数を呼んでたりする
DIコンテナでインスタンス生成と実行箇所が分かれている場合がある
PhpStormのRefacrot機能が優秀
過去の遺物へのリスペクトもリファクタリングは大事だよ
ちゃんと設計、しよう!
テスト実行速度を改善してお金をかけずに開発スピードをあげる
2017年のPHP開発
PSR当たり前
composer当たり前
テスト格の当たり前
CI回すの当たり前
CIのテスト実行を早くしたい
テスト自体を早くできるようにする
アサーションを必要な時に必要な分だけにする
setUp, tearDownを使ってテストケースのプロパティを開放する
フレームワークの上でも考慮したいセキュリティのポイント
フレームワークのレールに乗れば楽に安全にプログラムが書ける
hiddenは見える、改ざんできる(信用してはいけない)
仕様上のバグ
認証・認可のバグ
外部入力地にユーザIDや権限を持たせない
つねにDBや権限をチェックする
利用方法のミス
ホワイトリスト・ブラックリスト・フォーム改ざんチェック
なりすまし
evalこそパワー
文字列をコードとして実行する言語構造
非常に危険な言語構造です。使うことはおすすめしません。(公式)
危険≒つよい(確信)
おしゃれ危険ライブラリ
evalしたら速くなった!すっごーい!
PHPカンファレンス東京 10/8
Web APIを理解する
SPA作るときとか
REST APIはHTTPメソッドなどWebの制約に合わせる
推奨設計
リソース部分は目的語の複数形にするのが好ましい
できるだけ短く利用者に分かりやすい名前をつける
結果に見合ったレスポンスコードを作る方がいい
400番台はクライアントに問題がある
500番台はサーバに問題がある
元記事はこちら
「PHPカンファレンス関西2017に行ってきました」
August 09, 2017 at 12:00PM
0 notes
Photo

AWS Step Functions の Activity Worker を “郷” で実装してみた系 http://ift.tt/2fnUw3i
モチベーション
AWS Step Functions とは
郷で Activity Worker を実装 — Activity — 参考 — コード — こうやって使うことを想定
Demo — Activity Worker を動かす環境 — State Machine: ビジュアルワークフロー — State Machine: コード — State1 : Godesu1 で実行するコマンド — State2 : Godesu2 で実行するコマンド — State Machine の実行
ということで
どうも、郷です。
モチベーション
むかーし、むかーし、1 台の EC2 cron で動かしている複数のバッチ処理があったとさ
村人(むらびと)たちはバッチ処理を動かす時だけ EC2 を起動したいと考えたとさ
村人たちの思いを汲んだ禿兵衛は EC2 は Lambda で起動してから、バッチを実行しようと考えたとさ
ところが、禿兵衛は EC2 が正常に起動したことを正確に判断したり、バッチ処理の重複起動やハンドリングに頭を悩ましておりましたさ
��して、ちゃんと前後の処理をハンドリングしつつ、処理の流れをコード化(可視化)出来ればなあと黄昏れておりましたら…山の向こうから「AWS Step Functions というツールがあるばってん、こんツールはくさ、Activity を使えばくさ、EC2 やオンプレのタスクも制御出来るちゃんねー」という声を聞くのであった…
ということで、EC2 で動かしているバッチ処理を Activity で制御することを想定して、Golang で Worker を実装して Acitivity の挙動についてチュートリアルしてみたメモでござる。
AWS Step Functions とは
AWS Step Functions (分散アプリケーションとマイクロサービスの構築) | AWS
http://ift.tt/2fXy0ML
分散アプリケーションとマイクロサービスの構築を検討していますか?視覚的なワークフローを使用して分散アプリケーションのコンポーネントを調整する方法を学んでください。
Amazon Web Services, Inc.
aws.amazon.com
Step Functions の詳しい説明については、以下の資料がとても参考になりました。
AWS Step Functions 実践 from Shuji Kikuchi
www.slideshare.net
有難うございます!!
郷で Activity Worker を実装
Activity
Activities - AWS Step Functions
http://ift.tt/2fohozL
Learn about Step Functions activities.
docs.aws.amazon.com
docs.aws.amazon.com
Activities are an AWS Step Functions concept that refers to a task to be performed by a worker that can be hosted on EC2, ECS, mobile devices—basically anywhere.
超ざっくりだけど…
Activity とは EC2 や ECS 等、オンプレミスのサーバーでも動く Worker によって実行されるタスクのこと
AWS SDK や AWS CLI で Worker を実装出来る
Worker は Activity の ARN を指定して起動すると Activity に対してポーリングを行う
Activity は AWS CLI では以下のように作成します。
$ aws \ --profile oreno-profile --region ap-northeast-1 \ stepfunctions create-activity \ --name=OrenoActivity
以下のように出力されます。
{ "creationDate": 1500076193.843, "activityArn": "arn:aws:states:ap-northeast-1:012345678912:activity:OrenoActivity" }
State Machine には以下のように指定します。
{ "Comment": "Golang Demo", "StartAt": "Godesu1", "States": { "Godesu1": { "Type": "Task", "Resource": "arn:aws:states:ap-northeast-1:012345678912:activity:OrenoActivity", "Next": "wait_using_seconds" } } }
参考
こちらやこちらを目一杯参考にさせて頂きました。有難うございます!!
コード
gist.github.com
こうやって使うことを想定
./taskRunner -arn=${Activity ARN} -command=${実行したいコマンド}
Demo
Activity Worker を動かす環境
$ sw_vers ProductName: Mac OS X ProductVersion: 10.11.6 BuildVersion: 15G1421 $ go version go version go1.8.3 darwin/amd64 $ go build taskRunner.go
State Machine: ビジュアルワークフロー
State Machine とは State をつなげたフローのことで、以下のようなフローで動かしてみます。
State Name State Type State で実行したいコマンド Godesu1 Task demo01.sh wait_using_seconds Wait 10 秒待ってから State: Godesu2 を実行 Godesu2 Task demo02.sh
State Machine: コード
{ "Comment": "Golang Demo", "StartAt": "Godesu1", "States": { "Godesu1": { "Type": "Task", "Resource": "arn:aws:states:ap-northeast-1:123456789012:activity:OrenoFirstActivity", "Next": "wait_using_seconds" }, "wait_using_seconds": { "Type": "Wait", "Seconds": 10, "Next": "Godesu2" }, "Godesu2": { "Type": "Task", "Resource": "arn:aws:states:ap-northeast-1:123456789012:activity:OrenoSecondActivity", "End": true } } }
State1 : Godesu1 で実行するコマンド
$ cat demo01.sh #!/usr/bin/env bash for i in $(seq 1 2 10); do echo $i done
Activity Worker を以下のように実行して待機させておきます。
./taskRunner -arn=arn:aws:states:ap-northeast-1:123456789012:activity:OrenoFirstActivity -command="./demo01.sh"
以下のように出力されます。
$ ./taskRunner -arn=arn:aws:states:ap-northeast-1:123456789012:activity:OrenoFirstActivity -command="./demo01.sh" 2017/07/15 08:00:49 taskRunner Started.
State2 : Godesu2 で実行するコマンド
$ cat demo02.sh #!/usr/bin/env bash for i in $(seq 2 2 10); do echo $i done
Activity Worker を以下のように実行して待機させておきます。
./taskRunner -arn=arn:aws:states:ap-northeast-1:123456789012:activity:OrenoSecondActivity -command="./demo02.sh"
以下のように出力されます。
$ ./taskRunner -arn=arn:aws:states:ap-northeast-1:123456789012:activity:OrenoSecondActivity -command="./demo02.sh" 2017/07/15 08:00:55 taskRunner Started.
State Machine の実行
以下のように AWS CLI で実行します。
$ aws \ --profile oreno-profile --region ap-northeast-1 \ stepfunctions start-execution \ --state-machine-arn=arn:aws:states:ap-northeast-1:012345678912:stateMachine:DemoStateMachine-Go-3
以下のようにレスポンスが返ってきます。
{ "startDate": 1500075053.349, "executionArn": "arn:aws:states:ap-northeast-1:012345678912:execution:DemoStateMachine-Go-3:859949c4-b3a4-4b7c-84ed-60f555e859e6" }
そして、それぞれの Activity Worker では以下のように出力されています。
それぞれ別の Activity を利用しているので、順番も制御出来ている(Godesu1 → Godesu2 の順番)ことが判ります。
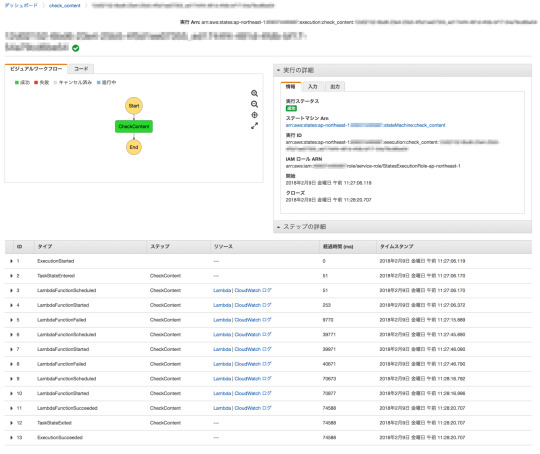
マネジメントコンソールでも上図のように State Machine の処理が正常に終了していることが判ります。
このフロー図を見ているだけでウキウキしますね。
ということで
Step Functions = Lambda という印象がありましたが、Activity を使うことで従来のバッチ処理等について変更を最小限に処理フロー(State Machine)に組み込めるのはとても嬉しいです。しかし、こちらでも言及されている通り、Activity は Worker を実装する必要があったり、Worker の運用管理が必要になる点は注意が必要です。
今回、禿兵衛の目の前にあるシチュエーションの場合、Activity Worker は EC2 が起動したタイミングで必ず起動することを保証する必要があったりしますが、それ自体も State の一つとして Lambda ファンクションに組み込んでしまうのもありかなと思ったりしています。
Step Functions とても面白いサービスで好きになっちゃいました。
元記事はこちら
「AWS Step Functions の Activity Worker を “郷” で実装してみた系」
August 08, 2017 at 04:00PM
0 notes