#sudo user debian
Explore tagged Tumblr posts
Visit Tumblr Blog
Explore Tumblr blogs with no restrictions, modern design and the best experience.
Last Seen Tumblr Blogs


Fun Fact
12.7% of mobile users access Tumblr.
Video
youtube
How to Create a New User and Grant Sudo Privileges to it in Linux Debian
In this video we will create a user for our Linux system and then grant it the sudo privilege. The commands we will use in this tutorial go following.
# Create a new user sudo adduser USERNAME
Note: Replace USERNAME with the username of your choice and after pressing enter, give it the user password.
# Make user sudoer usermod -aG sudo USERNAME
# Method 2 of making a user sudoer visudo # Add the following line to the end of file: USERNAME ALL=(ALL:ALL) ALL Ctrl+X Y
# Log into the user account su - USERNAME
# Test privileges whoami sudo whoami
# Logout from an account logout
All Open Source!
Arashtad provides high quality tutorials, eBooks, articles and documents, design and development services, over 400 free online tools, frameworks, CMS, WordPress plugins, Joomla extensions, and other products.
More Courses ▶ https://tuts.arashtad.com/
Business Inquiries ▶ https://arashtad.com/business-inquiries/ Affiliate Programs ▶ https://arashtad.com/affiliate-programs/
eBooks ▶ https://press.arashtad.com/ Our Products ▶ https://market.arashtad.com/ Our Services ▶ https://arashtad.com/services/ Our Portfolio ▶ https://demo.arashtad.com/ Free Online Tools ▶ https://tools.arashtad.com/ Our Blog ▶ https://blog.arashtad.com/ Documents ▶ https://doc.arashtad.com/ Licensing ▶ https://arashtad.com/licensing/ About us ▶ https://arashtad.com/about/
Join Arashtad Network ▶ https://i.arashtad.com/
Our Social Profiles ▶ https://arashtad.com/arashtad-social-media-profiles/ Vimeo ▶ https://vimeo.com/arashtad Udemy ▶ https://www.udemy.com/user/arashtad GitHub ▶ https://github.com/arashtad Linkedin ▶ https://www.linkedin.com/company/arashtad Twitter ▶ https://twitter.com/arashtad
0 notes
Text
Linux distros - what is the difference, which one should I choose?
Caution, VERY long post.
With more and more simmers looking into linux lately, I've been seeing the same questions over and over again: Which distro should I choose? Is distro xyz newbie-friendly? Does this program work on that distro?
So I thought I'd explain the concept of "distros" and clear some of that up.
What are the key differences between distros?
Linux distros are NOT different operating systems (they're all still linux!) and the differences between them aren't actually as big as you think.
Update philosophy: Some distros, like Ubuntu, (supposedly) focus more on stability than being up-to-date. These distros will release one big update once every year or every other year and they are thoroughly tested. However, because the updates are so huge, they inevitably tend to break stuff anyway. On the other end of the spectrum are so-called "rolling release" distros like Arch. They don't do big annual updates, but instead release smaller updates very frequently. They are what's called "bleeding edge" - if there is something new out there, they will be the first ones to get it. This can of course impact stability, but on the other hand, stuff gets improved and fixed very fast. Third, there are also "middle of the road" distros like Fedora, which kind of do... both. Fedora gets big version updates like Ubuntu, but they happen more frequently and are comparably smaller, thus being both stable and reasonably up-to-date.
Package manager: Different distros come with different package managers (APT on ubuntu, DNF on Fedora, etc.). Package managers keep track of all the installed programs on your PC and allow you to update/install/remove programs. You'll often work with the package manager in the terminal: For example, if you want to install lutris on Fedora, you'd type in "sudo dnf install lutris" ("sudo" stands for "super user do", it's the equivalent of administrator rights on Windows). Different package managers come with different pros and cons.
Core utilities and programs: 99% of distros use the same stuff in the background (you don’t even directly interact with it, e.g. background process managing). The 1% that do NOT use the same stuff are obscure distros like VoidLinux, Artix, Alpine, Gentoo, Devuan. If you are not a Linux expert, AVOID THOSE AT ALL COST.
Installation process: Some distros are easier to install than others. Arch is infamous for being a bit difficult to install, but at the same time, its documentation is unparalleled. If you have patience and good reading comprehension, installing arch would literally teach you all you ever need to know about Linux. If you want to go an easier and safer route for now, anything with an installer like Mint or Fedora would suit you better.
Community: Pick a distro with an active community and lots of good documentation! You’ll need help. If you are looking at derivatives (e.g. ZorinOS, which is based on Ubuntu which is based on Debian), ask yourself: Does this derivative give you enough benefits to potentially give up community support of the larger distro it is based on? Usually, the answer is no.
Okay, but what EDITION of this distro should I choose?
"Editions" or “spins” usually refer to variations of the same distro with different desktop environments. The three most common ones you should know are GNOME, KDE Plasma and Cinnamon.
GNOME's UI is more similar to MacOS, but not exactly the same.
KDE Plasma looks and feels a lot like Windows' UI, but with more customization options.
Cinnamon is also pretty windows-y, but more restricted in terms of customization and generally deemed to be "stuck in 2010".
Mint vs. Pop!_OS vs. Fedora
Currently, the most popular distros within the Sims community seem to be Mint and Fedora (and Pop!_OS to some extent). They are praised for being "beginner friendly". So what's the difference between them?
Both Mint and Pop!_OS are based on Ubuntu, whereas Fedora is a "standalone" upstream distro, meaning it is not based on another distro.
Personally, I recommend Fedora over Mint and Pop!_OS for several reasons. To name only a few:
I mentioned above that Ubuntu's update philosophy tends to break things once a big update rolls around every two years. Since both Mint and Pop!_OS are based on Ubuntu, they are also affected by this.
Ubuntu, Mint and Pop!_OS like to modify their stuff regularly for theming/branding purposes, but this ALSO tends to break things. It is apparently so bad that there is an initiative to stop this.
Pop!_OS uses the GNOME desktop environment, which I would not recommend if you are switching from Windows. Mint offers Cinnamon, which is visually and technically outdated (they use the x11 windowing system standard from 1984), but still beloved by a lot of people. Fedora offers the more modern KDE Plasma.
Personal observation: Most simmers I've encountered who had severe issues with setting up Linux went with an Ubuntu-based distro. There's just something about it that's fucked up, man.
And this doesn't even get into the whole Snaps vs. Flatpak controvery, but I will skip this for brevity.
Does SimPE (or any other program) work on this distro?
If it works on Fedora, then it works on Mint/Ubuntu/Arch/etc., and vice versa. This is all just a question of having the necessary dependencies installed and installing the program itself properly. Some distros may have certain prerequisites pre-installed, while others don't, but you can always just install those yourself. Like I said, different distros are NOT different operating systems. It's all still Linux and you can ultimately customize it however you want.
In short: Yeah, all Sims 2-related programs work. Yes, ReShade too. It ultimately doesn't really matter what distro you use as long as it is not part of the obscure 1% I mentioned above.
A little piece of advice
Whatever distro you end up choosing: get used to googling stuff and practice reading comprehension! There are numerous forums, discord servers and subreddits where you can ask people for help. Generally speaking, the linux community is very open to helping newbies. HOWEVER, they are not as tolerant to nagging and laziness as the Sims community tends to be. Show initiative, use google search & common sense, try things out before screaming for help and be detailed and respectful when explaining your problems. They appreciate that. Also, use the arch wiki even if you do not use Arch Linux – most of it is applicable to other distros as well.
#simming on linux#bnb.txt#if anyone wants to use this as a base for a video feel free#i don't feel like like recording and editing lol
115 notes
·
View notes
Text
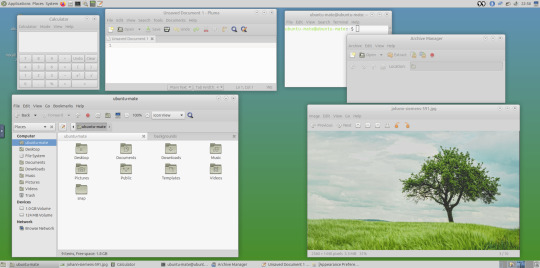

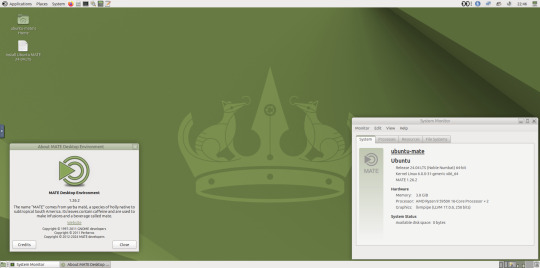

May 2025.
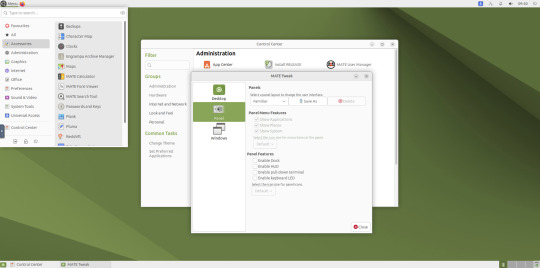
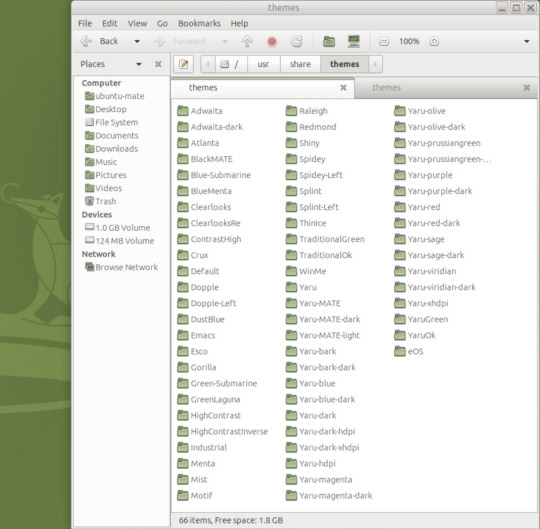
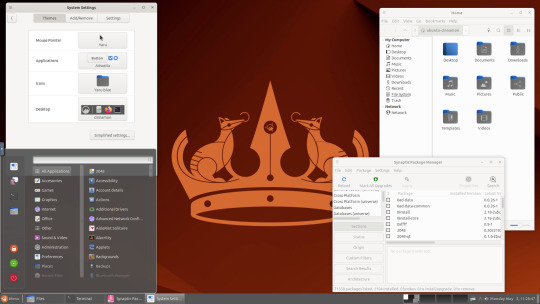
I tried installing a set of themes on Ubuntu MATE 24.04.1 LTS in Distrosea today.
https://distrosea.com/
These themes are provided as a theme package found in vanilla MATE desktops such as Debian and Fedora.
MATE is the modern day continuation of GNOME 2, a very popular, efficient and functional desktop environment from the early 2000s.
The theme pack I selected are compactable GTK3/4 (Graphical Toolkit) versions based on classic GNOME 2 era themes.
Ubuntu MATE website:
https://ubuntu-mate.org/
Debian Linux website:
https://www.debian.org/
Fedora Linux website:
https://fedoraproject.org/spins/mate
See MATE Desktop website here:
https://mate-desktop.org/blog/
About the Graphical Toolkit user interface:
https://en.wikipedia.org/wiki/GTK
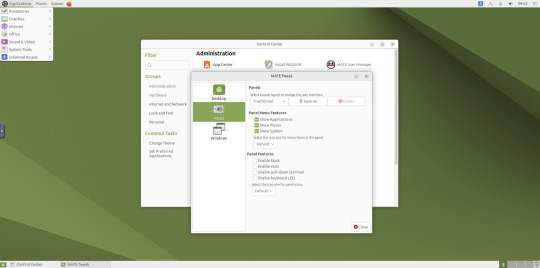
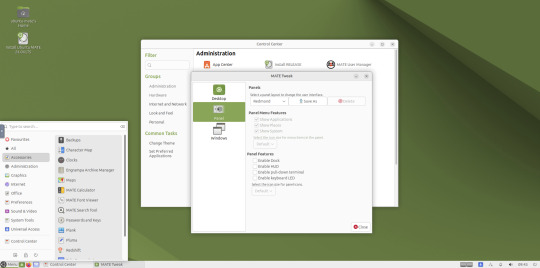
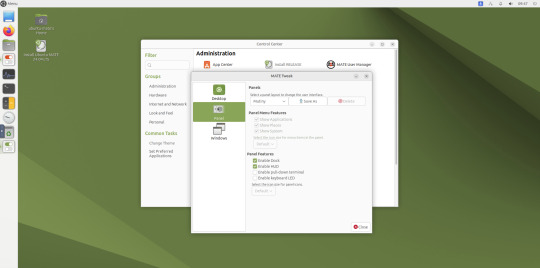
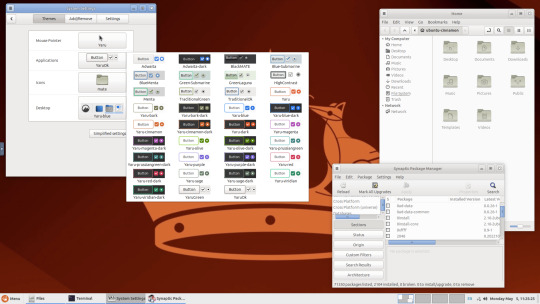
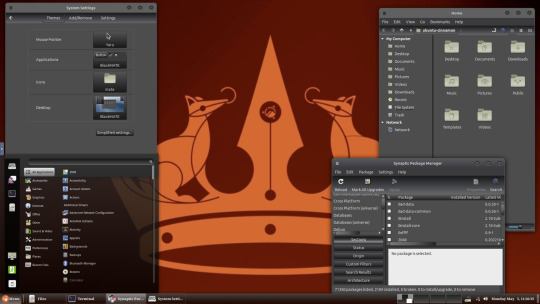
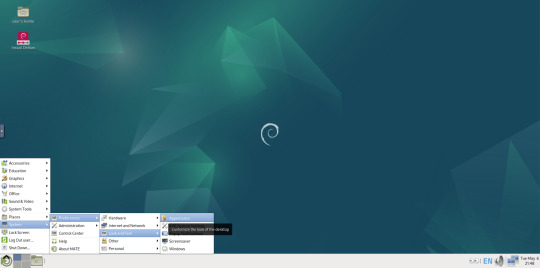
I used the MATE Tweak tool to adjust the panels from the 'familiar' layout to the 'traditional' layout. Here are many of the layouts available.
MATE Tweak can change the panel layout between Traditional (GNOME 2), Unity, Redmond (Windows) contemporary (Mac OS) style.
Here are many of the layouts available.
Afterwards, I used the command line to install the themes with the command: sudo apt install mate-themes.
This command then prompted me to agree the system changes and then it installed the required theme files to the list.
I opened up the theme folder in the Caja file manager. This shows all the ones installed on the system.
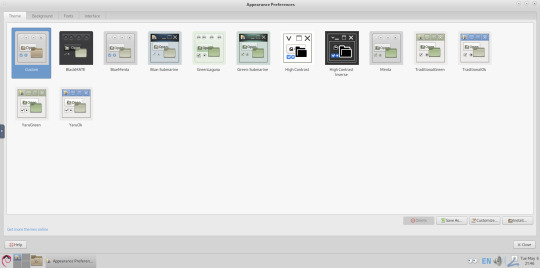
Next I opened the appearance preferences and cycled through each theme. There are a total of 12 new themes it added alongside the existing Yaru Colour theme collection for Ubuntu.
This package couldn't be installed graphical so this is why I installed it through the terminal. It is also available to install through the Software Manager on Linux Mint.
The theme package can also be installed on the Cinnamon desktop and other linux distributions.
I like these themes as they provide a more 3D feel and is refreshing to see themes for a desktop environment that hasn't moved towards flat design. It themes all the desktop elements from the windows, panels, drop down menus, CSD apps and widgets.
My favourite one is called YaruOK (blue), as it provides resizable window controls, 3D controls and provides a familiar look to the desktop. The theme is also called TraditionalOK.
This theme is a fork of a GTK2 theme called Clear-looks, which was created by Red Hat developers.
YaruOK is a modern variant that uses GTK3 & 4. The theme is rendered in SVG instead of PNG format which improves HiDpi scaling and features themed client side decorations for header bar windows such as the Disks utility.
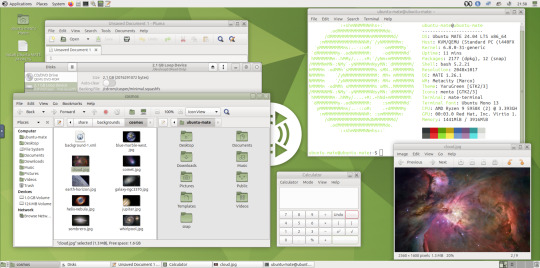
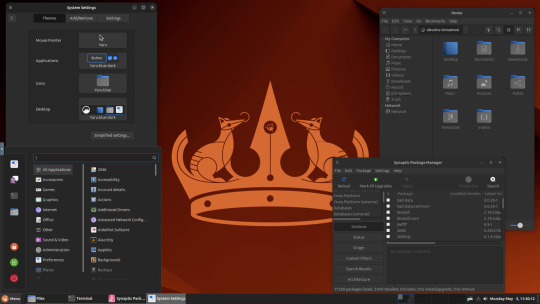
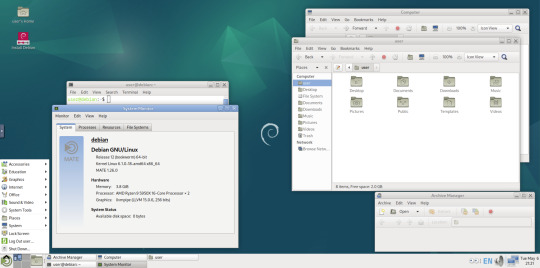
I also added a GNOME Eyes widget onto the panel!
These fun set of eyes follow your mouse cursor around the screen and can help you find the cursor amongst the clutter of windows. It is built to be very lightweight.
I also like the workspace switcher on the bottom left, which allows you to switch between as many desktop workspaces as you want.
The little square windows within each desktop can be clicked on and moved to another workspace.
Like with other desktop environments, you can also right click a window and move it onto another workspace. Each desktop can be named for a assigned task.
A System Monitor widget can also be added to the panels to display CPU, Memory, Swap and Network processes.
There are many other very interesting widget to play around with on the desktop and panels as well!
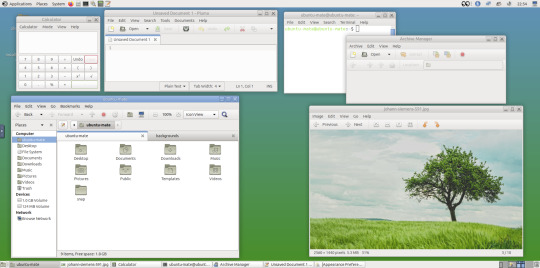
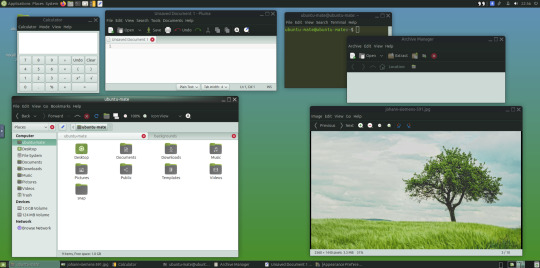
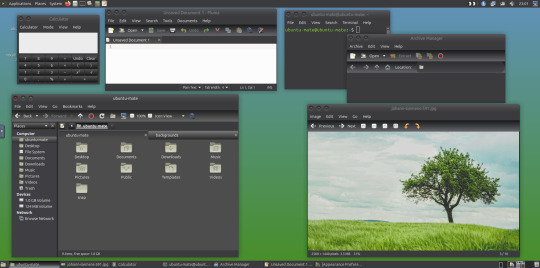
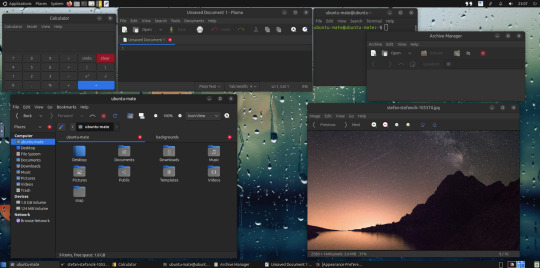
Here are the MATE themes in Ubuntu Linux 24.04.1, integrating with the Cinnamon desktop.
Below are some theming screenshots from Debian MATE 12 Linux.
I've customised the panel, selected the compact menu and changed notification sizes to make it more clearer. The window lists stack onto each other with the increased size.
The MATE panels have adjustable transparency and can be re-coloured and textured very easily through its own preferences box.
See screenshots below!
A very interesting look at the user interface elements found in GNOME 2, MATE and Cinnamon Linux desktop environments!
5 notes
·
View notes
Text
How to install and configure sudo on Debian Linux
The minimal version of Debian Linux 12/11 does not install sudo. When performing a network installation for Debian, the usual approach is to use the minimum version, which only installs the essential packages. Most Linux container images based upon Debian also skip sudo, and if your project needs sudo, then read on how to install and configure sudo and grant access to a user on a Debian Linux 12/11.
11 notes
·
View notes
Text
i take pride in being one of the linux users who are least invested in customizing my os. Pop! on my laptop, install & done. Same for the servers; install debian, sudo & docker and we're good. Got enough other shit to worry about
9 notes
·
View notes
Text
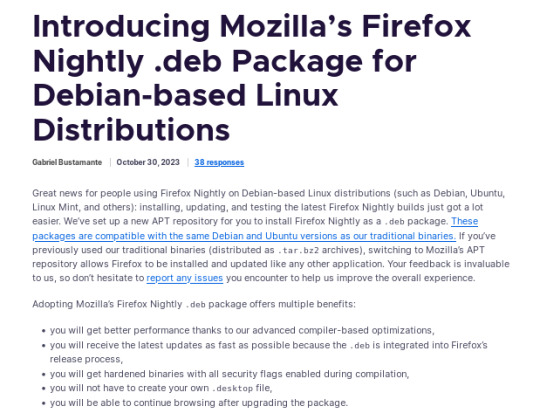
official instructions to add the Mozilla .deb repository for everyone on Ubuntu, Mint, or Debian, etc., who would like to install Firefox Nightly (most bleeding edge unstable version and users are likely to encounter bugs!). link attached to screenshot above.
it should be noted, however, that this repository provides both the main version of Firefox (non snap version) as well as Firefox Nightly and others so installing this repository may conflict with default Ubuntu apt version of Firefox (dummy package that installs the Snap version). although, I am not familiar with the Snap version so it might not be an issue (sorry)
as for other repositories, it appears the "mozilla teams" PPA version of the regular Firefox package takes precedence so there should be no conflict with the PPA installed alongside the official Mozilla repo.
alternatively however: if you wish to remove the PPA, you will need to explicitly install the Mozilla repo version number in order to receive future updates. for example:
sudo apt install firefox=134.0.2~build1
to find the latest version number:
apt-cache show firefox | grep Version | grep -v ubuntu | head -n 1
(the grep -v ubuntu should exclude other repository versions and hopefully the formatting holds up here I tried to avoid quotes)
and then if the PPA is not already removed at this point, just make sure to remove the PPA before the next update
2 notes
·
View notes
Text
Comparativa de Gestores de Paquetes en Linux: apt vs. dnf vs. pacman / Comparing Package Managers in Linux: apt vs. dnf vs. pacman
Introducción / Introduction
Español: Los gestores de paquetes son una pieza clave en cualquier distribución de Linux, ya que facilitan la instalación, actualización y gestión de software. Tres de los gestores de paquetes más populares son apt (usado en Debian, Ubuntu y derivadas), dnf (utilizado por Fedora y Red Hat), y pacman (nativo de Arch Linux). Cada uno tiene sus particularidades, ventajas y desventajas. En este blog, haremos una comparativa detallada para ayudarte a entender cuál de estos gestores de paquetes podría ser más adecuado para tus necesidades.
English: Package managers are a key component of any Linux distribution, as they facilitate the installation, update, and management of software. Three of the most popular package managers are apt (used in Debian, Ubuntu, and derivatives), dnf (utilized by Fedora and Red Hat), and pacman (native to Arch Linux). Each has its quirks, strengths, and weaknesses. In this blog, we’ll provide a detailed comparison to help you understand which of these package managers might be better suited to your needs.
apt: El Estándar de Debian y Ubuntu / apt: The Debian and Ubuntu Standard
Español: apt es el gestor de paquetes predeterminado en distribuciones basadas en Debian, como Ubuntu, Linux Mint y otros sistemas derivados. Es conocido por su simplicidad y robustez, siendo ideal para usuarios de todos los niveles.
1. Facilidad de Uso: Una de las mayores ventajas de apt es su facilidad de uso. Los comandos básicos como sudo apt update y sudo apt upgrade permiten a los usuarios mantener su sistema actualizado con facilidad. Además, apt es muy intuitivo, lo que lo convierte en una excelente opción para principiantes.
2. Amplia Documentación: Dado que Debian y Ubuntu son algunas de las distribuciones más populares, existe una enorme cantidad de documentación y recursos disponibles para solucionar problemas y aprender a usar apt de manera efectiva. Esto reduce significativamente la curva de aprendizaje y ayuda a resolver problemas rápidamente.
3. Soporte de Paquetes: apt ofrece acceso a una vasta cantidad de paquetes en los repositorios oficiales de Debian y Ubuntu. Además, la compatibilidad con PPA (Personal Package Archives) permite a los usuarios acceder a versiones más recientes de software o a programas que no están en los repositorios oficiales.
Desventajas: Aunque apt es extremadamente fiable, puede ser más lento en comparación con otros gestores de paquetes como pacman, especialmente en sistemas con muchas actualizaciones pendientes.
English: apt is the default package manager in Debian-based distributions such as Ubuntu, Linux Mint, and other derivatives. It’s known for its simplicity and robustness, making it ideal for users of all levels.
1. Ease of Use: One of the biggest advantages of apt is its ease of use. Basic commands like sudo apt update and sudo apt upgrade allow users to keep their system up-to-date with ease. Additionally, apt is very intuitive, making it an excellent choice for beginners.
2. Extensive Documentation: Since Debian and Ubuntu are some of the most popular distributions, there is a wealth of documentation and resources available to troubleshoot issues and learn to use apt effectively. This significantly reduces the learning curve and helps resolve problems quickly.
3. Package Support: apt provides access to a vast number of packages in the official Debian and Ubuntu repositories. Additionally, the support for PPAs (Personal Package Archives) allows users to access newer software versions or programs that are not in the official repositories.
Disadvantages: Although apt is extremely reliable, it can be slower compared to other package managers like pacman, especially on systems with many pending updates.
dnf: El Poderoso Gestor de Fedora y Red Hat / dnf: The Powerful Manager of Fedora and Red Hat
Español: dnf es el sucesor de yum y es el gestor de paquetes predeterminado en Fedora, Red Hat y CentOS. Está diseñado para ser rápido y eficiente, con un enfoque en la resolución de dependencias y la gestión de transacciones de manera más inteligente.
1. Resolución Avanzada de Dependencias: Uno de los mayores puntos fuertes de dnf es su capacidad para manejar dependencias de manera avanzada. Cuando se instala un paquete, dnf garantiza que todas las dependencias necesarias se instalen correctamente, y también maneja la eliminación de dependencias obsoletas con el comando dnf autoremove.
2. Soporte para Módulos: dnf incluye soporte para módulos, una característica que permite a los usuarios instalar diferentes versiones de un mismo paquete o conjunto de paquetes, algo especialmente útil en entornos de desarrollo o servidores donde se necesita probar distintas versiones de software.
3. Gestión de Transacciones: dnf realiza un seguimiento de las transacciones de paquetes, permitiendo revertir cambios si algo sale mal durante una actualización o instalación. Esto agrega una capa extra de seguridad y estabilidad al sistema.
Desventajas: dnf tiende a ser más pesado y lento en comparación con apt y pacman. Además, aunque Fedora y Red Hat son populares, su comunidad no es tan amplia como la de Debian/Ubuntu, lo que puede hacer que la búsqueda de soluciones específicas sea más difícil.
English: dnf is the successor to yum and is the default package manager in Fedora, Red Hat, and CentOS. It’s designed to be fast and efficient, with a focus on smarter dependency resolution and transaction management.
1. Advanced Dependency Resolution: One of dnf’s greatest strengths is its ability to handle dependencies in an advanced manner. When a package is installed, dnf ensures that all necessary dependencies are installed correctly, and it also handles the removal of obsolete dependencies with the dnf autoremove command.
2. Module Support: dnf includes support for modules, a feature that allows users to install different versions of the same package or set of packages, which is especially useful in development environments or servers where different software versions need to be tested.
3. Transaction Management: dnf keeps track of package transactions, allowing you to roll back changes if something goes wrong during an update or installation. This adds an extra layer of security and stability to the system.
Disadvantages: dnf tends to be heavier and slower compared to apt and pacman. Additionally, although Fedora and Red Hat are popular, their community isn’t as large as Debian/Ubuntu’s, which can make finding specific solutions more challenging.
pacman: La Elección de los Entusiastas de Arch Linux / pacman: The Choice of Arch Linux Enthusiasts
Español: pacman es el gestor de paquetes utilizado por Arch Linux y sus derivadas, como Manjaro. Es conocido por su velocidad y simplicidad, alineándose con la filosofía de Arch de mantener las cosas simples, rápidas y eficientes.
1. Velocidad y Eficiencia: pacman es increíblemente rápido, tanto en la instalación como en la actualización de paquetes. Su diseño ligero permite realizar operaciones de gestión de paquetes con una rapidez notable, lo que lo hace ideal para usuarios avanzados que desean un sistema ágil y optimizado.
2. Control Total: pacman ofrece a los usuarios un control granular sobre la instalación y gestión de paquetes. Además, Arch Linux y pacman permiten una personalización extrema del sistema, dándole al usuario la capacidad de construir y optimizar su entorno desde cero.
3. Acceso al AUR (Arch User Repository): Uno de los grandes atractivos de pacman es su integración con el AUR, un repositorio comunitario donde los usuarios pueden encontrar y compartir paquetes que no están disponibles en los repositorios oficiales. Esto extiende enormemente las posibilidades de software disponibles para los usuarios de Arch.
Desventajas: pacman está diseñado para usuarios que tienen un nivel avanzado de conocimiento en Linux. Su curva de aprendizaje es empinada, y aunque es extremadamente poderoso, puede no ser la mejor opción para principiantes o usuarios que prefieren un sistema que funcione bien "out of the box".
English: pacman is the package manager used by Arch Linux and its derivatives, like Manjaro. It’s known for its speed and simplicity, aligning with Arch’s philosophy of keeping things simple, fast, and efficient.
1. Speed and Efficiency: pacman is incredibly fast, both in installing and updating packages. Its lightweight design allows for package management operations to be performed with remarkable speed, making it ideal for advanced users who want a fast and optimized system.
2. Full Control: pacman offers users granular control over package installation and management. Additionally, Arch Linux and pacman allow for extreme system customization, giving users the ability to build and optimize their environment from the ground up.
3. Access to the AUR (Arch User Repository): One of pacman’s major attractions is its integration with the AUR, a community repository where users can find and share packages not available in the official repositories. This greatly extends the software possibilities available to Arch users.
Disadvantages: pacman is designed for users with an advanced level of Linux knowledge. Its learning curve is steep, and while it is extremely powerful, it might not be the best option for beginners or users who prefer a system that works well "out of the box."
Conclusión / Conclusion
Español: La elección del gestor de paquetes ideal depende en gran medida de tus necesidades y nivel de experiencia. apt es excelente para usuarios que buscan estabilidad y facilidad de uso, dnf ofrece una gestión avanzada de dependencias y transacciones, ideal para entornos empresariales, mientras que pacman es la mejor opción para aquellos que buscan velocidad y control total sobre su sistema. Cada uno tiene sus fortalezas, y la decisión final debe basarse en lo que mejor se adapte a tu flujo de trabajo y preferencias.
English: The choice of the ideal package manager largely depends on your needs and experience level. apt is great for users seeking stability and ease of use, dnf offers advanced dependency and transaction management, ideal for enterprise environments, while pacman is the best choice for those looking for speed and full control over their system. Each has its strengths, and the final decision should be based on what best fits your workflow and preferences.
#Linux#PackageManagers#apt#dnf#pacman#LinuxComparisons#SoftwareManagement#Debian#Ubuntu#Fedora#ArchLinux#LinuxCommunity
3 notes
·
View notes
Text
Glitch.GUI Cross Platform Glitch Art Generator and Effects Processor
Linux

macOS

Windows
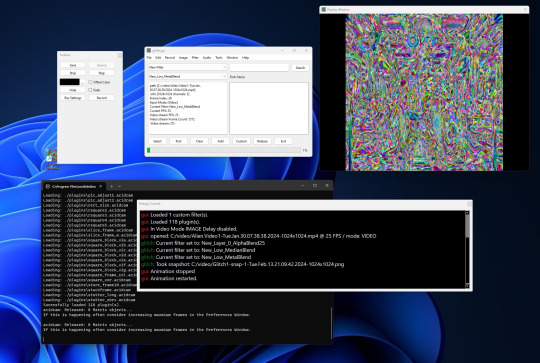
Glitch Art Generator and Effects Processor
This application enables users to generate captivating glitch art to use as base images for AI or apply various effects to any image or video, including those generated by AI. Users can chain effects together for both images and video files, and they have the ability to save custom filters created by mixing and matching different filters and plugins. Additionally, users can opt to incorporate sound from the original source video into their edited videos. The application also offers the functionality to rotate videos between portrait and landscape orientations.
How It Works
Input Files: Provide an example image or video file to begin the process.
Start Animation: Initiate the desired animation effect.
Save Output: Press the "Save" button or the shortcut key "s" to save a snapshot of the generated art.
Record Video: Optionally, record a video file by configuring the recording settings.
Navigation: Use the arrow keys to navigate through available distortion filters. Press "s" to save, "d" to start/stop recording, "e" to step through, or utilize the GUI buttons to perform the same operations.
Filter Application: Note that some filters may appear to have no effect on an image initially. In such cases, select a filter that induces visible changes, press the first button, and then choose the seemingly inactive filter. This is because certain filters require an animation to execute their intended action.
Required libraries: OpenCV 4, http://github.com/lostjared/libacidcam - libacidcam, Qt6, Qt6 Web Engine Widgets (on debian qt6-webengine-dev)
To compile for Linux download and install libacidcam
git clone https://github.com/lostjared/libacidcam.git
cd libacidcam
build cmake ../
make -j8 && sudo make install
enter directory of glitch.gui
qmake6
make -j8
./glitch.gui
Note: This program is pre-release so it may contain errors or bugs. We are working to make the program the best it can be.
Jared Bruni
2 notes
·
View notes
Text
Fixing XORG/MESA crashes on My Thinkpad X201

Introduction
I've recently aqcuired a Thinkpad X201. It features an Intel Core i5 520M and the integrated Intel Graphics Media Accelerator HD GPU, which should be plenty for some light browsing and word processing on Debian.
The Installation of the Operating System (Debian 12 "Bookworm" with the Mate Desktop) went smoothly and my spirits were high when I suddenly got catapulted back to the login screen after trying to copy some arbitrary textfile from my NAS to a local folder.
Because I have become kind of lazy in regards to sysadmin related activities I did some distrohopping (Arch, OpenSUSE) and tried multiple desktops (Mate, KDE, XFCE) but the problem persisted so I had to dive deeper.
The root cause (funny cuz Linux)
After some research this seemed to be a relativly common bug on these older Intel iGPUs that could be fixed by enabling the "TearFree" option of the driver using a custom /etc/X11/xorg.conf.d/20-intel.conf like so:
Section "Device" Identifier "Intel Graphics" Driver "intel" Option "TearFree" "true" EndSection
However, creating that custom config with the above content led to me not getting any graphical user interface at all, just the good old fashioned console login prompt.
After digging deeper it turns out MESA (which is used by X11 to display graphics) removed legacy INTEL drivers starting with version 22. They are supposed to be replaced by something called "crocus", but that doesn't support options such as "TearFree".
The Solution
The solution for this problem is called Mesa Amber, a branch of mesa based on the latest 21.x version and therefore still containing the legacy drivers. Some Distributions (like Arch) have a ready to use package for it, but Debian does not. It does however exist as source code. Therefore:
Building and installing from source
Depending on your configuration, execute these commands with sudo or as root when necessary
apt install git build-essential devscripts git clone https://salsa.debian.org/xorg-team/lib/mesa-amber.git cd mesa-amber mk-build-deps --install --remove rm mesa-amber-build-deps* debuild -us -uc cd .. apt install *.deb
As a final step, add MESA_LOADER_DRIVER_OVERRIDE=i965 to /etc/environment and create the file /etc/X11/xorg.conf.d/20-intel.conf with the content mentioned before: Section "Device" Identifier "Intel Graphics" Driver "intel" Option "TearFree" "true" EndSection After a reboot, your system should use the old driver and not crash anymore.
Source (Devuan Forum) Let me know if I made any mistakes!
0 notes
Link
#accesspoint#cloud#configuration#Controller#firewall#Install#IT#Monitoring#networkmanagement#networking#Performance#Security#self-hosted#Server#systemadministration#Ubiquiti#Ubuntu22.04#Ubuntu24.04#UniFi#WiFi#Wireless
0 notes
Text
Postal SMTP install and setup on a virtual server

Postal is a full suite for mail delivery with robust features suited for running a bulk email sending SMTP server. Postal is open source and free. Some of its features are: - UI for maintaining different aspects of your mail server - Runs on containers, hence allows for up and down horizontal scaling - Email security features such as spam and antivirus - IP pools to help you maintain a good sending reputation by sending via multiple IPs - Multitenant support - multiple users, domains and organizations - Monitoring queue for outgoing and incoming mail - Built in DNS setup and monitoring to ensure mail domains are set up correctly List of full postal features
Possible cloud providers to use with Postal
You can use Postal with any VPS or Linux server providers of your choice, however here are some we recommend: Vultr Cloud (Get free $300 credit) - In case your SMTP port is blocked, you can contact Vultr support, and they will open it for you after providing a personal identification method. DigitalOcean (Get free $200 Credit) - You will also need to contact DigitalOcean support for SMTP port to be open for you. Hetzner ( Get free €20) - SMTP port is open for most accounts, if yours isn't, contact the Hetzner support and request for it to be unblocked for you Contabo (Cheapest VPS) - Contabo doesn't block SMTP ports. In case you are unable to send mail, contact support. Interserver
Postal Minimum requirements
- At least 4GB of RAM - At least 2 CPU cores - At least 25GB disk space - You can use docker or any Container runtime app. Ensure Docker Compose plugin is also installed. - Port 25 outbound should be open (A lot of cloud providers block it)
Postal Installation
Should be installed on its own server, meaning, no other items should be running on the server. A fresh server install is recommended. Broad overview of the installation procedure - Install Docker and the other needed apps - Configuration of postal and add DNS entries - Start Postal - Make your first user - Login to the web interface to create virtual mail servers Step by step install Postal Step 1 : Install docker and additional system utilities In this guide, I will use Debian 12 . Feel free to follow along with Ubuntu. The OS to be used does not matter, provided you can install docker or any docker alternative for running container images. Commands for installing Docker on Debian 12 (Read the comments to understand what each command does): #Uninstall any previously installed conflicting software . If you have none of them installed it's ok for pkg in docker.io docker-doc docker-compose podman-docker containerd runc; do sudo apt-get remove $pkg; done #Add Docker's official GPG key: sudo apt-get update sudo apt-get install ca-certificates curl -y sudo install -m 0755 -d /etc/apt/keyrings sudo curl -fsSL https://download.docker.com/linux/debian/gpg -o /etc/apt/keyrings/docker.asc sudo chmod a+r /etc/apt/keyrings/docker.asc #Add the Docker repository to Apt sources: echo "deb https://download.docker.com/linux/debian $(. /etc/os-release && echo "$VERSION_CODENAME") stable" | sudo tee /etc/apt/sources.list.d/docker.list > /dev/null sudo apt-get update #Install the docker packages sudo apt-get install docker-ce docker-ce-cli containerd.io docker-buildx-plugin docker-compose-plugin -y #You can verify that the installation is successful by running the hello-world image sudo docker run hello-world Add the current user to the docker group so that you don't have to use sudo when not logged in as the root user. ##Add your current user to the docker group. sudo usermod -aG docker $USER #Reboot the server sudo reboot Finally test if you can run docker without sudo ##Test that you don't need sudo to run docker docker run hello-world Step 2 : Get the postal installation helper repository The Postal installation helper has all the docker compose files and the important bootstrapping tools needed for generating configuration files. Install various needed tools #Install additional system utlities apt install git vim htop curl jq -y Then clone the helper repository. sudo git clone https://github.com/postalserver/install /opt/postal/install sudo ln -s /opt/postal/install/bin/postal /usr/bin/postal Step 3 : Install MariaDB database Here is a sample MariaDB container from the postal docs. But you can use the docker compose file below it. docker run -d --name postal-mariadb -p 127.0.0.1:3306:3306 --restart always -e MARIADB_DATABASE=postal -e MARIADB_ROOT_PASSWORD=postal mariadb Here is a tested mariadb compose file to run a secure MariaDB 11.4 container. You can change the version to any image you prefer. vi docker-compose.yaml services: mariadb: image: mariadb:11.4 container_name: postal-mariadb restart: unless-stopped environment: MYSQL_ROOT_PASSWORD: ${DB_ROOT_PASSWORD} volumes: - mariadb_data:/var/lib/mysql network_mode: host # Set to use the host's network mode security_opt: - no-new-privileges:true read_only: true tmpfs: - /tmp - /run/mysqld healthcheck: test: interval: 30s timeout: 10s retries: 5 volumes: mariadb_data: You need to create an environment file with the Database password . To simplify things, postal will use the root user to access the Database.env file example is below. Place it in the same location as the compose file. DB_ROOT_PASSWORD=ExtremelyStrongPasswordHere Run docker compose up -d and ensure the database is healthy. Step 4 : Bootstrap the domain for your Postal web interface & Database configs First add DNS records for your postal domain. The most significant records at this stage are the A and/or AAAA records. This is the domain where you'll be accessing the postal UI and for simplicity will also act as the SMTP server. If using Cloudflare, turn off the Cloudflare proxy. sudo postal bootstrap postal.yourdomain.com The above will generate three files in /opt/postal/config. - postal.yml is the main postal configuration file - signing.key is the private key used to sign various things in Postal - Caddyfile is the configuration for the Caddy web server Open /opt/postal/config/postal.yml and add all the values for DB and other settings. Go through the file and see what else you can edit. At the very least, enter the correct DB details for postal message_db and main_db. Step 5 : Initialize the Postal database and create an admin user postal initialize postal make-user If everything goes well with postal initialize, then celebrate. This is the part where you may face some issues due to DB connection failures. Step 6 : Start running postal # run postal postal start #checking postal status postal status # If you make any config changes in future you can restart postal like so # postal restart Step 7 : Proxy for web traffic To handle web traffic and ensure TLS termination you can use any proxy server of your choice, nginx, traefik , caddy etc. Based on Postal documentation, the following will start up caddy. You can use the compose file below it. Caddy is easy to use and does a lot for you out of the box. Ensure your A records are pointing to your server before running Caddy. docker run -d --name postal-caddy --restart always --network host -v /opt/postal/config/Caddyfile:/etc/caddy/Caddyfile -v /opt/postal/caddy-data:/data caddy Here is a compose file you can use instead of the above docker run command. Name it something like caddy-compose.yaml services: postal-caddy: image: caddy container_name: postal-caddy restart: always network_mode: host volumes: - /opt/postal/config/Caddyfile:/etc/caddy/Caddyfile - /opt/postal/caddy-data:/data You can run it by doing docker compose -f caddy-compose.yaml up -d Now it's time to go to the browser and login. Use the domain, bootstrapped earlier. Add an organization, create server and add a domain. This is done via the UI and it is very straight forward. For every domain you add, ensure to add the DNS records you are provided.
Enable IP Pools
One of the reasons why Postal is great for bulk email sending, is because it allows for sending emails using multiple IPs in a round-robin fashion. Pre-requisites - Ensure the IPs you want to add as part of the pool, are already added to your VPS/server. Every cloud provider has a documentation for adding additional IPs, make sure you follow their guide to add all the IPs to the network. When you run ip a , you should see the IP addresses you intend to use in the pool. Enabling IP pools in the Postal config First step is to enable IP pools settings in the postal configuration, then restart postal. Add the following configuration in the postal.yaml (/opt/postal/config/postal.yml) file to enable pools. If the section postal: , exists, then just add use_ip_pools: true under it. postal: use_ip_pools: true Then restart postal. postal stop && postal start The next step is to go to the postal interface on your browser. A new IP pools link is now visible at the top right corner of your postal dashboard. You can use the IP pools link to add a pool, then assign IP addresses in the pools. A pool could be something like marketing, transactions, billing, general etc. Once the pools are created and IPs assigned to them, you can attach a pool to an organization. This organization can now use the provided IP addresses to send emails. Open up an organization and assign a pool to it. Organizations → choose IPs → choose pools . You can then assign the IP pool to servers from the server's Settings page. You can also use the IP pool to configure IP rules for the organization or server. At any point, if you are lost, look at the Postal documentation. Read the full article
0 notes
Text
Adding a User to Sudoers
Sudo access management is an essential administrative task on Linux that helps reduce security vulnerabilities caused by overgranting permissions or untrustworthy users gaining root access. Addition of a user to sudoers allows them to run commands as another user, typically root. This article presents two methods to do so in Debian. How to Add a User to Sudoers Sudoers allows users to temporarily…
0 notes
Text
Linux CLI 33 🐧 ssh command
New Post has been published on https://tuts.kandz.me/linux-cli-33-%f0%9f%90%a7-ssh-command/
Linux CLI 33 🐧 ssh command

youtube
a - ssh command ssh (Secure Shell) is a command that connects to a remote server It is secure and it does not share your password. You can log into a Linux or Unix system and execute commands on it. ssh user@hostname → user is the username from the remote system. instead of hostname you can also use an IP address install ssh Server and client RedHat based → sudo yum install openssh-clients openssh-server or sudo dnf install openssh-clients openssh-server Debian/Ubuntu → sudo apt install openssh-client openssh-server b - ssh login with SSH Key Pair You can login to a remote system without password use. You have to create an SSH key pair. Follow the instructions ssh-keygen -t rsa → creates the key pair Press enter when prompted for a file name and location, leaving the defaults as is (just hit enter) → Enter a passphrase when prompted (this will be used to encrypt your private key). You will then be prompted to confirm the passphrase. → Press enter again to continue. Copy the contents of the `id_rsa.pub` file (your public key) to a server you want to access. cat ~/.ssh/id_rsa.pub | ssh user@hostname "mkdir -p .ssh && chmod 700 .ssh && cat .ssh/authorized_keys" replace user with your user and hostname with the remote system hostname/IP address
0 notes
Text


07.05.25
I tried out two Linux distributions on my test laptop today.
Before I started the task, I updated Linux Mint Cinnamon with the update manager to receive the latest updates for the system and installed apps.
I can also use the terminal to update everything by typing the APT command 'sudo apt-get update'.
'sudo' elevates root (admin) privileges, 'apt-get' receives the packages needed and 'update' checks for updates. I then type 'sudo apt-get upgrade' and press enter to upgrade all the applications and the system.
System up to date!
Firstly, I downloaded Debian from: https://www.debian.org/distrib/
I chose the Debian Live MATE desktop environment.
I then went to download Linux Mint from: https://linuxmint.com/download.php
I chose the Mint MATE Edition desktop environment.
Debian MATE was 3.1 Giga-Bytes and Linux Mint MATE was 2.9 Giga-Bytes to download.
Once they had downloaded, I located them in Downloads and opened the built in USB writer application.
I wrote the ISO files to the sticks to create two bootable USB sticks.
After this step I booted Debian 12 MATE.
I selected 'try' on the boot menu screen.
Here it is in action! I played around with the user interface and tested the sound, which worked brilliantly!
Next, I booted Linux Mint 22.1 MATE.
Again, I selected 'try' to boot up the live environment.
Here it is in action! Again I tested the sound, played a YouTube video in Firefox and customised the panels and themes.
Both MATE desktops in both distros were very interesting and seemed even snappier when compared to the operating systems I have installed on this laptop, which are Linux Mint 22.1 Cinnamon and Ubuntu 24.04!
I found Debian with the MATE desktop to be the most stable environment however.
See blog below to learn more about the modern take on the classic GNOME 2 experience!
4 notes
·
View notes
Video
youtube
Discover the EASY Way to Install LINUX Without the Hassle!
*Linux For DevOps:* https://www.youtube.com/playlist?list=PLGj4aMqxhpL6qwlxRuVljjIxvNoMy-W91 *Linux For DevOps: Beginner Level:* https://www.youtube.com/playlist?list=PLGj4aMqxhpL5bLDvXBIpOmS_Vh6U8tjM0 *Linux For DevOps: Intermediate Level:* https://www.youtube.com/playlist?list=PLGj4aMqxhpL79czyihLsCRXHePzY0zQuv ***************************** * Discover the EASY Way to Install LINUX Without the Hassle! * 🎥: https://youtu.be/V7ZOuK6o5KQ *****************************
Linux is a powerful, versatile operating system widely used for servers, development environments, and personal computing. If you're new to Linux, this guide will walk you through the installation process and initial setup to get you started.
Why Choose Linux? - Free and Open Source: Most Linux distributions are completely free to use. - Customizable: Tailor your operating system to your needs. - Secure and Reliable: Preferred for servers and development due to robust security. - Community Support: A vast, active community to help with troubleshooting and learning.
Step 1: Choose a Linux Distribution Popular Linux distributions include: - Ubuntu: Beginner-friendly and widely supported. - Fedora: Cutting-edge features for developers. - Debian: Stable and ideal for servers. - Linux Mint: Great for transitioning from Windows. - CentOS Stream: Suitable for enterprise environments.
Step 2: Download the ISO File 1. Visit the official website of your chosen Linux distribution. 2. Download the appropriate ISO file for your system (32-bit or 64-bit).
Step 3: Create a Bootable USB Drive To install Linux, you'll need a bootable USB drive: 1. Use tools like Rufus (Windows), Etcher, or UNetbootin to create a bootable USB. 2. Select the downloaded ISO file and the USB drive, then start the process.
Step 4: Install Linux 1. Insert the bootable USB into your computer and restart. 2. Access the BIOS/UEFI menu (usually by pressing `F2`, `F12`, `Esc`, or `Del` during startup). 3. Set the USB drive as the first boot device. 4. Follow the installation wizard to: - Select your language. - Partition your disk (use “Automatic” if unsure). - Create a user account and set a password.
Step 5: Perform Initial Setup After installation: 1. Update the System: ```bash sudo apt update && sudo apt upgrade -y # For Debian-based systems sudo dnf update # For Fedora-based systems ``` 2. Install Essential Software: - Text editors: `nano`, `vim`. - Browsers: `Firefox`, `Chromium`. - Development tools: `git`, `gcc`.
3. Enable Firewall: ```bash sudo ufw enable # Uncomplicated Firewall ```
4. Learn Basic Commands: - File navigation: `ls`, `cd`. - File management: `cp`, `mv`, `rm`. - Viewing files: `cat`, `less`.
Tips for Beginners - Experiment with a Live Environment before installing. - Use VirtualBox or VMware to practice Linux in a virtual machine. - Join forums like Ubuntu Forums, Reddit’s r/linux, or Linux Questions for support.
Linux installation, Linux beginner guide, Linux setup, how to install Linux, Linux for beginners, Linux distributions, Ubuntu installation, Linux Mint setup, Fedora installation guide, Linux tips
#Linux #LinuxForBeginners #Ubuntu #LinuxMint #Fedora #LinuxTips #OpenSource #LinuxInstallation #TechGuide #LinuxSetup #ClouDolus #ClouDolusPro
ubuntu,Getting Started with Linux Installation and Basic Setup,linux tutorial for beginners,open source,linux terminal,distrotube,ubuntu is bad,linux tutorial,linux for beginners,linux commands,Linux installation,Linux beginner guide,Linux setup,how to install Linux,Linux for beginners,Linux distributions,Ubuntu installation,Fedora installation guide,Linux tips,cloudolus,cloudoluspro,free,Linux,Linux for DevOps,Linux basics,DevOps basics,cloud computing,DevOps skills,Linux tutorial,Linux scripting,Linux automation,Linux shell scripting,Linux in DevOps,Ubuntu,CentOS,Red Hat Linux,DevOps tools,ClouDolus,DevOps career,Linux commands for beginners,Introduction to Linux for DevOps: Why It’s Essential,devops tutorial for beginners,learn devops,devops tutorial,Who Should Learn Linux for DevOps?,Why You Should Learn Linux for DevOps,Why Linux is Critical in DevOps,Why Linux Essential?,What Is Linux Overview?,What Linux Key Features?,What Linux Key Benefits?,What Is Linux Overview? Linux for DevOps,Linux for cloud,Linux training,devops tutorial Linux,Linux commands for beginners ubuntu,cloud computing Linux for DevOps
***************************** *Follow Me* https://www.facebook.com/cloudolus/ | https://www.facebook.com/groups/cloudolus | https://www.linkedin.com/groups/14347089/ | https://www.instagram.com/cloudolus/ | https://twitter.com/cloudolus | https://www.pinterest.com/cloudolus/ | https://www.youtube.com/@cloudolus | https://www.youtube.com/@ClouDolusPro | https://discord.gg/GBMt4PDK | https://www.tumblr.com/cloudolus | https://cloudolus.blogspot.com/ | https://t.me/cloudolus | https://www.whatsapp.com/channel/0029VadSJdv9hXFAu3acAu0r | https://chat.whatsapp.com/D6I4JafCUVhGihV7wpryP2 *****************************
*🔔Subscribe & Stay Updated:* Don't forget to subscribe and hit the bell icon to receive notifications and stay updated on our latest videos, tutorials & playlists! *ClouDolus:* https://www.youtube.com/@cloudolus *ClouDolus AWS DevOps:* https://www.youtube.com/@ClouDolusPro *THANKS FOR BEING A PART OF ClouDolus! 🙌✨*
#youtube#ubuntuGetting Started with Linux Installation and Basic Setuplinux tutorial for beginnersopen sourcelinux terminaldistrotubeubuntu is badlin
0 notes
Text
Podman for Beginners: Understanding Rootless Containers
In the fast-evolving world of containerization, Podman has emerged as a powerful, user-friendly, and secure alternative to Docker. One of its standout features is the support for rootless containers, which allows users to run containers without requiring elevated privileges. If you're new to Podman and curious about rootless containers, this guide is for you.
What is Podman?
Podman (Pod Manager) is an open-source container engine that enables users to create, manage, and run containers and pods. Unlike Docker, Podman operates without a central daemon, which enhances its security and flexibility.
What Are Rootless Containers?
Rootless containers allow users to run containers as non-root users. This significantly reduces security risks, as it minimizes the impact of potential vulnerabilities within containers. With rootless containers, even if a container is compromised, the damage is limited to the privileges of the user running it.
Benefits of Rootless Containers
Enhanced Security Rootless containers reduce the risk of privilege escalation, making them an ideal choice for running containers in development and production environments.
User-Specific Containers Each user can manage their container ecosystem independently, avoiding conflicts and ensuring isolation.
No Root Privileges Required Rootless containers eliminate the need for administrative access, making them safer for shared environments and CI/CD pipelines.
How to Get Started with Podman Rootless Containers
Step 1: Install Podman
Ensure you have Podman installed on your system. For most Linux distributions, you can install Podman using the package manager:
sudo apt install podman # For Debian-based systems sudo dnf install podman # For Fedora-based systems
Step 2: Verify Installation
Run the following command to check if Podman is installed correctly:
podman --version
Step 3: Create and Run a Rootless Container
Switch to a non-root user and run the following commands:
Pull an image:podman pull alpine
Run a container:podman run --rm -it alpine sh
This runs an Alpine Linux container in a rootless mode.
Step 4: Manage Containers
You can list running containers using:
podman ps
And stop a container using:
podman stop <container_id>
Limitations of Rootless Containers
While rootless containers are highly secure, there are some limitations:
Networking: Networking features may be restricted due to the lack of root privileges.
Performance: Certain operations may have slight performance overheads.
Compatibility: Not all container images or workloads are fully compatible with rootless containers.
When to Use Rootless Containers
Rootless containers are ideal for:
Development environments where security and isolation are essential.
CI/CD pipelines that don’t require root access.
Scenarios where multi-user isolation is necessary.
Conclusion
Podman’s rootless containers offer a seamless and secure way to work with containers, especially for users who value security and flexibility. By enabling rootless operations, Podman empowers developers to build and manage containers without compromising system integrity.
Ready to embrace rootless containers? Install Podman today and experience the future of containerization!
For more details click www.hawkstack.com
#Podman #RootlessContainers #Containerization #DevOps #ContainerSecurity
0 notes