#survivor 30
Text
all returning players for survivor 31 was VERY MUCH needed after the flop of a cast in 30
#jeff has to save up his new lot of returning players for a season like this after the next cast of flops in the new era#survivor 31#survivor 30#survivor#ramble on
0 notes
Text


distractions
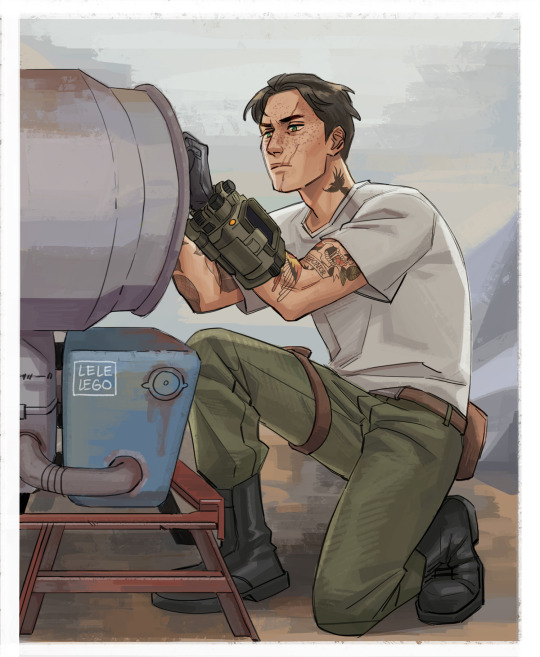
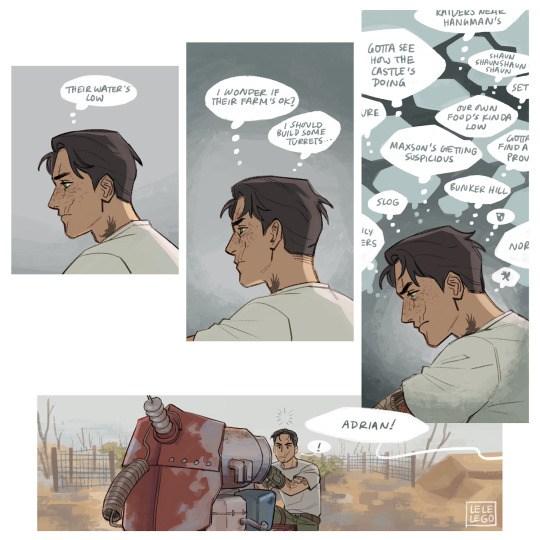
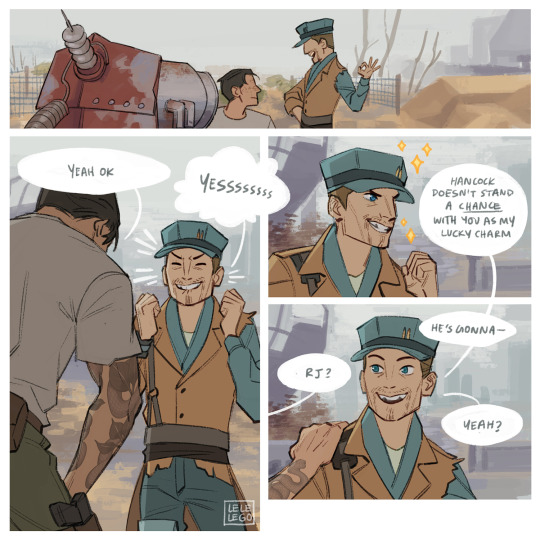
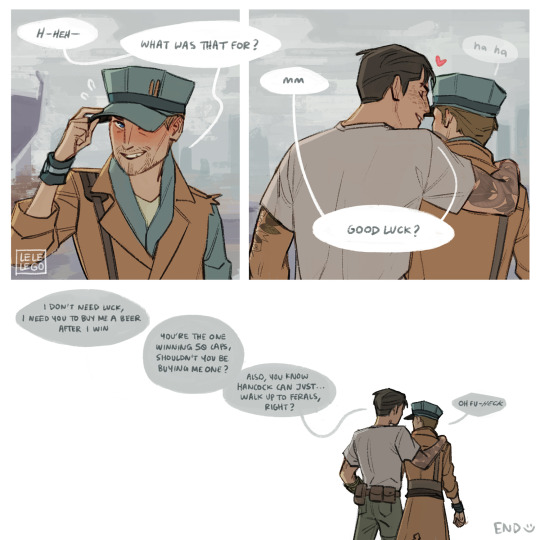
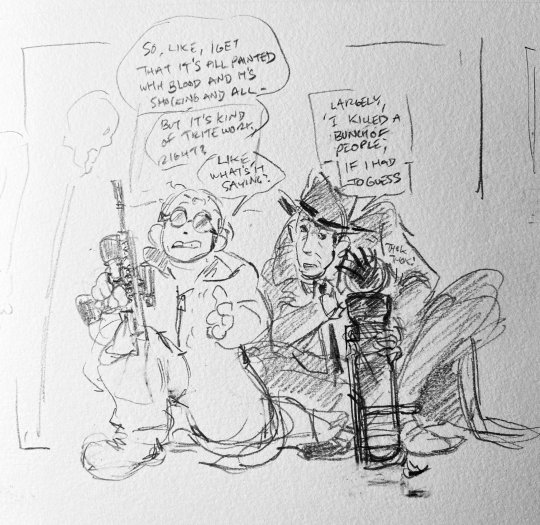
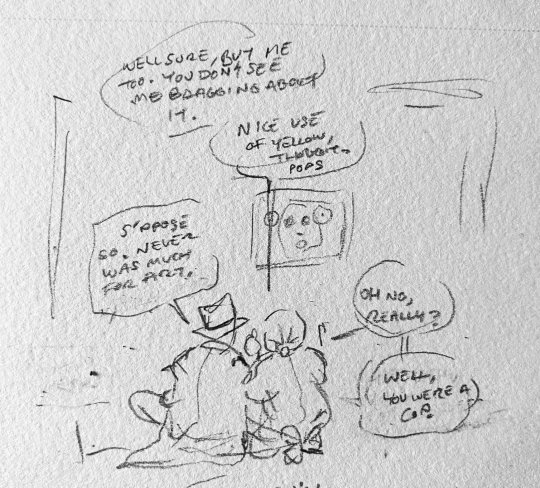
#fo4#fallout 4#fallout#robert joseph maccready#sole survivor#old comic from when i was working and also playing fo4 like 30-40 hours a week somehow LMFAOOOOO#the settlement building is so good :(#doodly thingy#fallout tag#oc: adrian#YES I HAVE AN OC NAMED ADRIAN AND ALSO AN OC NAMED ADRIÀ#i dont want to hear it. GOOD DAY
3K notes
·
View notes
Text
house md episodes will have the characters casually mention some deeply devastating and traumatic event in their past that would’ve fundamentally altered them as a person and then it will never be mentioned again for the rest of the series
#the entire series feels like. the aftermath. These are the survivors.#this is specificalkh abt thirteen dating a 30 yr old guy when she was 17. dating in quotations because that is just. grooming.#house md
600 notes
·
View notes
Text
The idea that children are inherently duplicitous, manipulative liars is genuinely doing harm to children and further obfuscates when genuine harm/abuse is occurring because, "what can the adults do, children are demons!"
The idea that children have divine knowledge that transcends adults' own knowledge and they use that knowledge for personal gain is, simply-put, abuse apologism. You are aiding and abetting abusive behaviour from adults, parents/guardians, medical professionals, whomever it might be.
#youth liberation#abuse#abuse tw#abuse apologia#sorry if i talked about this before - if i had then i simply forgor#again i just fucking despise how people talk about children *and* childhood abuse#like how was i manipulating people who were like 30+ at... ages three to thirteen#like it's infantilizing the adults in somebody's life while simultaneously blaming abuse survivors because they did something to deserve it#post that's kind of piggybacking off the last one but also just...#...man i hate in-depth and nuanced topics when many people have them
437 notes
·
View notes
Text
i dont think striker and alastor are characters who are "precious senpais who did nothing wrong" i just don't think they're as reprehensible as valentino or stella. their actions aren't excusable, no, but they aren't near that level of abhorrent.
#helluva boss#hazbin hotel#satu's unpopular opinions#alastor hazbin hotel#helluva boss striker#comparing an asexual character to a rapist is one bad take but comparing a minority character to a racist abusive rich woman?#I get all four of these characters have unbearable apologists but Jesus fucking christ some of you are actually INSANE with your takes#on striker and alastor specifically like do you not ever realize how YIKES it is to compare the few ace characters to the SEX TRAFFICKER#OR SOMEONE WHOS IMPLIED TO HAVE LOST EVERYTHING TO ROYALTY ... COMPARING HIM TO THE ABUSIVE RACIST ROYAL LADY#WHO HE DOESN’T EVEN LIKE WORKING FOR???#She’s abused her husband in front of her child and she mocks the fact he dissociated during sex yet that's comparable to someone who#at his very worst he has been a hit man with sadistic tendencies but even then it's never been on the levels of sadistic like crimson#IM NOT EXCUSING STRIKER OR ALASTORS ACTIONS BUT CHRIST!!! CHRIST ALMIGHTLY YOU GUYS ARE SOMETIMES UNBELIEVABLE#“Alastor is completely evil” is possibly the dumbest fucking thing bc if u know any basic lore you know he at least gives a shit#About Niffty. About Rosie and Mimzy. He loved his mother. His father was an abusive piece of shit#Not excusing mass murder nor the cannibalism but its likely to note he probably only became cannibal in death bc already being mixed race -#- AND A SERIAL KILLER IN THE 30S? IN LOUISIANA??? HE WOULDN'T HAVE EVEN LIVED TO 40 IF HE WAS ALSO A CANNIBAL FJFJFJ#again I'm not excusing how he treated Husk in episode 6 or how he kills people bc obviously there's no context for the latter#And the former is ... EUGH#but also I saw someone say he'd be raping Husk if he wasn't asexual and to that I say fuck you#I /will/ say that he isn't gonna redeem! I don't want him to redeem lol! him being nasty is what makes him interesting#mostly morally black yet there's some grey in there like he has layers... how did he get there...#I just don't think he's Valentino’s level of bad#Striker I'm gonna be lenient on this time because some of you are actually vile comparing him to Stella or even Valentino#Actually stop comparing any character to Valentino that isn't one of the Vees bc holy shit that's so disgusting to read as an SA survivor
45 notes
·
View notes
Text
i have a historiographical quibble with how the antisemitic campaigns in the soviet union in 1948–1953 are often framed as an extension of the holocaust in the scholarship rather than being fully considered within the context of the soviet nationalities policy. except when i'm applying for funding from institutions that do holocaust studies. then i'm fine with it
#the dissertation proposal is still in the slightly amorphous stage but the gist of it is how the reshaping of jewish culture#by soviet authorities in the 1920s-30s affects jewish historical memory#and particularly how the survivors understood the 1948-1953 campaigns within the scope of jewish and soviet history#*now* we look at those campaigns and they fit neatly within the trends of jewish history#of being tenuously accepted and integrated into the mainstream and then persecuted#but at the same time it fits within the broader trends of the nationalities policy which was applied to jews in more or less the same way#as it was to other national minorities#and they were *all* subject to russification in the 1930s and suspicion over their alleged foreign ties#and especially with how the soviet government downplayed jews as the main targets of the holocaust#in a way that still persists in a lot of post-soviet states#coupled with the fact that most of the jews who survived the holocaust were secularized bc they weren't in the occupied territories#and secular soviet jewish culture was disconnected from the religious aspects and the stories of persecution and survival#in holidays like pesach and chanukah#which is all to say that the way scholars of jewish history understand these campaigns now isn't necessarily how#soviet jews understood them *then*#holocaust tw#soviet jewish history#jumblr
21 notes
·
View notes
Text
Kinda gets me when people age them down in AUs and stuff because to me those characters wouldn't be half as interesting if Chilchuck, Senshi and Mithrun were the tallman equivalent of in their twenties
#just something about having a lot of history you know#like. chills is divorced or thereabouts. senshi spent like 30 years living in dungeon wilderness. mithrun knows kabru's mom#none of this would be possible if they were 20-somethings#dungeon meshi spoilers#dungeon meshi manga spoilers#somewhat i guess#like. yeah kabru and laios and falin (and marci for an elf) are really young BUT have a lot of life exp#but like. the fact that so much happened to them while they are so young is TRAUMA. its BAD#meanwhile chilchuck had like. a pretty average life for a halffoot his age. maybe even successful from a professional standpoint#senshi didnt have an average life but had the time to accumulate an amount of knowledge no 20something could have#and of course mithruns whole life story is like. slowed down because hes an elf#but even then i think its really important to show that it might take several years to start recuperating from a traumatic event#like its what makes his character such an interesting commentary on disability and depression#when you're 25 bouncing back is easier. when you're 40? 50? showing that theres hope#even when you've lost your whole youth to your pain... thats a whole other thing#sorry i started writing serious commentary in the tags#chills#captain mithrun#senshi#even in senshis character up to a point. he spent more years out of society than in it#and YET! even he manages to find a place. somewhat#like. they are all here to show that life goes on even after horrible or simply sad shit happens to you#they are survivors!!!! thats important
37 notes
·
View notes
Text

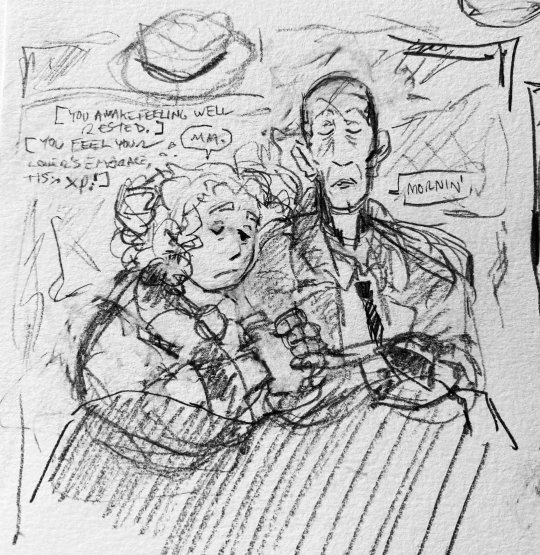


i finished The Joker's Fucked Up And Twisted Art Museum quest. also the romance mod added nick sharing a bed with you so you get the 'Lover's Embrace' perk, but given he doesn't sleep, I'm a little like 'oh my god, poor nick' so here's me wrapping my head around that
#fallout 4#nick valentine#think i might trim my survivor's head soon or something but it is winter in-game#'kid' here used as in 'here's looking at you kid' not 'you're a kid.' my survivor's in their late 30s-early 40s in my brain#there's no shaun they're just a mechanic who got into the vault from the same neighborhood. how? god knows. i'll figure that out.#i think however this survivor and nick would adopt the synth shaun happily.#nick's good with kids in game i notice#[all of this said delusionally]
284 notes
·
View notes
Text
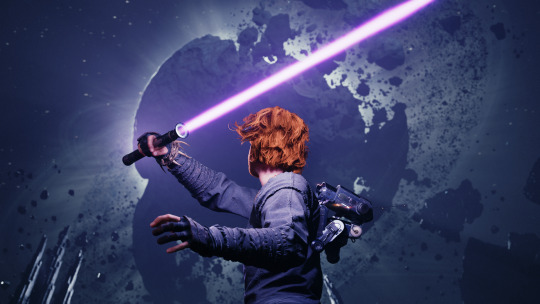
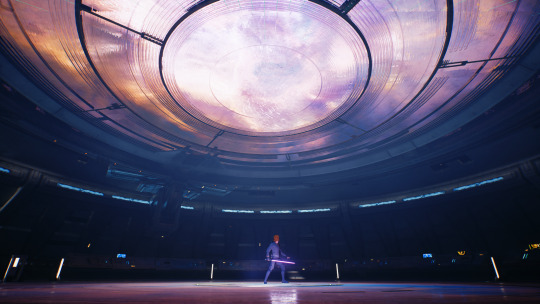
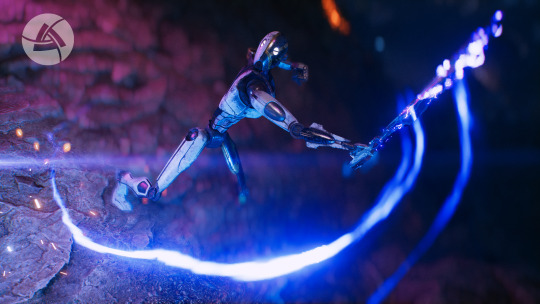
I proudly present to you:
The Splitsabers Photomode Guide!
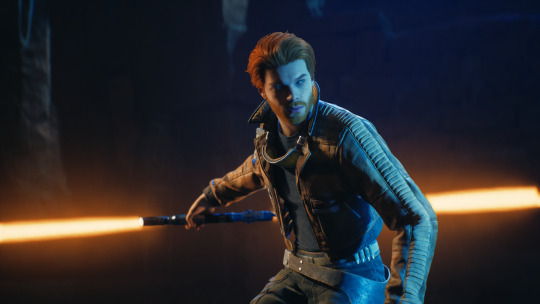
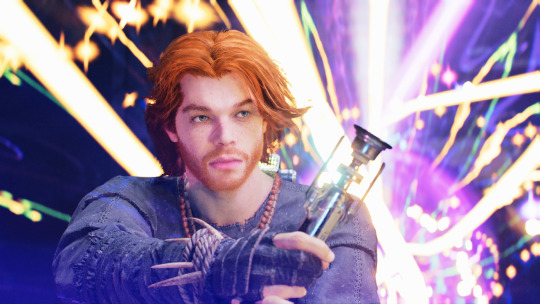

This guide will be a look into some of my thoughts and tips for photomode in Star Wars Jedi: Survivor. Let's get into it!
Disclaimer: I am in no way a professional 😂 my credentials include art as a hobby and a 3-month obsession with Jedi Survivor (still learning new things every day) so this is definitely more of a beginners guide but I love talking so here ya go
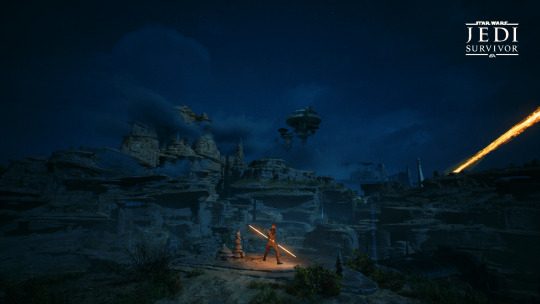
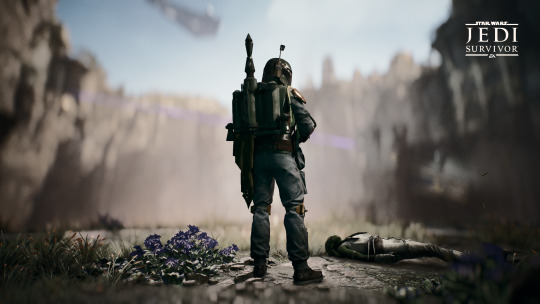
Survivor is a huge game full of environments, actions, and movements. When I'm looking to take photos, I have two files: one completed on New Game+, so I have access to all cosmetics and areas (this is what I use for the saber series), and one "fresh" file where I'll play the game from 0% and have access to specific animations, storylines, environments, and scenes:
When it comes to taking actual photos, I'll just run around and play the game as normal while constantly looking for areas with good lighting, scenes, or encounters.
Sometimes I'll have a specific idea, like with the saber series, where I want to take photos in certain environments. For example, for the purple saber I wanted to go for an "outcast" look with the outfit and selected areas like the laser on the Shattered Moon, observatory, and meditation arenas in force tears. I'd go through different lightsaber stances, animations, and poses, as well as lining them up with the environment to get shots I liked.
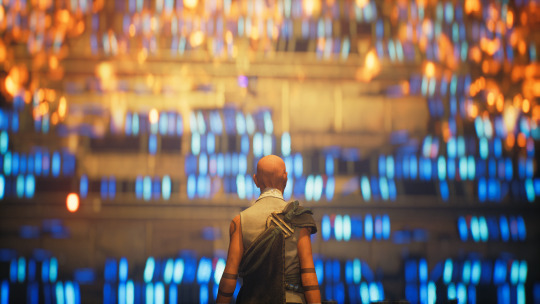
I have a collection of places I like to go throughout the game with good lighting, encounters, or similar (rehabilitation wing my beloved).
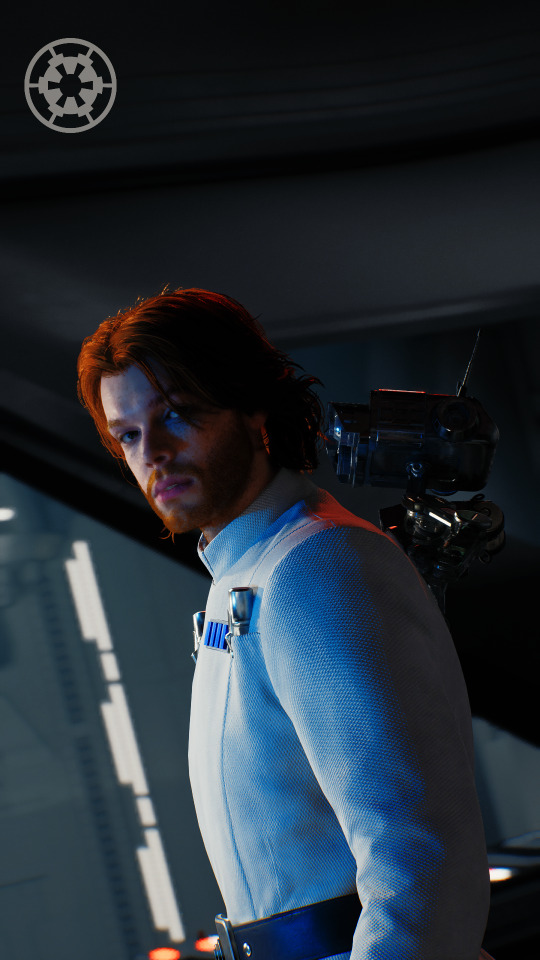
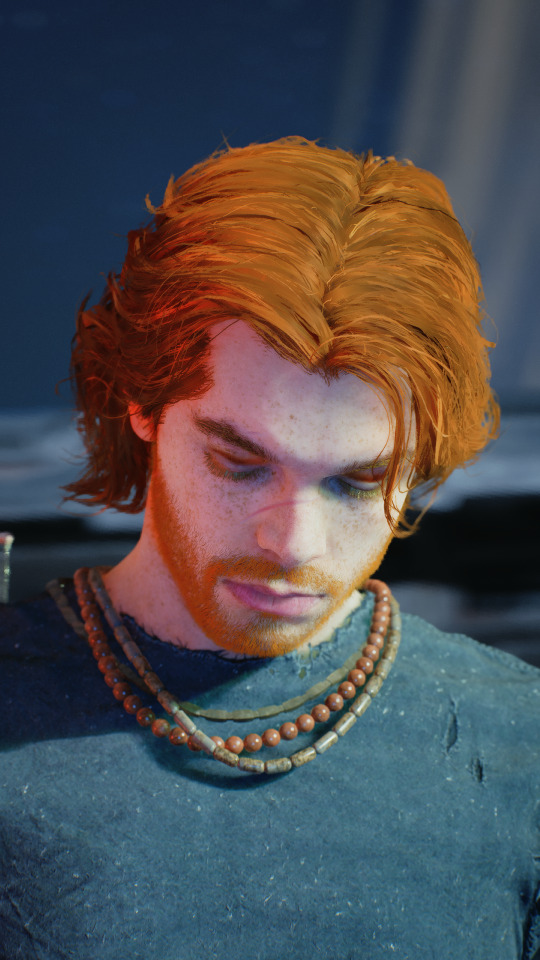
For 90% of my photos, I place the subject in focus (typically someone's face/body, weapon, or hands) and turn down the f-stop so the environment (or sometimes the rest of a person's body) is out of focus. I like doing this because it places attention onto the subject while leaving the background in context.
You can leave details like this that enhance the photo or add weight to the photographs - we as the audience can extrapolate how certain photos relate to the meaning of a shot from what we know about the game - a picture is worth a thousand words!
You can use the environment as a framing tool, or take pictures of the beautiful environments of Survivor itself!

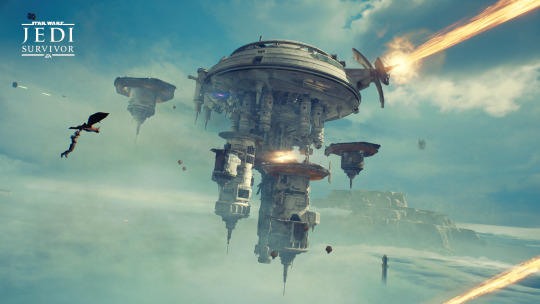
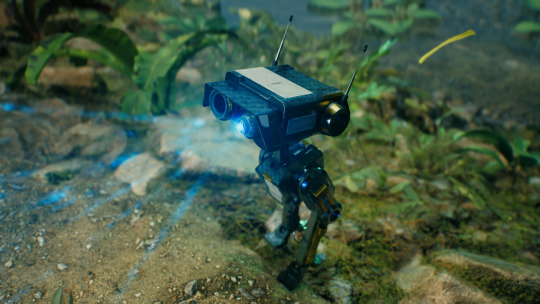
For posing, throughout a session I'll constantly pause and check the poses for characters I'd like to take photos of. Look at scenes from different angles to see what works! There are countless different actions in the game that can provide photo opportunities. These can be idle animations, finishers, combat engagements/attacks/stance switches, cutscenes, or character interactions!
It can take a lot of tries to get the right timing - for certain sets, I'll often reach a spot, take photos while constantly pausing and checking poses, and then quit out without saving so one-time animations (like certain combat finishers or the first BD visor interaction) can be repeated for that "perfect shot" (I'm working on collecting save files for different story points throughout the game).
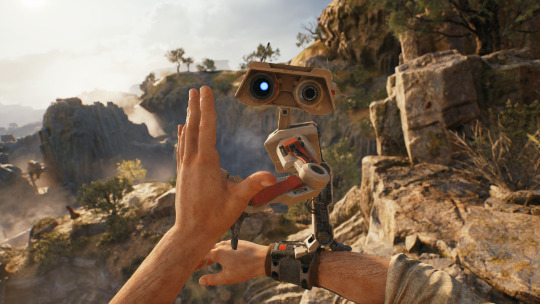
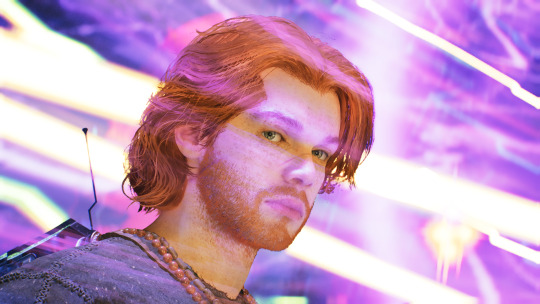
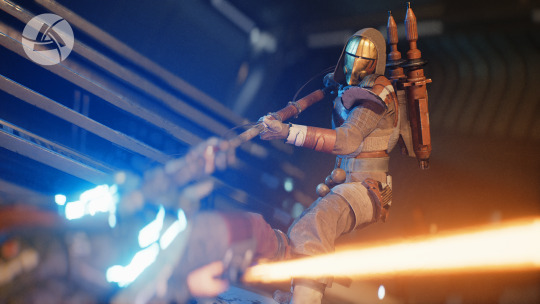
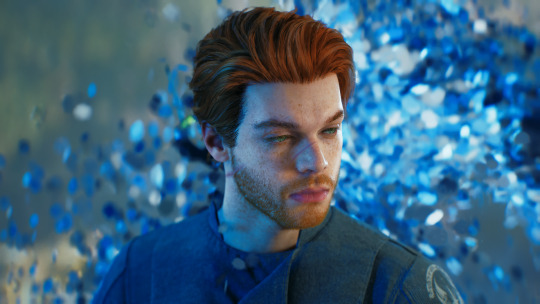
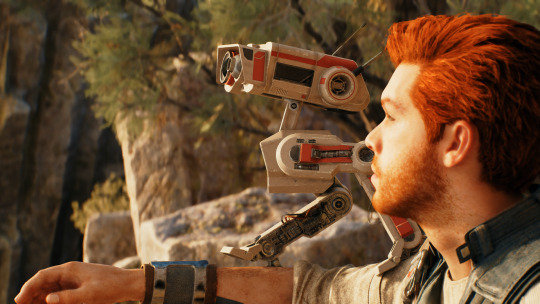
When it comes to posing Cal, while idle, he'll look in the same direction the camera does (it actually took me a long time to figure this out I still feel silly sometimes for not knowing) as long as the camera is behind him; otherwise he'll look straight forward. You can use this to get him to look down, up, or to the side!
Tilt can also be a fun way to add drama to a picture or change the framing of your subject to fit your shots!
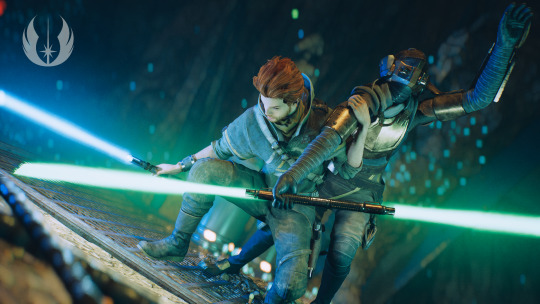
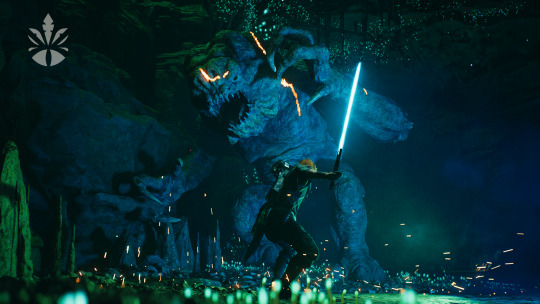
Exposure is useful for changing the whole brightness of a scene or creating better opportunities for shadows and highlights. For this photo, I had an idea for this nice strong contrasting shot where the lights would only see one side of Cal's face and make a sharp shadow. However, the light from his lightsaber illuminates the dark side (no pun intended) of his face.
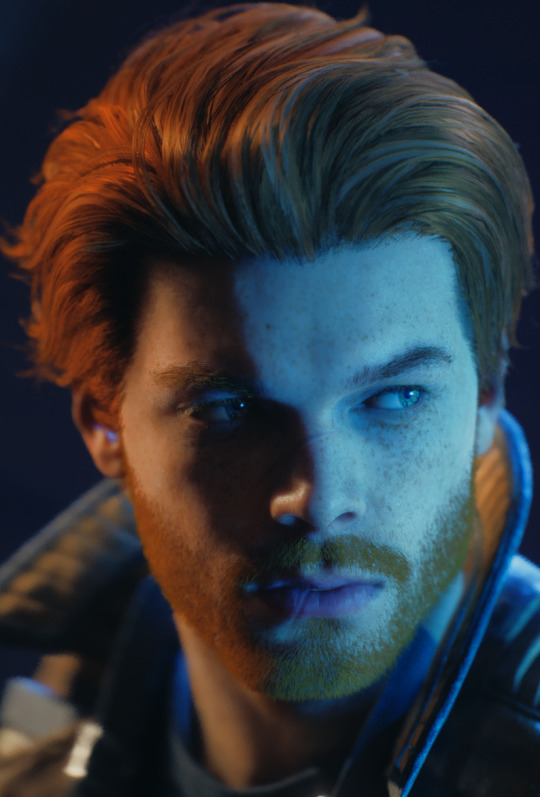
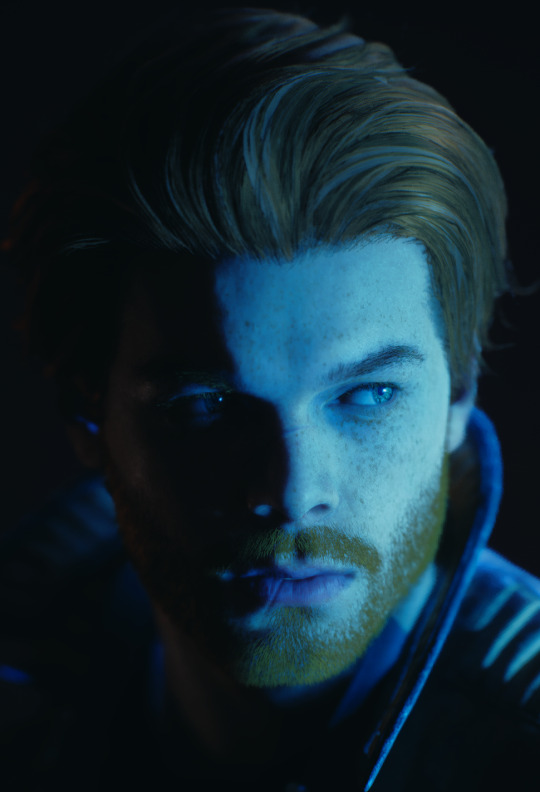
To solve this, I turned the exposure way down (so the saber glow would be much weaker) and really pumped that blue light onto the strong side with spotlights to create the effect I wanted.
Spotlights are also an incredibly important in creating light that frames your photo! They can be used to define and bring attention your subject, enhance existing lighting, or create visual interest using color.
I always find my favorite photos make creative/extensive use of lighting. Certain things will interact differently with spotlights or give off light of their own - consider your environment and intended effect. Also consider how the lighting will react with your subject - for example, metal reflects light differently from cloth (I'll often use spotlights to highlight/reflect metal objects like Cal's lightsaber or BD-1), or particles may have certain effects (echo sparkles will disperse spotlights really nicely!).
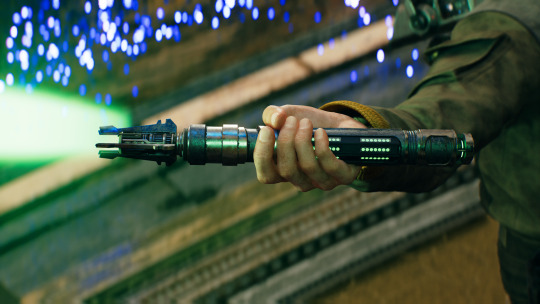
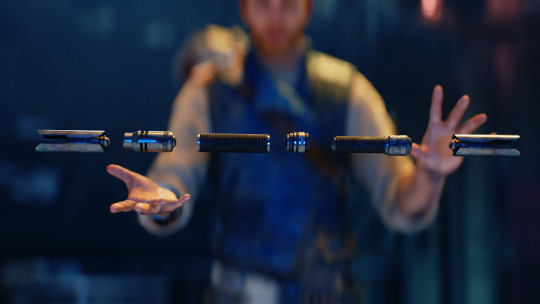
Here's a before and after; good lighting can really make a scene pop!
You can use spotlights to create light sources that serve to define your subject and their key features (wait... I just realized.. is that why it's called a key light??). I'll often use a 2-light combo of yellow and white to make an "artificial sun" where natural light can't reach.
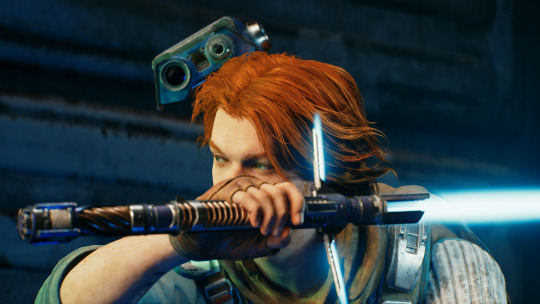
Since I post the majority of my photos in sets, when I take photos I'll often take the same photo in different color combinations of spotlights, exposures, and filters so that when I select the final photos for a set the whole "matches" and looks more cohesive together.
I personally don't do any editing on my photos third-party, but for most of my photos, I'll use the "Ryloth" filter at around 30-40% strength since I like the way it affects the saturation on colors (especially reds and oranges) and boosts the contrast a bit, although I will occasionally dip into the other filters. Of course, good graphics settings (if you can run them) can always improve the look of your photos.
As always, the #1 way to improve is practice! Learn for yourself what styles you prefer and try new things. I've taken (literally) thousands of photos and I definitely feel like I've improved by loads since I started.
If you're looking for more resources:
@animatedjen has made a lovely tutorial for portrait lighting, going over the different types of lighting in Survivor and ways to use them (💛💛)
Here's a guide by andva-ri on using a line of action - it's something I use more in my art, but I'll use this concept when I'm composing some of my more dynamic shots (love using this in combination with tilts)
Feel free to link resources of your own or to come to my inbox with any questions or advice! I'm so glad I got into this and I'd love to help other people learn, or learn something new myself <3.
Thanks for reading, and happy photographing! 📸
#<333#did this instead of writing my essay LOL#star wars jedi survivor#jedi survivor#photomode#swjs#splitsabers#tutorial#been thinkin about this for a while now it's a LOT#...curse you 30 photo tumblr post limit...#cal kestis
18 notes
·
View notes
Text
watching the passenger rn

#the weirdo manager guy just mentioned a job in redding. if this takes place in pa.#ofc it does. big pennsylvania vibes all around#only about 10 minutes in. and I know this is such an overused term#but this is such a liminal space ass movie#just dreamlike/nightmarish/WEIRD. I dig it.#every scene feels like the dreams u have when u wake up 1hr/30 min before ur alarm#and u doze off again but it's a fitful weird kinda sleep#dreaming about work and problems#the sign on the wall that said survivors will be shot again .....................#we're ASLEEP bitch we're DREAMING we're MYTHOLOGIZING#anyways! diving back in#sam speaks#this post is @ meg specifically. u have successfully coerced my ass into watching this fckn movie hfdshgfdshgfds
14 notes
·
View notes
Text
I'm gonna be honest every time I see someone complain that there's Too Many Order 66 Survivors I just think of this Youtube comment

#there were 10000 jedi and we have maybe 30-something confirmed survivors in canon#and most of them were either hunted down and killed by the time of anh#OR they became inquisitors and then the inquisitors also seemingly all died by anh#i made this post cause of rumors that the darksiders in ahsoka are surviving jedi which i know people are gonna complain about if true#star wars#shut up tristan
63 notes
·
View notes
Text
watching survivor 30. not a single iconic player in sight. idk if i can make it through this

#i started watching survivor from the beginning in 2020#and i’ve finally made it to the seasons i never watched#i didn’t watch 29 either but i knew of so many of the players so it was fine#but idk if i’m strong enough for this one…#survivor#ramble on#survivor 30
0 notes
Text
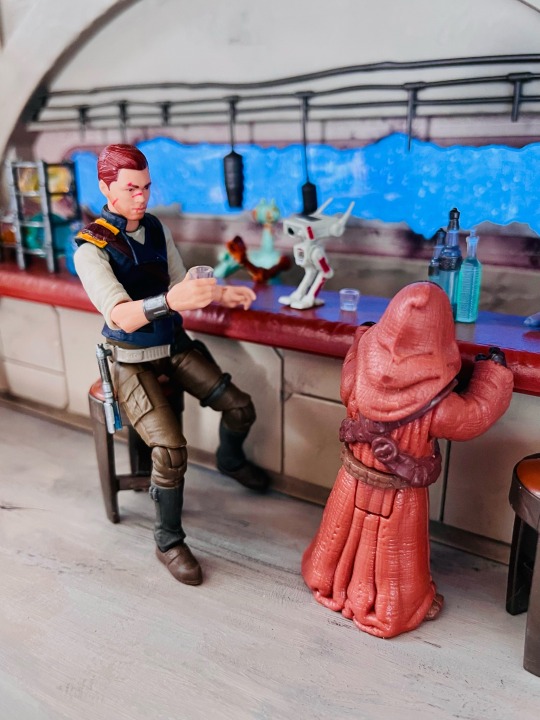
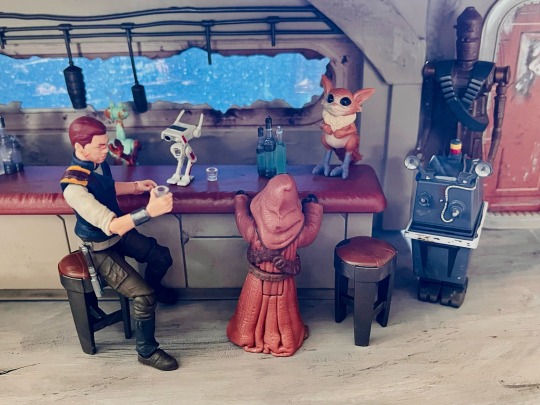


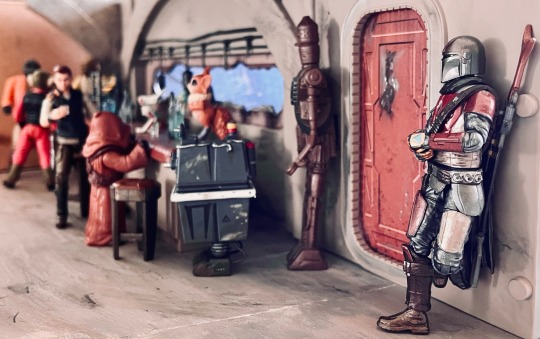
A little riff on Pyloon’s Saloon with some denizens from across the galaxy, including Cal Kestis, BD-1, Din Djarin, and Unidentified Bogling.
#the mandalorian#jedi: survivor#jedi: fallen order#cal kestis#bd 1#action!cal#action!din#action figure photography#action!bd#also including:#gonk droid#ig 11#bossk#nien nunb#ponda baba#Jawa#some of these figures I’ve had since fifth grade#so almost 30 years LOL!
36 notes
·
View notes
Text
should i go on a rant? yes, i think i will, so...
jedi survivor, right now i’m about 60%(?) in and we just killed off our main villain. like....i know who our second villain is, i’ve seen the spoilers, that’s fine, i don’t have a problem with that but i am positively baffled by the treatment of the first one.
see, trilla was a success story not just because she was hot but because she had a personality, she had fully developed story we ate up, but most importantly! because she was omnipresent. it was a game of cat and mouse with cal and she was sorta, kinda, always there. we met her right in the beginning and she was there to the bitter end. yeah, there was taron malicos, there was vader, but if you ask anyone who the villain was, the answer will be trilla. she had a full arc, she was one of the main characters.
now imagine you have a second game and your new main villain is a) hot as fuck, wet in leather pants and b) a hundreds years old jedi from high republic, who just woke up from stasis and the first thing he did was turn to dark side from the betrayal he suffered. sounds awesome right? surely we will explore his view on the new galaxy order, on the fall of jedi, we could hear ton about his backstory and discover more about high republic, we could delve into his motivations and what does it do to one psyche to wake up into a different world? right? yeah, that’s a no.
instead we get vague story about him being obsessed with finding tanalorr for whatever reason. he shows up late to the story (about 20% progress), we give him about two flashbacks and quite literally 4 scenes and we kill him off past half of the game. what in the ever loving fuck.
i have a lot of gripes with this game, this is just a tip of the iceberg, but honestly? i could forget them if they gave me decent villain and they failed in that regard spectacularly.
#jedi survivor#dagan gera#DESERVED BETTER#btw if its not clear enough i think they did#bode akuna#dirty too#60% in the game and the only thing i know about him is that he has a daughter and he wants her safe#we are gonna cram his whole story and motivation in what last 30% of the game? really?#at least merrin got a book before the game#bode and dagan got nothing
38 notes
·
View notes
Text
Andy reppin for every annoying ass bi man I’ve ever met
5 notes
·
View notes
Note
🌹🌹🌹!
A peek into the next chapter >;3

Foxy is in for a rough time next chapter lol
#arkhamverse#lynx's chatting corner#the flying fox#the riddler#arkham survivor au#Chapter 30 will be quite the struggle for Foxy lol
3 notes
·
View notes
Last Seen Blogs


oneboss
Spit in your face

vooodooochild
Green Fields Are Calling

melilive3
Meli_Live

skyofstarsif
Sky of Stars Interactive Fiction