#syslogd
Explore tagged Tumblr posts
Visit Tumblr Blog
Explore Tumblr blogs with no restrictions, modern design and the best experience.
Last Seen Tumblr Blogs


Fun Fact
There are dozens of funny blogs to kill time on Tumblr.
Link
0 notes
Text
linux posting
people shit on systemd for its complexity but god damn i've been screwing with alpine lately which uses openrc and i would rather deal with systemd than have to figure out why the fuck something that's happening in init isn't working on there
(i had an instance of busybox's 'syslogd' spinning in place and taking up a whole core on my build of postmarketos which uses the latest kernel 6.11, when i dug in it turned out that instance of syslogd wasn't even supposed to survive initramfs, and i have no idea why the 'kill' that's in the init script doesn't work because the init script does try to kill it)
0 notes
Text
Logbookd – SQLite Backed Syslogd
https://git.sr.ht/~martijnbraam/logbookd
0 notes
Text
At first I thought it was dinnerd, like Linux daemon process names... systemd, syslogd, httpd, etc. Now I want an automated Linux process that serves me dinner, that would be sweet...
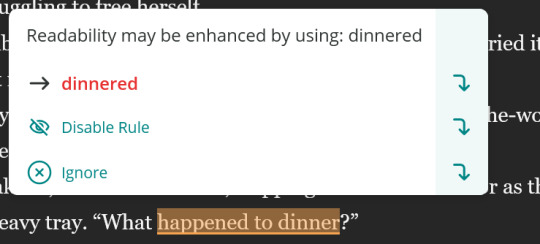
When I say editing software is getting dumber, this is what I mean.
In what world is "What dinnered?" more legible than "What happened to dinner?" I just... what?!
125K notes
·
View notes
Text
Syslogd oddities #1: do not sync log file action
When a selector ( e.g. facility.priority ) has identified a message the next step is to take an action. Usually this is to write the message to a file. If the file name is preceded by a hyphen - then the file is not synced after each log action, e.g. see man -s 5 syslog.conf :
Actions The action field of a rule describes the abstract term ''logfile''. A ''logfile'' need not to be a real file, btw. The syslogd(8) provides the following actions. Regular File Typically messages are logged to real files. The file has to be specified with full pathname, beginning with a slash ''/''. You may prefix each entry with the minus ''-'' sign to omit syncing the file after every logging. Note that you might lose information if the system crashes right behind a write attempt. Nevertheless this might give you back some performance, especially if you run programs that use logging in a very verbose manner.
0 notes
Photo

Nice try, syslogd
147 notes
·
View notes
Text
Ha ha, as it turned out, the Debian/Ubuntu part makes no difference.
My config works because their software specifically reads the value I set as the last config key before falling back to the hard coded default.
And because of how systemd/syslogd is architected these days. Which is also something upstream apparently doesn’t know about their own log processing software.
But I’m not telling them. I can’t risk having another comment edited.
I got “well actually”-ed on GitHub so I fuckin deleted the comment. It turns out:
I’m on Ubuntu, not Debian, and it probably mattered a lot this time
im really super offended by someone editing my code block reporting my actual, live config because “they don’t see how it could work” (see previous)
idk how it works, either, but I can confirm it does. or could, if i had been consulted
but hey. if they are omniscient, let them code in peace.
1 note
·
View note
Text
Forward Syslogs to multiple syslog servers from FortiGate
This is a quick and simple article to show how to forward syslogs to multiple syslog servers. Those who have few syslog servers in the environment this can be useful. It is quite simple. 1st Step is to go inside the Global configuration. FGT_1 # config global Then Have to go inside the syslogd as below FGT_1 (global) # config log syslogd setting Enable Syslogs FGT_1 (setting) # set status…

View On WordPress
0 notes
Text
自己從頭搞整套 Pi-hole 方案 (DNS 阻擋廣告的方案)
自己從頭搞整套 Pi-hole 方案 (DNS 阻擋廣告的方案)
如果不用 Pi-hole 這種套件的話,從頭自己搞差不多就是這樣:「Ads blocking with OpenBSD unbound(8)」。 作者除了阻擋的必要功能部份以外,還把 log 導出來丟進 InfluxDB,透過 Grafana 可以看狀態,這類似於 Pi-hole 提供的方案: Grafana to render the statistics ; InfluxDB to store the information ; syslogd(8) and awk(1) to turn DNS queries into statistics ; collectd(1) and shell script to store unbound statistics and logs ; unbound(8) and shell script to get and block DNS…

View On WordPress
1 note
·
View note
Text
Dvd archtect used the most recent menu command before

#DVD ARCHTECT USED THE MOST RECENT MENU COMMAND BEFORE HOW TO#
If you don’t require nanosecond accuracy, but you do want timestamps that are easier to read than the defaults, use the -T (human readable) option. The messages that occurred in each minute are labeled with the seconds and nanoseconds from the start of that minute. The timestamps show a timestamp with the date and time, with a minute resolution.The output is automatically displayed in less.To have this rendered in a more human-friendly format, use the -H (human) option. To force dmesg to always default to a colorized display use this command: sudo dmesg -color=alwaysīy default, dmesg use a timestamp notation of seconds and nanoseconds since the kernel started. If it isn’t, you can tell dmesg to colorize its output using the -L (color) option. sudo sysctl -w kernel.dmesg_restrict=0īy default, dmesg will probably be configured to produce colored output. But, be aware: it lets anyone with a user account your computer use dmesg without having to use sudo. If you want to avoid having to use sudo each time you use dmesg, you can use this command.
#DVD ARCHTECT USED THE MOST RECENT MENU COMMAND BEFORE HOW TO#
RELATED: How to Use the less Command on Linux Removing the Need for sudo Start the search function by pressing the forward slash key “/” in less. You can use the search function within less to locate and highlight items and terms you’re interested in. Now we can scroll through the messages looking for items of interest. Obviously, what we need to do is pipe it through less: sudo dmesg | less sudo dmesgĪll of the messages in the ring buffer are displayed in the terminal window. By default, you need to use sudo to use dmesg. The dmesg command allows you to review the messages that are stored in the ring buffer. Because it contains these low-level startup messages, the ring buffer is a good place to start an investigation into hardware errors or other startup issues.īut don’t go empty-handed. The kernel ring buffer stores information such as the initialization messages of device drivers, messages from hardware, and messages from kernel modules. Conceptually it can be thought of as a “ circular buffer.” When it is full, newer messages overwrite the oldest messages. It is simple in design, and of a fixed size. To avoid losing notable error messages and warnings from this phase of initialization, the kernel contains a ring buffer that it uses as a message store.Ī ring buffer is a memory space reserved for messages. In the very early stages of initialization, logging daemons such as syslogd or rsyslogd are not yet up and running. The startup processes then pick up the baton and complete the initialization of the operating system.
0 notes
Text
Nox app player error retrieving information from server

#Nox app player error retrieving information from server how to
#Nox app player error retrieving information from server software
That means log file names have automatically been changed within the system. Log files that have zeroes appended at the end are rotated files. To view users currently logged onto a Linux server, enter the who command as a root user: who This section explains different mechanisms for configuring log files. How to Configure Log Files on Ubuntu and CentOS It translates all data for highlighting, hiding lines, and displays this information for taking user requested action. Xlogmaster is useful for increasing security.
Tail mode: Checks log files within regular intervals.
Cat mode: Cats files within specified intervals.
Run mode: Starts a specified program and obtains stdout.
It is a user-friendly log monitoring GUI.Īlternatively, use Xlogmaster which can monitor a considerable number of log files. The interface provides several functions for managing logs, including a log statistics display. System Log Viewer is a GUI that can be used to monitor system logs. Supplemental GUIs for Viewing Linux Log Files They are not necessary for reading files as most can be read directly from the Linux terminal.
#Nox app player error retrieving information from server software
There are tools and software for reading Linux log files. They include login failure logs, last logins logs, and login records. Such files are often related to login information. Some are designed only to be read by system applications. Not all logs are designed in a human-readable format. Log files that fall into this category include CUPS Print System logs, Rootkit Hunter log, Apache HTTP server logs, Samba SMB server logs, and X11 server log. This can include error messages, signs of system compromise, and browser identification string. Application LogsĪpplication logs store information relevant to any application that is executed. This can be useful for debugging purposes. The syslogd daemon can forward log messages as well. The path for the system login daemon’s configuration is /etc/nf.Įach file consists of a selector and an action entry field. These logs have their own category of logs and are seen as the heart of the logging operations for any system. /var/log/kern.log: Kernel logs (the kernel log stores information from the Ubuntu Linux kernel)Ī daemon log is a program that runs in the background and is essential for system operations./var/log/maillog: Mail server logs (the mail log stores information related to mail servers and archiving emails)./var/log/daemon.log: Daemon logs (the daemon log contains information about events related to running the Linux operation)./var/log/debug: Debug logs (the debug log stores detailed messages related to debugging and is useful for troubleshooting specific system operations)./var/log/mysqld.log: MySQL database server log file./var/log/httpd/: Apache access and error logs./var/log/auth.log: Auth logs (the authentication log stores all authentication logs, including successful and failed attempts)./var/log/boot.log: System Boot log (the boot log stores all information related to booting operations).On its own, it contains the most significant amount of information about system functionality. Systems log files are needed for Linux to work. Many of these logs can be located in the var/log subdirectory. Most directories can be grouped into one of four categories:
#Nox app player error retrieving information from server how to
A good understanding of each type of file will help how to distinguish the respective logs. Logs can tell a lot about the operations of a system. Note: Check out our comprehensive guide on grep to learn how to use it with examples.
0 notes
Photo

Nice try, syslogd by pipedreamSEA https://www.reddit.com/r/ProgrammerHumor/comments/9qmqli/nice_try_syslogd/?utm_source=ifttt
1 note
·
View note
Text
Comando pgrep no Linux (localizar arquivos) [Guia Básico]

O Comando pgrep no Linux permite que se procure por expressões na lista de processos em execução e retorna o PID do processo em questão. Ele também permite que sinais sejam enviados para esses processos elencados na expressão de busca. Neste exemplo o pgrep lista todos os PIDs dos processos do nginx: $ pgrep nginx279912799327994 Para listar todos os PIDs dos processos cujo dono é o root: $ pgrep –u root123 Para enviar um sinal para os processos, basta usar a opção --signal e o número do sinal. Neste exemplo é enviado o sinal SIGHUP ao nginx: # pgrep --signal 1 nginx279912799327994 Mostra PID dos processos que cujo proprietário seja o root e tenham nome de named: $ pgrep -u root named Faz o processo syslog reler seu arquivo de configuração: $ pkill -HUP syslogd Mostra informações detalhadas de todos os processos conectados ao terminal xterm : $ ps -fp $(pgrep -d, -x xterm) Você pode combinar o uso do pgrep com expansões de shell, como no exemplo que faz o Firefox consumir menos CPU: $ renice +4 $(pgrep firefox) Diferença entre o pgrep e o killall O comando pgrep consegue ler a lista de processos baseados no nome ou uma série de atributos, enquanto o kill somente busca pelo nome do processo. O pgrep tem funcionamento parecido com o pkill. https://youtu.be/8uT_d95gXq4 Aprenda muito mais sobre Linux em nosso curso online. Você pode efetuar a matrícula aqui. Se você já tem uma conta, ou quer criar uma, basta entrar ou criar seu usuário aqui. Gostou? Compartilhe Read the full article
0 notes
Text
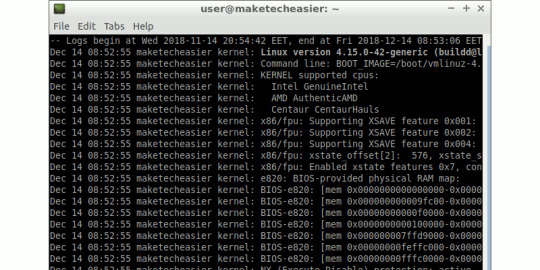
Uso del comando dmesg en linux

Uso del comando dmesg en linux. El comando dmesg (diagnostic message / mensajes de diagnóstico), es una herramienta exclusiva de sistemas basados en Unix con la capacidad de listar los avisos temporales generados por el kernel. Estos avisos se guardan en lo que se conoce como buffer, y contiene los mensajes más importantes que se generaron al iniciar el sistema (también los cambios durante su funcionamiento), por ejemplo de los drivers y el hardware. Estos (normalmente) se guardan mediante "syslog", siendo dmesg la herramienta con capacidad de de leer e imprimir (en formato humano) los avisos del kernel. Poder examinar los mensajes de arranque del núcleo, te ayudaran a solucionar problemas relacionados con el hardware. En este articulo vemos los conceptos principales que debes conocer de "dmesg".
Uso del comando dmesg en linux
Uso básico de dmesg La sintaxis de dmesg es muy simple. dmesg No es obligatorio que apliques opciones, lo puedes ejecutar tal cual. dmesg Normalmente esta herramienta se ejecuta sobre cualquier usuario, si por un extraño caso no te permite su uso en usuarios sin permisos, recibirás un mensaje similar a: dmesg: read kernel buffer failed: Operation not permitted El error anterior se produce por el ajuste del parámetro "kernel.dmesg_restrict". Solucionamos el problemas ajustando los privilegios. sudo sysctl -w kernel.dmesg_restrict=0 La salida impresa del comando puedes ser muy larga, y esto dificulta su lectura. Para ver el archivo linea por linea... dmesg --color=always | more La herramienta dmesg nos permite filtrar los mensajes por dispositivo. En nuestro caso y a modo de ejemplo, extraemos un pendrive usb y un raton usb, pasados unos segundos los insertamos de nuevo. dmesg | grep -i usb ejemplo... sololinux ~ # dmesg | grep -i usb usb 2-2: USB disconnect, device number 3 usb 3-1: new low-speed USB device number 2 using uhci_hcd usb 3-1: New USB device found, idVendor=046d, idProduct=c077 usb 3-1: New USB device strings: Mfr=1, Product=2, SerialNumber=0 usb 3-1: Product: USB Optical Mouse usb 3-1: Manufacturer: Logitech input: Logitech USB Optical Mouse as /devices/pci0000:00/0000:00:1d.1/usb3/3-1/3-1:1.0/0003:046D:C077.0004/input/input14 hid-generic 0003:046D:C077.0004: input,hidraw2: USB HID v1.11 Mouse on usb-0000:00:1d.1-1/input0 usb 1-2: new high-speed USB device number 5 using ehci-pci usb 1-2: New USB device found, idVendor=13fe, idProduct=4200 usb 1-2: New USB device strings: Mfr=1, Product=2, SerialNumber=3 usb 1-2: Product: USB DISK 2.0 usb 1-2: SerialNumber: C900589889F91731 usb-storage 1-2:1.0: USB Mass Storage device detected scsi host2: usb-storage 1-2:1.0 usbcore: registered new interface driver usb-storage usbcore: registered new interface driver uas scsi 2:0:0:0: Direct-Access USB DISK 2.0 PMAP PQ: 0 ANSI: 6 Formatear la salida de dmesg Dmesg nos permite aplicar opciones de formateo para que visualmente sea más comprensible. La más utilizada es la salida para humanos, opción -H. dmesg -H Para imprimir los tiempos... dmesg -T ejemplo... usb 1-2: new high-speed USB device number 5 using ehci-pci usb 1-2: New USB device found, idVendor=13fe, idProduct=4200 usb 1-2: New USB device strings: Mfr=1, Product=2, SerialNumber=3 Las marcas de tiempo admiten varios formatos al hacer uso de "--time-format". Se admiten los siguientes: ctime reltime notime delta iso En el ejemplo aplicamos "iso". dmesg --time-format=iso salida en iso... 2020-02-10T08:05:39,936151+0200 usb 2-2: USB disconnect, device number 3 2020-02-10T08:06:06,948110+0200 usb 3-1: new low-speed USB device number 2 using uhci_hcd 2020-02-10T08:06:07,144136+0200 usb 3-1: New USB device found, idVendor=046d, idProduct=c077 Comando dmesg en tiempo real. dmesg -w Aplicando varias opciones a la vez. dmesg -H -T Filtrar la salida de dmesg Se permite filtrar los mensajes por quien los genero, en este caso las opciones son las siguientes: user - mensajes a nivel de usuario kern - mensajes del kernel daemon - demonios del sistema auth - mensajes de seguridad y permisos mail - sistema de correos lpr - impresoras en línea news - novedades de la red syslog - avisos internos de syslogd Para lograr el objetivo utilizamos "-f", que ademas nos permite especificar varios filtros (si es necesario). # mensajes de usuario dmesg -f user # mensajes de usuario, kernel y demonios dmesg -f user,kern,daemon Otra opción de filtrado es por importancia del aviso, vemos las opciones por orden de importancia. emerg - error critico del sistema alert - debes solucionar el error rápidamente o el sistema entrara en modo "emerg" crit - en entorno esta en condiciones críticas err - errores warn - advertencias notice - el sistema es normal pero pon atención a este punto info - nota informativa debug - avisos de depuración Para lograr el objetivo utilizamos "-l", que ademas nos permite especificar varios filtros (si es necesario). # mensajes de emergencia dmesg -l emerg # mensajes de emergencia, de alerta y críticos dmesg -l emerg,alert,crit Borrar los mensajes del buffer A diferencia de la lectura de mensajes, para borrar todos los mensajes debes ser root o usuario con privilegios. Antes de vaciar todos los avisos, existe la opción de imprimir en pantalla y borrar, así los borras y visualizas a la vez. sudo dmesg -c Si quieres borrar todo sin imprimir nada... sudo dmesg -C Como ultimo apunte del articulo, dmesg también permite guardar los avisos en un archivo antes de borrarlo por completo. dmesg > dmesg_messages Existen más opciones que puedes ver en su manual al ejecutar el siguiente comando. man dmesg Canales de Telegram: Canal SoloLinux – Canal SoloWordpress Espero que este articulo te sea de utilidad, puedes ayudarnos a mantener el servidor con una donación (paypal), o también colaborar con el simple gesto de compartir nuestros artículos en tu sitio web, blog, foro o redes sociales. Read the full article
#comandodmesg#dmesg#driversyelhardware#herramientadmesg#kernel.dmesg_restrict#problemasrelacionadosconelhardware#serroot#sistemasbasadosenUnix
0 notes
Text
كيفية استخدام Journalctl لقراءة سجلات نظام Linux
كيفية استخدام #Journalctl لقراءة سجلات نظام Linux
لسنوات عديدة تم التعامل مع نظام وسجلات kernel بواسطة أداة مساعدة تسمى syslogd. لقد انتقلت معظم أنظمة التشغيل المستندة إلى Linux إلى systemd ، والذي يأتي مع دفتر سجل مختلف ، journald. للتفاعل مع هذه السجلات ، يمكنك استخدام الأداة المساعدة journalctl.
منح إذن المستخدم لقراءة سجلات النظام
يمكن فقط للمستخدمين الذين ينتمون إلى مجموعات “adm” أو “systemd-journal” قراءة سجلات systemd. تضيفك توزيعات مثل…
View On WordPress
0 notes