#sysprep
Explore tagged Tumblr posts
Visit Tumblr Blog
Explore Tumblr blogs with no restrictions, modern design and the best experience.
Last Seen Tumblr Blogs


Fun Fact
Tumblr Inc. is using 66 technologies for its website.
Text
Sysprep Kullanımı Hakkında
Merhaba, bu yazımda sizlere sysprep kullanımı hakkında bilgi vereceğim. Bir işletim sistemi kurulumu yaparken template hazırlamanız gerekebilir. Sürekli olarak sunucu kurulan ortamlarda belirli bir template hazırladıktan sonra bunu sürekli olarak kullanabilirsiniz. Ancak aynı SID numarasına sahip olan sunucular sorun yaratacaktır. Kurmuş olduğunuz sunucuların ID’lerini değiştirmek için sysprep…
View On WordPress
#sysprep nasıl kullanılır#sysprep nedir#sysprep windows 10#sysprep windows 11#sysprep.exe#windows sysprep kullanımı
0 notes
Text
Having a new shiny Mac comes with one startup drive named “Mac HD.” Although this kind of arrangement is fine but it’s not the only option as the disk can also be split up. This reorganizing of internal or external disk into one or more volumes called partitions. Another option comes if you want to make Windows handy with your Mac every time. This involves creating a non-destructive disk partitioning of the hard disk drive with an installation of Windows device drivers known as creation of Boot Camp partition. The process enables the user to have a Windows environment under OS X. It is a great feature as it temporarily turns your Mac into a Windows PC. Keeping Windows version on Mac is good but time comes when you want to restore your Boot Camp partition to another Mac or to a new hard drive. In this case, the first thing that should come in your mind is doing a back-up to your Windows partition in the same way as you back up your OS X data. To solve this nagging issue, there are many methods for a user to back-up their Mac Boot Camp hard drive partition, such as the in-built utility named Time Machine and other stand-out Mac cloning utilities. These software’s are capable to make clones of your Boot Camp partition to migrate or restore your Windows install. Under the following sections, I will be suggesting you two software that will perform backup and restoration of a Mac Boot Camp partition. WinClone This utility creates a disk image of your Mac’s Boot Camp partition in order to create its back up. It also has an option to restore the partition from a backup, or transfer it to another Mac. Cloning Just select the boot camp partition in Winclone’s Sources list. Click the Save Image icon in the Destinations pane and click the Save Image. Migrating Use Windows’s SysPrep utility before making a clone. Choose a location for the saved image By this the software creates an OS X disk image containing a clone of your Boot Camp partition. Restoring the image Select the image in Winclone’s Sources list. Choose your Boot Camp partition in the Destinations pane. Click Restore to Volume. The need: Backing up the Mac Boot Camp partition Place the source Mac in Target Disk Mode. Connect it to the Destination Mac. Enable the Share WinClone Images on Network option. Run WinClone on the source and destination machines. The source Mac’s Boot Camp partition will appear in the destination Mac’s Source list. (Back up has taken place) Note: You must have a Boot Camp partition on the destination Mac for this procedure. Stellar Drive Clone This is a Hard Drive Cloning utility that creates clone or image of the Mac hard drive, and a back-up of files/folders. The cloned hard drive can be used as an exact copy of the hard drive and the image file can be used to restore data. An additional option is provided that the software supports cloning of encrypted volumes. Cloning Click the Clone tab and select Disk Clone option. Select the source drive and destination drive. Click Continue to start cloning process. Imaging Click Imaging tab. Select the source drive and click Choose Destination. Specify the name for the image file and click Save. Click Continue to start imaging process. Restoring volume from image file Click Restore tab. Select the source drive from Choose Source Button and click Select Destination to choose destination for the restored volume. Click Continue to start restore process. The need: Backing up the Mac Boot Camp partition Click Backup tab. Select the source drive, then click Backup button. Now select destination for backup data from Open Directory dialog box. Click Choose to select the destination and start backup process. Now, as soon as the process will be completed, the data will back up to the destination. In the end I would like to say that these software’s are essential as the user is eliminated from the need to keep two different hard drives for two types of backup.
The feature of scheduled incremental backups is an added benefit that provides a speedy recovery from data loss even in the worst case.
0 notes
Photo

How to Fix Sysprep Was Not Able to Validate Your Windows Installation 👉 Read the article: https://bonguides.com/how-to-fix-sysprep-was-not-able-to-validate-your-windows-installation/?feed_id=1857&_unique_id=66c93a22da665
0 notes
Text
DailyMotion Allegedly Hacked, 85 Million User Accounts Stolen - BleepingComputer
Microsoft fixes Windows Sysprep issue behind 0x80073cf2 errorsUS Health Dept warns hospitals of hackers targeting IT help desksNew Windows driver blocks software from changing default web browserOver 92,000 exposed D-Link NAS devices have a backdoor accountTargus discloses cyberattack after hackers detected on file serversCritical RCE bug in 92,000 D-Link NAS devices now exploited in…

View On WordPress
0 notes
Text
Mastering Sysprep: A Step-by-Step Guide for Beginners
Introduction Sysprep, short for System Preparation Tool, is a powerful utility in the realm of computing that often remains hidden in the shadows for many users. Yet, its potential for simplifying system deployment and customization is immense. In this comprehensive guide, we’ll delve into the step-by-step process of using Sysprep, breaking down each stage into digestible pieces for even the…
View On WordPress
0 notes
Photo

#純靠北工程師7gv
----------
想說學個 go,新手上路 在 cmd > go 電腦就關機、還原了!!? 原來是跟**屋買的電腦,在 C://Windows 裡面有放一個名為 go 的腳本 net user user /delete rd c:\users\user /s /q C:\Windows\System32\sysprep\sysprep.exe /quiet /oobe /shutdown 這些命令行操作組合在一起時,會刪除特定的用戶帳號,清除該帳號的個人資料夾,並且準備系統重新安裝或部署給新用戶後關機。這樣的操作通常在你想要重新配置系統,以便給予新用戶一個未經使用的系統時進行。這些命令可能會導致資料丟失,所以在實際使用之前需要特別小心。 崩潰.....
----------
💖 純靠北工程師 官方 Discord 歡迎在這找到你的同溫層!
👉 https://discord.gg/tPhnrs2
----------
💖 全平台留言、文���詳細內容
👉 https://init.engineer/cards/show/9679
0 notes
Text
DOWNLOAD EPSON SCAN CX4200 DRIVER
File Size: 23 Mb Uploader: Curls Date Added: 24 October, 2019 Downloads: 3747 Price: Free File Name: epson scan cx4200 driver File Version: 310141221 Operating Systems: Windows NT/2000/XP/2003/2003/7/8/10 MacOS 10/X Download Type: http File Format: exe

What's New: - Fixes issue where CRT was not detected after(epson scan cx4200 driver after) Suspend/Resume mode or use of switch. - Fixed issue whereby(epson scan cx4200 driver whereby) 3G mode displays status incorrectly. - Fixed a bug where unnecessary response packets were sent when searching for the device using UPnP. - Fixed QPI Item string error. - Fixed the bug where multi-byte characters were not supported on FTP clients with UTF-8 character encoding. - Fixed an(epson scan cx4200 driver an) issue where a black screen was encountered after Sysprep Generalize. - Fixed the illegal MAC(epson scan cx4200 driver MAC) address warning for “MAC Clone”.- Fixed the Chinese SSID input deny message. - Corruption may(epson scan cx4200 driver may) be experienced with OGL or Vulkan API applications on some Hybrid Graphics system configurations. - Fixed VIA C3 cpu can't adjust ratio issue. - Fixed wrong detection of memory speed. Users content: Check the firmware update procedure manual carefully before starting update operations. GB* Intel Graphics Media Accelerator X4500, DirectX 10, Pixel Shader 4.0, Max. Added and Modified Features[Failover] - Improved the security level. Modifies host bridge offset to improve DRAM stability. Navigating from the Time settings page gives an incorrect error. We have a new, free software update available for your Kindle Paperwhite (7th Generation). GB DDR DDR 2 x DDR slots, DDR400/333/266Dual Channel memory technology Slots 3 PCI slots, PCI 2.2AMR 1 slots VGA Int. - GEM displays bleeding/ghosting charactersIt is highly recommended to always use the most recent driver version available. Even though other OSes might be compatible as well, we do not recommend applying this release on platforms other than the specified. Support VGA driver for XP and Windows 7. DOWNLOAD LG LS50 WIRELESS DRIVER Supported OS: Windows 10 Microsoft Windows 8.1 Enterprise (64-bit) Windows 7 64-bit Microsoft Windows 8.1 Enterprise (32-bit) Windows Server 2003 32-bit Windows XP 32-bit Microsoft Windows 8.1 (64-bit) Windows 8 Windows Server 2008 R2 Windows 8.1/8/7/Vista 32-bit Microsoft Windows 8.1 Pro (32-bit) Microsoft Windows 8 Pro (32-bit) Windows 8.1/8/7/Vista 64-bit Microsoft Windows 8.1 (32-bit) Windows Server 2016 Windows XP 64-bit Microsoft Windows 8 Enterprise (64-bit) Notebook 8.1/8/7 32-bit Microsoft Windows 8 (32-bit) Microsoft Windows 8 Enterprise (32-bit) Microsoft Windows 8 (64-bit) Windows 7 Microsoft Windows 10 (64-bit) Microsoft Windows 8 Pro (64-bit) Windows 2000 Windows Server 2003 64-bit Windows Server 2008 Windows 8.1 Windows Vista 32-bit Windows Server 2012 Microsoft Windows 8.1 Pro (64-bit) Windows Server 2012 R2 Windows Vista 64-bit Windows 7 32-bit Microsoft Windows 10 (32-bit) Notebook 8.1/8/7 64-bit Searches: driver epson scan cx4200; epson scan cx4200 driver for Windows XP 32-bit; epson scan cx4200 Rib905-ibm; epson scan cx4200 R RU905-9; epson scan cx4200 driver for Windows Vista 64-bit; epson scan cx4200 R90i; epson scan cx4200 RU9056; epson scan cx4200 driver for Microsoft Windows 8 Enterprise (32-bit); epson scan cx4200 RUZEB9056; epson scan cx4200 driver for Windows Server 2012; epson scan cx4200 driver for Windows Server 2008 R2 Compatible Devices: Android; Laptop; Printer; Scanner; Usb Cables; Videocard To ensure the integrity of your download, please verify the checksum value. MD5: c1d200e955e2c6012d7755fe95de711b SHA1: 5033940a811a8ff65b3b2fd9e178c1d30e6b87c1 SHA-256: 90b58b4a2f885137d69cb9327e9a3d16694882e489fc7cafa26046cbc9255c50
1 note
·
View note
Text
Debotnet - Controlling Windows 10's Many Privacy-Related Settings
Debotnet - Controlling Windows 10's Many Privacy-Related Settings #10039s #AutomationUI #Bloatware #commandline
[sc name=”ad_1″]
A free and portable tool for controlling Windows 10’s many privacy-related settings and keep your personal data private.
Your preparation for the Net! The Windows 10 default privacy settings leave a lot to be desired when it comes to protecting you and your private information. Whenever I set up a new computer or update a current setup for my family or job, I always carefully go…
View On WordPress
#10039s#Automation UI#Bloatware#command line#Controlling#Data#Debloat#Debotnet#Install Script#microsoft#Personal#Portable#PowerShell#Privacy Settings#PrivacyRelated#Private#Settings#Sysprep#Telemetry#Tiny#tool#windows#Windows 10#Wrapper
0 notes
Text
Voltando a pasta Users do Windows 10 ao local original com o Sysprep - Problemas e Soluções
Voltando a pasta Users do Windows 10 ao local original com o Sysprep – Problemas e Soluções
Quando os SSDs surgiram, eles ainda eram muito caros, e apenas modelos de baixa capacidade eram razoavelmente acessíveis. Com isso, apenas a instalação do Windows e programas já era suficiente para tomar todo o espaço de um SSD de 128GB, ou até mesmo de 256GB, dependendo da quantidade e do tamanho dos programas instalados.
Uma solução que eu adotava na época era mover a pasta \Usersdo Windows…
View On WordPress
0 notes
Text
How to deploy a vm using powercli and unattend.xml file
How to deploy a vm using powercli and unattend.xml file
Recently I blogged how to deploy a VM on VMware platforms(such as Vsphere) using PowerCLI, and more specifically the New-OScustomizationSpec. I mentioned in that article, that indeed the New-OSCustomizationSpec helps to create a new customizationspec, and give us the possibility to add customization to our Windows (or linux) deployment(s). In this article I’ll cover how to deploy a VM using…
View On WordPress
0 notes
Text
Windows Client に対して sysprep を実行する時のノウハウ
■ ミニセットアップで必ず聞いてくるユーザーアカウントの新規作成をバイパスする方法。
https://blogs.technet.microsoft.com/askcorejp/2010/05/28/12427/
不用意にバイパスすると取り返しがつかなくなるようです。
1. 最初のセットアップで User というユーザーアカウントを作成 2. Administrator を有効化 3. アカウント User を削除 4. LocalAccount にパラメーターを仕込んだ応答ファイルで sysprep 実施
とやると、Administrator アカウントが利用できない状態になり、対処不能になりました。今必死になって再構築している、というやつです。
http://mctjp.com/2011/08/12/windows7-%E3%81%AE%E3%83%99%E3%83%BC%E3%82%B9%E3%82%A4%E3%83%A1%E3%83%BC%E3%82%B8%E3%82%92%E4%BD%9C%E6%88%90%E3%81%99%E3%82%8B/
Administrator アカウントを無効にさせないためには、AutoLogon を設定すればよいらしいです。
■ ミニセットアップで必ず聞いてくる「設定」画面で「簡単設定」ボタンを洗濯する方法。
http://miyunyanchan.hatenablog.com/entry/2017/03/28/211057
http://mctjp.com/2011/08/12/windows7-%E3%81%AE%E3%83%99%E3%83%BC%E3%82%B9%E3%82%A4%E3%83%A1%E3%83%BC%E3%82%B8%E3%82%92%E4%BD%9C%E6%88%90%E3%81%99%E3%82%8B/
oobeSystem の Microsoft-Windows-Shell-Setup/OOBE で ProtectYourPC を 1 に、という記述が多いですが、これはどうもダウトなようです。 Windows 8.1 Enterprise with Update1 環境で試してみましたが、うまくいきませんでした。調査中ですが Specialize あたりにあるんじゃないかなぁ…?
■ 今使っているプロファイルを既定値にする方法。
http://miyunyanchan.hatenablog.com/entry/2017/03/28/211057
specialize の Microsoft-Windows-Shell-Setup で CopyProfile を true にします。
■ その他の基本的な設定方法。
http://www.vwnet.jp/Windows/WS12R2/2016071301/sysperp_untitled.htm
村嶋の旦那のページをご覧くだせぇ。 これだけ設定できれば私は満足。
0 notes
Link
Since I made the post about Sysprep utility and backing up the system: once you prep your system, then what? You now have a generalized lump of data sitting in a box, ready to be ported out, but the moment you start it up, it’s going to rewrite all those details back into place.
Interrupt that process by booting up with Paragon in the interim.
A drawback to using Paragon is that the driver availability (or rather, lack thereof) can make you do extra work. Case in point: When you boot up the Paragon interface, it will look for:
1) The hard drive where your OS and data is located (Made by “AJAX” (hypothetical name, I’ll explain why later)).
2) Any removable media (Let’s say, in this case, an external hard drive you want to back up to, made by “ACME”).
3) Additional removable media where your supplemental drivers can be located (important point: keep reading).
Because Paragon, in my experience, has limited amounts of drivers bundled in with it, you might be hard pressed to find ways of manually installing drivers into it that will allow it to detect your hard drive and other removable media manually. This is a huge drawback. You might have to manually install the driver for your AJAX 123 hard drive that you already have, the ACME 321 hard drive you want to export your sysprep’d hard drive to, and then there’s that dreaded chicken-or-egg situation where you have the drivers stored on removable media---that cannot be read without the driver.
Okay, didn’t mean to scare you guys: The greater chance is that yes, Paragon will detect your AJAX 123 with no problem. Since Sysprep doesn’t really interfere with 3rd party software or raw files created by the user, you can download the drivers directly to the AJAX 123, store them in a designated folder, and pull them up from within. Just make sure you have the right make and model of driver, so do your homework, folks!
0 notes
Text
KVM-从模板镜像克隆虚拟机
1. 准备工作
克隆虚拟机你需要以下文件:
一个定义文件(用于描述内存大小,CPUs的个数等等)
一个镜像模板(以安装好操作系统)
2. 创建预定义文件和镜像模板
定义文件为一个xml格式的文件,模板是一个虚拟机disk image.通过以下方法创建:
创建一个基本的虚拟机并安装好操作系统
关闭该虚拟机
virsh shutdown basevm
导出XML格式文件,并复制基础镜像为template.qcow2
virsh dumpxml basevm > /var/lib/libvirt/images/template.xml cp /var/lib/libvirt/images/basevm.qcow2 /var/lib/libvirt/images/template.qcow2
修改template.xml文件中镜像文件的指定位置
<disk type='file' device='disk'> <driver name='qemu' type='qcow2' cache='none'/> <source file='/var/lib/libvirt/images/template.qcow2'/> <target dev='vda' bus='virtio'/> <address type='pci' domain='0x0000' bus='0x00' slot='0x04' function='0x0'/> </disk>
通过 virt-sysprep 命令处理template.qcow2 这将重置镜像并移除SSH kesy, 为网卡创建新的MAC地址,修改udev persistent net rules, 清除log文件等
virt-sysprep -a /var/lib/libvirt/images/template.qcow2
【可选】如果你不再需要basevm,删除它。
virsh undefine basevm rm /var/lib/libvirt/images/basevm.qcow2
3. 从模板克隆新的虚拟机
通过template.xml, template.qcow2 创建虚拟机
virt-clone --connect qemu:///system \ --original-xml /var/lib/libvirt/images/template.xml \ --name newvm \ --file /var/lib/libvirt/images/newvm.qcow2
作者:FiveStrong
链接:https://www.jianshu.com/p/6aa13d6acfa5
来源:简书
简书著作权归作者所有,任何形式的转载都请联系作者获得授权并注明出处。
1 note
·
View note
Text
Photo stamp remover 8.3 key


You can now deploy Horizon Connection Servers and Horizon Agents in different data centers across WAN, as long as the Horizon Agents are located within 120ms of the Connection Servers.
HTML Access is now supported in an IPv6 environment.
You can now connect to the event database using SSL.
See Using the Legacy Microsoft CryptoAPI Standard. If you have a use case requiring use of the legacy CryptoAPI standard, you can still do so.
By default Horizon now uses the Microsoft Cryptography API: Next Generation (CNG) standard.
Cross-Origin Resource Sharing (CORS) is now enabled by default.
See Add vCenter Server Instances to VMware Horizon. Deployment type allows you to specify whether your vCenter is in a private data center or in a specific public cloud data center.
When adding a vCenter Server instance, you can now select a deployment type.
Manage Machine Maintenance - used for toggling machines manually to and from maintenance state.
Manage Machine Alias and User Assignment - used for machine user assignment and machine alias assignment.
Both new privileges are children of the Manage Machine privilege: See Privileges for Managing Machines and Object-Specific Privileges.
Role creation and edit now offer two new privileges applicable to access groups.
You can now use smart card caching emulation for non-Microsoft Windows client connections.
Users belonging to untrusted domains can use SAML authentication, True SSO, and smart card authentication.
See Using VMware Horizon Desktop Recording.
You can record desktop sessions for troubleshooting and auditing sessions.
See VMware Configuration Maximums for detailed scalability metrics.
Horizon supports 20,000 desktops and sessions per Pod.
See Estimating Memory Requirements for Virtual Machine Desktops.
5K and 8K client display resolutions are now supported (Blast only).
See Choosing ClonePrep or Sysprep for Customizing Your Virtual Desktops.
Microsoft Sysprep is now supported for customizing instant clone virtual machines.
See Worksheet for Creating an Instant-Clone Desktop Pool.
When creating or editing a desktop pool with session type Application and Desktop or Application, you can select the Bypass Session Timeout setting to allow application sessions to run forever.
See Worksheet for Creating an Automated Instant-Clone Farm in Horizon.
The Bypass Session Timeout setting allows application sessions to run forever.
The actual release date can vary based on business needs and engineering schedule changes to address critical customer requirements. This information is grouped by installable component.īeginning with this release, version numbering is based on the planned year and the month of the release. VMware Horizon version 2106 provides the following new features and enhancements.
Nonoperational Features in This Release.
No Longer Supported Features in This Release.
It always gives me accurate results.These release notes include the following topics: I’ve used it for a really long time and never once had a problem. This one does a great job removing photo background online as well as replacing. With its user-friendly and ad-free interface, a first-time user can create the most stunning photo with the fancy background templates it offers. It’s so much better than any other tools I’ve used before. This is exactly what I’ve been looking for. I successfully changed the background of my passport photo to white with this amazing tool. It not only erases my photo backgrounds but also provides multiple templates. This online background eraser does what it promises and does it very well. The AI technology helps me remove image background online with a single click. One of the best online photo background erasers by far.
0 notes
Text
Gigaware usb to serial driver 2603487

#Gigaware usb to serial driver 2603487 how to
#Gigaware usb to serial driver 2603487 serial
#Gigaware usb to serial driver 2603487 upgrade
Tech Ed New Orleans: The who, what, why and The Krewe.
Simple way to keep hackers out of your Digium Switchvox PBX system (or any VOIP PBX).
Setting up a Xirrus Wireless Array…It’s easy!.
#Gigaware usb to serial driver 2603487 upgrade
Script to remove Windows 10 Upgrade from your domain (or your computer).Script to Remove ALL Office Programs prior to deploying Office 2016 from a network location!.Script to DISABLE Auto Complete in Outlook for all versions of Outlook.SCCM 2012 Task Sequence Image Capture Failure Error 0x0004005 Sysprep Rearm – the FIX!.
#Gigaware usb to serial driver 2603487 how to
RDP session that SPANS both monitors… How to do it!.OneDrive for Business error: We can’t connect to the specified SharePoint site….Office 365 apps stop working, uninstall fails with Error Code: 30068-5 (1715).Microsoft Word 2016 Crashing when opening documents.Installing Office365 ProPlus on a RDS Server (Terminal Server) using Shared Computer Activation.Installing Microsoft SQL Server on Windows Server 2012R2 with required patches (KB291355) fails to install.How to send a file securely…Hidden inside of a picture!.How to Hard Reset a Microsoft Surface RT.How to FIX the Windows Server 2012 RDS deployment “The server has reboots pending and needs to be restarted.”.How to Extract Files from Exchange Public Folders and save them to a Network Share.How to Disable Internet Explorer on Windows XP, Windows 7 and Windows 8!.
#Gigaware usb to serial driver 2603487 serial
Gigaware Model: 2603487 USB to Serial Driver – YES the driver is here!.
Free Bitcoins and a chance to win more by playing High/Low Game.
FREE Bitcoin, LiteCoin & FeatherCoin (and other crypto coins) Daily!.
Easily Recover files from your Windows computer using a Linux Live Cd.
Disable Internet Explorer on Server 2008…3 simple steps!.
Deploy Office 2016 using a script, from a network share!.
Create a Text Database with EVERY Telephone number in the US!.
Cloud computing may not be as secure as you would like to believe…Vulnerabilities in Azure Part 2.
Cloud computing may not be as secure as you would like to believe…Vulnerabilities in Azure Part 1.
Click here to be infected with a Virus!.
Citrix lets my users work in the Dark! (with the help of Cisco, HP, and Eaton).
Change the default listening port for RDP.
Block Internet Explorer in Active Directory in a few clicks!.
Barracuda Spam Firewall…Two tips you may not know….
10 Easy Steps to Remove Malware from your Windows Computer.
0 notes
Text
How To Use Sysprep Tool In Windows 10
How To Use Sysprep Tool In Windows 10
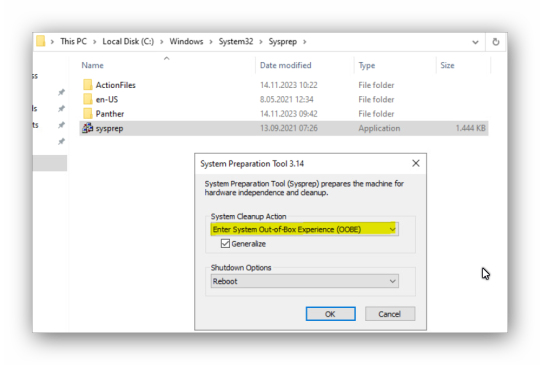
Advertising The System Preparation Tool (Sysprep), is intended for system administrators and OEMs, to automate Windows 10/8/7 operating system deployment. After you complete the initial configuration steps on a single computer, you can run the Sysprep tool to prepare the sample computer for cloning and automate deployment to other computers. It can be found in the WindowsSystem32sysprep…

View On WordPress
0 notes