#powercli
Explore tagged Tumblr posts
Visit Tumblr Blog
Explore Tumblr blogs with no restrictions, modern design and the best experience.
Last Seen Tumblr Blogs


Fun Fact
Tumblr has a low social media market share in South America.
Text
Enabling vTPM in vSphere VMs using Orchestrator
To enable a virtual Trusted Platform Module (vTPM) for a virtual machine in vCenter using Aria Automation Orchestrator (vRO), follow these steps. This process enhances security by enabling cryptographic features like BitLocker encryption and secure boot. What is vTPM?Before it, let us see TPM first – TPM or Trusted Platform Module is a specialized chip on an endpoint device that stores RSA…
0 notes
Text
PowerCLI vMotion Enable Easy Switcher Script
PowerCLI vMotion Enable Easy Switcher Script @vexpert #vmwarecommunities #vmotion #vmkernel #powercli #automation #devops #virtualization #homelab #homeserver #vexpert
Have you found yourself in the position of needing to change which vmkernel ports vMotion is enabled on? Maybe you have to storage vMotion a VM to a different cluster and need to make sure that vMotion is on the management interface. We have all run into issues with dedicated vMotion networks and storage vMotion to another cluster. Even when you enable this on the management interface if you…
0 notes
Text
Export DRS (Distributed Resource Scheduler) rules from a vCenter server using PowerCLI-How to?
To export DRS (Distributed Resource Scheduler) rules from a vCenter server using PowerCLI, you can use the following script. This script will connect to your vCenter server, retrieve the DRS rules for each cluster, and export them to a CSV file. Install VMware PowerCLI if you haven’t already: Install-Module -Name VMware.PowerCLI -Scope CurrentUser 2. Run the following PowerCLI script: #…
View On WordPress
0 notes
Text
PowerCLI ile VMware Yönetimi
PowerCLI ile VMware Yönetimi
Merhaba, bu yazımda sizlere PowerCLI ile VMware Yönetimi konusundan bahsedeceğim. İlk örnek olarak VMware ortamınızda olan sunucuların işletim sistemlerini görüntülemek için PowerCLI üzerinde aşağıdaki komutları kullanabilirsiniz. # VMware PowerCLI modülünü içeri aktar Import-Module VMware.PowerCLI # vCenter Server’a bağlan Connect-VIServer -Server vcenter_server_ip -User your_username -Password…

View On WordPress
#PowerCLI ile VMware Yönetimi#vmware powercli commands#vmware powercli download#vmware powercli install
0 notes
Text
PowerShell 7 で 実行しているPowerCLI 12を利用し 仮想マシンに対して並列で事前に定義したFunctionを実行する際 Use-PowerCLIContextとGet-PowerCLIContextとForEach-Object -Parallelを使用して 予めCSVファイル上の変数を���み込ませるにはどのようなコードを書けば良いですか?
CSVファイルを読み込んで、変数に格納します。
$csv = Import-Csv -Path "C:\path\to\file.csv"
ForEach-Object -Parallel で並列処理を行う前に、PowerCLIコンテキストを取得します。
$ctx = Get-PowerCLIContext Use-PowerCLIContext -Context $ctx
ForEach-Object -Parallelで並列処理を行います。 ここで、各仮想マシンに対して実行するFunctionに $csv を渡します。
$vmNames = "vm1", "vm2", "vm3" # 仮想マシン名のリスト $vmNames | ForEach-Object -Parallel { param($vmName, $csv) # ここにFunctionを記述 } -ArgumentList $_, $csv
-ArgumentList パラメータに $vmName と $csvを渡すことで、各スレッドで使用できるようにします。
上記の例では、$vmNames の各要素を $vmName に渡しています。
また、$csv は先に読み込んだCSVファイルを渡します。
0 notes
Photo

Get VMware vMotion performance report through PowerCLI. ⠀ ⠀ Want to know how long it took to vMotion your VM from one data store to another data store or from one ESXi host to another ESXi host? I created a PowerShell script that gives you a simple report of vMotions happened in your environment.⠀ ⠀ https://buff.ly/2RI40Eo⠀ ⠀ #VMware #vMotion #PowerCLI #Powershell #ESXi #virtualization #Dell #EMC #storage #scripting #script #automation #virtualmachine (at Toronto, Ontario) https://www.instagram.com/p/Btd8k2DAAjU/?utm_source=ig_tumblr_share&igshid=1e5b35wzg1b8q
#vmware#vmotion#powercli#powershell#esxi#virtualization#dell#emc#storage#scripting#script#automation#virtualmachine
1 note
·
View note
Text
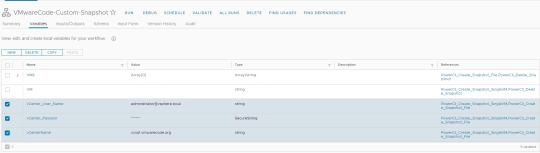
How to automate vm snapshot creation using csv and schedule automatic deletion of the snapshot using VRO 8
How to automate vm snapshot creation using csv and schedule automatic deletion of the snapshot using VRO 8
Snapshot is one of the great feature which we have in vSphere and which can be used like backup whenever we want to perform any change in Virtual Machine.There are multiple ways to take the snapshot for VM using multiple products/Language.We can use vSphere GUI or Rest APIs or pyvmomi or PowerCli . Also as precaution when take snapshot , it is recommended to delete the snapshot after x amount of…
View On WordPress
0 notes
Text
How To Install VMware PowerCLI Module using Powershell - Online Method
How To Install VMware PowerCLI Module using Powershell – Online Method

To use VMware PowerCLI you need to first install/enable the modules on your client computer. The steps provided below are of steps that I have frequently taken to install on my Windows 10 client machines.
Install VMware PowerCLI Module From PC With Internet Connection From a Windows 10 client with an internet connection open powershell (as an administrator) and issue the following commands:
View On WordPress
#how to connect vcenter server using powershell#install module vmware powercli#install powercli offline#Install VMware PowerCLI#powercli command to connect to esxi host#powercli connect to vcenter#vmware powershell module#vmware vcenter powershell module
0 notes
Text
Getting Started: vRealize Orchestrator Script Environments [CB10098]
Getting Started: vRealize Orchestrator Script Environments [CB10098]
Do you use a lot of Polyglot scripts in vRO? Are you tired of creating bundles every time you work on a Python, Node.js or PowerShell scripts which uses modules and libraries which are not provided out-of-the-box by vRealize Orchestrator? Probably vRO guys at VMware heard your prayers this time. vRO 8.8 onwards, you can now add modules and libraries directly as a dependency in your vRO actions…

View On WordPress
#8.8#CB10098#Environments#Javascript#nodejs#powercli#powershell#python#Script Environment#vRO#vROScript
0 notes
Text
Automate Home Lab Server Updates with GitLab CI CD
Automate Home Lab Server Updates with GitLab CI CD @vexpert #vmwarecommunities #devops #gitlab #linuxupdates #ubuntuupdates #automation #cicdpipeline #virtualization #homelab #homeserver #selfhosted #selfhosting #vhtforumsupdates #learneveryday
I recently wrote a blog post about replacing traditional Windows scheduled tasks with a CI/CD pipeline and the automation it provides. There are so many advantages to running something like Gitlab in your home lab to centralize your automation and help with bringing one-off scripts into source control with Git. I wanted to share with you guys a cool project I have been working on to bring my…
View On WordPress
0 notes
Text
Efficient vROps Tag Assignment with PowerCLI: Streamline Your Workflows
VMware’s vRealize Operations (vROps) is a comprehensive operations management platform that provides monitoring and management capabilities for your virtualized infrastructure. One of the ways to manage resources in vROps is by assigning tags to them, which allows you to group resources and perform monitoring and management operations more efficiently. While vROps provides its own REST API,…
View On WordPress
0 notes
Text
PowerCLI Distributed Switch Ekleme İşlemleri
Merhaba, bu yazımda sizlere daha önce de değinmiş olduğum PowerCLI distributed switch ekleme işlemleri konusunu biraz daha detaylandıracağım. VMware vCenter’da komut satırı arayüzü (CLI) üzerinden bir dağıtılmış sanal anahtar (distributed switch) eklemek için genellikle esxcli veya PowerCLI komutlarını kullanırsınız. Ancak, vCenter’a doğrudan CLI üzerinden dağıtılmış bir switch eklemek için…

View On WordPress
#powercli distributed switch ekleme#PowerCLI Distributed Switch Ekleme İşlemleri#powercli ile vcenter yönetimi#powercli ile vlan ekleme
0 notes
Text
New Post has been published on
New Post has been published on https://www.tayfundeger.com/powercli-ile-snapshot-raporu.html
PowerCli ile Snapshot Raporu
Merhaba,
PowerCli ile Snapshot Raporu isimli bu yazımda sizlere vCenter veya ESXi üzerinde bulunan virtual machine’ler üzerindeki snapshot’ların nasıl raporunu nasıl alabileceğinizi anlatacağım.
Daha önce snapshot ile ilgili aşağıdaki gibi bir makale yazmıştım. Bu yazıma aşağıdaki linkten ulaşabilirsiniz.
Snapshot Nedir?
Aşağıdaki script sayesinde snapshot’ların raporunu alabilir ve belirtmiş olduğunuz adrese mail olarak atabilirsiniz. Bu script’i Windows Task Scheduler üzerinde bir job oluşturup günlük olarak çalışmasını sağlayabilirsiniz. Aşağıda örnek ekran görüntüsünü görebilirsiniz. Gerekli bölümleri kendiniz değiştirebilirsiniz.
[php]
@” =============================================================================== Title: Get-VmwareSnaphots.ps1 Description: List snapshots on all VMWARE ESX/ESXi servers as well as VM’s managed by Virtual Center. Requirements: Windows Powershell and the VI Toolkit Usage: .\Get-VmwareSnaphots.ps1 Author: Tayfun Deger =============================================================================== “@
Import-Module VMware.VimAutomation.Core #Global Functions #This function generates a nice HTML output that uses CSS for style formatting. function Generate-Report Write-Output “<html><head><title></title><style type=””text/css””>.Error color:#FF0000;font-weight: bold;.Title background: #0077D4;color: #FFFFFF;text-align:center;font-weight: bold;.Normal </style></head><body><table><tr class=””Title””><td colspan=””5″”>VMware Snaphot Report</td></tr><tr class=”Title”><td>VM Name </td><td>Snapshot Name </td><td>Date Created </td><td>Description </td><td>Size (GB) </td><td>User Name </td></tr>”
Foreach ($snapshot in $report) Write-Output “<td>$($snapshot.vm)</td><td>$($snapshot.name)</td><td>$($snapshot.created)</td><td>$($snapshot.description)</td><td>$($snapshot.SizeGB)</td><td>$($snapshot.username)</td></tr> ” Write-Output “</table></body></html>”
#Login details for standalone ESXi servers $username = ‘vCenter-Login-Name’ $password = ‘vCenter-Login-Şifre’ #Change to the root password you set for you ESXi server
#List of servers including Virtual Center Server. The account this script will run as will need at least Read-Only access to Virtual Center #$ServerList = “vCenter-ISMI” #Chance to DNS Names/IP addresses of your ESXi servers or Virtual Center Server
#Initialise Array $Report = @()
#Get snapshots from all servers #’ foreach ($server in $serverlist) where $_.PowerState -eq “PoweredOn” echo $Report >> “C:\out1.txt”
# Generate the report and email it as a HTML body of an email Generate-Report > “VmwareSnapshots.html” IF ($Report -ne “”) $SmtpClient = New-Object system.net.mail.smtpClient $SmtpClient.host = “SMTP-IP-ADRESI” #Change to a SMTP server in your environment $MailMessage = New-Object system.net.mail.mailmessage $MailMessage.from = “[email protected]” #Change to email address you want emails to be coming from $MailMessage.To.add(“[email protected]”) #Change to email address you would like to receive emails. $MailMessage.IsBodyHtml = 1 $MailMessage.Subject = “vCenter-ISMI- Günlük Snapshot Listesi” $MailMessage.Body = Generate-Report $SmtpClient.Send($MailMessage)
Disconnect-VIServer vCenter-ISMI -Confirm:$false
[/php]
Umarım faydalı olmuştur.
İyi çalışmalar.
0 notes
Text
Vmware – PowerCLI
For all those scripting engineers, here is a nice one. Accessing your VCenter via PowerCLI. When you have to look for bunch of networks, IP’s , MAC Addresses or generally properties on a large base, PowerCLI to the rescue. Here is how you can connect to your VCenter or Node via PowerCLI. It is a module which can be run on Powershell. In order to run this, you will need to ensure that you have…
View On WordPress
0 notes
Text
PowerCLI and VMware Horizon View
By Curtis Brown
Introduction
VMware PowerCLI has been in existence for quite some time and over the last 2 years it has been moving at quite a rapid pace. It has traditionally been used to provide PowerShell based command and control functionality within VMware vSphere environments, with particular focus on the ability to create scripted functions for automation purposes. Used in conjunction with automation and orchestration tooling, a great many bespoke capabilities are available.
During 2018, there has been a release around every 2 months, the current release, version 11 was released in October and provides support for the following:
vSphere 6.7U1
VMware Horizon 7.6
NSX-T 2.3
VMware Cloud on AWS
Being based on PowerShell, it is also compatible with third party modules, such as those administering Active Directory, to provide an integrated solution across a wide range of products.
In this blog, I look at PowerCLI’s ability to support VMware Horizon.

Installing VMware PowerCLI
Installing PowerCLI was once a case of downloading an installer from the VMware Portal and installing the components. However, PowerCLI is now published from the PowerShell Gallery on the internet (https://www.powershellgallery.com/packages/VMware.PowerCLI/11.0.0.10380590) permitting installation on a connected PC straight from the PowerShell interface, simply by running:
Install-Module -Name VMware.PowerCLI

You might get something like this (accept the default):

Then it’ll install…

To allow execution of local scripts:
Set-ExecutionPolicy RemoteSigned

Then, run the following to confirm it’s all installed successfully.

Once installed, it’s worth configuring the Customer Experience Program participation by Enabling or Disabling this (It stops nag messages).
Set-PowerCLIConfiguration -Scope User -ParticipateInCEIP $true $false

After that, the basic PowerCLI is ready to go.
What can we do for Horizon?
‘Out of the box’, PowerCLI only provides the ability to connect or disconnect to the Connection Server, so providing a conduit for accessing the Horizon APIs. To connect to Horizon Connection Server:
Connect-HVServer -Server connectionserverFQDN -user adminuser@domain -Password XXXX

However, VMware maintain example scripts at https://github.com/vmware/PowerCLI-Example-Scripts that can be used as a basis for automation of Horizon and the other supported components.
By downloading the scripts as a ZIP file, it is possible to install them. First, check $env:PSModulePath to locate the modules directory paths (usually, there’s the user specific path, plus system ones)

For Horizon, we extract VMware.hv.helper from the ZIP and drop this into C:\Program Files\WindowsPowerShell\Modules.

In PowerShell, we then unblock the newly exported folder by running
dir ‘C:\Program Files\WindowsPowerShell\Modules\VMware.Hv.Helper\’ | Unblock-File
With this in place, we can now use a whole raft of useful PowerShell commands (they can be listed by using Get-Command -Module 'VMware.Hv.Helper'). These can be used for automation of tasks and generating reports.
For example, Get-HVPoolSummary will list configured pools, including their type, assignment type and status:

And we can see how many VMs are available:

Get-HVHealth shows a basic status:

By leveraging the ‘New‘ and ‘Remove’ commands, it is possible to provision and destroy new Pools (desktops and applications), entitlements, RDS Farms and Cloud Pod objects such as Sites and Entitlements. For Example, setting up Shared Desktop pool ‘Teachers 1’:


Closing Thoughts
What we have here is a set of powerful tools that are not just capable of managing the VMware vSphere infrastructure, but can also expand into the realm of delivering desktop pools – all from scripting and automation. For example, it would be possible to create a script that would leverage PowerShell to create an Active Directory Group and populate it, then create a desktop pool and grant the members of the group access to it. Further, this could be used in concert with vRealize Automation and Orchestration to provide a portal for self service requests for generating desktop pools and services.
Given that the current release supports VMware Cloud on AWS as well as VMware Horizon, this offers the tantalizing prospect of being able to programmatically manage a federated on-prem and AWS hosted Horizon Cloud Pod Architecture. The sky is the limit!
If you’re planning to deploy a Virtual Desktop solution, we can help. Xtravirt provide design and implementation services to create the right solution for your organisation. Contact us and we’d be happy to use our wealth of knowledge and experience to assist you.
About the Author
Curtis Brown joined the Xtravirt consulting team in October 2012. His specialist areas include End User Compute solutions and Virtual Infrastructure design and implementation with particular strength in VDI, storage integration, backup and Disaster Recovery design/implementation. He was awarded VMware vExpert 2018 and is a graduate of the VMware Advanced Architecture Course 2018.
About Xtravirt
Xtravirt are an experienced consulting firm dedicated to delivering outcomes to help customers solve their IT challenges. We design and build strategies to help customers unlock the full potential of cloud, datacentre and workspace technology.
We are the VMware Global and EMEA Professional Services partner of the year.
www.xtravirt.com
#xtracbrown#virtualization#virtualisation#cloud#vmware#horizon#PowerShell#PowerCLI#VDI#DaaS#EUC#horizonview6#horizonview#view
0 notes
Text
How to utilize VRO PowerCli actions to make the VRA custom form dynamics for cluster, network and Folder in vRealize Automation 8
How to utilize VRO PowerCli actions to make the VRA custom form dynamics for cluster, network and Folder in vRealize Automation 8
Recently I was working on used case where we need to make the custom form dynamics in VRA 8 . Dynamic custom forms ease the job because we do not need to hard code everything . There are multiple ways to do this like you can use JavaScript which is being used in vro from long time or You can use Python and Utilize Rest API calls , Python support is added in VRA 8 design along with PowerCli. I…

View On WordPress
0 notes