#the colouring and textures are so prettyyy
Text
gifmaker / cc wrapped ✦ every month of 2023
thank you so much to my favourites @raplinenthusiasts, @jkvjimin, @starcatching, @cordiallyfuturedwight, @sevencoloredstar, @rjshope, @hyunsung, @loversmore & @ye-xiu for wanting me to look back at my creations from last year, I love you!!
January
🌙 most popular: fluffy haired jungkook comp
🤍 my favourite: jimin x satellite gfx for my sweet mona; one of my most favourite things I've ever created, actually! I love how the textures turned out, and how I visualised the lyrics
February
🌙 most popular: yoongi-centric ot7 comp (😔😔😔)
🤍 my favourite: gradient taekook comp; the PLANNING that went into this agdhhj I was super proud of how this looked in the end! plus I love making gifts for others <3
March
🌙 most popular: yoongi's signature smirk comp
🤍 my favourite: jimin FACE gfx; I don't even know what had gotten into me, I made that so comparably fast?? I was just obsessed with the water theme and the new effects I used - the fact that I made a moving water reflection? hell yeah
April
🌙 most popular: Road to D-Day comp (my most popular from this whole year, actually)
🤍 my favourite: gradient jimin FACE era comp; probably my favourite set from this whole year, I'm beyond proud of how this looks, so vibrant and prettyyy lmao also Jimin and FACE were definitely the highlight of my year, I was so happy while making this)
May
🌙 most popular: jinminkook comp
🤍 my favourite: I love all three comps I made that month, but I think it's still gonna be awi's birthday jimin gfx, simply because I love her so much and the middle panel had my back in PAIN lmao, I love animating doodles even if it's a lot of work
June
🌙 most popular: the tannies being bad at sports comp
🤍 my favourite: they connect to 7G comp; unfortunately I had no ideas for a festa post this year, but I still made these two sets to celebrate them a little bit. I just love comps that have me smiling the whole time while making them!
July
🌙 most popular: jctpmwsmlastilmmtu pt. 1 (mimi series)
🤍 my favourite: yeah it's this one too :((( I love jimin so much y'all and that comp series is so self-indulgent and comforting and healing it literally. makes. me. tear. up. just look at him oh my god
August
🌙 most popular: jungkook for calvin klein
🤍 my favourite: yoongi's final concert; broke my heart into a million pieces, but his smiles glued it somewhat back together. I will forever be sad and miserable about this tour so let's not talk about it
September
🌙 most popular: jctpmwsmlastilmmtu pt. 2 (mimi series)
🤍 my favourite: ...yeah that one again :( but I also made so many nice taehyung layover gifs <33
October
🌙 most popular: the tannies sweeping yoongi off his feet comp, but the threemin suchwita comp literally just has one note less lol
🤍 my favourite: that one's tough... it was mimi month and so much good stuff got released + vicnic... ah I'll just go with blond jimin in his fluffy green sweater 💚
November
🌙 most popular: my sweet boiled dumpling pouty yoongi :(((
🤍 my favourite: the sweet boiled dumpling running excitingly; it was missing yoongi and the tannies month (still ongoing)
December
🌙 most popular: jimin backstage in his purple Filter outfit (while y'all saw the gender demon I saw my slayful colouring...and the gender demon)
🤍 my favourite: moon/ the astronaut seokjin gfx for my love kayla; it was nice to make an edit without time pressure for once, and I love the references I put in, also the colours and textures!
I'm tagging @avizou, @agustd3, @magicshop, @dasisugarun, @jung-koook, @jinstronaut and @taetheists, have fun!! 🤍
#tag game#*gifs#t'was a good year! so many comps lol#am also pretty happy with my more graphic-y creations#the jimin gif's colouring looks so different on mobile? I don't get it
27 notes
·
View notes
Note
Genuinely can’t get enough of your art. The style, the texture you sneak in with shadows and shapes and the doodled bits, the choices of colour, the composition, the life you put into your character redesigns, I’m completely and utterly enamoured
SO PRETTYYY
Omg OMG THANKSS UUU SOOO MUCH !!! it means Soo much to me to hear this ! I am Soo happy that ya think this !
#shapes and textures are forever a part i tried to work for the past years#bizzare talks#hope i can learn to animate iN my style soon YAY#THANKS U ANON U ARE SUSPER SWEET
6 notes
·
View notes
Text
Afi Hair by alerii
a box braids hairstyle with curls at the ends inspired by this. making hearts with braids is so prettyyy 🙏🏾
new mesh
bgc, not hat compatible
24 ea colours + 7 modmax
all lods
disabled for random
two versions: plain (26.3k polys) and hearts v2 (27.8k polys)
theres some clipping as seen in prev but i tried my best okay 😭
respect my TOU
Consider supporting me on Ko-Fi!
download (sfs, free)
---
(credits and in game preview below!)

credits (thank you to these creators!!!): @qicc for braid base, @sheabuttyr for harmoni hair texture, @qwertysims modmax swatches
#also look at my newly created simmie#shes called akosua#methinks she might become a reoccuring model hmm...#sim: akosua#ts4#i love adding hearts to hair its so fun#the sims 4#sims4#sims#thesims4#ts4mm#maxis mix#s4hair#simblr#dls#sims 4 hair#ts4 hair#ts4 custom content
1K notes
·
View notes
Note
hiii abby!! can you post a tutorial for how you make edits like your latest one? the url edit fro taylorswifh? it’s so prettyyy
♡ edit tutorial for this edit, requested by anon ♡
hiii so! this is quite long, but that’s because I wanted to capture my whole entire process to hopefully help you! I used photoshop (2018) for this tutorial, and all the resources I used are listed here (everything except for photoshop is free)! I’ve sort of split this tutorial up into sections, by the different steps. thank you and have a lovely day!! ♡
so before I begin, I always think about the edit, like what I want the final outcome to look like (or if I don’t know what that’ll look like yet, what direction I want it to go in, the main themes/ideas/colour schemes that I have). I personally love using a minimalist range of colours, all of them being light and pastel (that’s just my personal liking though). I also consider the main themes or ideas that I want to translate through my edit. you also need to have the passion and desire to edit, I’ve learned that there’s nothing more draining than editing when you really don’t want to. so I think that you should think about all these things before starting!!
tip; put on some music, it gets your creativity and thinking flowing if you’re in a good mood ldkjkl
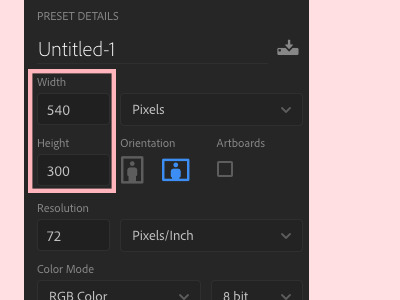
so! when creating the edit; first of all, I created a new document in photoshop - 540 x 300 pixels for this specific edit (just because that shows up as high quality on tumblr, but it doesn’t really matter!) when you click ‘create’, a white canvas should open up.
— creating the book
next! I used a book psd for my edit, which you can find and download here!! so I just opened that psd up (a psd is just a photoshop file that has like all the layers in place so it’s not just one photo);
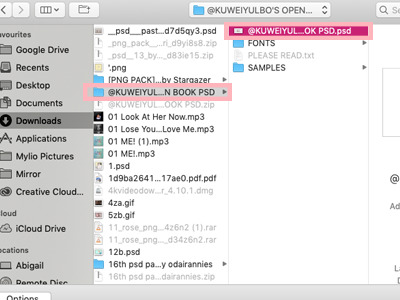
when you open the file up, this is how it should look (well not really, because I’d edited it to look like this, but it should have this general layout);
now what you have to do is sort of literally drag the file out and then, drag all the layers from that file into your white canvas, like this;

— giffing
I just wanted to quickly mention that giffing is definitely an optional step. I do it in pretty much all of my edits, but I wouldn’t recommend it if you’re just beginning to edit, because giffing takes the most time and it can be really draining and messy if not done right ldkjd.
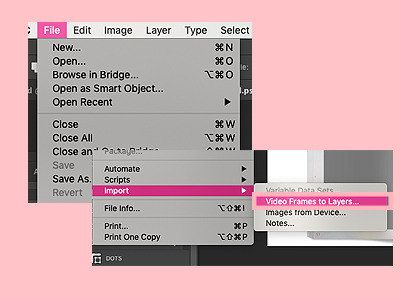
to create my gifs, I use youtube videos, which I download through 4k video downloader (it’s really simple with 4k, you just have to copy the youtube link and paste it into the app!). so to open up a video, go to ‘file’ then ‘import’ and finally ‘video frames to layers’;
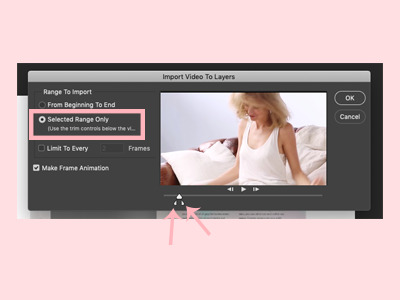
once you’ve chosen the video you want to use, open that up (don’t know why that’s so blurry dlkjdlj but you get the idea);

now this should pop up! make sure it’s on ‘selected range only’ and then use the toggles at the bottom to select the specific part of the video that you want to use (I usually gif about 20 frames because it’s sooo much work for me to do more than that lkdjldj)
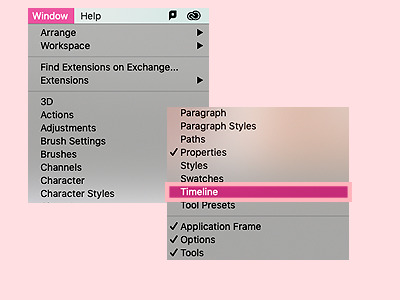
when you’re in the file, go to ‘window’ then ‘timeline’ for the gif to show up frame by frame;
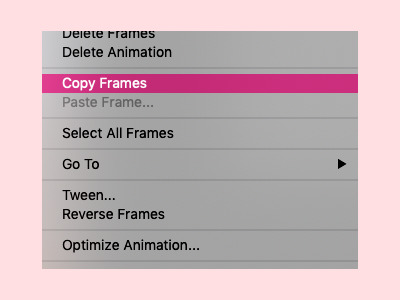
now highlight the specific frames that you want by literally dragging across them with the timeline bar at the bottom. then click the three bars on the top right of the bar, and click ‘copy frames’;

now go back to your book psd file, and at the timeline bar at the bottom, click ‘create frame animation’;

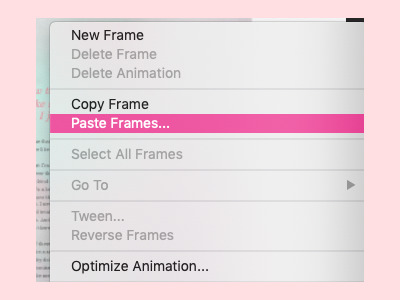
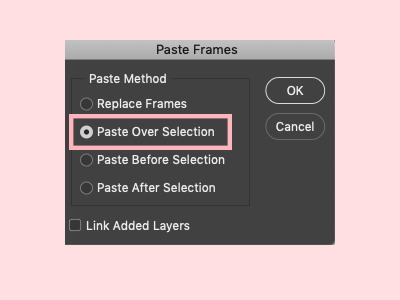
click on the three bars on the top right of the timeline bar and paste the frames over the selection;
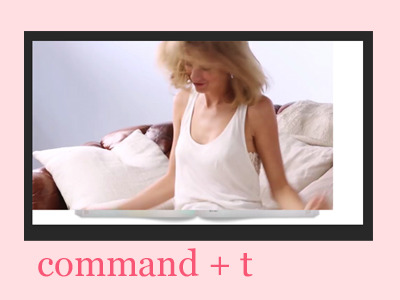
your file should now look something like this! to resize the gif, just press command + t and adjust it from there!
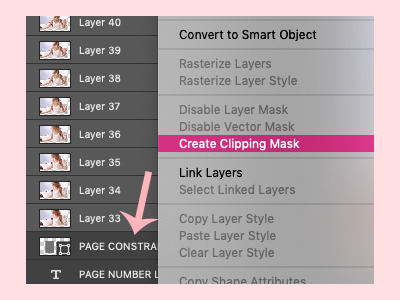
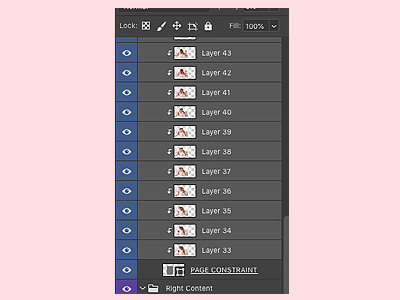
now to give it the effect that it’s a part of the book, you have to create a clipping mask (so it sort of clips onto the book layer like a paper clip). to do this, select all the layers of the gif, drag it right above the layer that you want to clip it onto (the page constraint layer in this case). then right click the gif layers and click ‘create clipping mask’;
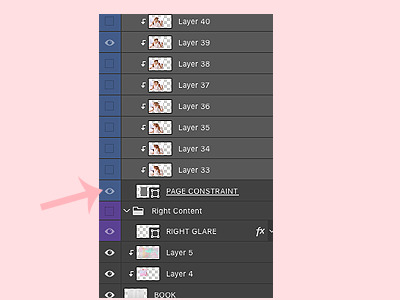
as a result, your layers should now look like this. you can use command + t again to adjust the gif size;
tip; press command + g to group the layers together so they take up less space!

now, with your gif, this step is pretty tiring and takes forever dlkdjl, but for the layer to show up in every frame of the gif, you have to click on the box button on the left of each layer so that an eye shows up. you can also press the eye button at the top of the settings, in the unify bar, so that it stays visible throughout the entire gif. I don’t know if I’m explaining it properly dlkdjl but just go through every layer and press the box so an eye shows up.

sometimes the unify button doesn’t work for some reason, and you’ll have to manually go through every single frame just to click on the eye button. it’s excruciating, but it’s worth it in the end lkdjdl
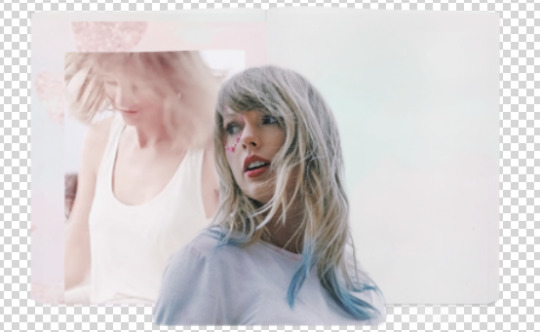
this is how your edit should look now!

now what I do is apply a psd (sort of like a filter) so it looks softer and prettier! these days, all of the psds that I apply come from this lovely pack!

in the same way that you dragged your book psd in, drag the psd *folder* into your edit;
your edit should now look like this!
— adding the photo
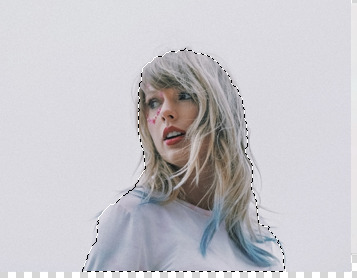
now’s the fun part! you can add whatever you want to, but what I did in my edit was I cut out a photo of taylor. now what you can do if you’re running short of time is find a transparent photo of taylor on google or on deviantart, but if you want to take the time to actually crop the photo out like me (even though I’m horrible at it), here’s how I do it! first find the photo you’d like to crop out. I usually use taylorpictures, they have the most high quality photos of taylor!
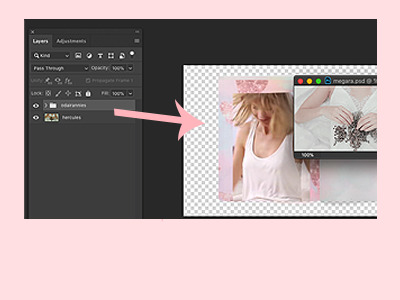
so find the photo you want to use, copy it;

then just paste it into your edit;

use command + t again to adjust the size;

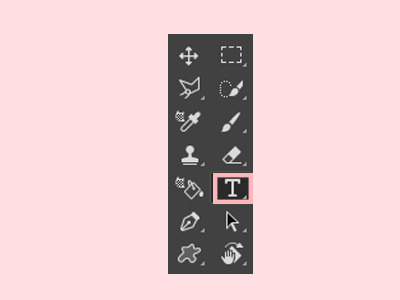
and now to crop it out, what I do is use the quick selection tool, which is this button right here;

in this mode, you can easily just select the part of taylor that you want to cut out (that sounds weird lkjd);
at the top, there should be a bar with a number of buttons, one of them being ‘select and mask’;

if you click on that, you should be taken to another page, similar to this;

now you can play with the settings on the right, then press ‘ok’ when you’re happy with it (the numbers change for each photo and your style, it entirely depends on how you want it to look);

now you should be back to your edit, click on the ‘add layer mask’ button on the bottom left of your page;
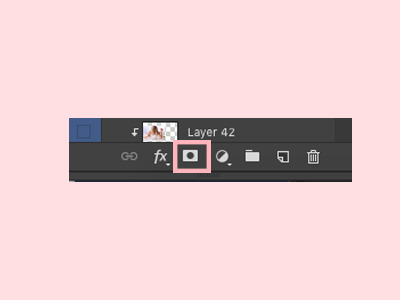
and taylor should now be cropped out from her background!
make sure all the layers are below the psd pack, including the photo of taylor that you just cropped out;


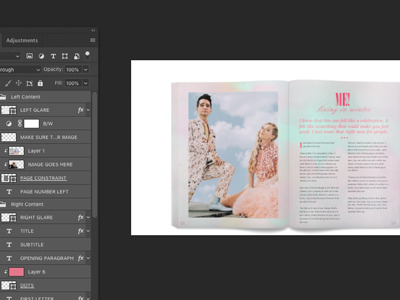
now for the colouring!! ‘selective colour’ is your best friend, and you can find that button here, in your adjustments (if you can’t find your adjustments, go to window > adjustments);
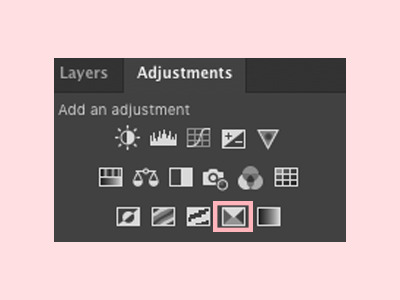
add a clipping mask (by right clicking the layer and clicking ‘create clipping mask’) of the selective colour onto the layer you want to colour, so that it only affects that one layer;

then on the selective colour panel, you can adjust the specific colours in that layer to your liking;

in addition, you can press command + u to change the whole colour scheme, saturation and lightness of the layer. make sure to press ‘ok’ when you’re done;

basically just play around with the colouring until you’re happy with it!

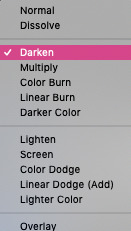
if you want it to look more realistic, you can also play around with the effects (I use layer effects all the time, they’re the best) on the layers bar, so the layer blends into the layers below it, like this;
— adding decoration
now you can decorate your little piece of work with whatever you’d like to, such as a background colour (layer > new fill layer > solid colour) ;

a texture (textures are honestly so amazing and you can find them all over tumblr and google; like you can search the word ‘texture’ up and then paste it into your edit);
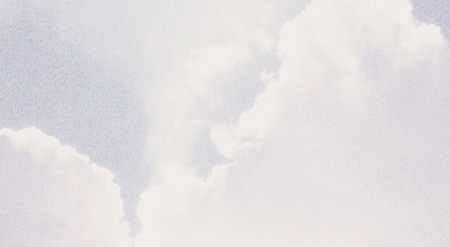
I usually place my texture at the top of the edit, then use one of the effects to blend it into all the layers;
final embellishments!! this step is optional you can add anything else that you’d like to, such as pngs (you can search these up on google and paste them into your edit, or find psd packs on tumblr and drag them in). again, you can add selective colour and a layer effect to these layers;
tip; finding already transparent images saves sooo much time, so try doing that instead of cropping the image out.
text;
tip; use a new layer for each line!
and so on. the flowers that I used come from this pack and the wax seal stamp comes from this pack from the beautiful @newrcmantlcs!! my main advice is to just play around with everything till you’re happy with it. don’t be afraid of deleting something or starting over completely if you’re not.
— giffing again
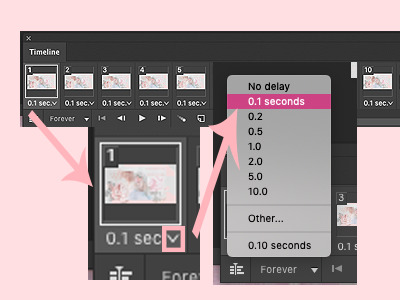
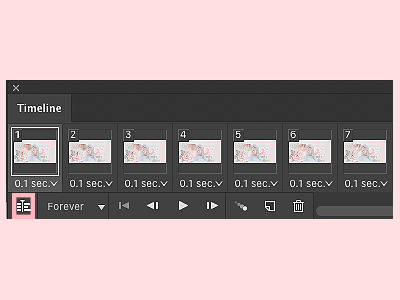
now to control the speed of the gif, highlight all of the frames, then click on the tiny dropdown button and change the speed to however fast or slow you want each frame to be. I usually make mine 0.1 seconds, but it’s completely up to you (and worth testing it out to see what speed you prefer!)
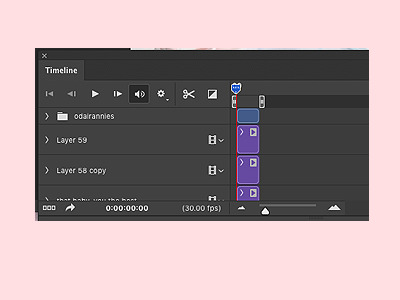
when you’re happy with everything, it’s time to sharpen it! first, you have to convert the frames to a video timeline, and do this by clicking on the button on the bottom left of the timeline bar.
your timeline should now look like this. everyone’s process is different, like some people like to start off their whole edit with a video timeline, but I find it a lot easier to start with a frame animation then convert it when I’m done with everything.
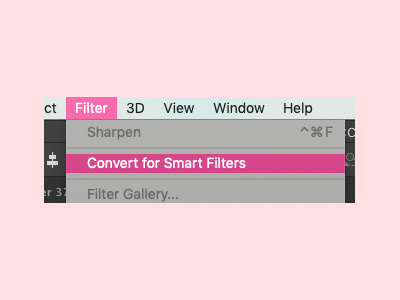
now to sharpen (in this case at least, sometimes I add a grainy effect instead) it, highlight the layers that you want to sharpen;
then click filter > convert for smart filters. this will turn your layers into one layer.
tip; if you do something you don’t like, command + z!!
now go to filter > sharpen > sharpen;
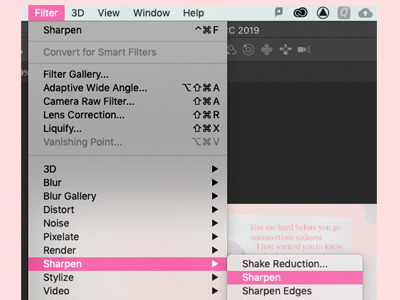
and your gif should now be sharpened! you can simply go to filter > sharpen if you want to sharpen a layer that isn’t a gif. play around with your edit a bit more until you’re happy, and finally, add a watermark if you’re going to post it online!
finallyyyyy! to save, go to file > export > save for web, if it’s a gif. if it’s a static photo, just click ‘save as’!

and yayyyy, you just finished an edit!!!!!
ahhh so this was my tutorial on how I created this specific edit, I hope it helped! If you create something similar or follow this tutorial, I’d loveee to see it; so if you post it on tumblr, you can tag me with #tuserabigail, or you can just dm me!
my process usually isn’t this rigid or precise, I usually edit on a tangent and in cluttered daydreams, it’s never like “oh, I have to make a gif now” or “ahh it’s time to add a texture!” so really, it’s just about playing around with your edit until you like it! it’s definitely okay to skip some steps or do things in a different order, because like I said, everyone has a different process, and this was just mine for this one specific edit (my process changes all the time too ldkdljk)
anyway, I hope this helped, and thank you!! ♡
125 notes
·
View notes
Last Seen Blogs


silmido-full-movie
실미도 간호사 시간 정지연 양호선생

fashion-stashing
Fashion Entertainment

noah-hughes
Noah

johnwatson93-blog
Untitled