#trying to get used to drawinf backgrounds
Text
Good for her
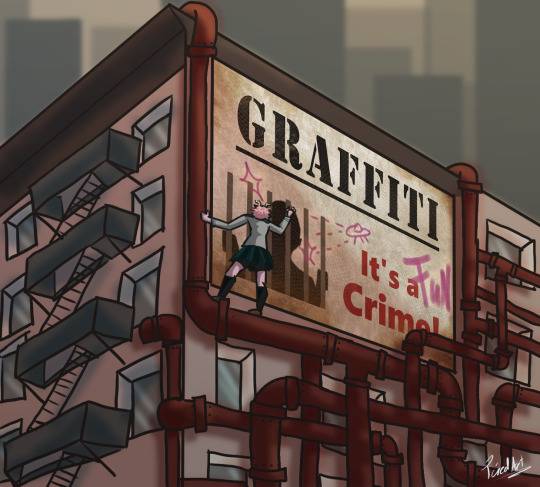
#Sneak peak#An AU that I have yet to post#All I'm gonna say is#Vigilante Mina#Graffiti artist Mina#This is another one of those 'I actullay wanted to do a quick sketch' and four hours later i wake up and look up and i have this#trying to get used to drawinf backgrounds#gotta say pretty like it#my art#art#bnha fanart#bnha#my hero academia#ashido mina fanart#mina ashido#ashido mina#graffiti is a fun crime#kudos to anyone who knows how i got the idea lol#bnha ashido#ashido#mha ashido#bnha mina#mha mina
17 notes
·
View notes
Note
hello, hope you had a good day and enjoyed your cookies hehe .i tried searching your tags for editing replies but nothing popped up and the resources page also didn't help me so asking directly do you use a ps action set or could you list your editing steps cuz your gameplay editing is so subtle yet so beautiful and aesthetic thank you in advance <3
hi there!!! thank u, I ate too many cookies if I’m honest but it was worth it! <3 thx for checking my tags I appreciate it, you are correct though I haven’t actually answered any editing questions yet so you are the first!
also thank you so much for the compliments! 💕
for my subtle gameplay editing my goal is usually to cut down the time it takes to edit, just so I can sit back and enjoy my game a little whilst also posting on tmblr!

I’ll answer under a cut!
1. Taking Screenshots
I always try to be very careful with my screenshots and their composition, just because the better your base the easier it makes editing. I use reshade in game, and I only turn it on when I’m taking screenshots, but I use the zoom in camera feature that hides the UI! You probably already know but just in case you didn’t know, when you’re using that camera you can use Q and E to move up and down, so you can get the perfect framing you desire pretty easily!
2. Photo Adjustments
Once I find a screenshot I’m happy with I open it up in Photoshop, this will be a PS tutorial since that’s what I use:

My first step is always to adjust my image, and I usually start with curves, you might not want to though, but there are a lot of adjustments there you can play around with. After I do curves I always mess with brightness/contrast then call it a day (as simple as that if I’m honest)!
3. Editing
This is where things get a little more complex, and also please bear in mind that I have a drawing tablet it is EXTREMELY helpful and does a lot of the work for me, I am basically cheating compared to those of you who don’t have a tablet so don’t get discouraged if these steps are challenging with a track pad that being said there are some cheap screenless tablets online and if this is a hobby you really enjoy I strongly recommend investing in it!
As you can see above, my edited screenshot is a lot brighter than my first pic and I achieved this using overlays! on the menu there on the right you should see a pull down that looks like this:

make a new layer and change it to overlay, and then take a soft brush (or any brush you prefer stylistically) and begin to draw an outline around your sim, use any colour you want but overlay works best with lighter colours! Play around tho it’s really fun to see how the overlay layer works!

the outline basically just helps my sims stand out a little against the background! but you can see I didn’t outline her whole body, just certain areas I felt blended a little, or where definition was lost!
I still want my image brighter though, so I then make another overlay layer, and take a tool from the left instead (our intention here is to make a screenshot more vibrant I guess!)

This might be a bucket symbol in your PS by default but switch over to the Gradient Tool instead, and a new menu should appear at the top:

as you can see I have my gradient set to move from colour to transparent, and Radial Gradient selected as opposed to linear, this just gives the gradient a nice soft edge which I like, but I have used Linear in the past (so it just depends on what you are doing) I then pick a colour I like, select the gradient tool and drag my mouse from point A to B to brighten the section of sky I want lighter:

4. Finishing Touches
Now that I have my image brighter and a little sharper looking I now need to add a few finishing touches so I create yet another overlay layer, take a soft brush, lower the opacity of that brush and go over my sims jewellery/eyes just to brighten them a little. This makes them look more ‘shiny’ and I love doing it for necklaces/earrings! I might also sometimes create a dust overlay affect myself but drawinf tiny dots/squiggles (but you can also find dust overlay PSDs online!)

and that’s pretty much it for my gameplay editing I like to keep it pretty simple compared to my edits (those I normally do a lot more adjusting/layers etc. but if you’re looking for simple editing overlays are your best friend)! One thing I didn’t mention is that I sometimes edit hair on to my sims, but I stopped doing this so much for gameplay because I’m lazy. If you do want to edit hair tho just do it before you do anything else! and do it on a regular layer just above the image. There are plenty of hair brushes available online!
#raesponses#itsmegxbree#editing#photoshop help#also if ur PS looks diff#it's cuz mine is old asfk#photoshop actions rarely work on mine so I don't use em#tutorials
65 notes
·
View notes
Last Seen Blogs

linkonoficial-blog
Sin título

toast-tales-2
toast-tales

ossielv
Ossiel V

linklore
quiet down small man

emiliyaaida
Untitled