#ts3answers
Explore tagged Tumblr posts
Visit Tumblr Blog
Explore Tumblr blogs with no restrictions, modern design and the best experience.
Last Seen Tumblr Blogs


Fun Fact
Tumblr was the first site to host the blog for President Barack Obama in 2011.
Text
Replies (with photos)
Replying here so I can better visualize what I'm trying to say. @gruesim @murfeelee @mspoodle1 Thank y'all for your help and taking the time to answer <3 <3
So this is one of the major edits I wanted to make for my world. I loved the ship itself, but hated the decor and doors that awkwardly grounded the ship to land. So, I went and started editing to make it water bound again.
I wound up getting it functional this last try, (I'd scrapped it for a long time, not having the proper knowledge to get it working) and the only thing that I can assume as an actual fix was the bone assignment through milkshape. As you can see, I successfully have both versions here in the photos.


The only thing I'm still having trouble with is figuring out what bone goes with what mesh piece for those with multiple assignments (probably a stupid easy solution, but it's had me stumped). I was attempting to edit one of the Resort cabins (the super cute beach ones? That totally don't go with my theme lol) but despite assigning the bones and using the exact same process as the ship here, it's stubbornly stuck to its original form. Perhaps there's something special in the script itself, or maybe it's the multiple bone assignments, I'm not sure. I'm hoping to edit a few more rabbit holes for this world, so I'll update progress as I (eventually) get to them. Maybe we'll have some custom rabbit holes around this joint in the end of things.
Thank y'all again for taking the time to answer, I appreciate it immensely! <3 You're the best(:
To everyone who had the same issue working with rabbit holes, the only advice I have at the moment is to ensure your bones are assigned properly, and be super careful with your groups as you're editing! I kept the same number of groups to ensure I didn't run into the dreaded problem of textures refusing to separate.
20 notes
·
View notes
Text
Updates: More eating of the crow
PSA: If you're behind the times like I apparently am, I just figured out you can copy and paste objects in blender, and not only that, but you can do it between open blender files as well. (Instead of exporting it out and importing it back into a new file, it saves lots of time).
Also, another neat trick blender 2.92 has, if you have a set of objects that share the same UV/Texture, you can select all of them and apply the texture to all of them at once, rather than doing it one at a time. Again, time saver!
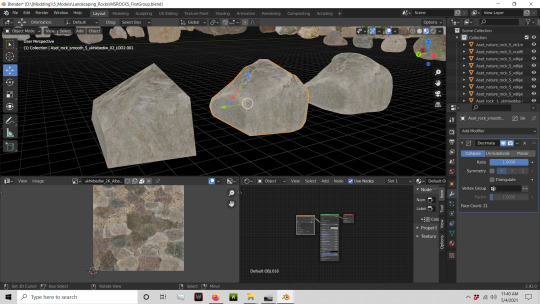
One more thing I found, that updates my previous decimation tutorial! If you go to the decimate modifier, and click planar, then select the UVs option, it will decimate while protecting the texture applied.
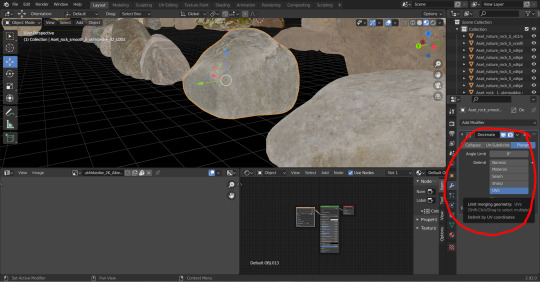
As you can see here, the one to the far right is the original (sitting at 1432 triangles). The middle one is the one I used the planar settings on, and it's sitting at 21 triangles. The one to the left I used the previous method of decimation, the collapse tool (still a viable option, but I pushed it to match the one in the middle) which is now also sitting at 20 triangles, but has become distorted. The Un-Subdivide made no changes at all, so I didn't show it (not entirely sure what it's technical purpose is, in that case). So, all y'all super high poly peeps, PAY ATTENTION!!!!
Let me know if you have questions you need answered about the current blender! I'll attempt to look for them and add it to the post(:
______________________________________________________________
UPDATE!!! I found how to link the UV! Finally! It's a single button too, dammit. It's the little [PIN] in the UV header. That will set it to where whatever face you select the UV editor will update the image automatically, instead of having to do it manually between images.

I suppose I'll just add to this post instead of making new ones. Maybe I'll use it as a reference later for all the crap I figured out (that should honestly be easy but for some reason I'm struggling), or possibly help someone else looking for the same button/shortcut. If you have your own "Aha!" moments feel free to comment! You'd be amazed how many people need to see them!
2: Saving the user settings is now located under File/Default/Save Startup File
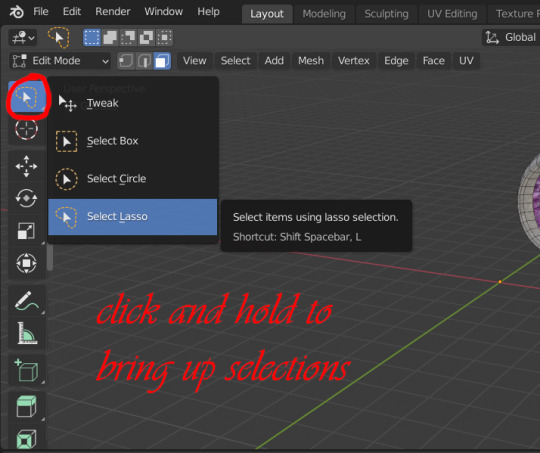
3: If you hate the box select (I've become too accustomed to the lasso to use it) the shortcut for the lasso is Shift/Spacebar/L or found here:
______________________________________________________________
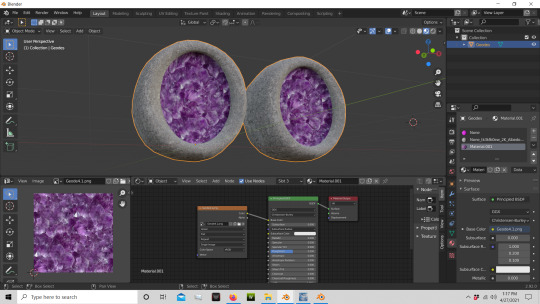
So I managed to apply the texture correctly at least. I made some basic geodes to try and get a feel for all the new capabilities and location changes on the most basic tools. It seems to me they made it way more complicated than it had to be, especially compared to 2.7 versions.
Breaking this down for anyone struggling with textures in blender 2.92. Hopefully it will help.
In addition to the info here, look above and make sure you have the PIN applied so your UV syncs!
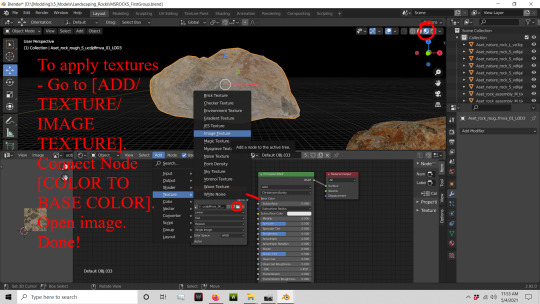
Cheers.
19 notes
·
View notes