#two steps authentication in asp.net core
Text
ASP.NET vs. .NET Core: Which Framework to Learn in 2023
In the ever-evolving world of web development, staying up-to-date with the latest technologies is crucial. As we step into 2023, one of the most important decisions aspiring developers face is choosing the right framework to learn. Two of the most prominent contenders in the Microsoft ecosystem are ASP.NET and .NET Core. But which one should you invest your time in, especially if you're looking to attend programming classes in Pune? In this article, we will explore ASP.NET and .NET Core, their evolution, and help you decide which framework aligns best with your programming career goals.
Understanding ASP.NET
ASP.NET, short for Active Server Pages.NET, is a mature and widely adopted web framework developed by Microsoft. It has been the cornerstone of web application development using the .NET framework for many years. ASP.NET offers a robust and comprehensive platform for building web applications, and it has evolved significantly over time.
Key Features of ASP.NET:
MVC (Model-View-Controller) Architecture: ASP.NET promotes a structured approach to web application development with MVC, making it easier to organize code and separate concerns.
Web Forms: ASP.NET offers Web Forms for rapid application development, which is particularly beneficial for building enterprise-level applications.
Rich Toolbox: The framework comes with a rich toolbox of server controls and components, simplifying UI development.
Support for Legacy Applications: ASP.NET allows developers to maintain and migrate legacy applications smoothly.
Integration with Visual Studio: Seamless integration with Visual Studio, Microsoft's powerful development environment, facilitates coding, debugging, and testing.
Robust Security: ASP.NET offers robust security features, including authentication, authorization, and protection against common web vulnerabilities.
Evolution of ASP.NET:
ASP.NET has undergone several iterations, with significant improvements and updates. The most noteworthy transition occurred when Microsoft introduced ASP.NET Core in 2016. This marked a pivotal moment in the .NET ecosystem and raised questions about the future of ASP.NET.
Enter .NET Core
.NET Core, initially introduced as a leaner and more modular version of the .NET Framework, has come a long way since its inception. It was designed to be cross-platform, open-source, and suitable for modern application development, including web development. Over time, .NET Core has matured and eventually merged with ASP.NET, resulting in the birth of ASP.NET Core.
Key Features of .NET Core:
Cross-Platform Compatibility: .NET Core allows developers to build and run applications on various platforms, including Windows, Linux, and macOS.
High Performance: .NET Core is known for its superior performance, making it an excellent choice for high-demand applications.
Modularity: Developers can include only the required components, making applications more efficient and reducing their footprint.
Support for Microservices: .NET Core is well-suited for building microservices-based architectures, a popular approach in modern application development.
Modern Development Patterns: It encourages the use of modern development patterns, such as Dependency Injection and Middleware, for more flexible and maintainable code.
Unified Framework: With the merge of ASP.NET and .NET Core, it's now a unified framework, known simply as .NET 6 (or later versions).
The Transition to .NET 6
As of 2023, .NET 6 is the latest and most significant release. It combines the best features of ASP.NET and .NET Core, making it a versatile and future-proof choice for developers. .NET 6 provides a single unified framework for web, desktop, cloud, and mobile applications.
So, Which Framework Should You Learn in 2023?
Now that we've explored both ASP.NET and .NET Core (or .NET 6), it's time to answer the crucial question: which one should you focus on in 2023, especially if you're considering programming classes in Pune?
Learning ASP.NET:
Learning .NET 6 (formerly .NET Core):
Conclusion
In conclusion, both ASP.NET and .NET 6 have their strengths and applications. Your choice should align with your career goals and the type of development you're passionate about. If you're interested in maintaining legacy applications, enterprise development, or rapid web application development, ASP.NET is a solid choice. However, if you aspire to work on modern, cross-platform, and high-performance projects, .NET 6 is the framework to learn in 2023 and beyond.
If you are searching for programming classes then CRBtech is the best corporate training institute in Pune. It has focused on training candidates in IT, Mechanical, Electrical,Civil and Clinical Research. It helps students to start their career journey with a good beginning in the industry.
0 notes
Link
multi factor authentication in asp .net
0 notes
Text
How to become a Web Developer: a detailed plan for learning JavaScript

Everyone who wants to become an IT developer usually begins with making sites, as the easiest part of it. To work, you need only a text editor for writing the code and browser to see visually what you are doing. If you're not aiming to a full-stack approach and you just want learn the magic of client-side programming, you won't have to study complicated algorithms: as a matter of fact, the main skill each client-side web developer must have nowadays is the knowledge of JavaScript (and its frameworks).
The best way to learn is by creating own website using multiple technologies. For example, you can create website and display stats from popular games like Counter-Strike and Valorant. Such a project requires HTML, CSS, Git, Bootstrap, JavaScript, Bash, MySQL. A nice example is the Valorant Tracker project, which is something that could be done in 4-6 months if you're willing to learning JavaScript programming. Once you manage to pull off something like that, you'll have a good chance to get hired as a junior code in a decent company and start your developer career.
Nowadays, JS has been developing incredibly fast, so it's easy to get confused while studying this language. We offer you an educational plan with a convenient structure, where you will find all the main aspects of JavaScript and other adjacent technologies.
Why JavaScript?
We have to mention that language being pretty open - many companies are rivaling using JS with the goal of its evolution. The language is incredibly flexible, so it is perfect for people who like both object-oriented and functional approaches. A mammoth amount of different libraries and frameworks allows you to solve even the most difficult issues. Moreover, the server platform Node.js allows you to use JS not just in browsers but on the console. You can create apps for both smartphones and PC. Apps for a computer by using the Electron framework, and mobile apps thanks to NativeScript or ReactNative.
Git
The first thing you should do is to study how Git works: a source code manager is a vital instrument for developers, so you have to learn it first - since it's arguably the best choice nowadays.
Here are three common topics you might start to learn to quickly understand the basics:
Creation and moving of the files across catalogs.
Initialization and commits in Git.
Repositories settings in GitHub.
Also, you must have the next skills:
Object-oriented JS - constructors and factories.
Functional JS - functions of the highest order, circuit, and recursion.
Specification of the Jasmine tests.
Basics of the HTML, CSS, and jQuery.
To better understand these topics, be sure to check out our posts, guides and tutorials regarding Git and GitHub.
Algorithms and data structures
Later you have to learn algorithms (especially big complicated ones), and basic data structures: connected lists, turns, stacks, binary searching trees, and hash-tables.
Back-end JavaScript frameworks
Node.js - Approximately a decade ago JS was used only for writing the code for front-end (just like CSS and HTML), but today due to Node.js the situation is quite the opposite. Node - is a server area for committing all the actions by JS, so you won't have to learn all the new syntax. Although, you will have to import and export files, divide the entire code for modules, and use the pack-manager NPM.
Express.js - Besides learning Node you have to get more knowledge about back-end development, especially about servers and routing. Ports and protocols with HTTP will be a nice start before studying Express. Express.js - Node-library for requests` processing.
Asynchronous JavaScript (AJAX)
If you don’t want to refresh your page after each change in your DB, Ajax is certainly what you will need - it sends asynchronous HTTP-request to reload only part of the page. You can work with Ajax through the jQuery (see below) or by directly (manually) handling the XMLHttpRequest object.
Asynchrony is the thing that makes JS unique but separating developers into two sides: some love it and some hate. Each developer has to know both advantages and disadvantages of that technology. You can start by studying call stacks, events cycles, and callbacks, then - studying promises.
Databases, Schemes, Models, and ORM
Databases one of the most important parts of web development. If your app has to save or load some information without losing it just after the page's update, you definitely will have to use DB. You have to learn how to see the difference between relational and non-relational DB and learn their connection ways. The next step will be studying the SQL and different systems for controlling DB. Knowledge of ORM won't be excessive.
HTML and CSS
Those languages are the very basics of the web-design. You don't have to know them perfectly but understand their code. Then you will have to learn at least one popular library (for example, Bootstrap). For CSS you have to learn processors, like Sass that will make CSS more similar to the normal code. For making work with the HTML you can pick any template, like PUG.
To better understand these topics, be sure to check out our posts, guides and tutorials regarding HTML, HTML5, CSS and CSS3.
jQuery and DOM manipulations
After you finished the main look of the page using HTML and CSS, you will use event translators and jQuery for the DOM controlling. Many people think that jQuery is useless and soon will be replaced by Angular or React. Maybe it's true, but jQuery is worldwide popular, so in any case, you must know it. Moreover, you can get into the situation when you will have to do an incredibly complicated job using React-microscope, so in that situation, light jQuery will be your salvation.
To better understand these topics, be sure to check out our posts, guides and tutorials regarding JQuery.
Chrome instruments for developers
If we didn't mention the Chrome instrument which makes the programming job easier, we wouldn't forgive ourselves. Thanks to them you will be able to learn DOM, debugging process through the console, routes` tracking and so much more.
Test-Diven Development
Also called TDD: this is the development tactic when the software divides for a few tiny cycles:
Writing down the code to make all changes you had to.
Writing down the code that will pass all tests.
Refactoring the code and writing new tests if those are necessary.
If some parts of the code don't pass the test, they have to be rewritten.
If you work with JS we firmly recommend you pay attention to the Jasmine, Chai, and Mocha frameworks.
To better understand these topics, be sure to check out the ASP.NET Core 3 and Angular 9 book, which features an entire chapter about client-side TDD using the Karma test runner and Jasmine testing suite.
Web Sockets
We have to pay extra attention to that topic because web-sockets are useful. WebSocket protocol, unlike the HTTP one, will allow you to work with a bidirectional data stream – the reason why is that tech unique. The most popular library called socket.io and is well documented here.
EcmaScript 6 (ES2015)
Nowadays, the main standard is ES6 (ES2015), ES2016 has been confirmed already and the ES2017 is under development right now, so you always have to watch their updates and use the newest and most stable version. All compatibility problems can be solved easily with the next apps.
Babel
Babel - compiles ES6 (ES2016 support is expected soon) into the ES5, which is well-known by all browsers. It also can compile JSX/REACT-components, which makes it vital for web-developers.
Webpack - takes all your files (images, fonts, style tables, JS-files, etc) into the single dependency graph. You don't have to use it if you are making a small app but shall use it while working with React.
React and Redux
React (also known as ReactJS) - the library which will allow you to create a user's interface. It was created by Facebook in 2013 and became worldwide popular pretty fast. React is needed not just for web-design, but there are versions for smartphones (React Native) and VR (React VR), published later by the same company.
Redux - container of predictable states, usually used with React. It can be used for shortening the code by the modeling way. Pretty useful in real-time working apps with a big number of users, such as games.
To better understand these topics, be sure to check out the series of React & ReactJS articles we've published in the last few years.
Authentication, Sessions, Cookies
You have to understand how the app will interact with users - how users will log in\out of their accounts, get bonuses, etc. For identifying people during surfing your site, web-sites using cookies - small text-files that send a reply from server to browser for user's HTTP request. For the connection between DB and log-in page, you can use the express-session library.
Web Security
Each site/app, of course, must be secure and reliable. You have to get the knowledge of all possible attacks on your creation and ways of protection as well.
To better understand these topics, be sure to check out the various IT & Development Security articles we published in the last few years.
Conclusions
In this post we tried to write a list of the main study topics that await a novice JavaScript developer. Most of these tools will become your best friends, others will make you spit blood: each of them, however, will help you better understand how to overcome the inevitable difficulties that await your learning path and satisfy the development requests of the clients.
Read the full article
#Ajax#Babel#Counter-Strike#CSS#Electron#ES2015#Express.js#Git#GitHub#HTML#Jasmine#Javascript#Karma#Node.js#React#Redux#Valorant
0 notes
Text
Simple Identity In Asp.Net Core Tutorial from scratch part 1
New Post has been published on https://is.gd/d7mlXc
Simple Identity In Asp.Net Core Tutorial from scratch part 1

Asp.net core Identity used for a security-related feature in your asp.net core application.
Asp.net core identity is a membership system that adds a login functionality to our app.
It is a built-in membership system.
Uses of Asp.net core Identity
Is used to create, update, read and delete user accounts
Authentication and authorization
Is also used for password recovery
Two-factor authentication with SMS
Asp.net core Identity supports external login like Facebook, Google and Microsoft
Steps for Identity In Asp.Net Core
Step 1
Need to add IdentityDBContext instead of DbContext means In Your application DbContext class must inherits from IdentityDbContext class.

Now our code becomes
public class OurDbContext:IdentityDbContext public DbSet<Student> Students get; set; public OurDbContext(DbContextOptions<OurDbContext> options):base(options) protected override void OnModelCreating(ModelBuilder modelBuilder) modelBuilder.Seed();
The identityDbContext is present in namespace of Microsoft.AspNetCore.Identity.EntityFrameworkCore;
Now Why we inherit from IdentityDbContext instead of DbContext because it has all the DbSet properties that are used for managing the Identity-related table in underlying database.
Now we can see the inner details of the IdentityDbContext class you can see
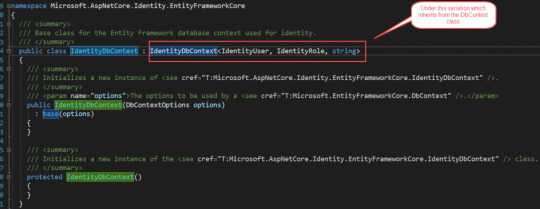
Our application works because it ultimately inherits from DbContext class.
Step 2:
Add identity services to our application. The services which are required are added to a startup.cs class file under the configureservices method.
services.AddIdentity<IdentityUser, IdentityRole>();
Now our configureservices method in a startup.cs class looks like below
public void ConfigureServices(IServiceCollection services) services.AddMvc(); services.AddTransient<IStudentRepository,StudentRepo>(); services.AddDbContextPool<OurDbContext>(options => options.UseSqlServer(_config.GetConnectionString("StudentDBString"))); services.AddIdentity<IdentityUser, IdentityRole>(); services.AddScoped<IStudentRepository, SQLStudentRepository>();
In this AddIdentity method first we pass IdentityUser as the first parameter so why we use this, because if you go to definition of this class you will find it inherits from IdentityUser<string> class and if you go further it will to that class you will know it uses the field like email, username and many more like below which is used to manage the properties of registered user class.
using System; namespace Microsoft.AspNetCore.Identity /// <summary>Represents a user in the identity system</summary> /// <typeparam name="TKey">The type used for the primary key for the user.</typeparam> public class IdentityUser<TKey> where TKey : IEquatable<TKey> /// <summary> /// Initializes a new instance of <see cref="T:Microsoft.AspNetCore.Identity.IdentityUser`1" />. /// </summary> public IdentityUser() /// <summary> /// Initializes a new instance of <see cref="T:Microsoft.AspNetCore.Identity.IdentityUser`1" />. /// </summary> /// <param name="userName">The user name.</param> public IdentityUser(string userName) : this() this.UserName = userName; /// <summary>Gets or sets the primary key for this user.</summary> [PersonalData] public virtual TKey Id get; set; /// <summary>Gets or sets the user name for this user.</summary> [ProtectedPersonalData] public virtual string UserName get; set; /// <summary>Gets or sets the normalized user name for this user.</summary> public virtual string NormalizedUserName get; set; /// <summary>Gets or sets the email address for this user.</summary> [ProtectedPersonalData] public virtual string Email get; set; /// <summary> /// Gets or sets the normalized email address for this user. /// </summary> public virtual string NormalizedEmail get; set; /// <summary> /// Gets or sets a flag indicating if a user has confirmed their email address. /// </summary> /// <value>True if the email address has been confirmed, otherwise false.</value> [PersonalData] public virtual bool EmailConfirmed get; set; /// <summary> /// Gets or sets a salted and hashed representation of the password for this user. /// </summary> public virtual string PasswordHash get; set; /// <summary> /// A random value that must change whenever a users credentials change (password changed, login removed) /// </summary> public virtual string SecurityStamp get; set; /// <summary> /// A random value that must change whenever a user is persisted to the store /// </summary> public virtual string ConcurrencyStamp get; set; = Guid.NewGuid().ToString(); /// <summary>Gets or sets a telephone number for the user.</summary> [ProtectedPersonalData] public virtual string PhoneNumber get; set; /// <summary> /// Gets or sets a flag indicating if a user has confirmed their telephone address. /// </summary> /// <value>True if the telephone number has been confirmed, otherwise false.</value> [PersonalData] public virtual bool PhoneNumberConfirmed get; set; /// <summary> /// Gets or sets a flag indicating if two factor authentication is enabled for this user. /// </summary> /// <value>True if 2fa is enabled, otherwise false.</value> [PersonalData] public virtual bool TwoFactorEnabled get; set; /// <summary> /// Gets or sets the date and time, in UTC, when any user lockout ends. /// </summary> /// <remarks>A value in the past means the user is not locked out.</remarks> public virtual DateTimeOffset? LockoutEnd get; set; /// <summary> /// Gets or sets a flag indicating if the user could be locked out. /// </summary> /// <value>True if the user could be locked out, otherwise false.</value> public virtual bool LockoutEnabled get; set; /// <summary> /// Gets or sets the number of failed login attempts for the current user. /// </summary> public virtual int AccessFailedCount get; set; /// <summary>Returns the username for this user.</summary> public override string ToString() return this.UserName;
So whatever properties are present in this class you have the corresponding column to underlying table.
But if you see in this class we have an only limited set of properties but in real-time scenario we might require some different fields to add these fields we can create another custom class and make sure that it is inherited from this IdentityUser class.
So in that class we can include additional properties which we required. And then remove this identityuser class from that configureservice AddIdentity method and add our new added class in that place.

IdentityRole: this is another built-in class provided by asp.net core identity system and it is used to manage user roles in the system.
AddEntityFrameworkStores: this is used for accessing or retrieving data from the underlying database table.
services.AddIdentity<IdentityUser, IdentityRole>() .AddEntityFrameworkStores<OurDbContext>();

Step 3:
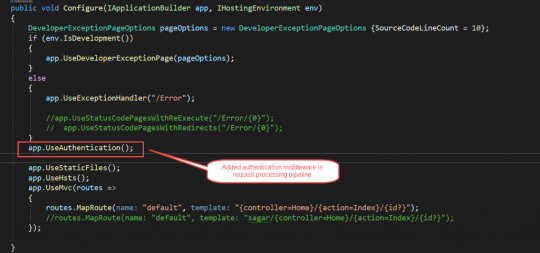
Add authentication middleware
To add authentication middleware in processing pipeline you need to add UseAuthentication extension in Configure method in configure service method in the startup.cs file. And also remember to add this before MVC middleware.
Now our code looks like this below
public void Configure(IApplicationBuilder app, IHostingEnvironment env) DeveloperExceptionPageOptions pageOptions = new DeveloperExceptionPageOptions SourceCodeLineCount = 10; if (env.IsDevelopment()) app.UseDeveloperExceptionPage(pageOptions); else app.UseExceptionHandler("/Error"); //app.UseStatusCodePagesWithReExecute("/Error/0"); // app.UseStatusCodePagesWithRedirects("/Error/0"); app.UseAuthentication(); app.UseStaticFiles(); app.UseHsts(); app.UseMvc(routes => routes.MapRoute(name: "default", template: "controller=Home/action=Index/id?"); //routes.MapRoute(name: "default", template: "sagar/controller=Home/action=Index/id?"); );
Step 4:
Now in this, we have added IdentityDbContext in our DB context class so we need to add migration command to use for migration.
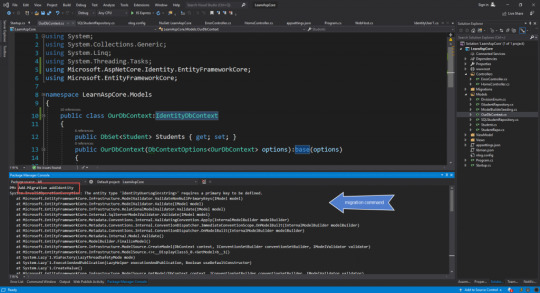
But doing this it will cause an error,
The entity type ‘IdentityUserLogin<string>’ requires a primary key to be defined.

The root cause of error in below class
public class OurDbContext:IdentityDbContext public DbSet<Student> Students get; set; public OurDbContext(DbContextOptions<OurDbContext> options):base(options) protected override void OnModelCreating(ModelBuilder modelBuilder) modelBuilder.Seed();
In this OnModelCreating method, we need to call base class OnModelCreating method why because keys are mapped here and we need to call this for that we use base keyword to access this and our code becomes.
public class OurDbContext:IdentityDbContext public DbSet<Student> Students get; set; public OurDbContext(DbContextOptions<OurDbContext> options):base(options) protected override void OnModelCreating(ModelBuilder modelBuilder) base.OnModelCreating(modelBuilder); modelBuilder.Seed();

Now again we run Migration command which is below in Package Manager Console
Add-Migration addIdentity

Below is the migration code snippet

After this, you need to fire another command to update the database
Update-database
Using this command we will able to add required tables in our database and after executing this command below tables were added in the database
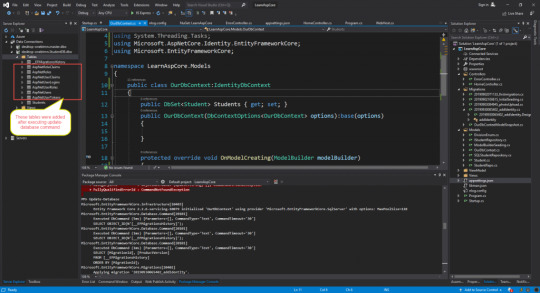
If you see the properties present in IdentityUser class were matching with the columns in AspNetUserLogins table see below image

For Entity Framework Part 1 Visit Link
For Entity Framework Part 2 Visit Link
For Entity Framework Code First Migration Visit Link
0 notes
Text
Write a reusable Blazor component
In this blog I have already talked about creating components but now I want to start from the beginning and explain how to write a reusable Blazor component from scratch. This is the first part of a Blazor article series to tell how to create a reusable Blazor component. So, we can use them in our Blazor application independently of the hosting model (Web Assembly or Server-side). If you google a bit, you can find a lot of example like that but I can’t find one example that explain exactly how the interaction works. Here, step by step what I understood.
Then, for more documentation, example and components about Blazor, here same links in this blog:
Getting Started With C# And Blazor
Setting Up A Blazor WebAssembly Application
Working With Blazor’s Component Model
Secure Blazor WebAssembly With IdentityServer4
Blazor Using HttpClient With Authentication
InputSelect component for enumerations in Blazor
Use LocalStorage with Blazor WebAssembly
Modal Dialog component for Blazor
Create Tooltip component for Blazor
Consume ASP.NET Core Razor components from Razor class libraries | Microsoft Docs
Also, you can download the source code of this post from GitHub.
So, there result of this post is a simple button. When you click the button, Blazor calls the code in a javascript file and runs it. The result is passed to the C# code and then as result of the component.
Start!
First, I have to create a new Blazor project. For that, Create a new project and search for Blazor. Then, select Blazor WebAssembly App.
Visual Studio 2019 – Create a new project
Then, you have to select the name of the project and its location. The name of my project is PSCBlazor and you can find it on GitHub.
Configure a new project
Select as Target Framework .NET 5. Then, Create.
Addition Information
Now, we have the main project. But to write a reusable Blazor component, we have to create another project for it. Following the same procedure, create a new project but this time select Razor Class Library.
Create a Razor Class Library
Then, follow the instruction. The name of my project is PSCBlazor.SimpleComponent.
If you don’t want to use Visual Studio, you can run from the Command Line
dotnet new razorclasslib
By default, the created project contains several elements:
A predefined “Component1” that is a basic component displaying some styled text in Component1.razor.
A ExampleJsInterop class that demonstrate how to call a basic JS function defined in its own js file in ExampleJsInterop.cs.
The static resources (like png, css and js files) in the “wwwroot” folder:
– background.png
– exampleJsInterop.js
– styles.css
The solution for the custom component
Separate the code from the razor code
Behind the scenes, when you write a razor page, an actual C# class is generated and hopefully the class is partial. It means that it is easy to separate the behavioral code of your component from the html view code.
Single mixed file Component1.razor:
<div class="my-component"> This Blazor component is defined in the <strong>PSCBlazor.SimpleComponent</strong> package. </div> @code { }
Sometimes it is nice to separate the view from the code. In Visual Studio is pretty simple. Create a new Class with the full name of the view file plus cs. For example, if the view is Component1.razor the new file should be Component.razor.cs and automatically Visual Studio understands that this file is part of the view.
Split view and code
Then, a little change in the code because the new class must be a partial class. For example:
using System; using System.Collections.Generic; using System.Linq; using System.Text; using System.Threading.Tasks; namespace PSCBlazor.SimpleComponent { public partial class Component1 { } }
Interop between Blazor and JavaScript
Now, I write a reusable component for Blazor and I’m going to modify the component to be able to exchange some data between the component itself and the parent. For that, I have to use a JS function through the generated ExampleJsInterop to prompt the user for a text input.
The component will be used this way with TextValue being a property used in the binding:
<Component1 ParentName=”Some text I want to transmit from the parent to the child component” @bind-Text=”TextValue”> </Component1>
Define the parameters
We need to define a property ParentName to transmit some data from the parent to the child component:
[Parameter] public string ParentName { get; set; }
The Parameter attribute tells that the C# property can be used as component parameter.
Now, I need to define a parameter to be able to transmit data to the child component, but we also want to get data from the component using a @bind property.
To make it possible, I have to define a parameter like the previous one named in our case Text.
[Parameter] public string Text { get; set; }
Define a EventCallback parameter to be able to notify the binding engine that the value has changed. As a convention, the name of the event callback property must be named accordingly to the property you want to bind. In our case it must be named TextChanged.
[Parameter] public EventCallback<string> TextChanged { get; set; }
The name of the event callback can be named differently but in that case it is required to specify it when binding a value using
@bind-{Property}:event=”NameOfPropertyChanged”
It means that the two notation are equivalent when binding a value:
<Child @bind-MyProperty="Text" /> <Child @bind-MyProperty="Text" @bind-MyProperty:event="TextChanged" />
Once the properties are defined, the component will have to invoke the event callback when the property value is changing.
await TextChanged.InvokeAsync(valueOfUserTextInputFromModalDialog);
Inject the appropriate services
To use the Java Script interop and the ExampleJsInterop example class we have to use an injected instance of IJSRuntime. We can do it with a dedicated attribute Inject in the component C# file.
Implement the behavior
Now, I have all we need to implement the behavior by adding a button with a click handler that is going to call the JS function through the ExampleJsInterop.Prompt method. Once we got the result we just need to forward to the TextChanged event call back and to update our Text property value.
So, in the razor file I created a bit of HTML, just to have a bit more fun.
<div class="my-component"> <div class="my-buttonkeeper"> <button class="my-button" @onclick="GetTextAsync">Click me</button> </div> </div> <br /> <text>Text (in the component) : @Text</text> <br />
Then, in the Component1.razor.css I added some CSS code
.my-component { border: 2px dashed red; padding: 1em; margin: 1em 0; background-image: url('background.png'); } .my-buttonkeeper { text-align: center; } .my-button { width: 150px; height: 150px; background-color: green; color: white; font-size: 20px; }
Why? Because I want to be sure the main application adds the CSS from this component but also the javascript we need. I’ll explain that in a second.
Then, it is the moment of the CS file:
private async Task GetTextAsync() { // Call JS interop. var text = await new ExampleJsInterop(JsRuntime).Prompt("Enter some text:"); // Trigger the changed event. await TextChanged.InvokeAsync(text); // Set the property value. Text = text; }
Inside wwwroot directory we have ready to use exampleJsInterop.js file which was created by Visual Studio or CLI. The code is like that
// This is a JavaScript module that is loaded on demand. It can export any number of // functions, and may import other JavaScript modules if required. export function showPrompt(message) { return prompt(message, 'Type anything here'); }
This is a simple javascript function. This rings a bell to me, it is like in React. Now, the magic is happening in the ExampleJsInterop.cs
using Microsoft.JSInterop; using System; using System.Threading.Tasks; namespace PSCBlazor.SimpleComponent { // This class provides an example of how JavaScript functionality can be wrapped // in a .NET class for easy consumption. The associated JavaScript module is // loaded on demand when first needed. // // This class can be registered as scoped DI service and then injected into Blazor // components for use. public class ExampleJsInterop : IAsyncDisposable { private readonly Lazy<Task<IJSObjectReference>> moduleTask; public ExampleJsInterop(IJSRuntime jsRuntime) { moduleTask = new(() => jsRuntime.InvokeAsync<IJSObjectReference>( "import", "./_content/PSCBlazor.SimpleComponent/exampleJsInterop.js").AsTask()); } public async ValueTask<string> Prompt(string message) { var module = await moduleTask.Value; return await module.InvokeAsync<string>("showPrompt", message); } public async ValueTask DisposeAsync() { if (moduleTask.IsValueCreated) { var module = await moduleTask.Value; await module.DisposeAsync(); } } } }
So, between the lines 24 and 28 there is a call via IJSObjectReference to the javascript function in the file under the wwwroot. You can see that in line 21 where there is an import of the javascript file.
Run the demo project
So, almost finish to write a reusable Blazor component with interop with javascript. First, I have to add the component as dependency in the project. In Solution Explorer, right click on Dependecies in the PSCBlazor and click on Add project references… Then, select the component.
Reference manager
Now, open _Imports.razor and add the reference to this component to add this line
@using PSCBlazor.SimpleComponent
Then, open Index.razor and add this code
<Component1 ParentName="This is a test" @bind-Text="_text"></Component1> The text from the component is: @_text @code { private string _text = ""; }
Also, we want to add the CSS and the javascript for the magic. Depending on the hosting model, it is required to add the reference to the CSS and javascript in specific index files in the application project:
wwwroot/index.html for the Web Assembly hosting model.
and
Pages/_Host.cshtml for the Server-side hosting model.
So, open the index.html under wwwroot and add those lines (I deleted a lot of lines for the purpose of showing what you have to add):
<head> <link href="_content/PSCBlazor.SimpleComponent/styles.css" rel="stylesheet" /> </head> <body> <script src="_framework/blazor.webassembly.js"></script> <script src="_content/PSCBlazor.SimpleComponent/exampleJsInterop.js" /> </body>
Basically, in the head I have to add the reference to the CSS from the component. Similarly, I have to do the same to add the javascript.
Compile and run. If everything is ok, you have the same result as I show at the top of this post.
The post Write a reusable Blazor component appeared first on PureSourceCode.
from WordPress https://www.puresourcecode.com/dotnet/blazor/write-a-reusable-blazor-component/
0 notes
Link
Key Takeaways
Caching is a technique for improving web application performance by temporarily storing requested data in memory for later reuse.
Response caching refers to specifying cache-related headers on HTTP responses made by ASP.NET Core MVC actions.
NCache is a cross-platform, open-source distributed caching framework from Alachisoft, built entirely using .NET.
This article presents a discussion on how we can work with NCache and response caching middleware in ASP.NET Core.
NCache is a cross-platform, open-source distributed caching framework from Alachisoft. It is an extremely fast distributed caching framework that is linearly scalable. This article presents a discussion on how we can work with NCache and response caching middleware in ASP.NET Core.
Pre-requisites
You should have Visual Studio and ASP.NET Core installed in your system to work with the code examples discussed in this article. As of this writing, ASP.NET Core 3.0 has been released. You can download ASP.NET Core from here.
You can download Visual Studio 2019 from here.
What is caching and why is it needed?
Caching is a technique of storing the page output or application data across HTTP requests in the memory so that subsequent requests to the same piece of data or the page would be fetched from the memory. It improves application performance by faster page rendering and reduced consumption of the server’s resources. You can take advantage of caching for building applications that can scale and are high performant.
What is response caching and when should I use it?
Response caching enables you to cache the server responses of a request so that the subsequent requests can be served from the cache. It is a type of caching in which you would typically specify cache-related headers in the HTTP responses to let the clients know to cache responses. You can take advantage of the cache control header to set browser caching policies in requests that originate from the clients as well as responses that come from the server. As an example, cache-control: max-age=90 implies that the server response is valid for a period of 90 seconds. Once this time period elapses, the web browser should request a new version of the data.
The key benefits of response caching include reduced latency and network traffic, improved responsiveness, and hence improved performance. Proper usage of response caching can lower bandwidth requirements and improve the application’s performance.
You can take advantage of response caching to cache items that are static and have minimal chance of being modified, such as CSS, JavaScript files, etc.
Why use NCache as a response caching middleware?
You might need to leverage distributed caching if your web application has a high traffic. NCache is one of the best response caching middlewares available. NCache provides the following benefits as a distributed cache:
100% .NET—NCache is built in .NET and in .NET Core. It is one of the rare distributed caches available that is built entirely using .NET.
Fast and scalable—NCache provides linear scalability and is very fast since it uses an in-memory distributed cache. Distributed caching is a concept in which the cached data might span multiple nodes or servers but within the same network hence enabling the cache to be scaled easily. The ability to scale linearly makes NCache a great choice when you experience performance challenges in your ASP.NET Core application during peak loads.
High availability—One of the great features of NCache is its support for peer clustering architecture. NCache is capable of caching ASP.NET Core web pages using response caching so that there is no data loss when the cache server is down.
NCache provides several features, such as support for virtualization and containerization, asynchronous operations, cache locking, searchable cache, cache elasticity, cache administration and management, etc. You can find more about its features here.
Creating a new ASP.NET Core MVC application
To create a new ASP.NET Core MVC web application in Visual Studio 2019, follow the steps outlined below:
Open the Visual Studio 2019 IDE
Select the option “Create a new project”
Select the option “ASP.NET Core Web Application” to specify the project type
Click on “Next”
Specify the project name and the location where you would like the new project to be saved
Optionally, you can click on the option “Place solution and project in the same directory” checkbox
Click on “Create”
In the “Create a new ASP.NET Core Web Application” dialog window, select “Web Application (Model-View-Controller)” as the project template
Select ASP.NET Core 3.0 from the DropDownList to specify the version of ASP.NET Core to be used
Uncheck the “No Authentication,” “Configure for HTTPS,” and “Enable Docker Support” checkboxes since we wouldn’t be using any of these here
Lastly, click on “Create”
Installing the NuGet packages
To work with NCache, you should install the following package(s) to your project via the NuGet Package Manager.
Install-Package NCache.Microsoft.Extensions.Caching
Note that you should include the Alachisoft.NCache.Caching.Distributed assembly in your programs to be able to work with the types in the NCache library. The following statement shows how you can do this.
using Alachisoft.NCache.Caching.Distributed;
Response caching options in NCache
There are three ways in which you can implement response caching using NCache. These include the following:
HTTP Based Caching—this is a type of response caching that caches the data at the web browser’s end. HTTP based caching can reduce the server hits since subsequent requests for a particular resource can be served from the cache.
In-Memory Caching - this is another type of response caching strategy in which data is cached in the memory of the web server. Note that the data in the cache is cleared when the ASP.NET engine is restarted since this is an in-proc mode of caching. In-memory caching is fast since it resides within the address space of your application.
Distributed Caching—this is yet another strategy used in response caching. A distributed cache is external to an application. In this strategy, the cache is distributed across several servers in a web farm. Any of the servers can respond to a request for data from the client. You can take advantage of NCache from Alachisoft to implement a distributed cache. If you are running your application in a load balanced multi-server environment, NCache can help you in distributed caching of the application’s data.
Add response caching services
You can take advantage of the AddResponseCaching() method in the Startup class’s ConfigureServices() method to configure response caching. Open the Startup.cs file and write the following code in the ConfigureServices method.
public void ConfigureServices(IServiceCollection services) { services.AddResponseCaching(); services.AddMvc(); }
Note that the response caching middleware is implicitly available in ASP.NET Core. The UseResponseCaching extension method is used to add the middleware to the request processing pipeline.
Lastly, call the UseResponseCaching() method to add the response caching middleware to the pipeline. Refer to the code snippet given below that shows how this can be achieved.
public void Configure(IApplicationBuilder app, IHostingEnvironment env, ILoggerFactory loggerFactory) { //Other code app.UseResponseCaching(); }
Configure the response cache middleware
Response caching is a great feature in ASP.NET Core and is a built-in functionality. You can take advantage of it to reduce the number of requests a client makes to a web server. NCache can also be used as a response caching middleware. Let’s explore how this can be achieved.
To use NCache as a response cache middleware, you need to do the following:
Specify the NCache settings in the Appsettings.json file
Invoke the AddResponseCaching and AddNCacheDistributedCache methods in the ConfigureServices method of the Startup class.
You can configure NCache as a distributed cache in two ways:
By specifying cache configuration in AppSettings.json
By specifying cache configuration in IOptions
Specify cache configuration in AppSettings.json file
The following code snippet illustrates how you can specify cache configuration settings in the AppSettings.json file—a section named NCacheSettings has been added.
{ "NCacheSettings": { "CacheName": "SpecifytheCacheNameHere", "EnableLogs": "True", "RequestTimeout": "60" } }
The ASP.NET Core IDistributedCache interface has been implemented in the NCache library. This allows you to use NCache as a response cache middleware in ASP.NET Core.
To use NCache as a NCache as your response cache middleware, write the following code in the ConfigureServices() method.
public void ConfigureServices(IServiceCollection services) { services.AddResponseCaching(); services.AddNCacheDistributedCache (Configuration.GetSection("NCacheSettings")); services.AddMvc(); }
Specify cache configuration in IOptions
You can also specify the NCache configuration details as IOptions as well. Refer to the code snippet given below to learnhow this can be achieved.
public void ConfigureServices(IServiceCollection services) { //Write code to add other services services.AddMvc(); services.AddNCacheDistributedCache(options => { options.CacheName = "SpecifytheCacheNameHere"; options.EnableLogs = true; options.ExceptionsEnabled = true; }); }
In the section that follows, we’ll examine how we can use NCache as a response caching middleware in the action methods.
Use response caching in the action methods
Assuming that you’ve configured the response caching middleware successfully, you can use the following code to take advantage of response caching in the action method.
public class HomeController : Controller { public IActionResult Index() { return View(); } [ResponseCache(Duration = 60, Location = ResponseCacheLocation.None, NoStore = false)] public IActionResult GetData() { //Write your code here } }
The Duration parameter is used to specify how long the data will remain in the cache. The ResponseCacheAttribute is used to specify the parameters in response caching. You can take advantage of the Location parameter to indicate if any client or intermediate proxy will cache the data. The possible values of the Location parameter are: ResponseCacheLocation.None, ResponseCacheLocation.Any, and ResponseCacheLocation.Client. If the value is ResponseCacheLocation.Any, it implies that the client or a proxy will cache the data. If the value is ResponseCacheLocation.Client, it implies that the client will cache the data. The NoStore parameter can have boolean values and if set to true, the Cache-Control header is set to no-store.
Use Distributed Cache Tag Helper
Now that NCache has been configured for response caching, you can specify the content that you would like to cache. To achieve this, you can take advantage of Distributed Cache Tag Helpers in ASP.NET Core.
The following code snippet illustrates how you can specify an item to remain in the cache forever.
<distributed-cache name="Key:A" > <div>@DateTime.Now.ToString()</div> </distributed-cache>
If you would like to set an expiry for a cached item, here’s what you need to write.
<distributed-cache name="Key:B" expires-after ="TimeSpan.FromSeconds(30)"> <div>@DateTime.Now.ToString()</div><br /> </distributed-cache>
The following code snippet illustrates how you can specify an item that will only be removed from cache if the “vary-by” value is changed.
<distributed-cache name="Key:C" vary-by ="test"> <div>@DateTime.Now.ToString()</div><br /> </distributed-cache>
Testing
To test the code examples given in the earlier section, you can create a new ASP.NET Core MVC application and write the following code in the Index.cshtml file:
<distributed-cache name="Key:A" > <div>@DateTime.Now.ToString()</div> </distributed-cache> <distributed-cache name="Key:B" expires-after ="TimeSpan.FromSeconds(30)"> <div>@DateTime.Now.ToString()</div><br /> </distributed-cache> <distributed-cache name="Key:C" vary-by ="test"> <div>@DateTime.Now.ToString()</div><br /> </distributed-cache>
When you execute the application you’ll observe that three DateTime values are displayed in the web browser. While the first and the third one doesn’t change, the second one changes the value after every 30 seconds.
Summary
Caching is a proven technique used in web applications to improve the performance and responsiveness. Response caching is a caching technique in which the response is served from the cache. ASP.NET Core provides support for response caching using the response caching middleware. For more information on NCache and how it can be used in ASP.NET Core, you can refer to the online documentation for NCache.
0 notes
Text
[Lynda] ASP.NET MVC 5 Identity: Authentication and Authorization
Authentication and authorization are core features of many modern apps. So why reinvent the wheel, forcing your users to create yet another login? Leveraging credentials from trusted platforms like Facebook and Google, you can save yourself precious development time and improve the user experience. This course shows how to authenticate and authorize users of your ASP.NET MVC 5 applications using .NET methods as well as third-party frameworks. Instructor Ervis Trupja discusses the options for identity management in ASP.NET MVC 5, showing how to implement third-party authentication in your app with Facebook, Twitter, Google, Microsoft, and GitHub. He shows how to set up email confirmation and two-step authentication and control levels of authorization for users. Finally, he discusses how to secure ASP.NET apps against the seven most common vulnerabilities. Topics include: Identity management Authentication vs. authorization Authentication via Facebook, Google, Microsoft, and more Email confirmation Two-step authentication Simple, role-based, and view-based authorization Defending against vulnerabilities
source https://ttorial.com/aspnet-mvc-5-identity-authentication-authorization
source https://ttorialcom.tumblr.com/post/177524236008
0 notes
Text
[Lynda] ASP.NET MVC 5 Identity: Authentication and Authorization
Authentication and authorization are core features of many modern apps. So why reinvent the wheel, forcing your users to create yet another login? Leveraging credentials from trusted platforms like Facebook and Google, you can save yourself precious development time and improve the user experience. This course shows how to authenticate and authorize users of your ASP.NET MVC 5 applications using .NET methods as well as third-party frameworks. Instructor Ervis Trupja discusses the options for identity management in ASP.NET MVC 5, showing how to implement third-party authentication in your app with Facebook, Twitter, Google, Microsoft, and GitHub. He shows how to set up email confirmation and two-step authentication and control levels of authorization for users. Finally, he discusses how to secure ASP.NET apps against the seven most common vulnerabilities. Topics include: Identity management Authentication vs. authorization Authentication via Facebook, Google, Microsoft, and more Email confirmation Two-step authentication Simple, role-based, and view-based authorization Defending against vulnerabilities
source https://ttorial.com/aspnet-mvc-5-identity-authentication-authorization
0 notes
Text
How to Install, Setup and Configure MS SQL Server 2017 Express Edition

If you're a .NET developer working with Visual Studio, you'll most likely know SQL Server LocalDB: a specialized edition of the well-known Microsoft SQL Server engine - firstly introduced in SQL Server Express 2012 - acting as a minimal, on-demand, version of SQL Server designed for application developers. Since its first introduction LocalDB has proved itself to be a great development tool, especially when used as an "embedded database" to quickly test our Data Model without having to setup a whole DBMS service. We briefly talked about it in a couple posts some months ago, such as when we compared the Entity Framework Data Modeling patterns (Code-first, Model-first and Database-first) and in our ASP.NET MVC 5 Web Application Project Setup Guide.
Although LocalDB proved itself to be a great development choice, it's not a good idea to use it in a production environment of any kind. The reasons for that are fairly simple to explain and understand:
Despite having the same performances of a regular SQL Server Express instance - since they share the same database engine - the LocalDb underlying process will shut down itself if it doesn't have any request for a while. When this happens, the next request(s) will most likely have poor performance and could even get a timeout.
There are some (minor and fixable) issues with the LocalDB default user profile and permissions that you'll need to fix to use it with an IIS-based production website: for further info about these problems - and their workarounds - I strongly suggest to take a look to this great two-part MSDN blog post (part 1 | part 2).
The "LocalDB in production" debate is also a recurrent topic on tech sites such as StackOverflow, which hosts some really interesting threads providing a great analysis of the pros and cons, such as:
Is it normal to use LocalDb in production?
Since LocalDB is for development purpose, then use what DB for production?
Having read and said all that, here come my 2 cents: although LocalDB is great, for a production machine I would strongly recommend using a standard, full-fledged and service-based instance of SQL Server: as for the chosen edition, we can either go for Express, Web, Standard, or Enterprise, depending on what we need and/or can afford.
In this post we'll see how to properly setup and configure an instance of Microsoft SQL Server 2017 Express Edition, aka MSSQL2017, which can be downloaded for free from this Microsoft page. Needless to say, we need to install it on a machine that is reachable from our web server via a Local Area Network (LAN) or within the web server itself, although this is definitely not a recommended choice: both IIS and SQL Server are resource-intensive, hence it could be advisable to keep them in two separate environments.
In the following tutorial we'll take for granted that we'll have a Windows Server available and accessible either phisically or via Remote Desktop, which would be the case for a server hosted, housed, virtualized or even available as a VPS or within a public, private or hybrid cloud farm.
Installing SQL Server 2017 Express
The installation process is pretty straightforward. Unless we don't need anything specific, we can just go for the basic type:

Eventually, we'll be prompted with the Installation Complete window, which will also give us some useful info, including the database instance name and a default connection string ready for a connection test:

Installing SQL Server Management Studio
From here, we can click the Install SSMS button and download SQL Server Management Studio, a tool that we can use to create our fist sample database and also a dedicated user that can access it.
SQL Server Management Studio is a separate product and can also be retrieved for free download at the following URL.
Configuring the MSSQL Service
Once we've downloaded and installed it, we can launch SQL Server Management Studio and start the required steps to create our first database. We will be prompted by a Connect to Server modal window that will allow us to connect to our local SQL Server instance.
To do this, select the Database Engine server type and then, from the Server name combo box, choose . Another pop-up window will appear, from which we'll be able to select the database engine we just installed on our server:

As for the Authentication part, we can leave Windows Authentication for now, being it the default SQL Server authentication mode: however, we're going to change it soon enough.
When we're done, click on the Connect button and a Server Explorer window will appear, containing a tree view representing the structure of your SQL Server instance. This is the interface we'll use to create our database and also the user/password that our application will use to access it.
Changing the authentication mode
The first thing we need to do is to change the default SQL Server authentication mode, so we won't be forced to use an existing Windows account. To do so, right-click on the root tree view node, which represents our SQL Server instance, and select Properties from the contextual menu. From the modal window that appears, select the Security page, then switch from Windows Authentication mode to SQL Server and Windows Authentication mode:

Adding the TestMakerFree database
Now we can create the database that will host our application's tables. Right-click on the Databases folder and choose Add Database from the contextual menu. Give it the TestMakerFree name and click on OK.
Adding the TestMakerFree login
Go back to the root Databases folders, then expand the Security folder, which should be just below it. From there, right-click on the Logins subfolder and choose New Login. Again, give it the TestMakerFree name. From the radio button list below, select SQL Server Authentication and set a suitable password - for example, SamplePassword123$ - and click on OK. If you want a simpler password you might have to also disable the enforce password policy option. However, we advise against doing that: choosing a weak password is never a wise choice, expecially if we do that in a production-ready environment. Instead, replace the sample password we used above with a custom one and store it carefully: we're going to need it later on.
Mapping the login to the database
The next thing we need to do is to properly map this login to the TestMakerFree database we added earlier. From the navigation menu to the left, switch to the User Mapping tab. Click on the checkbox right to the TestMakerFree database, then write TestMakerFree in the User cell and assign the db_owner membership role:

As soon as we click on the OK button, a new TestMakerFree user will be added to the TestMakerFree database with full administrative rights.
We can easily confirm that by going back to the root Databases folder and expanding it to TestMakerFree > Security > Users:

That's it! Now we'll be able to access our brand new TestMakerFree database with a standard connection string using the credentials we just created.
This article is part of the ASP.NET Core 2 and Angular 5 book, available as paperback, e-book and as a 26-lessons video-course. Promo Code: ASPCA50 to get it with a 50% discount!
Read the full article
0 notes
Text
External Provider Authentication using OAuth2 Implicit and Explicit Flow

Allowing users to sign in using their existing credentials is often a great way to drive additional traffic to our applications, as demonstrated by a number of case studies by Google, Facebook and Twitter. Such technique is commonly called External Provider Authentication or Third-Party Authentication and we already talked about it a number of times, such as in this AUTH-focused post.
As you might already know, a lot of modern web development frameworks comes with a set of handy packages that will take care of the whole Third-Party Authentication process with the above mentioned providers, saving ourselves from dealing with the relevant amount of complexity of the OAuth2 authentication flow: the .NET Framework offers a perfect example of that with the ASP.NET Core Identity package, featuring a set of plug-and-play , easy-to-implement features to authenticate users with Facebook, Twitter, Google and Microsoft providers in a (almost) seamless way: for more info on that, read the Microsoft ASP.NET Core official docs.
In this post we'll briefly explain what is going on behind the hood, i.e. what the OAuth2-based authorization flow is and how it actually works.
Introducing OAuth2
The 2.0 release of OAuth, also known as OAuth2, is arguably the best known third-party authorization protocol nowadays: it supersedes the former release (OAuth1 or simply OAuth) originally developed by Blaine Cook and Chris Messina in 2006. OAuth 2 has quickly become the industry-standard protocol for authorization and is currently used by a gigantic amount of community-based websites and social networks, including Google, Facebook and Twitter. It basically works like this:
Whenever an existing user requests a set of permissions to our application via OAuth, we open a transparent connection interface between them and a third-party authorization provider that is trusted by our application (for example, Facebook).
The provider acknowledges the user and, if they have the proper rights, responds entrusting them with a temporary, specific access key.
The user presents the access key to our application and will be granted access.
We can clearly see how easy it is to exploit this authorization logic for authentication purposes as well; after all, if Facebook says I can do something, shouldn't it also imply that I am who I claim to be? Isn't that enough?
The short answer is no. It might be the case for big players such as Facebook, because their OAuth 2 implementation implies that the subscriber receiving the authorization must have authenticated himself to their service first; however, this assurance is not written anywhere: considering how many websites are using it for authentication purposes we can assume that neither Facebook, nor Twitter nor Google won't likely change their actual behaviour, yet there are no guarrantees about it. Theoretically speaking, these websites could split their authorization system from their authentication protocol at any time, thus leading our application's authentication logic to an unrecoverable state of inconsistency. More generally, we can say that presuming something from something else is almost always a bad practice unless that assumption lies upon very solid, well-documented and (most importantly) highly guaranteed grounds. Nonetheless, since OAuth2 is arguably the most used standard for access delegation and SSO strategies around the web nowadays, we can say that such assumption has earned an high level of trust.
OAuth2 authorization flow
Let's do a quick recap of how OAuth2 authorization flow actually works for a standard web application:
The user asks the web application to login with the external provider X.
The web application prompts the user with a popup window containing a page directly hosted by the external provider X, from which he can:
Login to X to authenticate himself there, unless he's not logged-in there;
If/when logged-in, authorize the web application to use X as third-party authentication provider, thus giving it access to the minimum amount of required user info (name, e-mail, and so on) to allow that.
If the user refuses to either login to X or to give X the authorization, the popup will close and the authentication process will fail; if he accepts, X will send back an OAuth2 access token.
The web application will immediately consume that OAuth2 access token to fetch the above mentioned user info and use them to either create a new account or login with an existing one, depending if these info corresponds to an existing user or not.
This is what happens under the hood, regardless of X being Facebook, Google, Twitter or anything else. That said, such workflow can be implemented in a number of alternative ways, which can be grouped into two significative approaches (or, to better say, grant types):
Using an implicit flow, often handled by a Client-Side SDK written in JavaScript and made available by the external provider itself.
Using an explicit flow, with the help of a set of server-side tools, packages or libraries made available by the chosen development framework (such as ASP.NET Core), third-party packages or the external provider itself.
The explicit flow grant type is also called Authorization Code flow, because it returns a unique authorization code that must be used to retrieve the OAuth2 access token, avoiding the latter to be directly exposed to the user and to applications that might have access to the user's User Agent (such as browsers extensions, installed software, packet sniffers and so on).
To learn more about the OAuth2 authorization framework, we strongly suggest reading the following URLs:
Official Page: http://oauth.net/2/
RFC 6749: https://tools.ietf.org/html/rfc6749
Implicit flow vs Explicit flow
The main difference between the two grant types is all about how the aforementioned OAuth2 access token is requested, obtained and handled: in short words, how the steps 2 and 3 are actually performed.
In a standard implicit flow, these steps are entirely performed by the client-side part of our web app - often using a client-side SDK such as the Facebook JavaScript SDK - and the external provider servers. More specifically:
The popup window (step 2) will directly point to the external provider login/authorization page;
After the login and auth, the OAuth2 access token (step 3) will be directly fetched by the client-side part of our web application and then sent to a dedicated server-side API controller, which will use it to retrieve the user data and perform the account creation/login (step 4).
Conversely, when using an explicit flow grant type such as those provided by AspNet.Security.OAuth.Providers, Windows SDK for Facebook or OpenIddict, these same steps take place in the following way:
The popup window (step 2) will point to a server-side intermediate page of our app, which will then redirect the user to the external provider login/authorization page;
After the login & auth, the external provider will redirect the user to a specific callback URL together with an Authorization Code which will be used by the server-side part of our application to retrieve the actual OAuth2 access token (step 3) and then immediately use it to retrieve the user data and perform the account creation/login (step 4).
Either of these approaches is viable enough: however, they both have their pros and cons in terms of security and versatility, depending on the given scenario.
Implicit flow pros and cons
Implementing an implicit flow with an official client-side SDK released by the third-party provider is almost a walk in the park, even in Angular: we just have to find a way to implement a small, yet required amount of external JavaScript within our client-side code and load the external JS libraries without messing up the Angular components life cycle - or the page DOM - and we're set.
On top of that, the overall results will most likely look great: the required popup window will open (and close) in the best possible way, without size mismatches or other UI/UX issues, and without any hack (that we're aware of).
However, such approach also comes with a few downsides: our users will be able to receive their access tokens, together with whatever could spy, hack, sniff or impersonate them; additionally, it will also force us to write a certain amount of dedicated client-side code for each supported provider, which might be far from ideal if we want to support a whole lot of them.
Explicit flow pros and cons
The explicit flow approach is the most commonly used in server-side web applications for a number of good reasons: the auth source code is not publicly exposed, the Client Secret confidentiality can be mantained and the whole process is definitely more secure due to the presence of the Authorization Code, which is nothing less than an additional security layer. On top of that, if we're using a third-party-aware framework such as the .NET Framework, we could always count on the built-in server-side tools - such as the aforementioned Microsoft.AspNetCore.Identity service.
The only real downside about that is the fact that it still is a flow based upon browser redirection, which means that the application must be capable of interacting with the user-agent (aka the web browser): open the login/auth popup (with a proper size), receive API authorization codes that are routed through the browser, close that popup, and so on. Although this is hardly an issue in standard MVC web applications, it's definitely way more complicated when dealing with Angular and Single-Page Applications; although it can be definitely "forced" into that, the developer will eventually have to pull off a small, yet consistent number of nasty workarounds: it won't be an out-of-the-box experience, that's for sure.
Conclusions
As we can easily see, both approaches have their pros and cons. As always, it's mostly a matter of what we actually need (or want to) achieve as product owners, project managers or full-stack software developers.
This article is part of the ASP.NET Core 2 and Angular 5 book, available as paperback, e-book and as a 26-lessons video-course. Promo Code: ASPCA50 to get it with a 50% discount!
Read the full article
0 notes
Last Seen Blogs

inlove-fallen-angel
Wow Its Me

abearthegreat
The Abear Cave

tenthelement
Untitled

dkpkkk
Untitled

mig8best
Mig8 - Nhà cái uy tín hàng đầu châu Á hiện nay