#u need a how to crochet tutorial more than anything
Text
Listen everyones gotta start somewhere but some of the tutorials ppl make like ?? 😭😭 figure it out??
#this was abt a beginner crochet scarf tutorial and its like. just crochet a rectangle#u need a how to crochet tutorial more than anything
0 notes
Note
Hey, probably a question you have heard a thousant times. But what is the best way to get into any of the fiber arts? Books? Youtube? Actual people teaching you? (and if so how in the hell do you find them)
I started crochet and knitting but I pretty much can't get out of the basics, I can't managed to finish something that I have started cuz I always get frustrated that it's starting to look bad...
Hi! That's actually a really good question. Unfortunately (or maybe fortunately, depending on how u look at it) the only way to get any better at fibre crafts, is to keep doing them. Practice really does make perfect. There is no book or video tutorial or in-person teacher that holds the one ultimate secret that will make you Good At Crafts. All of these can be valuable resources if you struggle to understand how to do a specific thing; you can be taught stitches, and how to read charts, and such things. But the only way to really learn is to practice.
This is because there are more skills involved in crafting than just knowing how to do certain stitches. Confidence, patience, frustration tolerance: you can't learn that from tutorials. These are essential skills that you need to build. And the best way to build them, I'm afraid, is to actually finish the damn thing. Even if it has mistakes. Even if it "looks bad". You need to learn how to tolerate imperfections, if you ever want to get anything done.
Now that doesn't mean you should bully yourself. If you get easily bored and frustrated, leave the scarves and sweaters for now, and start small. Potholders, dishcloths, scrubbies or coasters are all projects that finish up quickly and yield usable objects, even when they are not perfect. If you never allow yourself the dopamine rush of Fuck Yeah I Made That, how do you expect yourself to build up the resilience to stick through the parts where it is slow and difficult and makes your fingers hurt?
Here are Ravelry searches for free dishcloth and potholder patterns.
Of course that doesn't mean you should only do those projects. You can do whatever you want. The most important thing is to teach yourself that you can have success, and the only way to do this is to successfully make things.
Also, it should always be fun. If it's not at least a little bit fun, maybe the technique isn't for you. This is also an important skill to develop: To learn when to stick through a bout of frustration, and when to abandon something.
There is a very steep learning curve. But you can and you will get there. I believe in you, and I also believe that what "looks bad" to you is perfectly fine.
#do you think i am perfect? no!#i dont make flat sweaters because my tension is shit#i cant do colourwork for the same reason#but yk what? who cares!#its okay to make mistakes and be imperfect its fine#learn to be patient with yourself#and also frogging something is fine too you need to enjoy the process of making#not just having the finished object#idk thats probably not what you want to hear anon but its the only advice i can give#this post was brought to you by that hat i am currently crocheting which i started over 4 times and ripped back a significant portion of#4 times more#its fine. its literally fine. i'll get there when i get there.#but thats the kind of frustration tolerance you need to build and for this you need to start out small#anonymaus#message#crafts
17 notes
·
View notes
Note
can I have an outline of how you draw bodies for reference please ^^ if u can and want too
I’m not good with tutorials because I’ve never been asked, but I’ll try my best tee hee
Also forgive the crusty art, it’s 2 am and I’m drawing mermaids.
Now, personally, I have a very different style that’s mainly culminated of many other styles that I have studied from other artists that I like, so this might not work for you or any other person that sees this, but I think trying in general is a big step in the right direction!
1. BLOCKING!!

Funny enough, I just started this step very recently, so if anything, it’s just an extra step to make sure everything is right. It’s actually helped me quite a lot since I have problems with anatomy and posing, so I really recommend it as a first step.
Think of it as a really messy sketch. In this step, you can do literally anything without being upset for getting frustrated because it doesn’t look right. It’s just a silhouette of an idea that you will expand on in the next step. I also recommend this for character design since silhouette is a BIG part of it and can make or break a line of characters. The last thing you want is for everyone character to look like a recolor of each other. ^^’
2. SHAPES!

I cannot stress enough how important shape language is for literally every single thing. Everything is made of shapes. People, animals, buildings, food. It all can be broken down into squares and circles. This is a part of anatomy that takes a little study, but once you get it, you get it.
For me, it’s changed a lot, but to put it simply: trapezoid and triangles. That’s all you really need for torsos really.
Now, for people of different body types, that’s a whole different story. Of course pear shaped people are not going to be built the same as people that are under rectangle or apple. That’s for another day, though. Slow and steady winds the race. If you take in too much, you’ll stress yourself out.
3. DETAILS!

Warning! If this part stresses you out the most, you are not alone.
I am better at drawing women and femmes because that was what my first Ocs were, so I’m still learning maize anatomy, but whatever. Nothing to worry about now.
This is completely reliant on what the person looks like. People have different bodies so not everyone is going to have a perfect hourglass figure. That being said, simply making the body wider or taller is not enough!! People have fat, it’s just one of the many things we are made of. Some people have more, some have less.
Think of it like a blanket almost. If you were to put a bed sheet over a chair, you would be able to see almost everything regarding the shape of it. If it was made of something thicker, like chunky crochet yarn, it would be harder to see the shape of the chair underneath. That’s putting it very simply. Things like muscle and stuff would be like throwing clothes onto the chair before putting the blanket on. Not a nursing major or anything, so take this with a grain of salt. I’m a stupid little guy.
It would take me forever to explain all of this, so I suggest looking into it on your own time in order to get a more in depth understanding of bodies and stuff like that. :)
EXTRAS!

If you haven’t noticed already p, which I completely understand, I am not that good at robots. I joined fnaf when Security Breach came out cus I like Suna nd Moon and I started this account with the intent of gaining an audience for my other Ocs. You goobers reeled me in and now I’m stuck here.
Anyway, when it comes to metal people, I draw them slightly different. They don’t have organs or anything, and are video game characters, so they don’t need a space for them. And nothing is better than saving space :)
I also make their bust a literal circle because I come on this app each day and see someone else draw them better and I start to sob uncontrollably. /j
This is completely up to you since people draw them all kinds of silly ways and I see no problem with that.
I don’t know how to end this but I hope this helped in some way :)
#mxiize#askcornmxiize#art help#artists on tumblr#original art#digital art#tutorial#helping#i don’t know what i’m doing#don’t hurt me#i so tired#honk shoo honk shoo
17 notes
·
View notes
Note
would u ever consider making a tutorial on how you make those cute litol crochet grunts? : o
Oh, hell yea, I figured out a very specific technique on making them!
The tutorial is under the cut!
(It's long and as thorough as I could make it.)
Materials you'll need:
Yarn (color of your choice, but more than one ball preferably JIC)
(Try to use the most regular yarn you find at craft stores, that doesn't make you itch.
Anything thicker or thinner usually makes the process a bit more complicated. Not impossible, it's just a bit of extra work)
Stuffing
Crochet needle (depending on the thiccness of your yarn)
Sewing needle (With a beeg hole so you can stick yarn through there comfortably) (Mine also has a dull end, which I honestly recommend as it keeps away from injury, yet still works like a charm.)
For added details you may use pipe cleaners, buttons or whatever else you see fit. Your plushie after all.
Keep in mind that I am not a professional.
I don't even know what the different loops are actually officially called, especially not in English.
Here's a lil image of what I will call the different loops in this tutorial, though:
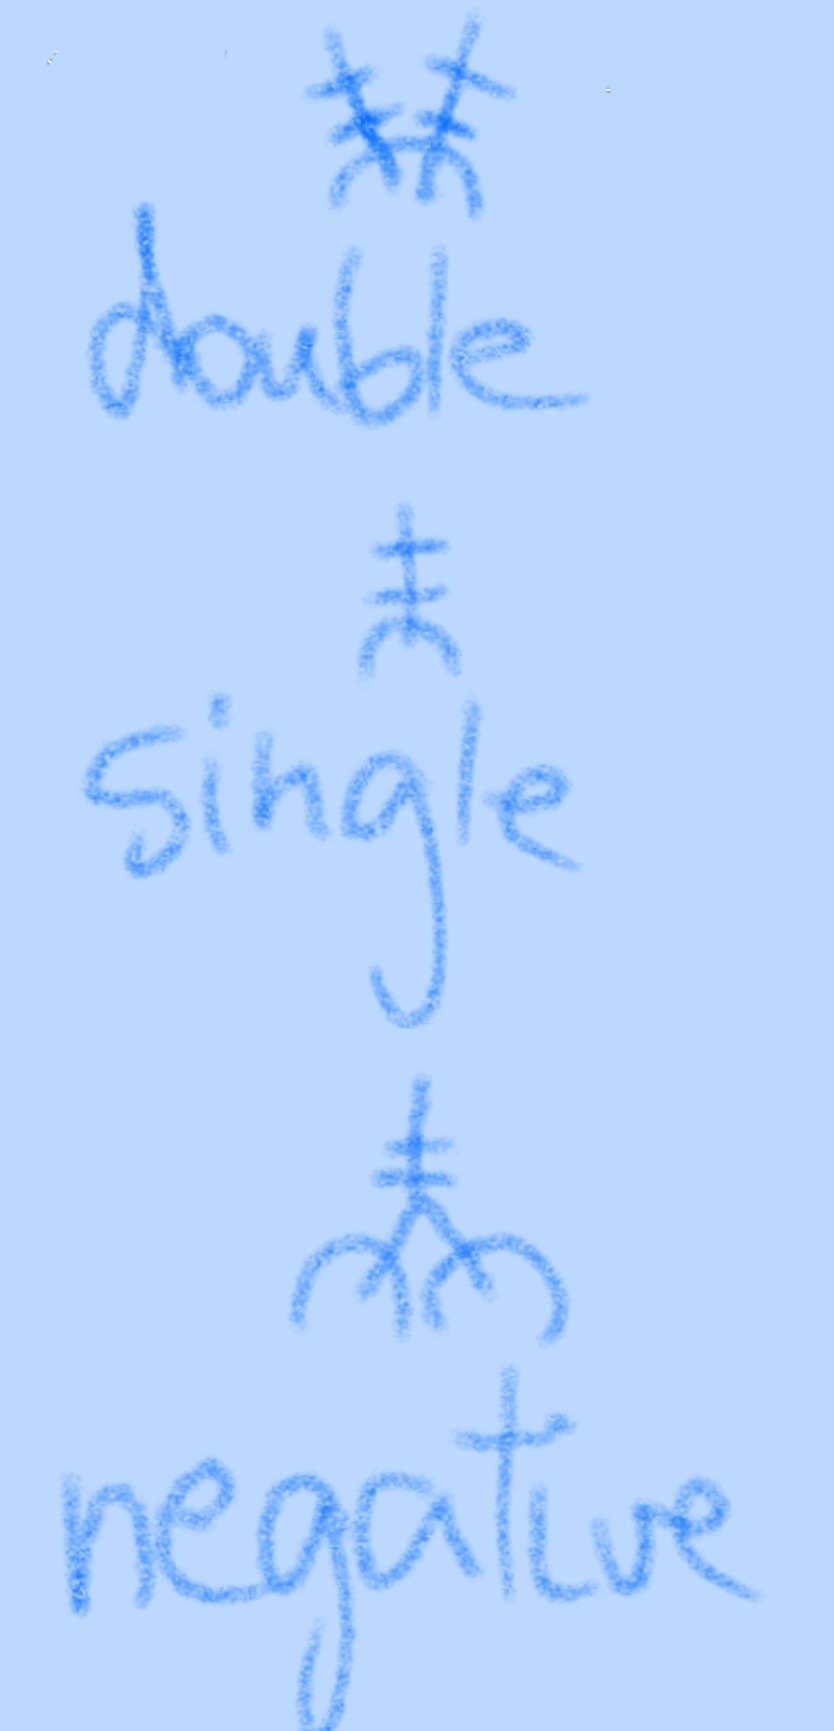
Also here's how to do a long (the green is yarn, that isn't already part of any loops):

A regular/single is this but skipping over steps 1 and 2.
A double is two singles in one premade loop.
A negative is two premade loops pulled together with one single.
Also, important side note, leave there a little ending of yarn every time you start or finish a section!
It stops your entire plushie from falling apart and in certain parts can be later used to sow parts of it together, if left long enough!
And don't worry about the little useless seeming danglies, you can just pull them into the plushie and noone'll know they're even there, yet your plushie stays perfectly in shape :))
Also, don't follow along before reading all of it first!
I add crucial details after I first mention doing something!
Read the whole thing first and then, if you want to, do according to the proper instructions!
Now, knowing the terms and conditions, on with the tutorial:

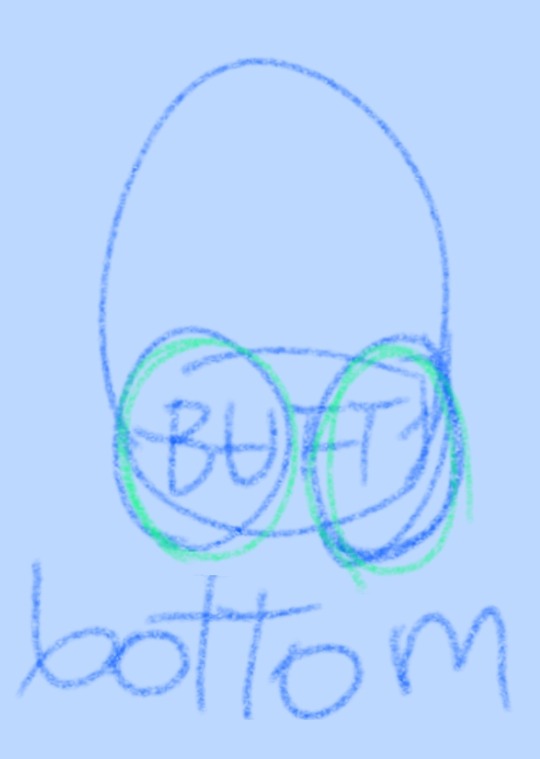
So, first things first, the Ball-Head.
It depends on how big ya wanna make the grunt, but for the ones I've already made...
You make the first loop and then you go back into it and create eight (8) regulars, forming a nice compact circle.
The next row continues from the first single of these eight loops.
This row will be a double over single aka double, single, double, single, and so on.
Repeat this process about three or four times until your thing (head-ball) starts to curve a bit.
Now, you shall do three rows of regulars.
(The middle row is allowed to be with longs, if you think that'll shape the head properly to what you need :>)
After these rows, you start doing rows of negative over regular aka same as double over regular, but with the opposite goal- decreasing the amount of loops rather than multiplying them.
Repeat this process until you have a hole that you can fit three or so fingers in.
Stuff the head through the hole to your liking and squeeze the head to see how soft it is.
(I usually make them soft enough to kinda squish but firm enough not to lose their form.)
After stuffing, finish the head by continuing the rows you were already doing.
You can do the cross now, if you so desire, but frankly I'm gonna show how to do it later, cause it's usually the last thing I do.
Holding onto the body and then sewing the head is frankly easier than holding that ball and having your fingers dangerously close to the needle.
Onto the next body part!

The Torso!
When I originally wanted to make the grunt, I had a whole other plan of attack planned, but I accidentally came across a way easier method, so...
First thing you're gonna wanna do is a chain.
How long this chain'll be is up to you, cause this is how long the body'll be + you gotta make two rows extra (will explain why in a bit).
After the chain is done, do not connect it with anything!
Start doing back and forth rows of singles instead!
Do as many as you think you'll grunt will be thick!
(Touch the last and first row you've done together every so often to see how thicc the lad is so far.
You gotta account for stuffing a bit, but only in the mid-section really. The first and last row will be the most resistant to stretching.)
Once you think you're done, leave a long ending of wool past your last loop before cutting.
You shall be using this to sew the body together.
Now you just stitch from the top to the bottom, leaving two round holes in said top and bottom, but don't cut the thread yet!
Now, sew the hole that you reached while stitching shut. Closer and more intricate stitches are recommended.
Once that's done, end + hide that end of the thread and start stuffing the body.
(Add however much stuffing you want, as long as you think the plushie will look right afterwards.)
Now, grab your sewing needle and a cut thread of yarn, cause you're stitching this bad boy to the head now!
How'll you know you sewed it in the right place to make the plushie look right? Trial and error, I'm sorry to say.
I make all of my plushies ever so slightly tilted cause I have barely any sense of centralization!
(Main tip I can give is that you can check the rows on the head to make sure you're centring it properly, as I know nothing else that can accurately tell you that.)
Now onto the next two body parts!

The Feeties!
Despite me drawing only one of them, you will probably be making two, so beware.
Ball-technique as used for head? NO, WRONG!
We'll be using the same technique as we did for the body instead!
Start with a chain. Now, keep in mind, this'll be the length of the foot. Not width, lenght. All the way around.
The width will be how many rows you make this time + extra rows for both sides.
Leave yarn to sew with once you're done, but remember- This time you'll sew all the holes shut, so make sure you stuff the foot in between your sewing.
Once that's done, where exactly will you attach the legs?
Well, that entirely depends:
Do you want your grunt to sit?

Attach the legs to the corners that your sewing left.
(Make sure you don't leave them too dangly though. That could make them come off easier.)
Do you want them to stand?
Attach the legs to where you made your seam, a little bit a part from one another.
(You might wanna make sure you left the legs either flatter or just bigger, cause otherwise your grunt'll always need a backrest or some other type of support to stand up.)
Now, finally the last detail I'll be talking about...

The Cross!
This'll just be made by stitching, so get your needle ready again.
First, finding where the centre of the face'll be.
I mean... I already told you I suck at centring shit.
If your feeties are in place, then they'll be your safest bet to tell where the face should be, probably.
(If, for some reason, you don't have your feet in place, cause you wanted to place the feet according to the cross instead, then you're fresh outta luck from me, friend.)
I usually start from the bottom, as I can leave a little space from the body, and have the grunt's face be in proper place that way.
Now, sew in the way shown in this image:

(The dotted line shows the yarn that's inside the plush/not visible. It's not supposed to connect yet, hold on.)
Now, once you reach where you think the top of the cross is, come back down, but the opposite way, making a little ××××× formation.
Once your back in the bottom, you can grab your crochet needle again and pull that thread through all those exes!
Like this:

If it doesn't look proper, then do a loop around the last X and go back down. That oughta leave you with a proper line right across this grunt's face.
The crossing line do the same way, just on the opposite axis.
Now just hide the thread, and voila!
By all means, the base of your grunt is now done!
Hope this was helpful or at least just interesting to read through :))
Edit: Also, forgot to mention that if you want to speed up the body-making process, then you can use longs :))
#madness combat#madness combat grunt#crochet#tutorial#info#if I left anything unclear or ya want extra info then I am happy to help :))
32 notes
·
View notes
Note
do u have any crochet tips for beginners? im making a baby blanket for my nephew but my fingers hurt and i always feel like im doing something wrong 😭
AHH okay first of all good luck!!! i’m sure it will be a treasured blanket regardless of how it turns out and always remember that any mistakes you make are going to be very obvious to you but mostly not to the people looking at the blanket unless you point them out – and even then it’s just another little thing that makes it homemade!
this got super long so i’m gonna put the rest of it under a cut kajsdlgks
as for tips, i think one of the main ones for me was not to worry about how i was holding the yarn/hook as long as i was getting good tension – i find it really difficult to hold the yarn how you’re “supposed” to because it’s more comfortable for me to hold it a different way, so i just did it that way and my projects came out just as good! so if your fingers hurt it might be a case of holding your yarn in a way that you find uncomfortable, maybe try a few different ways of holding it to see if that helps?
i actually find that watching youtube tutorials from a variety of crochet youtubers gives me a lot of peace in terms of holding yarn because they all do it so differently. sometimes i just watch their tutorials even if i have no intention of making whatever they’re demonstrating just because i like to see how they hold their yarn lmao? i think the person closest to how i currently hold my yarn is hooked by robin but there are sooo many people who wrap the yarn around the hook with their left hand like i used to. i think this also helped me become more familiar with the shapes of stitches and identifying them in different circumstances/with different yarns tbh! i literally watch it’s all in a nutshell videos because her voice is so sweet and soothing, but she’s SO comprehensive in her tutorials about pointing out where everything goes lmao, a lifesaver!!!
also, i used to crochet super tightly, but i feel like my stuff comes out better now i have a better grip on my tension, and i only really got used to the idea of loosening my tension after i did a big project in tunisian crochet. idk if you know what that is, but basically it’s like hybrid crochet/knitting where you’re always on the same side of the piece rather than turning at the end of each row, and you load a bunch of loops onto your hook on the ‘forward pass’ and then pull them off two at a time on the reverse pass (there’s a really great basics video on it here). if you crochet REALLY tightly with tunisian then your fabric is so angry and curled up that it’s difficult to crochet into the next row, so i really had to work on making all my movements super loose and then when i went back to regular crochet i found it so much easier to modulate my tension because i knew what crocheting more loosely was like, if that makes sense? ANYWAY that’s just the way i personally worked out my tension, there are definitely other ways to loosen up and i’m sure that will help with any finger troubles!
i know that a lot of beginners struggle with their work either getting wider or narrower as they crochet which can be super frustrating (it happened to me SO MUCH). most of the time that’s either because they’re adding/skipping stitches where they shouldn’t be (usually by missing the last stitch on the row), or because they’ll change their tension as they’re crocheting without realising. if you’re worrying about things like how you’re holding your yarn and your stitch count and not making mistakes you’re gonna be crocheting really tightly, and if you’ve relaxed into it you’re probably gonna be crocheting with less tension than you started with, so it’s super important when you start out that you know whether you tend to skew tighter or looser with your tension and really try to match that at the beginning. again, though, if your blanket is a little bit wonky there are things you can do like putting a border on it or trying to block it a bit, but also remember that it’s either going to be folded up or tucked over a baby, so nobody’s ever really going to see it stretched out completely flat and if it just has a SLIGHT discrepancy it’s honestly no big deal!!
besides stuff about tension i would generally say that reminding yourself you’re going to make a few mistakes as you’re learning is really important. like, i’ve been crocheting for a few years now and i still fuck up and have to frog yards and yards of yarn because of a mistake, but unless you get really bent out of shape about mistakes and it’s like upsetting you that you made a mistake (or it’s something that would throw off the rest of the pattern in a way that really needs to be fixed) then i would also suggest not being too strict with yourself! i empathise with the feeling of needing everything to be perfect, but if you wanted something to be perfect you would just go buy a blanket online somewhere right? if you drop a stitch somewhere and you only notice that you’ve done that like three rows later, just throw in an extra stitch somewhere in the row you’re on and you’re gucci!
i also think it’s good practice as a beginner to count your stitches and mark the first/last stitch on each row so you don’t accidentally miss ones there since i know that’s a really common mistake! i know counting your stitches is a pain, so you don’t have to do it every row, maybe just every few rows as you get more confident – also, if your blanket is massive and there are TONS of stitches in a row, you can use stitch markers to mark every 10th/20th stitch or something, so you’re just counting to 10 or 20 instead of 120 stitches in one go.
also, this might sound crazy but if you’re just doing a blanket that’s plain single/half double/double crochets or something, it might actually help you to switch to a pattern that has a slightly more “complicated” stitch pattern, like a granny stripe or something – that way it’s not as difficult to miss stitches by accident, you can see exactly where you’re working your clusters so there’s no mistakes about where to put them.
ultimately like i said up there, mistakes are noticeable to you because you’ve been staring at this thing for ages and you remember seeing the mistake and you see it every time you look at it, but i promise you NOBODY is going to pay that close attention, and if they are and they think less of this thing you’ve made because of a mistake then fuck em! the most important thing is being comfortable while you’re crocheting so make sure you’re holding everything in a way that makes the most sense to your hands and it will help you even out your tension if tension is an issue, and will also let you work for longer without getting uncomfy!
also, again, GOOD LUCK!! the blanket will be amazing and much loved because you made it! every project you make is practice with a new technique or a new stitch or a new yarn or a new hook so there’s always going to be some readjustments you’ll have to make but the more you crochet the better you’ll feel about everything. lmk if you need help with anything else!! 💕💕💕💕
5 notes
·
View notes
Text
Altars and How To Build Them
- From my Grimoire
What is an Altar?
A really good place to start when looking into building an altar is know exactly what an altar is. Essentially this is your place of power, and where all of your magickal workings will take place. They can also be places to worship or show reverence to your deities or to a spirit. The uses of altars can be endless, and they’re all unique to the individual and the purpose they’re making it for.
When building your altar, get creative and have fun with it. It’s connected to you and your energy, so making it personal to yourself is the most important aspect of creating one. I’ve even seen online and drawn altars, so feel free to think outside the box when it comes to yours if you can’t afford to make one that’s big and fancy. Your connection to it is what’s important.
There are also different types of altars and different themes and subcategories. The Altar I’ll be walking you through making today is a combination altar that’s centered around the Sun and Moon. Along with this, don’t feel like you can only have your altar up during specific times. If it’s a personal altar than it’s supposed to stay up year around c:
Types of Altars
As I usually say, this is not an inclusive list by far. Like I stated about, there are endless types of altars and even subcategories for the types. The kind of altar you make is completely up to you, so don’t feel like these are your only options.
House Altar - This is the energy center of the house and an altar for the entire family to use and draw power from. Usually this altar is located in the center of the house or the living room that way is accessible to everyone. These altars often change with the seasons, and have some sort of object or thing to represent every member of the family.
Personal Altar - Usually only connected to one of two people, and most often kept in a bedroom or closet. This type of altar is very personal to the person who makes it, often representing everything that they love and have passion for. It’s full of things like personal items, patron deity statues, and anything that has value to them.
Working Altar - This is an altar that is usually only put up when it’s needed. Used mostly for spell work and spell casting, it’s unique to the spell and intention. When building this kind of altar, think carefully about every aspect of it and how it can add to and enhance your spell.
Shrine - A type of altar made to honor a specific (type of) deity or spirit. These usually have things like idols on them and a space to give offerings. When building this kind of altar, work closely with the being who it’s meant to honor. Figure out what they like or don’t like.
Travel Altar - Often seen in mint canisters, these are a small collection of trinkets or items that you carry with you daily or only during extended stays and you want to keep a magickal connection. Use things that you care about, but are also easy to replace in case anything ever goes missing.
Supplies You’ll Need or Want
Here’s a list of some really basic supplies that you’re probably going to want when building your altar. That doesn’t mean these things are necessary, always make sure to use what works best for you!
Flat Surface - This can by anything from a windowsill to a table. Just any surface that’s flat enough to display everything properly. Personally I like to use a dresser because altars like to grow and expand, and having the extra storage space is nice.
Cloth - This is not only to protect your surface, but the cloth can be a sign of respect if you’re making a shrine.
Incense Burner/Oil Diffuser
Candles(and holders)/Wax Melts
Bowl - Used mostly for salt and water, but also to make offerings
Pentacle - A Sign of protection, feel free to draw this on your cloth of even a piece of paper.
Cup/Chalice - Used to hold water for blessing, cleansing crystals, or to make offerings of any drinks.
Cauldron - Used to burn or mix things together.
Bottles
Matches/Lighter
Salt and Water
Crystals/Stones
Some other, more traditional things you’ll see on an altar are things like:
Athame - A knife used for directing energy (sometimes used as a boline as well)
Boline - A knife used to cut herbs or branches, inscribe candles or carve runes/sigils into anything.
Bell - Used to call on spirits or the divine. Basically opens up communications with the spirit realm.
God and Goddess Idols - Idols representing someones deities
Wand - A tool used to direct energy, usually gifted to you by nature but can be bought or crafted as well.
Mortar and Pestle - Used to grind herbs, bones, or any other materials.
Building Your Altar: A Tutorial
Here’s the section everyone is probably waiting for, just exactly how do you build your altar? Well, there really is no direct way to build one but I can offer some basic guidelines. Never feel like this is the only way to build an altar because you can do whatever feels right to you. As long as it looks good to you, and works with your energy well, it’s perfect.
My methods of altar building have more traditional roots, but I’ve put my own spin on it to make it unique to me, so please do the same! ^u^
First off, you’re going to want to think about exactly where to place your altar. Think about the energy spaces in your home and room. What is your favorite spot or place? What makes you most comfortable? Also take into consideration if you have pets, or high traffic areas. If you’re going to have breakable things on your altar you don’t want your cat jumping up there, or someone bumping into it. Think carefully about everything!
Secondly, find your surface. My first altar was on a dinner tray table, so just about anything will work! It can be as big or small a space as you need. I chose a dresser that’s been in my family for a long time.

Next is to get your cloth. I personally like to get fabric from the craft store. Solid colors are cheap, and theres tons of them. I like to draw on mine to make them more personal. As for colors, use what works best for you. I like to use light colors during the warmer seasons and dark colors in the colder seasons.

Next thing you’re going to want to decide is your theme, or what kind of intentions you have for your altar. Find yourself a center piece. Something that you’ve made or connect with and that really means a lot to you. My Centerpieces are my crocheted God and Goddess dolls. This is more traditional, but if you’re curious, the feminine or spiritual side is the left side and the masculine or more physical side is the right side.

Next thing I focus on when building my altar, are where the candles and incense burner are gonna go. If you’re working with candles, HAVE FIRE SAFETY IN MIND ALWAYS. For me, I like to keep my candles in the middle away from everything else, and my incense burner fits nicely on the side.

After that comes your tools. Things like cups, bowls, athames, anything. Figure out where you want to put these tools that way they’re easy to access. My tools in the middle, I have laid out to correspond to the elements. Water(chalice), Lighter(fire), Salt Bowl(earth), and Bell(air)

The next part is to add some personal belongings and really set the mood for the altar. Me personally, one of my specialties is crystals, and that’s heavily reflected in my altar. I like to use the pentacle in the middle for crystal grids. It basically gives me a control panel for the altar, and allows me to change the mood for it whenever I feel like I need to. Some other things I added were a spell bottle my fiance gave me, an origami piece i was given by another covenmate, and a pinecone that just fell right in front of me on day.

And those are the basics to setting up an altar! If anyone has and questions or would like some advice, please feel free to send me a message or ask. Hopefully this helps some of you!
#pagan wicca#paganism#pagan#wicca#wiccan#witchcraft#witchblr#witches of tumblr#altar#witch altar#wicca altar#tutorial#how to#baby witch tips#witch tips#green witch#eclectic witch#cosmic witch#my grimoire#my tips
3K notes
·
View notes
Last Seen Blogs

gamiyan
gami-gami

is-rishisunak-still-pm
I hate Rishi Sunak and Kier Starmer

marktonytv
Untitled

social-identity-disorder
Bones Exposed...

gamangenkai
とある四十路大学生の顛末