#ue4 rename project
Explore tagged Tumblr posts
Visit Tumblr Blog
Explore Tumblr blogs with no restrictions, modern design and the best experience.
Last Seen Tumblr Blogs


Fun Fact
Tumblr posted its first advertisements in May 2012 and subsequently earned $13M in revenue.
Text
Why Custom Unity Character Animation?
Unity 3D is called as the open-source game engine within the VR & AR segments, it is an easy-to-use interface, it lets user import files from major designing 3D software programs such as Cinema 3D (.c4d, .c3d), Maya (.mb or .ma), Studio Max (.max), and Blender (.fbx). Animations are usually created in two ways for Unity projects, the first is through importing the characters from external applications, once the files get imported into Unity, the files need to be set up appropriately. For instance, 3D characters will have a rig – a set of bones driving the animation movements. The import settings enable users to define the Animation type i.e. Generic or Humanoid from the rig.

Setting up the Rig Steps:
• Any character you like can be imported from GameKit 3D Project into Unity, & select it in the Project window. • Then select the Rig tab in the ‘Inspector’. • Choose the Animation Type to either Generic or Humanoid.The Generic Animation type is only used for specific rigs characters & not creatures or any other type of character. The Humanoid Animation type is used for multiple humanoid characters. • Setting the ‘Avatar Definition’ as ‘Create From This Model’. • Choose Root node: as file name includes the word ‘Root’. • Checkmark on the option ‘Optimize Game Objects’ then Apply. • In the Project window, choose animation files for the character. • Select the Rig tab from Inspector. • Change Animation Type from the previous steps to match the character rig settings. • Pick ‘Avatar Definition’ as ‘Copy From Other Avatar’. • Select the Radio button for ‘Source’. • Choose the ‘Avatar Definition’ from previous steps & then Apply.
ue4 Pixel Streaming multiplayer & Unreal Streaming
Setting up the Animation Clips Steps: After the Rig set up, Animation clips set is important.
• In the Project window, choose Animation files for the character. • Select the Animation tab within the ‘Inspector’. • Rename the Animation Clip that describes your character animation. • Ensure for ‘Loop Time’ if it is looping animation. • Select ‘Root Transform’ parameters, enabling the ‘Bake into Pose’ to match the Animation clip from first to last frames. • Select ‘Based Upon’ parameter settings from the dropdown list. • Choose Apply. Then play to preview the animation in Editor.
Making Animation Clips Steps: Characters or almost any GameObjects can be animated in Unity using Animation Window.
• Choose Window > Animation option from the Menu. • Drag & drop the Animation window next to the Project window. • Choose your GameObject to animate in the Scene View. • Select the 'Create Animation Clip' button from the Animation window. • Save the Animation Clip in the destination Project directory. • Then click the Record button from the Animation window. • You can move the Time Slider to any frame location. • Move, Rotate, or Scale tool can be used to create a Keyframe on Time Slider’s location. • At the end of the animation, turn off the Record button.
Thus, customizing your characters in Unity, is you can see, adjust, and perform your animations directly in your scene with the real-time animation creation.
2 notes
·
View notes
Text
The Journey: Day 5 of 14
Today is going to be a little more involved and a little more tedious, this is a 37 minute video, feel free to speed up the pace this is going to have a lot of repetition, however once you understand what is going on; it will all make sense. In essence you are copying things over and renaming things. This is going to be how we set up our Landscapes using Megascans from the Quixel Library that we installed earlier. This will allow us to have higher quality textures while using Normal Maps, Tessellation, and Displacement.
Troubleshooting Steps if Needed: If you are having trouble finding the Displacement Material shown in the video, make sure you click the Megascans Icon in Unreal Engine at the top, check the box Enable Displacement and the box Import Master Material Textures. Then in Quixel Bridge, Edit > Export Settings --> Textures Tab > Surfaces and make sure the Displacement option is checked. If it is, and you did all the other steps, go ahead and re-export a surface into your project, select Yes to All to replace the currently existing ones and you should now have that displacement master material.
9 minute video made by Unreal Engine Tutorials 1. Import a few Surface Materials from Quixel to your project. https://www.youtube.com/watch?v=XrOk8bZfnGM 37 minute video made by UE4 Mentor. Not made by me. 2. https://www.youtube.com/watch?v=j6lMvQnG1P8
#ue4#indiegamedev#indiegame#gamedev#gamedevelopment#unreal engine#coding#blueprints#learning#material#landscape#advanced
1 note
·
View note
Text
Attract Mode in Unreal
To be able to get started on getting my Attract Mode into Unreal, I had to make sure to quick export all the layers in my Photoshop file as PNGs. This is to make it much easier to animate the attract mode with things like flashing words and moving assets. Also, I made sure to apply the paper 2D texture settings so the assets actually came out properly.
I then created a new level and called it AttractMode, and similar to in Unity or even my last UE4 project, this will act as the menu for the game.

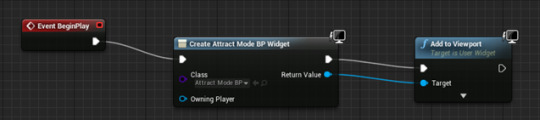
Next, I made a widget and renamed it to fit for my attract mode. Then, in the settings for my new level I attached a create node to an Event BeginPlay, changed the class to the AttractModeBP, attached that node to an “Add to Viewport” node which was all I needed to do for the screen to then show up when the level was opened.
After sorting that out, I went into the actual attract mode widget and began placing in the different PNGs in the same places to where I had them all originally in Photoshop. I also had to rename them so I knew what I was actually moving around too.

After everything was set up in the widget, I moved on to doing the animation for the flashing Insert Coin text. I just created a new animation in the timeline window below, then added tracks that focus on the specific assets I want (both the japanese and english insert coin text assets). From there, I pressed the plus sign on each new track and added the “render opacity” option, then just added in separate keyframes with the opacity increasing and decreasing from 1 to 0 with a constant interpolation.

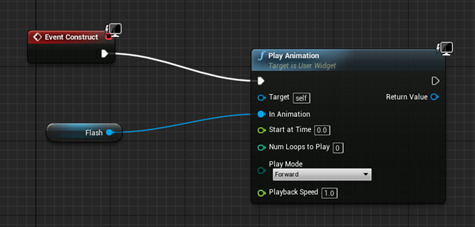
To then get the animation to play I went into the widget’s graph, and added a Play Animation node onto the pre-existing Event Construct, with the Flash animation I made being connected to said Play Animation node.
0 notes
Text
Working on the Glacier DLC Expansion Pack 1 Ultimate Collectors GOTY Edition
Week 9 is the first week of development sprint 3 and the first week back from the “uni break”. I got a bit creative with the landscape, solved a worrying bug or two, and added more assets.
Monday
Today was our first day back from our self imposed mini break or extended long weekend. It was also the beginning of sprint 3 of our production pipeline. Everyone was well rested and ready and reading to go (aside from one ill member). We talked about what we did in the weekend which included Nathan and his experience at GDC and my games that I played and took inspiration from. Also things like general things like where people went and such.
Xav had a new idea. Based on feedback from the GDM we wanted to make the space around the initial cave a shear cliff face that the player would not want to climb. Zav’s idea is to have a huge glacier in our landscape, potentially serving as the cave itself. This is a great idea and I started implementing it. However, adding a glacier means moving the environment from a central north island bush to a South island landscape. This means repainting the entire thing and rethinking entirely what flora I have, how much and where it goes. Lots of work for me.
Mark is working on modeling a hut. Should be finished end of today or first half tomorrow.
I think Kavita is now working on glacier art.
Tuesday
Today I used a couple BSP brushes to block out where a glacier might go near spawn. This is on the cold version I made yesterday. I then added a metal to it that was white with a blue emissive. This looked better than expected. I then put a crevasse down the middle and a temp player sized block for scale reference. It was then I realized how huge this ice block is. I then gave it a nice looking texture with macro variation and a variety of texture maps.
I will show this to the team (and Aldo) and ask them weather then want to pursue this, go back to the original project or find a compromise somehow. My vote will be to go back to the original project but take cool screenshots of this project for promotional purposes. This would mean we still need someone to model rock face static meshes. This will probably be me. At the very least I proved I could do it. A thought I just love. In saying that though it needs work to look good.
Wednesday
Nathan has finally cracked how to build our project. He's had to jump through so many hoops to get it working. I'll record specifics when I get them.
Mark finished the shed model but had issues unwrapping it so much we had to get the modeler from Aldo's team to help who really knows what he's doing with blender.
Xav painted it in Substance Painter and I will figure out how to import it tomorrow.
Kavita wants to move into modeling tasks. I didn't have a specific job to give her at the time and might have to follow this up tomorrow.
Garian made a night ambience track. It's dark and grand sounding. I think it could be good.
I had a bit of trouble finding the most up to date project among all my duplicate testing and debugging versions. The current one has been renamed kowhai 0_4.
Thursday
I implemented the steel shack and everyone was impressed with how good it looked including me. I now have Kavita working on a more advanced shack that she drew from her concept art.
I went to a small presentation run by our lecturer Stefan about his recent trip to Germany and the VR research he did there. It was very interesting and I'm glad I went. It did however leave me away from my team for another hour after I hadn't been in all morning. (they didn't see most of this though because they were on a apparently tortuous field trip this morning). When I got back however I was pleasantly surprised to see that Mark had made a drinking bottle canteen and it was being painted by Xav and Nathan has been doing some interesting and useful research into the effects of hypothermia.
I moved one of my trees into a file folder higher up in an attempt to fix some save errors and subsequently broke all my foliage. At the moment I am repainting it all and will drop the landscape between the two lakes in an attempt to make more of a canyon that funnels the player more effectively. In this canyon I will put a path up to the hut.
We plan to make a broken boat by the dock in the first lake. This is where the player will find the fire kit and will hopefully use it to warm up after they go through the water.
Friday
Mark, Kavita and I were in today. I played with the foliage, saved and went to have lunch or something. When I came back UE4 couldn't load my map. I went through the backup folder to find the most recent version of my map and was able to successfully load and work from that. I renamed that 0_4_2. The foliage is in in a logical manner and the groove cut in the landscape been the two lakes. I put the metal shed on the hill upper hut location and also by the first lake. Mark made a longer pier that I implemented also. I will surround it with foliage so much so that it hides the shed from the ridge and is seen when the player comes out of the lake. Mark also programmed a teleportation function that will make testing different areas of the map during play much easier.
I played the latest Just Dance game. I'm not very good but I think I have potential. I might get a dance game for my Xbox one Kinect. :P
Just kidding about the DLC. For now...
@aldovisini, @markyeoh, @ncyrocks, @vintagexvr, @kavitacreativetech, @garianleighton-anderson
1 note
·
View note
Text
[Tutorial] [Intermediate] Recreate Need For Speed Carbon’s Autosculpt in Unreal Engine 4 and Blender using Shape Keys and Morph Targets
Before following this tutorial, please note that this is not a step-by-step tutorial and it assumes you have some familiarity with Unreal Engine and Blender or a similar 3D package. If you’re a complete beginner Tesla Dev has a good video tutorial on Morph Targets ( https://www.youtube.com/watch?v=r0Jlu3mI6v0 )
Intro: When I first played Need for Speed Carbon I was amazed by the Autosculpt system and wanted to know how they’ve done it. While I didn’t find out at the time, while playing with Morph Targets in Unreal Engine recently, I figured they could be used to recreate a system similar to Autosculpt.
For those who haven’t played the game, Autosculpt was a feature that allowed you to do fine visual tweaks on different car parts such as wheels, bumpers, spoilers, side skirts, etc by adjusting a few sliders. These adjustments allowed you to vary several properties such as size, position, rotation, pulling on various groups of vertices to achieve numerous unique variations of a car part.
Here’s what we’re going to achieve:

Part 1 - Blender First of all we have to prepare the mesh. I’ll be using Blender for this but the following is achievable in most 3D packages such as 3DS Max and Maya. You can also make this in Unity instead of Unreal Engine.
The key feature in Blender which will help us achieve our goal is called Shape Keys. Shape Keys allow you to define several variations of a mesh and smoothly blend between them.
We start with a fairly simple car rim and tyre as one mesh with the modifier stack collapsed. This is needed due to Shape Keys not working with modifiers. So if you built your rim using the Array modifier you’ll unfortunately have to apply it to continue.
It’s important to keep your topology as simple as you can, avoiding any unnecessary topology such as no loops on the spokes like below. You’ll see why in a moment.
Important! Before you go any further make sure your mesh’s scale is applied as it will cause issues if not. To do this select your mesh, press Ctrl + A and select Scale.

Now go to the Data tab in the Properties panel and under Shape Keys click the “plus” icon to add a new shape key. This will add your Basis Key which defines the base shape of your mesh. Then click once more to add a new key, double-click it’s name to rename it and call it Split, followed by setting it’s Value slider to 1.

Now press Tab to go into Edit Mode and tweak your mesh to look similar to below. After you’re finished exit Edit Mode.
Note: This is where not having an edge loop on the spoke helps as you can bend it out of place by just moving the top vertices retaining its overall shape. This is a bit tedious and while it might be tempting to use the Array modifier to model just one spoke of the rim and duplicate everything it is unfortunately not possible due to the incompatibility of Shape Keys with the Array modifier.

After modifying your mesh like above you can drag the Split slider and see how your mesh blends nicely between the 2 variations.

Now you can move the slider to 0 and click on “plus” to add another Shape Key.
The process from here is the same:
1. Add Shape Key 2. Set the value to maximum 3. Enter Edit Mode > Modify your mesh to represent the maximum deformation for that Shape Key 4. Exit Edit Mode and play with the new Shape Key to check if you’re happy
I’ll quickly demonstrate all my Shape Keys and let you to either try and do the same or come up with your own.
Width - modifies the top width of the spokes

Poke - pokes the centre of the rim in

Offset - moves the entire spoke assembly in and out (deep dish style)

Twist - rotates the centre of the rim only

Radius - changes the radius of the rim (hint: use Proportional Editing to make this)

Tire - changes the tire width (if you want fat Lambo tires)

All that’s left to do in Blender now is to export this as a .fbx file and import into UE4. So go to File > Export > FBX and use the below settings.

This is for the Blender part now let’s jump to Unreal. Part 2 - Unreal
In Unreal the feature that allows us to use the Shape Keys we created is called Morph Target. These are a property of Skeletal Meshes so we’ll have to import our wheel like one.
In a project of your choice import the .fbx you exported earlier and match the settings underlined in red. You can leave everything else as default.

After you’ve done the settings press Import and double click your rim in the Content Browser. Go to the Mesh tab and your Shape Keys/Morph Targets are on the right. You can now adjust these as you did in Blender and combine them to achieve rather unique variations of your mesh.
As a bonus UE4 allows you to move the slider negatively down to -1 so you can get the opposite result to the original intent of your shape key. This might end in some interesting or just outright funny results!

To adjust these sliders within a game, use the Set Morph Target node in Blueprint which you can drive using a UMG slider or whatever else you prefer.

Challenge: Try and use the above techniques to tweak another car part! Did you know?: You can use these techniques to also make customisable doors, windows, stairs and many other things.
Hope this was helpful and if you have any questions send me a message and I’ll try to answer.
#ue4#unrealengine#unrealengine4#blueprints#blender#b3d#racing#nfs#need for speed#carbon#tuning#jdm#tutorial#training#cgi
14 notes
·
View notes
Text
Tomb Raider The Dagger of Xian
Tomb Raider The Dagger of Xian, or short Tomb Raider DOX is a fan creation by Nicobass,re-imagining Tomb Raider II in a “Tomb Raider Anniversary”-ish style. Nicobass uses the Unreal Engine 4 (short UE4) for this project. Those interested in playing the fan project can download the Demo from Nicobass’ website at http://tombraider-dox.com/downloads/.

System Requirements
The system requirements can be considered moderate, if you were able to play the reboot Tomb Raider games on your PC.
Windows 7 x64
Graphic card with Dx11
4GB RAM (8GB strongly recommended)
6GB free disk space
Any software able to open a .rar file (like Winrar)
(As given on tombraider-dox.com.)
Installation
I will first guide you through the installation.
Download the package from the download page at tombraider-dox.com. It has a file size of 1.8 GB, so depending on your internet connection that may finish quickly or take a while.
After the download is completed, unpack the .rar file using a program like winrar, 7zip or similar and then hop into the “TombRaiderDOX-1.0″ folder.
If you don’t have the UE4 Engine installed - which is the case if you are a little clueless right now - go to “Engine\Extras\Redist\en-us” within this folder and choose UE4PrereqSetup_x64. Follow all the instructions (you may have to install the .NET Framework on the way; Windows 10 will do this on its own during the setup, if you confirm it) until you hear the sweet words “Setup Successful”.
After that you are free to click on TombRaiderDOX.exe to start the demo. Yes, it is as simple as that.
Play Game
Choose “Play Game” and then “New Game” to begin the adventure.
You can pick a Combat Difficulty between (Easy, Medium and Hard) and turn Tutorial Text, Manual Grab and Manual Shoot on or off.

The Great Wall
Those who have played the original Tomb Raider II know the drill. Lara learns of the Dagger of Xian legend and sets out to China via helicopter.

Her first few steps are inside a dark but large cave at the foot of the wall. Thorough treasure hunters will find a dead explorer, deceased in 1984, in one of the side caves who has left a letter behind, telling his story, and there are several of these spread around the level.

“I don’t know what madness got into me when I decided to search for the Dagger of Xian. My research led me here, to this cave. But I have now been stuck in this place for four days, unable to reach the surface. I can hardly stand up but I’ll try one last time to climb the wall. Also, I have been hearing something for quite some time... like grunts... maybe a ferocious beast. I am wondering if it’s real, or if I’m starting to lose my mind... Johan, you were the one who led me here. Where are you?”
From his letter we can learn that he, too, was looking for the Dagger of Xian, and that he had a companion, Johan. Unfortunately Richard Dorton was trapped in the cave, but do not fear, Lara won’t suffer the same fate. Either the environment has changed over the last decade (or two? 😜) or Lara is just a much better climber. Soon she will have reached the top of the Great Wall of China.

Gamers who have played the original Tomb Raider II will notice that everything is vaguely familiar, but also completely different. The environment atop the wall looks stunning and caves are much more detailed, with a larger climbing-and-jumping portion.
Another document, written in old Chinese and impossible to date, found throughout the level gives more insight into the back story.

Qin Shi Huang, our Emperor, has died on the battlefield. I shouldn’t write this but... I am glad. When he came here with his army, I saw his cruelty with my own eyes. He was able to condemn someone to death with only a simple gestures of his hand. Did that child deserve to be slaughtered simply for stealing a piece of meat? I can’t shake the image from my mind... What did Qin Shi Huang come here for? I don’t know. But it is said that his soldiers, who were digging in the catacombs under the wall, found what they were looking for. Why have some people renamed Qin Shi Huang “The Dragon” ever since? Who cares. He is dead now.
I hope this article has served as an appetiser and piqued your interest in this great project.

Thank you, Nicobass.
0 notes
Text
Character Creator update for Unreal and Unity
Reallusion launched recently Unreal Engine 4 Character Creator 2.0 update, allowing developers to create, animate and export 3D characters for games, but also for different uses.
The Unreal (UE4) Character Creator 2.0 update, represents a solution for thousands of UE4 game developers to create, animate and export 3D characters fully-rigged and ready for games. Unreal character design for developers utilizing Adobe Fuse & Mixamo now have a new solution for game character creation and animation with Reallusion Character Creator’ full compatibility. Design a visually stunning character with easy morph sliders and clothing options, animate it with hundreds of iClone animations, custom mocap or lip-sync and export the finished characters to Unreal with a workflow that integrates into any indie or studio pipeline for game development.
Although presented as a new solution for game character creation and animation, the software can be the base for projects in other areas. In fact, Unreal Engine is being used, as revealed at NAB 2017, in broadcast production, and also used in pioneering new ways of creating movies, complete with objects characters and environments.
Character Creator 2.0 is optimized for Unreal Engine 4, as Unreal users highly requested a new character design tool that is dedicated to working and scaling with Unreal development. In response, Reallusion has adapted Character Creator 2.0 to auto convert character bone structures for UE4 rigs, allowing CC characters to be fully compatible with the Unreal UE4 Third Person Controller.
Although Unreal Engine is a main reference for Character Creator 2.0, the program is also compatible with Unity through the latest update. Through it, Character Creator assets can now enjoy a direct FBX export for Mecanim-compatible characters into Unity 3D, for instant 3rd person gameplay. Users will also be able to save and display the same realistic PBR looks in Character Creator to their Unity game by manually setting up their texture maps.
Mixamo motions can also be converted through Character Creator 2.0 for use in the Unreal Engine. Again, through the update, Reallusion now offers a quick workaround to quickly apply any Mixamo motions to character rigs in Unreal by taking it through 3DXchange. This will save time by avoiding the requirement to map and rename bones and re-align axis.
Benjamin Bishop of Caprica Productions details how Reallusion answered their call for help and saved their game company “thousands of dollars and hundreds of development hours”.
“We were using Mixamo, Adobe Fuse – says Benjamin Bishop – for a lot of our character creation needs. When the Unreal Engine 4 rig was removed from their service it completely broke our pipeline and caused us to lose countless hours of work. We turned to Reallusion for a possible solution and have found a company which was quick to respond, help and integrate everything we needed into their software. We found them vastly superior in every way and couldn’t have imagined a better interaction.”
Shortly after, continues Bishop, “Character Creator 2.0 was released including the feature we requested plus many others that make it an excellent addition to any developers’ tool bag. Reallusion have saved us thousands of dollars and hundreds of development hours. It’s great to find a company that really listens to their customers and does everything they can to help!”
The post Character Creator update for Unreal and Unity appeared first on ProVideo Coalition.
First Found At: Character Creator update for Unreal and Unity
0 notes