#uinavigationcontroller
Explore tagged Tumblr posts
Visit Tumblr Blog
Explore Tumblr blogs with no restrictions, modern design and the best experience.
Last Seen Tumblr Blogs


Fun Fact
Celebrities use Tumblr as well.
Text
Building a Custom Navigation Controller for iOS: A Practical Guide
Introduction Building a Custom Navigation Controller for iOS: A Practical Guide is a comprehensive tutorial that will walk you through the process of creating a custom navigation controller for iOS. This guide is designed for developers who want to create a custom navigation controller that meets their specific needs, rather than relying on the built-in UINavigationController. In this guide,…
0 notes
Video
youtube
Swift: Create Facebook's Tab Menu system with UITabBarController
my review point is 9/10
https://youtu.be/1Sg7HjR_k2c?t=2m30s UITabBarController 만들어 사용하기
https://youtu.be/1Sg7HjR_k2c?t=4m3s UITabBarController에 있는 viewControllers 프로퍼티를 다른 view controller로 채운다. 하단의 텝에 나오는 tab bar styling은 UINavigationController obj를 이용한다. title, tabBarItem 속성을 이용한다.
https://youtu.be/1Sg7HjR_k2c?t=16m43s tab bar가 투명하게 하는 것을 막는 작업 (UINavigationController 내의 tabBar.translucent = false )
https://youtu.be/1Sg7HjR_k2c?t=18m tab bar top border 바꾸기
https://youtu.be/1Sg7HjR_k2c?t=21m35s 기본적으로 텝이 선택되고 안 선택되고에 따라 버튼의 색이 ios 에 의해 지정되는데 이를 수정하는 작업 ( AppDelegate에서 UITabBar.appearance().tintColor 를 수정한다. )
#ios#brian#facebook feed#facebook#UITabBarController#tab#bar#viewController#tabBarItem#UINavigationController#navigation#transparent#tabBar#translucent#border#UITabBar#tintColor#color
0 notes
Text
Projeto Pitch Perfect da Udacity
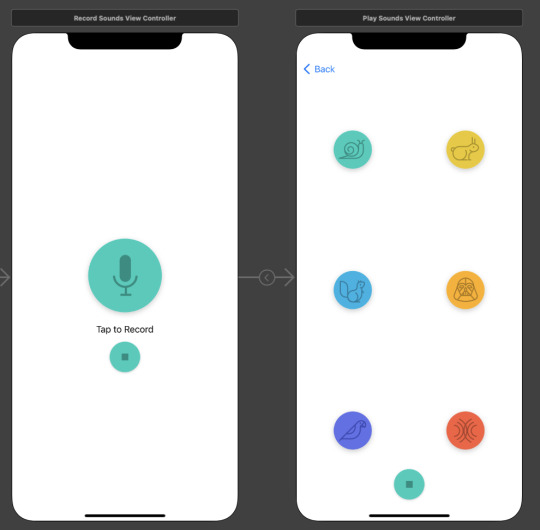
O aplicativo grava a sua voz, e toca ela com o efeito que desejar.
Nesse primeiro projeto do Nanodegree, ja pude revisar e aprender varias bases do desenvolvimento de aplicativos iOS.
Criar um novo projeto usando template "iOS App".
Adicionar botões, imagens/assets, labels e criar uma interface usando UIKit e Storyboard.
Os princípios da arquitetura: Model View Controller (MVC) isso incluindo escrever um model code customizado, e usando UIViewController e UIView.
Criar conexões Outlet e Action, entre views e views controllers, usando o benefício dos Delegates no código.
Navegar entre 2 cenas/telas/views usando UINavigationController
Gravando arquivos de áudio usando o AVFoundation e AVAudioEngine class.
Testar o aplicativo em um simulador.
Procurar por funções na documentação, resolver bugs e ver códigos da comunidade.
0 notes
Text
If you want more people to access your program, you will want to upgrade to a larger plan. Beyond using a wonderful idea however your program must be made. The app is the very first foray into the healthcare space of Index AR. A cell program is different from physical goods, or even sites. Get all you want to produce your mobile program.
Even though it might appear impossible to ascertain how a program is assembled, there are a few approaches to make educated guesses. Perhaps your program is going to be the next business disrupter. When you make your own app, pick a program creatorthat comes loaded using a spoonful of stunning templates and allows you to do unlimited customization without needing to code. It's possible to make a completely functioning app with each possible custom made feature it is possible to consider. There are a range of reasons why apps may not look as fantastic as their original designs. It doesn't mean that you need to abandon your program if that's the case. It's very simple to create a app. If you create professional programs with no ads, the MAU limit generally means the quantity of people who are going to have the ability to get your programs each month. As a consequence, React Native programs have a inclination to utilize custom navigation alterations as opposed to the normal push and pop of UINavigationController. app creator
1 note
·
View note
Text
Just refactored SwiftUI NavigationView to UIKit UINavigationController in a big #SwiftUI app. Why? 👍 Predictable & programmatic navigation 👍 Better deep link 👍 More styling options 👎 Bottom sheet with overlay or ZStack sucks 👎 isActive binding does not work as expected
— Khoa Pham (@onmyway133) March 31, 2022
0 notes
Text
How to Build a Login Screen in SwiftUI
In WWDC 2019 Apple announced a completely new user interface development framework called SwiftUI. SwiftUI is a user interface toolkit that lets us design apps in a declarative way. There was lots of talk about whether we should use Storyboard or build UI programmatically. SwiftUI is the answer to all these questions. You can now develop the app's UI with a declarative Swift syntax.
No more storyboard, Interface Builder and Auto-layout
Earlier we used to develop user interfaces with storyboards, xib's and auto layout. But with SwiftUI, storyboard and auto-layout are completely out of the picture. Now the code editor is available with a preview canvas.
Migrating from UIKit to SwiftUI
If you've used UIKit before then you need to understand what's the UIKit component equivalent in SwiftUI. Many of the classes you know just by removing prefix UI but few have been renamed. Let's have a look at the list.
1. UIViewController: View
2. UITableViewController: List
3. UITabbarController: TabView
4. UINavigationController: NavigationView
5. UIAlertController: Alert
6. UIAlertController with style .actionSheet: ActionSheet
7. UILabel: Text
8. UITextField: TextField
9. UITextField with secure entry: SecureField
10. UISwitch: Toggle
11. UISlider: Slider
12. UIButton: Button
13. UIStackView with horizontal axis: HStack
14. UIStackView with vertical axis: VStack
15. UIImageView: Image
16. UISegmentedControl: SegmentedControl
17. UIStepper: Stepper
18. UIDatePicker: DatePicker
19. UIPickerView: Picker
20. UITabbar: TabView
21. UINavigationBar: NavigationView
22. UIScrollView: ScrollView
Creating Project:
Step 1 - Creating a new project with SwiftUI
Step 2 - Add the VStack in the View. It will act as Vertical StackView
Step 3 - Add title text as Login in the View and can set style to the Text.
Step 4 - Adding Image to the top of the Screen to show that its user's login and adding frame of width and height as shown below.
Fig 1 - Adding Image and Text
Step 5 - Adding Text Field for Phone Number and password with TestField and SecureField inside the VStack and Alignment to leading.
Step 6 - Adding placeholder to the textfield , Add Text and Value will be saved in the Variable.
Step 7 - Give Divider() for allowing space between two textfield and add style as required for the textfield to be displayed.
Step 8 - Adding padding to bottom and given 15.
Step 9 - Adding Button of forgot password inside the HStack to align the right corner of the screen with the Text as shown below.
Fig 2 - Adding Textfield and SecureField with Forget Password
Step 10 - Add a button with the title “Login” for clicking the login functionality inside the VStack.
Step 11 - In this button Action will be added inside the action closure function and can add text to the button (i.e Title) and Style the button as shown.
Fig 3 - Adding Button with Action and Text
Step 12 - Add a button which will have an action to move to SignUp Screen inside the HStack with spacing. Where the SignUp text will be clickable which we implement using Attribute text Similarly in SwiftUI it is implemented in Simple Way.
Fig 4 - "Don't have an Account ? Sign Up"
Final Result - Login Screen with PhoneNumber and Password using SwiftUI
Conclusion
SwiftUI is new to everyone and might take time to get stable as a framework. But SwiftUI is the future of iOS development. There are a lot of things to learn in SwiftUI.
0 notes
Video
tumblr
Course Preview - Navigation Setup - UITabBarController & UINavigationController https://www.youtube.com/watch?v=VI3HaNWTYVg
0 notes
Text
要らないDead Codeを消す話
アプリを長い間運用していると、その間に仕様が変わったりリファクタをしたりで今まで使っていたコードがいらなくなることがあります。
そのときに要らなくなったものはちゃんと消しておかないとコード量がかさみ、コードの可読性が下がったりビルド時間が無駄にかかるようになったりといいことがありません。
今回はいらなくなったクラスを消すためのTipsをメモしていこうと思います。
まずは、Xcode上でできること。 ただし、この方法はObjective-Cにしか使えません。。
Related Items
View > Standard Editor > Show Related Items を選択すると、そのファイルに関係するクラスの一覧を確認することができます。


.hファイルで確認し Included By を見るとそのファイルを import しているクラスが一覧できるので、これを見て誰からも import されていないクラスは消すことができます。
誰からも import されていないクラスは以下のようにそのクラスの .mファイルしか表示されません。

ただし、注意が必要なのは、以下のようにstoryboardでビューの遷移が定義されている場合です

この場合でも Related Items > Included By にはそのクラスの .mファイルしか表示されないので、使われていないのかstoryboardからのみしか使われていないのか判別できません。
誤って消してしまうとアプリがバグってしまうので気を付ける必要があります。
ちなみにswiftも Related Items 自体は使えますが、Included By はグレーアウトされた状態になります。

次にサードパーティ製のツールを使う場合。
まずはObjective-C
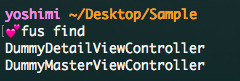
fui (https://github.com/dblock/fui)
使い方は README に書いてあるとおりですが「fui find」を実行すると、使われていないクラスの一覧が表示されます。

こちらは先程の Related Item とは違い、storyboard上で使われていると一覧には表示されません。
次にSwift
fus (https://github.com/tsabend/fus)
これは上述の fui を参考にSwift版を作ったものだそうです。
こちらも使い方は README に書いてありますが「fus find」を実行することで使われていないクラスの一覧が表示されます。
また、こちらも fui と同様storyboardで使われている場合は一覧に表示されませんでした。
ただし、 fui / fus の注意点としては、storyboardでそのクラスが使われていたとしても、そのクラスへの遷移が定義されていない場合はそのSceneとクラスファイルがともにごみとなってプロジェクト内に溜まっていってしまいます。
例えば
もともと UINavigationControllerのRootとなっていたのはBだが、仕様が変りAにつなぎ直され、Bはstoryboard上で取り残されてしまった。

みたいなケースです。
このケースは fui / fus では探しきれないので自分でstoryboard内を探しにいかないとダメそうです。
そもそもそんな中途半端なことすんじゃねーって感じですけどね。
最後に使えなかった方法を一応メモ。
Build Settings > warnings - All languages で Unused Functions を YES にする方法。
そもそも Unused Functions はデフォルトで YES です。
名前的に使われていないメソッドの検索に使えそうと思ったんですが、これは Objective-C の .hファイルにメソッドが定義されているのにその実装がない場合に警告を出すものでした。
Build Settings > Other Warning Flags に何か使えそうなオプションは無いのかと探してみたのですがなさそうでした。(参考:Warning-Options)
まとめ
バシッと不要なコードを探して消せる方法っていうのはなかなかなさそうでした。
AppCodeを使うと使われていないメソッドに警告を出してくれる機能があるようですが(参考:Code Analysis)、私はXcode派なのでちょっと微妙。 Code Analysisの機能を使いたいときだけAppCodeを使うって手もあるかもしれませんが、これ有料なのでやっぱり微妙。
あと、実装方法について、遷移をstoryboard上で定義するのは保守性が低い気がしました。
遷移の実装に色んな方法があると検索性が落ちます。
また、storyboard上で遷移を定義すると下のスクショのような表示になりますが、矢印は全部ViewControllerの真ん中から同じように伸びていて、直感的にどこが起因となって遷移が発生するのかすごくわかりづらいです。

個人的には全ての遷移をstoryboard上で定義するには無理があるため全てコードで実装するように統一したほうがいいのではないかと思います。
自分一人で実装している場合や、保守しないアプリではstoryboardを使った実装は楽ですし良いのですが、長いこと保守するアプリでは当時の実装者がいなくなったり新しいメンバーが入ってきたりします。
そんなとき何がどこに実装してあるのかわからない状態だとコードに手をいれる際容易にデグレが起きます。
また、もう当たり前となっているかもしれませんが、storyboardは画面毎に分けたほうがいいです。
Storyboard上に複数画面を配置していると、上の例で出てきたようなSceneの取り残しが発生したり、画面が増えることでstoryboardを開くのも時間がかかるため、一つの画面を探すにも骨と心が折れます。
あとは基本ですが不要なコードはちゃんと消していくことを心がけたいですね。
あとで使うかもと思ってコメントアウトするのもやめたいですね。
そういう場合は一旦消してまた必要になったらgitのコミットログから遡ればいいと思います。
というわけで要らないコードを消すTipsと所感でした。
5 notes
·
View notes
Text
Creating a Custom iOS Navigation System: A Deep Dive into UINavigationController and UINavigationBar
Introduction Creating a Custom iOS Navigation System: A Deep Dive into UINavigationController and UINavigationBar is a crucial aspect of building complex iOS applications. This tutorial will guide you through the process of creating a custom navigation system using the built-in UINavigationController and UINavigationBar components. By the end of this tutorial, you will have a comprehensive…
0 notes
Text
Favorite tweets
Updated my article on QuickLook in #SwiftUI: https://t.co/102IvZexod If we embed QLPreviewController in a UINavigationController inside UIViewControllerRepresentable it will have a Share button and a title. We can add a Done button manually to dismiss it. pic.twitter.com/NLFxI3NOYO
— Natalia Panferova (@natpanferova) August 16, 2020
from http://twitter.com/natpanferova via IFTTT
0 notes
Text
iOS Navigation Controller Tutorial | Xcode 11.4 Swift 5.2
In today’s beginner Swift tutorial we discuss the UINavigationController. We talk about what it is, how it works and build a basic version with some customization involving large titles and changing the font color. Doing this can ensure it fits in well with the style of your app.
source https://morioh.com/p/b859f6cfa373
View On WordPress
0 notes
Text
Split View Controller iOS Tutorial
A split view controller is a container view that implements a master-detail interface. On the iPad and on bigger iPhones there is more screen estate available, so two view controllers can be displayed side-by-side. In this tutorial some ios apps will be displayed. The titles of the apps will be listed in a table view and the icons will be displayed as an image inside a view controller. This tutorial is made with Xcode 11 and built for iOS 13.
Open Xcode and create a new Master-Detail App.
For product name, use IOSSplitViewControllerTutorial and then fill out the Organization Name and Organization Identifier with your customary values. Enter Swift as Language and Storyboard as User Interface. Choose Next.
Change the active scheme to any type of iPad using the scheme button.
Build and Run the project, the split view controller is displayed containing the table view controller and the regular view controller.
Change the orientation to portrait (cmd + arrow), only the detail view controller is displayed.
The are two files in the project template containing the layout:
MasterViewController - Table view controller on the left side of the split view controller in landscape mode
DetailViewController - Plain view controller on the right side of the split view controller in landscape mode.
First, lets' change the User Interface from the DetailViewController. Go to the storyboard and delete the label. Insert an imageView and make it a size of 250 by 250. Center the imageView and select it. At the bottom right of the Interface Builder press the align button and select "Horizontal Center in Container" and select "Vertical Center in Container". This will keep the imageView centered when the device rotates.
The detail view controller will look like this.
Select the Assistant Editor and make sure the DetailViewController.swift file is visible. Ctrl and drag from the label to the ViewController class and create the following Outlet
At the moment the split view controller doesn't contain any data, go to MasterViewController.swift and declare the following properties.
var appNames = ["Whatsapp", "YouTube", "Instagram"] var appIcons = ["whatsapp-icon.jpeg", "youtube-icon.png", "instagram-icon.png"]
change the tableview delegate methods to
override func numberOfSections(in tableView: UITableView) -> Int { // 1. return 1 } override func tableView(_ tableView: UITableView, numberOfRowsInSection section: Int) -> Int { // 2. return appNames.count } override func tableView(_ tableView: UITableView, cellForRowAt indexPath: IndexPath) -> UITableViewCell { // 3. let cell = tableView.dequeueReusableCell(withIdentifier: "Cell", for: indexPath) cell.textLabel?.text = appNames[indexPath.row] return cell }
There is only one section in the Table View so 1 needs to be returned in the numberOfSections(in:) method.
The number of rows is equal to the number of items in the array so the count property of the array class is used.
The name of the app at the current index of the apps array is assigned to the text property of the textLabel property of the current cell.
Next, change the prepare(for:sender) method.
override func prepare(for segue: UIStoryboardSegue, sender: Any?) { if segue.identifier == "showDetail" { if let indexPath = tableView.indexPathForSelectedRow { // 1. let appIcon = appIcons[indexPath.row] let controller = (segue.destination as! UINavigationController).topViewController as! DetailViewController // 2. controller.detailItem = appIcon controller.navigationItem.leftBarButtonItem = splitViewController?.displayModeButtonItem controller.navigationItem.leftItemsSupplementBackButton = true } } }
The current app icon is declared.
The appIcon variable is assigned to the detailItem variable of the DetailViewController. When an app name is selected in the table view, the corresponding icon must be updated through the detailItem variable.
Go to the DetailViewController.swift file and change the configureView method
func configureView() { // Update the user interface for the detail item. if let detail = detailItem { if let imageView = iconImageView { imageView.image = UIImage(named: detail) } } }
The image is diplayed containing the filename of the icon. Build and Run the project. Select the names in the table view and the corresponding icons will be visible in the detail view.
You can download the source code of the IOSSplitViewControllerTutorial at the ioscreator repository on Github
0 notes
Text
Week 298
Happy Thursday! Last week, a few minutes after we published that week's edition of iOS Goodies, Apple sent out invites to the press for a September 10 event at the Steve Jobs theater. Traditionally, the September event is when Apple announces its new iPhones, and there's no reason to think this year will be different. It remains to see if iOS 13 will also be launched then. In the meantime, Apple also gave developers a reminder about Dark Mode. What surprised me a bit was the last part of the text: "if Dark Mode is not suited for your app, you can learn how to opt out.". I was expecting Apple to push a bit more aggresivley for Dark Mode support, but it looks like they not doing it, at lest for now :).
Articles
Simplifying RxSwift code, by @M0rtyMerr
Modeling app state using Store objects in SwiftUI, by @mecid
Dark Mode on iOS 13, by @mattt
How to Integrate the Dual Camera Video Recording Feature in your iOS App?, by Hitesh Trivedi
Popovers, UINavigationController, and preferredContentSize, by @noahsark769
22 short tests of Combine – Part 1: Protocols and Part 2: Sharing, by @cocoawithlove
Tools/Controls
DWAlertController - A UIAlertController re-implementation with controller containment support, by Andrew Podkovyrin
Business/Career
Enough Agile, by @iwasleeg
7 ways of giving feedback that encourage change, by @clairejlew
UI/UX
I always meet the same issue on Apple Music so I tried to solve it, by @romainp_design
Why is low fidelity wireframe important in product design?, by Winnie Nguyen
The right ways to ask users for permissions
Videos
Swinject to handle dependency injection, by @dr_nerd
Credits
valianka, LisaDziuba, mecid, podkovyrin
0 notes
Text
How to Build a Login Screen in SwiftUI
What is SwiftUI ?
In WWDC 2019 Apple announced a completely new user interface development framework called SwiftUI. SwiftUI is a user interface toolkit that lets us design apps in a declarative way. There was lots of talk about whether we should use Storyboard or build UI programmatically. SwiftUI is the answer to all these questions. You can now develop the app's UI with a declarative Swift syntax.
No more storyboard, Interface Builder and Auto-layout
Earlier we used to develop user interfaces with storyboards, xib's and auto layout. But with SwiftUI, storyboard and auto-layout are completely out of the picture. Now the code editor is available with a preview canvas.
Migrating from UIKit to SwiftUI
If you've used UIKit before then you need to understand what's the UIKit component equivalent in SwiftUI. Many of the classes you know just by removing prefix UI but few have been renamed. Let's have a look at the list.
1. UIViewController: View
2. UITableViewController: List
3. UITabbarController: TabView
4. UINavigationController: NavigationView
5. UIAlertController: Alert
6. UIAlertController with style .actionSheet: ActionSheet
7. UILabel: Text
8. UITextField: TextField
9. UITextField with secure entry: SecureField
10. UISwitch: Toggle
11. UISlider: Slider
12. UIButton: Button
13. UIStackView with horizontal axis: HStack
14. UIStackView with vertical axis: VStack
15. UIImageView: Image
16. UISegmentedControl: SegmentedControl
17. UIStepper: Stepper
18. UIDatePicker: DatePicker
19. UIPickerView: Picker
20. UITabbar: TabView
21. UINavigationBar: NavigationView
22. UIScrollView: ScrollView
Creating Project:
Step 1 - Creating a new project with SwiftUI
Step 2 - Add the VStack in the View. It will act as Vertical StackView
Step 3 - Add title text as Login in the View and can set style to the Text.
Step 4 - Adding Image to the top of the Screen to show that its user's login and adding frame of width and height as shown below. Read more..
0 notes