#viewController
Explore tagged Tumblr posts
Visit Tumblr Blog
Explore Tumblr blogs with no restrictions, modern design and the best experience.
Last Seen Tumblr Blogs


Fun Fact
Average visit duration of Tumblr.com is 10 mins and 25 secs.
Text
Augmented Reality App Development Using ARKit

Augmented Reality (AR) has transformed the way users interact with the digital world, blending virtual elements with the real environment. ARKit, Apple's powerful framework for AR development, provides developers with the tools they need to create immersive AR experiences on iOS devices. This post will guide you through the basics of ARKit, its features, and how to get started with AR app development.
What is ARKit?
ARKit is a framework developed by Apple that enables developers to create augmented reality applications for iOS. It uses advanced computer vision and device motion tracking to integrate virtual content into the real world seamlessly. ARKit is designed to work with iPhone and iPad devices, making it accessible to a wide range of users.
Key Features of ARKit
Motion Tracking: Tracks the device's position and orientation in 3D space.
Environmental Understanding: Detects flat surfaces, such as tables or floors, to place virtual objects accurately.
Light Estimation: Adjusts the lighting of virtual objects to match the real-world environment.
Face Tracking: Recognizes and tracks facial features, enabling immersive experiences like filters or animations.
AR Anchors: Allows you to place virtual objects in the real world and keep them in place as the user moves around.
Getting Started with ARKit
Set Up Your Development Environment:
Install Xcode, Apple's integrated development environment (IDE).
Create a new project and choose the "Augmented Reality App" template.
Choose a Programming Language: ARKit supports both Swift and Objective-C. Swift is recommended for new projects.
Familiarize Yourself with ARKit API: Explore the ARKit documentation to understand key classes like ARSession, ARConfiguration, and ARAnchor.
Basic Example: Creating a Simple AR App
This example shows how to create a simple AR app that places a virtual cube on a detected flat surface:import UIKit import ARKit class ViewController: UIViewController, ARSCNViewDelegate { @IBOutlet var sceneView: ARSCNView override func viewDidLoad() { super.viewDidLoad() sceneView.delegate = self sceneView.showsStatistics = true let tapGesture = UITapGestureRecognizer(target: self, action: #selector(didTapScreen)) sceneView.addGestureRecognizer(tapGesture) let configuration = ARWorldTrackingConfiguration() configuration.planeDetection = [.horizontal] sceneView.session.run(configuration) } @objc func didTapScreen(gesture: UITapGestureRecognizer) { let location = gesture.location(in: sceneView) let hitTestResults = sceneView.hitTest(location, types: .existingPlaneUsingExtent) if let result = hitTestResults.first { let cube = SCNBox(width: 0.1, height: 0.1, length: 0.1, chamferRadius: 0) let material = SCNMaterial() material.diffuse.contents = UIColor.red cube.materials = [material] let cubeNode = SCNNode(geometry: cube) cubeNode.position = SCNVector3(result.worldTransform.columns.3.x, result.worldTransform.columns.3.y + 0.05, result.worldTransform.columns.3.z) sceneView.scene.rootNode.addChildNode(cubeNode) } } }
Best Practices for AR Development
Optimize 3D Models: Keep the polygon count low for better performance.
Test on Real Devices: Always test AR experiences on actual iOS devices for accurate performance.
Consider User Experience: Provide clear instructions for users on how to interact with the AR elements.
Leverage Lighting: Use realistic lighting to enhance the integration of virtual objects into the real world.
Advanced Features to Explore
Image Tracking: Recognize and track images in the environment.
Object Detection: Place virtual objects based on recognized physical objects.
Face Tracking: Utilize ARKit's face tracking capabilities for interactive experiences.
Multi-user Experiences: Implement shared AR experiences where multiple users can interact in the same virtual space.
Conclusion
ARKit provides developers with a robust framework for creating immersive augmented reality experiences on iOS. By leveraging the powerful features of ARKit, you can build innovative applications that engage users in new and exciting ways. Start exploring ARKit today and be part of the future of technology!
0 notes
Text
Building Your First iPhone App: Step-by-Step Tutorial
In today’s rapidly evolving tech landscape, mobile apps are at the heart of how businesses and individuals engage with users. If you've ever wondered how to develop an app for iPhone, you're not alone. Developing your first iPhone app can seem like a daunting task, but with the right guidance and tools, it’s completely achievable. Whether you’re an aspiring entrepreneur, a startup, or someone with a great idea, the steps to building your first iPhone app are relatively straightforward. In this blog post, we will walk you through the entire process, from idea conception to launching your app on the App Store.
Step 1: Define Your Idea
Before diving into the development process, it’s crucial to have a clear idea of the app you want to build. Is your app solving a specific problem? Is it for entertainment, productivity, or e-commerce? The more defined your concept is, the easier it will be to develop. Think about your target audience and the features your app will have. Create a simple wireframe or sketch of your app's layout and functionality to visualize its flow.
Step 2: Set Up Your Development Environment
The next step in how to develop an app for iPhone is to set up your development environment. To build iOS apps, you'll need a Mac computer with macOS installed. Apple’s Integrated Development Environment (IDE), Xcode, is the primary tool used for building iOS apps. Xcode provides everything you need to design, develop, and debug your app.
Download Xcode from the Mac App Store, and once it's installed, you can begin setting up a new project. Xcode uses a programming language called Swift, which is specifically designed for iOS app development. If you're unfamiliar with Swift, there are plenty of tutorials available to get you started.
Step 3: Learn Swift and Basic iOS Concepts
If you’re new to programming or Swift, it’s a good idea to spend some time learning the basics of the language and the key iOS concepts such as Views, ViewControllers, and Navigation Controllers. Swift is beginner-friendly but still powerful enough to create fully functional apps.
There are many online resources like Apple's official Swift documentation, tutorials on YouTube, or even free coding boot camps to help you learn how to develop your iPhone app.
Step 4: Build the App's User Interface (UI)
Once you’re familiar with Swift and the iOS development concepts, it’s time to start building your app’s user interface. iOS apps follow the Human Interface Guidelines set by Apple, which ensures your app is intuitive and user-friendly.
In Xcode, you can use Interface Builder, a drag-and-drop tool, to lay out your app’s UI. Create buttons, labels, and other elements and arrange them on the screen. You can also customize the look and feel of each component, including colors, fonts, and animations. Make sure that the design of your app is responsive, meaning it should adapt to different screen sizes like those of iPhones and iPads.
For a more complex app, you might want to hire a designer to help with the aesthetics. A well-designed app will not only look great but will also improve user engagement and retention. Keep your app’s interface simple, elegant, and easy to navigate to create a seamless user experience.
Step 5: Write the Code for App Functionality
At this stage, you’ll begin implementing the actual functionality of your app by writing Swift code. This includes defining what happens when a user clicks a button, how data is stored, and how the app interacts with external services like APIs. Depending on the complexity of your app, this part of the development process can take some time.
Start by focusing on smaller features first, and test them individually before integrating them into the app. Remember to test your app regularly to catch bugs early and ensure everything works as intended. Xcode includes built-in simulators for testing, so you can see how your app behaves on various iPhone models without needing the physical devices.
Step 6: Test Your App
Testing is one of the most critical phases of app development. Even after writing the code, you need to ensure that your app is bug-free, functional, and works across different devices and iOS versions.
Use Xcode's testing tools to run your app on an iPhone simulator. You should also test your app on a real iPhone to identify any issues related to performance, touch gestures, and real-world usage scenarios. You can invite users to participate in beta testing using TestFlight, a platform provided by Apple to distribute pre-release versions of your app to testers.
Step 7: Optimize and Debug
Once your app is functional, it’s time to optimize it for performance. This includes making sure it loads quickly, responds smoothly to user interactions, and doesn’t drain battery life unnecessarily. You’ll want to monitor the app’s performance using Xcode’s profiler to track memory usage, CPU usage, and network activity.
At this stage, debugging is essential. Test the app under various conditions to see how it behaves and fix any bugs you encounter. Even small issues, such as crashes or slow performance, can affect the user experience and lead to bad reviews.
If you're interested in exploring the benefits of how to develop an app for iPhone services for your business, we encourage you to book an appointment with our team of experts.
Book an Appointment
Step 8: Submit to the App Store
After successfully developing and testing your app, it’s time to submit it to the App Store. To do this, you’ll need an Apple Developer account, which costs $99 per year. Once your account is set up, use Xcode to submit your app for review. Make sure to follow Apple’s guidelines for submitting apps, including providing accurate descriptions, keywords, and screenshots.
Apple’s review process can take anywhere from a few days to a couple of weeks. If your app meets all of Apple’s guidelines, it will be published on the App Store, ready for download by millions of users around the world.
Step 9: Market Your App
Once your app is live, the next step is to market it. Use social media, blogs, and email newsletters to spread the word. You can also use paid ads or collaborate with influencers to reach a larger audience.
App Store optimization (ASO) is also important for getting your app noticed in the App Store. Optimize your app's title, keywords, and description to ensure it ranks high for relevant search queries.
Step 10: Maintain and Update
Building an app doesn't stop after it’s been launched. You’ll need to maintain and update your app regularly to fix bugs, add new features, and ensure compatibility with future iOS versions. Pay attention to user feedback and make updates based on their suggestions to improve your app and keep users engaged. Considering expanding your app to iPad? Explore our expertise in iPad app development for a seamless experience across all devices.
Conclusion
Building your first iPhone app is an exciting journey that requires patience, learning, and attention to detail. By following these step-by-step guidelines, you can turn your app idea into a fully functional product that’s ready for launch. Remember that, depending on the complexity of your app, the development process can be time-consuming and costly, so it’s always wise to use tools like a mobile app cost calculator to estimate the budget.
0 notes
Text
Stream for Mac: Work Note, Menus and More
Yesterday was the second day this week I managed to work on Stream for Mac.

Some things are starting to gel but as is typical I figure something out and run head long into the next thing I need to figure out. It’s all good stuff though! I’m definitely not complaining as I’m learning a lot and at least I should have a solid — very basic — understanding about the assembly of a Mac App when I’m done with this release.
Yesterday I managed to get the File Menu items hooked up and I did a very basic implementation of Import Subscriptions which allows you to import an OPML file of all of your feeds. For the first test the file name was hard wired to a file in the Downloads folder. There was my first challenge. I had to learn a little bit about the sandbox and setup the app to allow for read only access to Downloads, then ask the user for permission to access it. Once that worked I was able to start the import process by stubbing out some of my protocols used by the process and just allowing it to run in the background. It ran to completion and I was able to add an additional 206 feeds to my list. It’s a great way to populate the app!
Next Task
I’m trying to instantiate a class early on in the AppDelegate and I want to pass it down through all the various layers ultimately to the Feed View Controller. That’s where I got stuck once again. That’s ok. I’m learning and I may be doing it wrong. Right now the data I’d like to instantiate at startup is instantiated in the Feed View Controller. The reason I’d like to get it in the App Delegate is I’d like access to it when a menu item is selected. Maybe this is just flat out the wrong way to look at it? I don’t know yet, I’m still trying to decide what’s best.
First off I’m using Storyboards, which is the way the project was created in 2021 when I made the target. So, given that I’d like to programmatically load the WindowController, Window, and finally ViewController myself so I can pass this data all the way down to the ViewController. On iOS it’s a very straight forward process. Load the ViewController and specify the init method you’d like to use and provide parameters. Done, easy.
On the Mac there are two extra layers to go through which has me questioning my whole reason for existence. It seems really dumb to pass through two extra layers just to get to the ViewController. Perhaps I do need to rethink my entire existence? Perhaps I just need to rethink the structure of my existing classes to better accommodate the Mac?
Why, Rob, Why?
I’m doing this because the thing that kicks off the refresh process also takes an instance of a protocol that’s used to update progress of the refresh. It’s what drives the progress indicator you see in the navigation bar of the iOS app.
When someone selects the Refresh menu item it’s handled in the App Delegate. That is removed from the UI where the update needs to happen by two layers; Window Controller and Window.
On iOS the UI interaction is handled by the View Controller which kicks the process off right at that layer and provides an implementation of the progress protocol I’ve defined so the UI updates properly. If I didn’t want to update the UI the way I do it would be much easier. 😃 Perhaps the Mac App should do something different, like display a spinner and disable the refresh buttons and menu item until the process is complete?
Anyway. This is leading me to rethink a lot of my iOS strategies from years and years gone by to better suit the Mac and iOS platforms.
These notes are also really good for me. They help me think through the process as I’m typing and also lead me to say “Rob, you’re doing it wrong” a lot, which is also helpful to my learning process.
Overall I’ve had frustrating moments and really great ah-ha moments and I must say that the Mac and iOS communities have been so supportive of me and my stupid questions.

The Core Intuition Slack has been amazing! Thanks y’all, you know who you are! 🙏🏼
0 notes
Text
How to lock orientation at runtime on iOS 16 with .NET MAUI and Xamarin.Forms
I just blogged: How to lock orientation at runtime on iOS 16 with .NET MAUI and Xamarin.Forms #iOS #iOS16 #iOSDev #dotNET #dotNETMAUI #XamarinForms #XamariniOS
The old way Before iOS 16, it was pretty easy to lock a Page into a certain orientation. It was basically just one line of code (if you don’t count the DependencyService boilerplate code in): UIDevice.CurrentDevice.SetValueForKey(new NSNumber((int)UIInterfaceOrientation.Portrait), new NSString("orientation")); By calling this method whenever the size of a page was allocated, we were able to…

View On WordPress
#.NET MAUI#AppDelegate#iOS#landscape#MAUI#mvvm#orientaion lock#orientation#override#portrait#Scene#ViewController#xamarin#xamarin forms
0 notes
Text

3 notes
·
View notes
Text
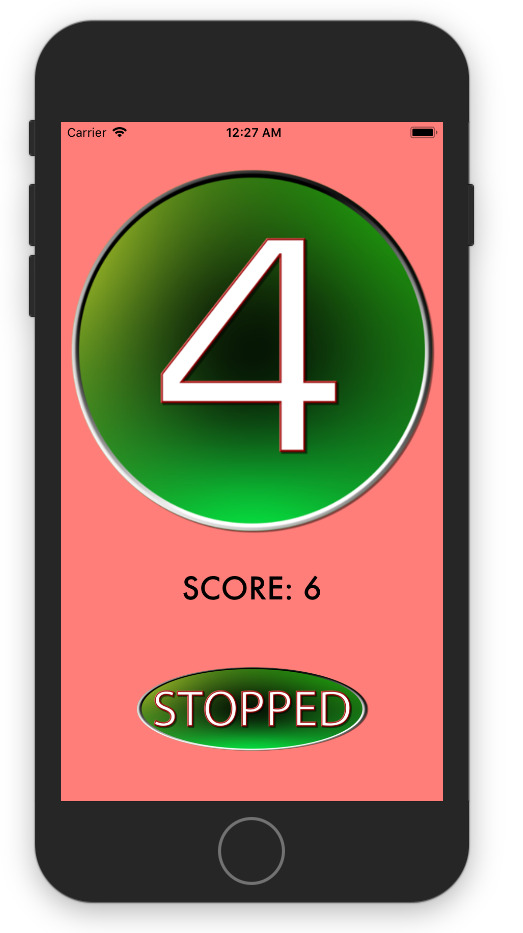
Version 0.13
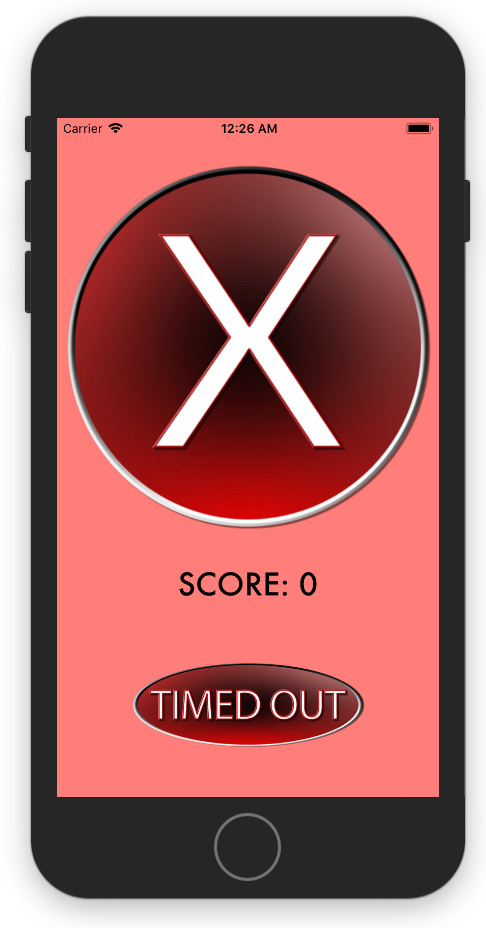
In this update - adapting to different screen sizes and displaying the numbers which have timed out.
Screen sizes. I’m developing this game just for the iPhone at the moment, so the range of screen sizes are limited, however, they are something that I need to take into account. Having done some research, the use of stacks seems to be the best option for me.
From the Object Library in the Main.Storyboard view, I selected Vertical Stack View and dragged it onto the canvas.
Everything currently on the canvas - the counter, the startBtn, the stopBtn and the scoreLabel needs to be added to the stack. To do this, I just dragged the objects into the stack on the left-hand side menu.
The objects are stacked vertically based on their order in the StackView:

I was then able to apply constraints the StackView, to ensure that it fills the screen - regardless of what size the screen is. I set each constraint to be 5 away from the edge of the safe area. The result generated surprised me:
To fix this, I had to play around with the Content mode in the Attributes tabs for both the counter image and the Stack View itself.

Eventually, I managed to find a combination that worked me the game. This made the title/counter big and filled the screen, then the score and the buttons appeared underneath. At this point, I decided to test the game to see how the stack was working. This is when I hit a major problem. StackView lists everything one after another. So the startBtn and stopBtn were appearing one after another, without a way to overlap them.
I spent a long period of time thinking about how best to overcome this problem when I realised that I'd already created a solution to this problem earlier without knowing it. I’d already coding boolean values - startBtnActive and stopBtnActive.
My idea was to combine the startBtn and stopBtn into one button, whose images and function changed depending on the results of those boolean variables.
To change the image of the button, I found that the code I needed was this:
startBtn.setImage(UIImage(named: "stopbtn"), for: UIControlState.normal)
It's a little more complex than selecting a new image for the imageView, because it is a button and the button has different states to take into account.
Having experimented with having a single button a problem arose. The way the I had set the code up, after I combined the start and stop functions into one button, as soon as I pressed the button in ‘startmode’ stop mode would instantly activate as well, thus making the turn and an 1 each single time.
I went back to the drawing board and found a much better, much easier solution. Instead of using alpha values, I could use another piece of code - isHidden.
By swapping all of the alpha commands to isHidden commands I could swap out the buttons as and when required. This, however, caused another issue. When there was neither button on the screen, the stackView would resize everything to fill the screen.
For now, the quickest solution was to make 2 new graphics - one saying ‘STOPPED’ and one saying ‘TIMED OUT’. I then made the ‘STOPPED’ graphic appear when the player presses the stopBtn, and the ‘TIMER OUT’ graphic appear when the user fails to press the stopBtn.
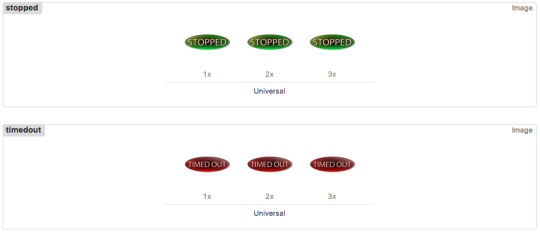
Using the code I found before to change the graphic on a button, I wrote code so that if the stopBtn was pressed the “STOPPED” graphic would appear and likewise, if the counter timed out, have the ‘TIMED OUT” graphic appear.
I’m pleased to say that the game works as expected, and I actually like the ‘STOPPED’ and ‘TIMED OUT’ graphics more than I thought I would.
This post is getting quite long, so I’m going to save the list of what number have timed out until next time. I have a few ideas as to how to do this - more stacks required I think!
0 notes
Text
Week 287
Happy Thursday! We got a new beta of Xcode, and each day we get more and more articles about SwiftUI and Combine and all the new things that are iOS 13 only. While this period can be very motivating and inspiring, and many new projects are started these days, I'm sure not all iOS developers are able to jump on the SwiftUI bandwagon, and some may even feel bad or left behind if they're not familiar with the new tech already. Just because one didn't get to play with SwiftUI yet doesn't mean he's not a good developer; we each learn new technology at our own pace, and in the time we have available for that. In the meantime, it's completely fine to keep using UIKit, MVC, the old ways of doing things or even Objective-C :). Now on to the links!
Articles
Building forms with SwiftUI, by @mecid
My favorite WWDC 2019 sessions, by @onmyway133
WWDC session videos recap, by @Blackjacxxx
Rendering SwiftUI views to HTML, by @zhuowei
How to Integrate the New ‘Sign in with Apple’ Button in Your iOS App? , by @spaceotech
You don’t (always) need [weak self], by @BesherMaleh
iOS 13: Changes in the ViewController Presentation Style, by @j_zonneveld
Tools/Controls
XCLogParser - Tool to parse the SLF serialization format used by Xcode and xcodebuild to store its Build and Test logs (xcactivitylog), by @spotifyeng
Business/Career
Roadblocks vs. Speed bumps, by @robwalling
UI/UX
Marking Required Fields in Forms, by @rbudiu
Videos
UIKonf 2019 videos
Credits
pmusolino, uraimo, onmyway133, mecid
3 notes
·
View notes
Text
5 Swift Quick Tips & Tricks Every Developer Should Know!

Swift is a modern programming language that supports a wide range of modern programming concepts. There are a few fundamental characteristics to consider while building iOS products that make the code more visible, efficient, and maintainable. You should make an ongoing effort to keep these variables in mind. we provide the best rapid app development services.
1. Make use of protocols
Protocols, as many of you are aware, are a fundamental component of object-oriented programming. Protocols in Swift serve the same purpose as interfaces in Java programming. You may make software components compatible with different implementations by defining and designing their behaviours using protocols. Swift's protocols offer a strong answer to a variety of programming difficulties.
2. Refactor Everything, Spotlight on Making It Intelligible, and Utilize Imprints
Refactoring has seen huge progressions with the arrival of Xcode 11. You found that the most recent form of Xcode was more financially savvy while performing refactoring errands, which caused me to feel calm while renaming classes, references, and strategies. We have forgotten about the times we accepted a name would be proper for an association,
3. When possible, use Programmatic Navigation instead of Storyboard:
I've been using storyboards since they were first included in Xcode, and I think they're an excellent tool. However, as your project grows and you have to deal with hundreds of ViewControllers, managing and handling navigation with code becomes more cost-effective and practical than using Segues and Storyboards. Furthermore, programmatic navigation gives you more control over shared parameters as well as specific behaviours while travelling. Additionally, doing so keeps your Storyboard from becoming a tangled mess like a gigantic octopus.
4. Use Container Views wherever possible, and ensure that the essential UI components are constantly visible and that inputs are placed on top.
Because of today's complex UI requirements, you must frequently integrate tabbed content, accordions, swipeable layouts, paged content, and other features. Container views may not show immediately and may take some time to develop. Nonetheless, adopting container views will surely be worthwhile because you are usually dealing with reusable controllers.
Connection points may, on occasion, be a mind boggling issue. Chipping away at applications that incorporate numerous capacities gave us this trouble a few times. Fortunately, we had a UI/UX expert working with me and training me on the best way to do it appropriately, yet as engineers, you want to remember a modest bunch of things.
5. Using Notifications and the Sender Parameter When Working With Events Actions Is Extremely Beneficial.
The Notification Centre is a fantastic tool for delivering messages between software's many components. They are portrayed in the developer documentation as the right technique to developing a communication or synchronization pattern between controllers and models or services. This is because they are shown how to do it correctly. A significant portion of our projects makes extensive use of the Notification Centre, which, in essence, implements the observer design and transforms your application into something more reactive.
As dedicated Swift App Development Company in India, XcelTec deliver Swift App Development Services that are unique and affordable way.
So, these were the best Swift Tips & Tricks.
Visit to explore more on 5 Swift Quick Tips & Tricks Every Developer Should Know!
You can Contact us at [email protected]
India – +91-987-979-9459
USA – +1-919-400-9200
#swift app development company#swift app development#custom Swift applications#Swift Application development services#web development company
0 notes
Text
Learn How to Get Started with iOS App Development
Do you know 49% of people open an application 11+ times each day? Such user behavior shows their increased app dependency. Not only this, but mobile internet usage has also surpassed desktop browsing internet usage with over 50 percent of the world’s total web traffic. Such an ever-growing demand for smartphone and app usage is the reason why businesses and individuals are shifting their interest toward app development services. But the mobile app development topic is incomplete without the debate between iOS vs. Android app development. No doubt, Android apps hold a huge market share, but iOS apps have their own pride place, especially in terms of privacy and data security. An iOS app can be a game-changing move for businesses as it assures safety and offers numerous advantages.
If you’re not new to the tech world, you might be very well aware of how the market segment of iOS applications is consistently escalating, pumping up the demand for iOS developers simultaneously. The iOS app store was launched with 500 applications in 2008 and this figure has now touched 1.96 million which persuaded many to go for the custom iOS application for their projects. Established businesses and new entrepreneurs recognize this opportunity and get started. If you also want to, make sure you have gained good information about iOS app development.
This blog post covers everything you need to know about iOS app development. Take a look-
What is iOS App Development?
iOS app development is the process of building quality software that can run on several Apple devices, including iPhone, iPad, and iTouch hardware. This whole development process holds a unique set of requirements in order to ensure iOS app compatibility and meet the specifications for Apple devices. When developing an iOS app, Apple has its own specific guidelines containing rules and ideal practices to get the app published to the Apple Store.
How to Start iOS App Development?
Getting started with iOS app development is not as hard as finding a needle in a haystack. All you have to do is to consider a few points we have already mentioned below for your ease.
1. Learn the language
Although there are numerous options you can choose from for iOS development, Objective-C and Swift are the two most popular languages that the majority of developers worldwide trust.
Objective-C is the typical language used for iOS, whereas Java is fairly used for Android. Swift is super easy to learn because it has a similar syntax to Object-C. If you have a good knowledge of Objective-C, you can catch the speed working with Swift language while iOS app development.
But do you know the difference between the languages used for Android and iOS app development? It’s the programming terms. For instance, Java uses words like “this, extends, implements,” and on the other hand, iOS uses programming terms like “delegates, inheritance, objects, subclasses, etc.”
2. Pick the Correct IDE
If you’ve worked on Android app development, there is a high chance you may find it hard to select the IDE. Right? But in the case of the Apple landscape, the whole picture is different. Apple uses a user-friendly, and fast IDE called XCode. You can reap the benefits of this IDE, by simply downloading it from the App Store. Doesn't this sound easier?
3. Pay Attention to User Interface
The next thing you should consider when getting started with iOS development is paying attention to the user interface. Being a developer, you might know that the design and presentation of UI are completely different for both iOS and Android platforms. The Android Studio uses XML files. On the other hand, XCode uses Storyboards that help to connect ViewControllers and coordinate transitions. You can easily move or play with the user interface components that Android doesn’t allow you to do.
4. Consider Dependency Management
Android uses Gradle’s dependency management, whereas CocoaPods are used in iOS to offer the same functionality. All you have to do is to add the dependencies in this file, and then it further handles the installation and upgradation of those packages on its own.
Things to remember
Try these following codes when you find that moving forward is difficult:
APK = Archive
Interfaces = Archive
Emulator = Simulator
Saying a big YES to iOS means taking a new road to success. But at the same time, it is imperative to learn about iOS development in depth to ensure that the apps you design won’t turn out into a mess.
Negative and Positive Side of iOS App Development
Every product has its positive and negative sides. iOS development also comes with a few pros and cons that you must have a look at before making your final call.
Pros of iOS
iOS doesn’t hold a diverse device fragmentation that makes the development process easier, more stable, and reliable.
iOS comes up with an authentic toolkit in order to ensure quality app development.
The development of interfaces in iOS consumes less time.
With iOS, one can expect high revenue generation, as compared to other app development platforms.
Cons of iOS
The app standardization process makes it hard to stay different in the market.
Customizing an app is hectic due to several kinds of restrictions.
iOS only accepts fully-functional apps.
Getting approval from Apple takes time which sometimes delays the app development.
How iOS App Development Will Change in the Future
If you have ever developed an iOS app, you are probably aware of its coding simplicity. Today, more and more users are inclined toward the iPhone because they score high in terms of security, appearance, and many more ways. Talking particularly about iOS apps, the thing that developers appreciate a lot is that it requires fewer code lines. Yes, Swift is less wordy, which results in faster iOS app development. Less coding makes the whole app development seamless and helps deliver a perfect product that delights customers.
But this is all about today! What’s the future of iOS apps? How will iOS development be going to change in the next 5 years? Well, we have covered all your answers below-
Grow in a Global Competitive Market
Apple is a tech giant that experiments with new technologies in order to build a unique and incredible solution that can bring revolution to the tech world. Many find them risk-prone or more entrepreneurial than others. But somehow it is necessary to withstand the fast-evolving competitive market. Apple’s zest for innovation somehow gives them the power to face the fierce competition. And we will see Apple thriving in a globally competitive market in the coming years as they consistently enhance the App Store and provide businesses with a better platform to flourish their business with their well-built iOS apps.
Battle Between Functionality &. Aesthetics
When it comes to iOS app development, there’s always a functionality vs aesthetics battle. We can’t consider iOS perfect in all ways. In order to provide more ease of use somewhat the design value is usually affected. In the future, we can expect this functionality vs. aesthetics battle to settle and won’t affect anymore. The latest iOS 16 has already made a step towards it.
Better Security & Privacy
Apple always focuses on a specific consumer type. So, it's a big question whether they focus on a wider audience base or not. The major iOS app development aspect on which many still rely is iOS security. It is one of the strongest features of iOS that will surely make the brand shine in the coming next five years. Besides app security, privacy is another aspect that is grabbing the attention of users and developers despite Google’s critical reports about system vulnerabilities.
Keeping a track of the changes made in the tech world is a challenge for iOS developers. After all, the leading technologies like AI, IoT, and augmented reality are already in a race that usually breaks the company's bank. But Apple is the one that can reap the benefits of these technologies in the future too.
Polishing or an Overhaul?
Apple always surprises with something better every time they release a new iOS version. But if we point to the overall user experience, it needs to be solved before anything else. Overall, the future of iOS seems like tiny improvements in the features instead of focusing on the major innovation that can help them bring a technological revolution in the digital world. Well, this is just the beginning. No one knows what’s hidden under the good.
Conclusion
After going through this whole blog post, there is a high chance you might be interested in taking your business to a wider audience base with a powerful iOS application. You can choose 75way for this task.
75way is a leading iOS app development company in the USA that can help your brand reach iPhones, iPads, and other Apple device users the world over. We are well-versed in several programming languages and follow a simple approach to craft your application. So, what are you waiting for? Reach out to 75way today!
#iOS app Development company USA#iOS app Development services USA#iOS app development in USA#mobile app development USA#web app development USA#Mobile iOS App development USA#Hybrid app Development USA
0 notes
Text
Return selected image to Previous ViewController
Return selected image to Previous ViewController
A very common scenario in an iOS App is to open another ViewController from one ViewController and return the value of the selected row to the previous ViewController and set the image e.g. setting an icon on the First ViewController.
You can perform the following steps to achieve this scenario:
1. Add a delegate variable on your second view controller. Please name it delegateand not Delegate as…
View On WordPress
1 note
·
View note
Text
Unit Testing Tips for Your UI
Unit Testing Tips for Your UI
Photo by NordWood Themes on Unsplash Today, we are going to learn extra tips to test your ViewController. It is always good to have extra test since it can increase your code validity. Testing your viewController can helps you be more extra aware of what is actually going on with the ViewController. There are some tips that I want to share to increase your code validity, so you won’t find this…

View On WordPress
0 notes
Link
original source : https://youtu.be/AaCfwqzH9SQ
containerview를 이용 다른 viewcontroller를 삽입하는 방법을 보여준다. 화면을 분할해서 한쪽에는 게임, 한쪽은 tableviewcontroller를 디스플레이하는 과정을 예제로 보여준다.
참고자��) iPhone Application 프로그래밍 10강 스크롤 뷰와 씬 내장 https://youtu.be/RfpbsZXgo9U
처음에는 이 동영상을 보고 좀더 이해하기위해 찾다가 위 동영상을 발견
0 notes
Text
What are the processes for creating an augmented reality app for iPhone and iPad using ARKit?
Augmented Reality
The user experience that incorporates virtual features, whether in 2D or 3D, into the real world environment using the device's camera is known as augmented reality. It enables users to engage with digital items or characters in their own environment to create a one-of-a-kind experience.

What exactly is ARKit?
Apple's ARKit framework manages the processing required to create Augmented Reality apps and games for iOS devices. It's a high-level API with a plethora of useful capabilities for bringing a magical world to life.
Read More: Top 10 Virtual Reality & Augmented Reality Applications in Business
Apps for Augmented Reality
AR apps have taken the world by storm, with a multibillion-dollar market already established. AR apps are available for a variety of uses, including utility, retail, education, social media, and gaming, all with a dash of fun thrown in.
The exciting part is learning how to create your first augmented reality iPhone app using ARKit's strong features. But first, a little tinkering with your computer and mobile devices is required. Although some upgrades must be installed before you can use ARKit, we've made it easy for you by offering the steps you'll need to make your computer and mobile devices ready.
Getting started with ARKit
To get started designing an AR app for Apple, you'll need a Mac machine with macOS 10.13 Beta installed completely. And, if you don't want to use any third-party software, you only need two pieces of software to create a native iOS app:
Xcode 9 is the most recent version of Apple's integrated development environment, which allows you to create apps for all of their platforms. Unity requires the most recent XCode Beta to conduct ARKit tasks.
IOS 11: Make sure you're using the most recent version of iOS on your smartphone; else, ARKit won't operate. Although iOS 11 is now available (and owners of supported devices can update at any moment), we used the beta version for developing our AR mobile software because it wasn't officially published when we started.
SCNScene: A displayable 3D scene composed of a hierarchy of nodes. SCNScene has all attributes such as geometry, cameras, and lights.
In an augmented reality application, a 3D object is a virtual object that appears on the screen. Because any 3D object may be added to SCNScene, you can utilise whichever 3D object you choose.
Downloading the ARKit Plugin
The ARKit plugin for Unity gives developers access to all the amazing features included in Apple's ARKit, including:
Ambient light estimation
World tracking
Live video rendering
Hit-testing API
Point cloud extraction
Plane estimation and updates
Read More: Evolution of Augmented Reality in the Past, Present and Future
A step-by-step guide to creating an augmented reality mobile app for iOS
We decided to create a prototype augmented reality mobile application with a quadcopter that allows users to go in all directions. However, you can try to create a similar AR app that has a different 3D object - it's all in your hands.
1. Creating a project
This is probably the easiest step in developing an augmented reality app with ARKit. To launch your project, launch Xcode 9 and create a new single view application in the iOS section.
2. ARKit SceneKit view addition
The ARKit SceneKit view must now be included in your storyboard. In the camera background, ARSCNView is used to display virtual 3D material. Remember to set the limitations so that ARSCNView can run in fullscreen mode on your device. Finally, in the ViewController, build an IBOutlet.
3. Switching on the camera
Because ARKit is a session-based framework, each session depicts a real-world virtual object display scenario. The ARKit iOS device sensors (camera, accelerometer, and gyroscope) must be used to allow rendering. In the ARKit, all virtual objects are rendered in relation to their position and orientation in relation to the camera.
4. Adding a Three-dimensional (3D) object
It's time to start adding 3D objects to our augmented reality app, but first, make sure you know which file formats ARKit supports. Only the ARScene Kit view is supported. Only dae (digital asset conversion),.abc (alemic), and.scn (SceneKit archive) file types are supported.
5. Incorporating a Three-dimensional (3D) object into the scene
Our project already has a 3D object associated with it, but it's merely a visual item in a folder. It's time to put it into the app, which means we'll have to add the object to the SCNScene.
How AppReal-VR Can Help?
Let's be honest. You don't want to understand how to create augmented reality apps for the iPhone or iPad. You want to create the money-making AR method that contains the most up-to-date AR capabilities to surprise the market.
Read More: Best Facial Recognition Apps currently available on iOS and Android
The sample we've provided is a highly basic representation of what ARKit can do. The aggression of driving midgets exposes ponderous elephants in the real world. AppReal-VR is in the business of making exceptional augmented reality concepts a reality. We specialize in AR technology as well as provide international software solutions for the mobile app market.
The end
From basic augmented reality iPhone apps to 3D gaming to sophisticated AR applications, we have the expertise to bring your project to life. With six R&D labs across the United States, we are well-positioned to serve you effectively regardless of your location.

Why not call an AR application development company in Virginia today for a free quote?
0 notes
Text
HackingWithSwift Day 24/25/26
Introduction to WKWebview
“The delegation solution is brilliant: we can tell WKWebView that we want to be informed when something interesting happens. In our code, we're setting the web view's navigationDelegate property to self, which means "when any web page navigation happens, please tell me – the current view controller.” Definition of delegation by the author, this will comes in handle when we create our own custom delegate after this.
class ViewController: UIViewController, WKNavigationDelegate
Parent class comes first, then only protocol next
@objc func openTapped() { let ac = UIAlertController(title: "Open page…", message: nil, preferredStyle: .actionSheet) ac.addAction(UIAlertAction(title: "apple.com", style: .default, handler: openPage)) ac.addAction(UIAlertAction(title: "hackingwithswift.com", style: .default, handler: openPage)) ac.addAction(UIAlertAction(title: "Cancel", style: .cancel)) ac.popoverPresentationController?.barButtonItem = self.navigationItem.rightBarButtonItem present(ac, animated: true) }
func openPage(action: UIAlertAction) { let url = URL(string: "https://" + action.title!)! webView.load(URLRequest(url: url)) }
action.title is refer to the title set at the new instance of UIAlertAction
================== And the very first delegate we use under WKNavigationDelegate
func webView(_ webView: WKWebView, didFinish navigation: WKNavigation!) { title = webView.title }
Whenever web view finished load a page, it will change the navigation title to be the same as web view title
==================
Now introduce UIToolbar and UIProgressView
var progressView: UIProgressView = UIProgressView(progressViewStyle: .default) progressView.sizeToFit() let progressButton = UIBarButtonItem(customView: progressView)
let spacer = UIBarButtonItem(barButtonSystemItem: .flexibleSpace, target: nil, action: nil) let refresh = UIBarButtonItem(barButtonSystemItem: .refresh, target: webView, action: #selector(webView.reload))
toolbarItems = [progressButton, spacer, refresh]
Wrap the progress button in UIBarButtonItem and add it to toolbarItems =============
Key-value observing (KVO)
To update the progressView we need to know the web view loading progress
webView.addObserver(self, forKeyPath: #keyPath(WKWebView.estimatedProgress), options: .new, context: nil)
Usually when do addObserver(), one need to take care of removeObserver() to ensure everything run fine
Then add the following method to get the value
override func observeValue(forKeyPath keyPath: String?, of object: Any?, change: [NSKeyValueChangeKey : Any]?, context: UnsafeMutableRawPointer?) { if keyPath == "estimatedProgress" { progressView.progress = Float(webView.estimatedProgress) } }
Since we want to observe the key path of WKWebView.estimatedProgress, then inside the method, we check if the key path of the value is actually same as WKWebView.estimatedProgress. If it’s the same, we get the estimate progress and update the progressView progress.
The extra float casting is needed since webView.estimatedProgress is a Double, and progressView.progress only accept Float.
================= func webView(_ webView: WKWebView, decidePolicyFor navigationAction: WKNavigationAction, decisionHandler: @escaping (WKNavigationActionPolicy) -> Void) { let url = navigationAction.request.url
if let host = url?.host { for website in websites { if host.contains(website) { decisionHandler(.allow) return } } }
decisionHandler(.cancel) }
To ensure user can’t navigate to other page, need this delegate method to control the site, but need to read more on @escaping closure
===================
0 notes
Text
How to Create New an App for Beginners 2021
How to Create New an App for Beginners 2021
How to Create New an App for Beginners 2021. This approach represents the controller ViewController. swift file in your Xcode project. If you click it, the editor area Turns into a code editor where you can write Swift code to manage the view. You Back to our Xcode project, click this stop icon here to stop your project from running. If we want to display something on the screen, we have to add…

View On WordPress
#How to Create New#How to Create New an App#How to Create New an App f2021#How to Create New an App for Beginners
0 notes
Text
iOSのネットワーク接続状態の検出にはReachabilityよりシンプルなNWPathMonitorを使いましょう。
from https://qiita.com/meSummery/items/9d096162a351e2e922c5?utm_campaign=popular_items&utm_medium=feed&utm_source=popular_items
iOSでネットワーク接続状態の取得といえばReachabilityを使うといった印象が強くありませんか。
Reachabilityを使うには、まず https://developer.apple.com/library/archive/samplecode/Reachability/Introduction/Intro.html からApple の提供しているサンプルコードをダウンロードして・・・なんて手間がありましたが、もっと手軽に利用できるApple標準のクラスがありました。
簡単にネットワーク接続のモニタリングが可能
NWPathMonitor
ネットワークの接続状態やネットワークインターフェースなどの情報をモニタリングできるNetwork frameworkのクラス。iOS 12.0以降から利用可能。 https://developer.apple.com/documentation/network/nwpathmonitor
実装ステップ
利用箇所でまずフレームワークをインポートしておきましょう。
モニタリング用クラスのインスタンス化
解放されるとコールバックが受け取れないので、ViewControllerのプロパティなどとして保持しておきましょう。
let monitor = NWPathMonitor()
requiredInterfaceType引数を指定して、ネットワークインターフェース別にモニタリングすることも可能です。
let wifiMonitor = NWPathMonitor(requiredInterfaceType: .wifi)
サポートしているインターフェースのタイプは以下に記載があります。 https://developer.apple.com/documentation/network/nwinterface/interfacetype
ネットワーク接続状態の変更をハンドリングする
monitor.pathUpdateHandler = { path in if path.status == .satisfied { // Connected } }
後述しますが、モニタリングは通常バックグラウンドキューで指定して実行されます。 クロージャー内でUIを操作する場合には、メインスレッドで行うようにしましょう。
ネットワーク接続状態のモニタリングを開始する
モニタリングイベントを配信するためのDispatchQueueを定義して、モニタリングを開始します。
private let queue = DispatchQueue(label: "com.sample") monitor.start(queue: queue)
ソースコード全体
import UIKit import Network final class ViewController: UIViewController { private let monitor = NWPathMonitor() private let queue = DispatchQueue(label: "com.sample") override func viewDidLoad() { super.viewDidLoad() monitor.pathUpdateHandler = { path in if path.status == .satisfied { print("Connected") } else { print("Not Connected") } } monitor.start(queue: queue) } }
まとめ
動画で載せたデモアプリの実装ですが、ViewController内を30行前後で書くことができました。 iOS12以降対応ですし、実用性もばっちりですね。 「ネットワーク接続状態の検出にはNWPathMonitor!」が定着すれば良いなと思います。
以上です

ありがとうございました。
0 notes