#unittesting
Explore tagged Tumblr posts
Visit Tumblr Blog
Explore Tumblr blogs with no restrictions, modern design and the best experience.
Last Seen Tumblr Blogs


Fun Fact
12.7% of mobile users access Tumblr.
Text
A Comprehensive Guide to the Top 7 Python Testing Frameworks

In today’s fast-paced development landscape, delivering high-quality, bug-free software is a non-negotiable requirement. Whether you're developing a web app, data pipeline, or AI solution, one thing remains constant—testing is essential. And when it comes to testing in Python, developers are spoiled for choice.
Python has long been celebrated for its simplicity and versatility, making it the backbone of many industries—from web development to AI. If you're serious about reliability and continuous delivery, it’s time to explore the top Python testing frameworks dominating 2025’s development practices.
Let’s dive into the top 7 Python testing frameworks and see how they stack up in real-world development environments.
1. Pytest �� The Developer Favorite
Pytest is arguably the most popular testing framework in the Python ecosystem. It’s simple, powerful, and incredibly flexible.
Key Features:
Supports unit testing, functional testing, and API testing
Fixtures for complex setup
Plugins like pytest-django, pytest-cov, and more
Ideal for both beginners and seasoned developers, Pytest is often the top choice when you hire Python developers to build robust web or software applications.
2. Unittest (Built-in) – Python’s Native Test Framework
Inspired by Java’s JUnit, Unittest is Python’s standard testing library. While it's not as flashy or feature-rich as Pytest, it's perfect for developers who prefer sticking to built-in modules.
Key Features:
Test discovery
Test fixtures (setUp, tearDown)
Supports test automation in CI/CD environments
For teams new to testing, this is often the starting point before moving to more advanced frameworks.
3. Behave – Behavior-Driven Development (BDD)
Behave enables Behavior-Driven Development, allowing teams to write human-readable tests in the "Given-When-Then" format.
Key Features:
Great for cross-functional collaboration
Gherkin syntax support
Ideal for user journey or acceptance testing
Startups and enterprises alike choose Behave when they hire dedicated Python developers to build user-centric applications with business logic validation at every step.
4. Nose2 – Successor to Nose
While the original Nose is no longer actively maintained, Nose2 is here to pick up the torch. It's compatible with unittest and offers more plugins and improved extensibility.
Key Features:
Automatic test discovery
Plugins for test coverage, parallel testing, and more
Supports legacy Nose tests
Nose2 is perfect for teams transitioning from older testing ecosystems or managing large-scale test suites.
5. Robot Framework – For Acceptance Testing
Robot Framework is a keyword-driven testing tool perfect for acceptance testing and robotic process automation.
Key Features:
Supports Selenium, API testing, database testing
Human-readable syntax
Integrates with Python libraries
It's widely used in enterprise environments and often seen in projects managed by a mature Python development company.
6. Testify – Scalable Testing for Large Codebases
Testify is a modern, feature-rich alternative to unittest and Nose, designed with scalability and readability in mind.
Key Features:
Class-based test organization
Built-in assertion methods
Clean API for large-scale development
For companies scaling their operations, Testify offers a neat balance of power and readability. It’s a good option for teams using Python for modern software development.
7. Tox – Testing Across Environments
Tox isn’t a test runner in itself but a tool that automates testing in different Python environments. It’s indispensable for Python library authors or those managing multiple versions.
Key Features:
Test automation for different Python versions
Dependency management
Seamless CI/CD integration
Tox is especially useful when paired with other frameworks like Pytest or Unittest, ensuring your code is compatible across all Python environments.
How to Choose the Right Framework?
Choosing the right Python testing framework depends on:
Project size and complexity
Team skill level
Framework support and community
Integration with CI/CD tools and third-party services
If your business is investing in Python, the smart move is to hire Python developers who are proficient in one or more of these frameworks and can align with your development goals.
Why Testing Frameworks Matter in Modern Development
With the growing demand for faster delivery and fewer bugs, adopting structured testing processes has become standard practice. Testing ensures stability, increases confidence in releases, and accelerates development cycles.
Modern frameworks also enable:
Continuous Integration/Delivery (CI/CD) pipelines
Test-driven development (TDD)
Behavior-driven development (BDD)
Cross-platform compatibility checks
The developers you choose must align with these practices—an experienced Python development company will already have these workflows baked into their development culture.
Closing Thoughts
In 2025, the role of Python in shaping digital products continues to grow—from web platforms and enterprise solutions to AI-driven software. To keep up with this momentum, testing must be at the heart of every project.
Whether you're enhancing your development pipeline, scaling your startup, or modernizing enterprise systems, these frameworks will guide your way. But tools are only as good as the hands that wield them.
Make the right choice—hire dedicated Python developers who understand the importance of quality and know how to integrate these tools effectively.
For those beginning their journey, here’s a solid starting point: our Guide to Python for Web Development and Python: The Top Frameworks & Best Practices blog series cover everything you need to build stable, scalable applications.
Need help with your next project? Tuvoc Technologies offers expert Python development services tailored for today’s software landscape. Let’s build something exceptional—together.
#Python#PythonProgramming#PythonDev#Coding#SoftwareDevelopment#PythonTesting#TestAutomation#UnitTesting#SoftwareTesting#QAEngineer#PyTest#Unittest#TDD (Test-Driven Development)#DevTips#CodeQuality
0 notes
Text
Modificación de Consultas en Feign con Spring Boot
¿Necesitas modificar parámetros de consulta en Feign con Spring Boot? Aprende cómo resolver el problema de actualización de queries usando RequestInterceptor y evita errores comunes. ¡Solución y test incluidos! 🚀 #Feign #SpringBoot
Resumen Este documento describe un problema común al trabajar con Feign en Spring Boot, donde se requiere modificar dinámicamente los parámetros de consulta (query parameters) en una solicitud HTTP. Se detalla el problema, la solución implementada y las consideraciones clave para evitar errores similares en el futuro. Contexto En una aplicación Spring Boot, se utilizó Feign como cliente HTTP…
#BackendDevelopment#Java#JavaCode#JavaDevelopment#JavaDevelopment SpringFramework UnitTesting JavaProgramming BackendDevelopment Microservices SoftwareTesting JavaCode SpringBootApp#JavaProgramming#JUnit#Microservices#SoftwareTesting#SpringBoot#SpringBootApp#SpringFramework#UnitTesting
0 notes
Text
Software Development Life Cycle (SDLC): A Comprehensive Guide
https://businessviewpointmagazine.com/wp-content/uploads/2024/11/35-Software-Development-Life-Cycle-SDLC_-A-Comprehensive-Guide-Source-logic-fruit.com_.jpg
Latest News
News
Stock Market Update: Nifty 50 Movement, Trade Setup, and Top Stock Picks
News
Markets on Edge: Indian Indices Dip, Bitcoin Hits Record, and Global Trends Shape the Week Ahead
News
BlueStone Jewellery Plans ₹1,000 Crore IPO with Fresh Issue and OFS
Source: logic-fruit.com
In the ever-evolving landscape of technology, the Software Development Life Cycle (SDLC) has emerged as a crucial framework for building high-quality software efficiently. For businesses and developers in India, understanding the intricacies of SDLC can lead to more successful projects, reduced costs, and improved product quality. This article delves into the various stages of the Software Development Life Cycle (SDLC), highlighting their significance and the best practices that can be adopted.
What is the Software Development Life Cycle (SDLC)?
The Software Development Life Cycle (SDLC) is a structured process that outlines the stages involved in software development from inception to deployment and maintenance. It serves as a roadmap for developers, guiding them through the complexities of creating software applications. The SDLC comprises several phases, each with specific objectives and deliverables.
1. Planning and Requirement Analysis
The first phase of the Software Development Life Cycle (SDLC) is planning and requirement analysis. During this stage, stakeholders, including clients and project managers, collaborate to gather and analyze the requirements of the software. This step is crucial, as it sets the foundation for the entire project.
In the Indian context, where diverse user needs must be addressed, thorough requirement analysis can prevent misunderstandings and scope creep later in the development process. The outcome of this phase is a detailed requirement specification document that outlines the functionalities and constraints of the software.
2. Design
https://businessviewpointmagazine.com/wp-content/uploads/2024/11/35.1-Design-Image-by-PP.jpg
Once the requirements are clearly defined, the next step in the Software Development Life Cycle (SDLC) is the design phase. This stage involves creating a blueprint for the software system, including architecture, user interfaces, and data structures.
In India, where user experience plays a pivotal role in software adoption, designing intuitive and user-friendly interfaces is vital. The design phase may include both high-level design (HLD) and low-level design (LLD) documents, which serve as a guide for developers in the next phase.
3. Development
Following the design phase, the actual development of the software takes place. This is where developers write the code based on the specifications and designs established in the earlier phases of the Software Development Life Cycle (SDLC).
In India, with a vast pool of skilled developers, this stage often employs various programming languages and frameworks suited to the project’s requirements. Collaboration tools and version control systems are commonly utilized to ensure seamless communication among team members and maintain code integrity.
4. Testing
https://businessviewpointmagazine.com/wp-content/uploads/2024/11/35.2-Testing-Image-by-shironosov-from-Getty-Images-Pro.jpg
Testing is a critical phase in the Software Development Life Cycle (SDLC) that ensures the software functions as intended and meets the specified requirements. Various testing methods, such as unit testing, integration testing, system testing, and acceptance testing, are conducted to identify and rectify defects.
In the Indian software industry, where competition is fierce, robust testing practices can significantly enhance product quality and user satisfaction. Automated testing tools are increasingly being adopted to streamline this phase and reduce time-to-market.
5. Deployment
Once the software has been thoroughly tested, it is time for deployment. This phase involves releasing the software to the end-users. In India, organizations often opt for a phased or full deployment strategy, depending on the scale and nature of the project.
During this stage, developers must also consider factors like user training and support to ensure a smooth transition for users. Effective deployment strategies can lead to higher user adoption rates and a better overall experience.
6. Maintenance and Support
https://businessviewpointmagazine.com/wp-content/uploads/2024/11/35.3-Maintenance-and-Support-Image-by-Aleksandr-Grechanyuk-from-Getty-Images.jpg
The final phase of the Software Development Life Cycle (SDLC) is maintenance and support. After deployment, software must be continually monitored and maintained to address any issues that arise and implement necessary updates or enhancements.
In the Indian context, where technology and user needs evolve rapidly, ongoing maintenance is essential to keep software relevant and functional. This phase may involve bug fixes, performance optimization, and feature updates based on user feedback.
Best Practices for Effective SDLC Implementation
To maximize the benefits of the Software Development Life Cycle (SDLC), organizations in India can adopt several best practices:
Involve Stakeholders Early: Engage stakeholders in the planning and requirement analysis phase to ensure their needs are accurately captured.
Adopt Agile Methodologies: Implement Agile principles to enhance flexibility and responsiveness to changing requirements throughout the SDLC.
Emphasize Documentation: Maintain comprehensive documentation at each phase of the SDLC to facilitate communication and knowledge sharing among team members.
Utilize Automation Tools: Incorporate automation tools for testing and deployment to improve efficiency and reduce human error.
Foster Continuous Learning: Encourage team members to stay updated on the latest technologies and trends in software development to maintain a competitive edge.
Conclusion
The Software Development Life Cycle (SDLC) is an indispensable framework that guides software development projects from start to finish. For businesses and developers in India, understanding and implementing the various phases of SDLC can lead to enhanced product quality, reduced development costs, and increased user satisfaction. By adhering to best practices and embracing a structured approach, organizations can navigate the complexities of software development and deliver successful projects that meet the needs of their users.
In today’s fast-paced technological environment, leveraging the Software Development Life Cycle (SDLC) effectively will be a key differentiator for Indian software companies, enabling them to thrive and innovate in a competitive market.
Did you find this article helpful? Visit more of our blogs! Business Viewpoint Magazine
#softwaredevelopment#testing#coding#stlc#agile#software#manualtesting#unittesting#analysis#regressiontesting#placement
0 notes
Text
White Box Testing vs Black Box Testing: What’s the Difference?

Behind every functional software lies the truth of its testing - Black Box vs White Box. 📦 One focuses on end-user experience, while the other delves into the inner workings. Which approach reveals the hidden bugs? 💻
What is Black Box Testing?
Black Box Testing is a method where the tester doesn’t need to understand the internal workings of the application. Instead, the focus is on testing the functionality from an external user perspective. Think of it like testing an app without seeing the code inside—it’s all about inputs and outputs! 🌐
➢ Key Features of Black Box Testing 🎯
No Code Knowledge Required 🧑🏫: Testers only need to know the functionality, not the internal code.
Focus on User Experience 👥: Ensures the software works as users expect.
Applicable to All Levels 🛠️: Useful for unit, integration, and system testing.
Detects Functional Issues ⚠️: Helps uncover missing or incorrect features.
Uses Structured Test Cases 📜: Relies on predefined input/output test cases.
What is White Box Testing? 🔍
White Box Testing (or Clear Box Testing) is all about knowing and testing the code itself. Testers need a good understanding of the internal structure of the application, as they’re checking how well each piece of code functions and interacts. It’s a deep dive into the codebase! 🖥️💻
➢ Key Features of White Box Testing 🎯
Requires Code Knowledge 💻: Testers need coding skills to examine the internal workings.
Examines Internal Logic 🧠: Focus on code structure, algorithms, and logic flows.
Ideal for Unit Testing ⚙️: Best suited for smaller code segments and functions.
High Coverage 🔍: Ensures every path and branch in the code is tested.
Early Detection of Errors 🚫: Catches logical and security issues early in development.
Black Box vs White Box Testing: Key Differences 🐞
When it comes to "Black Box vs White Box Testing," each approach has its own strengths, weaknesses, and best use cases. Let’s compare them across some key areas! 🌐
1. Knowledge Requirement 🧑🏫
Black Box Testing doesn’t require any knowledge of the underlying code.
White Box Testing requires a good understanding of the code, making it more suitable for developers or technical testers.
2. Testing Focus 🎯
Black Box Testing focuses on functional aspects from a user’s point of view.
White Box Testing focuses on the structural aspects, such as code quality, logic, and flow.
3. Application 🖥️
Black Box Testing can be used for end-to-end testing scenarios.
White Box Testing is mostly used for unit testing and integration testing within smaller code segments.
4. Bug Detection 🐞
Black Box Testing finds functional bugs, such as incorrect or missing functionality.
White Box Testing finds structural and logical bugs within the code.
5. Automatability 🤖
Black Box Testing can be easier to automate for UI/UX testing, especially in large systems.
White Box Testing is often automated to improve code quality, especially in Continuous Integration (CI) setups.
When to Use Black Box vs White Box Testing?
Deciding between Black Box vs White Box Testing depends on the stage of development, your testing goals, and the skills of your team:
➢ Use Black Box Testing when you’re:
Testing from an end-user perspective 🧑💻
Running final QA checks before a release
Validating functionality for end-to-end workflows
Using non-technical testers for broader functional checks
➢ Use White Box Testing when you’re:
Conducting unit tests during early development 🛠️
Looking to improve code quality with CI/CD pipelines
Debugging specific sections of code or functions
Using automated testing tools to verify code logic and paths Both methods can complement each other! In fact, using them together (called Gray Box Testing) combines user-focused testing with code-level insights, providing a comprehensive test strategy. 🤩
Conclusion
When it comes to Black Box vs White Box Testing, the best approach often depends on your testing goals and project needs. Black Box Testing excels in validating the user experience and ensuring that the functionality meets expectations. White Box Testing, on the other hand, is invaluable for catching code-level issues and improving the security and quality of the code itself.
#BlackBoxTesting#WhiteBoxTesting#SoftwareTesting#TestingComparison#TechTalk#QATesting#SoftwareQuality#SoftwareDevelopment#Testing101#QualityAssurance#Debugging#SoftwareEngineering#ManualTesting#AutomatedTesting#CodeTesting#FunctionalTesting#UnitTesting#TechInsights#TestingTechniques
0 notes
Text

Different Types of Testing in SAP Systems 💻🔍
✨ Unit Testing (FUT) ✨ Integration Testing ✨ Regression Testing ✨ User Acceptance Testing (UAT) ✨ Negative Testing ✨ Performance Testing
Explore these testing methodologies with Mentor TechSystems! 🚀
You can download the app:
https://play.google.com/store/apps/details?id=co.diaz.gxgya&pli=1
https://apps.apple.com/in/app/myinstitute/id1472483563
For more information, reach out to us at +91 8282824781 or +91 8282826381
Visit our website at www.mentortechsystems.com
Don't miss out on this incredible opportunity! 💡✨
#SAP#SAPTraining#MentorTechSystems#sapsystemtesting#unittesting#integrationtesting#regressiontesting#UAT#performancetesting
0 notes
Text
Did you know a glitch in software forced Nissan to recall over a million cars?
Learn how robust software testing can save millions in development and support costs.
Check out our new blog to find out: https://www.avisysservices.com/blog/what-is-software-testing-a-comprehensive-guide/
#SoftwareTesting#QualityAssurance#TestAutomation#ContinuousTesting#DevOps#IntegrationTesting#UnitTesting#FunctionalTesting#PerformanceTesting#APITesting#API#RegressionTesting#UsabilityTesting#AcceptanceTesting#SoftwareDefects#TestingAutomation#SoftwareDevelopmentLifecycle#SDLC#MobileAppTesting#MobileTesting#AppTesting#UserExperience#SoftwarePerformance#ServiceVirtualization#AppDowntime#ManagedTestingServices#ManagedTesting#SoftwareQuality#TestingFramework#TestAnalytics
0 notes
Text

Are you ready to take your business to new heights with the Cloud Migration? Finding the perfect Cloud Migration Provider is the first step toward a seamless and successful transition & business development.
Unlock Your Cloud Potential: Say goodbye to limitations and embrace the infinite possibilities of the cloud.
Reach out to us today and discover the perfect cloud migration partner for your business!
Phone: +61-423781815 website:https://kodeclust.com email: [email protected]
#CloudMigration#DigitalTransformation#CloudExperts#InfinitePossibilities#CloudMigrationServiceProvider#business#businessdevelopment#softwaremigration#CloudMigrationService#datamigrationservices#datamigration#softwaretestingservices#qualityanalysis#softwarequalityanalysis#qualitytesting#unittesting#devops#apitesting#apitestingservices
0 notes
Text
Are you ready to revolutionize your software testing process? Discover RLTF, a novel open-source online RL framework with unit test feedback of multi-granularity for refining code LLMs. It even leverages unit testing to guide the learning process of an RL agent. Learn about its unique capabilities and key features.
#RLTF#AI#MachineLearning#SoftwareTesting#ReinforcementLearning#UnitTesting#SoftwareEngineering#OnlineFramework#opensource#open source#artificial intelligence#software engineering#coding
0 notes
Text
"You need tests that don't break when you refactor. When you use dynamic mocks, tests tend to fail whenever you make changes in SUTs. Even though you have tests, they don't enable refactoring."
0 notes
Text
Exploring the Power of moduleNameMapper in Jest for Seamless Testing

If you're a developer who's passionate about writing efficient and reliable code, then you're probably familiar with the importance of testing. Testing ensures that your code functions as intended and helps you catch bugs before they cause havoc in production. One tool that has gained significant popularity in the JavaScript community for testing is Jest. In this article, we'll dive deep into a powerful feature of Jest called moduleNameMapper and how it can enhance your testing experience.
Table of Contents
- Introduction to Jest and Testing - Why testing is crucial for software development - Overview of Jest and its features - Understanding moduleNameMapper - What is moduleNameMapper? - How does moduleNameMapper work? - Use cases and benefits of using moduleNameMapper - Implementing moduleNameMapper in Your Project - Step-by-step guide to setting up moduleNameMapper - Practical examples of using moduleNameMapper - Best Practices for Effective Testing with moduleNameMapper - Keeping your test suite organized - Writing meaningful test descriptions - Leveraging moduleNameMapper for mocking - Advanced Techniques and Tips - Combining moduleNameMapper with other Jest features - Overcoming common challenges - Performance considerations and optimizations - Conclusion
Introduction to Jest and Testing
Why testing is crucial for software development In the world of software development, testing plays a pivotal role in ensuring the quality and reliability of your code. It allows you to identify and fix issues early in the development process, reducing the likelihood of encountering bugs in production. Overview of Jest and its Features Jest, developed by Facebook, is a widely used JavaScript testing framework. It's known for its simplicity and robustness, making it a favorite among developers for writing tests for their applications.
Understanding moduleNameMapper
What is moduleNameMapper? moduleNameMapper is a configuration option in Jest that enables you to map module names to different paths or mock implementations. This feature is particularly useful when dealing with complex project structures or third-party libraries. How does moduleNameMapper work? When Jest encounters an import statement, it checks the moduleNameMapper configuration to determine if a mapping exists for the imported module. If a mapping is found, Jest uses the specified path or mock implementation instead of the actual module. Use cases and benefits of using moduleNameMapper - Simplifying testing of components with external dependencies. - Mocking modules that perform network requests or have side effects. - Enhancing test performance by substituting heavy modules with lightweight alternatives.
Implementing moduleNameMapper in Your Project
Step-by-step guide to setting up moduleNameMapper - Open your Jest configuration file. - Locate the moduleNameMapper option and define your mappings. - Run your tests, and Jest will apply the mappings during test execution. Practical examples of using moduleNameMapper Example 1: Mocking API calls javascriptCopy code "moduleNameMapper": { "^api/(.*)": "/__mocks__/api/$1.js" } Example 2: Mapping CSS modules javascriptCopy code "moduleNameMapper": { ".(css|scss)$": "identity-obj-proxy" }
Best Practices for Effective Testing with moduleNameMapper
Keeping your test suite organized Organize your tests into descriptive folders and files to maintain a clear structure. This ensures that tests are easy to locate and manage, especially as your project grows. Writing meaningful test descriptions Use descriptive test names that clearly convey the purpose of each test. This makes it easier for developers to understand the test's intent and quickly identify issues. Leveraging moduleNameMapper for mocking Take advantage of moduleNameMapper to mock external dependencies or complex modules. This helps isolate the unit of code being tested and ensures reliable test results.
Advanced Techniques and Tips
Combining moduleNameMapper with other Jest features Pair moduleNameMapper with snapshot testing or mocking frameworks like jest.mock to create comprehensive and accurate tests. Overcoming common challenges Address challenges such as circular dependencies or dynamically generated paths by configuring appropriate mappings in moduleNameMapper. Performance considerations and optimizations While moduleNameMapper can improve test performance, be mindful of potential bottlenecks. Evaluate the impact of your mappings on overall test execution time.
Conclusion
Incorporating moduleNameMapper into your Jest testing strategy can significantly enhance your ability to write thorough and effective tests. By intelligently mapping module names, you can seamlessly mock dependencies, simplify complex scenarios, and ultimately build more reliable software.
FAQs
- What is the purpose of moduleNameMapper in Jest? moduleNameMapper allows you to map module names to different paths or mock implementations, enhancing testing flexibility. - Can moduleNameMapper be used alongside other Jest features? Absolutely! moduleNameMapper can be combined with various Jest features like mocking and snapshot testing for comprehensive tests. - Does moduleNameMapper impact test performance? While moduleNameMapper can improve performance, improper usage or excessive mappings may lead to performance issues. - Can I use regular expressions in moduleNameMapper configurations? Yes, you can use regular expressions to define mappings in the moduleNameMapper configuration. - Is moduleNameMapper exclusive to JavaScript projects? No, moduleNameMapper can be used in any project where Jest is employed for testing, regardless of the programming language used. Read the full article
0 notes
Text
StreamBuilder: ons opensource framework dat je dashboard mogelijk maakt.
We kunnen vol trots aankondigen dat ons eigen framework dat je dashboard op Tumblr mogelijk maakt, sinds 6 juli opensource is. We noemen dit framework StreamBuilder en we gebruiken het al jaren.
Eerst de basics. Wat betekent 'opensource'? Opensource is een model voor decentrale softwareontwikkeling die de samenwerking stimuleert. In begrijpelijke taal is het beschikbaar stellen van de broncode van softwareprogramma's zodat gebruikers of andere ontwikkelaars hem kunnen gebruiken of aanpassen. Wat is Streambuilder? Nou, elke keer dat je je feed Volgend of Voor Jou bezoekt, of een zoekopdracht invoert, een blogbericht of lijst met getagde posts bekijkt of zelfs als je naar de blogaanbevelingen kijkt, gebruik je dit framework. Als je de code zelf wilt bekijken, kijk dan hier op GitHub!
StreamBuilder doet een hoop. De primaire architectuur is gericht op contentstromen ('streams'): berichten van een blog, een lijst van blogs die je volgt, berichten met specifieke tags, of berichten aangaande een zoekopdracht. Dit zijn verschillende soorten streams die kunnen worden gecombineerd, gefilterd op basis van bepaalde criteria, gerangschikt op relevantie en kans op engagement, en meer. Op je Tumblr-dashboard zie je berichten van blogs en met tags die je volgt gecombineerd met blogaanbevelingen. Elk van deze types is een aparte stroom met een eigen logica, maar ze delen wel allemaal hetzelfde framework. We injecteren de aanbevelingen op bepaalde intervallen, filteren berichten op basis van je blokkeringslijst en rangschikken berichten op relevantie als je "Het beste eerst" hebt ingeschakeld. Dit zijn voorbeelden van de functionaliteit die StreamBuilder ons biedt. Wat zit er in de doos?
De volledige codebibliotheek voor het framework dat we gebruiken om zo goed als elke contentfeed op het platform weer te geven.
Een YAML-syntax voor het opstellen van contentstromen en het filteren, injecteren en rangschikken ervan.
Abstracties voor het programmatisch opstellen, filteren, rangschikken, injecteren en debuggen van stromen.
Abstracties voor stromen samen op te stellen, bijvoorbeeld in carroussels, voor stromen-in-stromen.
Een abstractie voor paginering op basis van de cursorpositie voor complexe stroomsjablonen.
Unittests voor de openbare interface voor de bibliotheek en het grootste deel van de onderliggende code.
Wat we nog in petto hebben
Documentatie. We moeten nog veel van onze eigen interne tools migreren!
Meer voorbeelden van stroomsjablonen en voorbeeldimplementaties voor verschillende veel voorkomende stromen.
Als je vragen hebt, kun je de code zelf bekijken en daar een ticket indienen.
5 notes
·
View notes
Text
ETL Testing: How to Validate Your Python ETL Pipelines
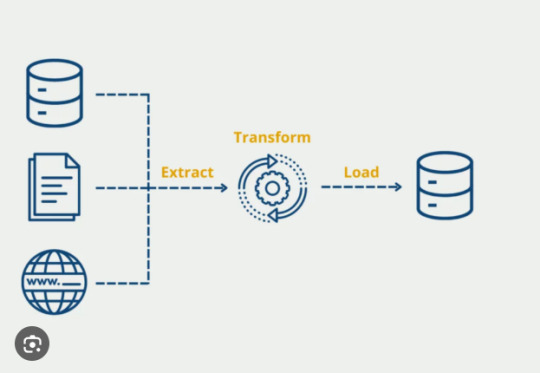
In the world of data engineering, building a strong Extract Transform Load (ETL) process is only half the battle. Ensuring that your ETL pipelines are reliable, accurate, and efficient is just as crucial. When working with Extract Transform Load Python workflows, proper ETL testing is essential to maintain data quality, catch errors early, and guarantee trustworthy outputs for downstream applications. In this article, we'll explore why ETL testing matters and how to effectively validate your Python ETL pipelines.
Why ETL Testing Is Critical
ETL processes move and transform data between systems — often at massive scales. A small mistake during extraction, transformation, or loading can result in significant business consequences, from incorrect analytics to failed reporting. Especially when using Extract Transform Load Python pipelines, where flexibility is high and custom scripts are common, thorough testing helps to:
Detect data loss or corruption
Ensure transformations are applied correctly
Validate that data is loaded into the target system accurately
Confirm that performance meets expectations
Maintain data consistency across different stages
Without systematic ETL testing, you risk pushing flawed data into production, which could impact decision-making and operations.
Key Types of ETL Testing
When validating Extract Transform Load Python pipelines, several types of testing should be performed:
1. Data Completeness Testing
This ensures that all the expected data from the source system is extracted and made available for transformation and loading. You might use row counts, checksum comparisons, or aggregate validations to detect missing or incomplete data.
2. Data Transformation Testing
In this step, you verify that transformation rules (like calculations, data type changes, or standardizations) have been correctly applied. Writing unit tests for transformation functions is a best practice when coding ETL logic in Python.
3. Data Accuracy Testing
Data must be correctly inserted into the target system without errors. Validation includes checking field mappings, constraints (like foreign keys), and ensuring values match expectations after loading.
4. Performance Testing
An efficient Extract Transform Load Python pipeline should process data within acceptable timeframes. Performance testing identifies slow stages and bottlenecks in your ETL workflow.
5. Regression Testing
Whenever changes are made to the ETL code, regression testing ensures that new updates don't break existing functionality.
How to Perform ETL Testing in Python
Python provides a wide range of tools and libraries that make ETL testing approachable and powerful. Here’s a practical roadmap:
1. Write Unit Tests for Each Stage
Use Python’s built-in unittest framework or popular libraries like pytest to create test cases for extraction, transformation, and loading functions individually. This modular approach ensures early detection of bugs.
2. Validate Data with Pandas
Pandas is excellent for comparing datasets. For example, after extracting data, you can create Pandas DataFrames and use assertions like:
python
CopyEdit
import pandas as pd
3. Create Test Data Sets
Set up controlled test databases or files containing predictable datasets. Using mock data ensures that your Extract Transform Load Python process can be tested repeatedly under consistent conditions.
4. Automate ETL Test Workflows
Incorporate your ETL testing into automated CI/CD pipelines. Tools like GitHub Actions, Jenkins, or GitLab CI can trigger tests automatically whenever new code is pushed.
5. Use Data Validation Libraries
Libraries like great_expectations can make ETL testing even more robust. They allow you to define "expectations" for your data — such as field types, allowed ranges, and value uniqueness — and automatically validate your data against them.
Common ETL Testing Best Practices
Always test with real-world data samples when possible.
Track and log all test results to maintain visibility into pipeline health.
Isolate failures to specific ETL stages to debug faster.
Version-control both your ETL code and your test cases.
Keep test cases updated as your data models evolve.
Final Thoughts
Validating your Extract Transform Load Python pipelines with thorough ETL testing is vital for delivering trustworthy data solutions. From unit tests to full-scale validation workflows, investing time in testing ensures your ETL processes are accurate, reliable, and scalable. In the fast-paced world of data-driven decision-making, solid ETL testing isn't optional — it’s essential.
0 notes
Text
Test-Driven Development (TDD)

Test-Driven Development (TDD) is a software development approach where you write tests before writing the actual code. It may sound counterintuitive at first, but TDD can significantly improve code quality, maintainability, and confidence in your software. This post introduces the TDD process, benefits, and how to start applying it effectively in your projects.
What is TDD?
TDD is a development methodology where tests are written to define desired behavior before implementing the functionality. It follows a short and repetitive development cycle:
The TDD Cycle
Write a Test: Write a test that describes the expected behavior of a feature.
Run the Test: The test should fail because the feature doesn't exist yet.
Write the Code: Write just enough code to make the test pass.
Run the Test Again: Verify that it passes.
Refactor: Clean up the code while ensuring the test still passes.
Benefits of TDD
Better Code Design: Forces you to think about the interface before the implementation.
Fewer Bugs: Catches errors early and reduces regression.
Confidence in Changes: Tests act as a safety net when modifying code.
Documentation: Tests serve as living documentation of your code's expected behavior.
Example: TDD in Python
Let’s walk through a simple example where we build a function that adds two numbers using TDD.
1. Write the Test (Fail First)
# test_calculator.py from calculator import add def test_add(): assert add(2, 3) == 5
2. Run the Test
Since the add function doesn't exist yet, this test will fail.
3. Write the Function
# calculator.py def add(a, b): return a + b
4. Run the Test Again
The test now passes. ✅
5. Refactor (If Necessary)
No refactor needed in this simple case, but you might optimize or clean up code in more complex examples.
Popular Testing Frameworks
Python: pytest, unittest
JavaScript: Jest, Mocha
Java: JUnit
C#: NUnit, xUnit
Ruby: RSpec
Best Practices for TDD
Write small, focused tests.
Only write code needed to pass the test.
Run tests frequently as you code.
Refactor with confidence using passing tests as backup.
Use meaningful test names to document behavior.
Challenges of TDD
Initial learning curve for writing good tests.
May slow down early development if not practiced correctly.
Requires discipline and consistency across teams.
Conclusion
Test-Driven Development can significantly boost the quality and maintainability of your code. It leads to cleaner architecture, fewer bugs, and more confidence in your changes. By starting with tests, you're also writing code that’s naturally more testable and modular. Embrace TDD as a habit, and you'll become a smarter, more reliable programmer.
0 notes
Text
Millionen Zeilen Code aber nicht einen Test. Wo startet man?

Eine berechtigte Frage, oder? Aber wie gehen wir am besten vor? Wir haben auf der einen Seite massiv viele Zeilen Code, aber eben keinerlei Test. Das genau ist in vieler Hinsicht schon ein massiver Fehler. Woher wissen wir eigentlich, dass der Source nicht massive Sicherheitsprobleme hat? Aus meiner Sicht ist es immer natürlich besser direkt mit dem Verständnis des Codes zu beginnen und eben mit der Codeanalyse auch gleichzeitig eine gewisse Spur von Expertise - Codeanalysen: Beginnt mit der Codeanalyse und dem Verständnis: Startet damit, die Architektur und Funktionalität des Codebestands zu verstehen. Dies könnte das Durchlesen von Dokumentationen beinhalten, falls verfügbar, sowie das Untersuchen des Codes selbst. Identifiziert kritische Bereiche, Module oder Funktionen, die für die ordnungsgemäße Funktion der Anwendung unerlässlich sind. - Identifiziert Hochrisikobereiche: Fokussiert euch auf kritische Funktionalitäten oder Module, die bei einem Ausfall wahrscheinlich den größten Einfluss haben. Sucht nach komplexen Algorithmen, Ein- und Ausgabevorgängen oder Bereichen, in denen Fehler am wahrscheinlichsten auftreten. - Priorisiert: Priorisiert die identifizierten Hochrisikobereiche für das Testen. Erwägt, mit Bereichen zu beginnen, die für die Funktionalität der Anwendung am wichtigsten sind oder in denen Fehler am wahrscheinlichsten auftreten. - Unittesting: Beginnt damit, Unittests für einzelne Funktionen oder Module zu schreiben. Unittests konzentrieren sich darauf, kleine Codeeinheiten isoliert zu testen. Wenn der Codebestand nicht für einfaches Unittesting strukturiert ist, erwägt eine Refaktorisierung, um ihn testbarer zu machen. - Integrationstesting: Sobald ihr Unittests implementiert habt, geht zum Integrationstesting über. Integrationstests konzentrieren sich darauf, wie verschiedene Teile des Systems zusammenarbeiten. Testet Interaktionen zwischen Modulen, Komponenten oder externen Abhängigkeiten. - Regressionstesting: Nach der Implementierung von Tests für kritische Bereiche solltet ihr Regressionstests hinzufügen, um sicherzustellen, dass neue Codeänderungen keine neuen Fehler einführen oder vorhandene Funktionalität beeinträchtigen. Automatisiert Regressionstests, wo immer möglich, um Probleme frühzeitig im Entwicklungsprozess zu erkennen.Kontinuierliches Testen und Integration: Implementiert eine Continuous Integration (CI)-Pipeline, um den Testprozess zu automatisieren. Dadurch werden Tests automatisch durchgeführt, wenn Änderungen am Codebestand vorgenommen werden. Integriert das Testen in den Entwicklungsworkflow, um euch dazu zu ermutigen, Tests für neuen Code zu schreiben und vorhandenen Code zu refaktorisieren, um ihn testbarer zu machen. - Codeüberprüfung: Integriert Codeüberprüfungen in den Entwicklungsprozess, um sicherzustellen, dass neue Codeänderungen gründlich getestet werden und bewährten Praktiken entsprechen. Ermutigt euch dazu, testbaren Code zu schreiben, und gebt Anleitungen zum Schreiben effektiver Tests. - Dokumentation und Wissensaustausch: Dokumentiert Teststrategien, bewährte Praktiken und spezifische Testfälle oder Szenarien. Teilt Wissen und Erfahrungen mit dem Testen im Team, um Testpraktiken zu verbessern und Konsistenz sicherzustellen. - Iteration und Verbesserung: Testing ist ein fortlaufender Prozess. Überwacht und verbessert kontinuierlich die Testabdeckung und -effektivität im Laufe der Zeit. Lernt aus Fehlern und passt die Teststrategie entsprechend an.
Codeanalyse
- Statische Codeanalyse-Tools nutzen: Nutzt statische Codeanalyse-Tools wie SonarQube, ESLint, Pylint oder FindBugs, um automatisierte Analysen des Codes durchzuführen. Diese Tools können potenzielle Fehler, Verstöße gegen Coding-Standards, Sicherheitslücken und andere Probleme identifizieren. - Manuelle Codeüberprüfung: Nehmt euch Zeit, um den Code manuell zu durchsuchen und zu verstehen. Beginnt mit den Hauptkomponenten und kritischen Bereichen. Stellt sicher, dass ihr die Dokumentation lest, um ein besseres Verständnis für das beabsichtigte Verhalten der Anwendung zu erhalten. - Reverse Engineering: Wenn möglich, verwendet Reverse-Engineering-Tools, um Diagramme oder Modelle der Codearchitektur zu erstellen. Dies kann helfen, komplexe Abhängigkeiten und Interaktionen zwischen verschiedenen Modulen oder Komponenten zu visualisieren. - Code Metriken: Verwendet Metriken wie Codekomplexität, Testabdeckung, Kopplung und Kohäsion, um die Qualität und Wartbarkeit des Codes zu bewerten. Dies kann euch helfen, Bereiche mit hoher Komplexität oder niedriger Testabdeckung zu identifizieren, die einer näheren Prüfung bedürfen. - Anforderungsanalyse: Stellt sicher, dass ihr die Anforderungen und das beabsichtigte Verhalten der Anwendung versteht. Vergleicht den Code mit den Anforderungen, um sicherzustellen, dass alle Funktionen ordnungsgemäß implementiert sind. - Prototyping und Experimentieren: Erstellt Prototypen oder führt Experimente durch, um das Verhalten bestimmter Teile des Codes zu testen oder zu verstehen. Dies kann helfen, Annahmen zu validieren und potenzielle Probleme frühzeitig zu identifizieren. - Kommunikation im Team: Diskutiert den Code und die Ergebnisse eurer Analyse mit anderen Teammitgliedern. Der Austausch von Meinungen und Perspektiven kann helfen, ein umfassenderes Verständnis für den Code zu entwickeln und potenzielle Probleme zu erkennen. Durch die Nutzung dieser Methoden und eine systematische Herangehensweise könnt ihr eine gründliche Codeanalyse durchführen und die Grundlage für die Einführung von Tests und die Verbesserung der Codequalität legen.
Unittests
Stellt klar: Unit-Tests sind nicht länger eine optionale Aufgabe. Zeitraum Alle Code-Änderungen werden jetzt getestet, je nach Bedarf neu oder aktualisiert. Die ersten Tests werden WIRKLICH schwer sein, da es am Anfang so viele Hürden gibt und die Lernkurve steil ist. Plant also vielleicht einen oder sechs Monate ein, um alle mit Schulungen, Präsentationen, Coaching und Nachhilfe darauf vorzubereiten. Um so streng zu sein (der gesamte Code muss jetzt getestet werden), müsst ihr zunächst mit mehreren Ebenen und Teilen der Organisation zusammenarbeiten, um die Leute vorzubereiten und mit den Ressourcen und dem Wissen auszustatten, das sie für eine so große Veränderung brauchen. Es kann leicht mehrere Monate dauern, bis eine solche Veränderung in Gang kommt, und ein bis drei Jahre, bis sie in Schwung kommt, sodass die Unternehmensleitung für einen langen Zeitraum bereit sein und ihre Erwartungen festlegen muss. Das Ergebnis ist ein modernes Unternehmen, das sich im Wettbewerb behauptet und gewinnt. Die Alternative ist der Untergang des Unternehmens. Phase 1 - Beginnen Sie mit der Einführung der Tests Schritt 1) Schreiben Sie einen „Wahr ist wahr“-Test. Schritt 2) Schreiben Sie einen Test „Aufruf einer einfachen Methode im Anwendungscode funktioniert“. Schritt 3) Schreiben Sie einen Unit-Test für eine einfache Methode, die alle Abhängigkeiten abbildet und ausblendet. Phase 2 - Anwendung der Tests auf die tatsächliche Entwicklung Für alle Code-Änderungen in der Zukunft: Schritt 1) Schreiben Sie Tests, die zusammen mit dem Code übertragen werden. Schritt 2) Schreiben Sie fehlgeschlagene Tests, bevor Sie den Anwendungscode schreiben. Schritt 3) Schreiben Sie Tests für den Rückstand der fehlenden Tests Machen Sie bei all diesen Schritten neben den Vorteilen auch die Schwierigkeiten deutlich. Verwenden Sie einen CI-Server, auf dem Ihre Zweige und Tests laufen. Wie circleCI zum Beispiel. Legen Sie die Innereien offen, um sie zu verbessern. „Tests zu haben hilft uns nicht wirklich, wenn wir keine Möglichkeit haben, sie auszuführen. „Das ist nur eine von Dutzenden Ausreden von Leuten, die nicht davon überzeugt sind, dass Testen eine wirklich tolle Sache ist - für Entwickler! Außerdem, seien wir ehrlich, MUSS ein Entwickler seinen Code irgendwie ausführen, um sicherzustellen, dass der glückliche Pfad tatsächlich ohne Syntaxfehler funktioniert. Niemand, den ich je gesehen habe, schreibt Code „blind“. Das Testen findet bereits statt, es wurde nur noch nicht formalisiert und automatisiert, das ist wahrscheinlich der Fall. Ich selbst habe früher Code ohne automatisierte Tests geschrieben (man kann wohlgemerkt sagen, dass ich ihn oft getestet habe), und zwar Millionen von Zeilen. Ihn zu ändern war schrecklich! Tests sind der beste Freund eines Entwicklers. Ich meine, wie kann man Code mit Zuversicht umgestalten - das Geheimnis der Qualität - wenn man keine Tests hat, die einen schützen? Der Anreiz, etwas zu verbessern, aber zu riskieren, etwas anderes kaputt zu machen, führt meiner Erfahrung nach dazu, dass überall Mist hinterlassen wird. Ist erst einmal ein Fenster zerbrochen, ist das Haus schnell zertrümmert (broken window theory). Es gelingt oft nicht, Menschen mit Argumenten umzustimmen, daher ist es wichtig, mit gutem Beispiel voranzugehen und Mitarbeiter zu gewinnen. Read the full article
0 notes
Text
Selenium with Python Tutorial: A Complete Beginner’s Guide

Introduction
Web automation has become a crucial skill in today's digital world, helping developers and testers automate repetitive tasks such as web testing, form submissions, data extraction, and more. Selenium with Python is one of the most powerful combinations for web automation, making it easier to interact with web applications programmatically.
This Selenium with Python tutorial is designed for beginners who want to learn how to automate web browsers efficiently. By the end of this guide, you will understand what Selenium is, why Python is a great choice for automation, and how you can start using Selenium for web testing and automation.
What is Selenium?
Selenium is an open-source automation framework used for testing web applications across different browsers and platforms. It allows developers and testers to simulate user interactions on a website, such as clicking buttons, filling out forms, navigating pages, and extracting information.
Key Features of Selenium:
Cross-Browser Testing – Supports multiple browsers like Chrome, Firefox, Edge, and Safari.
Multi-Platform Support – Works on Windows, macOS, and Linux.
Integration with Testing Frameworks – Can be used with frameworks like PyTest and Unittest for automated testing.
Headless Execution – Allows running tests in the background without opening a browser window.
Automated Web Scraping – Extracts useful data from websites efficiently.
Why Use Python for Selenium?
Python is one of the most popular programming languages for web automation because of its simplicity and extensive libraries. Here’s why Selenium with Python tutorial is a preferred choice for beginners and professionals:
Easy to Learn – Python has a simple syntax, making it ideal for beginners.
Rich Ecosystem – Offers numerous libraries and tools to enhance automation.
Fast Development – Requires fewer lines of code compared to other languages.
Active Community Support – A vast community of developers contributing to Python and Selenium.
Understanding Selenium Components
Selenium consists of several components that help automate web browsers effectively.
1. Selenium WebDriver
WebDriver is the core component of Selenium that interacts with web browsers. It allows automation scripts to perform actions like clicking buttons, entering text, and scrolling through pages.
2. Selenium Grid
Selenium Grid enables parallel execution of test cases on multiple browsers and operating systems simultaneously. It is useful for large-scale web testing.
3. Selenium IDE
A browser extension that records user interactions on a webpage and generates test scripts automatically. This is useful for beginners who want to learn Selenium without writing code initially.
4. Selenium Supported Browsers
Selenium supports all major web browsers, including:
Google Chrome
Mozilla Firefox
Microsoft Edge
Safari
Opera
Common Use Cases of Selenium with Python
Selenium is widely used across various domains for different purposes. Here are some common applications:
1. Automated Testing
Selenium helps developers test web applications by simulating user actions. This ensures the website functions correctly across different browsers and devices.
2. Web Scraping
With Selenium, users can extract data from dynamic websites that do not load content using traditional methods. This is useful for collecting market trends, pricing data, and more.
3. Form Filling and Data Entry
Selenium can automate tasks like filling out online forms, submitting surveys, or entering data into websites, saving time and reducing manual effort.
4. Automated Login and Navigation
Selenium allows users to automate login processes and navigate through websites programmatically, which is useful for testing authentication workflows.
5. Screenshot Capture
Developers and testers use Selenium to take automated screenshots of web pages for reporting and debugging purposes.
Challenges in Selenium Automation
While Selenium is a powerful tool, beginners might face some challenges when working with it:
1. Handling Dynamic Web Elements
Modern websites often use dynamic content that loads asynchronously. Identifying and interacting with such elements requires techniques like waiting for elements to appear.
2. Managing Browser Compatibility
Different browsers may render web pages differently. Ensuring cross-browser compatibility can be challenging without proper testing strategies.
3. Captcha and Bot Detection
Many websites implement security measures to prevent bots. Bypassing Captchas and handling bot detection mechanisms require additional tools.
4. Handling Pop-ups and Alerts
Web applications often contain pop-ups, alerts, and modal dialogs that need special handling during automation.
5. Maintaining Automation Scripts
Web pages frequently change, which may cause automation scripts to break. Regular updates and maintenance of test scripts are necessary to ensure reliability.
Best Practices for Using Selenium with Python
To effectively use Selenium for web automation, follow these best practices:
1. Use Explicit Waits
Instead of relying on fixed sleep times, use explicit waits to handle dynamic elements. This ensures better stability in test execution.
2. Keep Locators Unique and Reliable
Use stable locators like ID and CSS selectors to identify web elements. Avoid using XPaths that may change frequently.
3. Implement Logging and Reporting
Integrate logging mechanisms to capture test results and errors for better debugging.
4. Organize Test Scripts Properly
Follow a structured approach for writing automation scripts to improve maintainability.
5. Run Tests in Headless Mode When Needed
For faster execution, run Selenium tests in headless mode, especially in CI/CD pipelines.
Conclusion
This Selenium with Python tutorial provided an overview of how Selenium is used for web automation, why Python is a preferred language, and the key components that make Selenium a powerful tool. Whether you want to automate testing, scrape data, or perform repetitive web-based tasks, Selenium with Python offers a flexible and efficient solution.
By understanding its core concepts, best practices, and real-world applications, you can begin your journey into web automation with confidence. Start exploring Selenium today and take your automation skills to the next level! 🚀
0 notes
Text
UI Automation Secrets: Mastering iOS Testing
# Example: Basic test for the login screen import unittest from appium import webdriver class TestLoginScreen(unittest.TestCase): def setUp(self): # Set up Appium WebDriver caps = { 'platformName': 'iOS', 'platformVersion': '16.0', 'deviceName': 'iPhone 14 Pro', 'bundleId': 'com.example.YourApp' } self.driver = webdriver.Remote('http://localhost:4723/wd/hub', caps) def test_login(self): driver…
0 notes