#use AutoHotkey without installing
Explore tagged Tumblr posts
Visit Tumblr Blog
Explore Tumblr blogs with no restrictions, modern design and the best experience.
Last Seen Tumblr Blogs


Fun Fact
Average visit duration of Tumblr.com is 10 mins and 25 secs.
Text
August, 10th, 2023 AutoHotkey Newsletter
August 10th, 2023 AutoHotkey Newsletter Want to become an Automation expert? According to James Clear (in Atomic Habits) our identity emerges out of our habits. We aren’t born with preset beliefs. Every belief, including those about ourselves, is learned and conditioned through experience. More precisely, our habits are how we embody our identity. The more you repeat a behavior, the more you…

View On WordPress
#atomic habits#August ahk newsletter#compare lists#get text under mouse#text under mouse#use AutoHotkey without installing
0 notes
Text
So, how's the JukeBox development coming along? Well, it sure is coming, I promise.

In case you don't know what a JukeBox is, it's a little hotkey device I'm building! I originally made this to assist with my endeavors in streaming, but it turns out having extra keys is very useful for a lot of things! Whether it be hotkeys for quickly running macros via AutoHotKey, managing your Discord audio settings, playing funny sounds with VoiceMod, switching tools in your favorite art program like Paint Tool SAI, or managing OBS like I do. It's a very powerful device, and all it does is act like a keyboard with the F13-F24 keys. I bet you didn't even know there was more than the F1-F12 keys, am I right?
About a year ago, I said I would begin selling these soon. That was a bit of a lie, fortunately I am very good at those. That last bit was also a lie, in case you couldn't tell. I got the opportunity to work on the JukeBox as part of an independent study for college credit, so I took a lot of time to plan and rethink the product. That part wasn't a lie The result is the new V5 board!
Ok so this isn't the actual V5 board yet.
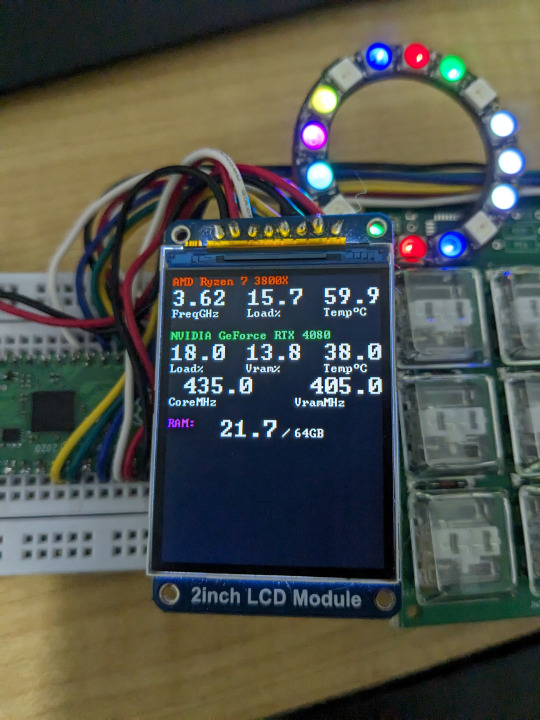
I decided to completely change up what makes up a JukeBox. I decided to use an RP2040 chip, which is used to power a Raspberry Pi Pico. I used a Pico board, along with the old JukeBox V4 boards, an RGB LED ring, and an OLED screen to build my ideal V5 prototype. The result is the same JukeBox known and loved but with some added features, like reactive lighting and a screen to display fun graphics and info!

This is the finalized board, it's design has been shipped off to manufacturing, and will hopefully arrive right at the start of the new year. I'm paying a lot of money for just 10 of these things! I can't wait.
The plan is to sell 3 versions of the board, a basic variant (keyboard only), an RGB variant, and an RGB plus screen variant. Prices are still being determined, but they will be higher than previously anticipated due to rising material costs. The goal is to keep the basic variant at $25 to maintain affordability. You will also be able to choose what kinds of keys you want, be it Cherry MX Blues or Kailh Choc Whites.


I'm working on the final casing. It'll be a 3D printed shell with some nice M2.5 nuts and bolts. It'll also be in a mostly-opaque white so the RGB looks good shining through. The legs are also completely optional, both the case and the legs will have nice rubber feet to keep the board steady. The keycaps will be "relegendable", meaning you'll be able to stick a piece of paper in them with whatever you want on them. You get everything seen here, plus a USB-C cable, and my deepest gratitude. Maybe some day you'll get to have a JukeBox in atomic purple instead of a basic white!
The best part about it all is that you don't need to install any drivers! The keyboard component is always guaranteed to work on any computer that supports USB, and most usually do (hopefully). The screen and RGB won't work without a companion app, sadly, but I'm working hard to make it painless to setup and use, near plug-and-play. I've been writing it in Rust while working on the board, and it will support Windows and Linux without much issue.
Lastly, the entire project is going to be open source! The code will be under an open license, and all the physical parts will be usable under a Creative Commons license (CC BY-NC-SA). I won't allow people to just up and sell the boards without modification, but if someone wants to make and sell their own variant I'd be more than happy to allow it if they ask. Devices like these should be cheap and accessible for everyone.
Hopefully I'll start selling these on my Ko-fi before Q2 of 2024. See you then!
13 notes
·
View notes
Text
Setting Up A Windows 11 Computer as a Permanent Installation
This guide covers setting up a brand new Windows 11 computer to serve as an arcade machine, but it is relevant for any project that where a single program should run in a gallery environment.
I'm a member of the arcade non-profit, Arcade Commons. As you might guess, we frequently make arcade machines that need to work as easily and reliably as possible. They are often on loan to venues, so the more automatic the machine is, the more likely it is to actually be running. This is equally true for setting up interactive projects in galleries.
The goal is for the computer to turn on as soon as it gets power, launch the game on startup, and not be interrupted by myriad updates and other popups that plague the modern Windows operating system. I also added an AutoHotkey script to handle restarting the game if it crashes.
This is an update to my previous post on how to do this for Windows 10.
That post was itself based on this excellent guide by Eva Schindlin on setting up Windows 7 for permanent installation.
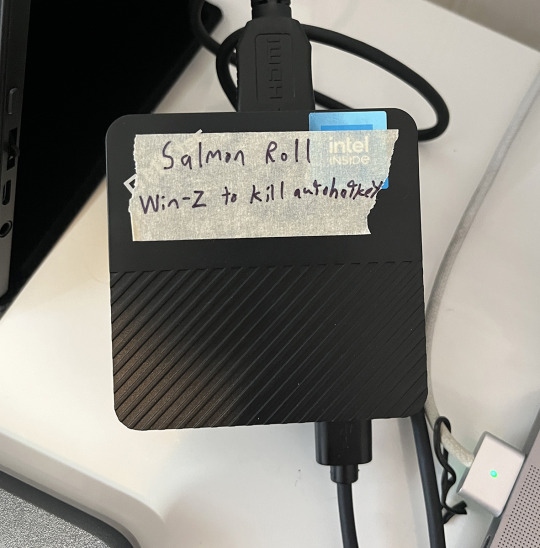
I'm writing this post because I just got a new computer to serve as a dedicated device for Salmon Roll: The Upstream Team, a game I developed with Jane Friedhoff and Diego Garcia. I took notes as I setup the machine, following along with my old post and adding some new things along the way.
I am working with a GMKtec NucBox G5 running Windows 11 Pro.
Required software
Before we get started, get installers for Notepad++ and AutoHotkey on a thumb drive.
I say to put these on a thumbdrive, because I do not want to connect my new computer to the internet if I can avoid it.
AutoHotkey is used for automation. If you don't plan on using it, you can skip this. Note: the AutoHotkey scripts I provide in this post are for v1.1, NOT v2.0. Make sure you grab the right installer.
Notepad++ is an excellent free text editor for Windows. Maybe you can get by doing things with TextEdit, but taking the 30 seconds to give yourself a good text editor will pay dividends.
Finally, I add the game I want to run.
Initial setup
The first time you plug the computer in, you'll get the usual Windows setup flow. If you are not connected to the internet, you should be able to skip linking the device to a Microsoft account.
If you do need to be online, it is possible to circumvent the seemingly required Microsoft account login. Here are a few posts on the subject.
Set the username as something simple with no spaces. I went with "salmon".
Leave the password field blank. This prevents needing the password to login.
On the privacy screen I unchecked every option. No tailored experiences etc.
After that I hit confirm, and the computer thinks for a bit.
Prepping the computer
This is the bulk of the process! We're going to change a lot of settings to keep things running smoothly and without interruption.
1. Run those installers
Install Notepad++ and AutoHotkey.
2. Test the game
Now is a great time to make sure your game actually runs well on this computer.
3. Prevent sleeping
We do not want the computer to go to sleep ever.
Control Panel
Hardware and Sound
Power Options
Change when the computer sleeps
Set it all to “never”
4. Disable Windows Fast Startup
If you set a wake time in BIOS (more on that in a bit) but it doesn't work, that may be because Windows Fast Startup is turned on. This makes the computer startup faster, but does it by hibernating instead of actually shutting down.
While in Power Options:
Select Change What Power Buttons Do
Click “Change settings that are currently unavailable”
Uncheck “Turn on fast startup”
Save changes
On this computer, "Turn on fast startup" was unchecked by default, but that is not always the case.
5. Turn off screen saver
Go to settings and turn the screen saver off.
Right click on the desktop and select "personalize"
Then search for "screensaver" in the search bar of the personalize window
This computer already had screensaver set to "none" but it's worth checking.
6. Change the desktop background
The desktop will be visible during startup and might be seen if the game crashes. It really breaks the illusion of an arcade or art installation to see the default Windows desktop.
While in personalize, you can:
Search for "desktop"
Select "Choose your desktop background"
If you have a logo for your project you can set that image. Otherwise, from the dropdown, select "solid color" and pick one. I go with black.
For the DreamBoxXx we set the desktop to be an image that looked like a loading screen, which worked amazingly well!
7. Set the computer time
Make sure the system clock has the correct time. This is important to automate startup/shutdown.
Right click the time in the bottom right corner of the taskbar
Select “Adjust date/time”
8. Disabling updates
Updates have a good chance at messing up the setup, so it is worth avoiding them. As much as possible, you want this install to be frozen in amber.
I'm trying to avoid this by simply never connecting to the internet, but that will often not be viable.
Poking around online and the consensus seems to be that there is really no way to stop them short of staying offline.
Some possible solutions that I have not tested:
Reddit post
Microsoft Forum
9. Disabling startup processes
Press the Windows key and search for “startup”
Select "Startup Apps"
Disable all of them
If your project requires QuickTime or some other Apple product, set Apple Software Update to never check for updates.
10. Hide the taskbar & widgets
Right click the taskbar and select “Taskbar settings”
Turn Widgets off
Scroll down and expand "Taskbar behaviors"
Check "Automatically hide the taskbar"
11. Add shortcuts/aliases to the startup folder
We'll want to have items that run on startup. This means dropping them in the startup folder (which is different from the panel where you disabled the startup processes).
You can open this folder by pressing Win-R for the run prompt and entering shell:startup
If you don't mind doing this every time, it's fine to just memorize that command, but I like to make a shortcut to the startup folder.
With the startup folder open:
Go up one level by selecting the enclosing folder, Programs
Right click the Startup folder
Select "Show more options"
Select Send to->Desktop (create shortcut)

A shortcut is an alias, a link to another file or folder on the computer. It is not a copy.
You can move this shortcut anywhere. It does not need to stay on the desktop.
Double clicking it will open the startup folder, same as entering "shell:startup" on the run prompt.
I'll dive into some AutoHotkey stuff further down, but if you just want your game to launch on startup, you can make a shortcut for the game and drop that shortcut into the startup folder.
Go to the exe for your game
Right click and select "Show more options"
Select Send to -> Desktop (create shortcut)
Find the shortcut/alias on the desktop
Drag it into the startup folder
This should be enough to launch your game on startup.
12. Bypass the login screen
If you kept the password blank and did not connect to the internet, the computer should skip the login screen. No muss no fuss.
But if you are getting a login screen, here's what I did on Windows 10. It may still work.
By default, you need to enter your password on startup, but this can be turned off. Here are the steps in this guide to bypass this.
Search for “netplwiz” in the start bar
Uncheck the box labeled “Users must enter a user name and password to use this computer.”
Hit OK
If you do not see this checkbox in the netplwiz screen, you may need to disable "Require Windows Hello sign-in for Microsoft Accounts." You can follow these steps from Tenforums user Faslane to do it pretty easily:
Just open the sign in options at settings/accounts/sign in options and turn the "Require Windows Hello sign-in for Microsoft Accounts" to off, then re-open Netplwiz. Voila! it's back ;-)
Modern Windows 10 PCs are set up with a PIN and not a password. Presumably this is true in Windows 11 as well. You will need to disable the PIN first, otherwise the option to bypass the password won’t show up in netplwiz.
Furthermore, if you don’t have a password OR pin, then the message “Require Windows Hello Sign-In” will be checked ON but greyed out so you can’t change it! So you need to then ADD a pin, uncheck the box, then you will see the checkbox in netplwiz.
Although I have not tested these steps for Windows 11, in favor of never connecting to the internet, they seem to match up with this Windows 11 answer from Tobias Schneider on the Microsoft forums.
13. Preventing the “Let’s Finish Setting Up Your Device” blue screen
Fellow Arcade Commons member Mark Kleeb recommended I add this as it has come up in a bunch of our machines. This screen can be really annoying because it often waits a few days or months before popping up and ruining your installation.
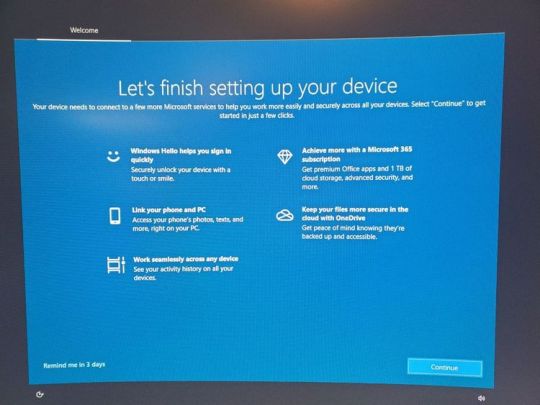
This post on the Microsoft forums has a solution for Windows 10.
The exact options are a little different on Windows 11:
Open Settings
Select System
Select Notifications
Scroll down to Additional Settings and select it
Uncheck everything
While I was in the Notifications page, I went ahead and unchecked everything because why not.
14. Hide desktop icons
This is optional, but I like to put the various files I need on the desktop. I also don't want it to look cluttered if people see the desktop during startup:
Right click anywhere on the desktop
Select View
Uncheck "Show desktop icons"
You can still view the desktop files by opening a file explorer window.
15. Setting the computer to shut down automatically
For some installations, this will not matter, but we often have the arcade machines living at venues. We can't count on the staff there turning them on and off, so it's good to automate this so the computer is not running 24/7.
Shutting the computer down can be done via the Windows task scheduler. Turning it back on is done via BIOS (we'll get to that in a second).
You can ignore this if you're in an environment when you will be around to turn the computer on and off.
Eva Schindling’s guide has this process with pictures and it is relatively unchanged in Windows 11, but here are the steps:
Control Panel
System and Security
Windows Tools (in Windows 7 and Windows 10 this was "Administrative Tools")
Task Scheduler
Action Menu
Create Basic Task
Add title and description
Task Trigger: select Daily
Set your shut-down time and recurrence
Action: select Start a program
Program/script: C:\Windows\System32\shutdown.exe
Add arguments: /s
Click Finish
Make sure you remembered to set the computer time!
BIOS settings
BIOS is short for Basic Input/Output System and it is the firmware that lives on your computer at a lower level than your operating system.
There's a good chance you've never needed to look at it, but this is where we can do things like ensuring that the computer turns on as soon as it receives power, or having it turn itself on at a given time (as long as it is plugged in).
Every computer has a different BIOS and there are different ways to open up BIOS, but it generally involves holding a function key during startup. Restart the computer, and start holding the key as soon as it shuts down. You generally need to be holding it the moment it starts to enter BIOS.
The specific instructions here are for a GMKtec NucBox because that's what I'm setting up, but the general principle can be applied to any computer.
You may need a wired keyboard to do this. Wireless keyboards may not be connected yet during the startup process. Often it's fine (it was on this computer), but if you're not getting a response, try a wired keyboard.
For this computer I had to hold the delete key during restart. Other computers I've worked on have used F12 or F2. Search for "enter BIOS [brand of computer]" for this info. Some computers will print the key you need to press for BIOS during the startup process, but many don't.
BIOS may be a keyboard-only DOS-looking screen, or it may have a simple GUI (although one that you can probably navigate with just keyboard). Likewise, the exact settings will be a little different, but I'll tell you what to look for.
Make sure to save and exit when you're done. The computer should startup normally after that.
BIOS to turn the computer on at a set time
You are looking for a setting along the lines of “Resume by Alarm” or “Wake Settings.”
For example, on the computer we used for the DreamBoxXx, it was under advanced->S5 RTC Wake Settings.
On my GMKtec NucBox it was under Power->S5 RTC Wake Settings.
Then I set it to "Enabled" and selected "Fixed Time".
Note: Make sure you disabled Windows Fast Startup earlier or this may not work.
BIOS to turn the computer on when plugged in
It's very handy to not need to press the power button to start the computer. By setting the device to turn on as soon as it receives power, your whole installation can be turned on by flipping on a power strip.
In the BIOS settings, there will also often be an option to have the computer turn on when it is connected to power. The setting is often primarily for what to do after a power outage, but we can use it for our purposes. The name of the setting changes from machine to machine, but it is typically something along the lines of “AC Back On” or “Action When Lost Power” or "Wake on Power".
For my GMKtec NucBox, it was under Chipset:
Chipset -> PCH-IO -> Wake on Power -> S0 State
You really have to dig to find this option sometimes. Searching the web for "[Computer band] Wake on Power" can help.
AutoHotkey
This part is optional, but using an AutoHotkey script to automate things, like relaunching the game if it crashes, can be useful.
In the case of Salmon Roll, simply putting an alias to the game in the startup folder is not enough because when it launches, there's the little Unity popup where you have to click "Play".

So instead I made an AutoHotkey script that launches the game, waits a few seconds and then presses ENTER.
It also checks every 10 seconds to see if there is no window matching the window title of the game (which is what will happen if the game crashes or somebody closes it), and it will relaunch the game if that happens.
You can see my script here. Feel free to modify it for your own purposes: https://gist.github.com/andymasteroffish/41a02deb5d2924dadb4e3c005e564b8f
If you do not need it to press ENTER after launching the program, just remove these lines:
Sleep 5000 ; Wait 5 seconds Send {Enter} ; Press Enter
Full disclosure: I am script-kiddie-level with AutoHotkey and this is mostly clobbered together from old scripts and random things from the internet.
I HIGHLY recommend putting the hotkey to kill the script in writing on the computer. It can be super confusing to try to work on a machine where an AutoHotkey script is running in the background opening apps or taking control of the mouse etc. I always use Win-Z to kill my scripts, but it's up to you. Do not write an AutoHotkey script that has no way to exit.
It is easy to forget to do this and you will regret it.
Once you have your AutoHotkey script, you can put it directly in the startup folder. If you are using AutoHotkey, make sure that you do not also have an alias to the game in the startup folder or it may launch twice.
That's it!
Hopefully that gets your arcade game or art installation running from now until the end of time.
Remember: do not connect to the internet if you don't have to!
And if you are more technically inclined, consider Linux for tasks like this.
If you use this guide, hit me up on Mastodon or Tumblr and show me what you made!
Follow Arcade Commons on Twitter, Instagram or Bluesky to see our games in action!
0 notes
Text
Minecraft Gamemode Switching: A Guide to Changing Modes Without Commands Table of Content. 1. Use a plugin or mod that allows you to change gamemode without using commands. 2. Use a third-party program or tool to modify your game files and change your gamemode. 3. Join a server that has a different gamemode and play on it instead of singleplayer. 4. Install a custom map or world with a different gamemode already set. 5. Use an external program to simulate a command that changes your gamemode, such as AutoHotKey. Minecraft is a game that has been enjoyed by millions of players worldwide... Read More. https://statesandcounties.com/2023/06/23/how-to-change-gamemode-in-minecraft-without-command-step-by-step-guide-to-changing-game-mode-in-minecraft-without-using-commands/?feed_id=4491&_unique_id=6499adde3bccd
0 notes
Text
batman arkham city cheats 100% working 52Y+
💾 ►►► DOWNLOAD FILE 🔥🔥🔥🔥🔥 Using the below cheat, you can select any alternative Batman skin and play them in the main game, without having to complete the full game. Left, Left, Down. The best place to get cheats, codes, cheat codes, walkthrough, guide, FAQ, unlockables, achievements, and secrets for Batman: Arkham City for Xbox There is a cheat code that allows you to use all the Batman's obtained skins and costumes. Head over to the Main Menu and hit the Left, Left. Start Batman: Arkahm City, and load a save. Once you load the save, double tap the F10 key. It will open the green command prompt on the bottom. 9 Home Discussions Workshop Market Broadcasts. Change language. Install Steam. It is only visible to you. If you believe your item has been removed by mistake, please contact Steam Support. Current visibility: Hidden. This item will only be visible to you, admins, and anyone marked as a creator. Current visibility: Friends-only. This item will only be visible in searches to you, your friends, and admins. I will go through a step-by-step process of how to use all the cheat codes in Batman: Arkham City. This item has been added to your Favorites. Created by. VeryThickBoy Offline. Category: Modding or Configuration , Secrets , Walkthroughs. Guide Index. Big Head Mode. Skin Selection. Skin Selection Hot-Key made by: Some dingus. Console Command Cheat Codes. Debug Menu. Hello Everyone! Now, let's get started Important information that should be taken into consideration before using a cheat is highlighted in bold. Big Head Mode is one of the best additions to the Arkham Series. Being in Arkham Origins, Arkham City, and Arkham Knight, it is well established in the series, and a hilarious cheat in these games. Note, to remove the Big Head Mode, repeat the steps of using the cheat, or restart you game. You can also use it in Riddler's Revenge challenge maps ; First Method. Cheat Code:. Using the guide, you can use a Hot-Key for the Skin Selection, instead of doing it manually. This'll help you if you're truly having trouble with the Cheat Code. I will be following her guide, and, please, go Rate and Follow her guide. Hot-Key Instructions:. Download Autohotkey [www. Download Mod [www. Like at the beginning of challenge maps, where you crack your knuckles, or throw something in the air and catch it, also know as a Taunt, can be activated using a cheat in story mode. Using Cheat Code. Installing the Console:. Using the Debug Menu will allow you to go to anywhere in the game, load any mission in the game, test rooms, peromance rooms, E3 presentations, etc. Check out my other guides You can contact me through my Discord Server [discord. Author: Very Thick Boy. Skin Selction Mod made by Some dingus. VeryThickBoy [author] 11 Sep, am. Dizzy Most if not all Unreal Engine games don't disable achievements. The only games that come to mind that actually disable achievements like that are anything made by Bethesda. Dizzy 16 Aug, pm. VeryThickBoy [author] 1 Oct, pm. Jordo24 No, only because these are engine level cheats. Big head mode is just for fun, skin selection same thing , etc. It isn't like a Bethesda game where it disables achievements if you move around a few files. Jordo24 1 Oct, pm. Do any of theese disable achievements? VeryThickBoy [author] 15 May, pm. Something like that would have to had been programmed in by the game devs already for us to use. Meaning, if there was something like that in the game, it would have been ripped out. Texmod sucks, GPUnity knows that, but that's best we can do right now. Keep an eye out though, and easier way to use his texture pack might be release soon. Nose Afaik, no, there isn't a cheat code for infinite disruptor ammo or a code for faster reloading. The codes that I supplied are the only codes I think that work in the game. There might have been other codes made my the devs to do something like what you're asking for. But, most of that stuff is ripped out of the game before the game ships. Is there any code for infinite disruptor ammo or make the disruptor reload more faster? Share to your Steam activity feed. You need to sign in or create an account to do that. Sign In Create an Account Cancel. All rights reserved. All trademarks are property of their respective owners in the US and other countries. Some geospatial data on this website is provided by geonames. View mobile website.
1 note
·
View note
Text
batman arkham city cheats work ELY%
💾 ►►► DOWNLOAD FILE 🔥🔥🔥🔥🔥 Using the below cheat, you can select any alternative Batman skin and play them in the main game, without having to complete the full game. Left, Left, Down. The best place to get cheats, codes, cheat codes, walkthrough, guide, FAQ, unlockables, achievements, and secrets for Batman: Arkham City for Xbox There is a cheat code that allows you to use all the Batman's obtained skins and costumes. Head over to the Main Menu and hit the Left, Left. Start Batman: Arkahm City, and load a save. Once you load the save, double tap the F10 key. It will open the green command prompt on the bottom. 9 Home Discussions Workshop Market Broadcasts. Change language. Install Steam. It is only visible to you. If you believe your item has been removed by mistake, please contact Steam Support. Current visibility: Hidden. This item will only be visible to you, admins, and anyone marked as a creator. Current visibility: Friends-only. This item will only be visible in searches to you, your friends, and admins. I will go through a step-by-step process of how to use all the cheat codes in Batman: Arkham City. This item has been added to your Favorites. Created by. VeryThickBoy Offline. Category: Modding or Configuration , Secrets , Walkthroughs. Guide Index. Big Head Mode. Skin Selection. Skin Selection Hot-Key made by: Some dingus. Console Command Cheat Codes. Debug Menu. Hello Everyone! Now, let's get started Important information that should be taken into consideration before using a cheat is highlighted in bold. Big Head Mode is one of the best additions to the Arkham Series. Being in Arkham Origins, Arkham City, and Arkham Knight, it is well established in the series, and a hilarious cheat in these games. Note, to remove the Big Head Mode, repeat the steps of using the cheat, or restart you game. You can also use it in Riddler's Revenge challenge maps ; First Method. Cheat Code:. Using the guide, you can use a Hot-Key for the Skin Selection, instead of doing it manually. This'll help you if you're truly having trouble with the Cheat Code. I will be following her guide, and, please, go Rate and Follow her guide. Hot-Key Instructions:. Download Autohotkey [www. Download Mod [www. Like at the beginning of challenge maps, where you crack your knuckles, or throw something in the air and catch it, also know as a Taunt, can be activated using a cheat in story mode. Using Cheat Code. Installing the Console:. Using the Debug Menu will allow you to go to anywhere in the game, load any mission in the game, test rooms, peromance rooms, E3 presentations, etc. Check out my other guides You can contact me through my Discord Server [discord. Author: Very Thick Boy. Skin Selction Mod made by Some dingus. VeryThickBoy [author] 11 Sep, am. Dizzy Most if not all Unreal Engine games don't disable achievements. The only games that come to mind that actually disable achievements like that are anything made by Bethesda. Dizzy 16 Aug, pm. VeryThickBoy [author] 1 Oct, pm. Jordo24 No, only because these are engine level cheats. Big head mode is just for fun, skin selection same thing , etc. It isn't like a Bethesda game where it disables achievements if you move around a few files. Jordo24 1 Oct, pm. Do any of theese disable achievements? VeryThickBoy [author] 15 May, pm. Something like that would have to had been programmed in by the game devs already for us to use. Meaning, if there was something like that in the game, it would have been ripped out. Texmod sucks, GPUnity knows that, but that's best we can do right now. Keep an eye out though, and easier way to use his texture pack might be release soon. Nose Afaik, no, there isn't a cheat code for infinite disruptor ammo or a code for faster reloading. The codes that I supplied are the only codes I think that work in the game. There might have been other codes made my the devs to do something like what you're asking for. But, most of that stuff is ripped out of the game before the game ships. Is there any code for infinite disruptor ammo or make the disruptor reload more faster? Share to your Steam activity feed. You need to sign in or create an account to do that. Sign In Create an Account Cancel. All rights reserved. All trademarks are property of their respective owners in the US and other countries. Some geospatial data on this website is provided by geonames. View mobile website.
1 note
·
View note
Text
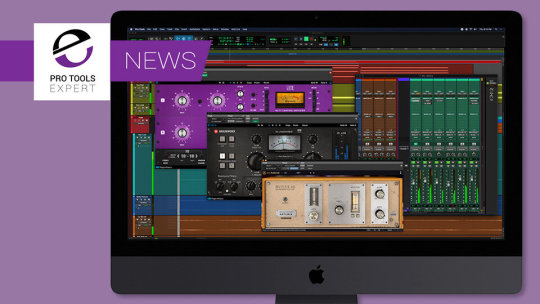
Pro tools 11

GPG key ID: 4AEE18F83AFDEB23 Learn about vigilant mode.
Antares – Auto-Tune Pro v has become more versatile and very easy in it’s use.
freeload vst plug-ins for audio production, mixing, and metering. Antares AutoTune Crack is an astonishing audio processor developed under the name of Antares Audio Technologies. Download over 700 presets for Waves plugins created by top producers, mixers, DJs and live sound engineers, including Dave Pensado, Afrojack, Dave Darlington, Greg Wells and many more. It also has an entirely new synth, allowing more control. AutoHotkey has had 1 update within the past 6 months.
Antares Autotune Free Plugin Download Fl Studio Antares Auto Tune Free Plugin Downloads Antares AutoTune Pro 9.
It’s also useful for choosing samples and Besides making the audio more in-tune, MAutoPitch also provides creative features such as formant shift and stereo-expansion.
Pro Tools Updates (avid.Auto key plugin freeload All product demos require an iLok USB key and an iLok account.
Pro Tools Session Compatibility & Interchange.
Pro Tools 11 Frequently Asked Questionsįor Information about opening older Pro Tools sessions in Pro Tools 11 and saving Pro Tools 11 sessions for use on earlier versions of Pro Tools please see the following:.
Information on Pro Tools 11, including what's new, feature comparison, and information on upgrades: Known Plug-in Issues – Pro Tools 11 on Mac OS X (Mountain Lion):Įleven Rack UI not available in Pro Tools 11įor product information, please see the following product sections: Mac OS X & Windows: RTAS and AudioSuite (.dpm) plug-ins compatible with Pro Tools HD 9 and Pro Tools HD 10 are not compatible with Pro Tools HD 11 Pro Tools 11 supports Native and AudioSuite 64-bit AAX plug-in types onlyĮarlier RTAS and AudioSuite ".dpm" plug-ins are not supported
Driver Downloads and Updates (/drivers).
Please download and install the latest drivers for your hardware from the following page:
Symantec Endpoint Anti-Virus (see details ).
Pro Tools 11 & 10 and Media Composer Co-install ( details).

Note: Video Satellite LE requires Pro Tools 10.3.7 or higher when used with Pro Tools HD 11 ( details).
Pro Tools 10.3.6 or higher automatically converts SD2 audio files to compatible audio files.
Not Supported: SD2 audio files and Pro Tools 4.x sessions and lower.
Third Party Audio Interfaces ( details).
Graphics Card: Dedicated Graphics Card highly recommended.
System Hard Drive: Minimum 15GB free space on startup drive required for Pro Tools installation.
Audio Drive Requirements: One or More Hard Disk Drives Dedicated for Audio Record and Playback.
Avid Audio Interfaces, Peripherals and Control Surfaces ( details).
iLok 2: Original iLok 1 not supported ( details).
Total System RAM: 4GB minimum, 8GB (or more) recommended.
System Software: (64-bit) Windows 8 Professional, Windows 8, Windows 7 Home Premium, Professional, or Ultimate edition with Windows 7 Service Pack 1.
Computer: Avid-qualified Windows-based computer ( details).
Total System RAM: 4GB minimum, 8GB required for video playback.
Mac OS X 10.9.1 is supported with Pro Tools 11.1.2.
There are known issues with Mac OS X 10.9 ( details).
Mac OS X 10.9 (Mavericks) and Mac OS X 10.8.5 (Mountain Lion) are now supported with Pro Tools 11.1.1.
System Software: Mac OS X 10.8.4 (Mountain Lion).
Computer: Avid-qualified Apple computer ( details).
While such systems may operate without problems, please understand we cannot provide support should you choose to use a non-qualified system. Important: Avid dedicates a significant amount of engineering resources and time to test and qualify specific platform configurations. System Requirements for Pro Tools 11 with S3L systemsįor optimal performance and reliability, be sure that your computer or laptop meets the following minimum system requirements. System Requirements and Compatibility with Pro Tools 11 Software * Note: The 13-inch Retina MacBook Pro may have performance problems and is not recommended for Pro Tools with FireWire interfaces
MacBook Air 2011 4,2 (not supported with video engine).
Mac Pro 3,1 "Harpertown" models and lower.
1 note
·
View note
Text
Retroarch n64 setup

#RETROARCH N64 SETUP INSTALL#
#RETROARCH N64 SETUP TRIAL#
#RETROARCH N64 SETUP 240P#
Extract ‘RetroArch_data.7z’ and copy the ‘retroarch’ folder into ux0:/data.Copy RetroArch’s VPK (RetroArch.vpk) to any directory you please.Open VitaShell and connect your PSVita via USB ( you can do it via FTP but copying the data files might take 20-30 minutes as they’re composed of a lot of small files).Obviously, your PSVita must be in hacked mode so run HENkaku/h-encore/Trinity before you start unless you use HENkaku Enso.
#RETROARCH N64 SETUP INSTALL#
I personally think that ‘minimalist’ wallpapers look the bestĪfter you download the above, you can grab your PSVita and do the following in order to install what you just downloaded: Optional – A wallpaper of your choice to make the interface look even better.This contains the stuff that will make RetroArch look great including fonts, menu icons, themes, audio/video filters and much more.Ive been at this for a week and about to loose my mind lol.If you just install RetroArch’s VPK without the data files and the configuration below, it won’t look pretty Ive tried setting descktop res on crt to 2560×240 also but just get a squished image but its there and isnt out of sync.
#RETROARCH N64 SETUP 240P#
I think once when I set crt to 60hz interlaced the game would load but it wasnt in 240p super res it was in mushy 480i. Do I need to run the crt at a specific resolution since it seems bigbox just takes whatever resolution the monitor its on is ran at? Ive tried 640×480 30hz interlaced, 60hz interlaced, 120hz interlaced and all give me the same out of sync image when a games loaded through bigbox. I feel like its something to do with retroarch being able to switch resolutions fine on its own but when ran through bigbox it gets messed up. After doing the above, every rom/core is running fine in retroarch directly but if ran from bigbox i get an out of sync looking screen. It would only work by setting video_refresh_rate to 30 and save_on_exit to false or it would keep starting in 60hz and my games wouldnt load right.
#RETROARCH N64 SETUP TRIAL#
It took me days of trial and error with the config file to get retroarch to launch roms that would display properly in 240p super res. I have groovymame running from bigbox fine and it looks amazing! Ive installed crt emu-driver and all the custom modelines in your guide. I only had 3 games that were a problem, so it wasn’t that bad… once you have one script for a game it’s just mostly cut-n-paste to do the others. The script also has a line to change the desktop resolution back to whatever it was when you exit the game. The script changes the desktop resolution to 400×256 before launching the game ROM and specifying the custom config file I made above. So now I have my front end (in my case Attract Mode) launch a special Autohotkey script for these problem games. You will not be using superresolutions for these games. Set the aspect ratio to 1:1 PAR (the RA value for this is 21 I think), turn off bilinear filtering. You don’t want to blow away the config file you made following the instructions in the article above. When you make this, make sure the first thing you do it turn off the “save on exit” option and rename this config something else (I called mine 400×256.cfg). I had to create a fresh retroarch.cfg without super-resolutions. I kludged together a fix… just listing it here in case someone stumbles on this.
0 notes
Text
How To Tab Out Of A Game 71
Go to the previous tab in the window: Windows 144, lol 144 = flicker in windows, flicker in game, alt tab works perfectly.

unable to ALT + Tab out of Steam Games? YouTube
Shift + ctrl + tab:

How to tab out of a game. Try windows key,or the alt+tab. Pc (windows 7 or later): Open the window you used least recently
If you’re using a laptop or another computer that has an fn (function) key on its keyboard, simply pressing f11 might not be enough to get the job done. It pretty much prevents me from going back to the game if i alt+tab. Purchase from the xbox store or play with xbox game pass
See below where you can find the game depending on your platform: If i alt+tab from a game (here, witcher 3) and try to resume it, it just flickers and automatically alt+tabs out from the game. Tabs is available for purchase on steam, epic games, microsoft store and xbox one.
Alt+tabbing should be a breeze then. Click on the multiplayer tab in the main menu, and click play online. you will be able to search for a game, or create a private lobby. Cbrate 10 years ago #6.
Pressing alt + tab allows gamers to switch to a different screen when running a game in full screen, and using the same hotkey allows them to return to the game easily. Your spotify music will now play in the background while you are playing the game. Switch to the “betas” tab in the game’s properties window.
Press & hold alt, tap tab until you get to the window you want to open, then release. To fix the fps, we need to jump across two tabs to the video tab. * tag me with @ea_atic if you are responding to me.
If it is possible, try running your game with borderless windows instead of fullscreen.it is more convenient to switch between game and desktop without any quit. To get out of the xbox gamebar, simply click anywhere else on the screen or press the esc button on your keyboard. Click the origin menu and select application settings.
Make sure you have the correct dimensions for your computer's screen selected in the options before you make this change. These events are the perfect place to try out your game and get the opinions of veteran board gamers. Hey @atusiii, when you are tabbing back in to the game, press alt + enter.
After installation, open the application, and then import your video clip by clicking the open a single video file. Kindle fire hdx 7 (3rd gen) kindle fire hdx 8.9 (3rd gen). The following grays out and disables your tab:
If you alt+tab out of it, you can hover over the game’s taskbar icon or press alt+tab again. For a variety of reasons — especially problems with the way some games are coded — the game may encounter a problem while doing this. You should now be able to skip out of the windows 10 configuration/settings menu and start going about your business as normal without any lag or slowness when it comes to using the alt+tab combination when gaming on the latest windows 10 update.
Press f11 on your computer’s keyboard. Notebook.tab (0, state=disabled) with 0 being the index of the tab you want to disable, and notebook being your notebook object. This will disable alt+tab, windows+tab, and both windows keys.
But doing this in the middle of a match is likely to disconnect you from the game. Switch your mode to borderless instead. Tabs download free option is a great opportunity to.
You can also press & hold alt, then tap tab, and select a window with the left or right arrow keys, mouse, or touch. A player’s age will likely impact how they approach your game. If all of them don't work,try using the ctrl +alt+delete to open the taskmgr, which could help you back to the desktop.
The connections tab is essentially a hub where you can monitor on which platforms you have your account logged in. = taskbar position of the app i want to switch to (pinned icons counts, too) We can’t disable these shortcuts in the registry, but we have successfully used autohotkey to disable alt+tab, windows key + tab, and the windows key itself.
Sounds like a windows setting not a lol one. Steam, epic games, microsoft store (also available on xbox game pass for pc) mac (mojave or later): In general how you disable widgets in tkinter is by setting the state option to tk.disabled or more foolproof just setting it to a string saying disabled.
Keep pressing win key, then press d to show desktop and force the game to minimize, (optionally) then press tab to show window previews, then press 1 2 3 4 etc. To see if that helps. Local hobby and game shops often have community games nights.
It even has a mind of its own: With the file imported, you’ll land on the picture settings tab. Open the origin client and log into your ea account.
Other shortcuts can also be obnoxious. Here you can opt into open betas if there are any by selecting. Pressing alt+tab or windows key+tab will open an application switcher that takes you out of your game.
The amazon version of roblox mobile is supported on the following devices: You can, if you need to, batch import a number of clips from one folder. You can also join a game from the lobby, or invite friends to a private lobby.
Try out the game with your younger siblings and grandparents to test its age appropriateness.
0 notes
Text
Install Virtualbox Without Admin Privileges On Pc

Let’s consider an easier way to force any program to run without administrator privileges (without entering the admin password) and with UAC enabled (Level 4, 3 or 2 of the UAC slider). Let’s take the Registry Editor as an example — regedit.exe (it is located in the C: Windows folder). Notice the UAC shield next to the app icon.
Installing VirtualBox Without Administrator Rights. Google Chrome installs without admin privileges, but it's only available for the user. STEP 2 Press “F8” three times at the first screen after the computer begins rebooting. Then select “Safe Mode” from the “Boot Options” menu that appears. STEP 3 Select the.
Set COMPATLAYER=RunAsInvokerstart SteamSetup.
Install Virtualbox Without Admin Privileges On Pc Xprog 5.3 Download Zig Powermaster Manual Adobe Top Spin 4 Pc Emulator Psp Easyworship K-lite Codec Pack Pro Tools Edirol Ua 25 Cubase Primus Acca Software Crack Works Test Drive Unlimited 2 Highly Compressed Download Game Java Resident Evil 4 Tampilan Ps2 240x320.
Portable software as a general rule is written in poor languages. AutoHotkey, AutoIt and NSIS are the three main languages in use, because they allow people to moderately easily produce not enormous binaries and have a surprisingly low initial learning curve (though later on you hit plenty of walls with them; none of them is suited as a general purpose programming language).
Install Virtualbox Without Admin Privileges On Pci
I speak this as the developer of the PortableApps.com Launcher, which I did in NSIS as the launchers already in use were NSIS, and as size matters a lot (that killed things like Python outright, though using the RPython parts of PyPy with the garbage collector ripped out would have worked---I checked it out and was able to successfully compile <100KB executables; D was disqualified for some reason I do not recall, Go for its heavy runtime even after ripping out the Unicode tables, &c.), and as I was not at all comfortable in C or C++ at the time.

I rather suspect that a large part of the reason for the apparently poor language choice is that the people that develop and use such things are strongly predominantly young people who are having to rove from computer to computer; as they get older, they tend to end up with a machine of their own and so no longer need portable apps. I don't any more, for example (and I don't use Windows any more either). The developers of these things are in consequence similarly young and have not yet learned good sense in programming (I include myself in that category, though I reckon the PortableApps.com Launcher to contain best-of-class engineer in the portable software space---five years later, at age 22, I am surprisingly unashamed of it, though now I would write it in Rust; I should try that one of these years).
Install Virtualbox Without Admin Privileges On Pc Windows 10
I don't have administrator account on my mac. Ask Question Asked 5 years. I can't install the new OS without resolving this. Danganronpa v1 game. There are several ways to regain/recreate administrator privileges on a Mac. The administrator account exists, but the password is forgotten. Jun 11, 2010 Actually, VirtualBox requires admin privileges because it loads a driver. I don't think there's any way around it. All I can suggest is QEMU. It's portable and can run with standard privileges. How to install logitech ffb for mac.
1 note
·
View note
Text
X Mouse Button Control Download Mac
Xmouse Mac
X Mouse Button Control Download Mac Free
X Mouse Button Control Download Mac Free
Aug 17, 2020 XMBC is not available for Mac computers. Alternatives to X-Mouse Button Control include Mouse Speed Switcher, Remote Mouse, and AutoHotKey. There is also a portable version of XMBC available called X-Mouse Button Control Portable. Downloading X-Mouse Button Control is easy. The Magic Mouse 2 eschews buttons for a touch-sensitive surface, which supports a decent range of gesture controls; so in addition to left and right buttons you can scroll sideways or horizontally, and also two-finger tap, extending Apple’s multi-touch functionality to its mouse. Oct 24, 2011 Download X-Mouse Button Control for Windows to rearrange your mouse button actions and automate various regular operations. X-Mouse Button Control has had 1 update within the past 6 months. X Mouse Button Control Download Mac 12/7/2020 A computer generally can’t function fluidly without a mouse, but often the mice are inconvenient and need an upgrade. On the Apple menu, click System Preferences. Click Microsoft Mouse. Note If this is the first time that you add a customized setting for a program, you may receive the following message: You are about to add an application and create a custom setting for it. Select the desired program in the next window.
Apple’s macOS and Windows have always had the same relationship as Android and iOS. In both markets, Apple’s offering is considered to be more secure and locked down. In both markets, it is also way behind in terms of market share. What is not debatable though is the aesthetics of Apple’s operating systems. Whether it is macOS or iOS, even users who didn’t choose to go the Apple way are fascinated by just how nice macOS or iOS look. You can download the macOS cursors for Windows 10 from below and learn to install and apply them on your PC.
This is why you’ll find a ton of different themes and hacks to make Windows look like macOS. Apple’s focus on aesthetics is undeniable but it’s not for everyone. Prices do play an important role but there are other factors as well that make some people prefer Windows. Gaming is one of them, for example. However, that doesn’t mean you can’t still secretly desire a Mac for its looks. If you do, there are many themes, icons, etc. that can help you emulate the look. It will still be windows and never really look the part but it’s worth trying.
An important aspect of making Windows look like macOS would be the cursors. Windows cursors are quite flat and boring while mac cursors are prettier and more animated. The cursors on both operating systems quite clearly define them. If you like the way the cursors look and behave on a Mac, you can get those Mac cursors on Windows. By using these 8 Windows 10 mouse tricks you can increase your productivity further.
Download macOS cursors for Windows 10
You can thank
Download Cursors (Windows)

Install Mac cursors on Windows 10
Download the Mac cursors on Windows from the link provided above.
On the page that opens up, click Clone or download and select Download ZIP.
Extract the zip file and navigate to the .windows folder inside.
Now right-click on the install.inf file and select Install.
Applying the cursors
To apply the cursors, go to Settings > Devices and click on Mouse in the left column. On the right, click on the Additional mouse options link.
In the MouseProperties window that opens, head to the Pointers tab and select Capitaine Cursors from the drop-down menu.
Click on Apply and OK to apply the changes and close the window. You should notice that your cursor changes as soon as you click Apply. If you don’t like the new theme and want to go back to the more visible, white Windows cursor, you can do this from here again by selecting Windows Default (system scheme). You can now enjoy macOS cursors on your Windows 10 PC. You should also learn how you can swap the right and left button on your mouse.
Read Next: How to Change Drive Letter in Windows 10 File Explorer
Use your gamepad or joystick like a mouse and keyboard on Mac OS X.
Xmouse Mac
Enjoyable-1.2.zip (311KB)
git clone http://git.yukkurigames.com/enjoyable.git
Requirements
Mac OS X 10.7+
One or more HID-compatible (e.g. USB or Bluetooth) input devices
Mappings
I play games with a Playstation 3 controller, so these will be useless if you have a different controller. These are the mappings I use for games I like. To use them, just save them and double-click on them in Finder, or use ⌘O in Enjoyable to import them.
License
2013 Joe Wreschnig, 2012 Yifeng Huang, 2009 Sam McCall
Enjoyable is free software written by Joe Wreschnig and is based on the Enjoy codebase written by Yifeng Huang and Sam McCall.
X Mouse Button Control Download Mac Free
Permission is hereby granted, free of charge, to any person obtaining a copy of this software and associated documentation files (the 'Software'), to deal in the Software without restriction, including without limitation the rights to use, copy, modify, merge, publish, distribute, sublicense, and/or sell copies of the Software, and to permit persons to whom the Software is furnished to do so, subject to the following conditions:
X Mouse Button Control Download Mac Free
The above copyright notice and this permission notice shall be included in all copies or substantial portions of the Software.
0 notes
Text
Version 302
youtube
windows
zip
exe
os x
app
tar.gz
linux
tar.gz
source
tar.gz
I had a great week. I've finished up the new 'simple downloader' and wrote a new way for subscriptions to run simultaneously.
simple downloader improvements
I have rounded out the new simple downloader, which replaced the old 'page of images' downloader last week. Its parsers have more descriptive names and it can import and export parsers for sharing. And it remembers which parser it had selected through a session restart.
I also reintroduced the old 'all files linked by images in a page' behaviour from the old page of images downloader. This parse method, which fetches anything linked to by an image in the entered URL, is a useful catch-all for threads from as-yet unsupported imageboards and other miscellaneous tasks.
I also added new parsers for mewch threads, webmshare file pages, and imgur image albums. The imgur album parser only works for the first page of results (about ten images) right now--we'll have to wait for the cleverer gallery parser to get full support.
simultaneous subscriptions
Subscriptions can now run in parallel! The new setting for how many can run at once is under options->downloading. I have kept the default as 1, so you will not see any change if you do not touch anything, but if you would like to bump it up to 2 or 3, please give it a go and let me know how it works for you.
This is new code, so I recommend not turning it up to 11 yet. I've improved how some of the bandwidth calculations work here, but I can't promise a very heavy situation will not result in a traffic jam.
misc
After a long time of hating the name, I have changed 'explicit tags' to 'additional tags'.
If you like, you can now set media to scale to 100% by default, even when the media is larger than the media or preview canvas size.
Some unusual searches that were formerly not returning any results (like 'akaiha_(akaihasugk)' on danbooru) should now be fixed. This was due to bad site-side markup not parsing correctly clientside. Users who run from source may like to check to see if they have 'html5lib' installed, which is the new parser I now prefer above the old 'lxml'.
new html parsing options
This is for advanced users getting into the new parsing system only!
To get the old 'all files linked by images in a page' behaviour working again, I had to update the new html parsing formulae to walk up the tree (ascending) as well as search down it (descending). So in any normal parsing step, as well as saying 'find all the img tags', you can now say 'walk back up the tree until you hit an 'a' tag'!
Also, you can now set a descending rule without an explicit tag name, so you can say 'find all tags with class="thumb"' without having to specify div or span or whatever. If you are a mad man, you can also just search for 'all tags' without any qualifiers, wew.
full list
improved how simple downloader parsing formulae are stored and passed around
the edit simple downloader parsing formulae panel now has an 'add defaults' menu button
the simple downloader formula edit panel handles its buttons better and can now do import from/export to clipboard/png and reimport from the defaults, and fixes duplicate names automatically
simple downloaders now remember their current parser through a session save/load
simple downloaders will set a new default parser selection for new simple downloader pages on any choice event
renamed all the default simple downloader parsers to more clearly explain what they do
added 'all files linked by images in page' to the simple downloader, which does the old page of images' behaviour, and is hence pretty decent for most imageboards
added a simple mewch thread html parse formula to the simple downloader
added a very simple webmshare parse formula to the simple downloader
added 'imgur image album' to the simple downloader, which will fetch the first 'page' of results from an image album. full parsing will have to wait for the gallery downloader update
subscriptions can now run simultaneously! you can set the max number at options->downloading page--the default remains 1, so default behaviour will not change
if subscriptions guess they can eat some bandwidth in the next 30s but it turns out they can't, they will bandwidth-override that last job after the 30s expires. this will stop some edge cases from causing subs to potentially hang for hours just on one last request
'explicit tags' are now renamed to 'additional tags'
you can now set media to initially scale to 100% even when it is larger than the media or preview canvas
the html parsing formula can now 'ascend' as well as search down the DOM tree--so, for instance, you can find all 'img' below an 'a' and then jump back up to the 'a' to fetch the 'href' of that image link!
html parsing formulae can now search without a tag name--so, for instance, 'find all tags with class = "whatever"' is doable, without having to specify div or span etc..
the html parsing formula rule panel is hence a bit richer. it also presents a preview of the rule's string as you edit
the client no longer needs lxml to boot, and if html5lib is present, it will prefer that for html parsing. if both libraries are missing and html parsing is requested, it will raise an exception explaining the error
the builds now include html5lib, which is better at recovering from some bad markup than lxml, and as a result some parsing jobs that formerly did not work (such as 'akaiha_(akaihasugk)' on danbooru) now do
rewrote how services test their functional status to better account for different states. the logic here should be a bit better now--repositories will still be able to process if their network side is down, but everything will pause if any pause is set, and it should all propagate up to higher levels of error catching and status reporting better
hydrus can now deal with really big decompression bombs (>~180 megapixel)
filtered out en-dashes (as an alternative to standard hyphens in a "? + -" link-prefix) from booru tag parsing
fixed a string generation issue that was stopping date decode string transformations from summarising themselves
fixed some catastrophic boot failure gui reporting
cleaned up a double-exit error on dialogs that could occur when spamming exit events with a script like AutoHotkey
improved some dead cpu thread clearout code
updated misc old code
misc cleanup
next week
With the simple downloader finished, I want to get into the meat of the gallery downloader. The first step of this will be allowing drag and drop of arbitrary booru/whatever file page URLs onto the client.
2 notes
·
View notes
Text
Scott Hanselman's 2021 Ultimate Developer and Power Users Tool List for Windows
Can you believe it's been 6 years since my last Tools list? Tools have changed, a lot are online, but honestly, it's just a LOT OF WORK to do the tools list. But here's one for 2020-2021. These are the tools in my Utils folder. I made a d:\dropbox\utils folder and I added it to my PATH. That way it's on all my computers and in my path on all my computers and I can get to any of them instantly.
This is the Updated for 2020-21 Version of my 2003, 2005, 2006, 2007, 2009, 2011, and 2014 List, and currently subsumes all my other lists. I’ve been doing this for over 17 years. Wow. I need to do better, I guess.
Everyone collects utilities, and most folks have a list of a few that they feel are indispensable. Here's mine. Each has a distinct purpose, and I probably touch each at least a few times a week. For me, "util" means utilitarian and it means don't clutter my tray. If it saves me time, and seamlessly integrates with my life, it's the bomb. Many/most are free some aren't. Those that aren't free are very likely worth your 30-day trial, and very likely worth your money.
These are all well loved and oft-used utilities. I wouldn't recommend them if I didn't use them constantly. Things on this list are here because I dig them. No one paid money to be on this list and no money is accepted to be on this list.
Personal Plug: If this list is the first time you and I have met, you should subscribe to my blog, and check out my podcasts, and sign up for my newsletter of Wonderful Things.
Please Link to http://hanselman.com/tools when referencing the latest Hanselman Ultimate Tools List. Feel free to get involved here in the comments, post corrections, or suggestions for future submissions. I very likely made mistakes, and probably forgot a few utilities that I use often.
THE LIFE AND WORK-CHANGING UTILITIES
"If everything was perfect, you would never learn and you would never grow." - Beyoncé
Windows Subsystem for Linux - It really can't be overstated how WSL/WSL2 has put the cherry on top of Windows 10. It runs on any build 20262 or higher as it was recently backported and it's integration with Windows is fantastic. It's also WAY faster than running a VM. Go learn more on my YouTube
Windows Terminal - Finally Windows has a modern terminal. You can run shells like Command Prompt, PowerShell, and Windows Subsystem for Linux (WSL). Its main features include multiple tabs, panes, Unicode and UTF-8 character support, a GPU accelerated text rendering engine, and the ability to create your own themes and customize text, colors, backgrounds, and shortcuts. It also includes a pseudo-console so 3rd party Terminals like hyper, conemu, terminus and more work better!
Windows PowerToys - They are back and they should be built into Windows. Install them here and get a color picker, fancy zones, file explorer addons, image resizers, keyboard manager and remapper, an Apple Spotlight-like running in the form of PowerToyrs Run, the Shortcut Guide and more!
Also check out Ueli as a great launcher/spotlight for Windows!
VS Code - Visual Studio Code is hella fast and is my goto text and code editor. I still use notepad sometimes and I'm in full Visual Studio a lot, but VS Code is like the Tesla of code editors. Check out my Favorite VS Code Extensions below.
PowerShell/OhMyPosh/PoshGit/Cascadia Code - I've had a blast this year taking my console prompt to the next level. Try these out but also look at Starship. Whatever you do, play! Don't accept the defaults!
ZoomIt - A true classic but also the answer to the #1 question I'm asked. How do you draw on the screen when you're sharing your screen? ZoomIt has been THAT TOOL in my toolbox. Really take some time and learn how to do boxes, arrows, colors and more and you'll be a more effective screen-sharer. In fact, just go get the whole SysInternals suite and put it all in your PATH.
Winget - It's apt-get for Windows. Similar to choco which I've used in the past, WinGet is going to be included in Windows 10 and has a ton of nice features. I use it to setup a machine in an hour from the command line, versus a day before doing it manually. Just add your MSA (Microsoft login) to the Package Manager Insiders Program and get it from the Store. It's bundled with the Windows App Installer. Then just "winget search <tool>" and winget install whatever!
QuickLook - Free in the Windows Store, just highlight a file in Explorer and press Space to get a preview!
Amazing .NET and Developer utilities
"Power means happiness; power means hard work and sacrifice." - Beyoncé
CodeTrack - CodeTrack is a free .NET Performance Profiler and Execution Analyzer. It works on basically every version of .NET and will give you massive insight into how your code is running! The flamegraph view is fantastic. It's free but you should donate as it's a one-person amazing app!
LINQPad - Interactively query your databases with LINQ with this tool from Joseph Albahari. A fantastic learning tool for those who are just getting into LINQ or for those who want a code snippet IDE to execute any C# or VB expression. Free and wonderful.
WinMerge - WinMerge just gets better and better. It's free, it's open source and it'll compare files and folders and help you merge your conflicted source code files like a champ. Also see Perforce Visual Merge which free and also can diff images, which is pretty amazing.
WinDbg - Low-level and classic but also new and fresh! WinDbg (Wind-bag?) is now in the Windows Store with ALL NEW VISUALS and more!
Insomnia and Nightingale are great alternatives to Postman for doing REST APIs!
NuGet Package Explorer - This app allows browsing NuGet packages from an online feed and viewing contents of the packages
WireShark - What's happening on the wire! WireShark knows!
GitHub Desktop - Gits, ahem, out of the way! Watch my Git 101 on YouTube!
Useful Windows Utilities that should be built in
"I love my job, but it’s more than that: I need it" - Beyoncé
Ear Trumpet - Fantastic advanced volume control for Windows! If you have ever wished that volume on Windows could turn their UI up to 11, Ear Trumpet is that app.
Teracopy - While I use the excellent built in copy features of Windows 10 the most, when I want to move a LOT of files as FAST as possible, nothing beats TeraCopy, an app that does just that - move stuff fast. The queue control is excellent.
AutoHotKey - This little gem is bananas. It's a tiny, amazingly fast free open-source utility for Windows. It lets you automate everything from keystrokes to mice. Programming for non-programmers. It's a complete automation system for Windows without the frustration of VBScript. This is the Windows equivalent of AppleScript for Windows. (That's a very good thing.
7-Zip - It's over and 7zip won. Time to get on board. The 7z format is fast becoming the compression format that choosey hardcore users choose. You'll typically get between 2% and 10% better compression than ZIP. This app integrates into Windows Explorer nicely and opens basically EVERYTHING you could ever want to open from TARs to ISOs, from RARs to CABs.
Paint.NET - The Paint Program that Microsoft forgot, written in .NET. It's 80% of Photoshop and it's free. Pay to support the author by getting the Windows Store version AND it will auto-update! It's only $7, which is an unreal value.
NimbleText - Regular Expressions are hard and I'm not very smart. NimbleText lets me do crazy stuff with large amounts of text without it hurting so much.
Markdown Monster - While I love VSCode, Markdown Monster does one thing incredibly well. Markdown.
Fiddler - The easy, clean, and powerful debugging proxy for checking out HTTP between here and there. It even supports sniffing SSL traffic.
NirSoft Utilities Collection - Nearly everything NirSoft does is worth looking at. My favorites are MyUninstaller, a replacement for Remove Programs, and WhoIsThisDomain.
Ditto Clipboard Manager - WindowsKey+V is amazing and close but Ditto keeps pushing clipboard management forward on Windows.
TaskbarX - It literally centers your Taskbar buttons. I love it. Open Source but also $1 in the Windows Store.
If you really want to mess with your Taskbar, try Taskbar Tweaker.
ShellEx View - Your Explorer's right click menu is cluttered, this can help you unclutter it!
OneCommander and Midnight Commander and Altap Salamander - As a long time Norton Commander user (google that!) there's a lot of great "reimaginings" of the Windows File Explorer. OneCommander and Altap Salamander does that, and Midnight Commander does it for the command line/CLI.
WinDirStat - A classic but still essential. What's taking up all that space? Spoiler - It's Call of Duty.
Also try SpaceSniffer!
FileSeek and Everything - Search it all, instantly!
I like Win+Share+S for Screenshots but also check out ShareX, Greenshot, and Lightshot
For animated Gifs, try screen2gif or LICEcap!
Alt-Tab Terminator - Takes your Alt-Tab to the next level with massive previews and search
PureText - PureText pastes plain text, purely, plainly. Free and glorious. Thanks Steve Miller
I still FTP and SCP and SFTP and I use WinSCP to do it! It's free or just $10 to get it from the Windows Store and support the author!
VLC Player - The best and still the best. Plays everything, everywhere.
PSReadline - Makes PowerShell more Bashy in the best way.
Yori and all Malcolm Smith's Utilities - Yori is a reimagning of cmd.exe!
Visual Studio Code Extensions
"I use the negativity to fuel the transformation into a better me." – Beyoncé
There's a million great Visual Studio Extensions. The ones I like won't be the that ones you like. But, go explore.
GitLens - Glorious. Just makes Git and VS a joy and adds a thousand tiny lovely features that will make you smile. You'll wonder why this isn't built in.
Version Lens - Do you have the latest package versions? Now you know
CodeSnap - Screenshots specifically tailored to make your code look nice.
.NET Core Test Explorer - Makes unit testing with .NET on VS Code so much nicer
Arduino for VS Code - The Arduino extension makes it easy to develop, build, deploy and debug your Arduino sketches in Visual Studio Code! So nice.
Coverage Gutters - This amazing extension highlights what code is covered with Unit Test and what's not. Ryan is looking for help, so go see if this is a great OSS project YOU can get started with!
Docker for VS Code - Container explorer and manager and deployer, directly from VS
GitHistory - Another nice add-on for Git that shows your Git Log
HexDump - I need this more than I would like to admit
LiveShare - Stop screen-sharing and start code and context sharing!
PowerShell for VS - A great replacement for the PowerShell ISE
Remote Containers - This is an AMAZING EXTENSION you have to try if you have Docker but it has a horrible non-descriptive name. But must be seen to be believed. Perhaps it's "Visual Studio Development Containers," I'm not sure. Open a folder and attach to a development container. No installs, just you debugging Rust, Go, C#, whatever whilst installing NOTHING. Amazing.
Remote SSH - Another in the VS Remote Family of Extensions, this one lets you use any remote SSH Server as your development environment.
Remote WSL - Edit and debug and build code from Windows...using Linux!
And finally, Yoncé, my current VS Code theme. Beyoncé inspired.
Things I enjoy
“We all have our purpose, we all have our strengths.” – Beyoncé
RescueTime - Are you productive? Are you spending time on what you need to be spending time on? RescueTime keeps track of what you are doing and tells you just that with fantastic reports. Very good stuff if you're trying to GTD and TCB. ;
Carnac - This wonderful little open source utility shows the hotkey's you're pressing as you press them, showing up as little overlays in the corner. I use it during coding presentations.
DOSBox - When you're off floating in 64-bit super-Windows-10-Pro land, sometimes you forget that there ARE some old programs you can't run anymore now that DOS isn't really there. Enter DOSBox, an x86 DOS Emulator! Whew, now I can play Bard's Tale from 1988 on Windows 10 in 2021! Check out Gog.com for lots of DOSBox powered classics
Oh yes, and finally Windows Sandbox - You already have this and didn't even know it! You can fire up in SECONDS a copy of your Windows 10 machine in a safe sandbox and when you close it, it's gone. Poof. Great for testing weird tools and utilities that some rando on a blog asks you to download.
Sponsor: IDC Innovators Report: Multicloud Networking--Read the latest from IDC and discover one of the premier platforms addressing the rise of multicloud architectures and cloud-native apps. Download now.
© 2020 Scott Hanselman. All rights reserved.


Scott Hanselman's 2021 Ultimate Developer and Power Users Tool List for Windows published first on https://deskbysnafu.tumblr.com/
0 notes
Text
Scott Hanselman's 2021 Ultimate Developer and Power Users Tool List for Windows
Can you believe it's been 6 years since my last Tools list? Tools have changed, a lot are online, but honestly, it's just a LOT OF WORK to do the tools list. But here's one for 2020-2021. These are the tools in my Utils folder. I made a d:\dropbox\utils folder and I added it to my PATH. That way it's on all my computers and in my path on all my computers and I can get to any of them instantly.
This is the Updated for 2020-21 Version of my 2003, 2005, 2006, 2007, 2009, 2011, and 2014 List, and currently subsumes all my other lists. I’ve been doing this for over 17 years. Wow. I need to do better, I guess.
Everyone collects utilities, and most folks have a list of a few that they feel are indispensable. Here's mine. Each has a distinct purpose, and I probably touch each at least a few times a week. For me, "util" means utilitarian and it means don't clutter my tray. If it saves me time, and seamlessly integrates with my life, it's the bomb. Many/most are free some aren't. Those that aren't free are very likely worth your 30-day trial, and very likely worth your money.
These are all well loved and oft-used utilities. I wouldn't recommend them if I didn't use them constantly. Things on this list are here because I dig them. No one paid money to be on this list and no money is accepted to be on this list.
Personal Plug: If this list is the first time you and I have met, you should subscribe to my blog, and check out my podcasts, and sign up for my newsletter of Wonderful Things.
Please Link to http://hanselman.com/tools when referencing the latest Hanselman Ultimate Tools List. Feel free to get involved here in the comments, post corrections, or suggestions for future submissions. I very likely made mistakes, and probably forgot a few utilities that I use often.
THE LIFE AND WORK-CHANGING UTILITIES
"If everything was perfect, you would never learn and you would never grow." - Beyoncé
Windows Subsystem for Linux - It really can't be overstated how WSL/WSL2 has put the cherry on top of Windows 10. It runs on any build 20262 or higher as it was recently backported and it's integration with Windows is fantastic. It's also WAY faster than running a VM. Go learn more on my YouTube
Windows Terminal - Finally Windows has a modern terminal. You can run shells like Command Prompt, PowerShell, and Windows Subsystem for Linux (WSL). Its main features include multiple tabs, panes, Unicode and UTF-8 character support, a GPU accelerated text rendering engine, and the ability to create your own themes and customize text, colors, backgrounds, and shortcuts. It also includes a pseudo-console so 3rd party Terminals like hyper, conemu, terminus and more work better!
Windows PowerToys - They are back and they should be built into Windows. Install them here and get a color picker, fancy zones, file explorer addons, image resizers, keyboard manager and remapper, an Apple Spotlight-like running in the form of PowerToyrs Run, the Shortcut Guide and more!
Also check out Ueli as a great launcher/spotlight for Windows!
VS Code - Visual Studio Code is hella fast and is my goto text and code editor. I still use notepad sometimes and I'm in full Visual Studio a lot, but VS Code is like the Tesla of code editors. Check out my Favorite VS Code Extensions below.
PowerShell/OhMyPosh/PoshGit/Cascadia Code - I've had a blast this year taking my console prompt to the next level. Try these out but also look at Starship. Whatever you do, play! Don't accept the defaults!
ZoomIt - A true classic but also the answer to the #1 question I'm asked. How do you draw on the screen when you're sharing your screen? ZoomIt has been THAT TOOL in my toolbox. Really take some time and learn how to do boxes, arrows, colors and more and you'll be a more effective screen-sharer. In fact, just go get the whole SysInternals suite and put it all in your PATH.
Winget - It's apt-get for Windows. Similar to choco which I've used in the past, WinGet is going to be included in Windows 10 and has a ton of nice features. I use it to setup a machine in an hour from the command line, versus a day before doing it manually. Just add your MSA (Microsoft login) to the Package Manager Insiders Program and get it from the Store. It's bundled with the Windows App Installer. Then just "winget search <tool>" and winget install whatever!
QuickLook - Free in the Windows Store, just highlight a file in Explorer and press Space to get a preview!
Amazing .NET and Developer utilities
"Power means happiness; power means hard work and sacrifice." - Beyoncé
CodeTrack - CodeTrack is a free .NET Performance Profiler and Execution Analyzer. It works on basically every version of .NET and will give you massive insight into how your code is running! The flamegraph view is fantastic. It's free but you should donate as it's a one-person amazing app!
LINQPad - Interactively query your databases with LINQ with this tool from Joseph Albahari. A fantastic learning tool for those who are just getting into LINQ or for those who want a code snippet IDE to execute any C# or VB expression. Free and wonderful.
WinMerge - WinMerge just gets better and better. It's free, it's open source and it'll compare files and folders and help you merge your conflicted source code files like a champ. Also see Perforce Visual Merge which free and also can diff images, which is pretty amazing.
WinDbg - Low-level and classic but also new and fresh! WinDbg (Wind-bag?) is now in the Windows Store with ALL NEW VISUALS and more!
Insomnia and Nightingale are great alternatives to Postman for doing REST APIs!
NuGet Package Explorer - This app allows browsing NuGet packages from an online feed and viewing contents of the packages
WireShark - What's happening on the wire! WireShark knows!
GitHub Desktop - Gits, ahem, out of the way! Watch my Git 101 on YouTube!
Useful Windows Utilities that should be built in
"I love my job, but it’s more than that: I need it" - Beyoncé
Ear Trumpet - Fantastic advanced volume control for Windows! If you have ever wished that volume on Windows could turn their UI up to 11, Ear Trumpet is that app.
Teracopy - While I use the excellent built in copy features of Windows 10 the most, when I want to move a LOT of files as FAST as possible, nothing beats TeraCopy, an app that does just that - move stuff fast. The queue control is excellent.
AutoHotKey - This little gem is bananas. It's a tiny, amazingly fast free open-source utility for Windows. It lets you automate everything from keystrokes to mice. Programming for non-programmers. It's a complete automation system for Windows without the frustration of VBScript. This is the Windows equivalent of AppleScript for Windows. (That's a very good thing.
7-Zip - It's over and 7zip won. Time to get on board. The 7z format is fast becoming the compression format that choosey hardcore users choose. You'll typically get between 2% and 10% better compression than ZIP. This app integrates into Windows Explorer nicely and opens basically EVERYTHING you could ever want to open from TARs to ISOs, from RARs to CABs.
Paint.NET - The Paint Program that Microsoft forgot, written in .NET. It's 80% of Photoshop and it's free. Pay to support the author by getting the Windows Store version AND it will auto-update! It's only $7, which is an unreal value.
NimbleText - Regular Expressions are hard and I'm not very smart. NimbleText lets me do crazy stuff with large amounts of text without it hurting so much.
Markdown Monster - While I love VSCode, Markdown Monster does one thing incredibly well. Markdown.
Fiddler - The easy, clean, and powerful debugging proxy for checking out HTTP between here and there. It even supports sniffing SSL traffic.
NirSoft Utilities Collection - Nearly everything NirSoft does is worth looking at. My favorites are MyUninstaller, a replacement for Remove Programs, and WhoIsThisDomain.
Ditto Clipboard Manager - WindowsKey+V is amazing and close but Ditto keeps pushing clipboard management forward on Windows.
TaskbarX - It literally centers your Taskbar buttons. I love it. Open Source but also $1 in the Windows Store.
If you really want to mess with your Taskbar, try Taskbar Tweaker.
ShellEx View - Your Explorer's right click menu is cluttered, this can help you unclutter it!
OneCommander and Midnight Commander and Altap Salamander - As a long time Norton Commander user (google that!) there's a lot of great "reimaginings" of the Windows File Explorer. OneCommander and Altap Salamander does that, and Midnight Commander does it for the command line/CLI.
WinDirStat - A classic but still essential. What's taking up all that space? Spoiler - It's Call of Duty.
Also try SpaceSniffer!
FileSeek and Everything - Search it all, instantly!
I like Win+Share+S for Screenshots but also check out ShareX, Greenshot, and Lightshot
For animated Gifs, try screen2gif or LICEcap!
Alt-Tab Terminator - Takes your Alt-Tab to the next level with massive previews and search
PureText - PureText pastes plain text, purely, plainly. Free and glorious. Thanks Steve Miller
I still FTP and SCP and SFTP and I use WinSCP to do it! It's free or just $10 to get it from the Windows Store and support the author!
VLC Player - The best and still the best. Plays everything, everywhere.
PSReadline - Makes PowerShell more Bashy in the best way.
Yori and all Malcolm Smith's Utilities - Yori is a reimagning of cmd.exe!
Visual Studio Code Extensions
"I use the negativity to fuel the transformation into a better me." – Beyoncé
There's a million great Visual Studio Extensions. The ones I like won't be the that ones you like. But, go explore.
GitLens - Glorious. Just makes Git and VS a joy and adds a thousand tiny lovely features that will make you smile. You'll wonder why this isn't built in.
Version Lens - Do you have the latest package versions? Now you know
CodeSnap - Screenshots specifically tailored to make your code look nice.
.NET Core Test Explorer - Makes unit testing with .NET on VS Code so much nicer
Arduino for VS Code - The Arduino extension makes it easy to develop, build, deploy and debug your Arduino sketches in Visual Studio Code! So nice.
Coverage Gutters - This amazing extension highlights what code is covered with Unit Test and what's not. Ryan is looking for help, so go see if this is a great OSS project YOU can get started with!
Docker for VS Code - Container explorer and manager and deployer, directly from VS
GitHistory - Another nice add-on for Git that shows your Git Log
HexDump - I need this more than I would like to admit
LiveShare - Stop screen-sharing and start code and context sharing!
PowerShell for VS - A great replacement for the PowerShell ISE
Remote Containers - This is an AMAZING EXTENSION you have to try if you have Docker but it has a horrible non-descriptive name. But must be seen to be believed. Perhaps it's "Visual Studio Development Containers," I'm not sure. Open a folder and attach to a development container. No installs, just you debugging Rust, Go, C#, whatever whilst installing NOTHING. Amazing.
Remote SSH - Another in the VS Remote Family of Extensions, this one lets you use any remote SSH Server as your development environment.
Remote WSL - Edit and debug and build code from Windows...using Linux!
And finally, Yoncé, my current VS Code theme. Beyoncé inspired.
Things I enjoy
“We all have our purpose, we all have our strengths.” – Beyoncé
RescueTime - Are you productive? Are you spending time on what you need to be spending time on? RescueTime keeps track of what you are doing and tells you just that with fantastic reports. Very good stuff if you're trying to GTD and TCB. ;
Carnac - This wonderful little open source utility shows the hotkey's you're pressing as you press them, showing up as little overlays in the corner. I use it during coding presentations.
DOSBox - When you're off floating in 64-bit super-Windows-10-Pro land, sometimes you forget that there ARE some old programs you can't run anymore now that DOS isn't really there. Enter DOSBox, an x86 DOS Emulator! Whew, now I can play Bard's Tale from 1988 on Windows 10 in 2021! Check out Gog.com for lots of DOSBox powered classics
Oh yes, and finally Windows Sandbox - You already have this and didn't even know it! You can fire up in SECONDS a copy of your Windows 10 machine in a safe sandbox and when you close it, it's gone. Poof. Great for testing weird tools and utilities that some rando on a blog asks you to download.
Sponsor: IDC Innovators Report: Multicloud Networking--Read the latest from IDC and discover one of the premier platforms addressing the rise of multicloud architectures and cloud-native apps. Download now.
© 2020 Scott Hanselman. All rights reserved.


Scott Hanselman's 2021 Ultimate Developer and Power Users Tool List for Windows published first on http://7elementswd.tumblr.com/
0 notes
Text
Lightning Sunset (Desktop 12)
Edit: much thanks to Lifehacker. 🙂 Featured Desktop: Lightning at Sunset How To: Roll Your Own Lightning at Sunset Desktop
This is a minor update to my previous desktop. As before, every bit of software in the shot is freeware, sans only the copy of Photoshop used to put it together.
Mouseover the icons on the left for a description of the new additions, D-Color and Xentient Thumbnails. The rest, as listed before:
Theme: – SlanXP 2.0. Requires patched uxtheme.dll – patcher here. – Wallpaper: "lightning in sunset" by ddoi.
Startups: – Autohotkey. See the note in the upper-right corner. – Launchy. My beloved. – Yod’m 3D 1.4. Last free version before it became Deskspaces. Probably the closest thing to Compiz Fusion you can get for Windows. – Taskbar Shuffle. I swear, it’s worth it just for middle-clicking to close windows. – Start Killer.
Programs usually running: – Samurize. I made the config myself, which you’re welcome to download here in a few different resolutions. – Google Desktop. Solely for the gadgets.
I’ve added a few other details as notes. And I’d be happy to answer any questions. I love talking about this stuff.
– – – – – – –
UPDATE: Much thanks to Lifehacker for the featured article. 🙂 As requested by some of the commenters over there, here follows a brief tutorial on getting this setup for your PC.
Theme. Download the above Uxtheme.dll Patcher. You’ll have to restart your computer; do so. Then, download "SlanXP2.msstyles", and run it; Windows will know what to do. Customize it however you want (I use the third color scheme). Hit Apply. You may want to keep the ".msstyles" file in a safe place; I placed a copy with my other themes in "C:WindowsResourcesThemes".
I’m sure most of you know how to move the taskbar to the top of the screen.
Launchy. I love Launchy so very much. Download, install and run it. The default hotkey to access it is Alt+Space, but I use Win+Z. Right-click to access options. From here, there are so many ways to go that I’m just going to refer you to Lifehacker’s numerous articles on customizing Launchy. But the gist is this: use the hotkey to bring it up. Start typing what you’re looking for, until Launchy finds it, then hit Enter to run it. The more you use it, the more Launchy will learn what you use most often, and you’ll have to type less and less. By default, it will index your Start Menu, Control Panel, and bookmarks, so feel free to get rid of those application icons on your desktop. Just go for it. Go!
Yod’m3D. This is actually a portable application, meaning you don’t have to install it. Extract the folder from the ZIP you downloaded to somewhere safe, like "C:Program Files". Manually add a shortcut to "Yodm3d.exe" in your Start Menu. Run it, and right-click the tray icon to open options.
I kept most of the defaults. I enabled "Auto turn cube when window move out of screen." I also disabled the tray icon (you can access options without it just by launching the shortcut again). In the Mouse tab, I enabled the bottom two corners for activation, with a delay of 250ms. In Zoom, I have the following numbers down the side: 0.00, 1.00, 1.00, 0.00, 0.12, 0.10.
To use it, just move your mouse to either bottom corner of the screen, which should suddenly become a translucent cube. To rotate it, click and drag, or just use the arrow keys. To select the face you’re centered on, middle-click or press Enter. Using the numbers I gave you, it won’t zoom at all by default, but if you want to zoom out a bit and visualize the whole cube, press the Up arrow. Yod’m can remember a different wallpaper for each desktop, but you have to set it through the Display dialogue.
D-Color. This one’s pretty self-explanatory. Download, install, run. Right-click the tray icon to select the icon style you want (tiles, in my case). Click "Configure" to customize the text color; I just have white text and a transparent background. (No shadows, annoyingly, which means this works best with a darkish background.)
Taskbar Shuffle. Another easy one. Download, install, run. As noted above, I don’t even really care about moving the window tabs around; I keep this around because it lets me middle-click to close windows. You will be amazed at how much you miss it on other computers. I disabled the tray icon with this one; as with Yod’m, you can just run the program shortcut again to bring it back.
StartKiller. Even easier. Download, install, run. Start button is gone. Done. (You can still access the start menu using the windows key button, or Ctrl-Esc.)
Google Desktop. Download, install, run. If I recall, it will open a browser window for you to start setting options. With Launchy, I have no need for GD’s primary function, desktop search, so I went through and disabled every option I could find related to indexing. When you’re done with this, right-click the tray icon and select "Sidebar." Said object should promptly appear on the side of your desktop, if it hadn’t already. On the top, click the middle of the three corner buttons, with the triangle. Select "Auto-hide," then "Add gadgets" to browse Google’s immense library of widgets. Once they’re added to your sidebar, you can click and drag to pull them onto the desktop in whatever arrangement you like. Now, you can just tap the "Shift" key twice to hide or reveal them, ala Dashboard.
Samurize. Samurize is the one program here with a bit of a learning curve, particularly because my config doesn’t fit all resolutions by default. Samurize’s website has a good comprehensive tutorial. For more information, see Lifehacker’s How To article on this desktop.
Basic instructions for this config are included in the download. I provided for a few different resolutions, mainly on request; I’m working on a way to make it auto-conform to any resolution, so keep an eye on this post.
Autohotkey. Download, install. You can run the program if you want to look at a sample script, but all you really have to do is create a new ".ahk" file somewhere safe (mine’s in My Documents). You can create a start menu shortcut to the "whatever.ahk" file itself; it will launch Autohotkey with that file, or "script," and to edit it, you can right-click the tray icon. When you’re done editing, save the file, right-click the tray icon again, and click "Reload script."
As for what you actually put into your script, you have free reign. Autohotkey’s website has a tutorial to get you familiar with the format. I’ll give you a few examples that I use regularly – in fact, you can copy and paste these if you want.
#f:: Run firefox.exe ; Win+F launches Firefox.
#+n:: Run notepad++ ; Win+Shift+N launches Notepad++.
^!d:: Run C:…Todo.txt ; Opens my to-do list; Samurize reads from the same file.
#1:: WinSet, Transparent, 255, A #2:: WinSet, Transparent, 217, A ; Win + 1-2 sets transparency of active window to 0%/15%. (255 is opaque.)] #3:: WinSet, Transparent, 255, ahk_class Shell_TrayWnd #4:: WinSet, Transparent, 217, ahk_class Shell_TrayWnd ; Win + 3-4 sets taskbar transparency.]
!F2:: WinMinimize, A ; Alt+F2 minimizes active window.
!F3:: WinGet MX, MinMax, A If MX WinRestore A Else WinMaximize A return ; Alt+F3 maximizes/restores active window.
For more information, see Lifehacker’s How To article on this desktop.
Posted by Kaelri on 2008-08-20 03:36:11
Tagged: , lifehacker , desktop , customization , deskspace , yod’m , transparency , slanxp , samurize , launchy , google , autohotkey , d-color , xentient
The post Lightning Sunset (Desktop 12) appeared first on Good Info.
0 notes
Text
Polymorphic Monero-Mining RETADUP Worm keeps threat detection on its toes
http://cryptobully.com/polymorphic-monero-mining-retadup-worm-keeps-threat-detection-on-its-toes/
Polymorphic Monero-Mining RETADUP Worm keeps threat detection on its toes
Polymorphic Monero-Mining RETADUP Worm gets an AutoHotKey Variant
A cryptocurrency mining worm written in the same open-source scripting language used for creating Windows hotkeys and using polymorphism is giving conventional threat detection techniques a run for their money.
Trend Micro researchers identified the malware via the endpoint of public sector organization as an AutoHotKey variant of the Monero-Mining RETADUP worm.
“AutoHotKey is relatively similar to the script automation utility AutoIt, from which RETADUP’s earlier variants were based on and used for both cybercrime and cyberespionage,” researchers said in the April 23 blog post.
Despite the malware operator’s history of deploying malware in targeted attacks, the observed sample only focused on cryptomining.
Reacher’s said the RETADUP’s AutoHotKey version and AutoIt variant both have similar endgames of mining Monero and both use the same techniques to propagate, evade detection, and install the malicious Monero miner.
The shift in programming languages was attributed to AutoHotKey being a novelty as a scripting language meaning that several security tools aren’t actively detecting and analyzing malware written in the language.
Researchers also noted the malware polymorphic behavior makes it more difficult to detect by IT teams without the time or resources to actively seek out similar or unique threats and thwart them down the line.
The stealth techniques used by the malware underscores the importance of having insight into an organization’s online perimeter from endpoints and networks to servers. The malware also highlights the need for organizations to have 24/7 monitoring and in-depth research and correlation on similar incidents to enable threat analysts to provide further insight on a case-to-case basis.
This will help catch attacks like RETADUP and help determine is threats are one-off, part of a coordinated, targeted attack, or part of an opportunistic cybercriminal campaign.
Monero
0 notes