#use curl in magento 2
Explore tagged Tumblr posts
Visit Tumblr Blog
Explore Tumblr blogs with no restrictions, modern design and the best experience.
Last Seen Tumblr Blogs


Fun Fact
The Tumblr app for Google Glass was released on May 16, 2013.
Text
How to make curl request in Magento 2?

Making curl HTTP requests is typical for API integrations, data retrieval, and external service communication tasks. cURL, which stands for Client URL, is a versatile command-line tool for making HTTP requests. This guide will delve into cURL and provide a step-by-step walkthrough on creating cURL requests in Magento 2.
What is curl?
cURL is a multifaceted command-line tool and library designed to help streamline data transfer across URLs. Developers can utilize this resource for web-based projects as it handles many protocols, including HTTP, HTTPS, FTP, FTPS, and LDAP. Its intuitive interface makes it effortless to interact with web services, making it an indispensable tool for any developer.
Why use curl in magento 2?
API Integration:
Magento 2 provides a robust API framework for third-party services or external systems integration. cURL is frequently employed to interact with these APIs, allowing developers to send requests, retrieve data, and synchronize information between Magento and other platforms.
Data Retrieval:
Developers often use cURL to retrieve data from external sources, such as fetching product information, inventory details, or customer data from remote systems. This is particularly useful for maintaining consistent and up-to-date information across different platforms.
Web Service Communication:
Magento 2 may need to communicate with various web services, and cURL is a versatile tool for handling HTTP requests. This can include interacting with payment gateways, shipping carriers, or other external services that play a role in the eCommerce ecosystem.
Custom Module Development:
When developing custom modules or extensions in Magento 2, developers may use cURL to communicate with external APIs or services. This allows for creating feature-rich and integrated solutions that go beyond the core functionalities of Magento.
Automated Tasks:
cURL commands can be integrated into scripts and automated tasks to perform specific actions, such as data synchronization, batch processing, or any other study involving web services.
Testing and Debugging:
CURL is valuable for debugging and troubleshooting during the development and testing phases. Developers can simulate requests to APIs or services to observe responses, diagnose issues, and ensure the proper functioning of their integrations.
Headless Commerce:
In scenarios where Magento is part of a headless commerce architecture, cURL can communicate between the front end (possibly built using a different technology or framework) and the Magento 2 backend. The system enables smooth communication and coordination among other components, facilitating seamless interactions.
CRON Jobs:
Magento 2 relies on CRON jobs for scheduling and executing tasks at predefined intervals. cURL can be used within these CRON jobs to trigger specific actions, perform periodic updates, or complete tasks that require communication with external services.
How to Create a cURL Request in Magento 2?
This guide will provide clear and concise examples for performing HTTP requests. Learn how to easily retrieve data using a GET request and submit information with custom headers using the POST method, using the versatile cURL tool.
Follow the Step-by-Step Guide and Create a cURL: cURL Request
Curl is a powerful tool used for various purposes in Magento 2. For example, you can import and export data, retrieve product information, create orders, and more. With its versatility and ease of use, curl is an excellent tool for developers to interact with Magento 2’s API and streamline their development process.
Magento 2 development cURL shows up as smooth connectivity and dynamic data integration. From simple GET requests to handling complex transactions, cURL’s versatility shines through. With its capacity to support various protocols and APIs, Magento 2 development cURL provides developers with a powerful tool for secure data exchange. Its flexibility allows for the reliable handling of data transfers, making it essential to creating robust and dynamic e-commerce solutions.
The Elightwalk team is an expert in Magento 2 development and can provide customized solutions tailored to your firm’s needs. Hire the best team for your e-commerce project and make it a success.
1 note
·
View note
Text
Step-by-Step Guide: Installing Magento on VPS with Ubuntu Server
Are you looking to set up your own Magento store on a Virtual Private Server (VPS) running Ubuntu Server? You've come to the right place! In this comprehensive guide, we'll walk you through the process of installing Magento on your VPS, ensuring a smooth setup from start to finish. Whether you're a seasoned developer or just starting out, follow these steps to get your Magento store up and running in no time.

1. Setting Up Your VPS
Before diving into Magento installation, you'll need to have a VPS ready to go. If you haven't already, consider purchasing a Windows RDP (Remote Desktop Protocol) or Linux-based VPS. You can easily buy RDP services from various providers online. Once you have access to your VPS, ensure you have installed Ubuntu Server as your operating system. Installing Ubuntu on RDP is a straightforward process and can be done using remote desktop software.
2. Installing Required Dependencies
Once you have Ubuntu Server up and running on your VPS, it's time to install the necessary dependencies for Magento. Open a terminal window and execute the following commands:
bashCopy code
sudo apt update sudo apt install apache2 mysql-server php libapache2-mod-php php-mysql php-xml php-intl php-gd php-zip php-curl php-mbstring php-xmlrpc unzip
These commands will update your package list and install Apache web server, MySQL database server, and PHP along with its required modules.
3. Configuring Apache and MySQL
After installing the required packages, you'll need to configure Apache and MySQL to work seamlessly with Magento. Start by configuring Apache:
bashCopy code
sudo a2enmod rewrite sudo systemctl restart apache2
Next, secure your MySQL installation by running the following command and following the on-screen prompts:
bashCopy code
sudo mysql_secure_installation
4. Downloading and Installing Magento
With the server properly configured, it's time to download and install Magento. Navigate to the Magento official website and download the latest version of Magento Open Source. Once downloaded, use the following commands to extract Magento files and move them to the Apache web directory:
bashCopy code
sudo mkdir /var/www/html/magento sudo unzip /path/to/downloaded/magento.zip -d /var/www/html/magento sudo chown -R www-data:www-data /var/www/html/magento sudo chmod -R 755 /var/www/html/magento
5. Completing Magento Installation
After moving Magento files to the web directory, you can complete the installation process by accessing your server's domain or IP address in a web browser. Follow the on-screen instructions to configure your Magento store, including database connection details and admin account setup.
Once the installation is complete, don't forget to set appropriate file permissions and clear the Magento cache:
bashCopy code
sudo chmod -R 755 /var/www/html/magento sudo chown -R www-data:www-data /var/www/html/magento sudo systemctl restart apache2
Congratulations! You've successfully installed Magento on your VPS running Ubuntu Server.
Conclusion
Setting up Magento on a VPS with Ubuntu Server is a relatively straightforward process, especially when following a step-by-step guide. By ensuring you have the necessary dependencies installed, configuring Apache and MySQL correctly, and following the Magento installation instructions carefully, you can have your online store up and running in no time.
Whether you're a small business owner or a developer looking to create e-commerce solutions for clients, Magento on Ubuntu offers a powerful platform to build and scale your online store. Take advantage of the flexibility and customization options Magento provides, and watch your business thrive in the world of e-commerce.
0 notes
Link
how to enable php extension in xampp PHP have several extension according to developement. in php extension are configuration’s setting PHP extensions are compiled libraries (collection of code, functions) which enable specific functions to be used in your PHP code. that PHP extensions is as simple short code. everyone extensions have big programming according requirement but we use only short code. Given below some php extensions extension=bz2 extension=curl extension=fileinfo extension=gd2 extension=gettext ;extension=gmp ;extension=intl ;extension=imap ;extension=interbase ;extension=ldap extension=mbstring Now enable php extensions first go php Configuration setting or you can call php.ini given below image Go xampp> php > php.ini > open php-configuration-setting Click on php.ini then open in notepad and other according you and search extension which want to enable How to enable PHP Extension intl Now remove semicolon from extension which you want to enable Befor ;extension=intl After extension=intl Then save and now need to restart your server like xampp , wamp and other and run your code like magento 2.x.x If you want enable other php extinsion you follow same process given above I hope you understand. and Thanks so much
1 note
·
View note
Text
Magento 2 in Ubuntu
Joomla, Drupal, Wordpress, Magneto CE, and other PHP based Information System Installation in the Ubuntu.
--------------------------------------------------------------------
Install and Configure apache2
--------------------------------------------------------------------
# apt update
# apt install apache2
# systemctl stop apache2.service
# systemctl start apache2.service
# systemctl enable apache2.service
--------------------------------------------------------------------
Install and Configure the database (MySql or MariaDB)
--------------------------------------------------------------------
# apt-get install mariadb-server mariadb-client -y
# systemctl start mariadb.service
# systemctl enable mariadb.service
# systemctl stop mariadb.service
-----------------------------------------------------------
Create Database in the MySql or MariaDB server.
-----------------------------------------------------------
# mysql -u root -p
mysql> CREATE DATABASE (DATABASE NAME);
mysql> CREATE USER 'USERNAME'@' web_server_IP' IDENTIFIED BY 'PASSWORD';
mysql> GRANT ALL ON DATABASE NAME.* TO ' USERNAME '@'localhost' IDENTIFIED BY 'PASSWORD' WITH GRANT OPTION;
mysql> GRANT ALL PRIVILEGES ON wordpress.* TO 'WEB_SERVER_USER'@'WEB_SERVER_IP';
mysql> FLUSH PRIVILEGES;
mysql> SET GLOBAL innodb_file_format = barracuda;
mysql> SET GLOBAL innodb_file_per_table = 1;
mysql> SET GLOBAL innodb_large_prefix = 'on';
mysql> EXIT;
--------------------------------------------------------------------
To change the MySql or MariaDB password use this line.
--------------------------------------------------------------------
# mysql_secure_installation
--------------------------------------------------------------------
Install the PHP and its extension
--------------------------------------------------------------------
# apt-get install software-properties-common -y
# add-apt-repository ppa:ondrej/php -y
# apt update -y
# apt install php -y
# apt install libapache2-mod-php -y
# apt install php-common -y
# apt install php-gmp -y
# apt install php-curl -y
# apt install php-soap -y
# apt install php-bcmath -y
# apt install php-intl -y
# apt install php-mbstring -y
# apt install php-xmlrpc -y
Note: In Ubuntu 18.04, We have to use
# apt install php7.1-mcrypt -y
Note: In Ubuntu 16.04, We have to use
# apt install php-mcrypt -y
# apt install php-mysql -y
# apt install php-gd -y
# apt install php-xml -y
# apt install php-cli -y
# apt install php-zip -y
# apt install zip -y
# apt install upzip -y
# apt install curl -y
# apt install git -y
--------------------------------------------------------------------
Edit the php.ini file in the etc directory
--------------------------------------------------------------------
# nano /etc/php/7.1/apache2/php.ini
Note: Update these lines in the file.
file_uploads = On
allow_url_fopen = On
short_open_tag = On
memory_limit = 2G
upload_max_filesize = 100M
max_execution_time = 360
date.timezone = America/Chicago
Note: Unchecked all the extension lines in the file
--------------------------------------------------------------------
Create php information file in the root directory
--------------------------------------------------------------------
# systemctl restart apache2.service
# nano /var/www/html/phpinfo.php
// php information file creator
<?php
// Show all information, defaults to INFO_ALL
phpinfo();
?>
--------------------------------------------------------------------
Edit the apache configuration file in the etc directory.
--------------------------------------------------------------------
# nano /etc/apache2/sites-available/000-default.conf
<VirtualHost *:80>
ServerAdmin [email protected]
DocumentRoot /var/www/html/FOLDER NAME/
ServerName example.com
ServerAlias www.example.com
<Directory /var/www/html/FOLDER NAME/>
Options Indexes FollowSymLinks MultiViews
AllowOverride All
Order allow,deny
allow from all
</Directory>
ErrorLog ${APACHE_LOG_DIR}/error.log
CustomLog ${APACHE_LOG_DIR}/access.log combined
</VirtualHost>
--------------------------------------------------------------------
Download the CMS and install in the Root Directory
--------------------------------------------------------------------
// Here, we are going to install Magento 2
// Here, we are going to download Magento 2 from github download
# cd /var/www/html/
# cd /var/www/html
# curl -sS https://getcomposer.org/installer | sudo php -- --install-dir=/usr/local/bin --filename=composer
# cd /var/www/html
# composer create-project --repository=https://repo.magento.com/ magento/project-community-edition (FOLDER NAME)
--------------------------------------------------------------------
For downloading the Magento 2, we will have to generate a set of public and private key in the Magento stie.
--------------------------------------------------------------------
Public Key 060f1460c97de693f3de3a8525db0ae8
Private Key b5c35b486038e871d5baca9fb326988e
# chmod 777 -R /var/www/html/
# chown -R www-data:www-data /var/www/html/FOLDER NAME /
# chmod -R 777 /var/www/html/FOLDER NAME/
# a2ensite magento2.conf
# a2enmod rewrite
# systemctl restart apache2.service
# chmod 777 -R /var/www/html/ // Most Important command in the installation
--------------------------------------------------------------------
After installation command
--------------------------------------------------------------------
# cd /var/www/html/magento2
# bin/magento maintenance:enable
# php bin/magento indexer:reindex
# php bin/magento cron:install
# php bin/magento maintenance:disable
# php bin/magento setup:store-config:set --base-url="http://www.cellon.com/ma/"
--------------------------------------------------------------------
Magento Update command
--------------------------------------------------------------------
# composer require magento/product-community-edition 2.3.0 --no-update
# composer update
# php bin/magento setup:upgrade
# php bin/magento setup:di:compile
1 note
·
View note
Text
The Full List of System Requirements to Install Magento 2

If you're looking to install Magento 2, one of the most important things you need to consider is whether your system meets the requirements. Magento 2 is a robust e-commerce platform that requires a specific set of software and hardware specifications to function correctly.
You must meet Magento 2 system requirements to avoid issues such as slow performance, errors, or even failure to install. In this article, we'll review the full list system requirements to install Magento 2, including the recommended hardware, software, and other prerequisites to ensure a smooth installation and optimal online store performance.
Magento 2 system requirements
Magento 2, a modern e-commerce platform, provides various web services that enable developers to access and interact with Magento's core functionalities remotely. To utilize these web services, there are several requirements that you must meet. Here are some of the key web service requirements for Magento 2: A web server: To host your Magento 2 website, you need a web server, such as Apache or Nginx, that can run PHP and support HTTPS.
Magento 2 installation: Before using Magento 2 web services, you must have Magento 2 installed and running on your web server.
Magento 2 API: Magento 2 provides a REST API and a SOAP API that you can use to access its functionalities remotely. To use these APIs, you need to enable them in the Magento 2 backend and configure access permissions.
Authentication: Magento 2 web services require authentication to ensure that only authorized users can access them. You can use OAuth or token-based authentication to secure your web services.
XML or JSON format: Magento 2 web services use either XML or JSON format to transfer data between the client and the server. You must ensure that your client supports the design you want to use.
HTTP or HTTPS: Magento 2 web services support HTTP and protocols. However, using HTTPS to ensure secure data transmission is highly recommended.
PHP extensions: Magento 2 web services require specific PHP extensions to function correctly. These extensions include SOAP, OpenSSL, and Curl.
By meeting these web service requirements, you can leverage the power of Magento 2 and develop custom applications that can access and interact with its functionalities remotely. This can enhance the user experience of your e-commerce website and increase its overall efficiency.
Magento 2 service requirements
Magento 2 is a powerful e-commerce platform that requires specific system requirements to function correctly. These requirements can vary based on the size of your store and the number of visitors you expect to receive. Here are some of the essential Magento 2 service requirements:
Web server: Magento 2 requires a web server that supports PHP 7.4 or later, including Apache, Nginx, and Microsoft IIS.
Database: Magento 2 requires a relational database management system (RDBMS) such as MySQL, MariaDB, or Percona.
PHP extensions: Magento 2 requires specific PHP extensions to function correctly, such as PHP extensions for BCmath, Ctype, cURL, DOM, GD, hash, iconv, intl, Mbstring, OpenSSL, PDO_mysql, SimpleXML, SOAP, XSL, and Zip.
ElasticSearch: Magento 2 uses ElasticSearch to provide advanced search functionality. ElasticSearch can be installed on the same server as Magento or on a separate server.
Redis or Varnish: Magento 2 uses Redis or Varnish to improve performance and reduce server load. Redis is used for session storage and caching, while Varnish is used for full-page caching.
RAM and CPU: The amount of RAM and CPU required by Magento 2 can vary depending on the size of your store and the number of visitors you expect to receive. Magento 2 recommends a minimum of 2GB of RAM and a 2GHz or faster CPU.
SSL certificate: Magento 2 requires an SSL certificate to ensure secure data transmission between the web server and the client.
Meeting these Magento 2 service requirements ensures your e-commerce store runs smoothly and provides a great user experience. Failure to fulfill these specifications may end in slow performance, errors, or even failure to install Magento 2.
Magento 2 system feature detail
Magento 2 is a robust e-commerce platform that offers a wide range of features designed to help businesses sell their products online. Here are some of the key Magento 2 system features in detail:
Store management: Magento 2 provides a powerful store management system that allows you to manage multiple stores, websites, and store views from a single dashboard. You can easily create new stores and configure their settings, including languages, currencies, and tax rules.
Catalog management: With Magento 2, you can easily manage your product catalog. You can add and edit products, create categories, and set pricing and inventory levels. You can also set up attributes and attribute sets to manage your product data more efficiently.
Order management: Magento 2 allows you to manage your orders from a single dashboard. You can view, edit, process orders, manage invoices, and issue refunds. You can also create custom order statuses and workflows to match your business needs.
Marketing and promotions: Magento 2 provides a wide range of marketing and promotional tools to help you attract and retain customers. You can create discounts, coupons, and special offers, set up email campaigns, and manage customer loyalty programs.
Payment and shipping: Magento 2 supports various payment and shipping options, including PayPal, credit cards, and direct bank transfers. You can set up shipping rules based on weight, destination, and shipping carrier and provide customers with real-time shipping rates.
SEO and analytics: Magento 2 has built-in SEO features to help you optimize your store for search engines. You can set up meta tags, create search-friendly URLs, and generate site maps. You can also integrate with Google Analytics to track your store's performance and customer behavior.
Mobile-responsive design: Magento 2 offers a mobile-responsive design that allows your store to look and function seamlessly across all devices, including desktops, tablets, and smartphones.
Security and performance: Magento 2 provides robust security features to help protect your store and customer data. It also offers performance optimization tools to help improve page load times, including full-page caching and image compression.
Overall, Magento 2 is a comprehensive e-commerce platform that provides businesses with robust features to sell their products online. With its flexible and customizable design, Magento 2 can be tailored to meet the specific needs of your business.
Magento 2 enterprise requirement
Magento 2 Enterprise, or Magento Commerce, is a premium version of the Magento 2 e-commerce platform that offers advanced features and support for larger and more complex businesses. Here are some of the essential Magento 2 Enterprise requirements:
Dedicated server: Magento 2 Enterprise requires a dedicated server with a minimum of 2 cores and 8GB of RAM. A dedicated server ensures your website can handle high traffic volumes and provides optimal performance.
ElasticSearch: Magento 2 Enterprise requires ElasticSearch to provide advanced search functionality, including synonyms, stop words, and spelling correction.
Advanced reporting: Magento 2 Enterprise provides advanced reporting and analytics tools, including sales and marketing reports, customer segmentation, and Google Analytics integration.
Staging and preview environments: Magento 2 Enterprise allows you to set up staging and preview environments to test changes and updates before deploying them to your live site.
Content staging: Magento 2 Enterprise provides a content staging feature that allows you to create and preview multiple versions of your website content, including pages, blocks, and widgets.
Advanced customer segmentation: Magento 2 Enterprise provides advanced customer segmentation capabilities that allow you to target specific customer groups with personalized content, promotions, and discounts.
Performance optimization: Magento 2 Enterprise includes features such as full-page caching, image compression, and lazy loading to ensure fast page load times and a smooth user experience.
Support and maintenance: Magento 2 Enterprise comes with dedicated support and maintenance services, including security updates, bug fixes, and technical support.
Overall, Magento 2 Enterprise is designed for larger and more complex businesses that require advanced features and support to succeed in e-commerce. By meeting these Magento 2 Enterprise requirements, you can ensure that your online store runs smoothly and provides a great user experience for your customers.
In conclusion, installing Magento 2 requires meeting a set of system requirements to ensure optimal performance and functionality. These requirements include a web server, a database server, PHP, and various PHP extensions.
Magento 2 requires specific web service requirements such as SOAP and REST. Once these requirements are met, Magento 2 provides a powerful e-commerce platform that offers features such as store management, catalog management, order management, marketing and promotions, payment and shipping, SEO and analytics, mobile-responsive design, and security and performance optimization.
Magento 2 Enterprise offers advanced features and support for larger and more complex businesses, including a dedicated server, ElasticSearch, advanced reporting, staging and preview environments, advanced customer segmentation, and performance optimization. By meeting these Magento 2 system requirements, businesses can create a robust and reliable e-commerce store that can scale and adapt to meet their needs. We hope this blog on the full list of system requirements to install Magento 2 is useful to the readers.
1 note
·
View note
Link
Full Stack Development Internship in Multiple locations at Dovelp IT Services Private Limited - https://www.jovency.com/?p=19327&utm_source=SocialAutoPoster&utm_medium=Social&utm_campaign=Tumblr JOVENCY-job portal Job title: Full Stack Development Internship in Multiple locations at Dovelp IT Services Private Limited Company: Dovelp IT Services Private Limited Job description: About Dovelp IT Services Private Limited Dovelp IT Services Private Limited is a subsidiary of a UK-based IT company Dovelp Limited. Our services include custom software development, application development, website development, new product development, prototype design, assembly of high precision devices, and circuit design. About the internship Selected intern’s day-to-day responsibilities include: 1. Work on the development, customization, and integration on Magento 2 2. Develop and manage e-commerce websites and web apps using Magento enterprise 3. Develop Magento modules and customization, and work on extension 4. Work on server management, website deployment to VPS, cloud, and server optimization (VPS, cloud) as per Gtmatrix recommendation Skill(s) required PHP MySQL HTML CSS JavaScript C# Magento Bootstrap MongoDB Node.js LARAVEL Learn these skills on Internshala Trainings Who can apply Only those candidates can apply who: 1. are available for full time (in-office) internship 2. can start the internship between 9th Mar’21 and 13th Apr’21 3. are available for duration of 3 months 4. are from Ambala, Chandigarh, Kharar, Mohali, Kalka, Panchkula and neighboring cities 5. have relevant skills and interests Other requirements 1. Should have some experience in PHP5 and PHP7, HTML5 Magento 2, Varnish, Redis, Elasticsearch, RabbitMQ, WooCommerce, WordPress, MEAN Stack, MySQL, Smarty, jQuery, AJAX, LAMP Stack, AWS, REST APIs, CURL, SAAS, and Cron jobs 2. Should have a degree in computer science, computer engineering, or related technical discipline 3. Should have experience in development, customization, and integration on Magento 2 4. Must have the ability to develop Magento modules and customization, and extension 5. Should have strong skills in PHP, MYSQL, OOPS, RDBMS concept, and MVC architecture Perks Certificate Letter of recommendation Informal dress code 5 days a week Number of openings 2 Additional Questions × Close Save yourself from fraud! If an employer asks you to pay any security deposit, registration fee, laptop fee, etc., do not pay and immediately. Remember, Internshala doesn’t charge a fee from the students to apply to a job or an internship & we don’t allow other companies to do so either. Expected salary: Rs.8000 – 12000 per month Location: Haryana Job date: Fri, 12 Mar 2021 03:53:01 GMT Keywords: #Full #Stack #Development #Internship #Multiple #locations #Dovelp #Services #Private #Limited Apply for the job now!
0 notes
Link
Hello Magento Friends,
Magento has already created a curl class for future enhancement. To maintain Magento standards, developers must use default curl class when there is a requirement to call third-party API.
Checkout Steps: How to use Default Curl Class for API Call in Magento 2
0 notes
Text
Installation and Migration Process to Magento 2 Platform
In the previous article, we have covered the understanding of Magento migration process. We learned about the review of the Magento 1 and the importance of extension. Let us move forward with the installation process of Magento 2.
The next step is to install Magento 2. Here is the list of the system tools you will need for the successful migration process.
Operating System: Must be a Linux x86-64 distribution such as Ubuntu or Debian. Windows or Mac does not support Magento installation or migration.
Memory: Minimum 2 GB of RAM is necessary to have.
Composer: This PHP package manager is used to install Magento elements.
Web Servers: Apache 2.4 along with enabled Apache mod_rewrite and mod_version modules and Nginx 1.x
Database: You must have one of each MySQL 5.6, 5.7, NDB Cluster 7.4; MariaDB 10.0, 10.1, 10.2 and Percona 5.7
PHP Version: PHP7.2 or 7.3 will support.
PHP Extensions: ext-ctype, ext-curl, ext-dom, ext-gd, ext-iconv, ext-intl, ext-mbstring,ext-bcmath, ext-openssl, ext-hash, ext-pdo_mysql, ext-simplexml, ext-soap, ext-xsl, ext-zip, lib-libxml
SSL: It requires a valid security certificate. Magento migration will not work with the self-signed certificates
Other System Accessories: bash, gzip, lsof, nice, sed, tar
Do a Test Run
Yes, as being a Magento development company, we advise you to do the actual test run before you actually opt for the migration process. It will save the countless time of yours to go back and fix errors. It will give a dedicated Magento developer a broad idea about where he might occur error and how to solve or how to get the guidance on it without extending downtime. Do not forget to copy your Magento 1 store to the temporary server and move the copy to Magento 2 to test the process out. Also, take the back up of all the data you have got till this point. Now we will move forward to complete the Magento migration process.
Use the Data Migration Tool
The data migration tool will require access to the databases of Magento 1 and 2. So, you have to open up the necessary ports in your firewall. It will require you to stop all the activities of the Admin panel. Though, It will not disturb the order management activities like shipping, invoice generation. It will work as it was working. After that, the dedicated Magento developer will move forward to transfer your setting and data to the Magento 2 platform. The developer will install the extensions of Magento 1 you want to keep for Magento 2 priorly.
Manual Data Migration
Do not be dependent on the data migration tool for everything. It can do the rest expect the four types of data. That includes:
Media
Storefront design
Admin user accounts
Access control lists
Magento development companies India developer can copy the media files directly from Magento 1 to (root)/pub/media folder in Magento 2. There is no need to copy .htaccess files from the Magento 1 to Magento 2 as it will already be there. The coping over will overwrite the files.
The Magento migration process will end here.
Go Live!
Now your Magento store is all set with updated settings, data and media. You can make it open for your web store visitors. Follow the listed steps to make it available for your visitors.
Activate the maintenance mode of Magento 1 to kick off the downtime of the website.
Move to data migration tool window and press CTRL +C. It will stop the incremental updates.
Go to Magento 2 platform and start all your scheduled jobs, reindex the stock indexer and cache the pages.
For the final step, Point your DNS, load balancers, etc. to your new production hardware.
Now, end the downtime as Your Magento 2 store is all ready to manage the visitor and your daily actions. For more information on migrating to Magento 2, contact top Magento development company India today.
0 notes
Link
Thank you for visiting letohost.com. We mainly evaluate web hosting services based on different factors such as reliability, user resources, and customer service.
Bana Hosting Review 2019
We have signed up for as many web hosts we can let you know which company offer the most useful features for beginners.
Nevertheless, whether you’re a Pro-blogger or a sprouting beginner.
In this article, we’re reviewing BanaHosting for thousands and millions of customers worldwide. BanaHosting founded in the year 2007 offering shared hosting services as well as domain registration and reseller solutions.
The company mainly rely on their data centers located in the US and Europe.

BanaHosting comes into light as when they have started with most competitive pricing and more bandwidth for less money. Besides this BanaHosting superior network guarantee makes the user more inclined toward trying their services.
Pros Cons 99% uptime guarantee Destructive maintenance 30-days no question asked money-back guarantee Live chat not available 24×7 support team Service was not good as in the beginning Easy website builder No such available
As you already know, not every hosting can offer you the peace of mind. Most web hosting provider claims to provide 99.9% uptime guarantee. But when it comes to execution they fail to implement them.
BanaHosting comes out to be one of the best and has invested in state of the art data centers that perform with multiple redundant network connections.
With each hosting plans, customers get to see powerful security tools such as ModSecurity and Hotlink protection.
There are only a handful of web hosting providers who lets you choose the desired location of your servers. But with BanaHosting you get absolute freedom to pick the closest location and servers of your choice.
BanaHosting emerges as a top contender among many popular web host by offering Dedicated IPs. Unlimited SSD server space, Free SSL and Free domain under the hosting account.
If you wish to build a brand new site then BanaHosting should be the top priority on your list. It integrates Softcalous in its cPanel which is convenient for the users to install WordPress, forums, e-stores, wikis, CRMs and photo galleries effortlessly without even creating the databases manually.
Why BanaHosting?
I know you are skeptical about why choose BanaHosting over popular reputed hosts.
Here I am going to offer you the benefits of choosing BanaHosting over its contenders. And I am sure you will be pleased with these things.
Promising service – The first & foremost is customer satisfaction which is why BanaHosting remained a top choice for decades.
The ticketing system is fair enough to say that their services are absolutely up to the mark. They promise to settle with the pertaining issues user faces.
The answers generally took not more than 10 minutes this is clear that they really have some truly amazing customer support employees.
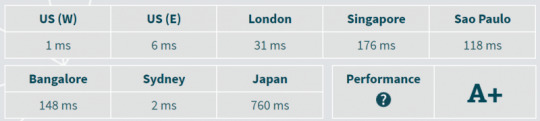
Fastest network (In our carried tests) – the fact that BanaHosting keeps the updates rolling in. it is evident that the fast network speed is provided by BanaHosting can significantly help you achieve more.
Becoming a part of their family – it is truly inevitable that customers who become an active user of BanaHosting enjoy a plethora of services & benefits and of course how can we forget the premium support from them.
With one service, you are guaranteed to be happy and scale your website into profitability.
If you have already a Webhosting somewhere BanaHosting migration facility is extremely simple and cost-effective. You need to articulate the concern to the team support. The whole process will be handled by the team efficiently.
That’s quite unique and fulfilling. Isn’t it!!
Services and Features of BanaHosting
BanaHosting hosting solutions mainly deal with shared web hosting, reseller hosting, VPS, dedicated and cloud servers as well as in domain registration services.
The reseller hosting plan is provided with adequate support, features, and tools to start a business in a few minutes. The plans start with the unlimited domains, sub-domains, MySQL databases CPanel and FTP accounts, free site builder, private name servers, domain reseller account and even more.
BanaHosting remains in the top in the support department. Having good customer support services essentially the major factors in deciding a web host. The quality of their services is absolutely phenomenal.
Apart from their customer support, they are also keen to provide customers with an advanced range of features that many hopes for. Thus making them one of the favourable in hosting service provider.
BanaHosting promises to answer every query regarding plans or something in the field of web hosting or server hosting. They have a good start with a dedicated server as well.
More Features On-board
The company is known for providing rock solid web hosting services by the inclusion of SSD hosting, unlimited bandwidth and many more. Here are some additional features you should be looking at:
Unlimited Disk Space
Unlimited Bandwidth
cPanel control panel
Over 100 Pre-installed scripts
Free RVSiteBuilder Pro
Free Domain / File / Database / Script Transfers
PHP, Perl, MySQL, FTP, CGI-Bin
Backups
Website Statistics: Webalizer, AWStats, Raw Log Manager, Error and Referrer Logs
Web-Based File Manager
Password Protected Directories
Redirect URL
IP Deny Manager
Hotlink Protection
Fantastico Deluxe Auto Installer
Instant Shopping Carts, Portals, Blogs, Forums, Formmail, Counters,
Unlimited MySQL Databases w/phpMyAdmin Access
CGI, PHP 5, Fast CGI, Ruby on Rails, Python, Perl, SSI
Curl, ImageMagick, GD Library, CPAN
FrontPage Extensions
Cron Job Scheduling
Unlimited POP3 Email with SMTP
IMAP Support via mobile phone
WebMail Access -Horde, RoundCube, SquirrelMail
SpamAssassin
Unlimited Auto-responders, Mailing Lists, Email Aliases, Mail Forwards
WordPress / Joomla / Drupal / Magento / Wiki Hosting
Uptime Guarantee 99.9%
While BanaHosting shared hosting plans offer the following benefits to the users such as:
cPanel and Softacalous
Free website builder
Unlimited bandwidth
24×7 security monitoring
PHP, MySQL, Perl
FTP accounts
DDoS protection
Advantages of Choosing BanaHosting host
We admire the fact that BanaHosting is offering superior hosting mainly in the uptime department. With consistent evaluations, they manage to strive for the best web hosting company among young masses. BanaHosting offers premium WordPress hosting with proper guidance to start the creation of a blog or website in less than 15 minutes.
It boasts several other features such as the gallery, Joomla and Drupal that offer top-notch quality to the users. Also in software departments, BanaHosting admires flexibility over high cost.
People who are thinking of recommending web hosting (BanaHosting) to others can use their exclusive affiliate program to make money online.
BanaHosting ensures that the customer shouldn’t bother about support when it comes to technical issues. Customers receive constant updates for with troubleshooting guides, videos, and state of the art ticketing system.
Reliability of the host: BanaHosting
BanaHosting makes the use of SingleHop as an exclusive network provider and datacentre for achiever higher efficiency in uptime departments with max top speed cisco cores built in for redundancy checks for performance and reliability.
A few datacentres equipped with diesel and centralized UPS that help the host to remain a top leader in server uptimes.
They include the following things while they operate from the servers.
Redhat Enterprise Linux
Redundant Gigabit backbone
Private and public ports
Intel server-grade hardware
Network intrusion detection system
SA-SCSI/SATA II hard drive
Raid controllers
Firewalls
64-bit processors and more
Pricing and Support
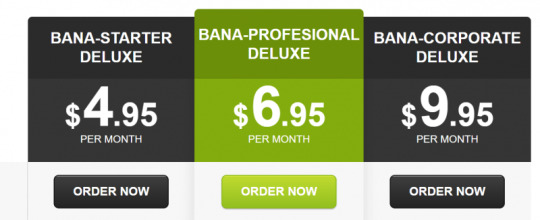
BanaHosting offers 4 distinct shared hosting plans. Among them, bana-starter and bana-Delux are most popular.
They vehemently offer support for hosting a single website and carries unlimited bandwidth, unlimited SSD disk space and free SSL for your domain.
Additionally, free migration and premium support are kept free of any charge.
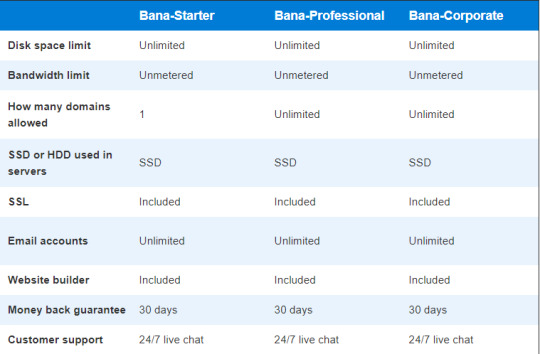
Bana-professional Delux hosting– includes everything from the basic hosting plan and on top of it has added advantages of hosting an unlimited website under one shared account.
You can also choose to host your website among Europe and the US. It supports WordPress and other customization that is essential to start a full-fledged online business.
Bana-corporate deluxe – the topmost plan provides you best in CPU power and memory space department.
The bana-corporate deluxe hosting plans are meant to offer top-notch to the consumer-grade I customers.
Also, this is best for those having multiple websites for different products.
You can even thrive for their 10% discount if you pay 12 months advance and 20% in the case of 2 years or more.
Cloud and VPS server by BanaHosting

BanaHosting VPS server – the first and foremost users on BanaHosting VPS server enjoys the following benefits such as:
They include the high-performance SSD drive for VPS hosting
Highly optimized servers for increment power, speed as well as performance.
Easily scalable
Inclusion of the SSD drives allows unmatched I/O, in their VPS hosting with a desired choice of the user specification, operating system as well as the control system.
Cloud Hosting – BanaHosting cloud hosting due to the fact that all things from VPS are here. But with the inclusion of the SSD cloud server make it, even more, performance-oriented and benefits users for just a fraction of the cost.
Our Final Verdict
BanaHosting has emerged in a mainstream contender for many popular web hosting providers. With best efforts and time it has become of the most competitive hosting companies of the world.
BanaHosting is known for domain managements and responsible for providing best web hosting solutions at an affordable price.
BanaHosting has a team of professional’s team support that helps new customers with pre-purchase questions and provide resolution or offer help through their online portal.
They also issue cashback/discounts through COUPON redemption as a part of goodwill gesture to those who want to try their hosting services for the first time.
You will find many COUPON codes up to (50%) discount when you choose to purchase a year or more hosting plan.
BanaHosting is defiantly fast and reliable hosting provider with up running for 1 year or so in our conducted tests. We did not have any downtime as always their support is commendable and far ahead from its contenders.
Overall BanaHosting deals with web hosting, domain management services, and reseller plans. It is most competitive and has professional staffs to manage servers and also equipped with staff who are responsible for resolving queries of the pre-sales.
We have reached the end of the review, let me just summarize things at one glance
In many ways, BanaHosting is fairly doing their business well. The hosting packages are great value for money.
BanaHosting also keeps a separate knowledge base and video tutorials which are easy to understand.
The post Bana Hosting Review 2019 appeared first on Letohost.
https://ift.tt/2ODgvEX
0 notes
Text
An Introduction To The Magento 2 API

According to Magento store developer in India Application program interface is an exceptional interface which comprises of conventions, routines,and devices intended to rearrange the procedure of programming advancement. Since APIs' significant object is to indicate the manner in which how unique programming parts communicate inside a framework, they are regularly used to program graphical UI segments. Great APIs give all structure squares important to building up an application, so a developer just need to assemble them. In spite of the fact that Magento 2 APIs join a similar rule, there are huge amounts of subtleties identified with the web based business stage.
Magento 2 API Framework
The best Magento website developer in India will begin their voyage into the universe of the Magento 2 API with center highlights of the Magento web API structure, since it furnishes engineers with the way to utilize web administrations associated with the Magento 2 framework. On the off chance that you are attempting to ace the Magento 2 API you should realize that:
· the framework underpins both REST and SOAP APIs;
· you'll need to manage three kinds of validation: OAuth 1.0a for outsider applications, tokens for portable applications, and login certifications for administrators and clients;
· records and incorporations are appointed to assets if there is access to them; the API structure checks whether a call is approved to play out the solicitation;
· you just need a couple of lines of xml to arrange any Magento or outsider administration as a web API; all XML components and properties ought to be characterized in a webapi.xml document, generally an administration won't be uncovered;
· the Magento 2 API structure depends on two models – CRUD and pursuit, however does not bolster web snares;
· it offers the web API reactions field sifting for rationing versatile data transfer capacity;
· Since Magento 2 APIs use reconciliation style, a solitary web API call can run various administrations all the while.
Magento 2 API Opportunities
The Magento 2 APIs give the capacity to play out a wide cluster of errands. For instance you can make a versatile application for your clients of representatives. There is additionally a chance to coordinate your online business store with CRM or ERP frameworks with the assistance of Magento 2 APIs just as interface a Magento 2 site with a CMS. Furthermore, you can create JavaScript gadgets for the two retail facades and administrator boards.
Beginning With Magento 2 API
As per Magento website designer in India Above all else, it is important to enroll another web administration on your Magento administrator. If there should arise an occurrence of token-based validation, make another web administration client under System/All Users/Add New User. For session-based and OAuth validation, there is no compelling reason to do this.
At that point, make another combination under System/Integration/Add New Integration. If you don't mind note that it is critical to set up assets the mix can get to.
The last advance requires utilizing a REST or SOAP customer for further setup.
The Magento 2 REST API
In view of the HTTP convention, Magento 2 REST API cooperations consolidate capacities went for make demands and get reactions. The guest issues a HTTP demand with the accompanying components:
· a HTTP header (for verification and different directions);
· an action word (GET, PUT, POST, or DELETE);
· an endpoint (URI that decides three significant parts: the server, the web administration, and the acted asset);
· a call payload (all information traits and parameters provided with the solicitation).
If you don't mind note that Magento 2 returns both a reaction payload and a HTTP status code. For additional data about Magento 2 REST API, check the accompanying authority guides:
· Confirmation
· Build a solicitation
· Use cURL to run the solicitation
· Survey the reaction
#Magento_store_developer_in_Bangalore#ecommerce_website_designer_bangalore#Magento_website_designer_in_Bangalore#ecommerce_website_developer_india#magento#designer#developer#api#rest#soap
0 notes
Text
CyberPanel là gì? Hướng dẫn cách cài đặt và quản trị CyberPanel
Vì chưa có nhiều kinh nghiệm sử dụng command line nên bạn muốn sử dụng CyberPanel cho đơn giản. Vậy CyberPanel là gì? Cách cài đặt và quản trị CyberPanel thế nào? Cùng Kdata tìm hiểu chi tiết nhé!
CyberPanel là gì?
CyberPanel là một hosting control thế hệ mới, tích hợp OpenLiteSpeed một web server mã nguồn mở của LiteSpeed Web Server EnterPrise. CyberPanel được thiết kế để cung cấp cho người dùng một web hosting control panel cực tốt về tốc độ, bảo mật và độ tin cậy cao (Speed, Security, Reliability).
Những tính năng của CyberPanel
Hỗ trợ tiếng Việt (được quản lý bởi cyberpanel.vn).
Giao diện web hiện đại, trực quan và dễ sử dụng.
Tùy chọn OpenLiteSpeed hoặc LiteSpeed Enterprise.
Hỗ trợ LSCache.
MariaDB (tùy chọn các phiên bản 10.0, 10.1, 10.2, 10.3, 10.4).
Tự động gia hạn miễn phí SSL – Let’s Encrypt.
Tích hợp sẵn Lightweight DNS Server, Email Server (Rainloop Webmail), giao diện Command Line, FirewallD,
SpamAssassin, ModSecurity,…
Cài đặt WordPress, Drupal, Magento,… chỉ trong một click chuột.
Hỗ trợ Git (Github, Gitlab).
Các phiên bản (CyberPanel Versions)
Hiện tại thì CyberPanel có 2 phiên bản: CyberPanel và CyberPanel Enterprise.
Điểm khác biệt duy nhất giữa 2 phiên bản này là đối với bản CyberPanel miễn phí thì chỉ hỗ trợ OpenLiteSpeed phiên bản opensource miễn phí. Còn CyberPanel Enterprise thì được hỗ trợ LiteSpeed web server enterprise, Nhưng có một điểm chung là chúng có thể cài được trên VPS và Server vật lý
Hiện tại, CyberPanel Ent có gói miễn phí nhưng bạn chỉ dùng được cho 1 domain thôi. Theo mình thấy thì nếu bạn nào chỉ có domain mà cần một vps, server tối ưu để chạy thì có thể dùng bản này.
Hướng dẫn cài đặt và quản trị CyberPanel
Để cài đặt, chúng ta sử dụng command sau. Đây là lệnh cài đặt phiên bản miễn phí, nó sẽ không yêu cầu nhập bất cứ license gì khi cài đặt cả.
sh <(curl https://cyberpanel.net/install.sh || wget -O - https://cyberpanel.net/install.sh)
Sau khi chạy command trên server, chúng ta tiếp tục thực hiện các bước sau:
Chọn 1 – “1. Install Cyber Panel” để cài đặt.
You are runing on root...Checking OS...Detecting CentOS 7.X...Pre-flight check completed...Process check completed... CyberPanel Installer v2.0 1. Install CyberPanel. 2. Install Addons. 3. Exit.Please enter the number[1-3]:
Phiên bản LiteSpeed để cài đặt, ở đây mình giải thích thêm là trong 2 phiên bản: OpenLiteSpeed thì miễn phí, còn LiteSpeed Enterprise thì chỉ miễn phí cho 01 domain (trường hợp muốn sử dụng hơn 1 domain thì phải mua bản quyền).
Ở đây mình sẽ chọn OpenLiteSpeed, nên bấm số 1 đê cài đặt – “1. Install CyberPanel with OpenLiteSpeed.”
CyberPanel Installer v2.0 RAM check : 97/990MB (9.80%) Disk check : 1/24GB (7%) (Minimal 10GB free space) 1. Install CyberPanel with OpenLiteSpeed. 2. Install Cyberpanel with LiteSpeed Enterprise. 3. Exit.Please enter the number[1-3]: 1
Chọn loại password mặc định cho admin, có 3 tùy chọn:
[d]fault : mật khẩu là 1234567
[r]andom: mật khẩu ngẫu nhiên
[s]et password: mật khẩu của bạn
Ở đây mình chọn d , và sẽ set lại mật khẩu sau khi cài đặt.
Please choose to use default admin password 1234567, randomly generate one (recommended) or specify the admin password?Choose [d]fault, [r]andom or [s]et password: [d/r/s] d
Một số cài đặt bổ sung khác như:
Replace JS/CSS files to JS Delivr?This may improve panel loading speed in Asia Pacific region...Please select [y/N]: NInstall Memcached extension for PHP?Please select [y/N]: yInstall LiteSpeed Memcached?Please select [y/N]: yInstall Redis extension for PHP?Please select [y/N]: yInstall Redis?Please select [y/N]: y
Cài đặt sẽ được diễn ra và kết quả sau khi cài đặt là các thông tin bên dưới.
https://ip-server:8090
Panel Username: admin
Panel Password: 1234567
MySQL Username
MySQL Password
Visit: https://ip-server:8090Panel username: adminPanel password: 1234567 Please change your default admin passwordIf you need to reset your panel password, please run:adminPass YOUR_NEW_PASSWORD If you change mysql password, please modify file in/etc/cyberpanel/mysqlPassword with new password as well Website : https://www.cyberpanel.netForums : https://forums.cyberpanel.netWikipage: https://docs.cyberpanel.net Enjoy your accelerated Internet byCyberPanel & OpenLiteSpeedCác bước cần thực hiện sau khi cài đặt
Thay đổi mật khẩu của Panel Admin
Nếu chọn mật khẩu mặc định khi cài đặt thì có thể thay đổi mật khẩu của admin bằng command sau:
adminPass
Thay đổi mật khẩu của MySQL User
Sửa file tại đường dẫn /etc/cyberpanel/mysqlPassword, thay thế bằng mật khẩu của bạn.
Truy cập tới CyberPanel
Truy cập tới đường dẫn https://ip-server:8090 với user là admin và mật khẩu bạn đã thay đổi
Cuối cùng sau khi đăng nhập thành công:
Thay đổi cấu hình CyberPanel
Thay đổi địa chỉ IP mặc định
Sửa file: /etc/cyberpanel/machineIP
Thay đổi giới hạn Upload cho PhpMyAdmin
Giá trị mặc định để upload CSDL trong PhpMyAdmin của CyberPanel chỉ là 2M (mặc định của php). Để tăng giá trị này lên, bạn vào mục Server => PHP => Basic => Chọn PHP Version 7.0
Setting các tham số như ảnh bên dưới.
upload_max_filesize
post_max_size
Rồi bấm Save Changes để lưu lại.
Truy cập vào server thông qua SSH.
Chạy lệnh để restart lại lscpd service.
sudo systemctl restart lscpd
Kết quả:
Chúc bạn thành công
0 notes
Link
how to enable php extension in xampp PHP have several extension according to developement. in php extension are configuration’s setting PHP extensions are compiled libraries (collection of code, functions) which enable specific functions to be used in your PHP code. that PHP extensions is as simple short code. everyone extensions have big programming according requirement but we use only short code. Given below some php extensions extension=bz2 extension=curl extension=fileinfo extension=gd2 extension=gettext ;extension=gmp ;extension=intl ;extension=imap ;extension=interbase ;extension=ldap extension=mbstring Now enable php extensions first go php Configuration setting or you can call php.ini given below image Go xampp> php > php.ini > open php-configuration-setting Click on php.ini then open in notepad and other according you and search extension which want to enable How to enable PHP Extension intl Now remove semicolon from extension which you want to enable Befor ;extension=intl After extension=intl Then save and now need to restart your server like xampp , wamp and other and run your code like magento 2.x.x If you want enable other php extinsion you follow same process given above I hope you understand. and Thanks so much
0 notes
Text
How to migrate from Magento 1 to Magento 2 Five Easy Steps?
Everyone in the e-commerce world is in a frenzy. Now, that the June 2020 deadline is near, businesses are scrambling to move from Magento 1 to the latest Magento 2 version. Even though more than 250,000 websites work on Magento, only a handful websites run on the current Magento 2 version. If you are planning to move to Magento 2, you have made the right decision. Planning a migration helps in avoiding downtime and data loss. Making strategic decisions and creating a solid Magento migration plan will keep your store up and running without any issues.
How do you move your Store from Magento 1 to Magento 2?
Here’s a step by step procedure for migrating your store to Magento 2:
1. Hardware and Software Compatibility
Once you are sure of how you want your new Magento 2 store to look and function, you must consider the software and hardware issues. Remember Magento 2 won’t function efficiently if you run it on outdated software.
1. Operating Systems – Linux x86-64 2. Web Servers – Apache 2.2 or 2.4 and nginx 1.x 3. Database - MySQL 5.6, 5.7 or MariaDB 10.0, 10.1, 10.2, Percona 5.7 and other binary-compatible MySQL technologies. 4. Supported PHP versions include 7.1.3+ or 7.2.0+ 5. Required PHP Extensions: bc-math, ctype, curl, dom, gd, hash, intl, iconv, mbstring, mcrypt, openssl, PDO/MySQL, SimpleXML, soap, spl, libxml, xsl, zip, json. 6. Verify PHP OPcache and PHP configuration settings including memory_limit. 7. Valid SSL certificate for HTTPS 8. System Tools – bash, gzip, lsof, mysql, mysqldump, nice, php, sed, tar 9. Mail Server - Mail Transfer Agent (MTA) or an SMTP server 10. If you are running Magento 2 extension on a system with less than 2GB of RAM, your upgrade might fail.
2. Install Magento 2 Software
The real process of migrating to Magento 2 starts here. You need to download the latest Magento 2 Open Source software from the official website. If you have the required hardware and software ready, the installation process will be quick & easy and the ���Success” message will appear on the screen. If there are any issues, make sure you install the missing software. Once the installation process is over, it’s time to start migrating your store to M2.
Before you begin the migration process, make sure to back up database and files to avoid data loss later. In order to avoid any errors, you can also opt for a staging environment to test-drive the entire process.
3. Install and Configure Data Migration Tool
The official Data Migration Tool makes data transfer from Magento 1 to Magento 2 easy. The tool is command-line interface (CLI) that allows you to migrate store settings, configurations, bulk databases and incremental data updates as required. Once you install and configure the tool, you should start migrating the settings from Magento 1 to Magento 2. It is recommended that you stop all Magento 1.x cron jobs for easy migration. You can also use the Data Migration tool for migrating products, wishlist products, customer orders, customers, categories, ratings, reviews and more.
Remember that you must avoid creating new products, attributes and categories in Magento 2 store before migrating data. The tool will overwrite new entities and thus, you will have to spend time in rework. It is essential that you run a test so that you do not miss out on any important element.
4. Migrate Themes, Extension and Customization
You need to check whether the Magento 1 theme is compatible with the latest Magento 2 standards. If it is not compatible, you will have to buy a new theme from the Magento market place or build a custom theme to fulfill M2 requirements. Using a theme compatible with Magento 2 is important because the old XML structure won’t work with the latest version.
You must also consider the third-party extensions. Make a list of extensions that are absolutely essential to you. Discuss your requirements with a Magento extension developer to customize your extensions or buy extensions that are compatible with Magento 2.
Do not worry about customization. With a Magento code migration tool, you can convert the custom Magento 1.x code to Magento 2 and save time as well as eliminate errors. You can use the tool to migrate specific files such as Layout XML files, Config XML files, PHP files, etc. However, you may have to undertake some editing manually.
5. Run Tests before you go Live
After migrating all store data, themes, extensions and customization, make sure that you run multiple tests to ascertain the proper functioning of the website. Check all the aspects of the website in detail. Migrating from Magento 1 to Magento 2 is not a simple task. Any mistake can lead to additional downtime and data loss.
If you have made any manual changes to the data, there are chances of errors in the incremental data migration. So, test your Magento 2 store for any problems or errors. Once you are sure that the new store is functioning properly, you can put your Magento 1 system in maintenance mode. Stop incremental updates and begin Magento 2 cron jobs. Replace DNS and load balancers to make your Magento 2 store go live.
All the best!
If you are new to Magento or simply want the migration process done faster, hire a Magento migration expert. A professional will ensure that you migrate from Magento-1 to Magento-2 in a safe, stress-free manner. It will mean zero data loss and minimal downtime.
0 notes
Text
PrestaShop error 500 – explained and how to troubleshoot
“500 Internal Server Error” or plain “Internal Server Error” is popular when installing and using any web platform. Not only PrestaShop but you might also encounter this error on WordPress, Shopify, Magento websites and so on. This disreputable HTTP Error 500 could turn an online store owner’s smile to a bewildered frown with one click. The fear of lost sales, it stonewalls your customers’ ability to browse your store and purchase products. For web developers, this error is a nightmare. Everyone has to scurry to get his or her stores back online.
As terrible as it sounds, it’s not too scary. On this post, I’ll explain the error and offer some troubleshooting ideas for your PrestaShop store. The next time you encounter this error, instead of hiding under your blanket, you’ll be prepared to act fast, handle the issue and keep on making deals. Even if you’re not using PrestaShop, these solutions can still worth to take a try.
How to perceive the HTTP Error 500
It’s necessary to not confound the HTTP Error 500 with the Error 404 Page Not Found. To deal with the error, firstly, we have to go over the various ways you may see this error message on your PC. There are different appearances of this message due to each host/server is permitted to adjust the way it’s shown. Here are some regular ways you may see this error.
“500 Internal Server Error”
“Internal Server Error”
“500 Error”
“HTTP 500 – Internal Server Error”
“HTTP 500 Internal Error”
“HTTP Error 500”
Most occasions you will see this message accompanied by different types of this classic familiar line “The server encountered an internal error or misconfiguration and was unable to complete your request”. And this error can appear on any web browser and any operating system. Here is a screen capture of one of the forms Error 500 may be displayed on your browser.
So, what is the HTTP Error 500?
Simply put, the Error 500 is the way your web server saying “Something turned out badly but I have no clue what it is!”
Well, it’s really unhelpful at all. But, the HTTP error logs can (and usually will) show you what has gone wrong.
How can I troubleshoot HTTP Error 500?
Each web server will have an error log.
For Apache servers, it is usually located at /var/log/apache/error.log. It will show you something like this:
[Thu Nov 22 12:59:12.862338 2018] [php7:error] [pid 3538] [client XX.XX.XX.XX:31504] PHP Fatal error: Out of memory (allocated 2097152) (tried to allocate 59462712 bytes) in /home/myuser/public_html/classes/Configuration.php on line 206
Again, not very helpful unless you recognize what these numbers mean. But don’t be worry, we still have another option.
Troubleshooting Error 500 for PrestaShop website
If your PrestaShop store is suffering from this error, you can get some detail information by turning on PrestaShop’s Error Reporting in the file “config/defines.inc.php”. There are 2 ways to turn on Error Reporting depending on what PrestaShop version you have.
For PrestaShop v1.4 through v1.5.2
Open config/config.inc.php
On or around line 29 you will find this line @ini_set(‘display_errors’, ‘off’);
Change that line to read @ini_set(‘display_errors’, ‘on’);
For Prestashop v1.5.3 and higher versions
Open config/defines.inc.php
On or around line 28 you will find this line define(‘_PS_MODE_DEV_’, false);
Change that line to read define(‘_PS_MODE_DEV_’, true);
Then back to the page that gave you the error once more, and you’ll see something like this:
[PrestaShopDatabaseException] Db->executeS() must be used only with select, show, explain or describe queries at line 471 in file classes/db/Db.php 465. 466. // This method must be used only with queries which display results 467. if (!preg_match(‘#^\s*\(?\s*(select|show|explain|describe|desc)\s#i’, $sql))
OK, more info but still scary for us.
Just show me how to fix this error
For most PrestaShop store owner, you’ll want to know the most common ways this problem is caused so that you can try out some solutions yourself.
Here we have the best 5 reasons why Error 500 occurs, and what you can do to address them.
1. File and folder permission is wrong
Some servers that have SuPHP or Fast-CGI turned on can be especially sensitive to file and folder permissions. The right permission for files is 644 and folders is 755. If you see from the server logs or PrestaShop error report that file permissions may be the problem, try resetting the permissions with these commands:
find /home/USERNAME/public_html -type d -exec chmod 755 {} \; find /home/USERNAME/public_html -type f -exec chmod 644 {} \;
Replace /home/USERNAME/public_html with the path to your web directory.
Note: Take a backup of your site before you execute any command
2. Incorrectly configured .htaccess file
Most of the times, you will receive an internal server error when the htaccess file is configured incorrectly. The main culprits of the htaccess errors are “URL Rewrite” settings or Friendly URL enabling. The htaccess syntax is very strict, if you add an incorrect command, or even an incorrect character, your server will return error 500.
Make a backup of your htaccess and regenerate the htaccess file either through the back office or by toggling the Enable Friendly URL option.
3. Server timeout
Every server has their own timeout setting, which sets the time that any given script can run. If the function or script crosses that limit, Error 500 will occur. The most common scripts in PrestaShop that may take too long to load are CSV Imports, backups, translation loading, import/exports and thumbnail regeneration.
Many server limits are set to 30 seconds, which is not long enough to run these scripts. You should contact your hosting provider and inquire about changing the limit, at least temporarily.
4. Low PHP memory limit
Many web hosts set the default memory allocation for PHP as 32 MB, 64 MB or 128 MB.
However, PrestaShop requires at least 128 MB to function and put in some more for modules if you need them. So, a suitable memory allocation is 256 MB. If you have a VPS, set it to 512 MB.
5. Missing PHP modules
A common issue seen with PrestaShop sites in VPSs is that they lack all the needed PHP modules.
To help PrestaShop function, we will need:
Mcrypt
OpenSSL
Zip
Curl
GD
PDO
To check if these modules are enabled for your website, copy the code below into “phpinfo.php” file and upload it to your site. Then open it in a browser, and check for these extensions.
<? phpinfo(); ?>
If any of those modules are missing, open your server’s php.ini file to see if it is enabled. If not, you’ll need to install them manually.
Note: Remember to delete the phpinfo.php file once you are done. Hackers could use that to target specific vulnerabilities.
The post PrestaShop error 500 – explained and how to troubleshoot appeared first on Presta Hero.
0 notes
Text
wordpress themes New Horned Dinosaur Species – Wendiceratops Pinhornensis
www.inhandnetworks.com
Life reconstruction of Wendiceratops pinhornensis. IMage Credit: Danielle Dufault
Researchers discover a new species of horned dinosaur, Wendiceratops pinhornensis.
Curator of Vertebrate Paleontology Dr. Michael Ryan co-led the discovery of a striking new specie Industrial 3g router s of horned dinosaur (ceratopsian) based on fossils collected from a bonebed in southern Alberta, Canada. Wendiceratops (WEN-dee-SARE-ah-TOPS) pinhornensis was approximately 6 meters (20 feet) long and weighed more than a ton. It lived about 79 million years ago, making it one of the oldest known members of the family of large-bodied horned dinosaurs that includes the famous Triceratops, the Ceratopsidae. Research describing the new species is published online in the open access journal, PLOS ONE.
Wendiceratops pinhornensis is described from more than 200 bones representing the remains of at least four individuals (three adults and one juvenile) collected from a bonebed in the Oldman Formation of southern Alberta, near the borde ct scanners remote monitoring r with Montana, USA. It was an herbivore, and would crop low-lying plants with a parrot-like beak, and slice them up with dozens of leaf-shaped teeth. Wendiceratops had a fantastically adorned skull, particularly for an early member of the horned dinosaur family. Its most distinctive feature is a series of forward-curling hook-like horns along the margin of the wide, shield-like frill that projects from the back of its skull. The new find ranks among other recent discoveries in having some of the most spectacular skull ornamentation in the horned dinosaur group.
The horn on the nose is the most interesting feature of Wendiceratops. Although the nasal bone is represented by fragmentary specimens and its complete shape is unknown, it is clear that it supported a prominent, upright nasal horncore. This represents the earliest documented occurrence of a tall nose horn in Ceratopsia. Not only does it tell scientists when the nose horn evolved, the research reveals that an enlarged conical nasal horn evolved at least twice in the horned dinosaur family, once in the short-frilled Centrosaurinae group that includes Wendiceratops, and again in the long-frilled Chasmosaurinae group which includes Triceratops. A nose horn has been generally thought to characterize Ceratopsidae, and be present in their common ancestor.
“Beyond its odd, hook-like frill, Wendiceratops has a unique horn ornamentation above its nose that shows the intermediate evolutionary development between low, rounded forms of the earliest horned dinosaurs and the large, tall horns of Styracosaurus, and its relatives,” said Ryan, co-author of the study. “The locked horns of two Wendiceratops could have been used in combat between males to gain access to territory or females.”
Dr. David Evans, Temerty chair and curator of vertebrate palaeontology at the Royal Ontario Museum in Toronto, Canada, and co-author of the study said, “Wendiceratops helps us understand the early evolution of skull ornamentation in an iconic group of dinosaurs characterized by their horned faces. The wide frill of Wendiceratops is ringed by numerous curled horns, the nose had a large, upright horn, and it’s likely there were horns over the eyes too. The number of gnarly frill projections and horns makes it one of the most striking horned dinosaurs ever found.”
The recognition of Wendiceratops affirms a high diversity of ceratopsids likely associated with a rapid evolutionary radiation in the group. It also helps document high faunal turnover rates of ceratopsid taxa early in their evolution, coupled with some degree of ecological niche partitioning during this time.
The name Wendiceratops (Wendi + ceratops) means “Wendy’s horned-face”, and celebrates renowned Alberta fossil hunter Wendy Sloboda, VPN gateway who discovered the site in 2010. This is a well-deserved honor for Sloboda, who has discovered hundreds of important fossils in the last three decades, including several new species. The name “pinhornensis” refers to Pinhorn Provincial Grazing Reserve, where the quarry was found.
Publication: David C. Evans and Michael J. Ryan, “Cranial Anatomy of Wendiceratops pinhornensis gen. et sp. nov., a Centrosaurine Ceratopsid (Dinosauria: Ornithischia) from the Oldman Formation (Campanian), Alberta, Canada, and the Evolution of Ceratopsid Nasal Ornamentation,” PLOS One, 2015; DOI: 10.1371/journal.pone.0130007
崀山, 崀山科技, 崀山科技全球服务中心, LangShan Technology Global Service Center, LangShan Technology, LangShan, china webdesign, seo, web design, 企业建站, SEO, joomla template, joomla webdesign, joomla web design, joomla seo, wordpress themes, wordpress webdesign, wordpress web design, wordpress seo, magento themes, magento webdesign, magento web design, magento seo, opencart themes, opencart webdesign, opencart web design, opencart seo, prestashop themes, prestashop webdesign, prestashop web design, prestashop seo, wordpress shop, wordpress plugins, wordpress plugins shop, lte, 4g, 4g-lte, 3g, umts, dsl, ethernet, cellular, gprs, wireless, wired, wi fi, vpn, m2m vpn, openvpn, ipsec-vpn, secure, reliable, dual sim, 2 sim, redundant, rugged, din rail, din rail mounting, ul certified, fcc certified, ptcrb certified, verizon wireless certified, att certified, ce certified-, emark certified, azure iot certified, cost effective, ipv6, python programming, reliability, security, high-speed, lte cat 1, router, gateway, routers, cellular gateway, modem, hardware, software, cloud platform, applications, ethernet switch, managed switch, vehicle router, car router, dtu, data terminal unit, computer, vending computer, vending pc, manufacturer, manufacturing, android computer, iot, industrial iot, industrial internet of things, m2m, industrial m2m, m2m communication, remote communication, wireless m2m, remote connectivity, remote access, m2m connectivity, iiot, industrial networking, industrial wireless, m2m iot, smart vending, touchscreen vending, cloud vms, telemeter, vending telemetry, cashless vending, light industrial, commercial, distribution automation, distribution power line monitoring, fault location, fault detection, da monitoring, smart grid, transformer monitoring, intelligent substation, goose messaging, remote machine monitoring, remote secure networks, remote secure networking, secure web based scada , remote diagnostics, remote maintenance, plc programming, intelligent traffic enforcement, ct scanners remote monitoring, mri remote monitoring, healthcare, wireless atm, branch networking, retail, digital signage, wastewater treatment, remote monitoring, industrial automation, automation, industrial transport, inhand, inhand network, inhand networks, Industrial IoT, IIoT, Industrial IoT Manufacturer, Industrial IoT Connectivity, Industrial IoT Products, Industrial IoT Solutions, Industrial IoT Products, industrial IoT Gateway, industrial IoT router, M2M IoT gateway, M2M IoT router, industrial router, Industrial IoT Router/Gateway, industrial IoT Gateway, industrial LTE router, Industrial VPN router, Dual SIM M2M router, Entry level Industrial Router, Cost effective, 3G 4G LTE, WiFi, VPN industrial router for commercial and industrial and M2M/IoT applications, Industrial 3G Router,
#distribution line sensor#compact industrial router#Overhead Line Monitoring#ATM Wireless Connectivity#Fault detection & location#vending PC#wireless atm
0 notes
Text
How to Recover Abandoned ECommerce Carts
If WordPress is the world’s favorite blogging platform, then WooCommerce is surely the most popular e-commerce solution available. WooCommerce is currently leading the WordPress e-commerce market and in popularity exceeds its nearest rivals—Shopify and Magento—roughly 4 times over.
In this post we’ll learn how to capture and recover abandoned shopping carts in WooCommerce and how to create a successful abandoned cart recovery email. But before we dive in, let’s quickly look at what cart abandonment is, and how we can reduce it in the first instance.
What is Shopping Cart Abandonment?
Shopping cart abandonment is an e-commerce term that is used to define the action when a visitor adds items to their shopping cart and then decides to leave the website without completing a purchase—they literally abandon their cart.
Unfortunately for shop owners, this is very common. It can’t be fully eliminated because there always will be those who take pleasure in window shopping. However, there are a few things that can be done to reduce abandonment:
Improve your business model by eliminating hidden charges at the end of your checkout process, and offer free shipping;
Remove unnecessary input fields and checkout steps—the longer the process, the greater the chances become that the customer will get distracted;
Do not force your visitors to register in order to buy, offer an option to create an account after the payment is complete instead;
Make your visitors feel safe when trusting you with their personal data, especially credit card details.
Capturing & Recovering Abandoned Shopping Carts
Although WooCommerce is a terrific e-commerce platform, it does not come with an integrated solution for capturing abandoned carts. Luckily, one of the best things about WordPress and WooCommerce is that there are plenty of free plugins just waiting to be picked up by us.
Capturing Abandoned Carts
To recover lost sales, we must first capture the abandoned carts:
Download and install a plugin such as the Save Abandoned Carts plugin from the WordPress repository. (I like this one because it requires no additional configuration, and even saves the checkout form fields if the page is accidentally refreshed.)
Activate the plugin.
You’re done.
That really is all there is to it, and from now on all your abandoned carts will be available in the dashboard under WooCommerce > Checkout Field Capture.
Now that we’ve captured our abandoned carts, how do we attempt to recover them?
Recovering Abandoned Carts
To recover an abandoned cart, we need to reach out to users and encourage them to return and complete the checkout process. The best channel to use is the one that is proven to be most effective: email.
There are several pros of using email to recover abandoned carts:
Lower costs—email is one of the cheapest ways to send a message;
Automation—email can be automated, and you can send personalized emails with little effort;
Design—email can be designed to convey emotions, and encourage sales;
Tracking—you can monitor and measure the success of your communications and tweak them to be more effective.
It’s worth remembering that there are also a couple of downsides:
Less persuasive—studies have shown that people over-estimate the effectiveness of email;
Spam—spam is a problem in email, and it’s easy for you message to be missed.
Writing Successful Abandoned Cart Recovery Emails
According to a study by Radicati, there are roughly 125 billion business emails sent and received each day. That is an enormous amount of information trying to influence us in different ways. What this means is that if we want to communicate successfully, we need to stand out; here are 7 tips to help you do just that:
1. First Impressions
We want our emails to be delivered and opened, this the the most essential aspect of our abandoned cart recovery workflow.
In many cases the subject and sender name are the only things visible to the recipient. A study by CMB shows that 64% of all users base their decision to open an email on the sender’s name, and 47% on the subject line.
A separate study by “Retention Science” found that 6–10 word long subject lines generate the highest email open rates. This is because short subjects are too brief to convey a message and long subjects get truncated.
Here are four real, excellent abandoned cart email subject lines that I’ve received:
“Hello, is it me you’re looking for?” (Lush Life)
“Complete Your Purchase” (Magic Madhouse)
“We’re holding this for you…” (Rip Curl)
“We saved your cart!” (Chewy.com)
Make your name and subject line clear. Stick to 6–10 words for the subject line.
Never use a “noreply@” email address for abandoned cart recovery; customers may have an issue that they need to talk to someone about in order to complete their purchase.
2. Timing
Timing is an essential element in your cart recovery process. Fortunately there are studies that have established the best time to send our cart recovery emails.
Send your email within an hour of the customer abandoning the cart, it is the most successful time for several reasons:
The email arrives before the customer has forgotten about the cart;
The customer hasn’t changed their “buying” mood;
The email arrives before the customer decides to purchase elsewhere.
3. Frequency & Content
We now know we need to send the first cart abandoned email within an hour, but did you know that if you send additional email reminders you greatly improve your chances of success? According to MailChimp you can earn 75% more revenue from abandoned carts by following up with a series of emails.
Here’s how to compose a series of emails:
Email 1—Sent within 1 hour. Be brief and informative. Showcase the product, and offer the customer a way of getting in touch if they had an issue with the site, the payment process, etc.
Email 2—Sent within 24 hours. Contain a product reminder. Include some related products in case the customer simply changed their mind, you might sell them a similar product instead.
Email 3—Sent within a few days. Try playing the urgency card by saying that the cart is about to expire. You might offer a discount for the user to complete the cart, but try to leave this several days or you risk making the product look over-priced.
You need to monitor your results and tailor this process for your business, because each industry is unique.
4. Stand Out
Be different. Experiment with copy and content. This can be hard for companies that are very strict about controlling their identity, but if you can do this, then please do. Don’t be like everyone else—exceptional advertisers capture attention. Dollar Shave Club do a great job here—they not only have clever copy but are also capitalizing on the emoji trend.
If possible, use animated Gif in your email. Since messaging and social media applications have integrated these animated images, their popularity has skyrocketed. Your abandoned cart recovery email with an animated Gif will definitely solicit attention.
(Note that not all email browsers support the animated Gif format, so the message must make sense without it.)
5. Personalization
If your abandoned cart recovery emails are automated—as they almost certainly will be—you are a little limited on the extent of tags that you can use, but you can still tailor the conversation using the recipient’s name; it helps to demonstrate that your message isn’t spam, and draws attention.
A study by “Retention Science” shows that the use of recipient’s first name in the subject line increases the open rate by almost 3%.
However, I must underline the importance of testing this one. As pointed out by MailChimp, you may see totally different results depending on a variety of factors.
6. Clear Copy & CTA
If you are sending out a message with an obvious goal, don’t try to hide it. Instead, highlight it, here are three simple rules to do just that:
Make sure you get to the point as early as possible and include your hook at the beginning;
Avoid sounding like a robot just sent out your email—use simple language, add some emojis to your message (that will brighten up the day );
I know this one is old, but people still do tend to underestimate the importance of Calls to Action. We must guide the user’s eye towards the button using good contrasts, font sizes and colors.
Bonus tip: If your email is longer, don’t be afraid to include multiple Call to Action buttons along the path. This will increase your chances of success.
7. Evaluate & Improve
I come from a digital agency background and know how quickly new projects arrive and are then passed by new ones. Rarely do we stop to assess and analyze the results to become better with our next projects.
This is a disaster since by doing so we are not evolving and improving, thus potentially spending more money in the future by repeating the same mistakes.
We have many different digital solutions to run tests, from A/B testing to real-life user tests. And I promise that this will not only be a very exciting and interesting process, but also will improve your sales results, and lower your expenses.
Wrapping Up
Cart abandonment is an issue that can never be fully eliminated, but with a little effort you can transfer, at least a portion of your abandoned carts into orders.
Add Realistic Chalk and Sketch Lettering Effects with Sketch’it – only $5!
Source from Webdesigner Depot https://ift.tt/2N4ZeTM from Blogger https://ift.tt/2x79q3b
0 notes