#vcenter powercli api
Explore tagged Tumblr posts
Visit Tumblr Blog
Explore Tumblr blogs with no restrictions, modern design and the best experience.
Last Seen Tumblr Blogs


Fun Fact
Tumblr’s website traffic is steadily declining.
Text
New Post has been published on
New Post has been published on https://www.tayfundeger.com/developer-center-code-capture.html
Developer Center - Code Capture
Merhaba,
Developer Center – Code Capture isimli bu yazımda sizlere Developer Center üzerinde yer alan Code Capture hakkında detaylı bilgiler vereceğim. Developer Center ile ilgili daha önce bir makale yazmıştım. Bu yazıma aşağıdaki linkten ulaşabilirsiniz.
Developer Center, vCenter Server 6.7 Update 2 ile birlikte geldi. Son zamanlarda oldukça işimize yarayacak ve kullanmamız gerekecek bir ürün olduğunu düşünüyorum. Ben bu yazımda sizlere Code Capture anlatacağım ancak Developer Center üzerinde API Explorer’da bulunuyor. API Explorer oldukça detaylı anlatacğaım bundan dolayı bu makalede API Explorer’a hiç giriş yapmayacağım. Bunu ayrıca bir makalede anlatacağım.
Developer Center Nedir?
Developer Center üzerinde yer alan Code Capture ile ilgli detaylı bilgi vermiştim. Buna yukarıdaki linkten ulaşabilirsiniz. Ancak yinede bu yazımda da Code Capture hakkında bilgiler vereceğim. Code Capture Nedir? sorusuna ilk olarak cevap vermek istiyorum. Developer Center üzerinde yer alan Code Capture sayesinde yapmış olduğumuz işlemleri kayıt altına alabiliyor ve bunları kod şeklinde çıkartabiliyoruz. Örneğin bir virtual machine’in clone’unu alıyorsunuz. Clone aldığınızda vCenter Server üzernde yapılan işlemleri powercli formatında komutlara dökebilir ve bunları export edebilirsiniz. Export ettiğinizde bu kodlar üzerinde çalışıp farklı yerlerde kullanabilirsiniz. Üstelik powercli öğrenmek istiyorsanız size oldukça faydası olacak bir uygulama olduğunu düşnüyorum.
Code Capture sayesinde vCenter Server üzerinde yapmış olduğumuz işlemleri PowerCLI, Ptyhon, VRO JavaScript ve GO olarak export alabiliyoruz. Ancak burada dikkat etmeniz gereken bir şey var. Code Capture sayesinde yapmış olduğunuz işlemleri kodlara dökebiliyorsunuz ancak bazı şeyleri Code Capture kodlara dökemiyor.
Permissions
Tags
Content Library
Storage Policies
Developer Center – Code Capture
Yukarıda belirtmiş olduğum bölümleri Code Capture‘da izleyemiyorsunuz. Aslında izlemenize de çok gerek bulunmuyor bence 🙂
Code Capture giriş yapmak için ilk olarak vCenter Server’a login oluyoruz. Ardından Home > Developer Center bölümüne giriş yapıyoruz. Bu bölüme giriş yaptıktan sonra Code Capture bölümüne giriş yapıyoruz.
Developer Center – Code Capture
Developer center > Code Capture bölümüne giriş yaptıktan sonra Default olarak Code Capture ‘un disable olduğunu görebilirsiniz. Evet Code Capture varsayılan olarak disable durumda geliyor. Eğer isterseniz bunu aktif duruma getirebilirsiniz. Enable Code Capture butonuna basıyoruz ve aktif duruma getiriyoruz.
Developer Center – Code Capture
Code Capture’ı aktif duruma getirdiğinizde sağ üstte kırmızı bir icon göreceksiniz. Bu icon’u gördüğünüzde Code Capture yapmış olduğunuz işlemleri izliyor olacaktır.
Peki biz şimdi Code Capture‘ı test etmek istiyoruz. Bunun için bir virtual machine’in clone’unu alacağım.
Test isimli virtual machine’im vardı bunun clone’unu alıyorum.
Clone işlemi başarılı bir şekilde tamamlandı. Peki bu clone tamamlandı ama bu yaptığımız işlemin PowerCLI karşılığı nedir?
Developer Center’a tekrar geri dönüyoruz. Aslında geri dönmeden sağ üstte yer alan kırmızı butona basarakta Code Capture’ı durdurabilirsiniz. Ancak biz Developer Center ‘a girelim ve bunları adım adım görelim.
Developer Center’a girdiğimizde karşımıza herhangi bir code çıkmıyor. Burada Stop Recording’a basmanız gerekiyor. Stop Recording’e basıyoruz.
Stop Recording’e bastığımıza karşımıza Code Capture’u start ettiğimizden stop yaptığımız zamana kadar yapmış olduğumuz işlemlerin kod çıktısını görüyoruz. Sağ tarafta yer alan Language bölümünden yapmış olduğunuz işlemlerin kod karşılığını farklı dillerde görebilirsiniz. PowerCLI, VRO JavaScript, Python, GO formatlarında görebilirsiniz.
Bu kodu farklı projelerde değerlendirmek veya test etmek amaçlı isterseniz dışarıya aktarabilirsiniz. Download butonuna bastığınızda
PowerCLI çıktısını isterseniz kendiniz değiştirebilir, farklı projelerde kullanabilirsiniz. Code Capture gerçekten kullanılması gereken bir özellik. Özelilkle Datacenter operasyonlarında eğer işlemleri otomasyona biraz daha dökmek istiyorsanız size api ve çeşitli yazılım dilleri konusunda oldukça kolaylıklar sağlayabilir. Ben açıkcası vCenter Server üzerinde yapılacak bazı işlemleri otomatize etmek için Code Capture ile yakaladığım PowerCLI komutlarını yakaladım ve bunları kullandım. Çıkardığım powercli komutlarını kendime göre editledikten sonra script ile virtual machine oluşturma ve belirtmiş olduğum özelliklerde virtual machine oluşturma gibi işlemlerde kullandım. Oldukça zevkli tavsiye ediyorum 🙂 Eğer powercli gibi script dillerini merak ediyorsanız sizlerinde bunu kullanmanızı ve öğrenmenizi tavsiye ediyorum. Zaten kullanımı oldukça basit, yukarıda belirtmiş olduğum adımları yapmanız takdirde sorunsuzca kullanabilirsiniz.
Umarım faydalı olmuştur.
İyi çalışmalar.
0 notes
Text
特定の仮想マシンへの vSphere UI リンクの生成
一部の組織では、VM がプロビジョニングされた後、vSphere UI の URL を含むログイン認証情報を含む通知 (電子メール、Slack など) をエンド ユーザーに送信するのが一般的です。
通常、提供される URL は単なる vCenter Server のベース URL であり、エンド ユーザーはログインして、vSphere インベントリ内の特定の VM に移動する必要があります。より良いエンド ユーザー エクスペリエンスを社内ユーザーに提供できないかという質問が提起されました。彼らは、エンド ユーザーに VM に直接アクセスできる特定の URL リンクを提供し、将来の使用のためにブックマークすることもできるようにしたいと考えていました。
さらに、顧客は、既存のプロビジョニング ワークフローに組み込めるように、プログラムで URL を生成することにも興味を持っていました。
vSphere UI の各インベントリ オブジェクトには一意の URL があるため、これは簡単に実現できます。このブログ投稿では、主に VM インベントリ オブジェクトに焦点を当てます。このオブジェクトは、[ホスト/クラスタ]ビューまたは[VM/VM テンプレート]ビューに存在しますが、この概念は他の vSphere インベントリ オブジェクトにも当てはまります。
[ホスト/クラスター] ビューでは、VM の URL は次のようになります: https://vcsa.primp-industries.local/ui/app/vm;nav=h/urn:vmomi:VirtualMachine:vm-40043:056a402b-2b3d-4f74-93f7-fa818adff697/summary
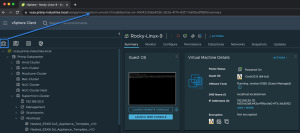
「VM/VM テンプレート」ビューでは、VM の URL は次のようになります: https://vcsa.primp-industries.local/ui/app/vm;nav=v/urn:vmomi:VirtualMachine:vm-40043:056a402b-2b3d-4f74-93f7-fa818adff697/summary
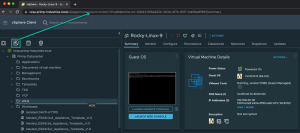
上記の両方の URL からわかるように、唯一の違いは、ビューがホスト/クラスター ( h ) にあるか、VM/VM テンプレート ( v ) にあるかを指定する「 nav= 」キーであり、URL の残りの部分は同じです。これには、青色のVM 管理オブジェクト参照 (MoRef) IDとオレンジ色のvCenter Server インスタンス UUIDが含まれます。
これらすべての情報を使用すると、vSphere UI 内で特定の VM の URL の生成を簡単に自動化できます。これを実証するために、vSphere API を使用し、次のスニペットを使用して PowerCLI を通じてそれを利用します。
$vmName = "Rocky-Linux-9"
$uiView = "v"
$vcHostname = $global :DefaultVIServer.name
$vcInstanceUUID = $global :DefaultVIServer.InstanceUuid
$vmId = (( Get-VM $vmName ) .id ) 。replace ( "VirtualMachine-" , "VirtualMachine:" )
書き込みホスト「https://${vcHostname}/ui/app/vm;nav=${uiView}/urn:vmomi:${vmId}:${vcInstanceUUID}/summary」
注: VM への直接リンクを使用している場合でも、ユーザーは vCenter Server にログインする必要があり、適切な権限を持っていない場合は、表示したり何も実行したりすることはできません。
0 notes
Text
VMware PowerCLI is a collection of PowerShell modules that provides cmdlets used to manage VMware environments. As a VMware Virtualization administrator, you’ll be able to perform most vSphere administrative tasks as well as automate many operations. A cmdlet is a lightweight command that PowerShell runtime invokes within the context of automation scripts that are provided at the command line. They are invoked programmatically through PowerShell APIs. The combination of VMware PowerCLI and PowerShell unlocks the power of automation more and more. PowerCLI provides an integration with VMware products such as vSphere ESXi, NSX, vCenter, vRealize Operations, VSAN, Horizon, and VMware Cloud platforms. Install VMware PowerCLI Tools on macOS The major requirement for this installation are: PowerShell Homebrew Internet connection Install Homebrew on macOS If you don’t have Homebrew already installed on your system, run the commands below to download it. /bin/bash -c "$(curl -fsSL https://raw.githubusercontent.com/Homebrew/install/HEAD/install.sh)" Confirm installation was successful by checking the version: $ brew --version Homebrew 3.6.3 Homebrew/homebrew-core (git revision cbc3731cfcd; last commit 2022-09-29) Homebrew/homebrew-cask (git revision c41e6a96ba; last commit 2022-09-29) Install PowerShell on macOS With the Homebrew package installed, we’ll use it to get PowerShell on macOS. $ brew install --cask powershell ==> Downloading https://github.com/PowerShell/PowerShell/releases/download/v7.2.6/powershell-7.2.6-osx-x64.pkg ==> Downloading from https://objects.githubusercontent.com/github-production-release-asset-2e65be/49609581/83411cda-c621-4bfd-bc39-7668321cbc45?X-Amz-Algorithm=AWS4-HMAC-SHA256&X-Amz-Credential=AKIA ######################################################################## 100.0% ==> Installing dependencies: openssl@3 ==> Downloading https://ghcr.io/v2/homebrew/core/openssl/3/manifests/3.0.5 ######################################################################## 100.0% ==> Downloading https://ghcr.io/v2/homebrew/core/openssl/3/blobs/sha256:c4de05580e98de88ece952f04d2ea019d89043379d44a18970cf4a1e9d93c825 ==> Downloading from https://pkg-containers.githubusercontent.com/ghcr1/blobs/sha256:c4de05580e98de88ece952f04d2ea019d89043379d44a18970cf4a1e9d93c825?se=2022-09-29T19%3A40%3A00Z&sig=lo9lADMAkHz0GxIH ######################################################################## 100.0% ==> Installing openssl@3 ==> Pouring [email protected] 🍺 /usr/local/Cellar/openssl@3/3.0.5: 6,444 files, 28.2MB ==> Installing Cask powershell ==> Running installer for powershell; your password may be necessary. Package installers may write to any location; options such as `--appdir` are ignored. Password: installer: Package name is PowerShell - 7.2.6 installer: Installing at base path / installer: The install was successful. 🍺 powershell was successfully installed! Verify that your installation is working properly: $ pwsh PowerShell 7.2.6 Copyright (c) Microsoft Corporation. https://aka.ms/powershell Type 'help' to get help. PS /Users/jkmutai/Desktop> You can get a newer version of PowerShell by updating Homebrew’s formulae and upgrading PowerShell: brew update brew upgrade powershell --cask Install VMware PowerCLI Tools on macOS Open PowerShell on your macOS workstation. $ pwsh Then run the commands in PowerShell to install all PowerCLI modules: PS /Users/jkmutai> Install-Module VMware.PowerCLI -Scope CurrentUser You may get a warning relating to modules installation from an untrusted repository, press Y or A to confirm the installation. Untrusted repository You are installing the modules from an untrusted repository. If you trust this repository, change its InstallationPolicy value by running the Set-PSRepository cmdlet. Are you sure you want to install the modules from 'PSGallery'? [Y] Yes [A] Yes to All [N] No [L] No to All [S] Suspend [?] Help (default is "N"): A
The modules are downloaded automatically and stored in the correct folder. The -Scope parameter can be used to make the PowerCLI modules available to AllUsers. PS /Users/jkmutai> Install-Module VMware.PowerCLI -Scope AllUsers To list all available modules, run: Get-Module -ListAvailable On macOS the modules are stored inside ~/.local/share/powershell/Modules directory. $ ls ~/.local/share/powershell/Modules VMware.CloudServices VMware.Sdk.vSphere.Content VMware.Sdk.vSphere.vCenter.TrustedInfrastructure VMware.DeployAutomation VMware.Sdk.vSphere.ContentLibrary VMware.Sdk.vSphere.vCenter.VCHA VMware.ImageBuilder VMware.Sdk.vSphere.Esx.Hcl VMware.Sdk.vSphere.vCenter.Vm VMware.PowerCLI VMware.Sdk.vSphere.Esx.Hosts VMware.Sdk.vSphere.vCenter.VmTemplate VMware.PowerCLI.Sdk VMware.Sdk.vSphere.Esx.Settings VMware.Sdk.vSphere.vStats VMware.PowerCLI.Sdk.Types VMware.Sdk.vSphere.VAPI.Metadata VMware.Sdk.vSphereRuntime VMware.PowerCLI.VCenter VMware.Sdk.vSphere.vCenter VMware.Vim VMware.PowerCLI.VCenter.Types.ApplianceService VMware.Sdk.vSphere.vCenter.Authentication VMware.VimAutomation.Cis.Core VMware.PowerCLI.VCenter.Types.CertificateManagement VMware.Sdk.vSphere.vCenter.CertManagement VMware.VimAutomation.Cloud VMware.Sdk.Nsx.Policy VMware.Sdk.vSphere.vCenter.Content VMware.VimAutomation.Common VMware.Sdk.Runtime VMware.Sdk.vSphere.vCenter.Datastore VMware.VimAutomation.Core VMware.Sdk.vSphere VMware.Sdk.vSphere.vCenter.Deployment VMware.VimAutomation.Hcx VMware.Sdk.vSphere.Appliance VMware.Sdk.vSphere.vCenter.Guest VMware.VimAutomation.HorizonView VMware.Sdk.vSphere.Appliance.Access VMware.Sdk.vSphere.vCenter.ISO VMware.VimAutomation.License VMware.Sdk.vSphere.Appliance.Health VMware.Sdk.vSphere.vCenter.Identity VMware.VimAutomation.Nsxt VMware.Sdk.vSphere.Appliance.InfraProfile VMware.Sdk.vSphere.vCenter.Inventory VMware.VimAutomation.Sdk VMware.Sdk.vSphere.Appliance.LocalAccounts VMware.Sdk.vSphere.vCenter.LCM VMware.VimAutomation.Security VMware.Sdk.vSphere.Appliance.Logging VMware.Sdk.vSphere.vCenter.NamespaceManagement VMware.VimAutomation.Srm VMware.Sdk.vSphere.Appliance.Networking VMware.Sdk.vSphere.vCenter.Namespaces VMware.VimAutomation.Storage VMware.Sdk.vSphere.Appliance.Recovery VMware.Sdk.vSphere.vCenter.OVF VMware.VimAutomation.StorageUtility VMware.Sdk.vSphere.Appliance.SupportBundle VMware.Sdk.vSphere.vCenter.Services VMware.VimAutomation.Vds VMware.Sdk.vSphere.Appliance.System VMware.Sdk.vSphere.vCenter.Storage VMware.VimAutomation.Vmc VMware.Sdk.vSphere.Appliance.Update VMware.Sdk.vSphere.vCenter.SystemConfig VMware.VimAutomation.WorkloadManagement VMware.Sdk.vSphere.Cis VMware.Sdk.vSphere.vCenter.Tagging VMware.VimAutomation.vROps VMware.Sdk.vSphere.Cis.Tagging VMware.Sdk.vSphere.vCenter.Topology VMware.VumAutomation PowerCLI usage example Let’s consider a simple example on using VMware vSphere cmdlets for automated administration of the vSphere environment. To get details about installed version of PowerCLI, use: PS /Users/jkmutai> Get-PowerCLIVersion
PowerCLI Version ---------------- VMware.PowerCLI 12.7.0 build 20091289 --------------- Component Versions --------------- VMware Common PowerCLI Component 12.7 build 20067789 VMware Cis Core PowerCLI Component PowerCLI Component 12.6 build 19601368 VMware VimAutomation VICore Commands PowerCLI Component PowerCLI Component 12.7 build 20091293 PS /Users/jkmutai> See current configuration before you proceed. PS /Users/jkmutai> Get-PowerCLIConfiguration Scope ProxyPolicy DefaultVIServerMode InvalidCertificateAction DisplayDeprecationWarnings WebOperationTimeout Seconds ----- ----------- ------------------- ------------------------ -------------------------- ------------------- Session UseSystemProxy Multiple Unset True 300 User AllUsers Update the configuration to ignore accept self-signed certificates for SSL connection: PS /Users/jkmutai> Set-PowerCLIConfiguration -InvalidCertificateAction Ignore Perform operation? Performing operation 'Update VMware.PowerCLI configuration.'? [Y] Yes [A] Yes to All [N] No [L] No to All [S] Suspend [?] Help (default is "Y"): A Scope ProxyPolicy DefaultVIServerMode InvalidCertificateAction DisplayDeprecationWarnings WebOperationTimeout Seconds ----- ----------- ------------------- ------------------------ -------------------------- ------------------- Session UseSystemProxy Multiple Ignore True 300 User Ignore AllUsers Connect to Environment Use the Connect-VIServer command to setup a new connection. This will ask you to input username and password. PS /Users/jkmutai> Connect-VIServer -Server esxi01.example.com -Protocol https Specify Credential Please specify server credential User: root Password for user root: ********** Name Port User ---- ---- ---- esxi01.example.com 443 root For non-interactive connection you can pass the username and password in CLI: Connect-VIServer -Server -Protocol https -User -Password Run a cmdlet to retrieve the datastores available. PS /Users/jkmutai> Get-Datastore Name FreeSpaceGB CapacityGB ---- ----------- ---------- datastore1 317.590 319.000 You can search for cmdlets commands using regex inPowerCLI, example: #Show all cmdlets with keyword switch it its name PS /Users/jkmutai> Get-VICommand *switch CommandType Name Version Source ----------- ---- ------- ------ Cmdlet Export-VDSwitch 12.7.0.20… VMware.VimAutomation.Vds Cmdlet Get-VDSwitch 12.7.0.20… VMware.VimAutomation.Vds Cmdlet Get-VirtualSwitch 12.7.0.20… VMware.VimAutomation.Core Cmdlet Initialize-CpuCoreConfigForEnhancedNetworkingStac… 4.0.0.200… VMware.Sdk.Nsx.Policy Cmdlet Initialize-PreconfiguredHostSwitch 4.0.0.200… VMware.Sdk.Nsx.Policy Cmdlet Initialize-RealizedLogicalSwitch 4.0.0.200… VMware.Sdk.Nsx.Policy Cmdlet Initialize-StandardHostSwitch 4.0.0.200… VMware.Sdk.Nsx.Policy Cmdlet New-VDSwitch 12.7.0.20… VMware.VimAutomation.Vds Cmdlet New-VirtualSwitch 12.7.0.20… VMware.VimAutomation.Core Cmdlet Remove-VDSwitch 12.7.0.20… VMware.VimAutomation.Vds
Cmdlet Remove-VirtualSwitch 12.7.0.20… VMware.VimAutomation.Core Cmdlet Set-VDSwitch 12.7.0.20… VMware.VimAutomation.Vds Cmdlet Set-VirtualSwitch 12.7.0.20… VMware.VimAutomation.Core For more understanding on PowerCLI usage, refer to official VMware documentation pages: VMware PowerCLI Cmdlets by Product PowerCLI Community Scripts
0 notes
Text
300+ TOP VMWARE Objective Questions and Answers
VMWARE Multiple Choice Questions :-
1.Which of the following dvPort binding types have been removed in vSphere 5? A. Dynamic Binding B. Ephemeral Binding C. Static Binding Ans: A 2.Your boss has asked you to setup 4 ESXi hosts to evaluate the new vSphere 5 release, which is the recommended install method to use in this situation? A. Interactive Installation B. Scripted Installation C. vSphere Auto Deploy Installation D. Upgrade via VMware Update Manager Ans: A 3.Your colleague has accidentally allocated more vRAM than your company are licensed for. What will happen to your virtual machines? A. All VM's will be Powered Off B. New VM's can not be Powered On C. VMware will be notified D. Nothing will happen Ans: B 4.In an HA cluster after an initial election process, host are either: A. Primary or Secondary B. Master or Slave C. King or Queen D. Live or Standby Ans: B 5.To get the maximum performance benefits of vNUMA it is recommended to: A. Make sure your clusters are composed entirely of hosts with matching NUMA architecture. B. Only use single vCPU virtual machines C. Enable EVC on your clusters D. Disable Hyper-Threading Ans: A 6.What is the name of the globally unique identifier assigned to each Fibre Channel Port? A. IP Address B. MAC Address (Mac) C. World Wide Name (WWN) D. Port_ID Ans: C 7.It is possible to Storage vMotion virtual machines that have snapshots? A. True B. False Ans: A 8.What are the 4 VM Restart Priority options available on an HA Cluster? A. Disabled, Low, Medium, High B. Enabled, Small, Medium, Large C. 1st, 2nd, 3rd, 4th D. Priority, 2nd Tier, 3rd Tier, Best Effort Ans: A 9.A memory reservation defines: A. the amount of virtual machine memory that can be paged to the VMkernel swapfile B. the amount of physical memory that is guaranteed to the VM C. the maximum amount of physical memory that will be used by a VM D. the amount of host memory reserved for the VMkernel Ans: D 10.Which of the following installation methods installs the ESXi image directly into the Host memory? A. Interactive ESXi Installation B. Scripted ESXi Installation C. vSphere Auto Deploy ESXi Installation Option D. Upgrade via VMware Update Manager Ans: D
VMWARE MCQs 11.VMFS-5 upgraded from VMFS-3 continues to use the previous file block size which may be larger than the unified 1MB file block size. A. True B. False Ans: A 12.Which of the following formulas defines the amount of virtual machine memory that will always be composed of disk pages? A. Memory allocated -(minus) memory limit B. Memory limit -(minus) memory reservation C. Memory limit -(minus) memory available D. Memory allocated -(minus) memory available Ans: D 13.The upgrade procedure from VMFS-3 to VMFS-5 will require downtime of that datastore? A. False B. True Ans: A 14.Which of the following actions would be LEAST likely to reduce resource contention? A. Powering off a VM B. Enabling Swap-To-Cache C. Disable transparent memory page sharing D. Enabling vNUMA Ans: C 15.When is vNUMA enable by default on a virtual machines? A. When a virtual machine has more than 8 vCPU's B. When the guestOS is configured using an SMP HAL C. All the time D. vNUMA is never enabled by default Ans: A 16.Which new feature of vSphere 5 is used to collect host core dumps? A. vMA 5.0 B. ESXi Dump Collector C. ESXi Syslog Collector D. VMware vDR 2.0 Ans: B 17.After an upgrade from ESX4.X to ESXi5.0 you notice that when you run the following command via the vMA: "esxcfg-vswif -l" you notice that their are no configure vswif interfaces listed. Why would this be? A. The Service Console is no longer available with vSphere 5. All vswif interfaces are removed during the upgrade. B. During the upgrade process all vswif interfaces are migrated to vmk interfaces. C. During the upgrade process, vswif interfaces are disable by default, they'll need to be enable before they will be listed. D. The wrong command is being used. "vicfg-vswif -l" is the correct command to display all vswif interfaces. Ans: B 18.How has vMotion been improved in vSphere 5? A. Multiple vMotion vmknics, allowing for more and faster vMotion operations B. Long distance vMotion, allowing for vMotions over a large geographical area C. Multi-platform vMotion, allowing for vMotions between vSphere and Hyper-V platforms D. Storage vMotion, allowing for virtual machines storage to be moved between datastores Ans: D 19.What are the Automation Levels on a DRS Cluster? A. Manual, Partially Automatic, Fully Automatic B. Manual, Partially Automated, Fully Automated C. Manual, Semi Automated, Fully Automatic D. Manual, Semi Automatic, Automatic Ans: D 20.What are the two iSCSI discovery methods that are supported by an ESXi host? A. Static Targets, Dynamic Targets B. Static Discovery, SendTargets C. Static Discovery, FindTargets D. Dynamic Discovery, FindTargets Ans: A 21.After an upgrade from ESX4.X to ESXi5.0 you notice that your Port Group named "Service Console" is missing. Where has it gone? A. Because ESXi 5.0 has no Service Console, upgrading from ESX 4.x to ESXi 5.0 removes the Service Console port group. B. During the upgrade all Port Groups are removed. The Service Console Port Group will need to be recreated. C. During the upgrade all Port Groups are moved to Distributed Switches. D. During the upgrade all Port Groups are moved to Standard Switches. Ans: A 22.You have been asked to provide high availability for your vCenter server. Which product would you use to help achieve this? A. Fault-Tolerance B. vCenter Linked-Mode C. vCenter Heartbeat D. Microsoft Clustering Services Ans: C 23.VMware vSphere can be evaluated prior to purchase. What is the maximum number of days the evaluation can be used before a license must be purchased? A. 30 Days B. 60 Days C. 90 Days D. 120 Days Ans: B 24.Which feature of vSphere 5 can be used to increase network throughput to virtual machines? A. SplitRX B. NPIV C. VMDirectpath I/O D. RDM Ans: A 25.Which feature of vSphere 5 can be used to reduce virtual machine memory overhead? A. VMX Swap B. SplitRX C. Swap to Host D. Memory Reservations Ans: A VMWARE Objective type Questions with Answers 26.By default, where do hosts deployed with VMware Auto Deploy store logs? A. In Memory B. First mounted LUN C. Local disk D. vMA Ans: A 27.Which new feature of vSphere 5 is used to create ESXi installation images with a customized set of updates, patches, and drivers? A. Image Builder B. Host Profiles C. Auto Deploy D. Esxcli Ans: D 28.Which of the following is not a new feature made available with vSphere 5? A. sDRS B. vDR C. VSA D. vSphere Web Client Ans: B 29.What protocol is used by an ESXi host to communicate with NAS devices? A. NFS B. iSCSI C. CIFS D. SMB Ans: B 30.After an upgrade from ESX/ESXi 4.1 to ESXi 5.0, your monitoring department are reporting that they have stopped receiving Syslog data from all of the ESXi hosts. What could be the problem? A. Custom ports that were opened by using the ESX/ESXi 4.1 esxcfg-firewall command do not remain open after the upgrade to ESXi 5.0. B. Custom ports that were opened by using the ESX/ESXi 4.1 esxcfg-firewall command do not do not get copied during the upgrade to ESXi 5.0. C. Tech Support Mode is disable by default after an upgrade to ESXi 5.0 stopping all traffic on all ports D. ESXi 5.0 cannot send logs to Syslog servers. Ans: D 31.The default security policy on a Port Group is: A. Reject, Accept, Accept B. Reject, Reject, Reject C. Accept, Accept, Accept D. Reject, Reject, Accept Ans: A 32.When deploying hosts with VMware Auto Deploy, which is the recommended method to configure ESXi once it has been installed? A. Host Profiles B. PowerCLI C. Manually D. via Direct Console Ans: A 33.What is an HA Slot? A. A slot is a logical representation of the memory and CPU resources that satisfy the requirements for any powered-on virtual machine in the cluster. B. A slot is a given to each Host in an HA Cluster, there is a maximum of 32 in an HA Cluster C. A slot is given to each Virtual Machine, this determines the restart priority. D. A slot has nothing to do with HA, it's how DRS calculates which Virtual Machine should be placed where. Ans: A 34.Which new version of VMFS is introduced by vSphere 5? A. VMFS-2 B. VMFS-3 C. VMFS-5 D. VMFS-4 Ans: C 35.ESXi 5.0 supports only LAHF and SAHF CPU instructions? A. True B. False Ans: A 36.Which of the following is no longer available with vSphere 5? A. ESX B. vCenter C. vSphere Client D. PowerCLI Ans: D 37.Which if the following is not a supported location for a host diagnostic partition? A. Shared local storage B. Private local storage C. Private SAN storage D. Shared SAN storage Ans: A 38.Which of the following actions is not available via the Direct Console? A. Shutdown host B. Enter host into Maintenance Mode C. View host logs D. Configure host DNS Ans: B 39.Which vSphere feature provides dynamic allocation of storage capacity? A. vStorage APIs / VCB B. Thinapp C. sDRS D. vStorage Thin Provisioning Ans: C 40.To improve security which new feature has been added to ESXi? A. Firewall B. Local Mode C. Anti-Virus D. vShield Ans: A 41.What the packaging format used by the VMware ESXi Image Builder? A. .rar B. .zip C. .iso D. VIB Ans: C 42.What are the three default roles provided on an ESXi host? A. No Access, Read Only and Administrator B. Read only, Operator Access and Administrator C. Virtual Machine User, Virtual Machine Power User and Administrator D. Network Consumer, Datastore Consumer and Resource Pool Administrator Ans: A 43.Which of the following is a requirement for vCenter? A. A Static IP address B. A DHCP IP address C. A valid (internal) domain name system (DNS) registration. Ans: C 44.Which two users are assigned the Administrator role at the ESX Server level by default? A. root, administrator B. root, vpxuser C. root, vpxa D. root, hostd Ans: B 45.After an upgrade from ESXi4.0 to ESXi5.0 you are unable to putty to your hosts. What could have caused this? A. SSH configuration is not migrated for ESX 4.x hosts or ESXi 4.0 hosts. For these hosts, SSH access is disabled during the upgrade or migration process B. SSH is not available with ESXi 5.0, it is only available with ESX 5.0. C. SSH is always disabled after an upgrade or clean installation. D. The SSH port in ESXi 5.0 has changed to 443 for added security. Ans: A 46.What are the three Host Isolation Response options available on an HA Cluster? A. Shut down, Power off, Leave powered on B. Shut down, Power off, Leave powered off C. Shut down, Restart, Leave powered on D. Shut down, Restart, power on Ans: B 47.You boss has asked you deploy 40 ESXi hosts as quickly as possible, which is the recommended install method to use in this situation? A. Interactive Installation B. Scripted Installation C. VMware Auto Deploy Installation D. Upgrade via VMware Update Manager Ans: D 48.Distributed Power Management (DPM) requires which technology to be available on the NIC? A. Wake On LAN (WOL) B. DNS C. BMC D. NetBIOS Ans: A 49.The organisation you work for is currently running vSphere 4.1 U1. Your team have just created a new Test/Dev environment based on vSphere 5. The VM management team have asked if you could combine the current 4.1 U1 environment and 5.0 vCenters with Linked-Mode. What is the correct response to the VM management team? A. vCenter 4.1 and vCenter cannot be joined with Linked-Mode B. Additional licensing is required to use Linked-Mode C. Only vCenter Administrators can use Linked-Mode D. No problem Ans: D 50.Which of the following is not a benefit of VMware Auto Deploy? A. Decouples the VMware ESXi host from the physical server and eliminates the boot disk B. Eliminates configuration drift C. Simplifies patching and updating D. Accelerates deployment of virtual machi VMWARE Questions and Answers pdf Download Read the full article
0 notes
Text
vSphere 6.7 のネイティブ MAC ラーニングにより、ネストされた ESXi の無差別モードが不要になります
長年にわたり、ネストされた ESXi をワークロードとして実行するための要件であるプロミスキャス モードの影響を軽減するために、さまざまなソリューションが あちこちで開発されてきました。これらのソリューションは非常にうまく機能しましたが、この機能を有効にするためにユーザーは追加のソフトウェアをインストールする必要がありました。最新のソリューションは、ESXi で MAC 学習機能を有効にする新しいLearnswitch VMkernel モジュール(VMware Fling としてリリース) でした。
本日、vSphere 6.7 のリリースにより、MAC 学習機能が VMware 分散仮想スイッチ (VDS) のネイティブ機能として利用可能になったことを発表できることを嬉しく思います。タイトルから推測した人もいるかもしれませんが、プロミスキャス モードはまた、Nested ESXi を実行するための要件もなくなりました。これを ESXi に統合して製品化するために精力的に働いてくれた VMware のネットワーク���よびセキュリティ ビジネス ユニット (NSBU) の Subin、Jobin、Sriram、Rajeev、Samuel に少し感謝したいと思います。これは、ネストされた ESXi ワークロードだけでなく、これまでプロミスキャス モードの使用を必要としていた他のソリューションやユースケースにも役立ちます。まだ ESXi 6.0 または 6.5 を実行しているお客様は、vSphere 6.7 に完全にアップグレードするまで、Learnswitch Fling を使用し続ける必要があります。
新しい MAC 学習機能を使用するには、もちろん vSphere 6.7 (vCenter と ESXi の両方) にアップグレードする必要がありますが、最新の VDS バージョン 6.6 にもアップグレードする必要があります。MAC ラーニングは分散仮想ポートグループごとに有効にすることができますが、現時点では vSphere API を使用する場合にのみ利用できます。VDS API を使用して VDS を管理している場合は、既存の ReconfigureDVPortgroup_Task()メソッドを使用するだけで済みます。6.7 では、 MAC ラーニング設定を有効にして定義できる新しいmacManagementPolicyプロパティが追加されました。この新しい MAC 管理ポリシーは、今後 DV ポートグループのセキュリティ ポリシーを管理するための新しい優先方法にもなり、以前のセキュリティ ポリシー設定は使用されなくなります。
免責事項:ネストされた ESXi はまだ VMware によって正式にサポートされていません。ご自身の責任でご使用ください。
新しい MAC Learning API をデモンストレーションするために、 Get-MacLearnとSet-MacLearnという 2 つの小さな PowerCLI 関数を作成しました。これらの関数は、ここからダウンロードできます 。vSphere 6.7 のサポートを追加する最新のPowerCLI 10.1.0リリースを必ずダウンロードする必要があります。
Get-MacLearn 関数を使用すると、特定の DV ポートグループの現在の MAC 学習設定を取得できます。1 つ以上の DV ポートグループ名を受け入れることができる次のコマンドを実行するだけです。
Get-MacLearn -DVPortgroupName @("Nested-01-DVPG")

出力からわかるように、現在、この DV ポートグループでは MAC 学習が有効になっていません。また、学習できる MAC アドレスの最大数 (最大 4096) を定義する制限や、学習された MAC アドレスの制限を超えた場合の切り替えポリシー (ドロップまたは受け入れ) を定義する limitPolicy などの新しいプロパティも確認できます。前述したように、セキュリティ ポリシーの管理には新しい Mac 管理インターフェイスを使用する必要があり、出力の一部として、新しいセキュリティ ポリシー設定と従来のセキュリティ ポリシー設定の両方も含めました。
Set-MacLearn 関数を使用すると、MAC 学習を有効にしたり、特定の DV ポートグループのセキュリティ ポリシーを指定したりできます。ネストされた ESXi を使用するには、次の設定を行う必要があります。
MAC 学習: true
無差別モード: False
偽造送信: True
MAC の変更: False
制限: 4096 (オプション、デフォルトは関数で提供されます)
制限ポリシー: Drop (オプション、デフォルトは関数で提供されます)
Set-MacLearn -DVPortgroupName @("Nested-01-DVPG") -EnableMacLearn $true -EnablePromiscuous $false -EnableForgedTransmit $true -EnableMacChange $false

再構成が完了したら、次のスクリーンショットに示すように、Get-MacLearn 関数を再実行して変更を確認できます。

この時点で、ネストされた ESXi ワークロードをこの DV ポートグループに展開する準備が整いました。または、既存の DV ポートグループの 1 つでこの操作を実行した場合は、無差別モードの必要性が無効になりました。
最後に、現在学習されている MAC アドレスに関する詳細情報を取得するのに役立つ追加ツールを 1 つ共有したいと思います。このツールは、ESXi Shell で直接のみ利用可能です。このユーティリティは netdebg と呼ばれ、以下にその使用方法の例をいくつか示します。
注:このツールはデバッグを目的としており、将来のリリースでも同じように機能し続けるという保証はないことに注意してください。
VSS と VDS の両方のすべてのスイッチを一覧表示するには、次のコマンドを実行します。
netdbg vswitch instance list
特定のパワーオン状態の VM の DV ポートで MAC 学習が有効になっているかどうかを確認するには、次のコマンドを実行して、DVPortID と VDS の名前を指定します ( esxcfg-vswitch -lまたは esxcli network vswitch dvs vmware list を使用する必要があります)。取得する):
netdbg vswitch mac-learning port get -p 10 --dvs-alias VDS 6.7
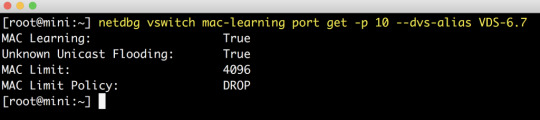
特定の DV ポートで学習したすべての MAC アドレスを取得するには、次のコマンドを実行して、DVPortID と VDS の名前を指定します (取得するには、esxcfg-vswitch -l または esxcli network vswitch dvs vmware list を使用する必要があり ます )。 :
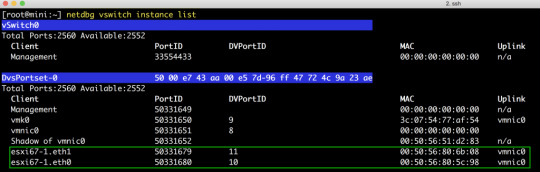
netdbg vswitch mac-table port get -p 10 --dvs-alias VDS 6.7

上のスクリーンショットでは、最初のアドレス (d5:d6) は実際にはネストされた ESXi VM 上で実行されている VM で、2 番目のアドレス (5c:98) はネストされた ESXi VM の vmnic0 です。MAC アドレス エントリは 10 ~ 20 分で自動的に期限切れになるため、学習された古いエントリを消去するために追加の手順を行う必要はありません。
0 notes
Text
New Post has been published on VMware Virtualization Blog
New Post has been published on https://www.tayfundeger.com/virtual-machine-encryption-bolum-2.html
Virtual Machine Encryption – Bölüm 2
Merhaba,
Virtual Machine Encryption – Bölüm 2 isimli bu yazımda sizlere Virtual Machine Encryption işlemlerinin nasıl yapılacağı konusunda bilgi vereceğim. Bir önceki bölümde yazmış olduğum makaleye aşağıdaki linkten ulaşabilirsiniz.
Virtual Machine Encryption – Bölüm 1
Virtual Machine Encryption yapabilmeniz için öncelikle altyapınızda KMS ‘in olması gerekiyor. KMS’in olması durumunda VM Encryption ‘i sorunsuz bir şekilde kullanabilirsiniz. Virtual Machine Encryption’ın kurulumunu yapmadan önce VM Encryption Best Practices hakkında bilgi vereceğim.
Virtual Machine Encryption – Bölüm 2
VM Encryption ‘i kullanmadan önce aşağıda sıralayacağı maddelere dikkat etmeniz gerekiyor.
vCenter Server virtual machine’ini asla şifrelemeyin.
Şifreleme yaptığımız virtual machine’in VMX ve VMDK dosyalarında düzenleme yapmayın. Çünkü bu dosyalarda şifreleme paketleri bulunur. Bundan dolayı eğer bu dosyalarda düzenleme yaparsanız virtual machine’i komple kaybedebilirsiniz.
KMS’de bulunan key provider name bir sebepten dolayı değişirse virtual machine’leri power on duruma getiremezsiniz. Böyle bir durumda önceki isim ile key provider ismini değiştirmeniz gerekir.
Ayrıca VM Encryption‘i aktif duruma getirdiğinizde aşağıdaki sıralayacağım özelliklerden/maddelerden faydalanamazsınız.
vSphere Fault Tolerance desteklenmez.
Clone bazı durumlarda desteklenmez. Normal bir virtual machine’in clone’unu alabilir ve almış olduğunuz clone’ın şifrelemesini kaldırabilirsiniz. Ancak linked clone kullanıyorsanız bağlı bulunduğu clone’un şifresini çözemez veya şifreleme methodunu değiştiremezsiniz.
vSphere ESXi Dump Collector
Content Library
Her yedeklenme yöntemi desteklenmez. En kritik nokta burası aslında. Virtual disk yedeklemesi için VMware vSphere Storage API – Data Protection (VADP) kullanan tüm yedekleme çözümleri desteklenmez.
VADP SAN yedekleme çözümleri desteklenmemektedir.
VMware Workstation gibi diğer VMware ürünlerinde şifreleme için vSphere Virtual Machine Encryption kullanamazsınız.
Şifreli bir sanal makineden bir seri bağlantı noktasına veya paralel bağlantı noktasına çıktı gönderemezsiniz.
RDM (Raw Device Mapping).
Multi-writer veya shared disks (MSCS, WSFC, veya Oracle RAC).
VM Encryption‘i aktif duruma getirdiğinizde VMDK şifreleneceği için aklınıza şu soru gelebilir. Thin dosyaları sürekli genişleyen dosyalar ve bundan dolayı şifreleme işlemi yapılabiliyor mu? Evet Thin veya Thick disk kullanmanız VM Encryption’i kullanmanıza engel değil. Her virtual machine için encyrption işlemini manuel olarak yapmanız gerekmektedir. Eğer bu işlemi otomatik hale getirmek istiyorsanız bunun için github’da bunun powercli modüllerine ihtiyacınız olacaktır. API’ler aracılığı ile yapabileceğinizide ayrıca belirtmek isterim. vSphere 6.5, FIPS 140-2 onaylı değildir ancak vSphere 6.7 , FIPS-140-2 onaylıdır. Buna dikkat etmeniz gerekir.
Aşağıdaki script ile Encrypt edilen virtual machine’lerin listesini çekebilirsiniz.
#List all VM’s Get-VM |Select Name,Encrypted,KMSserver #List only encrypted VM’s Get-VM |Where-Object $_.Encrypted -eq $True | Select Name,Encrypted,KMSserver #Export to Csv Get-VM |Where-Object $_.Encrypted -eq $True | Select Name,Encrypted,KMSserver |Export-Csv Encrypted.csv -NoTypeInformation
Son olarak VM Encryption işleminde vCenter Server ve KMS arasında bir ilişki sağlandığı için, vSphere HA tamamen support edilir. Yani KMS ile vCenter Server arasında bir güven ilişkisi bulunur. Bundan dolayı vCenter Server’a dahil olarak tüm ESXi host’larda VM Encryption işlemini gerçekleştirebilirsiniz. vSphere HA ile tam uyumlu çalışır. Ortamınızda Cross vCenter var ise VM Encryption desteklenmez. Ancak ilerleyen sürümlerde bunun support edileceğini düşünüyorum.
Ben burada VM Encryption için Hytrust ürününü kullanacağım. Açıkcası appliance olduğu için hem kurulumu hemde konfigurasyonu oldukça basit bundan dolayı Hytrust’ı tercih ettim.
Virtual Machine Encryption – Bölüm 2
İlk olarak vCenter Server’i seçiyoruz ve Configure bölümüne giriş yapıyoruz. Ardından Security altında yer alan Key Providers bölümüne giriş yapıyoruz. Burada Add Standard Key Provider butonuna basıyoruz.
Makalemin başındada belirtmiştim. Ben burada Hytrust ürününü kullanıyorum ve bunun erişim bilgilerini buraya tanımlıyorum. Optional yazan bölümleri doldurmanıza gerek bulunmuyor. Add Key Provider butonuna basıyoruz.
KMS’in bilgilerini girdikten sonra KMS not connected uyarısı çıkacaktır. Gerekli sertifika işlemlerini tamamlamadığımız için böyle bir uyarı almaktayız. Şimdi burada vCenter Server ve KMS arasında bir sertifika işlemi bulunuyor. Bu sertifika üzerinden güven ilişkisi kurulacaktır.
Trust vCenter butonuna basıyoruz.
KMS ile vCenter Server arasındaki ilişkiyi birden fazla yöntem ile sağlayabilirsiniz. Ben burada Yeni bir CSR oluşturacağım ve bunu KMS olarak kullandığım Hytrust’a ekleyeceğim. New Certificate Signing Request (CSR) butonuna basıyorum ve Next ile devam ediyorum.
Karşıma sertifikanın içeriği geliyor. Burada Download butonuna basıyorum ve CSR’i download ediyorum.
Hytrust üzerinde yeni bir client certificate oluşturuyorum. Burada daha önce oluşturduğum ve download ettiğim CSR dosyasını ekliyorum. Oldukça basit bir işlem zaten. Herhangi bir şifre belirtmiyorum. Create butonuna basıyorum.
Client Certificate ‘i başarılı bir şekilde oluşturduk. Şimdi bu oluşturduğumuz sertifikayı download edip tekrar vCenter Server ile KMS arasındaki ilişkiyi sağlamak için vCenter Server’a eklememiz gerekiyor. Bunun için Download Certificate butonuna basıyoruz.
İndirmiş olduğumuz sertifika dosyasını Winrar ile açtığımızda karşımıza 2 adet pem uzantılı dosya çıkıyor. Biz burada vcenter.pem isimli dosyayı kullanacağız.
Hytrust üzerinden indirmiş olduğumuz dosyayı yüklemek için, Establish Trust butonuna basıyoruz ve buradan Upload Signed CSR Certificate butonuna basıyoruz.
Burada Upload File butonuna basıyoruz ve Hytrust üzerinden indirmiş olduğumuz rar paketini açıp, vcenter.pem isimli dosyayı upload ediyoruz.
Tüm işlemleri başarılı bir şekilde tamamladığımızda yukarıdaki gibi bir ekran ile karşılaşacaksınız. Gördüğünüz gibi KMS Connected duruma geldi. Bu aşamadan sonra artık VM Encryption’i aktif hale getirebiliriz. Bu işlemlere bir sonraki bölümde devam edeceğim.
Umarım faydalı olmuştur.
İyi çalışmalar.
0 notes
Text
New Post has been published on
New Post has been published on https://www.tayfundeger.com/developer-center-nedir.html
Developer Center Nedir?
Merhaba,
Developer Center Nedir? isimli bu yazımda sizlere vCenter Server üzerinde yer alan Developer Center hakkında bilgi vereceğim. Ben daha önce Developer Center ile ilgili kısa kısa bilgiler vermiştim. Bu yazılarıma aşağıdaki linkten ulaşabilirsiniz.
vCenter Server 7 Yenilikleri
VMware Project Pacific Nedir?
Developer Center ilk olarak vCenter Server 6.7 Update 2 ile birlikte geldi. vCenter Server 6.7 Update 2 ve sonraki sürümlerde Developer Center’i bulabilirsiniz. Hatta bundan önce VMware Flings’de yayınlanan Onyx projesini hatırlıyor olabilirsiniz. O da bununla benzer işlevlere sahipti. VMware, normalde Developer Center’i ilk olarak AWS Cloud üzerindeki VMware’de kullanıma başladı. Yani ilk olarak orada yayınladı. Daha sonrasında aktif olarak kullanıldığını görünce VMware bunu vSphere ürün ailesine eklemek durumunda kaldı.
Developer Center Nedir?
Developer Center sayesinde, vCenter Server’da yapılan işlemlerinizi kayıt edebilir ve bu işlemleri kod olarak çıktısını verir. Developer Center içerisinde yer alan Code Capture, VMware vCenter Server üzerinde yapmış olduğunuz işlemleri kayıt eder ve bunları çalıştırabileceğiniz kodlara çevirir. Bunu yapması çok iyi birşey çünkü yapmış olduğunuz işlemlerin PowerCLI aracılığı ile analiz etmenize ve yeniden kullanmanıza imkan sağlar. Tabi burada yanlızca vCenter Server’in yapmış olduğu işlemlerin kayıt altına alındığını unutmayın. Yani vCenter Server üzerinden yapmış olduğunuz işlemler kayıt altına alınıyor. Ancak kayıt altına alınmayan bazı şeylerde var.
Permissions
Tags
Content Library
Storage Policies
Yukarıda belirtmiş olduğum başlıkları Code Capture üzerinde göremezsiniz. Code Capture‘ı kullanabilmeniz için öncelikle etkinleştirmeniz gerekiyor. Code Capture ile kayıt etmiş olduğunuz işlemleri daha sonra dışarıya powercli biçiminde çıkartabilir ve yapmış olduğunuz işlemlerin powercli karşılığını görebilirsiniz. Tabi burada siz isterseniz VRO Javascript, Python gibi yazılım dilleri olarakta kayıt edebilirsiniz.
Tabiki Developer Center içerisinde sadece Code Capture bulunmuyor ancak en önemlilerinden biri olduğu için ben ilk olarak Code Capture’ı açıklamak istedim. Developer Center içerisinde API Explorer isimli bir bölüm var. API Explorer içerisinde VMware vSphere tarafından desteklenen ve sunulan REST API’ları görebilir ve bunlar üzerine çalışmalar sağlayabilirsiniz. İleride API Explorer ile ilgili ayrıca bir makale yazacağım. Burada örnekler ile birlikte detay vereceğim.
Code Capture kullanabilmek için ilk olarak Develeoper Center’a giriş yapıyoruz.
Developer Center Nedir?
vCenter Server’ a login olduktan sonra Home > Developer Center bölümüne giriş yapabiliriz. Buraya giriş yaptığımızda karşımıza 3 bölüm çıkıyor.
Overview: Develeoper Center’i ile ilgili bilgiler veriilyor.
API Explorer: API Explorer, sistem tarafından desteklenen vSphere REST API‘lerine göz atmanızı ve çağırmanızı sağlar ve API çağrıları hakkında bilgi ve bağlam sağlar.
API Explorer ile ortamınızdan bir API endpoint seçebilir ve vSphere REST API’lerinin bir listesini alabilirsiniz. Kullanılabilir parametreler, beklenen yanıtlar ve yanıt durum kodları gibi ayrıntıları inceleyebilir ve API’ları canlı ortama çağırabilirsiniz.
Code Capture: Code Capture bölümünde, yapmış olduğumuz işlemlerin kod olarak karşılığını görüyoruz. Code Capture ile ilgili detaylı bir şekilde yukarıda bilgi verdiğim için ve Code Capture ile ilgili detaylı bir makale yazacağım için burada detay vermeyeceğim.
Bir sonraki makalemde Developer Center – Code Capture ile ilgili detaylı bilgiler vereceğim.
Umarım faydalı olmuştur.
İyi çalışmalar.
0 notes