#vue axios download file
Explore tagged Tumblr posts
Visit Tumblr Blog
Explore Tumblr blogs with no restrictions, modern design and the best experience.
Last Seen Tumblr Blogs


Fun Fact
The total number of visits Tumblr.com received during January 2021 is 327 million.
Link
In this tutorial, we will help you learn how to download the file in the vue js application using the Axios package.
0 notes
Text
Vue js download file via laravel API
Vue js download file via laravel API
Hello buddy, I hope you are doing well, in this article we will learn about how to download a pdf file via Vue js Axios and laravel as backed API. I understood that you search over enormous articles for this stuff but don’t get the working solution but we have one. The user doesn’t go bared hand from our website. We will follow the below steps to download the file via laravel API Write the…

View On WordPress
#how to download pdf in vue js#vue axios download file#vue download file from assets#vue download pdf from api#vue js download file from api#vue js download zip file#vuejs download file from server#vuetify download file
0 notes
Photo

Download Files with Axios and Vue ☞ http://bit.ly/2Ki1pAw #vuejs #javascript
1 note
·
View note
Text
Ff mod menu templates for ff vewer v3

#Ff mod menu templates for ff vewer v3 update#
#Ff mod menu templates for ff vewer v3 software#
#Ff mod menu templates for ff vewer v3 download#
#Ff mod menu templates for ff vewer v3 free#
Request For Commits #12 - Crowdfunding Open Source (Vue.js) (06-15-2017).
MW S04E08 - Vue.js with Evan You and Sarah Drasner (04-27-2017).
Codecasts #2 - Falando Sobre Vuejs e Web Components ().
#Ff mod menu templates for ff vewer v3 software#
Software Engineering Daily (12-29-2015).
VueJS Uzbekistan - Telegram Community and Support Group.
vueslack - 2300+ registered users worldwide.
VueJS Iran - Telegram Channel & group (group link available in channel bio).
vue-requests - Request a Vue.js module you wish existed or get ideas for modules.
#Ff mod menu templates for ff vewer v3 free#
Prokarman Resume Builder - A Free Resume Builder for crafting resumes for your dream job.Vue.js Interview Questions - A List of 300 VueJS Interview Questions and Answers.Vue.js Jobs - VueJobs - A Vue.js job portal to hire or get hired for all your Vue.js jobs.Notes on Vue - A personal guide to Vue development.Best vue.js Courses On YouTube - Handpicked list of best Vue.js tutorials on YouTube.Vue.js Articles - Assorted Vue 2 and 3 tutorials and articles.Vue.js Workshops - Learn Vue 2, in browser, by building 3 applications: Landing page, Todos App and Podcasts aggregator.( Vue.js, Vue-Router, Vuex, Vue-Axios, Vue-Apollo ).Vue 3 Video Playlist - Amazing Vue 3 tutorials and experiments.Vue Mastery - The ultimate learning resource for Vue developers.- An extensive list of websites created with the Vue.js Javascript framework.Vue.js Online Courses Directory - Vue.js courses from top e-learning platforms curated by Classpert, a online course search engine.Vue.js DEV Community - Official tag for the Vue.js JavaScript Framework on DEV.to.A minimalistic list of Vue.js libraries and components based on the awesome-vue repo. Tips & tricks about the Vue ecosystem, for busy devs. Vue School - Learn Vue.js from video courses by core members and industry experts.Vue Curated Resources - Recommended Vue.js courses and tutorials.Weekly Vue.js Newsletter - Weekly Vue.js news & tips by Vue News - Social website focusing on the latest Vue.js news and information.Vue.js 資料まとめ(for japanese) by Vue.js Wikipedia.If you’re unsure of what to pick, just leave them as they are and press Next.A curated list of awesome things related to Vue.js Go through the installing process and select your desired settings.
#Ff mod menu templates for ff vewer v3 download#
Click the link above, then click the download tab, then click the 32-bit or 64-bit Installer to download:.Notepad++ is far superior than the regular old Notepad and will allow you to edit your XMLs with ease. Don’t worry about any of the other settings for now.Now open it up and make sure it has the path to WinMerge correct.Then just move TS4 XML Compare.exe to your Desktop, no installation required.Find where you downloaded it to on your computer, then right-click to extract it using your extracting program (built-in, WinRAR, 7-zip, etc).Click the link above, then click on the Files tab, and click on TS4 XML Compare.rar as shown below:.
#Ff mod menu templates for ff vewer v3 update#
TS4 XML Compare will help you update any mods that become incompatible with a patch by comparing the old version to the new version.
Now that you have it open, go through the Options and set them as I have them below:.
Once installed, tick Launch WinMerge, then click Finish.
Go through the installing process and select your desired settings. If you’re unsure of what to pick, just leave them as they are and press Next.
Find where you downloaded it to on your computer, then double-click it.
Another window (or tab) will come up and it will automatically download.
Click the link above, then click the Download Now! button.
It’s required for TS4 XML Compare that we’re installing next. You’ll need WinMerge to check if your mods are compatible with new patches.
Close the program and it’s ready to go for the upcoming tutorials.
Once you have all of the settings done, go ahead and click the Save button in the Settings window.
Check to make sure the Sims 4 Path and Sims 4 Documents paths are set correctly.
Now that it’s open, click on Settings in the upper-left:.
Once it’s done installing, tick Launch Sims 4 Studio, then click Finish.
Once it’s done downloading, find where you downloaded it to on your computer and double-click the icon.
Scroll down and click on the Installer link to download:.
Now click on the link that says Sims 4 Studio version number (name) – Open Beta, as shown below (the version number/name will change as it receives updates):.
I’ve always used the Beta regardless and have had no issues. Note – The Community Tested Version was not available at the time that I wrote this guide, once it is you can use either one.
Click on Download Sims 4 Studio – Open Beta Version.
Click the link above, then Register (if needed) and Log in.
Most of these tutorials use Sims 4 Studio. I prefer Sims 4 Studio because it has almost everything you need to create Mods/CC all in one program.
0 notes
Text
Force File Download in #Vuejs using Axios https://t.co/6quEp2FycH #JavaScript #Vue https://t.co/MmPaRSXpYf
Force File Download in #Vuejs using Axios https://t.co/6quEp2FycH #JavaScript #Vue pic.twitter.com/MmPaRSXpYf
— Macronimous.com (@macronimous) September 21, 2020
from Twitter https://twitter.com/macronimous September 21, 2020 at 09:10PM via IFTTT
0 notes
Photo
React's rise, Babel 7.10.0, and good GitHub etiquette
#491 — June 5, 2020
Unsubscribe | Read on the Web
JavaScript Weekly
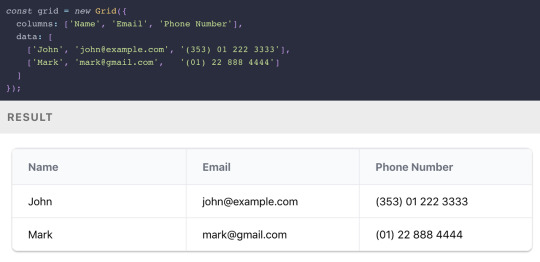
Grid.js: An Advanced Table Library — A lightweight, advanced table plugin that can work alongside React, Angular, Vue, or, well, nothing. Check out some of the examples for more on how to use it. It uses Preact under the hood.
Afshin Mehrabani
The Rise of React (And Its Growing Pervasiveness) — In the most recent issue of Increment, a noted journalist (for WIRED and The Economist) takes a wide-angle look at how React came to be one of the predominant frontend frameworks powering today’s web and the attendant implications ― both positive and negative ― for the future.
Chris Stokel-Walker (Increment)
Does a Serverless Headless CMS Exist? It Does Now — The first headless CMS built for serverless infrastructure. Forget about scaling problems, flash crowds, setting up and managing servers and stop overpaying for resources you don't use. It's free and open-source, check it out.
Webiny sponsor
Babel 7.10.0 Released — The hugely popular JavaScript transpiler got more tweaks than you’d expect for a minor point release including an experimental version of a new polyfills compatability architecture, improvements to optional chaining and private fields support, and better tree-shaking for React code.
Nicolò Ribaudo
⚡️ Quick bytes:
🖤 This week, the React core team joined the Facebook employee walkout in solidarity with the Black community — it's time to speak up, donate or even just stream a fundraising video, because Black lives matter.
The Repl.IT online IDE/sandbox now supports Deno if you want to play without installing it for real.
SpiderMonkey, Firefox's JavaScript engine, has a new regular expressions engine which opens up support for modern regex syntax it didn't have before.
AngularJS 1.8.0 is out. Yes, that's the old school Angular.js, not the more modern Angular.
Zappar has released some universal AR SDKs for Three.js and vanilla JavaScript if augmented reality is your bag.
💻 Jobs
JavaScript Developer at X-Team (Remote) — Join X-Team and work on projects for companies like Riot Games, FOX, Coinbase, and more. Work from anywhere.
X-Team
Find A Job Through Vettery — Vettery specializes in tech roles and is completely free for job seekers. Create a profile to get started.
Vettery
Senior Software Engineer — Save Lives & Make an Impact — We use Node/TS/React & ML to provide crisis support via SMS. Help us scale globally with a focus on privacy and security.
Crisis Text Line
📚 Tutorials and Opinions
Reusing UI Components at Enterprise Level — An engineer at PayPal explains how they share UI components across their various products.
Dong Chen (PayPal)
The 'Top Types' any and unknown in TypeScript — They’re not top types because they’re the best types 😂 .. but they’re essentially ‘universal’ types that can contain all values (in opposition to the never type which is the empty set).
Dr. Axel Rauschmayer
One Cool Trick to Simplify Reducer Functions — An introduction to the Immer immutable state library as a way to reduce the complexity of Redux reducers.
Eric Elliott
Getting Started With OpenTelemetry In Node.js
Lightstep sponsor
How-to Normalize Home Volume Levels with Node-RED — Node-RED is a JavaScript-powered ‘low code’ visual programming environment frequently used with hardware/IoT use cases. I rarely see tutorials about it, so this is pretty neat.
Blake Niemyjski
The Service Worker Lifecycle Explained — Explaining the lifecycle of Service Workers in PWAs and how to update them as fast as possible.
Felix Gerschau
Track Your (Android) Smartphone in Physical Space with JavaScript — Leans on the Generic Sensor APIs so you’re limited to Android for now, but it’s fun to see the potential.
Sanjeet Chatterjee
Some Reminders of Good GitHub Etiquette — Basic things, but sometimes easily forgotten, from one of the date-fns maintainers.
Sasha Koss
MongoDB Is Easy. Now Make It Powerful. Free Download for 30 Days.
Studio 3T sponsor
▶ Inside Vue 3 with Gregg Pollack — An hour long podcast chat with Gregg Pollack of Vue Mastery about Vue 3 reactivity model course and when and where the new Composition API is worth using.
Views on Vue Podcast podcast
How to Create a Web Worker-Driven Multithreaded Frontend App — It leans on an under-development Web Worker-driven framework called neo.mjs that promises “a new era of making better Web-based user interfaces.”
Tobias Uhlig
Stranger Things, JavaScript Edition — This is mostly a bit of fun mixed with a little bit of Wat picking on some JavaScript oddities. If the quirks of equality and NaN are familiar to you, move on.
Live Code Stream
Using Git to Run ESLint on Changed Files in a Feature Branch
Jeffrey Auriemma
🔧 Code & Tools

TUI Editor 2.1: A Powerful Markdown WYSIWYG Editor — You get the Markdown on the left, output on the right. The latest release added much better syntax highlighting for the Markdown source (if you want it) and ‘preview highlighting’ where the output of the code you’re working on is highlighted in the preview pane.
NHN
redaxios: The Axios API, as an 800 Byte Fetch Wrapper — If you love the Axios API but want to get it in a lighter way..
Jason Miller
A Much Faster Way to Debug Code Than with Breakpoints or console.log — Move forward and backwards through your code to understand what led to a specific bug, view runtime values, edit-and-continue, and more.
Wallaby.js sponsor
React Date Picker 3.0: A Simple and Reusable Date-Picker Component — A mature option that continues to get frequent updates. Demo here.
HackerOne
Frappe Charts 1.5: Responsive, Zero Dependency SVG Charts — Here’s are some examples (with code) to explore.
Prateeksha Singh
ms: Tiny Milisecond Conversion Utility — For example: ms('2.5 hrs') becomes 9000000 .. or ms(2 * 60000) becomes ‘2m’.
Vercel
🗓 Upcoming Online Events
JS Nation (June 18-19) — This free two-day remote conference features over 25 speakers, including Jen Looper, Max Stoiber, John Papa and others.
OpenJS World (June 23-24) — Speakers at this 'virtual experience' include Nicole Sullivan, Prosper Otemuyiwa, Cassidy Williams and more.
CascadiaJS 2020 (September 1-2) — This upcoming online conference is set to take place in September.
by via JavaScript Weekly https://ift.tt/2XyWzFv
0 notes
Text
Tackling Authentication With Vue Using RESTful APIs
Authentication (logging in!) is a crucial part of many websites. Let’s look at how to go about it on a site using Vue, in the same way it can be done with any custom back end. Vue can’t actually do authentication all by itself, —we’ll need another service for that, so we’ll be using another service (Firebase) for that, but then integrating the whole experience in Vue.
Authentication works quite differently on Single Page Applications (SPAs) than it works on sites that reload every page. You don’t have to make an SPA with Vue, but we will in this tutorial.
Here’s the plan. We’ll build a UI for users to log in and the submitted data will be sent to a server to check if the user exists. If yes, we’ll be sent a token. That’s very useful, because it’s going to be used throughout our site tocheck if the user is still signed in. If no, the user can always sign up. In other words, it can be used in lots of conditional contexts. Beyond that, if we need any information from the server that requires been logged in, the token is sent to the server through the URL so that information can be only sent to logged in users.
The complete demo of this tutorial is posted on GitHub for those that who are comfortable reading through the code. The rest of us can follow through with the article. The starter file is also on GitHub so you can follow through as we code together.
After downloading the repo, you’ll run npm install in your terminal. If you’re going to build this application completely on your own, you’ll have to install Vuex, Vue Router, and axios. We’ll also use Firebase for this project, so take a moment to set up a free account and create a new project in there.
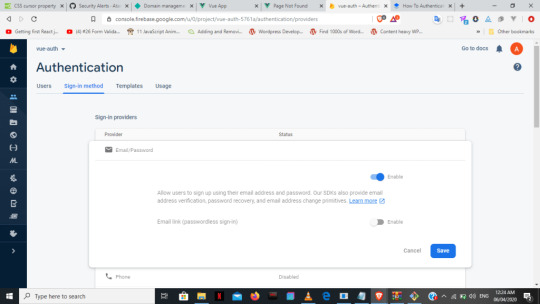
After adding the project to Firebase, go to the authentication section, and set up a sign in method where we would be using the traditional email/password provider, that’ll be stored on our Firebase servers.

After that we’ll then go to the Firebase Auth REST API documentation to get our sign up and sign in API endpoints. We’ll need an API key to use those endpoints in our app and it can be found in the Firebase project settings.
Firebase offers authentication over the SDK, but we’re using the Auth API to demonstrate authentication over any custom back end server.
In our stater file, we have the sign up form below. We’re keeping things pretty simple here since we’re focusing on learning the concepts.
<template> <div id="signup"> <div class="signup-form"> <form @submit.prevent="onSubmit"> <div class="input"> <label for="email">Mail</label> <input type="email" id="email" v-model="email"> </div> <div class="input"> <label for="name">Your Name</label> <input type="text" id="name" v-model.number="name"> </div> <div class="input"> <label for="password">Password</label> <input type="password" id="password" v-model="password"> </div> <div class="submit"> <button type="submit">Submit</button> </div> </form> </div> </div> </template>
If we weren’t working with an SPA, we would naturally use axios to send our data inside the script tag like this:
axios.post('https://identitytoolkit.googleapis.com/v1/account s:signUp?key=[API_KEY]', { email: authData.email, password: authData.password, returnSecureToken: true }) .then(res => { console.log(res) }) .catch(error => console.log(error)) } }
Sign up and log in
Working with an SPA (using Vue in this case) is very different from the above approach. Instead, we’ll be sending our authorization requests using Vuex in our actions in the store.js file. We’re doing it this way because we want the entire app to be aware of any change to the user’s authentication status.
actions: { signup ({commit}, authData) { axios.post('https://identitytoolkit.googleapis.com/v1/accounts:signUp?key=[API_KEY]', { email: authData.email, password: authData.password, returnSecureToken: true }) .then(res => { console.log(res) router.push("/dashboard") }) .catch(error => console.log(error)) }, login ({commit}, authData) { axios.post(https://identitytoolkit.googleapis.com/v1/accounts:signIn?key=[API_KEY]', { email: authData.email, password: authData.password, returnSecureToken: true }) .then(res => { console.log(res) router.push("/dashboard") }) .catch(error => console.log(error)) } }
We can use pretty much the same thing for the sign in method, but using the sign in API endpoint instead. We then dispatch both the sign up and log in from the components, to their respective actions in the store.
methods : { onSubmit () { const formData = { email : this.email, name : this.name, password : this.password } this.$store.dispatch('signup', formData) } } }
formData contains the user’s data.
methods : { onSubmit () { const formData = { email : this.email, password : this.password } this.$store.dispatch('login', {email: formData.email, password: formData.password}) } }
We’re taking the authentication data (i.e. the token and the user’s ID) that was received from the sign up/log in form, and using them as state with Vuex. It’ll initially result as null.
state: { idToken: null, userId: null, user: null }
We now create a new method called authUser in the mutations that’ll store the data that’s collected from the response. We need to import the router into the store as we’ll need that later.
import router from '/router'
mutations : { authUser (state, userData) { state.idToken = userData.token state.userId = userData.userId } }
Inside the .then block in the signup/login methods in our actions, we’ll commit our response to the authUser mutation just created and save to local storage.
actions: { signup ({commit}, authData) { axios.post('https://identitytoolkit.googleapis.com/v1/accounts:signUp?key=[API_KEY]'), { email: authData.email, password: authData.password, returnSecureToken: true }) .then(res => { console.log(res) commit('authUser', { token: res.data.idToken, userId: res.data.localId }) localStorage.setItem('token', res.data.idToken) localStorage.setItem('userId', res.data.localId) router.push("/dashboard") }) .catch(error => console.log(error)) }, login ({commit}, authData) { axios.post('https://identitytoolkit.googleapis.com/v1/accounts:signIn?key=[API_KEY]'), { email: authData.email, password: authData.password, returnSecureToken: true }) .then(res => { console.log(res) commit('authUser', { token: res.data.idToken, userId: res.data.localId }) localStorage.setItem('token', res.data.idToken) localStorage.setItem('userId', res.data.localId) router.push("/dashboard") }) .catch(error => console.log(error)) } }
Setting up an Auth guard
Now that we have our token stored within the application, we’re going touse this token while setting up our Auth guard. What’s an Auth guard? It protects the dashboard from unauthenticated users access it without tokens.
First, we’ll go into our route file and import the store. The store is imported because of the token that’ll determine the logged in state of the user.
import store from './store.js'
Then within our routes array, go to the dashboard path and add the method beforeEnter which takes three parameters: to, from and next. Within this method, we’re simply saying that if the tokens are stored (which is automatically done if authenticated), then next, meaning it continues with the designated route. Otherwise, we’re leading the unauthenticated user back to the sign up page.
{ path: '/dashboard', component: DashboardPage, beforeEnter (to, from, next) { if (store.state.idToken) { next() } else { next('/signin') } } }
Creating the UI state
At this point, we can still see the dashboard in the navigation whether we’re logged in or not, and that’s not what we want. We have to add another method under the getters called ifAuthenticated which checks if the token within our state is null, then update the navigation items accordingly.
getters: { user (state) { return state.user }, ifAuthenticated (state) { return state.idToken !== null } }
Next, let’s open up the header component and create a method called auth inside the computed property. That will dispatch to the ifAuthenticated getters we just created in the store. ifAuthenticated will return false if there’s no token, which automatically means auth would also be null, and vice versa. After that, we add a v-if to check if auth is null or not, determining whether the dashboard option would show in the navigation.
<template> <header id="header"> <div class="logo"> <router-link to="/">Vue Authenticate</router-link> </div> <nav> <ul> <li v-if='auth'> <router-link to="/dashboard">Dashboard</router-link> </li> <li v-if='!auth'> <router-link to="/signup">Register</router-link> </li> <li v-if='!auth'> <router-link to="/signin">Log In</router-link> </li> </ul> </nav> </header> </template> <script> export default { computed: { auth () { return this.$store.getters.ifAuthenticated } }, } </script>
Logging out
What’s an application without a logout button? Let’s create a new mutation called clearAuth, which sets both the token and userId to null.
mutations: { authUser (state, userData) { state.idToken = userData.token state.userId = userData.userId }, clearAuth (state) { state.idToken = null state.userId = null } }
Then, in our logout action , we commit to clearAuth, delete local storage and add router.replace('/') to properly redirect the user following logout.
Back to the header component. We have an onLogout method that dispatches our logout action in the store. We then add a @click to the button which calls the to the onLogout method as we can see below:
<template> <header id="header"> <div class="logo"> <router-link to="/">Vue Authenticate</router-link> </div> <nav> <ul> <li v-if='auth'> <router-link to="/dashboard">Dashboard</router-link> </li> <li v-if='!auth'> <router-link to="/signup">Register</router-link> </li> <li v-if='!auth'> <router-link to="/signin">Log In</router-link> </li> <li v-if='auth'> <ul @click="onLogout">Log Out</ul> </li> </ul> </nav> </header> </template> <script> export default { computed: { auth () { return this.$store.getters.ifAuthenticated } }, methods: { onLogout() { this.$store.dispatch('logout') } } } </script>
Auto login? Sure!
We’re almost done with our app. We can sign up, log in, and log out with all the UI changes we just made. But, when we refresh our app, we lose the data and are signed out, having to start all over again because we stored our token and Id in Vuex, which is JavaScript. This means everything in the app gets reloaded in the browser when refreshed.
What we’ll do is to retrieve the token within our local storage. By doing that, we can have the user’s token in the browser regardless of when we refresh the window, and even auto-login the user as long as the token is still valid.
Create a new actions method called AutoLogin, where we’ll get the token and userId from the local storage, only if the user has one. Then we commit our data to the authUser method in the mutations.
actions : { AutoLogin ({commit}) { const token = localStorage.getItem('token') if (!token) { return } const userId = localStorage.getItem('userId') const token = localStorage.getItem('token') commit('authUser', { idToken: token, userId: userId }) } }
We then go to our App.vue and make a created method where we’ll dispatch the autoLogin from our store when the app is loaded.
created () { this.$store.dispatch('AutoLogin') }
Yay! With that, we’ve successfully implemented authentication within our app and can now deploy using npm run build. Check out the live demo to see it in action.
The example site is purely for demonstration purposes. Please do not share real data, like your real email and password, while testing the demo app.
The post Tackling Authentication With Vue Using RESTful APIs appeared first on CSS-Tricks.
Tackling Authentication With Vue Using RESTful APIs published first on https://deskbysnafu.tumblr.com/
0 notes
Text
Tackling Authentication With Vue Using RESTful APIs
Authentication (logging in!) is a crucial part of many websites. Let’s look at how to go about it on a site using Vue, in the same way it can be done with any custom back end. Vue can’t actually do authentication all by itself, —we’ll need another service for that, so we’ll be using another service (Firebase) for that, but then integrating the whole experience in Vue.
Authentication works quite differently on Single Page Applications (SPAs) than it works on sites that reload every page. You don’t have to make an SPA with Vue, but we will in this tutorial.
Here’s the plan. We’ll build a UI for users to log in and the submitted data will be sent to a server to check if the user exists. If yes, we’ll be sent a token. That’s very useful, because it’s going to be used throughout our site tocheck if the user is still signed in. If no, the user can always sign up. In other words, it can be used in lots of conditional contexts. Beyond that, if we need any information from the server that requires been logged in, the token is sent to the server through the URL so that information can be only sent to logged in users.
The complete demo of this tutorial is posted on GitHub for those that who are comfortable reading through the code. The rest of us can follow through with the article. The starter file is also on GitHub so you can follow through as we code together.
After downloading the repo, you’ll run npm install in your terminal. If you’re going to build this application completely on your own, you’ll have to install Vuex, Vue Router, and axios. We’ll also use Firebase for this project, so take a moment to set up a free account and create a new project in there.

After adding the project to Firebase, go to the authentication section, and set up a sign in method where we would be using the traditional email/password provider, that’ll be stored on our Firebase servers.
After that we’ll then go to the Firebase Auth REST API documentation to get our sign up and sign in API endpoints. We’ll need an API key to use those endpoints in our app and it can be found in the Firebase project settings.
Firebase offers authentication over the SDK, but we’re using the Auth API to demonstrate authentication over any custom back end server.
In our stater file, we have the sign up form below. We’re keeping things pretty simple here since we’re focusing on learning the concepts.
<template> <div id="signup"> <div class="signup-form"> <form @submit.prevent="onSubmit"> <div class="input"> <label for="email">Mail</label> <input type="email" id="email" v-model="email"> </div> <div class="input"> <label for="name">Your Name</label> <input type="text" id="name" v-model.number="name"> </div> <div class="input"> <label for="password">Password</label> <input type="password" id="password" v-model="password"> </div> <div class="submit"> <button type="submit">Submit</button> </div> </form> </div> </div> </template>
If we weren’t working with an SPA, we would naturally use axios to send our data inside the script tag like this:
axios.post('https://identitytoolkit.googleapis.com/v1/account s:signUp?key=[API_KEY]', { email: authData.email, password: authData.password, returnSecureToken: true }) .then(res => { console.log(res) }) .catch(error => console.log(error)) } }
Sign up and log in
Working with an SPA (using Vue in this case) is very different from the above approach. Instead, we’ll be sending our authorization requests using Vuex in our actions in the store.js file. We’re doing it this way because we want the entire app to be aware of any change to the user’s authentication status.
actions: { signup ({commit}, authData) { axios.post('https://identitytoolkit.googleapis.com/v1/accounts:signUp?key=[API_KEY]', { email: authData.email, password: authData.password, returnSecureToken: true }) .then(res => { console.log(res) router.push("/dashboard") }) .catch(error => console.log(error)) }, login ({commit}, authData) { axios.post(https://identitytoolkit.googleapis.com/v1/accounts:signIn?key=[API_KEY]', { email: authData.email, password: authData.password, returnSecureToken: true }) .then(res => { console.log(res) router.push("/dashboard") }) .catch(error => console.log(error)) } }
We can use pretty much the same thing for the sign in method, but using the sign in API endpoint instead. We then dispatch both the sign up and log in from the components, to their respective actions in the store.
methods : { onSubmit () { const formData = { email : this.email, name : this.name, password : this.password } this.$store.dispatch('signup', formData) } } }
formData contains the user’s data.
methods : { onSubmit () { const formData = { email : this.email, password : this.password } this.$store.dispatch('login', {email: formData.email, password: formData.password}) } }
We’re taking the authentication data (i.e. the token and the user’s ID) that was received from the sign up/log in form, and using them as state with Vuex. It’ll initially result as null.
state: { idToken: null, userId: null, user: null }
We now create a new method called authUser in the mutations that’ll store the data that’s collected from the response. We need to import the router into the store as we’ll need that later.
import router from '/router'
mutations : { authUser (state, userData) { state.idToken = userData.token state.userId = userData.userId } }
Inside the .then block in the signup/login methods in our actions, we’ll commit our response to the authUser mutation just created and save to local storage.
actions: { signup ({commit}, authData) { axios.post('https://identitytoolkit.googleapis.com/v1/accounts:signUp?key=[API_KEY]'), { email: authData.email, password: authData.password, returnSecureToken: true }) .then(res => { console.log(res) commit('authUser', { token: res.data.idToken, userId: res.data.localId }) localStorage.setItem('token', res.data.idToken) localStorage.setItem('userId', res.data.localId) router.push("/dashboard") }) .catch(error => console.log(error)) }, login ({commit}, authData) { axios.post('https://identitytoolkit.googleapis.com/v1/accounts:signIn?key=[API_KEY]'), { email: authData.email, password: authData.password, returnSecureToken: true }) .then(res => { console.log(res) commit('authUser', { token: res.data.idToken, userId: res.data.localId }) localStorage.setItem('token', res.data.idToken) localStorage.setItem('userId', res.data.localId) router.push("/dashboard") }) .catch(error => console.log(error)) } }
Setting up an Auth guard
Now that we have our token stored within the application, we’re going touse this token while setting up our Auth guard. What’s an Auth guard? It protects the dashboard from unauthenticated users access it without tokens.
First, we’ll go into our route file and import the store. The store is imported because of the token that’ll determine the logged in state of the user.
import store from './store.js'
Then within our routes array, go to the dashboard path and add the method beforeEnter which takes three parameters: to, from and next. Within this method, we’re simply saying that if the tokens are stored (which is automatically done if authenticated), then next, meaning it continues with the designated route. Otherwise, we’re leading the unauthenticated user back to the sign up page.
{ path: '/dashboard', component: DashboardPage, beforeEnter (to, from, next) { if (store.state.idToken) { next() } else { next('/signin') } } }
Creating the UI state
At this point, we can still see the dashboard in the navigation whether we’re logged in or not, and that’s not what we want. We have to add another method under the getters called ifAuthenticated which checks if the token within our state is null, then update the navigation items accordingly.
getters: { user (state) { return state.user }, ifAuthenticated (state) { return state.idToken !== null } }
Next, let’s open up the header component and create a method called auth inside the computed property. That will dispatch to the ifAuthenticated getters we just created in the store. ifAuthenticated will return false if there’s no token, which automatically means auth would also be null, and vice versa. After that, we add a v-if to check if auth is null or not, determining whether the dashboard option would show in the navigation.
<template> <header id="header"> <div class="logo"> <router-link to="/">Vue Authenticate</router-link> </div> <nav> <ul> <li v-if='auth'> <router-link to="/dashboard">Dashboard</router-link> </li> <li v-if='!auth'> <router-link to="/signup">Register</router-link> </li> <li v-if='!auth'> <router-link to="/signin">Log In</router-link> </li> </ul> </nav> </header> </template> <script> export default { computed: { auth () { return this.$store.getters.ifAuthenticated } }, } </script>
Logging out
What’s an application without a logout button? Let’s create a new mutation called clearAuth, which sets both the token and userId to null.
mutations: { authUser (state, userData) { state.idToken = userData.token state.userId = userData.userId }, clearAuth (state) { state.idToken = null state.userId = null } }
Then, in our logout action , we commit to clearAuth, delete local storage and add router.replace('/') to properly redirect the user following logout.
Back to the header component. We have an onLogout method that dispatches our logout action in the store. We then add a @click to the button which calls the to the onLogout method as we can see below:
<template> <header id="header"> <div class="logo"> <router-link to="/">Vue Authenticate</router-link> </div> <nav> <ul> <li v-if='auth'> <router-link to="/dashboard">Dashboard</router-link> </li> <li v-if='!auth'> <router-link to="/signup">Register</router-link> </li> <li v-if='!auth'> <router-link to="/signin">Log In</router-link> </li> <li v-if='auth'> <ul @click="onLogout">Log Out</ul> </li> </ul> </nav> </header> </template> <script> export default { computed: { auth () { return this.$store.getters.ifAuthenticated } }, methods: { onLogout() { this.$store.dispatch('logout') } } } </script>
Auto login? Sure!
We’re almost done with our app. We can sign up, log in, and log out with all the UI changes we just made. But, when we refresh our app, we lose the data and are signed out, having to start all over again because we stored our token and Id in Vuex, which is JavaScript. This means everything in the app gets reloaded in the browser when refreshed.
What we’ll do is to retrieve the token within our local storage. By doing that, we can have the user’s token in the browser regardless of when we refresh the window, and even auto-login the user as long as the token is still valid.
Create a new actions method called AutoLogin, where we’ll get the token and userId from the local storage, only if the user has one. Then we commit our data to the authUser method in the mutations.
actions : { AutoLogin ({commit}) { const token = localStorage.getItem('token') if (!token) { return } const userId = localStorage.getItem('userId') const token = localStorage.getItem('token') commit('authUser', { idToken: token, userId: userId }) } }
We then go to our App.vue and make a created method where we’ll dispatch the autoLogin from our store when the app is loaded.
created () { this.$store.dispatch('AutoLogin') }
Yay! With that, we’ve successfully implemented authentication within our app and can now deploy using npm run build. Check out the live demo to see it in action.
The example site is purely for demonstration purposes. Please do not share real data, like your real email and password, while testing the demo app.
The post Tackling Authentication With Vue Using RESTful APIs appeared first on CSS-Tricks.
source https://css-tricks.com/tackling-authentication-with-vue-using-restful-apis/
from WordPress https://ift.tt/3g2vbXC via IFTTT
0 notes
Photo

Download Files with Axios and Vue ☞ https://morioh.com/p/f4d331b62cda #Axios #Vue #Morioh
#vue#vuejs#vue js#vue tutorial#vue framework#javascript framework#vuejs course#vuejs tutorial#vue course#vue tutorial for beginners#vue course for beginners#web development#codequs#morioh
0 notes
Photo

Download Files with Axios and Vue ☞ http://bit.ly/2Ki1pAw #vuejs #javascript
0 notes
Photo

Download Files with Axios and Vue ☞ http://bit.ly/2Ki1pAw #vuejs #javascript
0 notes
Photo

Download Files with Axios and Vue ☞ https://morioh.com/p/f4d331b62cda #Axios #Vue #Morioh
#vue#vuejs#vue js#vue tutorial#vue framework#javascript framework#vuejs course#vuejs tutorial#vue course#vue tutorial for beginners#vue course for beginners#web development#codequs#morioh
0 notes
Photo

Download Files with Axios and Vue ☞ https://morioh.com/p/f4d331b62cda #Axios #Vue #Morioh
#vue#vuejs#vue js#vue tutorial#vue framework#javascript framework#vuejs course#vuejs tutorial#vue course#vue tutorial for beginners#vue course for beginners#web development#codequs#morioh
0 notes
Photo

Download Files with Axios and Vue ☞ https://morioh.com/p/f4d331b62cda #Axios #Vue #Morioh
#vue#vuejs#vue js#vue tutorial#vue framework#javascript framework#vuejs course#vuejs tutorial#vue course#vue tutorial for beginners#vue course for beginners#web development#codequs#morioh
0 notes
Photo

Download Files with Axios and Vue ☞ https://morioh.com/p/f4d331b62cda #Axios #Vue #Morioh
#vue#vuejs#vue js#vue tutorial#vue framework#javascript framework#vuejs course#vuejs tutorial#vue course#vue tutorial for beginners#vue course for beginners#web development#codequs#morioh
0 notes
Photo

🎉 JavaScript turns 25 years old
#489 — May 22, 2020
Unsubscribe : Read on the Web
JavaScript Weekly
A Complete Walkthrough to Using WebGL — A really thorough walkthrough of getting started with WebGL at the low level, complete with integrated, editable examples and coverage of the math behind 3D rendering. If you’ve ever wondered what libraries like Three.js are using behind the scenes, it’s all here.
Maxime Euzière
Microsoft Unveils 'Azure Static Web Apps' — Azure Static Web Apps brings modern static site deployment to Azure and integrates with GitHub and Visual Studio Code too. Want to see more? Here’s a 6 minute screencast demo. Yet another way to deploy those static single page apps :-)
Microsoft
The Most Complete Spreadsheet for JavaScript Apps – SpreadJS — Deliver true Excel-like experiences with this fast JavaScript enterprise spreadsheet solution. Build FinTech, analysis, budgeting, and forecasting apps. Featuring an Excel I/O, 450+ functions, tables, charts, sparklines, and more. View the latest demo.
SpreadJS by GrapeCity sponsor
The Unreasonable Effectiveness of Declarative Programming — Siddharth shows off his single file animation library by way of showing off the benefits of doing things in an (arguably) declarative style. A nifty post, this, which encourages you to interact with the code yourself.
Siddharth Bhat
The Third Age of JavaScript? — Yes, purely an opinion piece but he might have a point. “Every 10 years there is a changing of the guard in JavaScript. I think we have just started a period of accelerated change that could in future be regarded as the Third Age of JavaScript.”
Shawn Wang
Electron 9.0.0 Released — The popular cross platform desktop app framework gets more dependency bumps and is now running on Chromium 83, V8 8.3, and Node.js 12.14. There’s an integrated PDF viewer now, if you need that.
GitHub Inc.
⚡️ Quick bytes:
JavaScript is 25 years old at.. roughly now!
Microsoft has been showing off its work getting React Native on macOS and some other new Windows features.
Vue has made it into the 'adopt' zone of ThoughtWorks' languages and frameworks technology radar (and Vue 3.0.0 beta 14 is out too.)
Ionic are running IoniConf 2020 online next month (June 24).
💻 Jobs
Senior Software Engineer — Save Lives & Make an Impact — We use Node/TS/React & ML to provide crisis support via SMS. Help us scale globally with a focus on privacy and security.
Crisis Text Line
Find a Job Through Vettery — Vettery specializes in tech roles and is completely free for job seekers. Create a profile to get started.
Vettery
📚 Tutorials and Opinions

▶ (Re)-Implementing The Easiest JavaScript Game Ever — Have you ever played the ‘running dinosaur’ game in Chrome when your connection goes down? This is a fun 8 minutes spent reimplementing the basic mechanic. It’s scrappy, but that’s kinda the point. If you like his style, he’s done a 2 minute video flying through the development of another arcadey game.
KnifeCircus
The Architecture of a Serverless, Vue.js-Powered Content Management System — Not only does this outline the AWS infrastructural architecture pretty well, there’s code for you to use for your own setup if you wish.
Dan Bartlett
Understanding Lazy-Loading in Popular Frontend Frameworks — How Angular, React, and Vue handle on-demand loading of components.
tamos piros
▶ One Developer's Five Most Used JavaScript 'Tricks' — If you’re more at the beginner end of the scale, you might appreciate six minutes spent here. Well presented.
Aaron Jack beginner
Stream Chat API & JavaScript SDK for Custom Chat Apps — Build real-time chat in less time. Rapidly ship in-app messaging with our highly reliable chat infrastructure.
Stream sponsor
5 Differences Between Arrow and Regular Functions — A nice detailed look, with examples, of the differences between arrow and regular functions in JavaScript. I’m sure one or two of these will be new to many of you.
dmitri pavlutin
Dropbox's Great CoffeeScript to TypeScript Migration of 2017 — A deep retrospective from the Dropbox team on migrating hundreds of thousands of lines of CoffeeScript to TypeScript, sharing details on why they chose TypeScript and the challenges faced. “Fast forward to 2020, we now have over two million lines of TypeScript at Dropbox.”
David Goldstein
Promise.all vs Promise.allSettled — “I was reading the MDN docs on JavaScript promises and realized that the difference between Promise.all and Promise.allSettled wasn’t immediately obvious.”
JonLuca DeCaro
Growing Pains: From 0 to 13,000 Dependencies — Find out how your project can go from 0 to 13,000 dependencies in just a few steps.
Nikola Đuza
Error Handling in RxJS
Eugene Ghanizadeh Khoub
A (Mostly) Complete Guide to React Rendering Behavior
Mark Erikson
How to Use Object Destructuring in JavaScript — A code-heavy tutorial looking at object destructuring, a feature introduced in ES6 that allows you to extract properties from objects and bind them to variables.
dmitri pavlutin
🔧 Code & Tools
Reveal.js 4.0: An HTML Presentation Framework — A mature library takes another step forward. The homepage itself is, cleverly, a live demo (use the arrow keys). v4 adds several new features. Just want the code? Here’s the GitHub repo.
Hakim El Hattab
ac-colors: A Reactive Color Conversion and Generation Library — A lot of power under the hood here being able to convert between RGB, HSL, HEX, XYZ, LAB, and LCHab, as well as handle random color generation and contrast ratio calculation.
Vinay
MongoDB Is Easy. Now Make It Powerful. Free Download for 30 Days. — Using MongoDB Atlas? Studio 3T is the professional GUI and IDE that unlocks the power you need.
Studio 3T sponsor
umi-request: A Modern HTTP Request Tool Based on Fetch — An attempt at combining some of the niceties of Axios with the modernity of the Fetch API to get the best of both worlds.
UmiJS
Howler.js: An Audio Library for The Modern Web — Makes things easier cross-platform. Uses the Web Audio API but can fall back to HTML5 Audio.
James Simpson
Vue Class Store: Universal Vue Stores You Write Once and Use Anywhere — We’ll let it speak for itself: “I’ll give you reactivity, computed properties and watches, written in standard JavaScript or TypeScript, with no setup or boilerplate, and you can use me anywhere.”
Dave Stewart
New Integration: PostgreSQL Instrumented for Node.js
AppSignal sponsor
Vue Formulate: The Easy Way to Build Forms with Vue.js — First linked a few months ago, this has come on leaps and bounds since with grouped fields, a way to stop validation, slots for customization, and more.
Braid LLC
NanoPop: A Minimalistic Positioning Engine — In a race to do things in as few bytes as possible, NanoPop aims to be much smaller than even PopperJS for positioning things like tooltips and popovers.
Simon R.
by via JavaScript Weekly https://ift.tt/3bVZAUv
0 notes