#vue.js tutorial 2019
Explore tagged Tumblr posts
Visit Tumblr Blog
Explore Tumblr blogs with no restrictions, modern design and the best experience.
Last Seen Tumblr Blogs


Fun Fact
130K people were victims of a chain letter scam that affected Tumblr in May 2011.
Photo

Wie Du mit Vue.js richtig durchstartest | Vue.js in a Nutshell In dieser Serie werden wir Vue.js behandeln und verstehen. Wir werden in dieser Serie alles behandeln, was es zu Vue.js zu wissen gibt. In diesem Video ... source
#durchstartest#mit#Nutshell#richtig#vue#vue cdn#vue cli#vue german#vue js#vue js tutorial#vue mastery#vue programmieren lernen#vue tutorial 2019#vue tutorial 2020#vue.js german#vue.js programmieren#vue.js tutorial 2019#vue.js tutorial 2020#vuejs#Wie
0 notes
Photo

The Vue Tutorial (2019) - Learn Vue.js from scratch ☞ https://school.geekwall.in/p/H126-j4wE/the-vue-tutorial-2019-learn-vue-js-from-scratch #vuejs #javascript
1 note
·
View note
Photo

The Vue Tutorial (2019) - Learn Vue.js from scratch ☞ http://dev.geekwall.in/4ea6419dc8 #vuejs #javascript
1 note
·
View note
Photo

Vue.js Tutorial for Beginners 2019 - Vue.js Crash Course ☞ http://codequs.com/p/rytMBOrME?utm_source=86 #java BJql0V2nrfN
1 note
·
View note
Photo

Vue.js Tutorial for Beginners 2019 - Vue.js Crash Course ☞ http://codequs.com/p/rytMBOrME?utm_source=86 #code #learntocode #developer ryOU9rirGN
1 note
·
View note
Photo

6 Top JavaScript UI Frameworks & Libraries for 2020
This article was created in partnership with Sencha. Thank you for supporting the partners who make SitePoint possible.
JavaScript is the technology at the heart of today’s snappy and fast web apps. There are countless UI frameworks and libraries for building complex, reactive apps that scale well.
Some will help you write more efficient, maintainable code. Or you need help designing a set of consistent, interoperable, and fast UI components. In almost any situation, you can find an option that does much of the heavy lifting for you. There’s no need to start from scratch and reinvent the wheel.
The most popular JavaScript frameworks available present some common capabilities. In particular, they:
can keep state and view synchronized
offer routing functionality
let developers build, reuse, and maintain user interface components…
… that are efficient and fast to respond to user interaction.
The number of JS frameworks available is high and that number continues to grow. Take a look at these options. I’ve listed both stable, popular libraries and newer options for the curious.
Let’s jump in with a sleek, enterprise-level JavaScript framework — Ext JS by Sencha.
1. Ext JS by Sencha
Need to build a web app that handles large amounts of data, and need powerful, flexible front-end tools for displaying and working with it?
Sencha Ext JS is described as the…
most comprehensive JavaScript framework for building data-intensive, cross-platform web and mobile applications for any modern device. Ext JS includes 140+ pre-integrated and tested high-performance UI components.
Some of these components include:
a HTML5 calendar
grids
trees
lists
forms
menus
toolbars
and much more
Ext JS is a reliable, paid framework that comes with outstanding docs, tutorials, and support packages. Recent tests showed that the Ext JS data grid was 300x faster than leading competitors. In fact, its Virtual Scrolling experience retrieves and shows large quantities of data in under a second.
Advantages of Ext JS include:
quick, smooth development. Enjoy seamless integration between an enterprise framework and state-of-the-art components and tools.
comprehensive set of secure components. You’ll never have to go out of the framework to find any missing widget or functionality.
great design capabilities due to included integrated tools. Sencha Architect offers drag and drop capabilities. Sencha Stencils lets developers mock up, style, prototype and test UI concepts.
awesome unit and end-to-end testing tools with Sencha Test.
a layout manager. Manage the display of data and content across different browsers and screen sizes. A responsive config system adapts the interface to device orientation and browser window sizes.
easy to achieve accessibility compliance with the Ext JS ARIA package
a robust data package that decouples the UI components from the data layer.
You can find out more about Ext JS on the framework’s site.
2. React
React is enormously popular among front-end developers. It’s an open-source JavaScript library for building blazingly fast, interactive UIs. React was first created by Jordan Walke, a software engineer working for Facebook. It was first deployed on Facebook’s newsfeed in 2011, and on Instagram in 2012. It’s used by the likes of Netflix, Airbnb, Instagram, and the New York Times, to name a few.
Reasons for choosing React to power your next project include:
React is quick to learn and use. It’s JavaScript with a small API.
code components are stable and reusable. They’re a breeze to create and maintain using the API’s declarative syntax.
A big company and a strong community support React.
The library is stack agnostic, can also render on the server using Node.js, and on mobile apps with React Native.
3. Angular
Angular is a free, open-source framework by Google that works for both desktop and mobile.
There’s a learning curve, including getting familiar with TypeScript, a superset of JavaScript. Despite that, Angular remains a great framework to work with. Here are some of the reasons for using it:
cross-platform – progressive web apps, native mobile apps, and desktop
offers speed and performance
has great features like filters, two-way data binding, directives, and more
makes available awesome tooling for faster development
has full support from Google and a strong community of developers behind it.
For more details, don’t miss Angular Introduction: What It Is, and Why You Should Use It by Ilya Bodrov-Krukowski.
4. Vue
Vue JS is a free and open-source progressive JavaScript framework created by Evan You. It uses a template syntax (like Angular) and relies on a component-based architecture (like React).
Here’s how Vue describes itself in its own GitHub repository page:
Vue (pronounced /vjuː/, like view) is a progressive framework for building user interfaces. It is designed from the ground up to be incrementally adoptable, and can easily scale between a library and a framework depending on different use cases. It consists of an approachable core library that focuses on the view layer only, and an ecosystem of supporting libraries that helps you tackle complexity in large Single-Page Applications.
Here are some of Vue’s strongest points:
developer-friendly. If you know the languages of the web (HTML, CSS and JavaScript), the Vue docs are all you need to start building right away.
you can integrate it within a project progressively. It easily scales from a library to a full-fledged framework.
small and comes with a super-fast virtual DOM.
has an amazing community behind it, which makes it a stable framework to adopt.
offers great documentation.
If you’d like to delve deeper, read How to Tell If Vue.js Is the Right Framework for Your Next Project by Karolina Gawron.
5. Ember
Released in December 2011 by Yehuda Katz and Tom Dale, Ember is:
A framework for ambitious web developers.
Ember.js is a productive, battle-tested JavaScript framework for building modern web applications. It includes everything you need to build rich UIs that work on any device.
This JavaScript framework is free, open-source, and has a strong community behind it. Here are some of the reasons why Ember is successful among developers:
leverages the convention over configuration approach championed by David Heinemeier Hansson. It aims to lower the number of decisions that a developer has to make (without sacrificing flexibility).
almost all you need to set up your app comes with Ember out of the box.
backwards-compatible.
quick to adopt the latest web standards and JavaScript features.
offers great docs and resources.
6. Svelte 3
Though it’s growing up quickly, Svelte 3 is the new kid on the frameworks block. Rich Harris released Svelte in November 2016 as an open-source project. Version 3 came out in April 2019 and was a complete overhaul.
Svelte works differently from most frameworks listed so far. In particular:
Whereas traditional frameworks like React and Vue do the bulk of their work in the browser, Svelte shifts that work into a compile step that happens when you build your app.
Many frameworks use using techniques like virtual DOM diffing. Instead, Svelte surgically updates the DOM when the state of your app changes. Compiling code creates noticeable performance benefits.
Svelte is quick for beginners to get started with. You can build components without lots of boilerplate code. Just use HTML, CSS, and JavaScript. The Svelte site features beginner-friendly resources. These include a tutorial, examples, and a detailed API for more seasoned Svelte devs. For help and support, you’re invited to join the dedicated Discord server.
Conclusion
Choosing a framework is always a circumstancial decision. It involves paying attention to what your specific project’s challenges are. It also means considering your team’s experience and preferences.
For example, if your team needs to build data-intensive, enterprise-level projects that need a secure, reliable, and comprehensive framework with a large set of components that work well with each other, Ext JS by Sencha is a great option. You’ll never have to go out of the framework to search for components. For projects that start small but need flexibility and scaling capabilities, Vue could work well. And if your front-end team has extensive React expertise, going with React could be your best bet.
Do you have any other JS UI frameworks or library you’d like to suggest? Which ones have you found yourself using the most as a developer? Let us know on Twitter.
Continue reading 6 Top JavaScript UI Frameworks & Libraries for 2020 on SitePoint.
by Maria Antonietta Perna via SitePoint https://ift.tt/31RCs81
1 note
·
View note
Link
Vue.jsの人気がす���いですね。 いくつかの企業はすでにVue.jsを使い始めており、一部はメインのプロダクトに、一部は二次的なプロジェクトに使用しています。 Vue.jsへの関心が高まる中、人気が高いフレームワーク、そしてVue.jsをすでに採用している企業サイトを紹介します。 画像: vuejs.org Google, Apple and Other Users of Vue.js by Luca Spezzano 下記は各ポイントを意訳したものです。 ※当ブログでの翻訳記事は、元サイト様にライセンスを得て翻訳しています。 Vue.jsはGoogleも採用している 先日、Googleの人材募集サイトにアクセスした際に私が注目したのは、Chromeの機能拡張でVue.jsのアイコンがアクティブになったことです! これは、GoogleがVue.jsを使用していることを意味し、私は非常に驚きました。実際ここ数年で、Vue.jsへの関心が高まりましたが、Googleのような会社がすでに使い始めているとは思っていませんでした。 Vue.jsは現在最も注目されているJavaScriptフレームワークの1つで、Vue.jsの詳細については、公式ドキュメントをご覧ください。 人気が高いフレームワークは? Most Loved, Dreaded, and Wanted Web Frameworks Stackoverflow(デベロッパーの最大のコミュニティ)が2019年に行った調査によると、React.jsとVue.jsが最も愛され、最も望まれているフレームワークです。 Vue.jsを信頼している10大企業 Google, Apple, Behance, Oval, Nintendo, Gitlab, 9gag, Font Awesome, Trivago, Trustpilot Vue.jsを実際に使用している企業について調査を始めた結果、世界で有名な企業のいくつかが既にVue.jsを採用している事実が分かりました。 Google まずはGoogle、前述した通り人材募集のページにVue.jsが使用されています。 careers.google.com Apple Appleはプレゼンテーションを必要とせず、SwiftUIのチュートリアルでVue.jsが使用されています。 developer.apple.com/tutorials/swiftui Nintendo 人展度うはゲームに特化した日本最大の企業の1つで、自社のロイヤリティプログラムMy NintendoでVue.jsを使用しているのを見つけました。 my.nintendo.com Behance BehanceはAdobeファミリーの一員で、クリエイティブな作品と出会えるプラットフォームです。WebアプリにVue.jsが使用され、これはメインのプロダクトであることを意味します。 behance.net Oval Money Ovalはヨーロッパで最も有望なスタートアップの1つで、ここ3年で急成長をとげ、ユーザー数は350kを超えています。ファイナンシャルコーチング、投資、計画のためのアプリを提供しています。公式サイトやWebプロジェクトにVue.jsとNuxtを使用しています。 ovalmoney.com Trivago Trivagoは世界最大のホテル検索サイトの1つで、マガジンにNuxtとVue.jsが使用されています。 magazine.trivago.com Font Awesome Font Awesomeは、フロントエンドのデベロッパーやデザイナーによく知られているアイコンサイトで、Vue.jsが使用されています。 fontawesome.com Gitlab Gitlabは主にソフトウェアのエンジニアが利用しているサイトで、ソースコードの管理とモニタリングで最も人気のある1つです。GitlabはVue.jsで開発された単一のアプリケーションとして提供されています。 gitlab.com 9GAG Vue.jsはWeb上で最も人気のあるプラットフォームの1つである9GAGにも使用され、月に1億6000万人以上のユーザーを獲得しています。同社のFacebookページは4100万の「いいね」があり、Instagramには5100万人のフォロワーがいます。 9gag.com Trustpilot Trustpilotは世界最大級の消費者レビューサイトで、世界中の企業のレビューをホストしており、Vue.jsを使用しています。 trustpilot.com いくつかのブログでNetflix、Facebook、AlibabaがVue.jsを使用し始めたという記事を見かけましたが、私はそれを見つけることができませんでした。 Vue.jsを使用しているかは、Chromeの機能拡張で確認できます。 Vue.js devtool -chrome ウェブストア まとめ あなたもお気づきのように、いくつかの大企業はVue.jsを使い始め、一部はメインのプロダクトに、一部は二次的なプロジェクトに使用しています。 これはVue.jsへの関心が高まっていることを意味し、2020年にリリース予定のVue 3.0により、このフレームワークはReactの最大の競合になると思われます。 参考: Vue 3.0 Updates もしあなたがVue.jsを使用している他の大企業を知っているなら、@93lucaspまでメッセージをください。リストを更新します😃😉
0 notes
Text
Pitching Your Writing To Publications
Pitching Your Writing To Publications
Rachel Andrew
2019-08-19T14:00:59+02:002019-08-19T12:28:45+00:00
Recently, I had a chat with Chris Coyier and Dave Rupert over on the Shoptalk Podcast about writing for publications such as Smashing Magazine and CSS-Tricks. One of the things we talked about was submitting ideas to publications — something that can feel quite daunting even as an experienced writer.
In this article, I’m going to go through the process for pitching, heavily based on my own experience as a writer and as Editor in Chief of Smashing. However, I’ve also taken a look at the guidelines for other publications in order to help you find the right places to pitch your article ideas.
Do Your Research
Read existing articles on the site that you would like to write for. Who do they seem to be aimed at? What tone of voice do the writers take? Does the publication tend to publish news pieces, opinion, or how-to tutorials? Check to see if there are already other pieces which are on the same subject as your idea, i.e. will your piece add to the conversation already started by those articles? If you can show that you are aware of existing content on a particular subject, and explain how you will reference it or add to that information, the editor will know you have done some research.
Research more widely; are there already good pieces on the subject that an editor will consider your piece to be a repeat of? There is always space for a new take on an issue, but in general, publications want fresh material. You should be ready to explain how your piece will reference this earlier work and build upon it, or introduce the subject to a new audience.
A good example from our own archives is the piece, “Replacing jQuery With Vue.js”. There are a lot of introductions to Vue.js, however, this piece was squarely aimed at the web developer who knows jQuery. It introduced the subject in a familiar way specifically for the target audience.
Find The Submission Guide
The next thing to do is to find the submission information on the site you want to write for. Most publications will have information about who to contact and what information to include. From my point of view, simply following that information and demonstrating you have done some research puts you pretty high up the queue to be taken seriously. At Smashing Magazine, we have a link to the guide to writing for us right there on the contact form. I’d estimate that only 20% of people read and follow those instructions.

The link to our submission guide on our Contact Us page.
When you submit your idea, it is up to you to sell it to the publication. Why should I run with your idea over the many others that will show up today? Spending time over your submissions will make a huge difference in how many pieces you have accepted.
Different publications have different requirements. At Smashing Magazine, we ask you to send an outline first, along with some information about you so that we can understand your expertise in the subject matter. We’re very keen to feature new voices, and so we’ll accept pieces from writers who haven’t got a huge string of writing credentials.
The information we request helps us to decide if you are likely to be able to deliver a coherent piece. As our articles are technical in nature (often tutorials), I find that an outline is the best way to quickly see the shape of the proposal and the scope it will cover. A good outline will include the main headings or sections of the article, along with an explanation of what will be taught in that section.
For many other publications, a common request is for you to send a pitch for the article. This would typically be a couple of paragraphs explaining the direction your piece will take. Once again, check the submission guide for any specific details that publication is interested to see.
The Verge has an excellent submission guide which explains exactly what they want to see in a pitch:
"A good pitch contains a story, a narrative backbone. Pitches should clearly and concisely convey the story you plan to write and why it matters. The best pitches display promising pre-reporting and deep knowledge of the topic as well as a sense of the angle or insight you plan to pursue. If your story depends on access to a person or company, you should say whether you have obtained it already (and if not, what your prospects are). Pitches should also be written in the style you expect to write the story." — “How To Pitch The Verge,” The Verge
A List Apart explains what they will accept in their contribution page:
"... a rough draft, a partial draft, or a short pitch (a paragraph or two summarizing your argument and why it matters to our readers) paired with an outline. The more complete your submission is, the better feedback we can give you." — “Write For Us,” A List Apart
The Slate has a list of Do’s and Don’ts for pitching:
"Do distill your idea into a pitch, even if you have a full draft already written. If you happen to have a draft ready, feel free to attach it, but please make sure you still include a full pitch describing the piece in the body of the email." — “How To Pitch Slate,” The Slate
Including your pitch or outline in the body of the email is a common theme of pitch guidelines. Remember that your aim is to make it as easy as possible for the editor to think, “that looks interesting”.
Include A Short Biography
The editor doesn’t need your life story, however, a couple of sentences about you is helpful. This is especially useful if you are a newer writer who has subject matter expertise but fewer writing credentials. If you are proposing an article to me about moving a site from WordPress to Gatsby, and tell me that the article is based on your experience of doing this on a large site, that is more interesting to me than a more experienced writer who has just thought it would be a good topic to write about.
If you do have writing credits, a few relevant links are more helpful than a link to your entire portfolio.
When You Can’t Find A Submission Guide
Some publications will publish an email address or contact form for submissions, but have no obvious guide. In that case, assume that a short pitch as described above is appropriate. Include the pitch in the body of the email rather than an attachment, and make sure you include contact details in addition to your email address.
If you can’t find any information about submitting, then check to see if the publication is actually accepting external posts. Are all the articles written by staff? If unsure, then get in touch via a published contact method and ask if they accept pitches.
I’ve Already Written My Article, Why Should I Send An Outline Or Pitch?
We ask for an outline for a few reasons. Firstly, we’re a very small team. Each proposal is assessed by me, and I don’t have time in the day to read numerous 3000-word first draft proposals. In addition, we often have around 100 articles in the writing process at any one time. It’s quite likely that two authors will want to write on the same subject.
On receiving an outline, if it is going in a similar direction to something we already have in the pipeline, I can often spot something that would add to — rather than repeat — the other piece. We can then guide you towards that direction, and be able to accept the proposal where a completed piece may have been rejected as too similar.
If you are a new writer, the ability to structure an outline tells me a lot about your ability to deliver us something useful. We are going to spend time and energy working with you on your article, and I want to know it will be worthwhile for all of us.
If you are an experienced writer, the fact that you have read and worked with our guidelines tells me a lot about you as a professional. Are you going to be difficult for our editorial team to work with and refuse to make requested changes? Or are you keen to work with us to shape a piece that will be most useful and practical for the audience?
In The Verge submission guide included above, they ask you to “clearly and concisely” convey the story you plan to write. Your pitch shouldn’t be an article with bits removed or about the first two paragraphs. It’s literally a sales pitch for your proposed article; your job is to make the editor excited to read your full proposal! Some publications — in particular those that publish timely pieces on news topics — will ask you to attach your draft along with the pitch, however, you still need to get the editor to think it is worth opening that document.
Promoting Yourself Or Your Business
In many guides to self-promotion or bootstrapping the promotion of a startup, writing guest posts is something that will often be suggested. Be aware that the majority of publications are not going to publish an advert and pay you for the privilege.
Writing an article that refers to your product may be appropriate, as most of our expertise comes from doing the job that we do. It is worth being upfront when proposing a piece that would need to mention your product or the product of the company you work for. Explain how your idea will not be an advert for the company and that the product will only be mentioned in the context of the experience gained in your work.
Some publications will accept a trade of an article for some promotion. CSS-Tricks is one such publication, and describes what they are looking for as follows:
“The article is intended to promote something. In that case, no money changes hands. In this scenario, your pitch must be different from a sponsored post in that you aren’t just straight up pitching your product or service and that you’re writing a useful article about the web; it just so happens to be something that the promotion you’ll get from this article is valuable to you.” — “Guest Posting,” CSS-Tricks
Writing for a popular publication will give you a byline, i.e. your credit as an author. That will generally give you at least one link to your own site. Writing well-received articles can be a way to build up your reputation and even introduce people to your products and services, but if you try and slide an advert in as an article, you can be sure that editors are very well used to spotting that!
Pitching The Same Idea To Multiple Publications
For time-sensitive pieces, you might be keen to spread the net. In that case, you should make publications aware of submitting that you have submitted it elsewhere. Otherwise, it is generally good practice to wait for a response before offering the piece to another publication. The Slate writes,
"Do be mindful if you pitch your idea to multiple publications. We try to reply to everyone in a timely manner, typically within one to two days. As a general rule, and if the story isn’t too timely, it’s best to wait that amount of time before sharing the pitch with another publication. If you do decide to cast a wide net, it’s always helpful to let us know ahead of time so we can respond accordingly." — “How To Pitch Slate,” The Slate
If Your Pitch Is Rejected
You will have ideas rejected. Sometimes, the editor will let you know why, but most often you’ll get a quick no, thanks. Try not to take these to heart; there are many reasons why the piece might be rejected that have nothing to do with the article idea or the quality of your proposal.
The main reasons I reject pitches are as follows:
Obvious Spam This is the easy one. People wanting to publish a “guest post” on vague subjects, and people wanting “do-follow links”. We don’t tend to reply to these as they are essentially spam.
No Attempt At A Serious Outline I can’t tell anything about an idea from two sentences or three bullet points, and if the author can’t spend the time to write an outline, I don’t think I want to have a team member working with them.
Not A Good Topic For Us There are some outlines that I can’t ever see being a great fit for our readers.
An Attempt To Hide An Advert In this case, I’ll suggest that you talk to our advertising team!
Difficult To Work With Last but not least, authors who have behaved so badly during the pitch process that I can’t bring myself to inflict them on anyone else. Don’t be that person!
If I have a decent outline on a relevant subject in front of me, then one of two things are going to happen: I’ll accept the outline and get the author into the writing process or I’ll reply to the author because there is some reason why we can’t accept the outline as it is. That will usually be because the target audience or tone is wrong, or we already have a very similar piece in development.
Quite often in these scenarios, I will suggest changes or a different approach. Many of those initial soft rejections become an accepted idea, or the author comes back with a different idea that does indeed work.
Ultimately, those of us who need to fill a publication with content really want you to bring us good ideas. To open my inbox and find interesting pitches for Smashing is a genuine highlight of my day. So please do write for us.
Things To Do
Research the publication, and the type of articles they publish;
Read their submissions guide, and follow it;
Be upfront if you have sent the pitch to other publications;
Include a couple of sentences about you, and why you are the person to write the article. Link to some other relevant writing if you have it;
Be polite and friendly, but concise.
Things To Avoid
Sending a complete draft along with the words, “How do I publish this on your site?”;
Sending things in a format other than suggested in the submissions guide;
Pitching a piece that is already published somewhere else;
Pitching a hidden advert for your product or services;
Following up aggressively, or sending the pitch to multiple editors, Facebook messenger, and Twitter, in an attempt to get noticed. We publish a pitch contact, because we want pitches. It might take a day or two to follow up though!
More Pitching Tips
“How To Write A Pitch That Gets You Published,” Format with tips for creatives pitching to magazines
“How To Successfully Pitch The New York Times (Or, Well, Anyone Else),” Tim Herrera, NiemanLab some excellent tips on writing good pitches

(il)
0 notes
Text
[ Part 01 VueJs Introduction ] Complete Vue.JS Tutorial Series for beginners in اردو / हिंदी
[ad_1] Hello Friends,
Welcome to Part 01 VueJs Introduction by Perfect Web Solutions, This is a Complete Vue.JS Tutorial Series for Beginners in Urdu and Hindi Language 2018.
Vue (pronounced /vjuː/, like view) is a progressive framework for building user interfaces. Unlike other monolithic frameworks, Vue is designed from the ground up to be incrementally adoptable. The core library is focused on…
View On WordPress
#beginners#complete#Introduction#javascript#javascript functions#learn vue.js#learn vuejs#Part#perfect web solutions#series#tutorial#vue js#vue js 2#vue js 2 tutorial#vue js 2018#vue js 2019#vue js in hindi 2017#vue js in urdu#vue js tutorial#vue js tutorial 2018#vue js tutorial for beginners#vue js tutorial hindi#vue js tutorial in urdu 2018#vue js tutorial urdu#vue.js components#vuejs#vuejs components#vuejs hindi#VueJs Introduction#vuejs todo
1 note
·
View note
Photo

10+ Best Vue.js Courses & Tutorials in 2019! Everybody talks about Vue.js, why is it so popular? Yes, I know. You often ask this question.
0 notes
Link
JavaScript Essentials 2019 Mini Course ##100%FREEUdemyDiscountCoupons ##FreeOnlineTraining #Essentials #JavaScript #MINI JavaScript Essentials 2019 Mini Course This is the perfect introduction course to JavaScript to learn JavaScript from scratch and become an intermediate frontend developer. In this course you will learn all the JavaScript fundamentals that will launch you into a career as a web developer. JavaScript Essentials was designed to give your transferable programming skills so you can learn Node.js, Vue.js, React.js and even Python/PHP, so you can become a full stack developer. We'll go over variables, query selectors, functions and much much more! View the list of lessons below. 👉 Activate Udemy Coupon 👈 Free Tutorials Udemy Review Real Discount Udemy Free Courses Udemy Coupon Udemy Francais Coupon Udemy gratuit Coursera and Edx ELearningFree Course Free Online Training Udemy Udemy Free Coupons Udemy Free Discount Coupons Udemy Online Course Udemy Online Training 100% FREE Udemy Discount Coupons https://www.couponudemy.com/blog/javascript-essentials-2019-mini-course/
0 notes
Photo

The Vue Tutorial (2019) - Learn Vue.js from scratch ☞ https://school.geekwall.in/p/H126-j4wE/the-vue-tutorial-2019-learn-vue-js-from-scratch #vuejs #javascript
0 notes
Photo

The Vue Tutorial (2019) - Learn Vue.js from scratch ☞ https://school.geekwall.in/p/H126-j4wE/the-vue-tutorial-2019-learn-vue-js-from-scratch #vuejs #javascript
0 notes
Text
Using Vue.js To Create An Interactive Weather Dashboard With APIs
Using Vue.js To Create An Interactive Weather Dashboard With APIs
Souvik Sarkar
2019-02-01T13:00:18+01:002019-02-01T11:48:39+00:00
(This is a sponsored article.) In this tutorial, you will build a simple weather dashboard from scratch. It will be a client-end application that is neither a “Hello World” example, nor too intimidating in its size and complexity.
The entire project will be developed using tools from the Node.js + npm ecosystem. In particular, we will be heavily relying on the Dark Sky API for the data, Vue.js for all the heavy lifting, and FusionCharts for data visualization.
Prerequisites
We expect that you are familiar with the following:
HTML5 and CSS3 (we will also be using the basic features provided by Bootstrap;
JavaScript (especially ES6 way of using the language);
Node.js and npm (the basics of the environment and package management is just fine).
Apart from the ones mentioned above, it would be great if you have familiarity with Vue.js, or any other similar JavaScript framework. We don’t expect you to know about FusionCharts — it’s so easy to use that you will learn it on the fly!
Expected Learnings
Your key learnings from this project will be:
How to plan about implementing a good dashboard
How to develop applications with Vue.js
How to create data-driven applications
How to visualize data using FusionCharts
In particular, each of the sections take you a step closer to the learning goals:
An Introduction To The Weather Dashboard This chapter gives you an overview of different aspects of the undertaking.
Create The Project In this section, you learn about creating a project from scratch using the Vue command-line tool.
Customize The Default Project Structure The default project scaffolding that you get in the previous section is not enough; here you learn the additional stuff needed for the project from a structural point of view.
Data Acquisition And Processing This section is the meat of the project; all the critical code for acquiring and processing data from the API is showcased here. Expect to spend maximum time on this section.
Data Visualization With FusionCharts Once we have all the data and other moving parts of the project stabilized, this section is dedicated towards visualizing the data using FusionCharts and a bit of CSS.
1. The Dashboard Workflow
Before we dive into the implementation, it is important to be clear about our plan. We break our plan into four distinct aspects:
Requirements
What are our requirements for this project? In other words, what are the things that we want to showcase through our Weather Dashboard? Keeping in mind that our intended audience are probably mere mortals with simple tastes, we would like to show them the following:
Details of the location for which they want to see the weather, along with some primary information about the weather. Since there are no stringent requirements, we will figure out the boring details later. However, at this stage, it is important to note that we will have to provide the audience a search box, so that they can provide input for the location of their interest.
Graphical information about the weather of their location of interest, such as:
Temperature variation for the day of query
Highlights of today’s weather:
Wind Speed and Direction
Visibility
UV Index
Note: The data obtained from the API provides information regarding many other aspects of the weather. We choose not to use all of them for the sake of keeping the code to a minimum.
Structure
Based on the requirements, we can structure our dashboard as shown below:
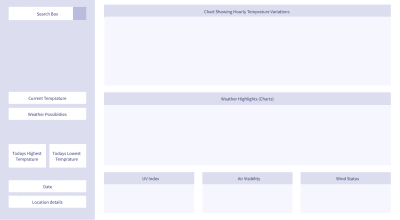
(Large preview)
Data
Our dashboard is as good as the data we get, because there will be no pretty visualizations without proper data. There are plenty of public APIs that provide weather data — some of them are free, and some are not. For our project, we will collect data from the Dark Sky API. However, we will not be able to poll the API endpoint from the client end directly. Don’t worry, we have a workaround that will be revealed just at the right time! Once we get the data for the searched location, we will do some data processing and formatting — you know, the type of technicalities that helps us pay the bills.
Visualization
Once we get clean and formatted data, we plug it in to FusionCharts. There are very few JavaScript libraries in the world as capable as FusionCharts. Out of the vast number of offerings from FusionCharts, we will use only a few — all written in JavaScript, but works seamlessly when integrated with the Vue wrapper for FusionCharts.
Armed with the bigger picture, let’s get our hands dirty — it’s time to make things concrete! In the next section, you will create the basic Vue project, on top of which we will build further.
2. Creating The Project
To create the project, execute the following steps:
Install Node.js + npm (If you have Node.js installed on your computer, skip this step.) Node.js comes with npm bundled with it, so you don’t need to install npm separately. Depending on the operating system, download and install Node.js according to the instructions given here. Once installed, it’s probably a good idea to verify if the software is working correctly, and what are their versions. To test that, open the command-line/terminal and execute the following commands:
node --version npm --version
Install packages with npm Once you have npm up and running, execute the following command to install the basic packages necessary for our project.
npm install -g vue@2 vue-cli@2
Initialize project scaffolding with vue-cli Assuming that the previous step has gone all well, the next step is to use the vue-cli — a command-line tool from Vue.js, to initialize the project. To do that, execute the following:
Initialize the scaffolding with webpack-simple template.
vue init webpack-simple vue_weather_dashboard
You will be asked a bunch of questions — accepting the defaults for all but the last question will be good enough for this project; answer N for the last one.

(Large preview)
Keep in mind that although webpack-simple is excellent for quick prototyping and light application like ours, it is not particularly suited for serious applications or production deployment. If you want to use any other template (although we would advise against it if you are a newbie), or would like to name your project something else, the syntax is:
vue init [template-name] [project-name]
Navigate to the directory created by vue-cli for the project.
cd vue_weather_dashboard
Install all the packages mentioned in the package.json, which has been created by the vue-cli tool for the webpack-simple template.
npm install
Start the development server and see your default Vue project working in the browser!
npm run dev
If you are new to Vue.js, take a moment to savor your latest achievement — you have created a small Vue application and its running at localhost:8080!

(Large preview)
Brief Explanation Of The Default Project Structure
It’s time to take a look at the structure inside the directory vue_weather_dashboard, so that you have an understanding of the basics before we start modifying it.
The structure looks something like this:
vue_weather_dashboard |--- README.md |--- node_modules/ | |--- ... | |--- ... | |--- [many npm packages we installed] | |--- ... | |--- ... |--- package.json |--- package-lock.json |--- webpack.config.js |--- index.html |--- src | |--- App.vue | |--- assets | | |--- logo.png | |--- main.js
Although it might be tempting to skip getting familiar with the default files and directories, if you are new to Vue, we strongly recommend at least taking a look at the contents of the files. It can be a good educational session and trigger questions that you should pursue on your own, especially the following files:
package.json, and just a glance at its cousin package-lock.json
webpack.config.js
index.html
src/main.js
src/App.vue
A brief explanation of each of the files and directories shown in the tree diagram are given below:
README.md No prize for guessing — it is primarily for humans to read and understand the steps necessary for creating the project scaffolding.
node_modules/ This is the directory where npm downloads the packages necessary for kickstarting the project. The information about the packages necessary are available in the package.json file.
package.json This file is created by the vue-cli tool based on the requirements of the webpack-simple template, and contains information about the npm packages (including with their versions and other details) that must be installed. Take a hard look at the content of this file — this is where you should visit and perhaps edit to add/delete packages necessary for the project, and then run npm install. Read more about package.json here.
package-lock.json This file is created by npm itself, and is primarily meant for keeping a log of things that npm downloaded and installed.
webpack.config.js This a JavaScript file that contains the configuration of webpack — a tool that bundles different aspects of our project together (code, static assets, configuration, environments, mode of use, etc.), and minifies before serving it to the user. The benefit is that all things are tied together automatically, and the user experience enhances greatly because of the improvement in the application’s performance (pages are served quickly and loads faster on the browser). As you might encounter later, this is the file that needs to be inspected when something in the build system does not works the way it is intended to be. Also, when you want to deploy the application, this is one of the key files that needs to be edited (read more here).
index.html This HTML file serves as the matrix (or you can say, template) where data and code is to be embedded dynamically (that’s what Vue primarily does), and then served to the user.
src/main.js This JavaScript file contains code that primarily manages top/project level dependencies, and defines the topmost level Vue component. In short, it orchestrates the JavaScript for the entire project, and serves as the entry point of the application. Edit this file when you need to declare project-wide dependencies on certain node modules, or you want something to be changed about the topmost Vue component in the project.
src/App.vue In the previous point, when we were talking about the “topmost Vue component”, we were essentially talking about this file. Each .vue file in the project is a component, and components are hierarchically related. At the start, we have only one .vue file, i.e. App.vue, as our only component. But shortly we will add more components to our project (primarily following the structure of the dashboard), and link them in accordance to our desired hierarchy, with App.vue being the ancestor of all. These .vue files will contain code in a format that Vue wants us to write. Don’t worry, they are JavaScript code written maintaining a structure that can keep us sane and organized. You have been warned — by the end of this project, if you are new to Vue, you may get addicted to the template — script — style way of organizing code!
Now that we have created the foundation, it’s time to:
Modify the templates and tweak the configuration files a bit, so that the project behaves just the way we want.
Create new .vue files, and implement the dashboard structure with Vue code.
We will learn them in the next section, which is going to be a bit long and demands some attention. If you need caffeine or water, or want to discharge — now is the time!
3. Customizing The Default Project Structure
It’s time to tinker with the foundation that the scaffolded project has given us. Before you start, ensure that the development server provided by webpack is running. The advantage of running this server continuously is that any changes you make in the source code — one you save it and refresh the web page — it gets immediately reflected on the browser.
If you want to start the development server, just execute the following command from the terminal (assuming your current directory is the project directory):
npm run dev
In the following sections, we will modify some of the existing files, and add some new files. It will be followed by brief explanations of the content of those files, so that you have an idea of what those changes are meant to do.
Modify Existing Files
index.html
Our application is literally a single page application, because there is just one webpage that gets displayed on the browser. We will talk about this later, but first let’s just make our first change — altering the text within the <title> tag.
With this small revision, the HTML file looks like the following:
<!DOCTYPE html> <html lang="en"> <head> <meta charset="utf-8"> <!-- Modify the text of the title tag below --> <title>Vue Weather Dashboard</title> </head> <body> <div id="app"></div> <script src="/dist/build.js"></script> </body> </html>
Take a moment to refresh the webpage at localhost:8080, and see the change reflected on the title bar of the tab on the browser — it should say “Vue Weather Dashboard”. However, this was just to demonstrate you the process of making changes and verifying if it’s working. We have more things to do!
This simple HTML page lacks many things that we want in our project, especially the following:
Some meta information
CDN links to Bootstrap (CSS framework)
link to custom stylesheet (yet to be added in the project)
Pointers to the Google Maps Geolocation API from <script> tag
After adding those things, the final index.html has the following content:
<!DOCTYPE html> <html lang="en"> <head> <meta http-equiv="Content-Type" content="text/html;charset=utf-8" /> <meta http-equiv="X-UA-Compatible" content="IE=edge"> <meta name="viewport" content="width=device-width, initial-scale=1, shrink-to-fit=no"> <link rel="stylesheet" href="//maxcdn.bootstrapcdn.com/bootstrap/4.0.0/css/bootstrap.min.css"> <link rel="stylesheet" type="text/css" href="src/css/style.css"> <title>Weather Dashboard</title> <script src="https://maps.googleapis.com/maps/api/js?key=AIzaSyC-lCjpg1xbw-nsCc11Si8Ldg2LKYizqI4&libraries=places"></script> </head> <body> <div id="app"></div> <script src="/dist/build.js"></script> </body> </html>
Save the file, and refresh the webpage. You might have noticed a slight bump while the page was getting loaded — it is primarily due to the fact that the page style is now being controlled by Bootstrap, and the style elements like fonts, spacing, etc. are different from the default we had earlier (if you are not sure, roll back to the default and see the difference).

(Large preview)
Note: One important thing before we move on — the URL for the Google Maps API contains a key which is a property of FusionCharts. For now, you can use this key to build the project, as we don’t want you to get bogged down by these type of minute details (which can be distractions while you are new). However, we strongly urge you to generate and use your own Google Maps API key once you have made some progress and feel comfortable to pay attention to these tiny details.
package.json
At the time of writing this, we used certain versions of the npm packages for our project, and we know for sure that those things work together. However, by the time you are executing the project, it is very much possible that the latest stable versions of the packages that npm downloads for you are not the same as we used, and this might break the code (or do things that are beyond our control). Thus, it is very important to have the exact same package.json file that was used to build this project, so that our code/explanations and the results you get are consistent.
The content of the package.json file should be:
{ "name": "vue_weather_dashboard", "description": "A Vue.js project", "version": "1.0.0", "author": "FusionCharts", "license": "MIT", "private": true, "scripts": { "dev": "cross-env NODE_ENV=development webpack-dev-server --open --hot", "build": "cross-env NODE_ENV=production webpack --progress --hide-modules" }, "dependencies": { "axios": "^0.18.0", "babel": "^6.23.0", "babel-cli": "^6.26.0", "babel-polyfill": "^6.26.0", "fusioncharts": "^3.13.3", "moment": "^2.22.2", "moment-timezone": "^0.5.21", "vue": "^2.5.11", "vue-fusioncharts": "^2.0.4" }, "browserslist": [ "> 1%", "last 2 versions", "not ie
We encourage you to go through the new package.json, and figure out what are functions of different objects in the json. You may prefer changing the value of the “author” key to your name. Also, the packages mentioned in the dependencies will reveal themselves at the right time in the code. For the time being, it’s sufficient to know that:
babel-related packages are for properly handling the ES6 style code by the browser;
axios deals with Promise-based HTTP requests;
moment and moment-timezone are for date/time manipulation;
fusioncharts and vue-fusioncharts are responsible for rendering charts:
vue, for obvious reasons.
webpack.config.js
As with package.json, we suggest you to maintain a webpack.config.js file that is consistent with the one we used for building the project. However, before making any changes, we recommend you to carefully compare the default code in the webpack.config.js, and the code we have provided below. You will notice quite a few differences — google them and have a basic idea of what they mean. Since explaining webpack configurations in depth is out of the scope of this article, you are on your own in this regard.
The customized webpack.config.js file is as follows:
var path = require('path') var webpack = require('webpack') module.exports = { entry: ['babel-polyfill', './src/main.js'], output: { path: path.resolve(__dirname, './dist'), publicPath: '/dist/', filename: 'build.js' }, module: { rules: [ { test: /\.css$/, use: [ 'vue-style-loader', 'css-loader' ], }, { test: /\.vue$/, loader: 'vue-loader', options: { loaders: { } // other vue-loader options go here } }, { test: /\.js$/, loader: 'babel-loader', exclude: /node_modules/ }, { test: /\.(png|jpg|gif|svg)$/, loader: 'file-loader', options: { name: '[name].[ext]?[hash]' } } ] }, resolve: { alias: { 'vue$': 'vue/dist/vue.esm.js' }, extensions: ['*', '.js', '.vue', '.json'] }, devServer: { historyApiFallback: true, noInfo: true, overlay: true, host: '0.0.0.0', port: 8080 }, performance: { hints: false }, devtool: '#eval-source-map' } if (process.env.NODE_ENV === 'production') { module.exports.devtool = '#source-map' // http://vue-loader.vuejs.org/en/workflow/production.html module.exports.plugins = (module.exports.plugins || []).concat([ new webpack.DefinePlugin({ 'process.env': { NODE_ENV: '"production"' } }), new webpack.optimize.UglifyJsPlugin({ sourceMap: true, compress: { warnings: false } }), new webpack.LoaderOptionsPlugin({ minimize: true }) ]) }
With changes made to the project’s webpack.config.js, it’s imperative that you stop the development server which is running (Ctrl + C), and restart it with the following command executed from the project’s directory after installing all the packages mentioned in the package.json file:
npm install npm run dev
With this, the ordeal of tweaking the configurations and ensuring that the right packages are in place ends. However, this also marks the journey of modifying and writing code, which is a bit long but also very rewarding!
src/main.js
This file is the key to top-level orchestration of the project — it is here that we define:
What the top level dependencies are (where to get the most important npm packages necessary);
How to resolve the dependencies, along with instructions to Vue on using plugins/wrappers, if any;
A Vue instance that manages the topmost component in the project: src/App.vue (the nodal .vue file).
In line with our goals for the src/main.js file, the code should be:
// Import the dependencies and necessary modules import Vue from 'vue'; import App from './App.vue'; import FusionCharts from 'fusioncharts'; import Charts from 'fusioncharts/fusioncharts.charts'; import Widgets from 'fusioncharts/fusioncharts.widgets'; import PowerCharts from 'fusioncharts/fusioncharts.powercharts'; import FusionTheme from 'fusioncharts/themes/fusioncharts.theme.fusion'; import VueFusionCharts from 'vue-fusioncharts'; // Resolve the dependencies Charts(FusionCharts); PowerCharts(FusionCharts); Widgets(FusionCharts); FusionTheme(FusionCharts); // Globally register the components for project-wide use Vue.use(VueFusionCharts, FusionCharts); // Instantiate the Vue instance that controls the application new Vue({ el: '#app', render: h => h(App) })
src/App.vue
This is one of the most important files in the entire project, and represents the topmost component in the hierarchy — the entire application itself, as a whole. For our project, this component will do all the heavy lifting, which we will explore later. For now, we want to get rid of the default boilerplate, and put something of our own.
If you are new to Vue’s way of organizing code, it would be better to get an idea of the general structure within the .vue files. The .vue files comprises of three sections:
Template This is where the HTML template for the page is defined. Apart from the static HTML, this section also contains Vue’s way of embedding dynamic content, using the double curly braces .
Script JavaScript rules this section, and is responsible for generating dynamic content that goes and sits within the HTML template at appropriate places. This section is primarily an object that is exported, and consists of:
Data This is a function itself, and usually it returns some desired data encapsulated within a nice data structure.
Methods An object that consists of one or more functions/methods, each of which usually manipulates data in some way or the other, and also controls the dynamic content of the HTML template.
Computed Much like the method object discussed above with one important distinction — while all the functions within the method object are executed whenever any one of them is called, the functions within the computed object behaves much more sensibly, and executes if and only if it has been called.
Style This section is for CSS styling that applies to the HTML of the page (written within template) — put the good old CSS here to make your pages beautiful!
Keeping the above paradigm in mind, let’s minimally customize the code in App.vue:
<template> <div id="app"> <p>This component’s code is in </p> </div> </template> <script> export default { data() { return { filename: 'App.vue' } }, methods: { }, computed: { }, } </script> <style> </style>
Remember that the above code snippet is simply for testing out that App.vue is working with our own code in it. It will later go on through a lot of changes, but first save the file and refresh the page on the browser.
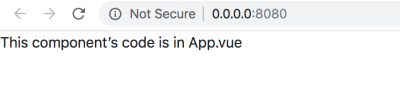
(Large preview)
At this point, it’s probably a good idea to get some help in tooling. Check out the Vue devtools for Chrome, and if you don’t have much problems in using Google Chrome as your default browser for development, install the tool and play around with it a bit. It will come in extremely handy for further development and debugging, when things becomes more complicated.
Additional Directories And Files
The next step would be to add additional files, so that the structure of our project becomes complete. We would add the following directories and files:
src/css/ — style.css
src/assets/ — calendar.svg — vlocation.svg — search.svg — winddirection.svg — windspeed.svg
src/components/ — Content.vue — Highlights.vue — TempVarChart.vue — UVIndex.vue — Visibility.vue — WindStatus.vue
Note: Save the hyperlinked .svg files in your project.
Create the directories and files mentioned above. The final project structure should like look (remember to delete folders and files from the default structure that are now unnecessary):
vue_weather_dashboard/ |--- README.md |--- node_modules/ | |--- ... | |--- ... | |--- [many npm packages we installed] | |--- ... | |--- ... |--- package.json |--- package-lock.json |--- webpack.config.js |--- index.html |--- src/ | |--- App.vue | |--- css/ | | |--- style.css | |--- assets/ | | |--- calendar.svg | | |--- location.svg | | |--- location.svg | | |--- winddirection.svg | | |--- windspeed.svg | |--- main.js | |--- components/ | | |--- Content.vue | | |--- Highlights.vue | | |--- TempVarChart.vue | | |--- UVIndex.vue | | |--- Visibility.vue | | |--- WindStatus.vue
There might be some other files, like .babelrc, .gitignore, .editorconfig, etc. in the project’s root folder. You may ignore them safely for now.
In the following section, we will add minimal content to the newly added files, and test whether they are properly working.
src/css/style.css
Although it will not be of much use immediately, copy the following code to the file:
@import url("https://fonts.googleapis.com/css?family=Roboto:300,400,500"); :root { font-size: 62.5%; } body { font-family: Roboto; font-weight: 400; width: 100%; margin: 0; font-size: 1.6rem; } #sidebar { position: relative; display: flex; flex-direction: column; background-image: linear-gradient(-180deg, #80b6db 0%, #7da7e2 100%); } #search { text-align: center; height: 20vh; position: relative; } #location-input { height: 42px; width: 100%; opacity: 1; border: 0; border-radius: 2px; background-color: rgba(255, 255, 255, 0.2); margin-top: 16px; padding-left: 16px; color: #ffffff; font-size: 1.8rem; line-height: 21px; } #location-input:focus { outline: none; } ::placeholder { color: #FFFFFF; opacity: 0.6; } #current-weather { color: #ffffff; font-size: 8rem; line-height: 106px; position: relative; } #current-weather>span { color: #ffffff; font-size: 3.6rem; line-height: 42px; vertical-align: super; opacity: 0.8; top: 15px; position: absolute; } #weather-desc { font-size: 2.0rem; color: #ffffff; font-weight: 500; line-height: 24px; } #possibility { color: #ffffff; font-size: 16px; font-weight: 500; line-height: 19px; } #max-detail, #min-detail { color: #ffffff; font-size: 2.0rem; font-weight: 500; line-height: 24px; } #max-detail>i, #min-detail>i { font-style: normal; height: 13.27px; width: 16.5px; opacity: 0.4; } #max-detail>span, #min-detail>span { color: #ffffff; font-family: Roboto; font-size: 1.2rem; line-height: 10px; vertical-align: super; } #max-summary, #min-summary { opacity: 0.9; color: #ffffff; font-size: 1.4rem; line-height: 16px; margin-top: 2px; opacity: 0.7; } #search-btn { position: absolute; right: 0; top: 16px; padding: 2px; z-index: 999; height: 42px; width: 45px; background-color: rgba(255, 255, 255, 0.2); border: none; } #dashboard-content { text-align: center; height: 100vh; } #date-desc, #location-desc { color: #ffffff; font-size: 1.6rem; font-weight: 500; line-height: 19px; margin-bottom: 15px; } #date-desc>img { top: -3px; position: relative; margin-right: 10px; } #location-desc>img { top: -3px; position: relative; margin-left: 5px; margin-right: 15px; } #location-detail { opacity: 0.7; color: #ffffff; font-size: 1.4rem; line-height: 20px; margin-left: 35px; } .centered { position: fixed; top: 45%; left: 50%; transform: translate(-50%, -50%); } .max-desc { width: 80px; float: left; margin-right: 28px; } .temp-max-min { margin-top: 40px } #dashboard-content { background-color: #F7F7F7; } .custom-card { background-color: #FFFFFF !important; border: 0 !important; margin-top: 16px !important; margin-bottom: 20px !important; } .custom-content-card { background-color: #FFFFFF !important; border: 0 !important; margin-top: 16px !important; margin-bottom: 0px !important; } .header-card { height: 50vh; } .content-card { height: 43vh; } .card-divider { margin-top: 0; } .content-header { color: #8786A4; font-size: 1.4rem; line-height: 16px; font-weight: 500; padding: 15px 10px 5px 15px; } .highlights-item { min-height: 37vh; max-height: 38vh; background-color: #FFFFFF; } .card-heading { color: rgb(33, 34, 68); font-size: 1.8rem; font-weight: 500; line-height: 21px; text-align: center; } .card-sub-heading { color: #73748C; font-size: 1.6rem; line-height: 19px; } .card-value { color: #000000; font-size: 1.8rem; line-height: 21px; } span text { font-weight: 500 !important; } hr { padding-top: 1.5px; padding-bottom: 1px; margin-bottom: 0; margin-top: 0; line-height: 0.5px; } @media only screen and (min-width: 768px) { #sidebar { height: 100vh; } #info { position: fixed; bottom: 50px; width: 100%; padding-left: 15px; } .wrapper-right { margin-top: 80px; } } @media only screen and (min-width:1440px) { #sidebar { width: 350px; max-width: 350px; flex: auto; } #dashboard-content { width: calc(100% — 350px); max-width: calc(100% — 350px); flex: auto; } }
src/assets/
In this directory, download and save the .svg files mentioned below:
calendar.svg
location.svg
search.svg
winddirection.svg
windspeed.svg
src/components/Content.vue
This is what we call a dumb component — a placeholder, that is there just to maintain the hierarchy, and essentially passes on data to its child components.
Remember that there is no technical bar for writing all our code in the App.vue file, but we take the approach of splitting up the code by nesting the components for two reasons:
To write clean code, which aids readability and maintainability;
To replicate the same structure that we will see on screen, i.e., the hierarchy.
Before we nest the component defined in Content.vue within the root component App.vue, let’s write some toy (but educational) code for Content.vue:
<template> <div> <p>This child components of Content.vue are:</p> <ul> <li v-for="child in childComponents"></li> </ul> </div> </template> <script> export default { data () { return { childComponents: ['TempVarChart.vue', 'Highlights.vue'] } }, methods: { }, computed: { }, } </script> <style> </style>
In the code, carefully observe and understand the following:
Within the <script> tag (where we obviously write some JavaScript code), we define an object that is exported (made available to other files) by default. This object contains a function data(), that returns an array object called childComponents, with its elements being names of the component files that should be nested further.
Within the <template> tag (where we write some HTML template), the thing of interest is the <ul>.
Within the unordered list, each list item should be names of the intended child components, as defined in the array object childComponents. Moreover, the list should automatically extend till the last element of the array. Seems like we should write a for-loop, isn’t it? We do that by using the v-for directive provided by Vue.js. The v-for directive:
Acts as an attribute of the <li> tag, iterates through the array, renders the names of the child components where the iterator is mentioned within the brackets (where we write the text for the list items).
The code and the explanation above forms the basis of your subsequent understanding of how the script and the template are interrelated, and how we can use the directives provided by Vue.js.
We have learnt quite a lot, but even after all these, we have one thing left to learn about seamlessly connecting components in hierarchy — passing data down from the parent component to its children. For now, we need to learn how to pass some data from src/App.vue to src/components/Content.vue, so that we can use the same techniques for the rest of the component nesting in this project.
Data trickling down from the parent to the child components might sound simple, but the devil is in the details! As briefly explained below, there are multiple steps involved in making it work:
Defining and the data For now, we want some static data to play with — an object containing hard-coded values about different aspects of weather will just be fine! We create an object called weather_data and return it from the data() function of App.vue. The weather_data object is given in the snippet below:
weather_data: { location: "California", temperature: { current: "35 C", }, highlights: { uvindex: "3", windstatus: { speed: "20 km/h", direction: "N-E", }, visibility: "12 km", }, },
Passing the data from the parent To pass the data, we need a destination where we want to send the data! In this case, the destination is the Content.vue component, and the way to implement it is to:
Assign the weather_data object to a custom attribute of the <Content> tag
Bind the attribute with the data using the v-bind: directive provided by Vue.js, which makes the attribute value dynamic (responsive to changes made in the original data).
<Content v-bind:weather_data=“weather_data”></Content>
Defining and passing the data is handled at the source side of the handshake, which in our case is the App.vue file.
The code for the App.vue file, at its current status, is given below:
<template> <div id="app"> <p>This component’s code is in </p> <Content v-bind:weather_data="weather_data"></Content> </div> </template> <script> import Content from './components/Content.vue' export default { name: 'app', components: { 'Content': Content }, data () { return { filename: 'App.vue', weather_data: { location: "California", temperature: { current: "35 C", }, highlights: { uvindex: "3", windstatus: { speed: "20 km/h", direction: "N-E", }, visibility: "12 km", }, }, } }, methods: { }, computed: { }, } </script> <style> </style>

(Large preview)
With the data defined and passed from the source (parent component), it is now the child’s responsibility to receive the data and render it appropriately, as explained in the next two steps.
Receiving the data by the child The child component, in this case Content.vue, must receive the weather_data object send to it by the parent component App.vue. Vue.js provides a mechanism to do so — all you need is an array object called props, defined in the default object exported by Content.vue. Each element of the array props is a name of the data objects it wants to receive from its parent. For now, the only data object that it is supposed to receive is weather_data from App.vue. Thus, the props array looks like:
<template> // HTML template code here </template> <script> export default { props: ["weather_data"], data () { return { // data here } }, } </script> <style> // component specific CSS here </style>
Rendering the data in the page Now that we have ensured receiving the data, the last task we need to complete is to render the data. For this example, we will directly dump the received data on the web page, just to illustrate the technique. However, in real applications (like the one we are about to build), data normally goes through lots of processing, and only the relevant parts of it are displayed in ways that suits the purpose. For example, in this project we will eventually get raw data from the weather API, clean and format it, feed the data to the data structures necessary for the charts, and then visualize it. Anyway, to display the raw data dump, we will just use the brackets that Vue understands, as shown in the snippet below:
<template> <div id="pagecontent"> // other template code here </div> </template>
It’s now time to assimilate all the bits and pieces. The code for Content.vue — at its current status — is given below:
<template> <div id="pagecontent"> <p>This child components of Content.vue are:</p> <ul> <li v-for="child in childComponents"></li> </ul> </div> </template> <script> export default { props: ["weather_data"], data () { return { childComponents: ['TempVarChart.vue', 'Highlights.vue'] } }, methods: { }, computed: { }, } </script> <style> #pagecontent { border: 1px solid black; padding: 2px; } </style>
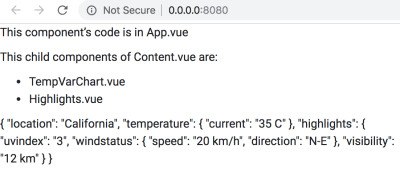
(Large preview)
After making the changes discussed above, refresh the webpage on the browser and see how it looks. Take a moment to appreciate the complexity that Vue handles — if you modify the weather_data object in App.vue, it gets silently conveyed to Content.vue, and eventually to the browser displaying the webpage! Try by changing the value for the key location.
Although we have learned about props and data binding using static data, we will be using dynamic data collected using web APIs in the application, and will change the code accordingly.
Summary
Before we move on to the rest of the .vue files, let’s summarize what we have learnt while we wrote the code for App.vue and components/Content.vue:
The App.vue file is what we call the root component — the one that sits at the top of the component hierarchy. The rest of the .vue files represents components that are its direct child, grandchild, and so on.
The Content.vue file is a dummy component — its responsibility is to pass on the data to levels below and maintain the structural hierarchy, so that our code remains consistent with the philosophy “*what we see is what we implement*”.
The parent-child relationship of component does not happen out of thin air — you must register a component (either globally or locally, depending on the intended usage of the component), and then nest it using custom HTML tags (whose spellings are the exact same as that of the names with which the components has been registered).
Once registered and nested, data is passed on from parent to child components, and the flow is never reverse (bad things will happen if the project architecture allows backflow). The parent component is the relative source of the data, and it passes down relevant data to its children using the v-bind directive for the attributes of the custom HTML elements. The child receives the data intended for it using props, and then decides on its own what to do with the data.
For the rest of the components, we will not indulge in detailed explanation — we will just write the code based on the learnings from the above summary. The code will be self-evident, and if you get confused about the hierarchy, refer to the diagram below:
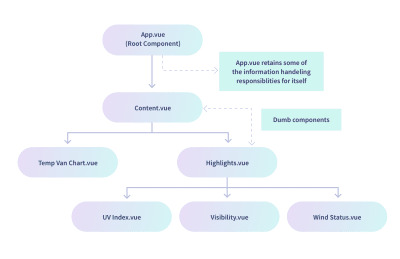
(Large preview)
The diagram says that TempVarChart.vue and Highlights.vue are the direct child of Content.vue. Thus, it might be a good idea to prepare Content.vue for sending data to those components, which we do using the code below:
<template> <div id="pagecontent"> <p>This child components of Content.vue are:</p> <ul> <li v-for="child in childComponents"></li> </ul> <temp-var-chart :tempVar="tempVar"></temp-var-chart> <today-highlights :highlights="highlights"></today-highlights> </div> </template> <script> import TempVarChart from './TempVarChart.vue' import Highlights from './Highlights.vue' export default { props: ["weather_data"], components: { 'temp-var-chart': TempVarChart, 'today-highlights': Highlights }, data () { return { childComponents: ['TempVarChart.vue', 'Highlights.vue'], tempVar: this.weather_data.temperature, highlights: this.weather_data.highlights, } }, methods: { }, computed: { }, } </script> <style> </style>
Once you save this code, you will get errors — don’t worry, it is expected. It will be fixed once you have the rest of the component files ready. If it bothers you not to be able to see the output, comment out the lines containing the custom element tags <temp-var-chart> and <today-highlights>.
For this section, this is the final code of Content.vue. For the rest of this section, we will reference to this code, and not the previous ones that we wrote for learning.
src/components/TempVarChart.vue
With its parent component Content.vue passing on the data, TempVarChart.vue must be set up to receive and render the data, as shown in the code below:
<template> <div id="tempvarchart"> <p>Temperature Information:</p> </div> </template> <script> export default { props: ["tempVar"], data () { return { } }, methods: { }, computed: { }, } </script> <style> </style>
src/components/Highlights.vue
This component will also receive data from App.vue — its parent component. After that, it should be linked with its child components, and relevant data should be passed on to them.
Let’s first see the code for receiving data from the parent:
<template> <div id="highlights"> <p>Weather Highlights:</p> </div> </template> <script> export default { props: ["highlights"], data () { return { } }, methods: { }, computed: { }, } </script> <style> </style>
At this point, the web page looks like the image below:

(Large preview)
Now we need to modify the code of Highlights.vue to register and nest its child components, followed by passing the data to children. The code for it is as follows:
<template> <div id="highlights"> <p>Weather Highlights:</p> <uv-index :highlights="highlights"></uv-index> <visibility :highlights="highlights"></visibility> <wind-status :highlights="highlights"></wind-status> </div> </template> <script> import UVIndex from './UVIndex.vue'; import Visibility from './Visibility.vue'; import WindStatus from './WindStatus.vue'; export default { props: ["highlights"], components: { 'uv-index': UVIndex, 'visibility': Visibility, 'wind-status': WindStatus, }, data () { return { } }, methods: { }, computed: { }, } </script> <style> </style>
Once you save the code and see the web page, you are expected to see errors in the Developer Console tool provided by the browser; they appear because although Highlights.vue is sending data, nobody is receiving them. We are yet to write the code for the children of Highlights.vue.
Observe that we have not done much of the data processing, i.e, we have not extracted the individual factors of weather data that goes under the Highlights section of the dashboard. We could have done that in the data() function, but we preferred to keep Highlights.vue a dumb component that just passes on the entire data dump it receives to each of the children, who then own their own extracts what is necessary for them. However, we encourage you to try out extracting data in the Highlights.vue, and send relevant data down to each child component — it’s a good practice exercise nonetheless!
src/components/UVIndex.vue
The code for this component receives the data dump of highlights from Highlights.vue, extracts the data for UV Index, and renders it on the page.
<template> <div id="uvindex"> <p>UV Index: </p> </div> </template> <script> export default { props: ["highlights"], data () { return { uvindex: this.highlights.uvindex } }, methods: { }, computed: { }, } </script> <style> </style>
src/components/Visibility.vue
The code for this component receives the data dump of highlights from Highlights.vue, extracts the data for Visibility, and renders it on the page.
<template> <div id="visibility"> <p>Visibility: </p> </div> </template> <script> export default { props: ["highlights"], data () { return { visibility: this.highlights.visibility, } }, methods: { }, computed: { }, } </script> <style> </style>
src/components/WindStatus.vue
The code for this component receives the data dump of highlights from Highlights.vue, extracts the data for Wind Status (speed and direction), and renders it on the page.
<template> <div id="windstatus"> <p>Wind Status:</p> <p>Speed — ; Direction — </p> </div> </template> <script> export default { props: ["highlights"], data () { return { speed: this.highlights.windstatus.speed, direction: this.highlights.windstatus.direction } }, methods: { }, computed: { }, } </script> <style> </style>
After adding the code for all the components, take a look at the web page on the browser.
(Large preview)
Not to dishearten, but all these toiling was just to link the components in hierarchy, and test out whether data flow is happening between them or not! In the next section, we will throw away most of the code we have written so far, and add a lot more pertaining to the actual project. However, we will certainly retain the structure and nesting of the components; the learnings from this section will allow us to build a decent dashboard with Vue.js.
4. Data Acquisition And Processing
Remember the weather_data object in App.vue? It had some hard-coded data that we used to test whether all the components are working correctly, and also to help you learn some basic aspects of Vue application without getting bogged down in the details of real-world data. However, it’s now time that we shed our shell, and step out into the real world, where data from the API will dominate most of our code.
Preparing Child Components To Receive And Process Real Data
In this section, you will get code dump for all the components except App.vue. The code will handle receiving real data from App.vue (unlike the code we wrote in the previous section to receive and render dummy data).
We strongly encourage to read the code of each component carefully, so that you form an idea of what data each of those components are expecting, and will eventually use in visualization.
Some of the code, and the overall structure, will be similar to the ones you have seen in the previous structure — so you will not face something drastically different. However, the devil is in the details! So examine the code carefully, and when you have understood them reasonably well, copy the code to the respective component files in your project.
Note: All the components in this section are in the src/components/ directory. So each time, the path will not be mentioned — only the .vue file name will be mentioned to identify the component.
Content.vue
<template> <div style="position: relative;"> <temp-var-chart :tempVar="tempVar"></temp-var-chart> <today-highlights :highlights="highlights"></today-highlights> </div> </template> <script> import TempVarChart from './TempVarChart.vue'; import Highlights from './Highlights.vue'; export default { props: ['highlights', 'tempVar'], components: { 'temp-var-chart': TempVarChart, 'today-highlights': Highlights }, } </script>
The following changes have been made from the previous code:
In the <template>, text and data within has been removed, since we are now just receiving data and passing down to the children, with no rendering specific this component.
In the export default {}:
The props have been changed to match the data objects that will be send by the parent: App.vue. The reason for changing the props is that App.vue itself will display some of the data it acquires from the weather API and other online resources, based on the search query of the user, and pass on the rest of the data. In the dummy code we wrote earlier, App.vue was passing on the entire dummy data dump, without any discrimination, and the props of Content.vue was set up accordingly.
The data() function now returns nothing, as we are not doing any data manipulation in this component.
TempVarChart.vue
This component is supposed to receive detailed temperature projections for the rest of the current day, and eventually display them using FusionCharts. But for the time being, we will display them only as text on the webpage.
<template> <div> </div> </template> <script> export default { props: ["tempVar"], components: {}, data() { return { }; }, methods: { }, }; </script> <style> </style>
Highlights.vue
<template> <div> <uv-index :highlights="highlights"></uv-index> <visibility :highlights="highlights"></visibility> <wind-status :highlights="highlights"></wind-status> </div> </template> <script> import UVIndex from './UVIndex.vue'; import Visibility from './Visibility.vue'; import WindStatus from './WindStatus.vue'; export default { props: ["highlights"], components: { 'uv-index': UVIndex, 'visibility': Visibility, 'wind-status': WindStatus, }, data () { return { } }, methods: { }, computed: { }, } </script> <style> </style>
The changes made from the previous code are:
In the <template>, the text and the data within has been removed, because this is a dumb component, just like Content.vue, whose only job is to pass on the data to children while maintaining the structural hierarchy. Remember that dumb components like Highlights.vue and Content.vue exists to maintain the parity between the visual structure of the dashboard, and the code we write.
UVIndex.vue
The changes made to the previous code are as follows:
In the <template> and <style>, the div id has been changed to uvIndex, which is more readable.
In the export default {}, the data() function now returns a string object uvIndex, whose value is extracted from the highlights object received by the component using props. This uvIndex is now temporarily used to display the value as text within the <template>. Later on, we will plug in this value to the data structure suitable for rendering a chart.
Visibility.vue
<template> <div> <p>Visibility: </p> </div> </template> <script> export default { props: ["highlights"], data () { return { visibility: this.highlights.visibility.toString() } }, methods: { }, computed: { }, } </script> <style> </style>
The only change made in this file (with respect to its previous code) is that the definition of the visibility object returned by the data() function now contains toString() at its end, since the value received from the parent will be a floating point number, which needs to be converted into string.
WindStatus.vue
<template> <div> <p>Wind Speed — </p> <p>Wind Direction — , or degree clockwise with respect to true N as 0 degree.</p> </div> </template> <script> export default { props: ["highlights"], data () { return { windSpeed: this.highlights.windStatus.windSpeed, derivedWindDirection: this.highlights.windStatus.derivedWindDirection, windDirection: this.highlights.windStatus.windDirection } }, methods: { }, computed: { }, } </script> <style> </style>
The changes made to the previous code are as follows:
Throughout the file, windstatus has been renamed as windStatus, to promote readability and also to be in sync with the the highlights object that App.vue provides with actual data.
Similar naming changes have been made for the speed and direction — the new ones are windSpeed and windDirection.
A new object derivedWindDirection has come into play (also provided by App.vue in the highlights bundle).
For now, the received data is rendered as text; later, it will be plugged in to the data structure necessary for visualization.
Testing With Dummy Data
Resorting to dummy data repeatedly might be a bit frustrating for you, but there are some good reasons behind it:
We have made a lot of changes to the code of each component, and it’s a good idea to test whether those changes are breaking the code. In other words, we should check that whether the data flow is intact, now that we are about to move to more complex parts of the project.
The real data from the online weather API will need lot of massaging, and it might be overwhelming for you to juggle between the code for data acquisition and processing, and the code for smooth data flow down the components. The idea is to keep the quantum of complexity under control, so that we have a better understanding of the errors we might face.
In this section, what we do is essentially hardcode some json data in the App.vue, which will obviously be replaced with live data in the near future. There are a lot of similarity between the dummy json structure, and the json structure we will use for the actual data. So it also provides you a rough idea of what to expect from the real data, once we encounter it.
However, we admit that this is far from the ideal approach one might adopt while building such a project from scratch. In the real world, you will often start with the real data source, play around with it a bit to understand what can and should be done to tame it, and then think about the appropriate json data structure to capture the relevant information. We intentionally shielded you from all those dirty work, since it takes you farther from the objective — learning how to use Vue.js and FusionCharts to build a dashboard.
Let’s now jump into the new code for App.vue:
<template> <div id="app"> <dashboard-content :highlights="highlights" :tempVar="tempVar"></dashboard-content> </div> </template> <script> import Content from './components/Content.vue' export default { name: 'app', components: { 'dashboard-content': Content }, data () { return { tempVar: { tempToday: [ {hour: '11.00 AM', temp: '35'}, {hour: '12.00 PM', temp: '36'}, {hour: '1.00 PM', temp: '37'}, {hour: '2.00 PM', temp: '38'}, {hour: '3.00 PM', temp: '36'}, {hour: '4.00 PM', temp: '35'}, ], }, highlights: { uvIndex: 4, visibility: 10, windStatus: { windSpeed: '30 km/h', windDirection: '30', derivedWindDirection: 'NNE', }, }, } }, methods: { }, computed: { }, } </script> <style> </style>
The changes made to the code with respect to its previous version are as follows:
The name of the child component has been changed to dashboard-content, and accordingly the custom HTML element in the <template> has been revised. Note that now we have two attributes — highlights and tempVar — instead of a single attribute that we used earlier with the custom element. Accordingly, the data associated with those attributes have also changed. What’s interesting here is that we can use the v-bind: directive, or its shorthand : (as we have done here), with multiple attributes of a custom HTML element!
The data() function now returns the filename object (that existed earlier), along with two new objects (instead of the old weather_data): tempVar and highlights. The structure of the json is appropriate for the code we have written in the child components, so that they can extract the data pieces they need from the dumps. The structures are quite self-explanatory, and you can expect them to be quite similar when we deal with live data. However, the significant change that you will encounter is the absence of hardcoding (obvious, isn’t it) — we will leave the values blank as the default state, and write code to dynamically update them based on the values we will receive from the weather API.
You have written a lot of code in this section, without seeing the actual output. Before you proceed further, take a look at the browser (restart the server with npm run dev, if necessary), and bask in the glory of your achievement. The web page that you should see at this point looks like the image below:

(Large preview)
Code For Data Acquisition And Processing
This section is going to be the meat of the project, with all the code to be written in App.vue for the following:
Location input from the user — an input box and a call-to-action button is sufficient;
Utility functions for various tasks; these functions will be called later in various parts of the component code;
Getting detailed geolocation data from Google Maps API for JavaScript;
Getting detailed weather data from the Dark Sky API;
Formatting and processing the geolocation and weather data, which will be passed on to the child components.
The subsections that follows illustrates how we can implement the tasks laid out for us in the above points. With some exceptions, most of them will follow the sequence.
Input From The User
It’s quite obvious that the action starts when the user provides the name of the place for which the weather data needs to be displayed. For this to happen, we need to implement the following:
An input box for entering the location;
A submit button that tells our application that the user has entered the location and it’s time to do the rest. We will also implement the behavior when processing starts upon hitting Enter.
The code we show below will be restricted to the HTML template part of App.vue. We will just mention the name of the method associated with the click events, and define them later in the methods object of the <script> in App.vue.
<div id="search"> <input id="location-input" type="text" ref="input" placeholder="Location?" @keyup.enter="organizeAllDetails" > <button id="search-btn" @click="organizeAllDetails"> <img src="./assets/Search.svg" width="24" height="24"> </button> </div>
Placing the above snippet in the right place is trivial — we leave it to you. However, the interesting parts of the snippet are:
@keyup.enter="organizeAllDetails"
@click="organizeAllDetails"
As you know from the earlier sections, @ is Vue’s shorthand for the directive v-on:, which is associated with some event. The new thing is “organizeAllDetails” — it’s nothing but the method that will fire once the events (pressing Enter or clicking the button) happens. We are yet to define method, and the puzzle will be complete by the end of this section.
Text Information Display Controlled By App.vue
Once the user input triggers the action and lots of data is acquired from the APIs, we encounter the inevitable question — “What to do with all these data?”. Obviously some data massaging is required, but that does not answer our question fully! We need to decide what’s the end use of the data, or more directly, which are the entities that receives different chunks of the acquired and processed data?
The child components of App.vue, based on their hierarchy and purpose, are the frontline contenders for the bulk of the data. However, we will also have some data that does not belong to any of those child components, yet are quite informative and makes the dashboard complete. We can make good use of them if we display them as text information directly controlled by App.vue, while the rest of the data are passed on to the child for getting displayed as pretty charts ultimately.
With this context in mind, let’s focus on the code for setting the stage of using text data. It’s simple HTML template at this point, on which the data will eventually come and sit.
<div id="info"> <div class="wrapper-left"> <div id="current-weather"> <span>°C</span> </div> <div id="weather-desc"></div> <div class="temp-max-min"> <div class="max-desc"> <div id="max-detail"> <i>▲</i> <span>°C</span> </div> <div id="max-summary">at </div> </div> <div class="min-desc"> <div id="min-detail"> <i>▼</i> <span>°C</span> </div> <div id="min-summary">at </div> </div> </div> </div> <div class="wrapper-right"> <div class="date-time-info"> <div id="date-desc"> <img src="./assets/calendar.svg" width="20" height="20"> </div> </div> <div class="location-info"> <div id="location-desc"> <img src="./assets/location.svg" width="10.83" height="15.83" style="opacity: 0.9;" > <div id="location-detail" class="mt-1"> Lat: <br> Long: </div> </div> </div> </div> </div>
In the above snippet, you should understand the following:
The stuff inside — they are Vue’s way of inserting dynamic data in the HTML template, before it renders in the browser. You have encountered them before, and there is nothing new or surprising. Just keep in mind that these data objects stems from the data() method in the export default() object of App.vue. They have default values that we will set according to our requirements, and then write certain methods to populate the objects with real API data.
Don’t worry for not seeing the changes on the browser — the data is not defined yet, and it’s natural for Vue to not render things that it does not know. However, once the data is set (and for now, you can even check by hard-coding the data), the text data will be controlled by App.vue.
The data() Method
The data() method is a special construct in the .vue files — it contains and returns data objects that are so crucial for the application. Recollect the generic structure of the <script> part in any .vue file — it roughly contains the following:
<script> // import statements here export default { // name, components, props, etc. data() { return { // the data that is so crucial for the application is defined here. // the data objects will have certain default values chosen by us. // The methods that we define below will manipulate the data. // Since the data is bounded to various attributes and directives, they // will update as and when the values of the data objects change. } }, methods: { // methods (objects whose values are functions) here. // bulk of dynamic stuff (the black magic part) is controlled from here. }, computed: { // computed properties here }, // other objects, as necessary } </script>
So far, you have encountered the names of some of the data objects, but are a lot more. Most of them are relevant for the child components, each of which handles a different aspect of the weather information dump. Given below is the entire data() method that we will need for this project — you will have a fair idea about what data we are expecting from the APIs, and how we are disseminating the data, based on the nomenclature of the objects.
data() { return { weatherDetails: false, location: '', // raw location from input lat: '', // raw latitude from google maps api response long: '', // raw longitude from google maps api response completeWeatherApi: '', // weather api string with lat and long rawWeatherData: '', // raw response from weather api currentWeather: { full_location: '', // for full address formatted_lat: '', // for N/S formatted_long: '', // for E/W time: '', temp: '', todayHighLow: { todayTempHigh: '', todayTempHighTime: '', todayTempLow: '', todayTempLowTime: '' }, summary: '', possibility: '' }, tempVar: { tempToday: [ // gets added dynamically by this.getSetHourlyTempInfoToday() ], }, highlights: { uvIndex: '', visibility: '', windStatus: { windSpeed: '', windDirection: '', derivedWindDirection: '' }, } }; },
As you can see, in most cases the default value is empty, because that will suffice at this point. Methods will be written for manipulating the data and filling it up with appropriate values, before it is rendered or passed on to the child components.
Methods in App.vue
For .vue files, the methods are generally written as values of keys nested in the methods { } object. Their primary role is to manipulate the data objects of the component. We will write the methods in App.vue keeping the same philosophy in mind. However, based on their purpose, we can categorize the methods of App.vue into the following:
Utility methods
Action/Event oriented methods
Data acquisition methods
Data processing methods
High level glue methods
It’s important that you understand this — we are presenting the methods to you on a platter because we have already figured out how the APIs work, what data they give, and how we should use the data in our project. It’s not that we pulled the methods out of thin air, and wrote some arcane code to deal with the data. For the purpose of learning, it’s a good exercise to diligently read and understand the code for the methods and data. However, when faced with a new project that you have to build from scratch, you must do all the dirty work yourself, and that means experimenting a lot with the APIs — their programmatic access and their data structure, before glueing them seamlessly with the data structure that your project demands. You will not have any hand holding, and there will be frustrating moments, but that’s all part of maturing as a developer.
In the following subsections, we will explain each of the method types, and also show the implementation of the methods belonging to that category. The method names are quite self-explanatory about their purpose, and so is their implementation, which we believe you will find to be easy enough to follow. However, before that, recollect the general scheme of writing methods in .vue files:
<script> // import statements here export default { // name, components, props, etc. data() { return { // the data that is so crucial for the application is defined here. } }, methods: { // methods (objects whose values are functions) here. // bulk of dynamic stuff (the black magic part) is controlled from here. method_1: function(arg_1) { }, method_2: function(arg_1, arg_2) { }, method_3: function(arg_1) { }, ……. }, computed: { // computed properties here }, // other objects, as necessary } </script>
Utility Methods
The utility methods, as the name suggests, are methods written primarily for the purpose of modularizing repetitive code used for fringe tasks. They are called by other methods when necessary. Given below are the utility methods for App.vue:
convertToTitleCase: function(str) { str = str.toLowerCase().split(' '); for (var i = 0; i
// To format the “possibility” (of weather) string obtained from the weather API formatPossibility: function(str) { str = str.toLowerCase().split('-'); for (var i = 0; i
// To convert Unix timestamps according to our convenience unixToHuman: function(timezone, timestamp) { /* READ THIS BEFORE JUDGING & DEBUGGING For any location beyond the arctic circle and the antarctic circle, the goddamn weather api does not return certain keys/values in each of this.rawWeatherData.daily.data[some_array_index]. Due to this, console throws up an error. The code is correct, the problem is with the API. May be later on I will add some padding to tackle missing values. */ var moment = require('moment-timezone'); // for handling date & time var decipher = new Date(timestamp * 1000); var human = moment(decipher) .tz(timezone) .format('llll'); var timeArray = human.split(' '); var timeNumeral = timeArray[4]; var timeSuffix = timeArray[5]; var justTime = timeNumeral + ' ' + timeSuffix; var monthDateArray = human.split(','); var monthDate = monthDateArray[1].trim(); return { fullTime: human, onlyTime: justTime, onlyMonthDate: monthDate }; },
// To convert temperature from fahrenheit to celcius fahToCel: function(tempInFahrenheit) { var tempInCelcius = Math.round((5 / 9) * (tempInFahrenheit — 32)); return tempInCelcius; },
// To convert the air pressure reading from millibar to kilopascal milibarToKiloPascal: function(pressureInMilibar) { var pressureInKPA = pressureInMilibar * 0.1; return Math.round(pressureInKPA); },
// To convert distance readings from miles to kilometers mileToKilometer: function(miles) { var kilometer = miles * 1.60934; return Math.round(kilometer); },
// To format the wind direction based on the angle deriveWindDir: function(windDir) { var wind_directions_array = [ { minVal: 0, maxVal: 30, direction: 'N' }, { minVal: 31, maxVal: 45, direction: 'NNE' }, { minVal: 46, maxVal: 75, direction: 'NE' }, { minVal: 76, maxVal: 90, direction: 'ENE' }, { minVal: 91, maxVal: 120, direction: 'E' }, { minVal: 121, maxVal: 135, direction: 'ESE' }, { minVal: 136, maxVal: 165, direction: 'SE' }, { minVal: 166, maxVal: 180, direction: 'SSE' }, { minVal: 181, maxVal: 210, direction: 'S' }, { minVal: 211, maxVal: 225, direction: 'SSW' }, { minVal: 226, maxVal: 255, direction: 'SW' }, { minVal: 256, maxVal: 270, direction: 'WSW' }, { minVal: 271, maxVal: 300, direction: 'W' }, { minVal: 301, maxVal: 315, direction: 'WNW' }, { minVal: 316, maxVal: 345, direction: 'NW' }, { minVal: 346, maxVal: 360, direction: 'NNW' } ]; var wind_direction = ''; for (var i = 0; i = wind_directions_array[i].minVal && windDir
Although we haven’t implemented it, you can take out the utility methods from the .vue file, and put it in a separate JavaScript file. All you need to do is import the .js file at the start of the script part in the .vue file, and you should be good to go. Such approach works really well and keeps the code clean, especially in big applications where you might use lots of methods that are better grouped together based on their purpose. You can apply this approach to all of the method groups listed in this article, and see the effect itself. However, we suggest you do that exercise once you have followed the course presented here, so that you have the big picture understanding of all the parts working in complete sync, and also have a working piece of software which you can refer to, once something breaks while experimenting.
Action/Event Oriented Methods
These methods are generally executed when we need to take an action corresponding to an event. Depending on the case, the event might be triggered from an user interaction, or programmatically. In the App.vue file, these methods sit below the utility methods.
makeInputEmpty: function() { this.$refs.input.value = ''; },
makeTempVarTodayEmpty: function() { this.tempVar.tempToday = []; },
detectEnterKeyPress: function() { var input = this.$refs.input; input.addEventListener('keyup', function(event) { event.preventDefault(); var enterKeyCode = 13; if (event.keyCode === enterKeyCode) { this.setHitEnterKeyTrue(); } }); },
locationEntered: function() { var input = this.$refs.input; if (input.value === '') { this.location = "New York"; } else { this.location = this.convertToTitleCase(input.value); } this.makeInputEmpty(); this.makeTempVarTodayEmpty(); },
One interesting thing in some of the above code snippets is the use of $ref. In simple terms, it’s Vue’s way of associating the code statement containing it, to the HTML construct it is supposed to affect (for more information, read the official guide). For example, the methods makeInputEmpty() and detectEnterKeyPress() affects the input box, because in the HTML of the input box we have mentioned the value of the attribute ref as input.
Data Acquisition Methods
We are using the following two APIs in our project:
Google Maps Geocoder API This API is for getting the coordinates of the location that the user searches. You will need an API key for yourself, which you can get by following the documentation in the given link. For now, you can use the API key used by FusionCharts, but we request you not to abuse it and get a key of your own. We refer to the JavaScript API from the index.html of this project, and we shall use the constructors provided by it for our code in the App.vue file.
The Dark Sky Weather API This API is for getting the weather data corresponding to the coordinates. However, we won’t be using it directly; we will wrap it within an URL that redirects through one of the FusionCharts’s server. The reason is that if you send a GET request to the API from an entirely client-end application such as ours, it results in the frustrating CORS error (more information here and here).
Important Note: Since we have used Google Maps and Dark Sky APIs, Both these APIs have their own API keys which we have shared with you in this article. This will help you focus on client-side developments rather than the headache of backend implementation. However, we recommend you to create your own keys, because our APIs keys will come with limits and if these limits exceed you won't be able to try the application by yourself.
For Google Maps, go to this article to get your API key. For Dark Sky API, visit https://darksky.net/dev to create your API key and respective endpoints.
With the context in mind, let’s see the implementation of the data acquisition methods for our project.
getCoordinates: function() { this.locationEntered(); var loc = this.location; var coords; var geocoder = new google.maps.Geocoder(); return new Promise(function(resolve, reject) { geocoder.geocode({ address: loc }, function(results, status) { if (status == google.maps.GeocoderStatus.OK) { this.lat = results[0].geometry.location.lat(); this.long = results[0].geometry.location.lng(); this.full_location = results[0].formatted_address; coords = { lat: this.lat, long: this.long, full_location: this.full_location }; resolve(coords); } else { alert("Oops! Couldn't get data for the location"); } }); }); },
/* The coordinates that Google Maps Geocoder API returns are way too accurate for our requirements. We need to bring it into shape before passing the coordinates on to the weather API. Although this is a data processing method in its own right, we can’t help mentioning it right now, because the data acquisition method for the weather API has dependency on the output of this method. */ setFormatCoordinates: async function() { var coordinates = await this.getCoordinates(); this.lat = coordinates.lat; this.long = coordinates.long; this.currentWeather.full_location = coordinates.full_location; // Remember to beautify lat for N/S if (coordinates.lat > 0) { this.currentWeather.formatted_lat = (Math.round(coordinates.lat * 10000) / 10000).toString() + '°N'; } else if (coordinates.lat 0) { this.currentWeather.formatted_long = (Math.round(coordinates.long * 10000) / 10000).toString() + '°E'; } else if (coordinates.long
/* This method dynamically creates the the correct weather API query URL, based on the formatted latitude and longitude. The complete URL is then fed to the method querying for weather data. Notice that the base URL used in this method (without the coordinates) points towards a FusionCharts server — we must redirect our GET request to the weather API through a server to avoid the CORS error. */ fixWeatherApi: async function() { await this.setFormatCoordinates(); var weatherApi = 'https://csm.fusioncharts.com/files/assets/wb/wb-data.php?src=darksky&lat=' + this.lat + '&long=' + this.long; this.completeWeatherApi = weatherApi; },
fetchWeatherData: async function() { await this.fixWeatherApi(); var axios = require('axios'); // for handling weather api promise var weatherApiResponse = await axios.get(this.completeWeatherApi); if (weatherApiResponse.status === 200) { this.rawWeatherData = weatherApiResponse.data; } else { alert('Hmm... Seems like our weather experts are busy!'); } },
Through these methods, we have introduced the concept of async-await in our code. If you have been a JavaScript developer for some time now, you must be familiar with the callback hell, which is a direct consequence of the asynchronous way JavaScript is written. ES6 allows us to bypass the cumbersome nested callbacks, and our code becomes much cleaner if we write JavaScript in a synchronous way, using the async-await technique. However, there is a downside. It takes away the speed that asynchronous code gives us, especially for the portions of the code that deals with data being exchanged over the internet. Since this is not a mission-critical application with low latency requirements, and our primary aim is to learn stuff, the clean code is much more preferable over the slightly fast code.
Data Processing Methods
Now that we have the methods that will bring the data to us, we need to prepare the ground for properly receiving and processing the data. Safety nets must be cast, and there should be no spills — data is the new gold (OK, that might be an exaggeration in our context)! Enough with the fuss, let’s get to the point.
Technically, the methods we implement in this section are aimed at getting the data out of the acquisition methods and the data objects in App.vue, and sometimes setting the data objects to certain values that suits the purpose.
getTimezone: function() { return this.rawWeatherData.timezone; },
getSetCurrentTime: function() { var currentTime = this.rawWeatherData.currently.time; var timezone = this.getTimezone(); this.currentWeather.time = this.unixToHuman( timezone, currentTime ).fullTime; },
getSetSummary: function() { var currentSummary = this.convertToTitleCase( this.rawWeatherData.currently.summary ); if (currentSummary.includes(' And')) { currentSummary = currentSummary.replace(' And', ','); } this.currentWeather.summary = currentSummary; },
getSetPossibility: function() { var possible = this.formatPossibility(this.rawWeatherData.daily.icon); if (possible.includes(' And')) { possible = possible.replace(' And', ','); } this.currentWeather.possibility = possible; },
getSetCurrentTemp: function() { var currentTemp = this.rawWeatherData.currently.temperature; this.currentWeather.temp = this.fahToCel(currentTemp); },
getTodayDetails: function() { return this.rawWeatherData.daily.data[0]; },
getSetTodayTempHighLowWithTime: function() { var timezone = this.getTimezone(); var todayDetails = this.getTodayDetails(); this.currentWeather.todayHighLow.todayTempHigh = this.fahToCel( todayDetails.temperatureMax ); this.currentWeather.todayHighLow.todayTempHighTime = this.unixToHuman( timezone, todayDetails.temperatureMaxTime ).onlyTime; this.currentWeather.todayHighLow.todayTempLow = this.fahToCel( todayDetails.temperatureMin ); this.currentWeather.todayHighLow.todayTempLowTime = this.unixToHuman( timezone, todayDetails.temperatureMinTime ).onlyTime; },
getHourlyInfoToday: function() { return this.rawWeatherData.hourly.data; },
getSetHourlyTempInfoToday: function() { var unixTime = this.rawWeatherData.currently.time; var timezone = this.getTimezone(); var todayMonthDate = this.unixToHuman(timezone, unixTime).onlyMonthDate; var hourlyData = this.getHourlyInfoToday(); for (var i = 0; i
getSetUVIndex: function() { var uvIndex = this.rawWeatherData.currently.uvIndex; this.highlights.uvIndex = uvIndex; },
getSetVisibility: function() { var visibilityInMiles = this.rawWeatherData.currently.visibility; this.highlights.visibility = this.mileToKilometer(visibilityInMiles); },
getSetWindStatus: function() { var windSpeedInMiles = this.rawWeatherData.currently.windSpeed; this.highlights.windStatus.windSpeed = this.mileToKilometer( windSpeedInMiles ); var absoluteWindDir = this.rawWeatherData.currently.windBearing; this.highlights.windStatus.windDirection = absoluteWindDir; this.highlights.windStatus.derivedWindDirection = this.deriveWindDir( absoluteWindDir ); },
High Level Glue Methods
With the utility, acquisition, and processing methods out of our way, we are now left with the task of orchestrating the entire thing. We do that by creating high level glue methods, that essentially calls the methods written above in a particular sequence, so that the entire operation is executed seamlessly.
// Top level for info section // Data in this.currentWeather organizeCurrentWeatherInfo: function() { // data in this.currentWeather /* Coordinates and location is covered (get & set) in: — this.getCoordinates() — this.setFormatCoordinates() There are lots of async-await involved there. So it's better to keep them there. */ this.getSetCurrentTime(); this.getSetCurrentTemp(); this.getSetTodayTempHighLowWithTime(); this.getSetSummary(); this.getSetPossibility(); },
// Top level for highlights organizeTodayHighlights: function() { // top level for highlights this.getSetUVIndex(); this.getSetVisibility(); this.getSetWindStatus(); },
// Top level organization and rendering organizeAllDetails: async function() { // top level organization await this.fetchWeatherData(); this.organizeCurrentWeatherInfo(); this.organizeTodayHighlights(); this.getSetHourlyTempInfoToday(); },
mounted
Vue provides instance lifecycle hooks — properties that are essentially methods, and gets triggered when the instance lifecycle reaches that stage. For example, created, mounted, beforeUpdate, etc., are all very useful lifecycle hooks that allows the programmer to control the instance at a much more granular level than that would have been possible otherwise.
In the code of a Vue component, these lifecycle hooks are implemented just like you would for any other prop. For example:
<template> </template> <script> // import statements export default { data() { return { // data objects here } }, methods: { // methods here }, mounted: function(){ // function body here }, } </script> <style> </style>
Armed with this new understanding, take a look at the code below for the mounted prop of App.vue:
mounted: async function() { this.location = "New York"; await this.organizeAllDetails(); }
Complete Code For App.vue
We have covered a lot of ground in this section, and the last few sections have given you things in bits and pieces. However, it’s important that you have the complete, assembled code for App.vue (subject to further modifications in subsequent sections). Here it goes:
<template> <div id="ancestor"> <div class="container-fluid" id="app"> <div class="row"> <div id="sidebar" class="col-md-3 col-sm-4 col-xs-12 sidebar"> <div id="search"> <input id="location-input" type="text" ref="input" placeholder="Location?" @keyup.enter="organizeAllDetails" > <button id="search-btn" @click="organizeAllDetails"> <img src="./assets/Search.svg" width="24" height="24"> </button> </div> <div id="info"> <div class="wrapper-left"> <div id="current-weather"> <span>°C</span> </div> <div id="weather-desc"></div> <div class="temp-max-min"> <div class="max-desc"> <div id="max-detail"> <i>▲</i> <span>°C</span> </div> <div id="max-summary">at </div> </div> <div class="min-desc"> <div id="min-detail"> <i>▼</i> <span>°C</span> </div> <div id="min-summary">at </div> </div> </div> </div> <div class="wrapper-right"> <div class="date-time-info"> <div id="date-desc"> <img src="./assets/calendar.svg" width="20" height="20"> </div> </div> <div class="location-info"> <div id="location-desc"> <img src="./assets/location.svg" width="10.83" height="15.83" style="opacity: 0.9;" > <div id="location-detail" class="mt-1"> Lat: <br> Long: </div> </div> </div> </div> </div> </div> <dashboard-content class="col-md-9 col-sm-8 col-xs-12 content" id="dashboard-content" :highlights="highlights" :tempVar="tempVar" ></dashboard-content> </div> </div> </div> </template> <script> import Content from './components/Content.vue'; export default { name: 'app', props: [], components: { 'dashboard-content': Content }, data() { return { weatherDetails: false, location: '', // raw location from input lat: '', // raw latitude from google maps api response long: '', // raw longitude from google maps api response completeWeatherApi: '', // weather api string with lat and long rawWeatherData: '', // raw response from weather api currentWeather: { full_location: '', // for full address formatted_lat: '', // for N/S formatted_long: '', // for E/W time: '', temp: '', todayHighLow: { todayTempHigh: '', todayTempHighTime: '', todayTempLow: '', todayTempLowTime: '' }, summary: '', possibility: '' }, tempVar: { tempToday: [ // gets added dynamically by this.getSetHourlyTempInfoToday() ], }, highlights: { uvIndex: '', visibility: '', windStatus: { windSpeed: '', windDirection: '', derivedWindDirection: '' }, } }; }, methods: { // Some utility functions convertToTitleCase: function(str) { str = str.toLowerCase().split(' '); for (var i = 0; i < str.length; i++) { str[i] = str[i].charAt(0).toUpperCase() + str[i].slice(1); } return str.join(' '); }, formatPossibility: function(str) { str = str.toLowerCase().split('-'); for (var i = 0; i < str.length; i++) { str[i] = str[i].charAt(0).toUpperCase() + str[i].slice(1); } return str.join(' '); }, unixToHuman: function(timezone, timestamp) { /* READ THIS BEFORE JUDGING & DEBUGGING For any location beyond the arctic circle and the antarctic circle, the goddamn weather api does not return certain keys/values in each of this.rawWeatherData.daily.data[some_array_index]. Due to this, console throws up an error. The code is correct, the problem is with the API. May be later on I will add some padding to tackle missing values. */ var moment = require('moment-timezone'); // for handling date & time var decipher = new Date(timestamp * 1000); var human = moment(decipher) .tz(timezone) .format('llll'); var timeArray = human.split(' '); var timeNumeral = timeArray[4]; var timeSuffix = timeArray[5]; var justTime = timeNumeral + ' ' + timeSuffix; var monthDateArray = human.split(','); var monthDate = monthDateArray[1].trim(); return { fullTime: human, onlyTime: justTime, onlyMonthDate: monthDate }; }, fahToCel: function(tempInFahrenheit) { var tempInCelcius = Math.round((5 / 9) * (tempInFahrenheit — 32)); return tempInCelcius; }, milibarToKiloPascal: function(pressureInMilibar) { var pressureInKPA = pressureInMilibar * 0.1; return Math.round(pressureInKPA); }, mileToKilometer: function(miles) { var kilometer = miles * 1.60934; return Math.round(kilometer); }, deriveWindDir: function(windDir) { var wind_directions_array = [ { minVal: 0, maxVal: 30, direction: 'N' }, { minVal: 31, maxVal: 45, direction: 'NNE' }, { minVal: 46, maxVal: 75, direction: 'NE' }, { minVal: 76, maxVal: 90, direction: 'ENE' }, { minVal: 91, maxVal: 120, direction: 'E' }, { minVal: 121, maxVal: 135, direction: 'ESE' }, { minVal: 136, maxVal: 165, direction: 'SE' }, { minVal: 166, maxVal: 180, direction: 'SSE' }, { minVal: 181, maxVal: 210, direction: 'S' }, { minVal: 211, maxVal: 225, direction: 'SSW' }, { minVal: 226, maxVal: 255, direction: 'SW' }, { minVal: 256, maxVal: 270, direction: 'WSW' }, { minVal: 271, maxVal: 300, direction: 'W' }, { minVal: 301, maxVal: 315, direction: 'WNW' }, { minVal: 316, maxVal: 345, direction: 'NW' }, { minVal: 346, maxVal: 360, direction: 'NNW' } ]; var wind_direction = ''; for (var i = 0; i < wind_directions_array.length; i++) { if ( windDir >= wind_directions_array[i].minVal && windDir <= wind_directions_array[i].maxVal ) { wind_direction = wind_directions_array[i].direction; } } return wind_direction; }, // Some basic action oriented functions makeInputEmpty: function() { this.$refs.input.value = ''; }, makeTempVarTodayEmpty: function() { this.tempVar.tempToday = []; }, detectEnterKeyPress: function() { var input = this.$refs.input; input.addEventListener('keyup', function(event) { event.preventDefault(); var enterKeyCode = 13; if (event.keyCode === enterKeyCode) { this.setHitEnterKeyTrue(); } }); }, locationEntered: function() { var input = this.$refs.input; if (input.value === '') { this.location = "New York"; } else { this.location = this.convertToTitleCase(input.value); } this.makeInputEmpty(); this.makeTempVarTodayEmpty(); }, getCoordinates: function() { this.locationEntered(); var loc = this.location; var coords; var geocoder = new google.maps.Geocoder(); return new Promise(function(resolve, reject) { geocoder.geocode({ address: loc }, function(results, status) { if (status == google.maps.GeocoderStatus.OK) { this.lat = results[0].geometry.location.lat(); this.long = results[0].geometry.location.lng(); this.full_location = results[0].formatted_address; coords = { lat: this.lat, long: this.long, full_location: this.full_location }; resolve(coords); } else { alert("Oops! Couldn't get data for the location"); } }); }); }, // Some basic asynchronous functions setFormatCoordinates: async function() { var coordinates = await this.getCoordinates(); this.lat = coordinates.lat; this.long = coordinates.long; this.currentWeather.full_location = coordinates.full_location; // Remember to beautify lat for N/S if (coordinates.lat > 0) { this.currentWeather.formatted_lat = (Math.round(coordinates.lat * 10000) / 10000).toString() + '°N'; } else if (coordinates.lat < 0) { this.currentWeather.formatted_lat = (-1 * (Math.round(coordinates.lat * 10000) / 10000)).toString() + '°S'; } else { this.currentWeather.formatted_lat = ( Math.round(coordinates.lat * 10000) / 10000 ).toString(); } // Remember to beautify long for N/S if (coordinates.long > 0) { this.currentWeather.formatted_long = (Math.round(coordinates.long * 10000) / 10000).toString() + '°E'; } else if (coordinates.long < 0) { this.currentWeather.formatted_long = (-1 * (Math.round(coordinates.long * 10000) / 10000)).toString() + '°W'; } else { this.currentWeather.formatted_long = ( Math.round(coordinates.long * 10000) / 10000 ).toString(); } }, fixWeatherApi: async function() { await this.setFormatCoordinates(); var weatherApi = 'https://csm.fusioncharts.com/files/assets/wb/wb-data.php?src=darksky&lat=' + this.lat + '&long=' + this.long; this.completeWeatherApi = weatherApi; }, fetchWeatherData: async function() { await this.fixWeatherApi(); var axios = require('axios'); // for handling weather api promise var weatherApiResponse = await axios.get(this.completeWeatherApi); if (weatherApiResponse.status === 200) { this.rawWeatherData = weatherApiResponse.data; } else { alert('Hmm... Seems like our weather experts are busy!'); } }, // Get and set functions; often combined, because they are short // For basic info — left panel/sidebar getTimezone: function() { return this.rawWeatherData.timezone; }, getSetCurrentTime: function() { var currentTime = this.rawWeatherData.currently.time; var timezone = this.getTimezone(); this.currentWeather.time = this.unixToHuman( timezone, currentTime ).fullTime; }, getSetSummary: function() { var currentSummary = this.convertToTitleCase( this.rawWeatherData.currently.summary ); if (currentSummary.includes(' And')) { currentSummary = currentSummary.replace(' And', ','); } this.currentWeather.summary = currentSummary; }, getSetPossibility: function() { var possible = this.formatPossibility(this.rawWeatherData.daily.icon); if (possible.includes(' And')) { possible = possible.replace(' And', ','); } this.currentWeather.possibility = possible; }, getSetCurrentTemp: function() { var currentTemp = this.rawWeatherData.currently.temperature; this.currentWeather.temp = this.fahToCel(currentTemp); }, getTodayDetails: function() { return this.rawWeatherData.daily.data[0]; }, getSetTodayTempHighLowWithTime: function() { var timezone = this.getTimezone(); var todayDetails = this.getTodayDetails(); this.currentWeather.todayHighLow.todayTempHigh = this.fahToCel( todayDetails.temperatureMax ); this.currentWeather.todayHighLow.todayTempHighTime = this.unixToHuman( timezone, todayDetails.temperatureMaxTime ).onlyTime; this.currentWeather.todayHighLow.todayTempLow = this.fahToCel( todayDetails.temperatureMin ); this.currentWeather.todayHighLow.todayTempLowTime = this.unixToHuman( timezone, todayDetails.temperatureMinTime ).onlyTime; }, getHourlyInfoToday: function() { return this.rawWeatherData.hourly.data; }, getSetHourlyTempInfoToday: function() { var unixTime = this.rawWeatherData.currently.time; var timezone = this.getTimezone(); var todayMonthDate = this.unixToHuman(timezone, unixTime).onlyMonthDate; var hourlyData = this.getHourlyInfoToday(); for (var i = 0; i < hourlyData.length; i++) { var hourlyTimeAllTypes = this.unixToHuman(timezone, hourlyData[i].time); var hourlyOnlyTime = hourlyTimeAllTypes.onlyTime; var hourlyMonthDate = hourlyTimeAllTypes.onlyMonthDate; if (todayMonthDate === hourlyMonthDate) { var hourlyObject = { hour: '', temp: '' }; hourlyObject.hour = hourlyOnlyTime; hourlyObject.temp = this.fahToCel(hourlyData[i].temperature).toString(); this.tempVar.tempToday.push(hourlyObject); /* Since we are using array.push(), we are just adding elements at the end of the array. Thus, the array is not getting emptied first when a new location is entered. to solve this problem, a method this.makeTempVarTodayEmpty() has been created, and called from this.locationEntered(). */ } } /* To cover the edge case where the local time is between 10 — 12 PM, and therefore there are only two elements in the array this.tempVar.tempToday. We need to add the points for minimum temperature and maximum temperature so that the chart gets generated with atleast four points. */ if (this.tempVar.tempToday.length <= 2) { var minTempObject = { hour: this.currentWeather.todayHighLow.todayTempHighTime, temp: this.currentWeather.todayHighLow.todayTempHigh }; var maxTempObject = { hour: this.currentWeather.todayHighLow.todayTempLowTime, temp: this.currentWeather.todayHighLow.todayTempLow }; /* Typically, lowest temp are at dawn, highest temp is around mid day. Thus we can safely arrange like min, max, temp after 10 PM. */ // array.unshift() adds stuff at the beginning of the array. // the order will be: min, max, 10 PM, 11 PM. this.tempVar.tempToday.unshift(maxTempObject, minTempObject); } }, // For Today Highlights getSetUVIndex: function() { var uvIndex = this.rawWeatherData.currently.uvIndex; this.highlights.uvIndex = uvIndex; }, getSetVisibility: function() { var visibilityInMiles = this.rawWeatherData.currently.visibility; this.highlights.visibility = this.mileToKilometer(visibilityInMiles); }, getSetWindStatus: function() { var windSpeedInMiles = this.rawWeatherData.currently.windSpeed; this.highlights.windStatus.windSpeed = this.mileToKilometer( windSpeedInMiles ); var absoluteWindDir = this.rawWeatherData.currently.windBearing; this.highlights.windStatus.windDirection = absoluteWindDir; this.highlights.windStatus.derivedWindDirection = this.deriveWindDir( absoluteWindDir ); }, // top level for info section organizeCurrentWeatherInfo: function() { // data in this.currentWeather /* Coordinates and location is covered (get & set) in: — this.getCoordinates() — this.setFormatCoordinates() There are lots of async-await involved there. So it's better to keep them there. */ this.getSetCurrentTime(); this.getSetCurrentTemp(); this.getSetTodayTempHighLowWithTime(); this.getSetSummary(); this.getSetPossibility(); }, organizeTodayHighlights: function() { // top level for highlights this.getSetUVIndex(); this.getSetVisibility(); this.getSetWindStatus(); }, // topmost level orchestration organizeAllDetails: async function() { // top level organization await this.fetchWeatherData(); this.organizeCurrentWeatherInfo(); this.organizeTodayHighlights(); this.getSetHourlyTempInfoToday(); }, }, mounted: async function() { this.location = "New York"; await this.organizeAllDetails(); } }; </script>
And finally, after so much of patience and hard work, you can see the data flow with its raw power! Visit the application on the browser, refresh the page, search for a location in the application’s search box, and hit Enter!
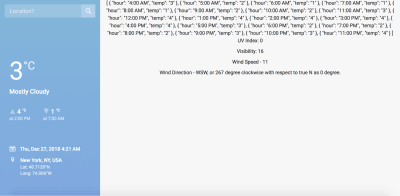
(Large preview)
Now that we are done with all the heavy lifting, take a break. The subsequent sections focus on using the data to create charts that are beautiful and informative, followed by giving our ugly looking application a much deserved grooming session using CSS.
5. Data Visualization With FusionCharts
Fundamental Considerations For Charts
For the end user, the essence of a dashboard is essentially this: a collection of the filtered and carefully curated information on a particular topic, conveyed through visual/graphic instruments for quick ingestion. They don’t care about the subtleties of your data pipeline engineering, or how aesthetic your code is — all they want is a high-level view in 3 seconds. Therefore, our crude application displaying text data means nothing to them, and it’s high time we implement mechanisms to wrap the data with charts.
However, before we dive deep into the implementation of charts, let’s consider some pertinent questions and the possible answers from our perspective:
What type of charts are appropriate for the type of data we are dealing with? Well, the answer has two aspects — the context, and the purpose. By context, we mean the type of data, and it’s overall fit in the scheme of bigger things, bounded by the scope and audience of the project. And by purpose, we essentially mean “what we want to emphasize on?”. For example, we can represent today’s temperature at different times of the day by using a Column chart (vertical columns of equal width, with height proportional to the value the column represents). However, we are rarely interested in the individual values, but rather the overall variation and trend throughout the data. To suit the purpose, it is in our best interest to use a Line chart, and we will do that shortly.
What should be kept in mind before selecting a charting library? Since we are doing a project predominantly using JavaScript based technologies, it’s a no-brainer that any charting library that we choose for our project should be a native of the JavaScript world. With that basic premise in mind, we should consider the following before zeroing down on any particular library:
Support for the frameworks of our choice, which in this case, is Vue.js. A project can be developed in other popular JavaScript frameworks like React, or Angular — check the support of the charting library for your favorite framework. Also, support for other popular programming languages like Python, Java, C++, .Net (AS and VB), especially when the project involves some serious backend stuff, must be considered.
Availability of charts types and features, since it is almost impossible to know beforehand what will be final shape and purpose of the data in the project (especially if the requirements are regulated by your clients in a professional setting). In this case, you should cast your net wide, and choose a charting library that has the widest collection of charts. More importantly, to differentiate your project from others, the library should have have enough features in the form of configurable chart attributes, so that you can fine-tune and customize most aspects of the charts and the right level of granularity. Also, the default chart configurations should be sensible, and the library documentation has to be top notch, for reasons that’s obvious to professional developers.
Learning curve, support community, and balance must also be taken into consideration, especially when you are new to data visualization. On one end of the spectrum, you have proprietary tools like Tableau and Qlickview that costs a bomb, has smooth learning curve, but also comes with so many limitations in terms of customizability, integration, and deployment. On the other end there is d3.js — vast, free (open source), and customizable to its core, but you have to pay the price of a very steep learning curve to be able to do anything productive with the library.
What you need is the sweet spot — the right balance between productivity, coverage, customizability, learning curve, and off course, cost. We nudge you to take a look at FusionCharts — the world’s most comprehensive and enterprise-ready JavaScript charting library for the web and mobile, that we will be using in this project for creating charts.
Introduction To FusionCharts
FusionCharts is used worldwide as the go-to JavaScript charting library by millions of developers spread across hundreds of countries around the globe. Technically, it’s as loaded and configurable as it can be, with support for integrating it with almost any popular tech stack used for web based projects. Using FusionCharts commercially requires a license, and you have to pay for the license depending on your use case (please contact sales if you are curious). However, we are using FusionCharts in this projects just to try out a few things, and therefore the non-licensed version (comes with a small watermark in your charts, and a few other restrictions). Using the non-licensed version is perfectly fine when you are trying out the charts and using it in your non-commercial or personal projects. If you have plans to deploy the application commercially, please ensure that you have a license from FusionCharts.
Since this is a project involving Vue.js, we will need two modules that needs to be installed, if not done earlier:
The fusioncharts module, because it contains everything you will need for creating the charts
The vue-fusioncharts module, which is essentially a wrapper for fusioncharts, so that it can be used in a Vue.js project
If you have not installed them earlier (as instructed in the third section), install them by executing the following command from the project’s root directory:
npm install fusioncharts vue-fusioncharts --save
Next, ensure that the src/main.js file of the project has the following code (also mentioned in section 3):
import Vue from 'vue'; import App from './App.vue'; import FusionCharts from 'fusioncharts'; import Charts from 'fusioncharts/fusioncharts.charts'; import Widgets from 'fusioncharts/fusioncharts.widgets'; import PowerCharts from 'fusioncharts/fusioncharts.powercharts'; import FusionTheme from 'fusioncharts/themes/fusioncharts.theme.fusion'; import VueFusionCharts from 'vue-fusioncharts'; Charts(FusionCharts); PowerCharts(FusionCharts); Widgets(FusionCharts); FusionTheme(FusionCharts); Vue.use(VueFusionCharts, FusionCharts); new Vue({ el: '#app', render: h => h(App) })
Perhaps the most critical line in the above snippet is the following:
Vue.use(VueFusionCharts, FusionCharts)
It instructs Vue to use the vue-fusioncharts module for making sense of many things in the project that are apparently not explicitly defined by us, but is defined in the module itself. Also, this type of statement implies global declaration, by which we mean that anywhere Vue encounters anything strange in the code of our project (things that we have not explicitly defined about using FusionCharts), it will at least look once in the vue-fusioncharts and fusioncharts node modules for their definitions, before throwing up errors. If we would have used FusionCharts in an isolated part of our project (not using it in almost all of the component files), then perhaps local declaration would have made more sense.
With that, you are all set to use FusionCharts in the project. We will be using quite a few variety of charts, the choice being dependent on the aspect of the weather data that we want to visualize. Also, we will get to see the interplay of data binding, custom components, and watchers in action.
General Scheme For Using Fusioncharts In .vue Files
In this section, we will explain the general idea of using FusionCharts for creating various charts in the .vue files. But first, let’s see the pseudocode that schematically illustrates the core idea.
<template> <div> <fusioncharts :attribute_1="data_object_1" :attribute_2="data_object_2" … … ... > </fusioncharts> </div> </template> <script> export default { props: ["data_prop_received_by_the_component"], components: {}, data() { return { data_object_1: "value_1", data_object_2: "value_2", … … }; }, methods: {}, computed: {}, watch: { data_prop_received_by_the_component: { handler: function() { // some code/logic, mainly data manipulation based }, deep: true } } }; </script> <style> // component specific special CSS code here </style>
Let’s understand different parts of the above pseudocode:
In the <template>, within the top level <div> (that’s pretty much mandatory for the template HTML code of every component), we have the custom component <fusioncharts>. We have the definition of the component contained in the vue-fusioncharts Node module that we have installed for this project. Internally, vue-fusioncharts relies on the fusioncharts module, which have also been installed. We imported the necessary modules and resolved their dependencies, instructed Vue to use the wrapper globally (throughout the project) in the src/main.js file, and therefore there is no lack of definition for the custom <fusioncharts> component that we have used here. Also, the custom component has custom attributes, and each of the custom attribute is bound to a data object (and in turn, their values), by the v-bind directive, for which the shorthand is the colon (:) symbol. We will learn about the attributes and their associated data objects in a greater detail, when we discuss some of the specific charts used in this project.
In the <script>, first you declare the props that the component is supposed to receive, and then go on defining the data objects that are bounded to the attributes of <fusioncharts>. The values assigned to the data objects are the values that the attributes of <fusioncharts> pulls in, and the charts are created on the basis of those pulled in values. Apart from these, the most interesting part of the code is the watch { } object. This is a very special object in Vue’s scheme of things — it essentially instructs Vue to watch over any changes happening to certain data, and then take actions based on how the handler function for that data has been defined. For example, we want Vue to keep a watch on the prop received, i.e., data_prop_received_by_the_component in the pseudocode. The prop becomes a key in the watch { } object, and the value of the key is another object — a handler method that describes what needs to be done whenever the prop changes. With such elegant mechanisms to handle the changes, the app maintains its reactivity. The deep: true represents a boolean flag that you can associate with watchers, so that the object being watched is watched rather deeply, i.e., even the changes made in the nested levels of the object are tracked. (For more information on watchers, consult the official documentation).
Now that you are equipped with an understanding of the general scheme of things, let’s dive into the specific implementations of the charts in the .vue component files. The code will be pretty self-explanatory, and you should try to understand how the specifics fit in the general scheme of things described above.
Implementation Of Charts In .vue Files
While the very specifics of the implementation varies from one chart to another, the following explanation is applicable for all of them:
<template> As explained previously, the <fusioncharts> custom component has several attributes, each of them being bound to corresponding data object defined in the data() function by using the v-bind: directive. The attribute names are quite self-explanatory for what they mean, and figuring out the corresponding data objects is also trivial.
<script> In the data() function, the data objects and their values are what makes the charts work, because of the binding done by the v-bind (:) directives used on the attributes of <fusioncharts>. Before we dive deep into the individual data objects, it’s worth mentioning some general characteristics:
The data objects whose values are either 0 or 1 are boolean in nature, where 0 represents something not available/turned off, and 1 represents availability/turned on state. However, be cautious that non-boolean data objects can also have 0 or 1 as their values, besides other possible values — it depends on the context. For example, containerbackgroundopacity with its default value as 0 is boolean, whereas lowerLimit with its default value as 0 simply means the number zero is its literal value.
Some data objects deals with CSS properties like margin, padding, font-size, etc. — the value has an implied unit of “px” or pixel. Similarly, other data objects can have implicit units associated with their values. For detailed information, please refer to the respective chart attributes page of FusionCharts Dev Center.
In the data() function, perhaps the most interesting and non-obvious object is the dataSource. This object has three main objects nested within it:
chart: This object encapsulates lots of chart attributes related to the configuration and cosmetics of the chart. It is almost a compulsory construct that you will find in all the charts you will create for this project.
colorrange: This object is somewhat specific to the chart under consideration, and is mainly present in charts that deals with multiple colors/shades to demarcate different sub-ranges of the scale used in chart.
value: This object, again, is present in charts that has a specific value that needs to be highlighted in the range of the scale.
The watch { } object is perhaps the most crucial thing that makes this chart, and the other charts used in this project, spring to life. The reactivity of the charts, i.e., the charts updating themselves based on the new values resulting from a new user query is controlled by the watchers defined in this object. For example, we have defined a watcher for the prop highlights received by the component, and then defined a handler function to instruct Vue about the necessary actions that it should take, when anything changes about the object being watched in the entire project. This means that whenever App.vue yields a new value for any of the object within highlights, the information trickles down all the way down to this component, and the new value is updated in the data objects of this component. The chart being bound to the values, also gets updated as a result of this mechanism.
The above explanations are quite broad strokes to help us develop an intuitive understanding of the bigger picture. Once you understand the concepts intuitively, you can always consult the documentation of Vue.js and FusionCharts, when something is not clear to you from the code itself. We leave the exercise to you, and from the next subsection onward, we will not explain stuff that we covered in this subsection.
src/components/TempVarChart.vue
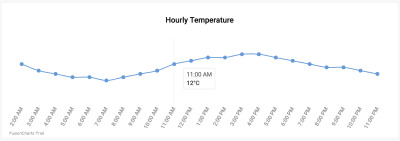
(Large preview)
<template> <div class="custom-card header-card card"> <div class="card-body pt-0"> <fusioncharts type="spline" width="100%" height="100%" dataformat="json" dataEmptyMessage="i-https://i.postimg.cc/R0QCk9vV/Rolling-0-9s-99px.gif" dataEmptyMessageImageScale=39 :datasource="tempChartData" > </fusioncharts> </div> </div> </template> <script> export default { props: ["tempVar"], components: {}, data() { return { tempChartData: { chart: { caption: "Hourly Temperature", captionFontBold: "0", captionFontColor: "#000000", captionPadding: "30", baseFont: "Roboto", chartTopMargin: "30", showHoverEffect: "1", theme: "fusion", showaxislines: "1", numberSuffix: "°C", anchorBgColor: "#6297d9", paletteColors: "#6297d9", drawCrossLine: "1", plotToolText: "$label<br><hr><b>$dataValue</b>", showAxisLines: "0", showYAxisValues: "0", anchorRadius: "4", divLineAlpha: "0", labelFontSize: "13", labelAlpha: "65", labelFontBold: "0", rotateLabels: "1", slantLabels: "1", canvasPadding: "20" }, data: [], }, }; }, methods: { setChartData: function() { var data = []; for (var i = 0; i < this.tempVar.tempToday.length; i++) { var dataObject = { label: this.tempVar.tempToday[i].hour, value: this.tempVar.tempToday[i].temp }; data.push(dataObject); } this.tempChartData.data = data; }, }, mounted: function() { this.setChartData(); }, watch: { tempVar: { handler: function() { this.setChartData(); }, deep: true }, }, }; </script> <style> </style>
src/components/UVIndex.vue
This component contains an extremely useful chart — the Angular Gauge.
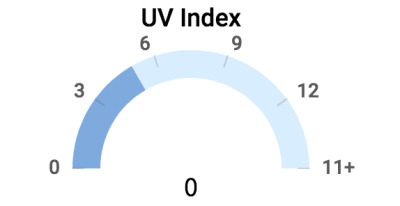
(Large preview)
The code for the component is given below. For detailed information on the chart attributes of Angular Gauge, refer to FusionCharts Dev Center page for Angular Gauge.
<template> <div class="highlights-item col-md-4 col-sm-6 col-xs-12 border-top"> <div> <fusioncharts :type="type" :width="width" :height="height" :containerbackgroundopacity="containerbackgroundopacity" :dataformat="dataformat" :datasource="datasource" ></fusioncharts> </div> </div> </template> <script> export default { props: ["highlights"], components: {}, data() { return { type: "angulargauge", width: "100%", height: "100%", containerbackgroundopacity: 0, dataformat: "json", datasource: { chart: { caption: "UV Index", captionFontBold: "0", captionFontColor: "#000000", captionPadding: "30", lowerLimit: "0", upperLimit: "15", lowerLimitDisplay: "1", upperLimitDisplay: "1", showValue: "0", theme: "fusion", baseFont: "Roboto", bgAlpha: "0", canvasbgAlpha: "0", gaugeInnerRadius: "75", gaugeOuterRadius: "110", pivotRadius: "0", pivotFillAlpha: "0", valueFontSize: "20", valueFontColor: "#000000", valueFontBold: "1", tickValueDistance: "3", autoAlignTickValues: "1", majorTMAlpha: "20", chartTopMargin: "30", chartBottomMargin: "40" }, colorrange: { color: [ { minvalue: "0", maxvalue: this.highlights.uvIndex.toString(), code: "#7DA9E0" }, { minvalue: this.highlights.uvIndex.toString(), maxvalue: "15", code: "#D8EDFF" } ] }, annotations: { groups: [ { items: [ { id: "val-label", type: "text", text: this.highlights.uvIndex.toString(), fontSize: "20", font: "Source Sans Pro", fontBold: "1", fillcolor: "#212529", x: "$gaugeCenterX", y: "$gaugeCenterY" } ] } ] }, dials: { dial: [ { value: this.highlights.uvIndex.toString(), baseWidth: "0", radius: "0", borderThickness: "0", baseRadius: "0" } ] } } }; }, methods: {}, computed: {}, watch: { highlights: { handler: function() { this.datasource.colorrange.color[0].maxvalue = this.highlights.uvIndex.toString(); this.datasource.colorrange.color[1].minvalue = this.highlights.uvIndex.toString(); this.datasource.annotations.groups[0].items[0].text = this.highlights.uvIndex.toString(); }, deep: true } } }; </script>
src/components/Visibility.vue
In this component, we use a Horizontal Linear Gauge to represent the visibility, as shown in the image below:
(Large preview)
The code for the component is given below. For an in depth understanding of the different attributes of this chart type, please refer to FusionCharts Dev Center page for Horizontal Linear Gauge.
<template> <div class="highlights-item col-md-4 col-sm-6 col-xs-12 border-left border-right border-top"> <div> <fusioncharts :type="type" :width="width" :height="height" :containerbackgroundopacity="containerbackgroundopacity" :dataformat="dataformat" :datasource="datasource" > </fusioncharts> </div> </div> </template> <script> export default { props: ["highlights"], components: {}, methods: {}, computed: {}, data() { return { type: "hlineargauge", width: "100%", height: "100%", containerbackgroundopacity: 0, dataformat: "json", creditLabel: false, datasource: { chart: { caption: "Air Visibility", captionFontBold: "0", captionFontColor: "#000000", baseFont: "Roboto", numberSuffix: " km", lowerLimit: "0", upperLimit: "40", showPointerShadow: "1", animation: "1", transposeAnimation: "1", theme: "fusion", bgAlpha: "0", canvasBgAlpha: "0", valueFontSize: "20", valueFontColor: "#000000", valueFontBold: "1", pointerBorderAlpha: "0", chartBottomMargin: "40", captionPadding: "30", chartTopMargin: "30" }, colorRange: { color: [ { minValue: "0", maxValue: "4", label: "Fog", code: "#6297d9" }, { minValue: "4", maxValue: "10", label: "Haze", code: "#7DA9E0" }, { minValue: "10", maxValue: "40", label: "Clear", code: "#D8EDFF" } ] }, pointers: { pointer: [ { value: this.highlights.visibility.toString() } ] } } }; }, watch: { highlights: { handler: function() { this.datasource.pointers.pointer[0].value = this.highlights.visibility.toString(); }, deep: true } } }; </script>
src/components/WindStatus.vue
This component displays the wind speed and direction (wind velocity, if you are physics savvy), and it is very difficult to represent a vector using a chart. For such cases, we suggest representing them with the aid of some nice images and text values. Since the representation we have thought about is entirely dependent on CSS, we will implement it in the next section that deals with the CSS. However, take a look at what we are aiming to create:
(Large preview)
<template> <div class="highlights-item col-md-4 col-sm-6 col-xs-12 border-top"> <div> <div class="card-heading pt-5">Wind Status</div> <div class="row pt-4 mt-4"> <div class="col-sm-6 col-md-6 mt-2 text-center align-middle"> <p class="card-sub-heading mt-3">Wind Direction</p> <p class="mt-4"><img src="../assets/winddirection.svg" height="40" width="40"></p> <p class="card-value mt-4"></p> </div> <div class="col-sm-6 col-md-6 mt-2"> <p class="card-sub-heading mt-3">Wind Speed</p> <p class="mt-4"><img src="../assets/windspeed.svg" height="40" width="40"></p> <p class="card-value mt-4"> km/h</p> </div> </div> </div> </div> </template> <script> export default { props: ["highlights"], components: {}, data() { return {}; }, methods: {}, computed: {} }; </script>
Wrapping Up With Highlights.vue
Recall that we have already implemented code with CSS for all the components — except Content.vue and Highlights.vue. Since Content.vue is a dumb component that just relays data, the minimal styling it needs has already been covered. Also, we have already written appropriate code for styling the sidebar and the cards containing the charts. Therefore, all we are left to do is add some stylistic bits to Highlights.vue, which primarily involves using the CSS classes:
<template> <div class="custom-content-card content-card card"> <div class="card-body pb-0"> <div class="content-header h4 text-center pt-2 pb-3">Highlights</div> <div class="row"> <uv-index :highlights="highlights"></uv-index> <visibility :highlights="highlights"></visibility> <wind-status :highlights="highlights"></wind-status> </div> </div> </div> </template> <script> import UVIndex from "./UVIndex.vue"; import Visibility from "./Visibility.vue"; import WindStatus from "./WindStatus.vue"; export default { props: ["highlights"], components: { "uv-index": UVIndex, "visibility": Visibility, "wind-status": WindStatus, }, }; </script>
Deployment And Source Code
With the charts and style in order, we are done! Take a moment to appreciate the beauty of your creation.

(Large preview)
It’s now time for you to deploy your application, and share it with your peers. If you don’t have much idea about deployment and expect us to help you, look here about our take on deployment ideas. The linked article also contains suggestions on how to remove the FusionCharts watermark at the left bottom of every chart.
If you mess up somewhere and want a reference point, the source code is available on Github.

(ms, ra, il)
0 notes
Photo

The Top 10 SitePoint Guides & Tutorials of 2019
In 2019, we published hundreds of new guides, tutorials, and articles. Whether we showed you how to use new technologies and tools, or published career advice from people at the top of their game, our aim was always to help you level up as a web developer.
Though tech moves fast, all of those articles are still relevant now in the start of 2020. To celebrate a year concluded, we wanted to take a look at the 10 pieces our readers enjoyed and shared the most in 2019. Hopefully, there's something here that's useful to you going into this new year.
What Is Functional Programming?
As a programmer, you probably want to write elegant, maintainable, scalable, predictable code. The principles of functional programming, or FP, can significantly aid in these goals. Ali Spittel walks you through these principles, using JavaScript to demonstrate them.
➤ Read What Is Functional Programming?
10 Must-have VS Code Extensions for JavaScript Developers
Visual Studio Code is undoubtedly the most popular lightweight code editor today. It does borrow heavily from other popular code editors, mostly Sublime Text and Atom. However, its success mainly comes from its ability to provide better performance and stability. In addition, it also provides much-needed features like IntelliSense, which were only available in full-sized IDEs like Eclipse or Visual Studio 2017.
The power of VS Code no doubt comes from the marketplace. Thanks to the wonderful open-source community, the editor is now capable of supporting almost every programming language, framework, and development technology. Support for a library or framework comes in various ways, which mainly includes snippets, syntax highlighting, Emmet and IntelliSense features for that specific technology.
➤ Read 10 Must-have VS Code Extensions for JavaScript Developers
Why the Highest Paid Developers "Fight" Their Co-workers
Most employees want to keep their jobs and their clients. They don’t have the leverage or control they want over their own careers. They need their job. In fact, most people are terrified of losing their jobs.
Research shows the fear of losing your job creates job dissatisfaction and a lack of commitment at work. This, in turn, affects job performance, negatively increasing the likelihood that you will lose your job. It’s a vicious cycle that seems to repeat itself over and over.
But there’s something worse than the fear of a job loss.
➤ Read Why the Highest Paid Developers "Fight" Their Co-workers
How to Tell If Vue.js Is the Right Framework for Your Next Project
Vue.js grew from a one-man project to a JavaScript framework everyone’s talking about. You’ve heard about it from your front-end colleagues and during conferences. You’ve probably read multiple comparisons between Vue, React, and Angular. And you’ve probably also noticed that Vue outranks React in terms of GitHub stars.
All that’s made you wonder whether Vue.js is the right framework for your next project? Well, let’s explore the possibilities and limitations of Vue to give you a high-level look at the framework and make your decision a little easier.
➤ Read How to Tell If Vue.js Is the Right Framework for Your Next Project
JavaScript Web Workers: A Beginner's Guide
Today’s mobile devices normally come with 8+ CPU cores, or 12+ GPU cores. Desktop and server CPUs have up to 16 cores, 32 threads, or more. In this environment, having a dominant programming or scripting environment that is single-threaded is a bottleneck.
JavaScript is single-threaded. This means that by design, JavaScript engines — originally browsers — have one main thread of execution, and, to put it simply, process or function B cannot be executed until process or function A is finished. A web page’s UI is unresponsive to any other JavaScript processing while it is occupied with executing something — this is known as DOM blocking.
The solution: web workers.
➤ Read JavaScript Web Workers: A Beginner's Guide
React vs Angular: An In-depth Comparison
Should I choose Angular or React? Each framework has a lot to offer and it’s not easy to choose between them. Whether you’re a newcomer trying to figure out where to start, a freelancer picking a framework for your next project, or an enterprise-grade architect planning a strategic vision for your company, you’re likely to benefit from having an educated view on this topic.
➤ Read React vs Angular: An In-depth Comparison
Fetching Data from a Third-party API with Vue.js and Axios
More often than not, when building your JavaScript application, you’ll want to fetch data from a remote source or consume an API. I recently looked into some publicly available APIs and found that there’s lots of cool stuff that can be done with data from these sources.
With Vue.js, you can literally build an app around one of these services and start serving content to users in minutes.
I’ll demonstrate how to build a simple news app that will show the top news articles of the day allow users to filter by their category of interest, fetching data from the New York Times API.
➤ Read Fetching Data from a Third-party API with Vue.js and Axios
How to Install Docker on Windows 10 Home
If you’ve ever tried to install Docker for Windows, you’ve probably come to realize that the installer won’t run on Windows 10 Home. Only Windows Pro, Enterprise or Education support Docker. Upgrading your Windows license is pricey, and also pointless since you can still run Linux Containers on Windows without relying on Hyper-V technology, a requirement for Docker for Windows.
In this tutorial, I’ll show you how to quickly setup a Linux VM on Windows Home running Docker Engine with the help of Docker Machine.
➤ Read How to Install Docker on Windows 10 Home
How to Use Windows Subsystem for Linux 2 and Windows Terminal
In this article, you’ll learn how you can use Windows Subsystem for Linux 2 to set up and run a local Linux shell interface in Windows without using a virtual machine. This not like using terminals such as Git Bash or cmder that have a subset of UNIX tools added to $PATH. This is actually like running a full Linux kernel on Windows that can execute native Linux applications. That’s pretty awesome, isn’t it?
➤ Read How to Use Windows Subsystem for Linux 2 and Windows Terminal
How to Migrate to Gulp.js 4.0
Despite competition from webpack and Parcel, Gulp.js remains one of the most popular JavaScript task runners. Gulp.js is configured using code which makes it a versatile, general-purpose option. As well as the usual transpiling, bundling and live reloading, Gulp.js could analyze a database, render a static site, push a Git commit, and post a Slack message with a single command.
➤ Read How to Migrate to Gulp.js 4.0
Happy New Year from SitePoint
We hope you all had a restful break and have come back recharged and ready to tackle your goals for this new year. We'll continue to collaborate with working developers to help you improve your skills this year, and we'll explore new areas that we hope you'll find both useful and exciting. And we'll continue our work on leveling SitePoint Premium up into a next-generation learning platform and comprehensive reference library. Happy New Year from SitePoint!
The post The Top 10 SitePoint Guides & Tutorials of 2019 appeared first on SitePoint.
by Joel Falconer via SitePoint https://ift.tt/2QXWTt4
0 notes
Text
Understanding Client-Side GraphQl With Apollo-Client In React Apps
About The Author
Blessing Krofegha is a Software Engineer Based in Lagos Nigeria, with a burning desire to contribute to making the web awesome for all, by writing and building … More about Blessing …
Ever tried interacting with a GraphQL server in a client-side application and felt like giving up even before getting anywhere? Ever declined an invitation to join a code base that requires working with GraphQL API because you had no idea? Ever felt like the only front-end engineer who hasn’t learned how to consume GraphQL APIs? If you answered yes to any of these questions, then this tutorial is for you. We’ll be taking a closer look at a few basics of GraphQL and Apollo Client, as well as how to work with both of them. By the end, we’ll have built a pet shop app that uses Apollo Client. Then, you can go on to build your next project.
According to State of JavaScript 2019, 38.7% of developers would like to use GraphQL, while 50.8% of developers would like to learn GraphQL.
Being a query language, GraphQL simplifies the workflow of building a client application. It removes the complexity of managing API endpoints in client-side apps because it exposes a single HTTP endpoint to fetch the required data. Hence, it eliminates overfetching and underfetching of data, as in the case of REST.
But GraphQL is just a query language. In order to use it easily, we need a platform that does the heavy lifting for us. One such platform is Apollo.
The Apollo platform is an implementation of GraphQL that transfers data between the cloud (the server) to the UI of your app. When you use Apollo Client, all of the logic for retrieving data, tracking, loading, and updating the UI is encapsulated by the useQuery hook (as in the case of React). Hence, data fetching is declarative. It also has zero-configuration caching. Just by setting up Apollo Client in your app, you get an intelligent cache out of the box, with no additional configuration required.
Apollo Client is also interoperable with other frameworks, such as Angular, Vue.js, and React.
Note: This tutorial will benefit those who have worked with RESTful or other forms of APIs in the past on the client-side and want to see whether GraphQL is worth taking a shot at. This means you should have worked with an API before; only then will you be able to understand how beneficial GraphQL could be to you. While we will be covering a few basics of GraphQL and Apollo Client, a good knowledge of JavaScript and React Hooks will come in handy.
GraphQL Basics
This article isn’t a complete introduction to GraphQL, but we will define a few conventions before continuing.
What Is GraphQL?
GraphQL is a specification that describes a declarative query language that your clients can use to ask an API for the exact data they want. This is achieved by creating a strong type schema for your API, with ultimate flexibility. It also ensures that the API resolves data and that client queries are validated against a schema. This definition means that GraphQL contains some specifications that make it a declarative query language, with an API that is statically typed (built around Typescript) and making it possible for the client to leverage those type systems to ask the API for the exact data it wants.
So, if we created some types with some fields in them, then, from the client-side, we could say, “Give us this data with these exact fields”. Then the API will respond with that exact shape, just as if we were using a type system in a strongly typed language. You can learn more in my Typescript article.
Let’s look at some conventions of GraphQl that will help us as we continue.
The Basics
Operations In GraphQL, every action performed is called an operation. There are a few operations, namely:
Query This operation is concerned with fetching data from the server. You could also call it a read-only fetch.
Mutation This operation involves creating, updating, and deleting data from a server. It is popularly called a CUD (create, update, and delete) operation.
Subscriptions This operation in GraphQL involves sending data from a server to its clients when specific events take place. They are usually implemented with WebSockets.
In this article, we will be dealing only with query and mutation operations.
Operation names There are unique names for your client-side query and mutation operations.
Variables and arguments Operations can define arguments, very much like a function in most programming languages. Those variables can then be passed to query or mutation calls inside the operation as arguments. Variables are expected to be given at runtime during the execution of an operation from your client.
Aliasing This is a convention in client-side GraphQL that involves renaming verbose or vague field names with simple and readable field names for the UI. Aliasing is necessary in use cases where you don’t want to have conflicting field names.
GraphQL basic conventions. (Large preview)
What Is Client-Side GraphQL?
When a front-end engineer builds UI components using any framework, like Vue.js or (in our case) React, those components are modeled and designed from a certain pattern on the client to suit the data that will be fetched from the server.
One of the most common problems with RESTful APIs is overfetching and underfetching. This happens because the only way for a client to download data is by hitting endpoints that return fixed data structures. Overfetching in this context means that a client downloads more information than is required by the app.
In GraphQL, on the other hand, you’d simply send a single query to the GraphQL server that includes the required data. The server would then respond with a JSON object of the exact data you’ve requested — hence, no overfetching. Sebastian Eschweiler explains the differences between RESTful APIs and GraphQL.
Client-side GraphQL is a client-side infrastructure that interfaces with data from a GraphQL server to perform the following functions:
It manages data by sending queries and mutating data without you having to construct HTTP requests all by yourself. You can spend less time plumbing data and more time building the actual application.
It manages the complexity of a cache for you. So, you can store and retrieve the data fetched from the server, without any third-party interference, and easily avoid refetching duplicate resources. Thus, it identifies when two resources are the same, which is great for a complex app.
It keeps your UI consistent with Optimistic UI, a convention that simulates the results of a mutation (i.e. the created data) and updates the UI even before receiving a response from the server. Once the response is received from the server, the optimistic result is thrown away and replaced with the actual result.
For further information about client-side GraphQL, spare an hour with the cocreator of GraphQL and other cool folks on GraphQL Radio.
What Is Apollo Client?
Apollo Client is an interoperable, ultra-flexible, community-driven GraphQL client for JavaScript and native platforms. Its impressive features include a robust state-management tool (Apollo Link), a zero-config caching system, a declarative approach to fetching data, easy-to-implement pagination, and the Optimistic UI for your client-side application.
Apollo Client stores not only the state from the data fetched from the server, but also the state that it has created locally on your client; hence, it manages state for both API data and local data.
It’s also important to note that you can use Apollo Client alongside other state-management tools, like RedUX, without conflict. Plus, it’s possible to migrate your state management from, say, Redux to Apollo Client (which is beyond the scope of this article). Ultimately, the main purpose of Apollo Client is to enable engineers to query data in an API seamlessly.
Features of Apollo Client
Apollo Client has won over so many engineers and companies because of its extremely helpful features that make building modern robust applications a breeze. The following features come baked in:
Caching Apollo Client supports caching on the fly.
Optimistic UI Apollo Client has cool support for the Optimistic UI. It involves temporarily displaying the final state of an operation (mutation) while the operation is in progress. Once the operation is complete, the real data replaces the optimistic data.
Pagination Apollo Client has built-in functionality that makes it quite easy to implement pagination in your application. It takes care of most of the technical headaches of fetching a list of data, either in patches or at once, using the fetchMore function, which comes with the useQuery hook.
In this article, we will look at a selection of these features.
Enough of the theory. Tighten your seat belt and grab a cup of coffee to go with your pancakes, as we get our hands dirty.
Building Our Web App
This project is inspired by Scott Moss.
We will be building a simple pet shop web app, whose features include:
fetching our pets from the server-side;
creating a pet (which involves creating the name, type of pet, and image);
using the Optimistic UI;
using pagination to segment our data.
To begin, clone the repository, ensuring that the starter branch is what you’ve cloned.
Getting Started
Install the Apollo Client Developer Tools extension for Chrome.
Using the command-line interface (CLI), navigate to the directory of the cloned repository, and run the command to get all dependencies: npm install.
Run the command npm run app to start the app.
While still in the root folder, run the command npm run server. This will start our back-end server for us, which we’ll use as we proceed.
The app should open up in a configured port. Mine is http://localhost:1234/; yours is probably something else.
If everything worked well, your app should look like this:
Cloned starter branch UI. (Large preview)
You’ll notice that we’ve got no pets to display. That’s because we haven’t created such functionality yet.
If you’ve installed Apollo Client Developer Tools correctly, open up the developer tools and click on the tray icon. You’ll see “Apollo” and something like this:
Apollo Client Developer Tools. (Large preview)
Like the RedUX and React developer tools, we will be using Apollo Client Developer Tools to write and test our queries and mutations. The extension comes with the GraphQL Playground.
Fetching Pets
Let’s add the functionality that fetches pets. Move over to client/src/client.js. We’ll be writing Apollo Client, linking it to an API, exporting it as a default client, and writing a new query.
Copy the following code and paste it in client.js:
import { ApolloClient } from 'apollo-client' import { InMemoryCache } from 'apollo-cache-inmemory' import { HttpLink } from 'apollo-link-http' const link = new HttpLink({ uri: 'https://localhost:4000/' }) const cache = new InMemoryCache() const client = new ApolloClient({ link, cache }) export default client
Here’s an explanation of what is happening above:
ApolloClient This will be the function that wraps our app and, thus, interfaces with the HTTP, caches the data, and updates the UI.
InMemoryCache This is the normalized data store in Apollo Client that helps with manipulating the cache in our application.
HttpLink This is a standard network interface for modifying the control flow of GraphQL requests and fetching GraphQL results. It acts as middleware, fetching results from the GraphQL server each time the link is fired. Plus, it’s a good substitute for other options, like Axios and window.fetch.
We declare a link variable that is assigned to an instance of HttpLink. It takes a uri property and a value to our server, which is https://localhost:4000/.
Next is a cache variable that holds the new instance of InMemoryCache.
The client variable also takes an instance of ApolloClient and wraps the link and cache.
Lastly, we export the client so that we can use it across the application.
Before we get to see this in action, we’ve got to make sure that our entire app is exposed to Apollo and that our app can receive data fetched from the server and that it can mutate that data.
To achieve this, let’s head over to client/src/index.js:
import React from 'react' import ReactDOM from 'react-dom' import { BrowserRouter } from 'react-router-dom' import { ApolloProvider } from '@apollo/react-hooks' import App from './components/App' import client from './client' import './index.css' const Root = () => ( <BrowserRouter> <ApolloProvider client={client}> <App /> </ApolloProvider> </BrowserRouter> ); ReactDOM.render(<Root />, document.getElementById('app')) if (module.hot) { module.hot.accept() }
As you’ll notice in the highlighted code, we’ve wrapped the App component in ApolloProvider and passed the client as a prop to the client. ApolloProvider is similar to React’s Context.Provider. It wraps your React app and places the client in context, which allows you to access it from anywhere in your component tree.
To fetch our pets from the server, we need to write queries that request the exact fields that we want. Head over to client/src/pages/Pets.js, and copy and paste the following code into it:
import React, {useState} from 'react' import gql from 'graphql-tag' import { useQuery, useMutation } from '@apollo/react-hooks' import PetsList from '../components/PetsList' import NewPetModal from '../components/NewPetModal' import Loader from '../components/Loader' const GET_PETS = gql` query getPets { pets { id name type img } } `; export default function Pets () { const [modal, setModal] = useState(false) const { loading, error, data } = useQuery(GET_PETS); if (loading) return <Loader />; if (error) return <p>An error occured!</p>; const onSubmit = input => { setModal(false) } if (modal) { return <NewPetModal onSubmit={onSubmit} onCancel={() => setModal(false)} /> } return ( <div className="page pets-page"> <section> <div className="row betwee-xs middle-xs"> <div className="col-xs-10"> <h1>Pets</h1> </div> <div className="col-xs-2"> <button onClick={() => setModal(true)}>new pet</button> </div> </div> </section> <section> <PetsList pets={data.pets}/> </section> </div> ) }
With a few bits of code, we are able to fetch the pets from the server.
What Is gql?
It’s important to note that operations in GraphQL are generally JSON objects written with graphql-tag and with backticks.
gql tags are JavaScript template literal tags that parse GraphQL query strings into the GraphQL AST (abstract syntax tree).
Query operations In order to fetch our pets from the server, we need to perform a query operation.
Because we’re making a query operation, we needed to specify the type of operation before naming it.
The name of our query is GET_PETS. It’s a naming convention of GraphQL to use camelCase for field names.
The name of our fields is pets. Hence, we specify the exact fields that we need from the server (id, name, type, img).
useQuery is a React hook that is the basis for executing queries in an Apollo application. To perform a query operation in our React component, we call the useQuery hook, which was initially imported from @apollo/react-hooks. Next, we pass it a GraphQL query string, which is GET_PETS in our case.
When our component renders, useQuery returns an object response from Apollo Client that contains loading, error, and data properties. Thus, they are destructured, so that we can use them to render the UI.
useQuery is awesome. We don’t have to include async-await. It’s already taken care of in the background. Pretty cool, isn’t it?
loading This property helps us handle the loading state of the application. In our case, we return a Loader component while our application loads. By default, loading is false.
error Just in case, we use this property to handle any error that might occur.
data This contains our actual data from the server.
Lastly, in our PetsList component, we pass the pets props, with data.pets as an object value.
At this point, we have successfully queried our server.
To start our application, let’s run the following command:
Start the client app. Run the command npm run app in your CLI.
Start the server. Run the command npm run server in another CLI.
VScode CLI partitioned to start both the client and the server. (Large preview)
If all went well, you should see this:
Pets queried from the server.
Mutating Data
Mutating data or creating data in Apollo Client is almost the same as querying data, with very slight changes.
Still in client/src/pages/Pets.js, let’s copy and paste the highlighted code:
.... const GET_PETS = gql` query getPets { pets { id name type img } } `; const NEW_PETS = gql` mutation CreateAPet($newPet: NewPetInput!) { addPet(input: $newPet) { id name type img } } `; const Pets = () => { const [modal, setModal] = useState(false) const { loading, error, data } = useQuery(GET_PETS); const [createPet, newPet] = useMutation(NEW_PETS); const onSubmit = input => { setModal(false) createPet({ variables: { newPet: input } }); } if (loading || newPet.loading) return <Loader />; if (error || newPet.error) return <p>An error occured</p>; if (modal) { return <NewPetModal onSubmit={onSubmit} onCancel={() => setModal(false)} /> } return ( <div className="page pets-page"> <section> <div className="row betwee-xs middle-xs"> <div className="col-xs-10"> <h1>Pets</h1> </div> <div className="col-xs-2"> <button onClick={() => setModal(true)}>new pet</button> </div> </div> </section> <section> <PetsList pets={data.pets}/> </section> </div> ) } export default Pets
To create a mutation, we would take the following steps.
1. mutation
To create, update, or delete, we need to perform the mutation operation. The mutation operation has a CreateAPet name, with one argument. This argument has a $newPet variable, with a type of NewPetInput. The ! means that the operation is required; thus, GraphQL won’t execute the operation unless we pass a newPet variable whose type is NewPetInput.
2. addPet
The addPet function, which is inside the mutation operation, takes an argument of input and is set to our $newPet variable. The field sets specified in our addPet function must be equal to the field sets in our query. The field sets in our operation are:
id
name
type
img
3. useMutation
The useMutation React hook is the primary API for executing mutations in an Apollo application. When we need to mutate data, we call useMutation in a React component and pass it a GraphQL string (in our case, NEW_PETS).
When our component renders useMutation, it returns a tuple (that is, an ordered set of data constituting a record) in an array that includes:
a mutate function that we can call at any time to execute the mutation;
an object with fields that represent the current status of the mutation’s execution.
The useMutation hook is passed a GraphQL mutation string (which is NEW_PETS in our case). We destructured the tuple, which is the function (createPet) that will mutate the data and the object field (newPets).
4. createPet
In our onSubmit function, shortly after the setModal state, we defined our createPet. This function takes a variable with an object property of a value set to { newPet: input }. The input represents the various input fields in our form (such as name, type, etc.).
With that done, the outcome should look like this:
Mutation without instant update.
If you observe the GIF closely, you’ll notice that our created pet doesn’t show up instantly, only when the page is refreshed. However, it has been updated on the server.
The big question is, why doesn’t our pet update instantly? Let’s find out in the next section.
Caching In Apollo Client
The reason our app doesn’t update automatically is that our newly created data doesn’t match the cache data in Apollo Client. So, there is a conflict as to what exactly it needs to be updated from the cache.
Simply put, if we perform a mutation that updates or deletes multiple entries (a node), then we are responsible for updating any queries referencing that node, so that it modifies our cached data to match the modifications that a mutation makes to our back-end data.
Keeping Cache In Sync
There are a few ways to keep our cache in sync each time we perform a mutation operation.
The first is by refetching matching queries after a mutation, using the refetchQueries object property (the simplest way).
Note: If we were to use this method, it would take an object property in our createPet function called refetchQueries, and it would contain an array of objects with a value of the query: refetchQueries: [{ query: GET_PETS }].
Because our focus in this section isn’t just to update our created pets in the UI, but to manipulate the cache, we won’t be using this method.
The second approach is to use the update function. In Apollo Client, there’s an update helper function that helps modify the cache data, so that it syncs with the modifications that a mutation makes to our back-end data. Using this function, we can read and write to the cache.
Updating The Cache
Copy the following highlighted code, and paste it in client/src/pages/Pets.js:
...... const Pets = () => { const [modal, setModal] = useState(false) const { loading, error, data } = useQuery(GET_PETS); const [createPet, newPet] = useMutation(NEW_PETS, { update(cache, { data: { addPet } }) { const data = cache.readQuery({ query: GET_PETS }); cache.writeQuery({ query: GET_PETS, data: { pets: [addPet, ...data.pets] }, }); }, } ); .....
The update function receives two arguments:
The first argument is the cache from Apollo Client.
The second is the exact mutation response from the server. We destructure the data property and set it to our mutation (addPet).
Next, to update the function, we need to check for what query needs to be updated (in our case, the GET_PETS query) and read the cache.
Secondly, we need to write to the query that was read, so that it knows we’re about to update it. We do so by passing an object that contains a query object property, with the value set to our query operation (GET_PETS), and a data property whose value is a pet object and that has an array of the addPet mutation and a copy of the pet’s data.
If you followed these steps carefully, you should see your pets update automatically as you create them. Let’s take a look at the changes:
Pets updates instantly.
Optimistic UI
A lot of people are big fans of loaders and spinners. There’s nothing wrong with using a loader; there are perfect use cases where a loader is the best option. I’ve written about loaders versus spinners and their best use cases.
Loaders and spinners indeed play an important role in UI and UX design, but the arrival of Optimistic UI has stolen the spotlight.
What Is Optimistic UI?
Optimistic UI is a convention that simulates the results of a mutation (created data) and updates the UI before receiving a response from the server. Once the response is received from the server, the optimistic result is thrown away and replaced with the actual result.
In the end, an optimistic UI is nothing more than a way to manage perceived performance and avoid loading states.
Apollo Client has a very interesting way of integrating the Optimistic UI. It gives us a simple hook that allows us to write to the local cache after mutation. Let’s see how it works!
Step 1
Head over to client/src/client.js, and add only the highlighted code.
import { ApolloClient } from 'apollo-client' import { InMemoryCache } from 'apollo-cache-inmemory' import { HttpLink } from 'apollo-link-http' import { setContext } from 'apollo-link-context' import { ApolloLink } from 'apollo-link' const http = new HttpLink({ uri: "http://localhost:4000/" }); const delay = setContext( request => new Promise((success, fail) => { setTimeout(() => { success() }, 800) }) ) const link = ApolloLink.from([ delay, http ]) const cache = new InMemoryCache() const client = new ApolloClient({ link, cache }) export default client
The first step involves the following:
We import setContext from apollo-link-context. The setContext function takes a callback function and returns a promise whose setTimeout is set to 800ms, in order to create a delay when a mutation operation is performed.
The ApolloLink.from method ensures that the network activity that represents the link (our API) from HTTP is delayed.
Step 2
The next step is using the Optimistic UI hook. Slide back to client/src/pages/Pets.js, and add only the highlighted code below.
..... const Pets = () => { const [modal, setModal] = useState(false) const { loading, error, data } = useQuery(GET_PETS); const [createPet, newPet] = useMutation(NEW_PETS, { update(cache, { data: { addPet } }) { const data = cache.readQuery({ query: GET_PETS }); cache.writeQuery({ query: GET_PETS, data: { pets: [addPet, ...data.pets] }, }); }, } ); const onSubmit = input => { setModal(false) createPet({ variables: { newPet: input }, optimisticResponse: { __typename: 'Mutation', addPet: { __typename: 'Pet', id: Math.floor(Math.random() * 10000 + ''), name: input.name, type: input.type, img: 'https://via.placeholder.com/200' } } }); } .....
The optimisticResponse object is used if we want the UI to update immediately when we create a pet, instead of waiting for the server response.
The code snippets above include the following:
__typename is injected by Apollo into the query to fetch the type of the queried entities. Those types are used by Apollo Client to build the id property (which is a symbol) for caching purposes in apollo-cache. So, __typename is a valid property of the query response.
The mutation is set as the __typename of optimisticResponse.
Just as earlier defined, our mutation’s name is addPet, and the __typename is Pet.
Next are the fields of our mutation that we want the optimistic response to update:
id Because we don’t know what the ID from the server will be, we made one up using Math.floor.
name This value is set to input.name.
type The type’s value is input.type.
img Now, because our server generates images for us, we used a placeholder to mimic our image from the server.
This was indeed a long ride. If you got to the end, don’t hesitate to take a break from your chair with your cup of coffee.
Let’s take a look at our outcome. The supporting repository for this project is on GitHub. Clone and experiment with it.
Final result of our app.
Conclusion
The amazing features of Apollo Client, such as the Optimistic UI and pagination, make building client-side apps a reality.
While Apollo Client works very well with other frameworks, such as Vue.js and Angular, React developers have Apollo Client Hooks, and so they can’t help but enjoy building a great app.
In this article, we’ve only scratched the surface. Mastering Apollo Client demands constant practice. So, go ahead and clone the repository, add pagination, and play around with the other features it offers.
Please do share your feedback and experience in the comments section below. We can also discuss your progress on Twitter. Cheers!
References
(ks, ra, al, yk, il)
Website Design & SEO Delray Beach by DBL07.co
Delray Beach SEO
source http://www.scpie.org/understanding-client-side-graphql-with-apollo-client-in-react-apps/ source https://scpie.tumblr.com/post/625015311855419392
0 notes