#was difficult to find good quality screencaps but hopefully these are good enough
Note
can I request some blinkees of Robotomy (tv shoe), many for the main characters (Blastus & Thrasher, Weenus, Maimy, Megawatt and Tacklebot)


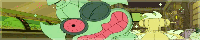


hopefully these work? <:]
#was difficult to find good quality screencaps but hopefully these are good enough#these are bigger than my usual blinkies because my usual size made them way too blurry#robotomy#flashing gif#for some reason i just couldnt get an image of tacklebot to work they all were so FUZZY :( im sorry
37 notes
·
View notes
Note
hi hi first of all I wanna say that i absolutely adore your icons! thank you som much for making them! i was going to ask how you make them if you don't mind? i wish you have an amazng day! <3
Hey Nonnie, thank you so much, I'm very happy you like them! 🥰 I wish I was eloquent enough for a proper tutorial, but I'm gonna try it for you 😌
If I don't make sense, there are a lot of helpful tuts around tumblr, here are some of them: x x x x 😅
Assuming that you know your way around the basic Photoshop tools, let me sum up in a nutshell what my process is:
REMOVING THE BACKGROUND
I usually get a picture or grab a screencap with a good enough quality, open it in Photoshop, and based on its complexity I select the object with my Pen tool, brush tool (on a layer mask), or some combinations of these with other selection tools (magic wand/quick selection tool) - most of the times it is a combination of all of the above. 😅 (watch this tutorial if you want to cut out a subject that is a more difficult shape e.g. messy hair, but there is a contrast between the subject and the background)
I don't erase the background: I cut the object using the layer mask, in case I need to add/get rid of some pixels after colouring and resizing the picture, and it’s also a tremendous help when I use different tools to remove the backgrund.

2. COLOURING
When I have my subject cut out, I create a new file in 150x150px, drag and drop the subject's layer and resize it with the Ctrl+T just to have the freedom to decide which parts to be included in the icon or in case I want more versions of the same picture, just like here (also don’t forget to delete the background by double clicking on it >> Enter >> Del) :

This is when I add/remove pixels on the layer mask if needed, and use some basic colouring on the picture, the layers added as a clipping mask so it will only affect the layer of the subject.

3. ADDING THE BACKGROUND + MORE COLOURING
Then I add some gradient and texture layers below my subject's layer, and in the blending options I add some drop shadow to my subject's layer. (If you're aiming for a more complex icon, there are icon textures around the internet too, here is one.)

To make the picture blend into the background more smoothly I usually add some adjustment layers as a clipping mask to the subject's layer to adjust the colours more to the background, and/or add some more adjustment layers on the top of all the layers (not as a clipping mask) that will affect the background and the subject as well.

+1 CHANGING THE COLOURS
If I want to blend my subject's clothes more with the background, I add a Solid color layer as a clipping mask somewhere over my subject's layer, using the Eyedropper tool I choose a colour from the background (or something around it), I set the mode to Colour, with the layer mask I remove everything I don’t want to colour, and if needed, I add another layer with Soft Light or another mode that works with my picture.
That's how I changed Javi's originally orange shirt for this set:

Sometimes I add a bit of a smart sharpen on my subject's layer with some fading, so it's not that aggressive, then I save the icon in a PNG format.
Hopefully the tuts and my description could help you a bit, but let me know if you need some more help with any of these steps... if anything, I can help you find a nice tutorial 😅
41 notes
·
View notes
Last Seen Blogs
cheekbites-moved
moved.

pkcrewsetelagoas
Parkour & Free Running

bakbenchers
Bakbenchers

lua-sketchdump-blog
What is quality

pepperoni043-blog
Untitled