#which was what i used for a lot of my mockup w this doll 👍
Text
Doing different things w a faceup is resulting in me just being like yeah. The under eye bags r not dark enough I need to keep putting more grey on those bad boys
#i will make a silly little post when im done bc im rly happy w it 👍 wiped the prev owners faceup bc man it did NOT fit and it was a never+#ending scrub fest to get it off. also learned w this sealant method that you can get rly nice subtle colors on the skin by only doing one +#coat of the sealant. which basically is letting me go fucking ham w the colors. like its like using a 50% opacity layer in digital art#which was what i used for a lot of my mockup w this doll 👍#i am making my silly little character have the horrible disease of does not sleep enough due to the whole being undead thing#sorry i have to bjd post at like. 6 am basically sorry#twist rambles
3 notes
·
View notes
Text
Doll posting under the cut (I do seem to always finish my faceups at like 3 am but 👍)
This was my first time doing an anime faceup and it was um. So so scary 👍 all I knew going in is I wanted to use a lot of orange tones since she has an orange wig :)

^ the faceup before :) my mom did it for me since my hands r 1 million percent shaky and it's a good faceup but I wanted smth a bit more polished! The watercolor pencils with the eyebrows just weren't as smooth of lines as I wanted so I got to work :)
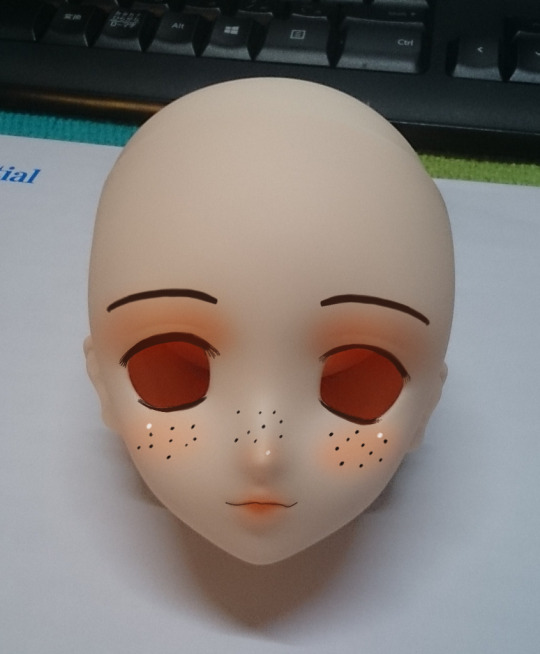
^ the faceup mockup kind of came across more Halloweeny than I think I wanted with how dark the brows and freckles were so I'm glad I made the changes I did :)

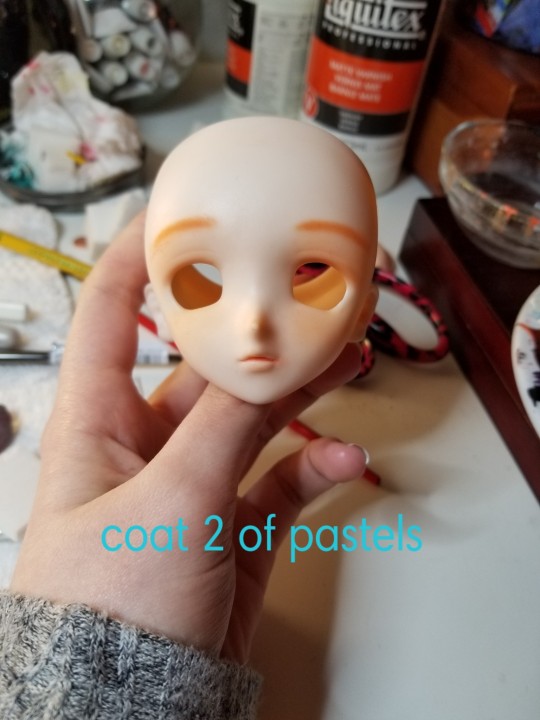
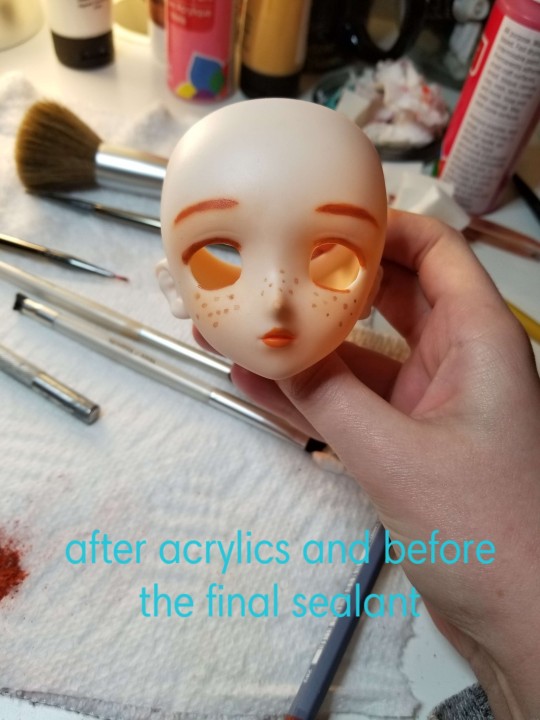

Most of the work was with acrylics which was honestly very scary! I really didn't know how well it would work to do the lashes and putting the brows in acrylic was a last minute decision and frankly one I'm glad I made! The freckles were also a challenge as trying to replicate a more anime style of doing them versus realistic (like what I did with Cordula's freckles) is something I've never done before. I'm honestly really happy w how it turned out and using the new sealant method went better this time (almost like not having to coat your head in acrylic paint before sealing helps or smth 🙄) and I barely had any dust or fuzzies trapped between the layers (although it surely helped to do way less layers of sealant than the last one, due to how I chose to do the layers). Next up is um. A head smaller than a Barbie doll so I'm going to have a scary time 👍
#twist rambles#bjd posting#beatrix#realizing once i put the ummm mockup pic in that i completely fucking forgot to redraw her little smile line that she had before and in the#mockup. oh well i could always add it later 👍#but yeah um shes got kind of like silly girl swag now i think.
9 notes
·
View notes
Text
Doll faceup/doll nudity under the cut 👍 this is a big project so word heavy
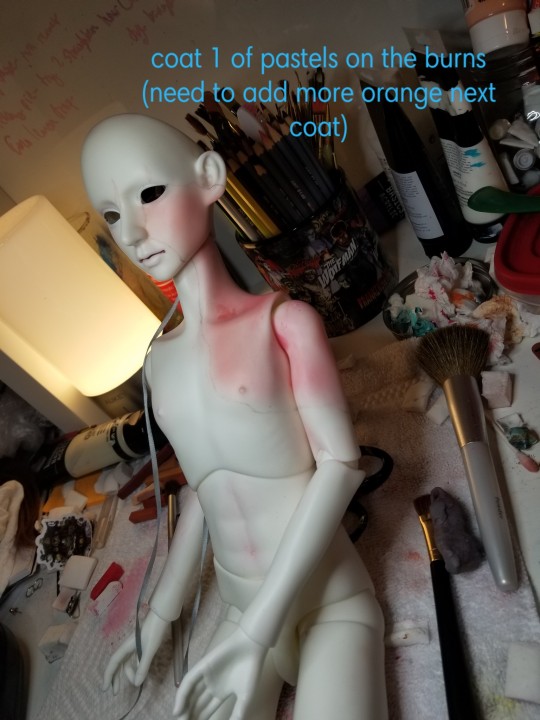
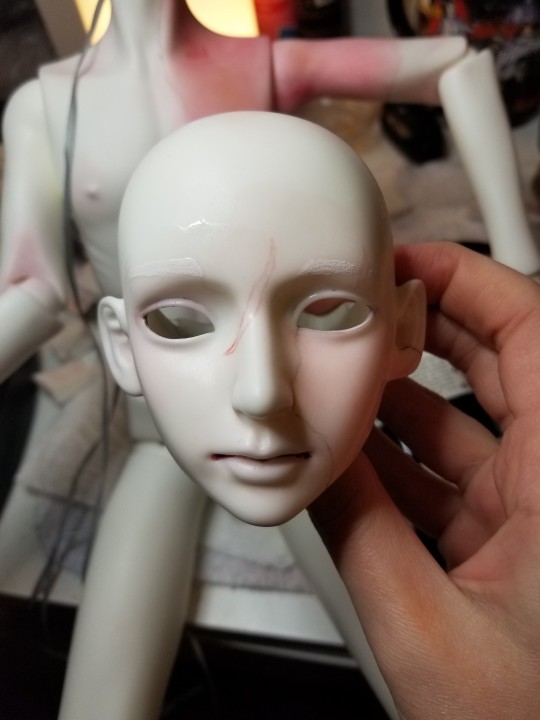
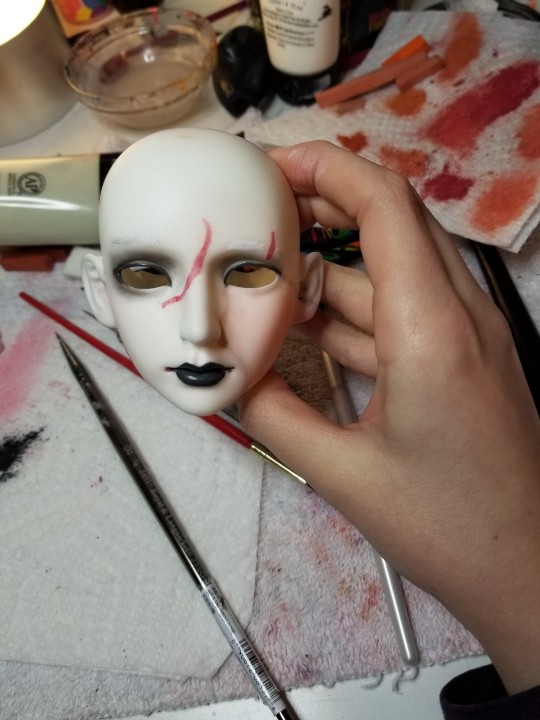
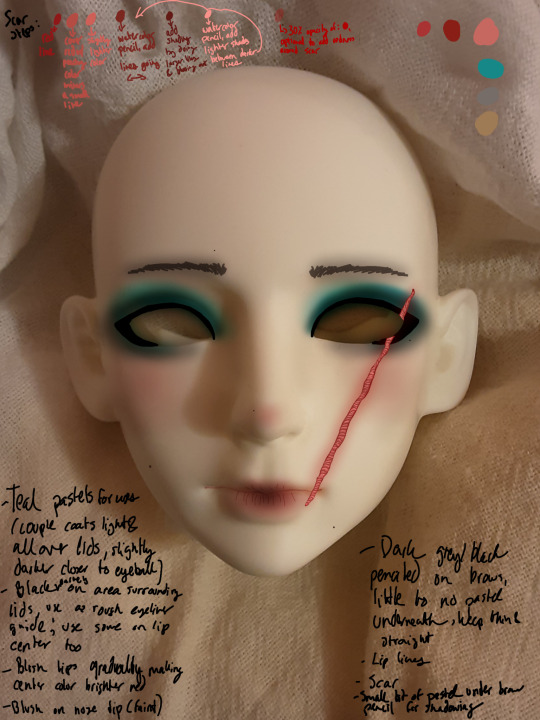
Dindrane, my poor Bobobie Apollo is in for his THIRD faceup because I just couldn't figure out the vibes of what I wanted to do with him until a day or two ago. I wanted to test how I could make burn scars seem realistic on a BJD, as I wanted to give him several, along with several scars on his body and head! This was in a way, preparing for my VERY big Frankenstein doll project, as I would be blushing that full doll in different colors with pastels. The mockup on this one was definitely a bit harder and I decided to not include it here for the fact that it would be way easier to just jump into the work!
First off, I used a watercolor pencil in burgundy to sketch out where I wanted my scars and a normal pencil to sketch the burns out. There's a LOT of spots I wanted the burns so I wanted to use a lighter color pencil but they weren't showing up on the resin at all 😭
^ first coat of blush (VERY faint. He's white resin so I have to do very pale colors unless I want it to overly stand out). The outlines are kinda hard to see here but they are definitely there!
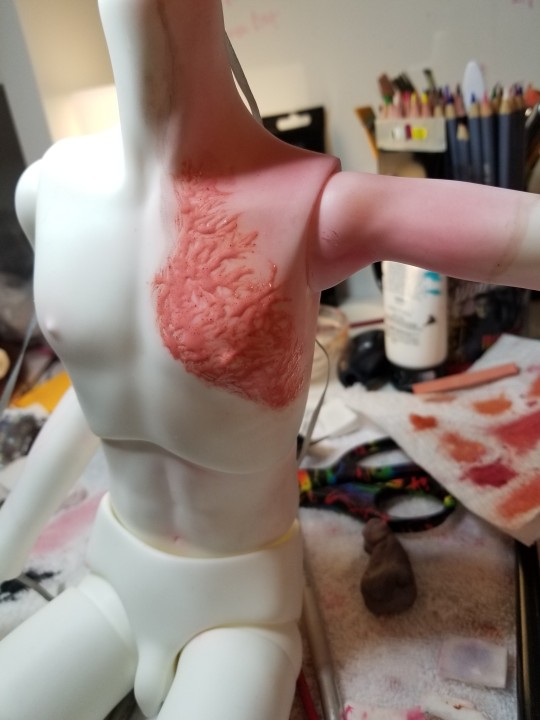
Then I saw some peachy orange pastels I had mixed up for my last faceup on Theo, and realized that would be a perfect color for under the actual 3 dimensional burns I would be making later on. So I just jumped right into it, running out and then mixing up a color that I thought was the same but turned out to be more red. I would have to add more orange/peachy tones next layer.
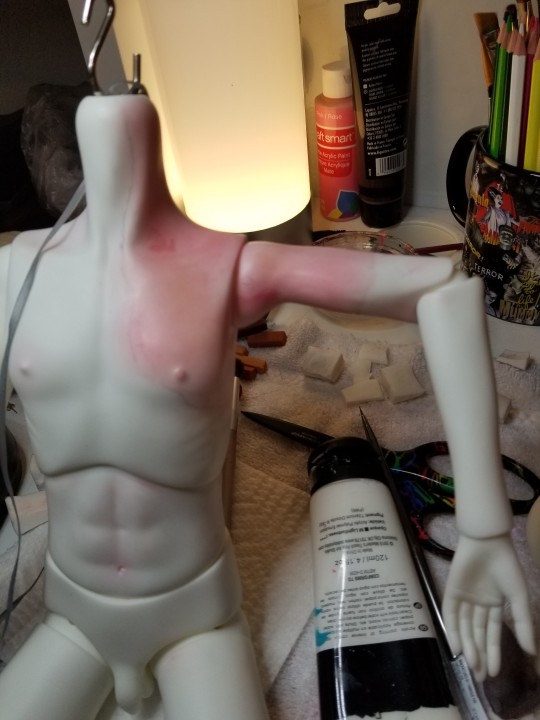
^ not to Bob Ross here but I had a few happy accidents with this layer! My sealant had kind of been finicky in a couple places but really just added more texture/depth to the scar sites! You can definitely see where the burns are more vividly now! I obviously still have to do the regular faceup and the rest of it but so far so good! I keep the head right by to match with the body so I can really make sure that the scar is matching from the neck to the head. I had originally wanted to do something similar with Dindrane, with a scar instead of a burn but I feel that he is really coming together like this! A lot of the areas I'm not showing (ie the back) are still blushed but I can't go TOO picture heavy or I'll have to make this a 2 part post 👍
Next layer was adding more colors to the pastels, the method I use to seal (using a sponge on sealant) gives me really interesting edges when I do this so I'm really happy with again all the happy accidents of the pastels picking up on the sponge I'm using! When I switch to the rest of the faceup, I am definitely going to get a new sponge but for right now it creates a lot more natural edges on the burns imo!
I have the head and body separate here because they're drying (shocker i forgot to take a pic before sealing lol)
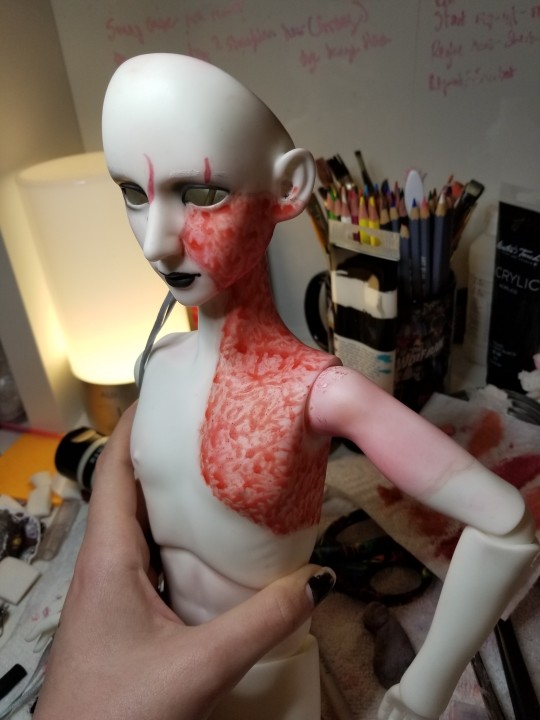
Burn is pretty much at the color I want! We did run into SOME technical issues with the eyebrows as you wouldn't guess that white pencil wouldn't show up on a white resin doll but it doesn't. So i had to paint the general shape on w acrylic paint lmao. They are BARELY visible but they're pretty even for what I'm working with rn! Next up is adding a lot of the really dramatic black eye makeup that he had before and then doing small burns and scars on the body! Also blushing the lips but I also might do a lipstick, it'll really just depend on how I'm feeling when I hit it 👍 the blushing is cracking a lot less in the joints than I expected which again is very good to know for my Frankenstein doll since 99% of the joints are going to be going through a similar treatment!
My favorite hobby is being like hmm ok this is where I'm going with this faceup ^-^ -> get into it and am like hmm. Ok whole different direction. This is definitely what happened here lmao. I had been struggling to pin this guy's character down for a month and while doing the eyebrows, it hit me fully and I knew what I wanted to do with this faceup! Which was a wonderful feeling tbh! So in my horribly terrible mistake fashion, I decided to do my acrylics and pastels on the same layer as I did NOT want to wait for it to dry and my inspo leave me in the meantime. This basically means I cannot make any mistake which is scary. Do not do this etc.
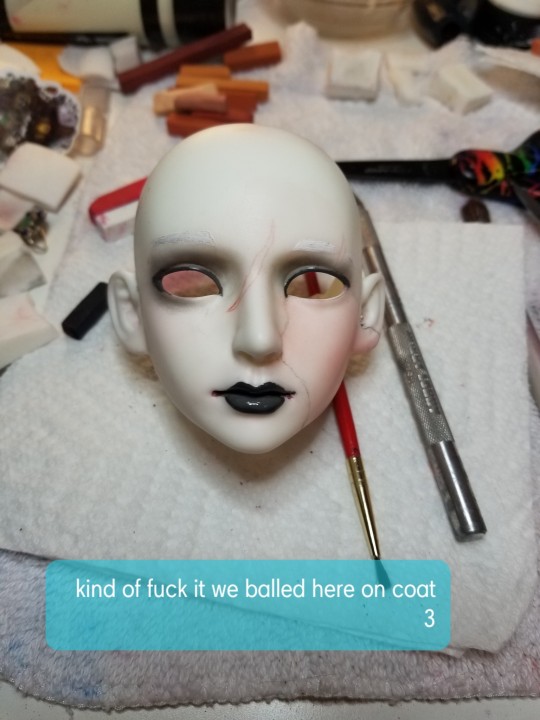
Brows still BARELY visible in pics but everything else turned out perfectly. By some FUCKING miracle my god. No clue how tho. So this now just leaves the burns and the scars, the latter of which I'm putting the red paint on rn bc i am um. Impatient so so bad lol. Very happy w this faceup tho like... It's him to me and that's a really good feeling :)
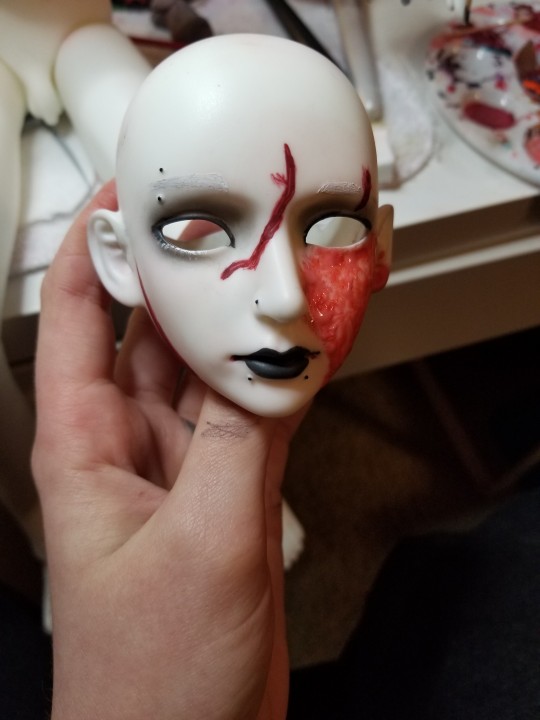
Realized the dark ass pencil was in fact a pain to cover up so mixed a kind of skin color paint with a tiny bit of my blood color to get a kinda middle shade between the skin and the scar which created a nice edge which will hopefully blend a bit better when I get to the glue and texture stage!
This is while it's still drying BUT. If it looks anywhere near this good when dry I'll be THRILLED. This worked way better than I expected and I am VERY glad I did such dark pastels under bc it set a really good foundation for the textured part of the burn! It's 7 am as I'm writing this and I am so so sleepy so I postponed the arm for another day but here's how the torso is looking! I'm letting it dry overnight, as well as the head and then will see if I need to do another coat tomorrow
^ very early on as I covered all the red on the torso but this pic shows it looking pretty dry so wanted to pick this one 👍
Faceup still drying here but. I added more definition to the scars on the body by doing another layer of glue + pastel and did the same on the face. Added piercings to him and it's basically all just waiting for a ton of it to dry now 👍
^ first pic is before the second coat but just showing how it all looked dry and second pic is faceup finished minus gloss! I will be posting finished pictures later but this was a BIG project so I hit max pic limit quickly. Obviously when I did the rest of the glue, I added the arm burns and the rest of the burns on the lower arms. I'm STILL not done with this body though. I need to do a lot of burns on the legs and add tattoos on the legs as well! This is definitely a very long project lol. The tattoo stuff is definitely going to wait for later because I have no clue what I want to do with him but this entire project has been a HUGE help with doing 3 dimensional modifications like this and it's going to be insanely helpful when I work on my Frankenstein body next. A lot of the techniques I used here are ones I will also use there so it should be pretty easy! Hopefully lmao.
#twist rambles#bjd posting#dindrane#god yeah i guess i didnt have a name for him last time lol#anyways ummm sorry for all the silly details but it helps me and i am more detailed when I write these between coats drying vs at the end#this has def been a happy accidents kinda thing but I honestly do not mind like... im happy w it so far
4 notes
·
View notes
Text
Doll faceup below the cut aka i got a bit SILLAY w it and impulse ordered this guy w no concept of what i wanted to do and then had a silly time with the faceup
I ordered this Bobobie Apollo with not a ton of ideas other than I wanted to try my hand at the old style bjd faceups that were very dramatic and edgy because I ADORE how they look and he's an older sculpt! Along the way I decided I wanted to give him a sort of edgy style as well as a purple and teal (this eventually turned into green) color scheme.

First draft of the faceup with eyes photoshopped in (before i got the doll) vs the second draft (in which I decided I would figure piercings out later)
I then had um. Horrible terrible failures the first time I tried to do this faceup to the point where I just wiped it fully and set it aside for a few days. I wasn't used to the style nor working on white resin so it was a mess with blush and the lips. I then went in for the second try with a MUCH lighter blush and the goal to keep around the lips as clean as I could (both of those were big issues with my first attempt)
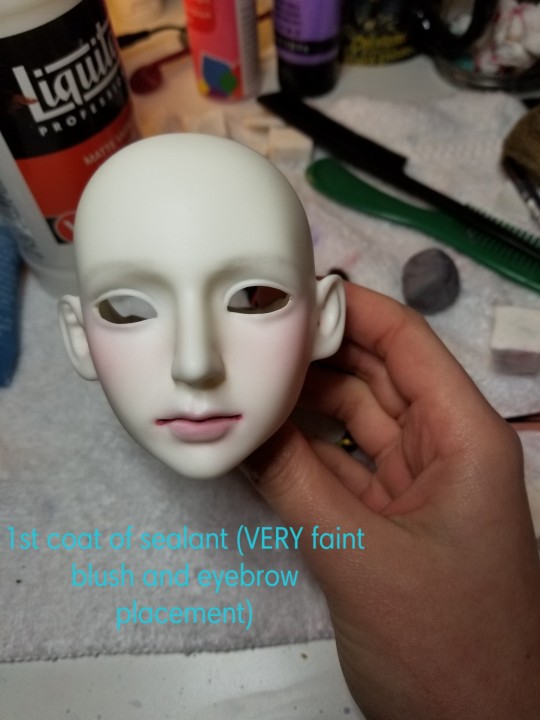
So I did what I do with faceups I prefer to be more natural, going one coat of sealant at a time (versus 3 coats) so the color shows up a lot less bright. The first coat was promising with the blush showing up how I wanted it and the brows were going pretty ok (hard to see here but i used a light grey pastel to slightly figure out how i wanted them placed)
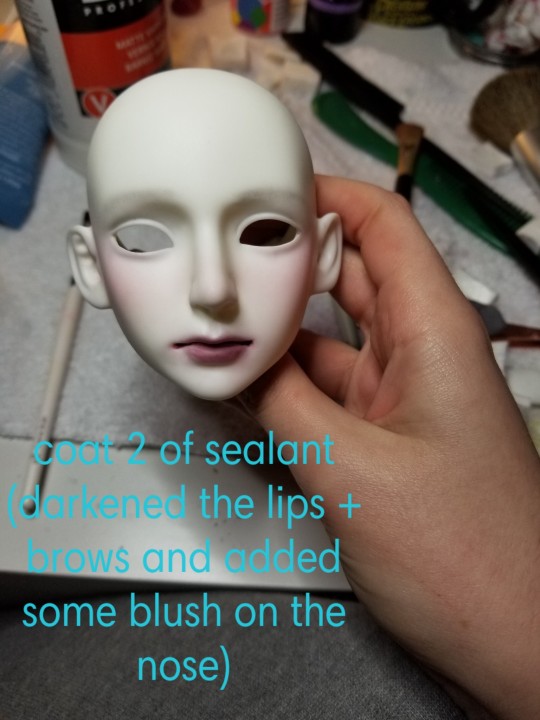
The lips were coming along pretty perfectly by the time I hit my second coat of sealant and I was nearly ready to start on the brows (in terms of using watercolor pencils to draw the hairs)
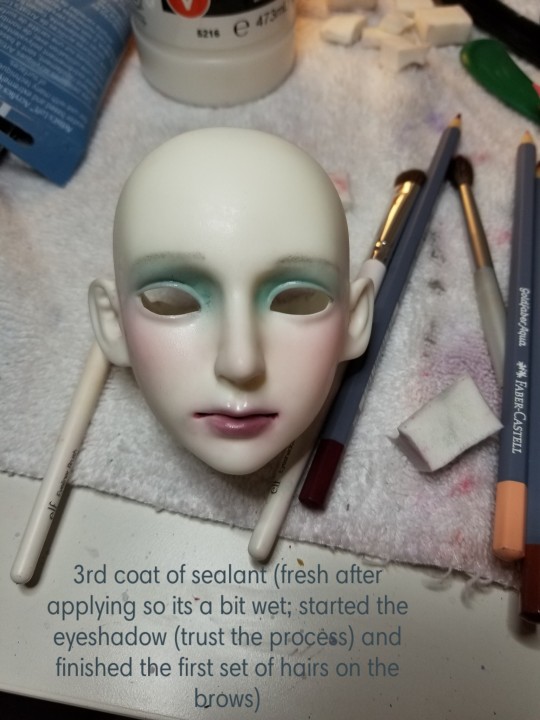
The eyeshadow looks very scary in both versions of this faceup at first but I KNEW how I wanted it to look and it had to go through some rough patches before it got better. The brows were still VERY light by this point even with the hairs on them but it didn't worry me as I had a light purple wig that I'd bought for this doll so it would look ok if they were too light!
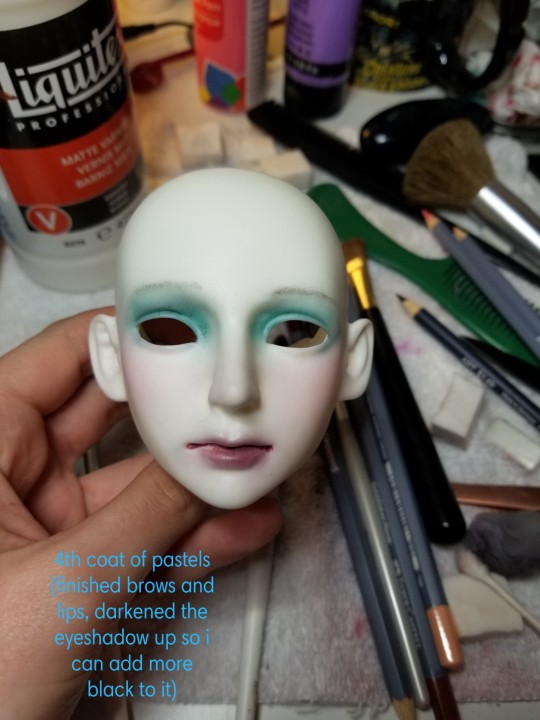
I added some lines to the lips using a watercolor pencil as well as some slightly darker colors to get the lips to that perfect color that reminded me of the older style goth faceups (goth used VERY loosely here). The shadows were still pretty scary but i knew that as soon as I added the black pastels on top that it would work out just fine. The brows were about as dark as I could get them, so this layer was pretty productive in terms of how much I finished.
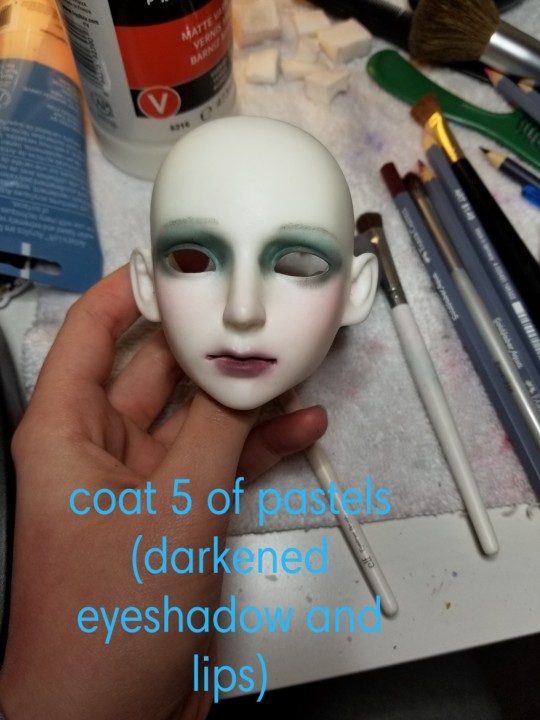
The eyeshadow was FINALLY good and I made the lips a teensie bit darker since I hadn't put my gloss varnish on them yet (which is my very last step w lips when I do them). It was FINALLY time for acrylics which was also when a lot of the harder work came in (ie. The scar)
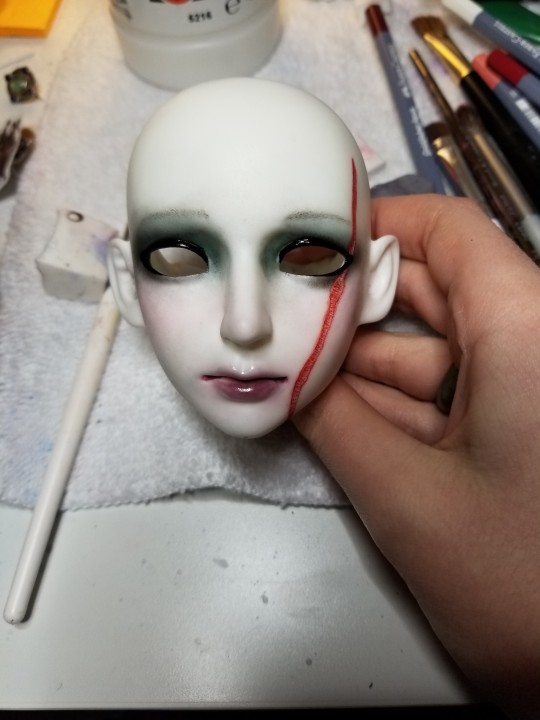
^ I finished the eyeliner but it's VERY hard to see from this angle and finished the scar (took pics of the whole process that I'll post separately since Tumblr photo limit 👍)
And then the finished product :)
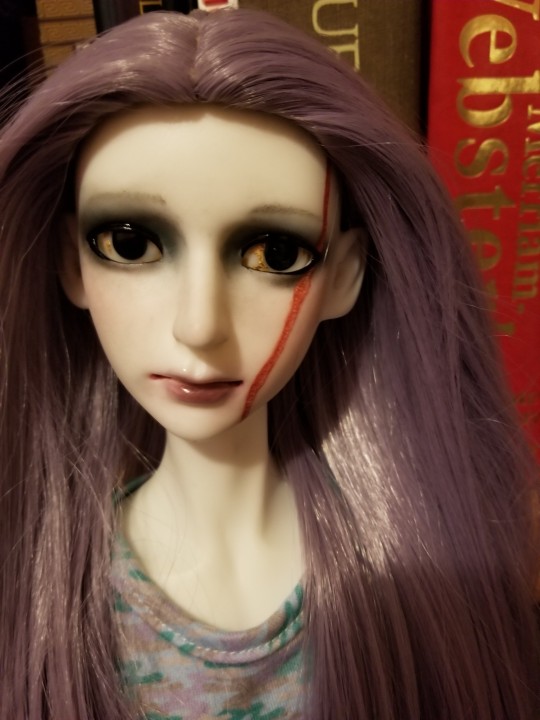

I'm honestly VERY happy with how it turned out, it all came together really well in the end with what I was trying to do and I feel it has the early edgy bjd faceup aesthetic but also met the goals I jotted down when doing my mockup!
#bjd posting#twist rambles#the lighting in my room is atrocious im so so sowwy but i needed the wig to be in full view bc it is STUNNING#the eyes were fun to work with too like. i love the eye shop i use bc they do such a good job#dindrane
5 notes
·
View notes
Last Seen Blogs

artfortytwo
art containment chamber

every-smile-hides-a-secret-blog
every smile hides a secret

bangtansaranghae911
YOLO YOLO EH

talulatheoutcast-blog
Waking Nightmare

mwcrhome
Midwest Construction and Remodeling