#windowssupport
Text
Windows manufacturer in Melbourne
If You Looking for The Best Windows Manufacturer in Melbourne? We are your local experts in manufacturing windows, offering a wide range of options to suit your needs. From energy-efficient designs to stylish and durable windows, doors. Our team of skilled professionals is committed to delivering exceptional products and services. For more Info, Get in touch with us.

0 notes
Text
youtube
Welcome to our YouTube channel! In this informative video titled "Quick and Easy Guide: Uninstalling Programs in Windows 10," we will provide you with step-by-step instructions on how to effectively uninstall programs on your Windows 10 operating system.
Uninstalling programs can be a hassle for many users, but with our simple tutorial, you'll learn the quickest and most efficient methods to remove unwanted software from your computer. We understand the importance of optimizing your computer's performance by eliminating unnecessary programs, and we're here to guide you through the process.
In this video, we'll cover various techniques to uninstall programs in Windows 10. We'll explore the traditional method using the Control Panel, as well as the modern approach through the Settings app. We'll also delve into additional tips and tricks to ensure a thorough removal, including tackling stubborn programs and dealing with leftovers.
By following our comprehensive guide, you'll save valuable disk space, enhance system speed, and maintain a clutter-free computer experience. Whether you're a beginner or a tech-savvy user, our instructions are designed to be easily understood and implemented.
Remember, regularly uninstalling programs that you no longer use is crucial for optimizing your Windows 10 experience and freeing up valuable resources. Keep your system clean and organized with our practical advice and recommendations.
So why wait? Join us now and become proficient in uninstalling programs in Windows 10. Don't let unnecessary software slow down your computer; take control with our expert guidance! Hit the play button and let's get started. If you find value in our video, don't forget to like, share, and subscribe to our channel for more helpful content.
#Windows10#UninstallingPrograms#QuickandEasyGuide#WindowsTips#ComputerTips#SoftwareRemoval#PCMaintenance#TechnologyGuide#WindowsTutorial#TechTips#WindowsHelp#WindowsSupport#HowToUninstall#WindowsUpdates#SoftwareUninstall#TechGuide#PCGuide#WindowsAdvice#WindowsTraining#ProgramRemoval#WindowsTutorials#Youtube
0 notes
Text
Usb external drive for mac

USB EXTERNAL DRIVE FOR MAC HOW TO
USB EXTERNAL DRIVE FOR MAC FOR MAC
USB EXTERNAL DRIVE FOR MAC INSTALL
USB EXTERNAL DRIVE FOR MAC DRIVERS
USB EXTERNAL DRIVE FOR MAC WINDOWS 10
Step 3: In the menu bar click Virtual Machine → CD/DVD (SATA) → Choose Disc or Disc Image. This will mount the SSD to the virtual machine installation, and allow the virtual machine to write to the drive. Step 2: With VMWare open, in the menu bar click Virtual Machine → USB & Bluetooth and select the BOOTCAMP external SSD that you created earlier with Disk Utility in macOS. Step 1: Drag the WinToUSB installer and the WindowsSupport folder from your Mac’s desktop to the virtual machine Windows desktop. Install Windows on the external drive using WinToUSB Step 9: On the Networks slide over click Yes to allow your PC to be discoverable by other PCs and devices on the same network. The installation will take a while, but you shouldn’t have to configure any settings prior to arriving at the desktop. Step 8: Click the Play button to begin the Windows virtual machine installation. Close the Settings page once finished with allocating resources. You can always skip this option and leave the settings as default, but if you have resources to spare, adding more RAM or CPU cores will speed up your virtual machine.
USB EXTERNAL DRIVE FOR MAC WINDOWS 10
Step 7: On the Windows 10 圆4 Settings page, use the Processors & Memory option to provide extra resources to the virtual machine. Step 6: On the Finish page, click Customize Settings, and click Save to save the Windows virtual machine configuration. Step 5: On the Integration page, select More Isolated, and click continue. Step 4: Click Continue Without Key (you can enter a Windows Product key later if you purchased Windows). Step 3: Click the drop-down list, select Windows 10 Home for your Windows version, and click Continue. Step 2: Drag the Windows ISO that you downloaded earlier to the designated area within VMWare Fusion and click Continue.
USB EXTERNAL DRIVE FOR MAC INSTALL
Click Open, followed by entering your Administrator password to start the install process. Step 1: Double-click the VMware Fusion.dmg that you downloaded earlier and double-click the VMware Fusion installer that appears. Step 6: Once the format is complete, quick Disk Utility. Step 5: Select the following parameters and click the Erase button: Step 4: Select your external SSD and click Erase. Step 3: Click the View button and select Show All Devices. Step 2: Launch Disk Utility in /System/Applications/Utilities/ Keep in mind that the entire contents of the drive will be erased. Step 1: Connect your external SSD to your Mac via USB and use Finder to ensure that there’s nothing on it that you need. Step 5: Once the download is completed, macOS will prompt you to enter your administrator password in order to save the WindowsSupport folder. Step 4: Save the Windows Support Software to the Downloads folder. Step 3: Click Action in the menu bar and select Download Windows Support Software. Step 2: Launch Boot Camp Assistant in /System/Applications/Utilities/ Step 1: Remove any external drives that are connected to your Mac. In order to download the needed Windows Support Software that contains necessary drivers, you’ll need to perform the following steps on the Mac that you plan on using to run Windows: Subscribe to 9to5mac on YouTube for more videos Download the Windows Support Software
USB EXTERNAL DRIVE FOR MAC FOR MAC
Sponsored by Logitech: Get the MX Master 3, MX Keys, and K380 for Mac today!
USB EXTERNAL DRIVE FOR MAC HOW TO
Video tutorial: How to install Windows 10 on a Mac external drive
External USB keyboard/USB mouse/trackpadĭownload the following to the Downloads folder:.
External SSD, I recommend the Samsung T5 or Samsung T7 external SSD.
This tutorial has been streamlined and updated to be more clear and understandable, uses the latest version of Windows, etc. This is a much-requested follow up to our original Windows 10/external drive tutorial posted back in 2017. Be sure to subscribe to 9to5Mac on YouTube for more handy tutorials like this.
USB EXTERNAL DRIVE FOR MAC DRIVERS
In this video walkthrough, I show you step-by-step how to deploy a Windows installation using Boot Camp drivers on an external drive connected to your Mac. With this in mind, setting up an external Windows drive on your Mac might prove to be handy. Considering that many Macs out there have relatively minuscule amounts of onboard storage, installing Boot Camp to run Windows isn’t always a feasible option. Traditional Boot Camp installations can take up a lot of storage space on your Mac.
0 notes
Photo

Forgetting password prevents you from accessing the system, account or Windows. It is always recommended to contact the team of experts. https://passwordrecoverysupport.us/windows-password-recovery.php …
0 notes
Photo

https://www.skymodfista.com/kms-windows-activator-download-latest-version/
Activate your Windows or Microsoft office without any product key with KMSPico
0 notes
Text
Cmap Download Mac

Cmaptools Download Per Mac
When you install Microsoft Windows on your Mac, Boot Camp Assistant automatically opens the Boot Camp installer, which installs the latest Windows support software (drivers). If that doesn't happen, or you experience any of the following issues while using Windows on your Mac, follow the steps in this article.
Full Featured Vector Charts: Tides&Currents: Rivers & Lakes: Detailed marina port plans: High Resolution Bathymetry/Fishing Charts. CmapTools for iPad is the perfect tool to rapidly construct concept maps and knowledge models on your iPad and share them on the Cmap Cloud. Following the same simple user interface for concept construction as CmapTools, CmapTools for iPad enables the full construction of Knowledge Models, with drag-and-drop capabilities of resource and Cmaps, full style palette, combined with the direct.

Your Apple mouse, trackpad, or keyboard isn't working in Windows.
Force Touch isn't designed to work in Windows.
You don't hear audio from the built-in speakers of your Mac in Windows.
The built-in microphone or camera of your Mac isn't recognized in Windows.
One or more screen resolutions are unavailable for your display in Windows.
You can't adjust the brightness of your built-in display in Windows.
You have issues with Bluetooth or Wi-Fi in Windows.
You get an alert that Apple Software Update has stopped working.
You get a message that your PC has a driver or service that isn't ready for this version of Windows.
Your Mac starts up to a black or blue screen after you install Windows.
If your Mac has an AMD video card and is having graphics issues in Windows, you might need to update your AMD graphics drivers instead.
Install the latest macOS updates
Before proceeding, install the latest macOS updates, which can include updates to Boot Camp.
Format a USB flash drive
To install the latest Windows support software, you need a 16GB or larger USB flash drive formatted as MS-DOS (FAT).
Start your Mac from macOS.
Plug the USB flash drive into your Mac.
Open Disk Utility, which is in the Utilities folder of your Applications folder.
Choose View > Show All Devices from the menu bar.
From the sidebar in Disk Utility, select your USB flash drive. (Select the drive name, not the volume name beneath it.)
Click the Erase button or tab.
Choose MS-DOS (FAT) as the format and Master Boot Record as the scheme.
Click Erase to format the drive. When done, quit Disk Utility.
Download the Windows support software
After preparing your USB flash drive, complete these steps:

Make sure that your Mac is connected to the Internet.
Open Boot Camp Assistant, which is in the Utilities folder of your Applications folder.
From the menu bar at the top of your screen, choose Action > Download Windows Support Software, then choose your USB flash drive as the save destination. When the download completes, quit Boot Camp Assistant.
Learn what to do if you can't download or save the Windows support software.
Install the Windows support software
After downloading the Windows support software to your flash drive, follow these steps to install the software. (If you're attempting to resolve issues with a Bluetooth mouse or keyboard, it might be easier to use a USB mouse or keyboard until these steps are complete.)
Make sure that the USB flash drive is plugged into your Mac.
Start up your Mac in Windows.
From File Explorer, open the USB flash drive, then open Setup or setup.exe, which is in the WindowsSupport folder or BootCamp folder. When you're asked to allow Boot Camp to make changes to your device, click Yes.
Click Repair to begin installation. If you get an alert that the software hasn't passed Windows Logo testing, click Continue Anyway.
After installation completes, click Finish, then click Yes when you're asked to restart your Mac.
Learn more
If you can't download or save the Windows support software:
If the assistant says that the Windows support software could not be saved to the selected drive, or that the USB flash drive can't be used, make sure that your USB flash drive has a storage capacity of at least 16GB and is formatted correctly.
If the assistant doesn't see your USB flash drive, click Go Back and make sure that the drive is connected directly to the USB port on your Mac—not to a display, hub, or keyboard. Disconnect and reconnect the drive, then click Continue.
If the assistant says that it can't download the software because of a network problem, make sure that your Mac is connected to the Internet.
Make sure that your Mac meets the system requirements to install Windows using Boot Camp.
Cmaptools Download Per Mac
If a Mac feature still doesn't work after updating the Windows support software, search for your symptom on the Apple support website or Microsoft support website. Some features of your Mac aren't designed to work in Windows.
1 note
·
View note
Photo

Computer support service help for business in USA , Canada- #computer Repair IT Support Service | Apple Mac Repair. #computersupport #windows #windowssupport #MacBook #mac #apple #itservice #Windows10 #softwareservices
#windowssupport#mac#windows#itservice#windows10#apple#softwareservices#computersupport#computer#macbook
0 notes
Text
Bm05e_v2 01 Bluetooth Driver Windows 10
Bm05e_v2 01 Bluetooth Driver Windows 10 64-bit
Bm05e_v2 01 Bluetooth Driver Windows 10 Pro
You can pair all kinds of Bluetooth devices with your PC—including keyboards, mice, phones, speakers, and a whole lot more. To do this, your PC will need to have Bluetooth. Some PCs, such as laptops and tablets, have Bluetooth built in. If your PC doesn’t, you can plug a USB Bluetooth adapter into the USB port on your PC to get it.
Add driver to the system Run WindowsSupport BootCamp Drivers Broadcom BroadcomBluetooth64.exe (probably similar procedure will work for WiFi, so you could also run BroadcomWirelessUDMx64.exe to add drivers to the system) Install the driver 1. Open Device Manager 2. Right-click on the device (Bluetooth USB Host Controller) 3. Update the driver 4. Download the latest XP-Pen drivers, User Manual, and software for Windows 7 /8 /10 and Mac operating system. BM05E V2 01 Bluetooth driver bluetooth bm05e v2. Him in my windows 7 or newer. Its virtual disc gives bluetooth bm05e v2. Download Bluetooth Bm05e V2.01 Driver Download File. Plz send me enter bluetooth 2.0 drivers or BM05EV2.01. Erik, nesecito el controlador. Customs, i ned the driver. KhLK, AA A RFW dzfw ertw trefdsf d fghsdrgsd. Pls send me orchidinnovactions drivers for my windows xp i have a bluetooth but i can not insttal it bec i have no drivers. Pls send me drivers. Easily toggle your Bluetooth settings for your phone ON or OFF. FEATURES:. WORKS ON ALL WINDOWS 10 MOBILE, WINDOWS PHONE 8.1, 8 and 7.5 devices!. FASTEST Bluetooth application on the marketplace. Pin to start screen. Wide tile support. No configuration needed, just start the app and you can see and edit your Bluetooth Settings! For more info on how to check, see Fix Bluetooth problems in Windows 10. If you need help adding a device without Bluetooth capabilities, see Add a device to a Windows 10 PC. Turn on Bluetooth. After you've checked that your Windows 10 PC supports Bluetooth, you'll need to turn it on. Here's how: In Settings.
Windows 10Windows 8.1Windows 7
Before you start, make sure that your Windows 10 PC supports Bluetooth. For more info on how to check, see Fix Bluetooth problems in Windows 10. If you need help adding a device without Bluetooth capabilities, see Add a device to a Windows 10 PC.
Turn on Bluetooth
After you've checked that your Windows 10 PC supports Bluetooth, you'll need to turn it on. Here's how:
In Settings
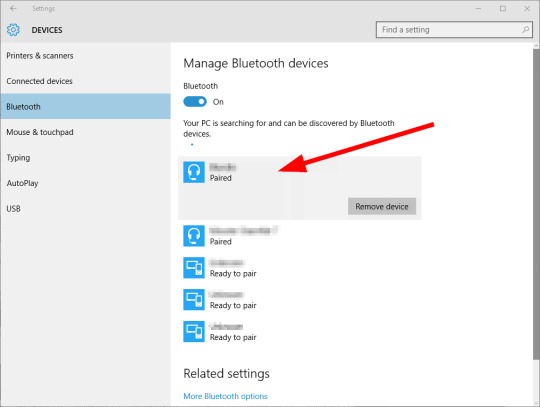
Select Start > Settings > Devices > Bluetooth & other devices, and turn on Bluetooth.
In action center
Action center can be found next to time and date on your taskbar. On the taskbar, select action center ( or ), then select Bluetooth to turn it on. If it's turned off, it might appear as Not connected.
If you don't see Bluetooth in your action center, here's how you can change it:
Expand quick actions. On the taskbar, select action center ( or ) > Expand. Bluetooth should appear here. It will appear as Bluetooth or Not connected.
Add Bluetooth to action center. Select Start > Settings > System > Notifications & actions > Quick actions. Go to Add or remove quick actions and turn on Bluetooth.
Note: For more info about how to change the apps and settings that appear in action center, see Change notification and action settings in Windows 10.
To pair a Bluetooth headset, speaker, or other audio device
Turn on your Bluetooth audio device and make it discoverable. The way you make it discoverable depends on the device. Check the device or visit the manufacturer's website to learn how.
On your PC, select Start > Settings > Devices > Bluetooth & other devices > Add Bluetooth or other device > Bluetooth. Choose the device and follow additional instructions if they appear, then select Done.
Your Bluetooth device and PC will usually automatically connect anytime the two devices are in range of each other with Bluetooth turned on.
Note: Not seeing your Bluetooth audio device? Learn how to fix connections to Bluetooth audio devices and wireless displays.
To pair a Bluetooth keyboard, mouse, or other device
Turn on your Bluetooth keyboard, mouse, or other device and make it discoverable. The way you make it discoverable depends on the device. Check the device or visit the manufactur's website to learn how.
On your PC, select Start > Settings > Devices > Bluetooth & other devices > Add Bluetooth or other device > Bluetooth. Choose the device and follow additional instructions if they appear, then select Done.
To pair a Bluetooth printer or scanner
Turn on your Bluetooth printer or scanner and make it discoverable. The way you make it discoverable depends on the device. Check the device or visit the manufacturer's website to learn how.
Select Start > Settings > Devices > Printers & scanners > Add a printer or scanner. Wait for it to find nearby printers, then choose the one you want to use and select Add device.
If you’re having installation issues with your printer or scanner, see either Fix printer problems or Install and use a scanner in Windows 10.
To pair a Bluetooth device using Swift Pair
Swift Pair in Windows 10 lets you quickly pair a supported Bluetooth device with your PC. If the Bluetooth device supports Swift Pair, you’ll receive a notification when it's nearby and you put it into pairing mode to make it discoverable.
Turn on a Bluetooth device that supports Swift Pair and make it discoverable. The way you make it discoverable depends on the device. Check the device or visit the manufacturer’s website to learn more.
If this is your first time using Swift Pair, select Yes when asked if you want to get notifications and use Swift Pair.
When a notification appears that a new Bluetooth device was found, select Connect.
After it’s connected, select Close.
Before you start, make sure that your Windows 8 PC supports Bluetooth.
Turn on your Bluetooth device and make it discoverable.
The way you make it discoverable depends on the device. Check the device or visit the manufacturer's website to learn how.
Select Start > type Bluetooth > select Bluetooth settings from the list.
Turn on Bluetooth > select the device > Pair.
Follow any instructions if they appear. Super smash flash 2 mcleodgaming. Otherwise, you're done and connected.
Your Bluetooth device and PC will usually automatically connect anytime the two devices are in range of each other with Bluetooth turned on.
Before you start, make sure that your Windows 7 PC supports Bluetooth. https://linuxfox29.tumblr.com/post/665692338310529024/pl-sql-developer-mac-os-x.
Turn on your Bluetooth device and make it discoverable.
The way you make it discoverable depends on the device. Check the device or visit the manufacturer's website to learn how.Turn on your Bluetooth device and make it discoverable. The way you make it discoverable depends on the device. Check the device or visit the manufacturer's website to learn how.
Select Start > Devices and Printers.
Select Add a device > select the device > Next.
Follow any other instructions that might appear. Otherwise, you're done and connected.
Your Bluetooth device and PC will usually automatically connect anytime the two devices are in range of each other with Bluetooth turned on.
Before you begin
Driver updates for Windows 10, along with many devices, such as network adapters, monitors, printers, and video cards, are automatically downloaded and installed through Windows Update. You probably already have the most recent drivers, but if you'd like to manually update or reinstall a driver, here's how:
Update the device driver
In the search box on the taskbar, enter device manager, then select Device Manager.
Select a category to see names of devices, then right-click (or press and hold) the one you’d like to update.
Select Search automatically for updated driver software.
Select Update Driver.
If Windows doesn't find a new driver, you can try looking for one on the device manufacturer's website and follow their instructions.
Bm05e_v2 01 Bluetooth Driver Windows 10 64-bit
Reinstall the device driver

In the search box on the taskbar, enter device manager, then select Device Manager.
Right-click (or press and hold) the name of the device, and select Uninstall.
Restart your PC.
Windows will attempt to reinstall the driver.

More help
Bm05e_v2 01 Bluetooth Driver Windows 10 Pro
If you can't see the desktop and instead see a blue, black, or blank screen, see Troubleshoot blue screen errors or Troubleshoot black or blank screen errors.
0 notes
Text
youtube
In this comprehensive step-by-step guide, we will show you the easiest and most effective methods to uninstall programs in Windows 10. Whether you're a beginner or an experienced user, this tutorial will provide you with the essential knowledge and actionable tips to seamlessly remove unwanted software from your PC. Follow our instructions closely and get ready to optimize your Windows 10 experience!
We will begin by explaining the traditional method of uninstalling programs through the Control Panel. We'll walk you through the entire process, from accessing the Control Panel to locating the program you wish to remove and successfully uninstalling it. Additionally, we'll demonstrate how to identify and uninstall bundled software that often comes pre-installed with certain applications.
Next, we will delve into the more advanced method of using the Windows 10 Settings app to uninstall programs. This modern approach offers a user-friendly interface and additional features that make the process even more convenient. We'll guide you through each step, ensuring you can easily navigate the Settings app and confidently remove any program of your choice.
Furthermore, we'll share some vital tips and tricks to optimize your program uninstallation experience. You'll learn how to troubleshoot common issues, such as failed uninstallations or leftover files, to maintain a clean and clutter-free system. Additionally, we'll discuss the importance of regularly uninstalling unnecessary programs to free up storage space and improve your PC's performance.
By the end of this tutorial, you will have gained a thorough understanding of how to uninstall programs in Windows 10 effectively. Armed with this knowledge, you can efficiently manage your software library, eliminate unwanted applications, and ensure your computer runs smoothly.
Don't let unnecessary programs clutter your Windows 10 system any longer! Watch this tutorial now and empower yourself with the essential skills to easily uninstall programs. Your computing experience will never be the same!
#Windows10#UninstallPrograms#StepByStepGuide#WindowsTips#WindowsTricks#WindowsTutorial#WindowsHelp#WindowsSupport#PCGuide#TechHelp#TechSupport#SoftwareGuide#SoftwareTips#SoftwareTutorial#SoftwareHelp#ComputerTips#ComputerTricks#ComputerTutorial#ComputerHelp#YouTubeTutorial#Youtube
0 notes
Text
Tuio Mouse Driver For Mac
Boot Camp requires a Mac with an Intel processor.
Tuio Mouse Driver For Mac Windows 7
Mouse Drivers
Ventuz Designer
When you install Microsoft Windows on your Mac, Boot Camp Assistant automatically opens the Boot Camp installer, which installs the latest Windows support software (drivers). If that doesn't happen, or you experience any of the following issues while using Windows on your Mac, follow the steps in this article.
Your Apple mouse, trackpad, or keyboard isn't working in Windows.
Force Touch isn't designed to work in Windows.
You don't hear audio from the built-in speakers of your Mac in Windows.
The built-in microphone or camera of your Mac isn't recognized in Windows.
One or more screen resolutions are unavailable for your display in Windows.
You can't adjust the brightness of your built-in display in Windows.
You have issues with Bluetooth or Wi-Fi in Windows.
You get an alert that Apple Software Update has stopped working.
You get a message that your PC has a driver or service that isn't ready for this version of Windows.
Your Mac starts up to a black or blue screen after you install Windows.
Mac Apps for Mouse Drivers Filter. Add customizable gestures to Magic Mouse or MacBook trackpad. BetterTouchTool MagicPrefs. For software and drivers select your product from the list below. Mac OS 10.4.x-10.7 (32-bit and 64-bit). SteerMouse 5.5.4 - Powerful third-party mouse driver. Download the latest versions of the best Mac apps at safe and trusted MacUpdate.
If your Mac has an AMD video card and is having graphics issues in Windows, you might need to update your AMD graphics drivers instead.
Install the latest macOS updates
Before proceeding, install the latest macOS updates, which can include updates to Boot Camp.
Format a USB flash drive
To install the latest Windows support software, you need a 16GB or larger USB flash drive formatted as MS-DOS (FAT).
Start your Mac from macOS.
Plug the USB flash drive into your Mac.
Open Disk Utility, which is in the Utilities folder of your Applications folder.
Choose View > Show All Devices from the menu bar.
From the sidebar in Disk Utility, select your USB flash drive. (Select the drive name, not the volume name beneath it.)
Click the Erase button or tab.
Choose MS-DOS (FAT) as the format and Master Boot Record as the scheme.
Click Erase to format the drive. When done, quit Disk Utility.
Download the Windows support software
After preparing your USB flash drive, complete these steps:
Make sure that your Mac is connected to the Internet.
Open Boot Camp Assistant, which is in the Utilities folder of your Applications folder.
From the menu bar at the top of your screen, choose Action > Download Windows Support Software, then choose your USB flash drive as the save destination. When the download completes, quit Boot Camp Assistant.
Learn what to do if you can't download or save the Windows support software.
Install the Windows support software
After downloading the Windows support software to your flash drive, follow these steps to install the software. (If you're attempting to resolve issues with a Bluetooth mouse or keyboard, it might be easier to use a USB mouse or keyboard until these steps are complete.)
Make sure that the USB flash drive is plugged into your Mac.
Start up your Mac in Windows.
From File Explorer, open the USB flash drive, then open Setup or setup.exe, which is in the WindowsSupport folder or BootCamp folder. When you're asked to allow Boot Camp to make changes to your device, click Yes.
Click Repair to begin installation. If you get an alert that the software hasn't passed Windows Logo testing, click Continue Anyway.
After installation completes, click Finish, then click Yes when you're asked to restart your Mac.
Learn more
If you can't download or save the Windows support software:
If the assistant says that the Windows support software could not be saved to the selected drive, or that the USB flash drive can't be used, make sure that your USB flash drive has a storage capacity of at least 16GB and is formatted correctly.
If the assistant doesn't see your USB flash drive, click Go Back and make sure that the drive is connected directly to the USB port on your Mac—not to a display, hub, or keyboard. Disconnect and reconnect the drive, then click Continue.
If the assistant says that it can't download the software because of a network problem, make sure that your Mac is connected to the Internet.
Make sure that your Mac meets the system requirements to install Windows using Boot Camp.
If a Mac feature still doesn't work after updating the Windows support software, search for your symptom on the Apple support website or Microsoft support website. Some features of your Mac aren't designed to work in Windows.
PD7DXT-WR / PD7DXT
How do I grip the DXT mouse?
Start by placing the tip of the ring finger over the black plastic triangular area beneath the bottom click button. The remaining finger tips and thumb will naturally position themselves on the first half of the front and back mouse surfaces, respectively, with the pinkie finger tucked in. The fingers should be comfortably curled (e.g. holding a pen) versus extended or lying flat.
The resulting hand and finger posture facilitates precision movements and avoids the fingers being placed one upon the other and coming into contact with the cable. It should be noted that the body of the mouse is not placed parallel to the side of the keyboard but at an angle to the side of the keyboard.
What operating systems is the DXT2 compatible with?
The DXT is designed to work on all USB operating systems including Windows, Mac OS X and Linux.
I lost my dongle, can I get a replacement?
Yes, we offer replacement dongles for wireless DXT mice. Please contact [email protected]. See the Troubleshooting section below for instructions on pairing the new dongle with your mouse.
How do I use my DXT with my left hand?
Simply tap the “L/R” switch on the back of the mouse to switch between left and right handed modes.

How do I charge the wireless DXT mouse?
Connect the includes micro-usb charging cable to the mouse and an available USB port on your computer. The DXT’s rapid-charge system was designed to be charged from a PC, not from another charging devices which could lead to damage.
A full-charge (120 minutes of uninterrupted charging) should last approximately 2 weeks with normal mouse usage. To extend your battery life, use the on/off switch on the underside to turn the mouse off when not in use.
How do I change the cursor speed?
Flip the mouse over and tap the DPI button on the underside to cycle between the four sensititivity levels (500 | 1000 | 1500 | 2000) until you find the one that is right for you. The higher the sensitivity, the more the cursor will move in response to hand movements.

500: 1 Flash
1000: 2 Flashes
1500: 3 Flashes
2000: 4 Flashes
Does the wireless DXT require a bluetooth connection?
No, the wireless DXT uses RF-wireless technology. Simply plug the included RF “dongle” into an available full-size USB port on your PC
Does the DXT require any special drivers?
No, neither DXT Wireless or Wired require any special drivers.
What type of charging cable does the DXT wireless use?
Tuio Mouse Driver For Mac Windows 7
The DXT wireless utilizes a micro USB charging cable.
If your DXT2 ergonomic mouse is not working as expected please reference the FAQs above and the Troubleshooting Tips at right. If your issue persists, please submit a Trouble Ticket using the link at the bottom of the page.
Before you submit a trouble ticket, try connecting the mouse to another computer. If the mouse works on another computer it suggests there is a problem with the original computer. Try reconnecting the mouse and restarting your computer. If that doesn’t work, try removing any custom mouse drivers you may have downloaded for other mice which could be affecting the DXT. If the mouse doesn’t work on the other computer, it suggests there may be a failure with the mouse itself. Please submit a trouble ticket using the link at the bottom of the page.
Mouse Drivers
Confirm the mouse has a battery charge. The mouse will flash the L/R LEDs when the battery is low. If you suspect the battery maybe low, or even dead, connect the charging cable between the mouse and your PC for 120 minutes to restore the mouse to a full charge. The L/R LEDs will illuminate steady when the batter is charging. When the battery is fully charged, the L/R LEDs will turn off.
Before you submit a trouble ticket, try connecting the mouse to another computer. If the mouse works on another computer it suggests there is a problem with the original computer. Try reconnecting the mouse and restarting your computer. If that doesn’t work, try removing any custom mouse drivers you may have downloaded for other mice which could be affecting the DXT. If the mouse doesn’t work on the other computer, it suggests there may be a failure with the mouse itself. Please submit a trouble ticket using the link at the bottom of the page.
The process for pairing a DXT mouse with a replacement dongle depends on what generation mouse you have. Flip the mouse over and take note of the last 5 digits of the serial number.
Serial Number: 07,001 – 09,000
Download Pairing Program Version 1 for Windows:
Switch off the mouse
Plug the new USB dongle into the PC
Switch on the mouse
Run Pairing Program Version 1 and click “PAIR”
Press and hold the upper button and scroll wheel
The Pairing Program will display “Pairing” and then “Success”
Ventuz Designer
Serial Number: 09,001 – 19,999
Download Pairing Program Version 2 for Windows
Switch off the mouse
Plug the new USB dongle into the PC
Switch on the mouse
Run Pairing Program Version 2 and click “PAIR”
Press and hold the upper button and scroll wheel.
The Pairing Program will display “Pairing” and then “Success”
Serial Number: 20,000 and above
Switch off the mouse
Plug the new USB dongle into the PC
Switch on the mouse
Place mouse next to the USB dongle
Press and hold the left, right, and scroll wheel buttons at the same time for 5-10 seconds
All DXT2 mice are backed by a TWO YEAR limited warranty
Not finding your answer?
Submit a trouble ticket and a support technician will respond to you in a timely manner.
0 notes
Text
Air Video Mac Download

When you install Microsoft Windows on your Mac, Boot Camp Assistant automatically opens the Boot Camp installer, which installs the latest Windows support software (drivers). If that doesn't happen, or you experience any of the following issues while using Windows on your Mac, follow the steps in this article.
Your Apple mouse, trackpad, or keyboard isn't working in Windows.
Force Touch isn't designed to work in Windows.
You don't hear audio from the built-in speakers of your Mac in Windows.
The built-in microphone or camera of your Mac isn't recognized in Windows.
One or more screen resolutions are unavailable for your display in Windows.
You can't adjust the brightness of your built-in display in Windows.
You have issues with Bluetooth or Wi-Fi in Windows.
You get an alert that Apple Software Update has stopped working.
You get a message that your PC has a driver or service that isn't ready for this version of Windows.
Your Mac starts up to a black or blue screen after you install Windows.
The application's installer is commonly called airvideoserver2.4.5-beta7u1.dmg or airvideoserver2.4.6-beta3u2.dmg etc. The most popular version among the program users is 2.4. This free software for Mac OS X was originally created by Inmethod. This Mac download was scanned by our built-in antivirus and was rated as clean. Amazon Prime Video Features:. Download movies and TV shows on your Mac to watch anywhere, anytime. Access hundreds of thousands of movies and TV episodes you bought or rented including new release movies or the latest TV programming, with the ability to download titles for offline viewing. How Do I Convert Video to MP4 on Mac for Free? Launch the Wondershare Video Converter for Mac and add the video file. Select MP4/MKV/MOV or any other format as the output format. Click on Convert to start the conversion for free. Step 1 Launch the Best Free Video Converter for Mac and import videos. Launch the Video Converter Free for Mac. Air Video For Mac 2.4.5 Beta 6, Downloads: 316, License: Freeware, By: InMethod, Size: 8.73. Air Video can stream videos in almost any format to your iPhone and iPod touch. Airy helps to download videos from YouTube in different format types and resolutions for Mac and Windows.
If your Mac has an AMD video card and is having graphics issues in Windows, you might need to update your AMD graphics drivers instead.
Install the latest macOS updates
Before proceeding, install the latest macOS updates, which can include updates to Boot Camp.
Format a USB flash drive
To install the latest Windows support software, you need a 16GB or larger USB flash drive formatted as MS-DOS (FAT).
Start your Mac from macOS.
Plug the USB flash drive into your Mac.
Open Disk Utility, which is in the Utilities folder of your Applications folder.
Choose View > Show All Devices from the menu bar.
From the sidebar in Disk Utility, select your USB flash drive. (Select the drive name, not the volume name beneath it.)
Click the Erase button or tab.
Choose MS-DOS (FAT) as the format and Master Boot Record as the scheme.
Click Erase to format the drive. When done, quit Disk Utility.
Download the Windows support software
After preparing your USB flash drive, complete these steps:
Make sure that your Mac is connected to the Internet.
Open Boot Camp Assistant, which is in the Utilities folder of your Applications folder.
From the menu bar at the top of your screen, choose Action > Download Windows Support Software, then choose your USB flash drive as the save destination. When the download completes, quit Boot Camp Assistant.
Learn what to do if you can't download or save the Windows support software.
Install the Windows support software
After downloading the Windows support software to your flash drive, follow these steps to install the software. (If you're attempting to resolve issues with a Bluetooth mouse or keyboard, it might be easier to use a USB mouse or keyboard until these steps are complete.)
Make sure that the USB flash drive is plugged into your Mac.
Start up your Mac in Windows.
From File Explorer, open the USB flash drive, then open Setup or setup.exe, which is in the WindowsSupport folder or BootCamp folder. When you're asked to allow Boot Camp to make changes to your device, click Yes.
Click Repair to begin installation. If you get an alert that the software hasn't passed Windows Logo testing, click Continue Anyway.
After installation completes, click Finish, then click Yes when you're asked to restart your Mac.
Learn more
If you can't download or save the Windows support software:
If the assistant says that the Windows support software could not be saved to the selected drive, or that the USB flash drive can't be used, make sure that your USB flash drive has a storage capacity of at least 16GB and is formatted correctly.
If the assistant doesn't see your USB flash drive, click Go Back and make sure that the drive is connected directly to the USB port on your Mac—not to a display, hub, or keyboard. Disconnect and reconnect the drive, then click Continue.
If the assistant says that it can't download the software because of a network problem, make sure that your Mac is connected to the Internet.
Make sure that your Mac meets the system requirements to install Windows using Boot Camp.
If a Mac feature still doesn't work after updating the Windows support software, search for your symptom on the Apple support website or Microsoft support website. Some features of your Mac aren't designed to work in Windows.
Easily download YouTube Video in seconds
Save entire playlists from YouTube
Choose the desired MP3 quality for an awesome experience
Download Videos from YouTube in Batches
Pause and resume the downloads as you wish
100% compatible with Mac and Windows, safe and clean software
Make YouTube Videos Download with Airy
If you’re still looking for the perfect tool to download MP3 from YouTube and listen to your favorite tracks offline, we have great news for you! Airy provides the perfect combination of functionality, versatility, and user experience for a complete experience. Choose from a wide list of audio formats and make the songs compatible with any device or operating systems thanks to this complete app. We put a very high price on your time, that’s why we made downloading and converting files to MP3 as simple as possible with our Youtube downloader app. Check out the full list of features you’re going to enjoy with Airy.
No Limits for Conversions
You can convert YouTube video files without worrying about ever reaching a limit. Rely on Airy to deliver round the clock functionality to build that offline MP3 playlist that you can listen to on any device.
Complete YouTube Playlists - 100% Offline
Not only that Airy enables you to download audio from YouTube video, but you will be able to use it to download entire playlists for offline listening. Ever wondered what will you do if you lost the Wi-Fi connection or you’d simply ran out of mobile data? That’s right, it’s times like these when an offline playlist comes to the rescue.
Airy - Download YouTube Videos HD as well as Entire Channels
Thanks to Airy’s functionality, you won’t need to waste time downloading one video after another. Its batch download mode allows you to download entire channels at once. This means you can save all your favorite videos from various subscribers without having to worry about needing a Wi-Fi connection.
Compatible with All Popular Browsers


For even faster operation, Airy comes with built-in browser integration. This means that you’ll just use your browser to watch the videos you love and a download button will become available thanks to Airy. It’s compatible with Safari, Chrome, Firefox, or Opera.
Airy’s Top Features for YouTube Videos Download
▪ 100% compatible with the most popular web browsers. No matter if you’re using Chrome, Safari, Firefox, or Opera, you can count on Airy to deliver excellent results.
▪ Converts YouTube videos in MP3 in a matter of seconds allowing you to save more videos.
▪ You don’t need an account to use Airy - nor will you be required to share your email address to convert or download YouTube videos to MP3 and MP4.
▪ Unlimited downloads and conversions - Airy will never limit how many downloads you get.
▪ For an even more user-friendly experience, the app is offered in 20 languages.
How to Download YouTube Videos
For any player or downloader app to succeed it needs to have a user-friendly interface and a multitude of video quality settings. It’s not by coincidence that Airy offers both. It comes with a very intuitive user interface and plenty of settings to get the video you want. And even though you’ll have no problems using Airy even if it’s your first time trying such an app, we’ve put together a short guide on how to get started:
Download and install Airy on your computer.
Go to YouTube and grab the URL of the video you wish to download then paste it in Airy.
Click the format drop-down section and choose media format. Initiate the download.
Download Youtube Videos Mac
Keep in mind that Airy was created to enable you to back up personal audio and video content or build offline playlists for when you can’t connect to the Internet. It’s your sole responsibility if you decide to use this software to download content that is protected by copyright.
FAQ
Airy is a simple YouTube HD downloader and converter and it comes with intuitive design and a friendly user interface. However, just to make sure we covered all ground, we put together a list of the most frequent questions from how to download subtitles from YouTube, convert YouTube videos to MP4, or download entire channels, we answered these questions here:
Indeed, when you first download Airy you get two free downloads with all the features enabled. After you convince yourself of the functionality this app offers, you can get a subscription to use it for all your YouTube videos.
No limits whatsoever, you can count on Airy to download as many videos as you wish!
Right now, there isn’t a dedicated mobile app for Airy. However, you can get Airy for your computer, be it macOS or Windows. You should also know that our development team is all about challenges and we encourage you to send suggestions for a mobile app and what you’d want to get from it.
Getting in touch with us is very simple. You can use the [email protected] email address to inform us of any feedback, request, or inquiry you may have. Someone will get back to you in the shortest time possible.
There are absolutely no compatibility issues between Airy and all the popular web browsers that are still in use right now. Download your favorite videos no matter what you use to surf the internet.
Airy
Download YouTube videos & convert video into MP3 format
Get a download link for Desktop
Submit your email address to get link for quick download and get started!
Requirements:OS X 10.9+, 23.17MB free space
Latest version: v3.20.310, released 27 Oct, 2020Release notes
Category:UtilitiesApplication
How To Download Youtube Videos On Mac
Pricing: Starts from $19.95
Download Air Video Hd
Languages: 中文, Český, Deutsch, English, Français, Italiano, 日本の, 한국어, Русский, Español, Nederlands
Download Videos Mac Free
The registered users of the previous version can upgrade with a 50% discount. Learn more
0 notes
Text
Bootcamp Drivers Install

Bootcampdrivers Installation Video
Bootcamp Drivers Not Installing
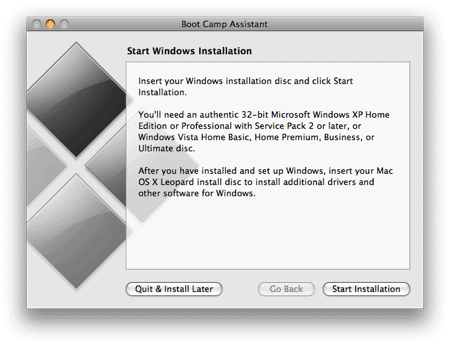
Bootcamp (Boot Camp Assistant) is essentially Apple's way of welcoming Microsoft into its walled garden in a roundabout way. In other words, it allows you to install Windows on a Mac computer by partitioning the disk and letting you dual-boot a laptop or desktop. You will need to specify the amount of disk space for Windows installation, as well as get all the drivers required to run Windows on your Mac OS X or macOS computer. Once installed, it will be exactly the same as working in Windows. A lot of users prefer this over switching between Mac and PC, so you can imagine why Boot Camp Assistant has been so popular for so many years.
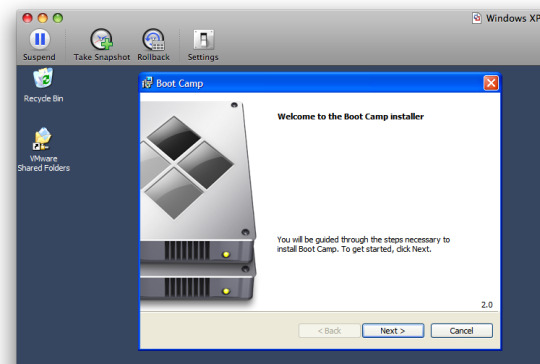
After Windows installation completes, your Mac starts up in Windows and opens a ”Welcome to the Boot Camp installer” window. Follow the onscreen instructions to install Boot Camp and Windows support software (drivers). You will be asked to restart when done. Boot Camp combines Windows 10 with install scripts to load hardware drivers for the targeted Mac computer. Boot Camp currently supports Windows 10 on a range of Macs dated mid-2012 or newer. By default, Mac will always boot from the last-used startup disk.
Part 1: Problems with Bootcamp Assistant on Mac
There are some tricks you can do it to install network and wireless driver for windows 8.1: 1- after installing windows 8 try to update bootCamp by running setup.exe again and repair. 2- install BroadcomNetAdapterWin7x64.exe again from folder driver in bootCamp driver. It may work with you.
After you install windows you need to install the proper drivers from the apple software update to run windows 10 under bootcamp. The SFC command is just sfc /scannow and hit enter from an elevated command prompt ( + X ) click on command prompt (Admin).
That being said, there are a lot of problems in using Bootcamp Assistant on latest macOS such as Mojave or High Serria. One of the errors is the 'Boot Camp installation failed' error. Apple suggests that you move to macOS Mojave and try installing Windows 10 again, but the issue doesn't always go away. Another common error is when trying to copy the Windows installation files. In still other cases, you'll notice that several Mac features don't work when running Windows, such as Apple Software Update stopping, no audio from built-in speakers, mic or webcam not recognized by Windows and so on.
To avoid such errors and issues, which can often take quite a lot of your time to figure out and fix, you can use alternative solutions to install Windows on a Mac from USB. Though you will still need to use Boot Camp Assistant for part of the process, but you're not likely to come across major installation errors when doing this. You can also use Terminal in Mac to help you install Windows. The next two sections describe these methods in detail.
Part 2: Make a Bootable Windows 10/8/7 USB Installer on Mac
Boot Camp Assistant is the official recommendation for creating bootable Windows USB. In case it does not work, we will suggest two alternative software in this section. Both are working fine on latest macOS and we tested three USB drives without running into any issue.
Method 1: Create Windows Bootable USB Using ISO Editor (without Bootcamp)

Bootcampdrivers Installation Video
UUByte ISO Editor can work as a great alternative to Bootcamp for installing Windows OS on Mac. You can easily fetch all the required drivers using Bootcamp, but the installation process for putting Windows on your Mac is different from how Bootcamp does it. UUbyte is one of the most robust Windows 10 bootable USB creator for Mac that you'll ever find. It can do a lot more than just create bootable media, such as creating ISO files, editing them, copying from disc to ISO and so on. For this process, you will need to use the Burn module, which is explained below:
Step 1: Get the Windows 10 ISO from Microsoft's website and install the Mac version of UUbytes ISO Editor.
Step 2: Launch Boot Camp Assistant, go to Action and click on Download Windows Support Software. When the dialog appears, click Save and specify a location for the files.
Step 3: Open the UUbytes program and click on the module that says Burn. Insert a USB flash drive and burn ISO to USB drive. Select the ISO image and click on Burn. This will create a bootable USB drive for the Windows installation.
UUByte is the best alternative to BootCamp for creating bootable Windows USB installer. It is simple to use and has less errors.
Method 2: Create Windows Bootable USB Using Terminal App (without Bootcamp)
This method uses Terminal application to create the bootable media for Windows 10. You will still need Boot Camp Assistant for the support software, but if you're comfortable with command line work, you try this approach. You will first need to download the Windows 10 ISO file. You will also need to use Boot Camp Assistant to get the support files, for which you can follow Step 3 from Method 1.
Step 1: Launch an instance of Terminal. Type the following command and then Enter to list out your drives:
diskutil list external
Step 2: Scroll down the name of the USB drive listed in Terminal. You will be using this in the next command. For now, let's call it disk2. The next step is to format your USB drive for Windows 10. Use the following command, then hit Enter:
diskutil eraseDisk ExFat 'WINDOWS10' MBR disk2
Step 3: You will be able to see a mounted disk called Windows 10. Mount the downloaded Windows 10 ISO file by double-clicking it in Finder. The name will be CCCOMA_X64FRE_EN-US_DV9. You can also run the following command:

cp -rp /Volumes/CCCOMA_X64FRE_EN-US_DV9/* /Volumes/WINDOWS10/
Step 4: Unfortunately, there's no progress bar to indicate that the bootable media is being created. However, after a sufficient amount of time has passed, the USB drive will contain bootable media for a Windows 10 installation.
Part 3: Create a New Partition for Windows OS on Mac
Windows OS can be only installed on a FAT/ExFAT or NTFS partition. You have to create a new partition on Mac for storing Windows OS files as the default partition on Mac is HFS+ or APFS. This can be done with the help of built-in Disk Utility app. However, this is a highly risky task. Please backup your important data to iCloud or external drive with Time Machine.
To create a new partition for Windows OS, please open Disk Utility app on your Mac. Click the internal disk name on the left sidebar. Now, click the Partition tab on top menu. From the pop-up window, type a name for this new partition and select ExFAT for Windows 10 and MS-DOS (FAT) for Windows 7 from Format drop-down menu. At the end, set a size for the new partition. Finally, click Apply button to take this into effect.
Part 4: Boot Mac from Windows Installation USB
Mac will boot from internal hard drive or SSD in default. To install Windows OS on Mac without Boot Camp, you should let your Mac booting from USB drive to start the installation process. However, this is an easy task.
Make sure you disconnect all USB devices except a wired keyboard and the USB drive containing the Windows ISO files. Now restart your computer and hold down the Option (Alt) key at the same time. Wait for about 10 seconds, Apple logo shows up and you will be presented with several boot options. Pick up the drive you have set in Part 2. If you did not do that, the default name is EFI Boot.
Part 5: Start Installing Windows 10/8/7 on Mac without Bootcamp
When Mac boots from the bootable Windows 10 USB, wait about 30 seconds and Windows installation wizard appears. At this time, the window is much small because graphics driver are not installed yet. Now, you have to follow the screen prompt to choose language, region and most importantly the partition to install Windows OS files.
Part 6: Download and Install Windows Support Software (Drivers)
The Windows ISO image file only has the basic drivers for running Windows OS. Some of the hardware on Mac won't work in Windows, suchas Apple Mouse, trackpad or speaker. You have to install addition drivers to use Windows seamlessly as it is on a PC. To do this, you should download and install Windows Support Software with the help of Boot Camp Assistant.
As usual, launch Boot Camp Assistant app on your Mac and click Action tab on menu bar, where you can see an option named Download Windows Support Software. Now, choose your Windows Installer USB as the target location to store the driver files. It will take 5-10 minutes for the downloading task.
Now, boot your Mac into Windows partition. You will see a pop-up from Boot Camp installer. Just follow the prompt to install Windows Support Software. If it does not appear, then plug the USB drive and navigate to USB drive in File Explorer; then go to WindowsSupport -> BootCamp, and click setup.exe to start installing Windows drivers for this Mac.
Part 7: How to Switch Between Windows and macOS
Now, you have everything set up properly for both Windows and macOS. You may be wondering how can you switch OS between Windows and macOS? The trick is a bit different depending on which OS you are currentlt in.
If you are in macOS now and want to restart into Windows, then reboot your Mac and hold Option key untill you see the Startup Manager, where you can choose a booting device like we mentioned in Part 4, something like this:
You can also do this in Startup Disk from System Preferences. Choose th Windows partition and click Restart... button to boot Mac into Windows OS.
If you are in Windows OS and want to switch to Mac, click the Up Carat icon and select Restart in macOS. If this option does not show up, then reboot Windows as normal and press Option key to bring up Startup Manager and pick up Macintosh HD this time.
Conclusion
Bootcamp Drivers Not Installing
It is absolutely not an easy journey for installing Windows on Mac without BootCamp. Fortunately, we have put everything together to help you complete this task smoothly. The key part is how to partition the Mac internal drive and create bootable Windows USB. If you are not comfortable using Terminal, UUByte ISO Editor is the recommended way to install Windows on a Mac without Boot Camp Assistant. It's reliable, quick and doesn't require any special technical knowledge.
0 notes
Text
Amd Drivers For Mac

Amd Radeon Drivers For Macos
Amd Bootcamp Drivers
Apple makes its own drivers & they are included in the OS updates. The way to be up to date on drivers is to always be running the latest OS. There is debate over whether Apple make the entire driver set themselves, or just take NVidia/AMD's core code & add their own hardware/OS-specific code to it. Supported Systems Name Description Revision Number File Size Release Date Download Link iMac (Retina 5K, 27-inch, 2020) Boot Camp for Windows 10 Display Driver AMD. Amd drivers for mac free download - AMD64 AMD Athlon 64 Driver 1.1.0.0.zip, AMD USB Filter Driver, Paragon NTFS for Mac, and many more programs. For the first time in AMD hackintosh history, AMD patches for macOS were released the same day as the OS. This is purely down to Algrey utilizing the Mask kernel patching feature offered by OpenCore. Below you’ll find the updated patches which allow a smooth upgrade to macOS Catalina.
Amd Radeon Drivers For Macos

When you install Microsoft Windows on your Mac, Boot Camp Assistant automatically opens the Boot Camp installer, which installs the latest Windows support software (drivers). If that doesn't happen, or you experience any of the following issues while using Windows on your Mac, follow the steps in this article.


Your Apple mouse, trackpad, or keyboard isn't working in Windows.
Force Touch isn't designed to work in Windows.
You don't hear audio from the built-in speakers of your Mac in Windows.
The built-in microphone or camera of your Mac isn't recognized in Windows.
One or more screen resolutions are unavailable for your display in Windows.
You can't adjust the brightness of your built-in display in Windows.
You have issues with Bluetooth or Wi-Fi in Windows.
You get an alert that Apple Software Update has stopped working.
You get a message that your PC has a driver or service that isn't ready for this version of Windows.
Your Mac starts up to a black or blue screen after you install Windows.
If your Mac has an AMD video card and is having graphics issues in Windows, you might need to update your AMD graphics drivers instead.
Install the latest macOS updates
Amd Bootcamp Drivers
Before proceeding, install the latest macOS updates, which can include updates to Boot Camp.
Format a USB flash drive
To install the latest Windows support software, you need a 16GB or larger USB flash drive formatted as MS-DOS (FAT).
Start your Mac from macOS.
Plug the USB flash drive into your Mac.
Open Disk Utility, which is in the Utilities folder of your Applications folder.
Choose View > Show All Devices from the menu bar.
From the sidebar in Disk Utility, select your USB flash drive. (Select the drive name, not the volume name beneath it.)
Click the Erase button or tab.
Choose MS-DOS (FAT) as the format and Master Boot Record as the scheme.
Click Erase to format the drive. When done, quit Disk Utility.
Download the Windows support software
After preparing your USB flash drive, complete these steps:
Make sure that your Mac is connected to the Internet.
Open Boot Camp Assistant, which is in the Utilities folder of your Applications folder.
From the menu bar at the top of your screen, choose Action > Download Windows Support Software, then choose your USB flash drive as the save destination. When the download completes, quit Boot Camp Assistant.
Learn what to do if you can't download or save the Windows support software.

Install the Windows support software
After downloading the Windows support software to your flash drive, follow these steps to install the software. (If you're attempting to resolve issues with a Bluetooth mouse or keyboard, it might be easier to use a USB mouse or keyboard until these steps are complete.)
Make sure that the USB flash drive is plugged into your Mac.
Start up your Mac in Windows.
From File Explorer, open the USB flash drive, then open Setup or setup.exe, which is in the WindowsSupport folder or BootCamp folder. When you're asked to allow Boot Camp to make changes to your device, click Yes.
Click Repair to begin installation. If you get an alert that the software hasn't passed Windows Logo testing, click Continue Anyway.
After installation completes, click Finish, then click Yes when you're asked to restart your Mac.
Learn more
If you can't download or save the Windows support software:
If the assistant says that the Windows support software could not be saved to the selected drive, or that the USB flash drive can't be used, make sure that your USB flash drive has a storage capacity of at least 16GB and is formatted correctly.
If the assistant doesn't see your USB flash drive, click Go Back and make sure that the drive is connected directly to the USB port on your Mac—not to a display, hub, or keyboard. Disconnect and reconnect the drive, then click Continue.
If the assistant says that it can't download the software because of a network problem, make sure that your Mac is connected to the Internet.
Make sure that your Mac meets the system requirements to install Windows using Boot Camp.
If a Mac feature still doesn't work after updating the Windows support software, search for your symptom on the Apple support website or Microsoft support website. Some features of your Mac aren't designed to work in Windows.
0 notes
Text
Old devices could be costing your business? Cyberattacks affect nearly 50% of U...
Old devices could be costing your business? Cyberattacks affect nearly 50% of U…
Old devices could be costing your business?
Cyberattacks affect nearly 50% of UK businesses. Upgrade to Windows 10 Pro to stay secure.
Give Us A Call – 01376 316 101 or PM us for further info.
#software #computersales #computerupgrades #computerrepair #pcrepair #pcupgrade #networks #servers #serverinstallation #windowssupport #windowslifecyclesupport #cctvinstallation #coggeshall #essex…

View On WordPress
0 notes
Last Seen Blogs

kaikosims4
DearLovelySims*別館

ajuvaba-ee-blog
Lihtsalt üks järjekordne leht

unaarista
Una's doodles and stuff

madsforlifez
Truth. Life.

2up-sports
2UP